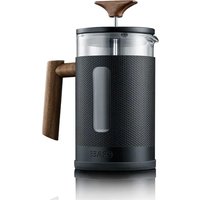
Dicianova ES 1100 - Coffee machine GRAEF - Free user manual and instructions
Find the device manual for free Dicianova ES 1100 GRAEF in PDF.

| Product type | Portafilter espresso machine |
| Brand | Graef |
| Model | Dicianova ES 1100 |
| Power supply | 220-240 V ~ 50/60 Hz |
| Power | Approx. 1400 W |
| Pump pressure | 15 bars |
| Water tank capacity | 1.6 L |
| Dimensions (W x D x H) | Approx. 30 x 25 x 35 cm |
| Weight | Approx. 10 kg |
| Housing material | Stainless steel and plastic |
| Display | Digital screen with backlight |
| Control | Rotary knob and toggle switches |
| Functions | Espresso, steam, hot water |
| Programming | Infusion time (1-999 s) and volume (1-999 ml) |
| Pre-infusion | Adjustable (Off, P1-P4) |
| Steam adjustment | 7 levels |
| Hot water adjustment | 5 levels |
| Coffee temperature | 86-98 °C (adjustable) |
| Warming tray | Passive with silicone coating |
| Drip tray | Removable with level indicator |
| Water filter | Cartridge included |
| Standby mode | Adjustable (5-60 min) or Off |
| Display languages | French, German, English |
| Safety | Auto shut-off, anti-scale protection, portafilter lock |
| Maintenance | Programmed descaling, brew group cleaning, exterior cleaning |
| Warranty | 2 years (manufacturer) |
| Included accessories | Portafilter, 2 filter baskets (1 and 2 cups), tamper, blind filter, milk pitcher, cleaning tool |
Frequently Asked Questions - Dicianova ES 1100 GRAEF
User questions about Dicianova ES 1100 GRAEF
0 question about this device. Answer the ones you know or ask your own.
Ask a new question about this device
Download the instructions for your Coffee machine in PDF format for free! Find your manual Dicianova ES 1100 - GRAEF and take your electronic device back in hand. On this page are published all the documents necessary for the use of your device. Dicianova ES 1100 by GRAEF.
USER MANUAL Dicianova ES 1100 GRAEF
Operating Instructions
Espresso machine
IT
Manuale operativo
natural_image
Mechanical component diagram showing a lever and handle assembly (no text or symbols)


Information about this user manual 20
Warning notices....20
General safety notices....20
Hazard due to electric current....21
Intended use....21
Limitation of liability....22
Customer service....22
Unpacking....22

Disposal of packaging....22
Disposal of the unit....22
Requirements for the installation site....22
Electrical connection....23
Display language 23
Before first use....23
Bleeding....23
Preparation for use....23
Emptying the drip pan....23
Menu overview 24
Types of extraction....24
Under-extraction 24
Optimal extraction 25
Over-extraction 25
Manual espresso preparation (factory setting)....25
Advantages of controlled espresso preparation....26
Espresso preparation using the set brewing time 26
Espresso preparation by volume 26
Hot water dispensing....26
Milk frothing 26
Programmes & settings 27
1 TIMED BREW 27
2 VOLUME BREW 27
3 COFFEE TEMP 28
4 STEAM SETTING 28
5 HOT WATER 28
6 PRE-INFUSION 28
7 DESCALE 28
8 DESCALE REMINDER 29
9 STANDBY TIME 29
10 OFFSET TEMP 29
11 LANGUAGE 29
12 FACTORY SETTING 29
13 EXIT 29
Descaling reminder....29
Descaling....30
Cleaning 31
Cleaning the brewing group....31
External cleaning 31
Cleaning tool....31
Error codes 31
2-year warranty....31
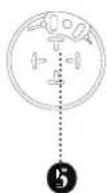
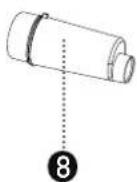
PRODUCT DESCRIPTION
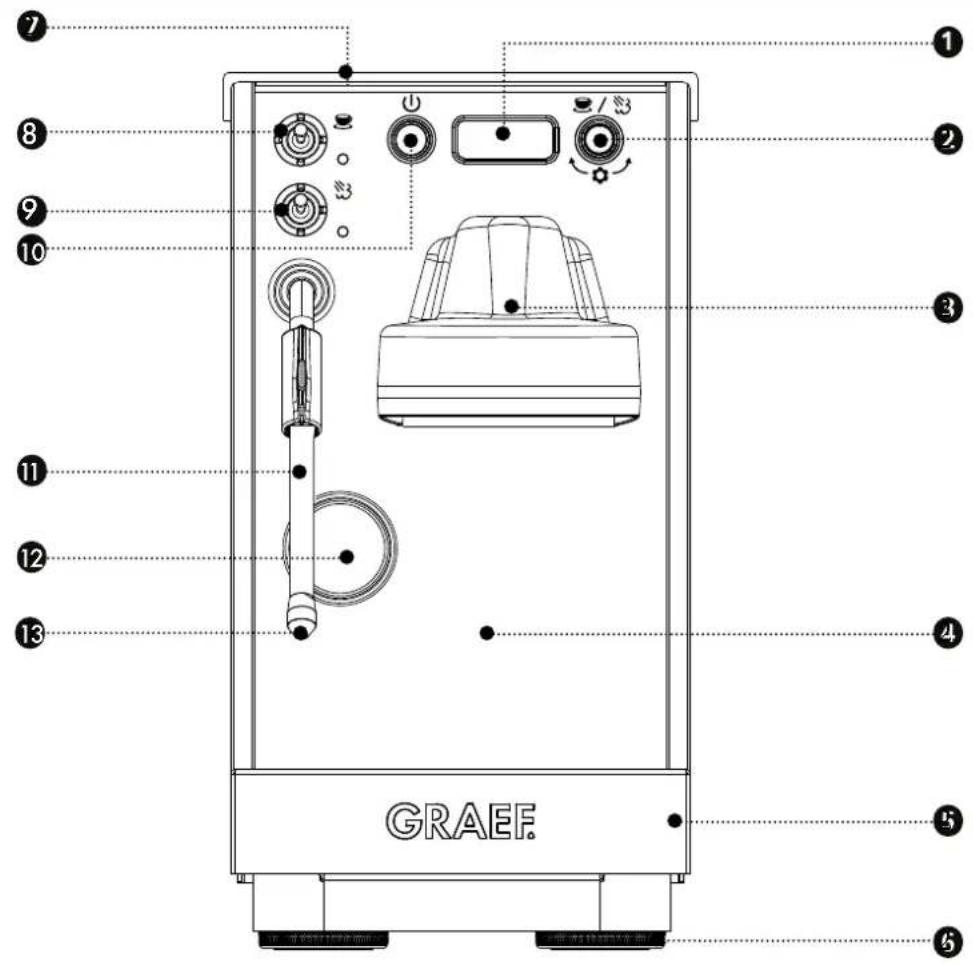
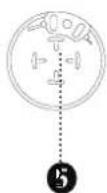
① Display
2 Control knob for selecting between espresso/steam dispensing & programme setting
3 Brewing unit
4 Housing
Drip pan with drip tray
6 Height-adjustable feet
⑦ Passively heated cup warmer with silicone pad
8 Toggle switch for espresso
9 Toggle switch for steam / hot water
10 On/off button
11 Steam/hot water wand
12 Pressure gauge
13 Steam nozzle
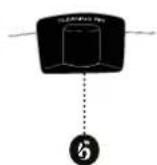
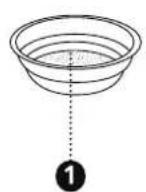
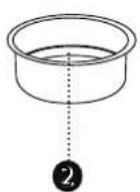
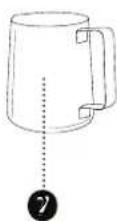
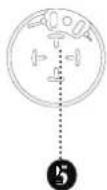
ACCESSORIES
natural_image
Mechanical component diagram showing a lever and handle assembly (no text or symbols)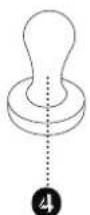


① Filter insert for 1 cup
2 Filter insert for 2 cups
3 Group handle with double spout
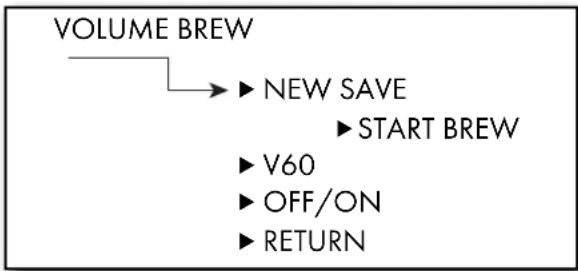
4 Tamper
5 Blanking disk
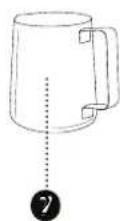
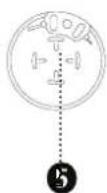
6 Cleaning tool
7 Milk jug
8 Water filter cartridge
PREFACE
Dear Customer,
By purchasing this portafilter espresso machine, you have made an excellent choice. You have acquired a recognised quality product.
We thank you for your purchase and wish you much enjoyment with your new portafilter espresso machine.
INFORMATION ABOUT THIS USER MANUAL
This user manual is part of the portafilter espresso machine (hereinafter referred to as the "unit") and provides you with important information regarding commissioning, safety, intended use, and care of the unit.
The user manual must always be available at the unit. It must be read and followed by anyone who is responsible for the unit in terms of:
- Commissioning,
- Operation,
- Troubleshooting and/or
- Cleaning.
Keep this user manual and pass it on to the next owner together with the unit.
This user manual cannot cover every possible aspect. For further information or in case of problems that are not covered or not covered in sufficient detail in this manual, please contact Graef customer service or your specialist retailer.
WARNING NOTICES
The following warning notices and signal words are used in this user manual:
WARNING
This indicates a potentially dangerous situation. Non-compliance with this notice may result in serious injury or even death.
CAUTION
This indicates a potentially dangerous situation. Non-compliance with this notice may result in property damage.
IMPORTANT!
This indicates usage tips and other particularly important information.
GENERAL SAFETY NOTICES
This unit complies with the prescribed safety regulations. However, improper use may result in personal injury or property damage.
For safe handling of the unit, please observe the following safety notices:
- Before use, check the unit for any visible external damage to the housing and the power cord and plug. Do not operate a damaged unit.
- Repairs may only be carried out by a qualified technician or by Graef customer service. Improper repairs can pose significant risks to the user. In addition, the warranty claim will be void.
- Defective components may only be replaced with original spare parts. Only these parts are guaranteed to meet the safety requirements.
- This unit must not be used by children. The unit and its power cable must be kept out of reach of children.
• Children should be supervised to ensure that they do not play with the unit. - This unit may also be used by persons with reduced physical, sensory or mental capabilities or lack of experience and/or knowledge if they are supervised or have been instructed in the safe use of the unit and understand the hazards involved.
- The unit is not intended to be used with an external timer switch or a separate remote control.
• Always unplug the power cord from the socket by pulling the plug, not the power cord itself.
- Do not use the unit if the power cable or plug is damaged.
- Prevent liquids from coming into contact with the plug.
- If the power cable is damaged, to avoid hazards, it must only be replaced by the manufacturer, its customer service, or a similarly qualified person.
- Never open the housing of the unit under any circumstances. If live connections are touched and the electrical or mechanical construction is altered, there is a risk of electric shock.
- Never touch live parts. These can cause an electric shock or even be fatal.
- Before connecting the unit, compare the connection data (voltage and frequency) on the rating plate with those of your power supply. These data must match to prevent damage to the unit.
- Ensure that the power cord is laid out safely. If the cable gets caught, the unit may fall off the work surface.
- Packaging materials must not be used as toys. There is a risk of suffocation.
- Never use the unit near a heat source.
- Never use the unit outdoors and always store it in a dry place.
- Never remove the group handle filled with ground coffee during coffee dispensing, as it is under pressure.
- Only use the unit when the drip tray and drip grid are in position.
- Before preparing espresso, ensure that the group handle is securely tightened.
- To avoid potential hazards, use the unit only for coffee preparation and milk frothing. Any other use is not permitted.
• Always unplug the mains plug before cleaning.
- Allow the unit to cool down before any external cleaning.
- Do not use aggressive or abrasive cleaning agents or solvents for external cleaning.
- Do not scrape off stubborn dirt with hard objects.
- Do not put the unit in the dishwasher or hold it under running water.
- Never immerse the unit in water.
- Use only the supplied milk jug or a larger vessel for milk frothing. Do not use a cup. Overflowing milk can cause burns.
- Never point the steam wand at yourself or at other people. Risk of burns!
- Use the handle to move the steam wand.
- Do not touch the tip of the steam wand after use, as it becomes hot.
• During use, surfaces may become hot.
- The unit must not be operated inside a cupboard during use.
- The energy-saving mode of this unit is: Ready state, power consumption: Max. 0.3 W
- The unit automatically switches to ready state 30 minutes after the last use.
HAZARD DUE TO ELECTRIC CURRENT
WARNING
There is a risk of fatal injury if you come into contact with live wires or components!
Observe the following safety notices to avoid the risk of electric shock:
- Do not use the unit if the power cable or plug is damaged.
- In this case, before further use of the unit, have a new power cable installed by Graef customer service or a qualified technician.
- Never open the housing of the unit under any circumstances. If live connections are touched or the electrical or mechanical construction is altered, there is a risk of electric shock.
- Never touch live parts. These can cause an electric shock or even be fatal.
INTENDED USE
This unit is not intended for commercial use. Use the unit exclusively for espresso preparation or steam extraction. This unit is intended for use in households and similar environments, such as:
• In staff kitchens of shops and offices
• On agricultural estates
• By guests in hotels, motels and other residential facilities
• In bed and breakfasts
IMPORTANT!
Use only in household-like environments!
Any other or further use is considered improper.
CAUTION
The unit may pose hazards if used improperly.
- Use the unit exclusively as intended.
- Follow the procedures described in this user manual.
WARNING
- In cases of unusually frequent use in a short period, which is not typical for households, the fill level of the drip pan must be checked regularly.
• Non-compliance may result in a risk of scalding when transporting an overfilled drip pan.
Any claims for damages resulting from improper use are excluded.
The operator alone bears the risk.
LIMITATION OF LIABILITY
All technical information, data, and instructions for installation, operation, and maintenance contained in this user manual are up to date at the time of publication and are provided to the best of our knowledge, based on our previous experience and expertise.
No claims can be derived from the information, illustrations, and descriptions in this manual.
The manufacturer accepts no liability for damages resulting from:
• Non-compliance with the manual
- Improper use
- Incorrect repairs
• Technical modifications
• Use of unauthorised spare parts
Translations are prepared to the best of our knowledge. We accept no liability for translation errors. Only the original German text is legally binding.
CUSTOMER SERVICE
If your Graef unit is defective, please contact your specialist retailer or Graef customer service on 02932-9703677, or send us an email at service@graef.de.
IMPORTANT!
Keep the original packaging during the warranty period of the unit so that the unit can be properly packed and transported in the event of a warranty claim.
UNPACKING
Proceed as follows when unpacking the unit:
- Remove the unit from the box.
- Remove all packaging components.
- Remove any stickers from the unit. Do not remove the rating plate!
- Also remove any packaging material that may be inside the unit (e.g. in the water tank).
• Fully assemble the unit. (Insert drip tray, etc.)
DISPOSAL OF PACKAGING
The packaging protects the unit from transport damage. The packaging materials have been selected for their environmental compatibility and disposal characteristics and are therefore recyclable.
Returning the packaging to the material cycle saves raw materials and reduces the amount of waste. Dispose of packaging materials that are no longer needed at the collection points for the "Grüner Punkt" recycling system.
DISPOSAL OF THE UNIT
This product must not be disposed of with normal household waste at the end of its service life. The symbol on the product and in the user manual indicates this. The materials are recyclable according to their labelling. By reusing, recycling, or other forms of recovery of old appliances, you are making an important contribution to protecting our environment. Please ask your local authority about the appropriate disposal site.
REQUIREMENTS FOR THE INSTALLATION SITE
For safe and fault-free operation of the unit, the installation site must meet the following requirements:
- The unit must be placed on a solid, level, horizontal, and non-slip surface with sufficient load capacity.
- Ensure that the unit cannot tip over.
- Choose the installation site so that children cannot touch the unit's power cord.
- Do not place the unit on or near hot surfaces such as hotplates.
-
Never use the unit outdoors and always store it in a dry place.
-
The unit is not intended for installation in a wall or built-in cupboard.
- Do not place the unit in a hot, wet, or humid environment.
- The socket must be easily accessible so that the plug can be quickly removed in an emergency.
ELECTRICAL CONNECTION
For safe and fault-free operation of the unit, observe the following instructions when making the electrical connection:
- Before connecting, compare the connection data (voltage and frequency) on the rating plate with those of your power grid. These data must match to prevent damage to the unit. If in doubt, consult a qualified electrician.
- The socket must be protected by at least a 10A safety circuit breaker.
- Ensure that the power cord is undamaged and is not laid over hot surfaces or sharp edges.
• The power cord must not be stretched tight.
- The electrical safety of the unit is only guaranteed if it is connected to a properly installed protective earthing system. Operation at a socket without a protective earth conductor is prohibited. If in doubt, have your house installation checked by a qualified electrician. The manufacturer accepts no responsibility for damage caused by a missing or interrupted protective earth conductor.
DISPLAY LANGUAGE
The factory setting for the display language is German. You can adjust this setting if required. The following languages are available: English (EN) and French (FR). Under "Programmes & settings", item 11, you can select the desired language.
BEFORE FIRST USE
Before first use, clean the group handle (not the unit), the water filter cartridge, and the water tank under running water to remove any production residues. Then insert the water filter cartridge into the water tank and place the water tank into the unit.
IMPORTANT!
Before initial start-up or after a prolonged period of non-use, bleed the unit. To bleed, do not insert the group handle.
BLEEDING
- Plug the power cord into the socket.
- Fill the water tank with water. The maximum fill volume is 1.6 litres.
- Press
IMPORTANT!
If "CHECK SWITCHES" appears on the display, check that the toggle switches are set to O.
• The unit is heating up.
- When "G" appears on the display, the unit is ready for operation.
• Take the milk jug and hold it under the steam/hot water wand.
- Push the toggle switch for the steam/hot water wand upwards.
- Let the air escape until hot water flows out.
- Push the toggle switch for the steam wand downwards O.
PREPARATION FOR USE
IMPORTANT!
After heating up, a purge shot (without ground coffee) should be performed as described below. This brings the group handle more quickly to the target temperature.
- Fill the water tank with water. Maximum 1.6 litres.
- Insert the desired filter insert into the group handle.
- Lock the group handle in place without ground coffee (from left to right).
- Switch on the unit
IMPORTANT!
If "CHECK SWITCHES" appears on the display, check that the toggle switches are set to O.
- Wait until the unit has heated up and "G" appears on the display.
• The unit is now ready for operation. - Push the toggle switch for espresso preparation upwards 🎯 and briefly let water run through to bring the system up to temperature.
- Push the toggle switch for espresso preparation downwards again O.
Remove the drip tray from the drip pan to better see the fill level.
Grip the drip pan with both hands on the left and right and pull it out forwards to empty. Then carry and empty it using both hands. Do not touch the bottom surface of the drip tray in the middle, as it may be hot.
CAUTION!
The fill level of the drip pan must be checked regularly.
Non-compliance may result in a slight risk of scalding when transporting an overfilled drip pan. Do not touch the bottom surface of the drip tray in the middle, as it may be hot.
MENU OVERVIEW
For better orientation, here is a summary of the individual menu items.
| Program number | Program name | Functionality | Possible setting Factory setting | ||
| 1 | TIMED BREW Espresso | preparation according to the set time in seconds (e.g. T25 = 25 seconds) | T1 - T999 T25 | ||
| 2 | VOLUME BREW Espresso | preparation according to the set Volume in ml (e.g. V60 = 60 ml) | V1 - V999 V60 | ||
| 3 | COFFEE TEMP Setting the brewing temperature in °C 86 - 98 °C 92C | ||||
| 4 | STEAM QUALITY Setting the steam level | 1 - 7 | 4 | ||
| 5 | HOT WATER | Setting the hot water level | 1 - 5 | 3 | |
| 6 | PREINFUSION | Setting the pre-infusion | OFF, P1 - P4 | P1 | |
| 7 | DESCALE Perform descaling | - | - | ||
| 8 | DESCALE REMINDER | Setting the descaling reminder | 12L, 25L, 50L | 25L | |
| 9 | STANDBY TIME | Setting the standby time | OFF, 5 - 60 min in 5-minute steps | 30M | |
| 10 | OFFSET TEMP | Setting the offset temperature | -9°C to +9°C | 0C | |
| 11 | LANGUAGE | Setting the language | DE, EN, FR | EN | |
| 12 | RESET | Reset unit to factory settings | - | - | |
| 13 | EXIT | Exit programme selection Return to standby mode | - | - | |
TYPES OF EXTRACTION
With the pressure gauge, you can read the brewing pressure during espresso extraction.
Below you will find an explanation of the terms under-extraction, optimal extraction, and over-extraction:
UNDER-EXTRACTION
With under-extraction, you get a very thin, flat, and underdeveloped coffee. The coffee flows into the cup very quickly. Too few components have been extracted here. The coffee is very light, or the crema is very thin, absent, or the crema is very pale with large bubbles.
- Brewing pressure less than 7 to 8 bar.
• Coffee flows into the cup very quickly.
• The coffee tastes sour or flat.
Possible reasons for under-extraction
| Cause | Solution |
| Grind size too coarse (falls out of the grinder very quickly, the ground coffee feels quite coarse when rubbed between the fingers). | Grind finer, gradually adjust to the optimal grind size. |
| Too little ground coffee. | Use more ground coffee, observe the maximum fill volume, and if necessary, also adjust the grind size. |
| Channeling: Tamping is uneven. | The tamper should rest evenly and not at an angle on the compressed ground coffee. Otherwise, channels can form in the coffee and the hot water will flow through the coffee too quickly. |
| Beans are not fresh or ground coffee is not fresh (possibly pre-ground for too long). | Ideally, store the beans in the resealed coffee packaging. Light and oxygen will otherwise cause the coffee to age. Only take as much coffee as you will use in the near future. |
| Beans are too lightly roasted. | Lighter beans behave somewhat differently during brewing than darker ones and are usually brewed at lower pressure. By adjusting the quantity and grind size, you can also prepare a delicious espresso with different flavour notes. However, this can only be briefly addressed within the scope of this manual. |
| Brewing temperature too low | Adjust the brewing temperature in the menu |
OPTIMAL EXTRACTION
With optimal extraction, the espresso flows evenly, slowly, and with a honey-like consistency from the spout into the cup. The crema is dense and dark to golden brown.
• Brewing pressure from 7-8 up to 12-13 bar.
• Tamping pressure approx. 15 kg.
• Ground coffee evenly distributed in the group handle.
• Optimal grind size, not too fine, not too coarse.
- Beans are fresh or ground coffee is freshly ground.
• Optimal water temperature, not too cold, not too hot.
OVER-EXTRACTION
With over-extraction, too many bitter compounds are extracted from the coffee. The preparation takes a very long time, and the coffee drips slowly into the cup. The coffee is very dark, and the crema is dark brown to reddish and tastes very unpleasant and bitter, or even burnt. The pattern on the crema is uneven, with light spots among darker areas.
• Brewing pressure above 13 bar.
• Coffee flows slowly (extraction time well over 30 seconds) and drips into the cup.
• The coffee tastes bitter and burnt.
Possible reasons for over-extraction.
| Cause Solution | |
| Grind size too fine (falls out of the grinder rather slowly, the ground coffee sometimes feels like powder when rubbed between the fingers). | Grind coarser, gradually adjust to the optimal grind size. |
| Too much ground coffee. Use less ground coffee, and if necessary, also adjust the grind size. | |
| Beans are too darkly roasted. | This is rare with purchased beans. If roasting beans yourself, end the roasting process earlier. |
| Ground coffee is left in the brewing unit for too long before preparation. | The ground coffee can change its aroma due to the temperature. As a result, the coffee tastes burnt even with otherwise optimal extraction. After locking in the group handle, brewing should be started immediately. |
Brewing temperature too high. Adjust the brewing temperature in the menu.
MANUAL ESPRESSO PREPARATION (FACTORY SETTING)
IMPORTANT!
See the Preparation chapter for warming up the group handle, the system, and the cups. Insert the filter insert for one or two cups. Then start espresso preparation.
- Carefully dry the group handle.
- Grind the desired amount of coffee directly into the group handle.
- Tamp the ground coffee with the tamper. Make sure to press evenly and straight so that the water can later flow evenly over the entire surface.
- Insert the group handle firmly into the machine.
- Place one or two cups under the spout.
- Push the toggle switch upwards 📁 to start espresso preparation. The current flow time appears on the display. Ideally, the flow time should be around 20–30 seconds.
- As soon as the desired amount is reached, push the toggle switch downwards again O.
• The brewing time will be displayed for 10 seconds. - Remove the group handle and knock the coffee grounds into the coffee grounds container.
- Clean the filter insert of coffee residue and lock the group handle back in place.
- Push the toggle switch for espresso preparation upwards 📁 and briefly let water run through to remove any coffee residue sticking to the filter.
- To end the process, push the toggle switch for espresso preparation downwards O.
- Clean the filter insert and the group handle and place them on the drip tray to dry.
IMPORTANT!
Optimal espresso preparation depends on many influencing factors. The unit is delivered with factory settings for brewing time, brew volume, brewing temperature, etc. For optimal espresso and milk froth, you can adjust the parameters in the programmes for perfect coffee enjoyment.
ADVANTAGES OF CONTROLLED ESPRESSO PREPARATION
Controlled espresso preparation via brewing time or brew volume gives you the ability to programme a reproducible extraction – for consistently enjoyable coffee.
ESPRESSO PREPARATION USING THE SET BREWING TIME
To prepare espresso with a fixed brewing time, you must first adjust the factory settings. To do this, open menu item 1 TIMED BREW. There you can save the desired brewing time, display the currently saved brewing time, and activate the brewing time mode. A detailed description of the brewing time menu can be found later in this manual under "Programmes & settings". After successfully activating and saving the brewing time, proceed as follows:
- Carefully dry the group handle.
- Grind the desired amount of coffee directly into the group handle.
- Tamp the ground coffee with the tamper. Make sure to press evenly and straight so that the water can later flow evenly over the entire surface.
- Insert the group handle firmly into the machine.
- Place one or two cups under the spout.
- Push the toggle switch upwards 📁 to start espresso preparation. The current flow time in seconds appears on the display "TOO".
- As soon as the set time is reached, the process stops automatically.
- Push the toggle switch downwards again O.
- Remove the group handle and knock the coffee grounds into the coffee grounds container.
ESPRESSO PREPARATION BY VOLUME
To prepare espresso with a fixed brew volume, you must first adjust the factory settings. To do this, open menu item 2 VOLUME BREW. There you can save the desired volume, display the currently saved brew volume, and activate the brew volume mode. A detailed description of the brew volume menu can be found later in this manual under "Programmes & settings". After successfully activating and saving the brew volume, proceed as follows:
- Carefully dry the group handle.
- Grind the desired amount of coffee directly into the group handle.
- Tamp the ground coffee with the tamper. Make sure to press evenly and straight so that the water can later flow evenly over the entire surface.
- Insert the group handle firmly into the machine.
- Place one or two cups under the spout.
- Push the toggle switch upwards 📁 to start espresso preparation. The current flow time in ml appears on the display "V00".
- As soon as the set amount is reached, the process stops automatically.
- Push the toggle switch downwards again O.
- Remove the group handle and knock the coffee grounds into the coffee grounds container.
HOT WATER DISPENSING
- Switch on the unit. "PREHEAT" appears on the display.
- As soon as "G" is displayed, the unit is ready for operation.
- Place a cup under the steam wand.
- Set the toggle switch to .
• Hot water flows into the cup.
• End the process by pushing the toggle switch downwards O.
MILK FROTHING
- Switch on the unit. "PREHEAT" appears on the display.
- As soon as "G" is displayed, the unit is ready for operation.
- Press the control knob to switch to steam mode.
- The unit now heats up to steam temperature. "STEAM HEAT" appears on the display.
- Fill the supplied milk jug about halfway with cold milk (straight from the refrigerator).
- When "*G*" is displayed, the unit is ready for frothing.
- First, point the steam wand at the drip tray and push the toggle switch for steam upwards 🌐 to release condensate. Push the toggle switch downwards again ○ once the condensate has been released and steam is produced.
- Turn the steam wand outwards and immerse the steam nozzle just below the surface of the milk in the jug.
- Switch on the steam 🌐. The correct position is reached when a steady slurping sound can be heard. You are now in the stretching phase, during which air is incorporated into the milk. Slowly lower the jug as the milk level rises.
- Once the desired volume is reached, raise the jug so that the steam nozzle is fully submerged in the milk.
- This is the roll-out phase. Hold the jug steady and place one hand flat against the exterior surface. The milk should now swirl without drawing in any more air. If air is still being drawn in, slightly adjust the position of the steam nozzle.
- The milk froth has reached the correct temperature when the side of the jug becomes too hot to touch comfortably.
• End the process by pushing the toggle switch downwards O.
IMPORTANT!
Only remove the steam wand from the milk after the toggle switch has been pushed downwards.
- Carefully remove the steam wand from the milk.
- Tap the milk jug lightly on the tabletop to remove any remaining large air bubbles. By gently swirling, the froth is distributed evenly and achieves a fine, creamy texture.
- Clean the steam wand immediately after frothing to prevent milk residue from sticking.
- Briefly release steam from the nozzle and then wipe the wand from the outside with a damp cloth. Be careful of the heat.
- If you do not wish to froth any more milk, press the control knob 🎨/ 🌐 to switch back to coffee mode.
- The unit will now display "COOLING" and the system will be cooled by flushing with water.
- When "G" is displayed, the unit is ready for coffee dispensing.
IMPORTANT!
During several consecutive cooling processes, steam may come out of the drip tray. This is completely normal.
IMPORTANT!
To practise, you can use the following method:
• Pour cold water into the milk jug.
- Add a drop of dishwashing liquid.
• Froth this mixture as described above.
- If you perform the frothing process correctly, the mixture will look like real milk froth.
Please do not drink this mixture!!
PROGRAMMES & SETTINGS
1 TIMED BREW
- Open menu
- Turn the control knob
- "1 TIMED BREW" appears on the display.
- Press the control knob 🎥 / 🌐 to enter the brewing time settings menu.
- Save new brewing time
- Select "NEW SAVE" and press the control knob 📄/ 🌐.
• "START BREW" appears on the display. - Place a vessel under the brewing unit or prepare for coffee dispensing as described under "Manual espresso preparation".
- Push the toggle switch for espresso extraction upwards 📄; "L00" appears on the display and the timer starts.
- Once the desired brewing time is reached, push the toggle switch downwards again O.
• The setting you have made will blink to confirm.
- The new brewing time is now saved and the brewing time mode is automatically activated.
- Recall set brewing time
- By turning further, the set brewing time appears (factory setting: T25).
- Check/change programme status
- By turning further, "OFF" or "ON" appears on the display depending on the programme status:
- "OFF" = The programme is deactivated. "ON" = The programme is activated.
• To change the status, proceed as follows:
- Press the control knob to open the selection.
- Turn the knob ↙ to select OFF (deactivate) or ON (activate).
• The setting you have made will blink to confirm.
IMPORTANT!
If the unit is in steam mode for milk frothing, these functions are temporarily unavailable. The display will show the message "STEAM MODE".
2 VOLUME BREW
- Open menu
- Turn the control knob until "2 VOLUME BREW" appears on the display.
- Press the control knob 📋 / 🌐 to enter the brew volume settings submenu.
- Save new brew volume
- Select "NEW SAVE" and press the control knob 📋/ ✉.
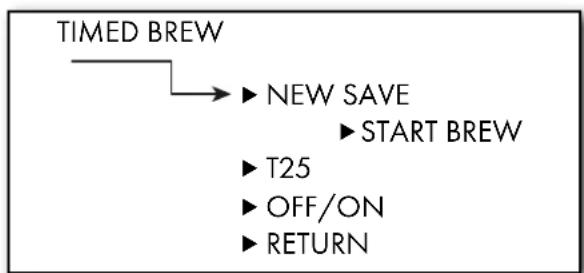
flowchart
graph TD
    A["TIMED BREW"] --> B["NEW SAVE"]
    B --> C["START BREW"]
    C --> D["T25"]
    D --> E["OFF/ON"]
    E --> F["RETURN"]
• "START BREW" appears on the display.
- Place a vessel under the brewing unit.
- Push the toggle switch for espresso extraction upwards 📄; "L00" appears on the display and water flows.
- Once the desired brew volume is reached, push the toggle switch downwards again O.
- The setting you have made will blink to confirm.
- The new brew volume is now saved and the brew volume mode is automatically activated.
flowchart
graph TD
    A["VOLUME BREW"] --> B["NEW SAVE"]
    B --> C["START BREW"]
    C --> D["V60"]
    C --> E["OFF/ON"]
    C --> F["RETURN"]
- Recall set brew volume
- By turning further, the set volume appears (factory setting: V60).
- Check/change programme status
- By turning further, "OFF" or "ON" appears on the display depending on the programme status:
- "OFF" = The programme is deactivated. "ON" = The programme is activated.
• To change the status, proceed as follows:
- Press the control knob to open the selection.
- Turn the knob ↙ to select OFF (deactivate) or ON (activate).
• The setting you have made will blink to confirm.
IMPORTANT!
If the unit is in steam mode for milk frothing, these functions are temporarily unavailable. The display will show the message "STEAM MODE".
3 COFFEE TEMP
- Open menu
- Turn the control knob until "3 COFFEE TEMP" appears on the display.
• The set temperature appears on the display. - By pressing 🎨/ 🌐 and then turning ⏱ left/right, you can change the temperature.
- Confirm the desired temperature by pressing the control knob.
• The setting you have made will blink to confirm.
4 STEAM SETTING
- Open menu
- Turn the control knob until "4 STEAM QUALITY" appears on the display.
• The current setting is displayed. - Confirm the desired setting by pressing the control knob / 3
• The setting you have made will blink to confirm.
- By pressing 📋/💡 and then turning ⚙️ left/right, you can change the setting. 1 = dry steam at lower steam pressure, 7 = wet steam at higher steam pressure.
5 HOT WATER
- Open menu
- Turn the control knob until "5 HOT WATER" appears on the display.
• The current setting is displayed. - Confirm the desired setting by pressing the control knob / 3
• The setting you have made will blink to confirm.
- By pressing 🎨/ ✉ and then turning ⏱ left/right, you can change the setting. 1 = weaker water jet, 5 = stronger water jet.
6 PRE-INFUSION
- Open menu
- Turn the control knob until "6 PREINFUSION" appears on the display.
• The current setting is displayed. - By pressing 🎨/ ✉ and then turning ↙️ left/right, you can change the setting.
- Confirm the desired setting by pressing the control knob / §3
• The setting you have made will blink to confirm.
7 DESCALE
- Open menu
- Turn the control knob until "7 DESCALE" appears on the display.
- Confirm "YES" by pressing the control knob 📋/ 📃.
• The setting you have made will blink to confirm.
IMPORTANT!
If the unit is in steam mode for milk frothing, these functions are temporarily unavailable. The display will show the message "STEAM MODE".
8 DESCALE REMINDER
- Open menu
- Turn the control knob until "8 DESCALE REMINDER" appears on the display.
• The current setting is displayed (RESET 25L). - By pressing 🎨 / 🌘 and then turning ↙️ left/right, you can change the setting.
- Confirm the desired setting by pressing the control knob / 3
• The setting you have made will blink to confirm.
9 STANDBY TIME
- Open menu
- Turn the control knob until "9 STANDBY TIME" appears on the display.
• The current setting is displayed (RESET 30M). - By pressing 📋/ ✉ and then turning left/right, you can change the setting.
- Confirm the desired setting by pressing the control knob / §3
• The setting you have made will blink to confirm.
10 OFFSET TEMP
- Open menu
- Turn the control knob until "10 OFFSET TEMP" appears on the display.
• The current setting is displayed (RESET OC). - By pressing 🎨 / 🌘 and then turning ↙ left/right, you can change the setting.
- Confirm the desired setting by pressing the control knob / §3
• The setting you have made will blink to confirm.
11 LANGUAGE
- Open menu
- Turn the control knob until "11 LANGUAGE" appears on the display.
• The current setting is displayed (RESET DE). - By pressing 📄/⌘ and then turning ↙ left/right, you can change the setting.
- Confirm the desired setting by pressing the control knob / 3
• The setting you have made will blink to confirm.
12 FACTORY SETTING
- Open menu
- Turn the control knob until "12 RESET" appears on the display.
- "RESET ITEM" appears on the display.
- Confirm this by pressing the control knob / 3
- "NO" is displayed; if you press the control knob 🎨/ 🌐, no reset will be performed.
- By turning ⚙️, YES is displayed. If you wish to reset the unit, confirm by pressing the control knob 📄/ ✉.
• The setting you have made will blink to confirm.
13 EXIT
- Open menu
- Turn the control knob until "13 EXIT" appears on the display.
- Confirm this by pressing the control knob 🎥 / 🌐 and you will return to operating mode "G".
DESCALING REMINDER
The factory setting for the descaling reminder is 25 litres. After 25 litres have been used, "DESCALE PLEASE" will appear on the display once every 60 seconds. Additionally, the control knob illumination lights up red. You can continue to use the unit as usual, but the reminder will continue to appear on the display. The descaling reminder will only disappear and the illumination will return to white after a complete descaling of the system (see the "Descaling" chapter). The volume in litres can be adjusted according to your usage and the hardness level of your water.
12 l = (Hard water over 15°dH)
25 l = (Medium water 7.3°dH to 14°dH)
50 l = (Soft water up to 7.3°dH)
You can find out your exact water hardness from your local waterworks. How to change the volume in litres can be found under SETTINGS = "8 DESCALE REMINDER".
DESCALING
Perform descaling regularly, at the latest when the descaling reminder appears and the control knob lights up red. We recommend using Graef descaling tablets. You can purchase these in our online shop at www.graef.de under item no. 145618 or from your specialist retailer.
IMPORTANT!
We accept no liability for missing or insufficient descaling. In this case, the warranty will be void.
The entire descaling process takes approx. 20 minutes, including preparation and rinsing. Please allow for this time.
Preparation
- Remove the water filter cartridge from the tank.
• Fill the water tank with 1.6 litres of water. - Add descaling tablets to the tank and wait until they have dissolved (approx. 5 min).
- Remove the group handle.
- Loosen the screw under the brewing unit.
- Remove 2 filter inserts, washer, and sealing ring.
- Clean the parts under running water, dry thoroughly, and store safely.
- Clean the brewing unit with a small brush to remove coffee residue.
Start descaling
- Select menu "7" "DESCALE"
- Confirm by pressing the control knob ("YES").
Descale coffee circuit
• The display shows: "COFFEE START"
- Place a large vessel under the brewing unit. The lamp flashes red.
- Press the control knob / 📄
- The display shows: "DESCALE COFFEE". The lamp lights up red.
• The coffee circuit will be descaled; this takes approx. 6 min.
- After the process is complete, the display shows: "STEAM START". The lamp flashes red.
Descale steam circuit
• Empty the vessel and place it under the steam nozzle again.
- Press the control knob / 3
- The display shows: "DESCALE STEAM". The lamp lights up red.
• The steam circuit will be descaled; this takes approx. 6 min.
- After the process is complete, the display shows: "CLEAN TANK". The lamp flashes red.
Rinsing
- Remove the water tank.
- Rinse it out and reinsert the water filter cartridge.
- Fill the water tank with fresh water and place the water tank back into the unit.
- Press the control knob 🎨 / 🌐, "COFFEE START" appears on the display. The lamp flashes red.
- Place an empty vessel under the brewing unit and press the control knob 📄/ 🌐again.
- The display shows: "CLEAN COFFEE". The lamp lights up red.
- After the process is complete, the display shows: "STEAM START". The lamp flashes red.
- Empty the vessel and place it under the steam nozzle. Press the control knob 📄/ 🐃
• The display shows: "CLEAN STEAM". The lamp lights up red. - "G" appears on the display.
- After the process is complete, the display shows: "DESCALE FINISHED". Confirm this by pressing the control knob 📄/ ✉
Completion
- Insert the sealing ring back into the brewing unit.
- Now reinsert the two filter inserts and the washer, and secure them with the screw.
• The unit is now ready for operation.
IMPORTANT!
During the descaling process, you can also pause the process to empty the container. To do this, press the control knob. The process will stop and "PAUSE" will appear on the display. Then press the control knob again to continue the process.
IMPORTANT!
The cartridge does not provide complete protection against limescale build-up – so regularly changing the cartridge does not mean you can skip descaling.
CLEANING THE BREWING GROUP
IMPORTANT!
We recommend performing a backflush once a week.
We recommend using Graef cleaning tablets for cleaning. You can purchase these in our online shop at www.graef.de under item no. 145614 or from your specialist retailer.
- If the unit is switched off, switch it on and wait until it has heated up.
- Fill the tank with water.
- Insert the filter insert for 2 cups into the group handle.
- Insert the blanking disk and place the tablet in the recess.
- Lock the group handle in place.
- Ensure that the drip pan is inserted.
- Push the toggle switch for coffee upwards.
• After approx. 10 seconds, push the toggle switch downwards again.
- Repeat this process about 4 times.
- Then remove the group handle. Rinse the blanking disk, filter insert, and group handle.
- Lock the group handle with the blanking disk back in place.
- Push the toggle switch for coffee upwards.
• After approx. 10 seconds, push the toggle switch downwards again.
- Repeat this process about 4 times.
• Now empty the drip pan, rinse it, and reinsert it.
EXTERNAL CLEANING
- Clean the external surfaces of the unit with a soft, damp cloth.
- For heavy soiling, a mild cleaning agent can be used.
- Pull out the drip pan.
- Remove the drip tray.
- Empty the drip pan.
- Clean both under running water.
- Then reinsert the drip pan together with the tray.
CLEANING TOOL
The cleaning tool is stored with the filter inserts and the blanking disk in the milk jug.
The thinner end can be used to clean the holes in the filter inserts as well as the holes in the steam nozzle.
ERROR CODES
| Error code Description | |
| ERROR 01 Internal power supply missing | |
| ERROR 02 Coffee/hot water NTC faulty | |
| ERROR 03 Brewing unit NTC faulty | If one of these error codes appears on the display, contact Graef customer service. |
| ERROR 05 Coffee/hot water heating faulty | |
| ERROR 07 Brewing unit heating faulty | |
| ERROR 08 Flow meter / water pump faulty |
2-YEAR WARRANTY
For this product, we provide a 24-month manufacturer's warranty from the date of sale for defects attributable to manufacturing and material faults. Your statutory guarantee claims under § 437 ff. BGB remain unaffected by this regulation. The warranty does not cover damage caused by improper handling or use, as well as defects that only insignificantly affect the function or value of the unit. Furthermore, we accept no liability for damage resulting from missing or insufficient descaling and maintenance. In this case, the warranty will also be void. Use only Graef original descaling and cleaning tablets. In addition, transport damage, unless we are responsible for it, is excluded from the warranty claim. Warranty claims are also excluded for damage resulting from repairs not carried out by us or one of our authorised representatives. In the case of justified complaints, we will, at our discretion, repair the defective product or replace it with a fault-free product.
Sur-extraction....39
natural_image
Mechanical component diagram showing a lever and handle assembly (no text or symbols)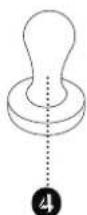

natural_image
Mechanical component diagram showing a lever and handle assembly (no text or symbols)


ONTKALKINGSHERINNERING
12 l = (hard water boven 15°dH)
25 l = (middelhard water 7,3°dH tot 14°dH)
natural_image
Diagram of a mechanical clamp or lever assembly with a numbered label (3) pointing to the handle and base, no text or symbols present.


natural_image
Mechanical component diagram showing a lever and handle assembly (no text or symbols)