No 655 - Blender CARRERA - Free user manual and instructions
Find the device manual for free No 655 CARRERA in PDF.

User questions about No 655 CARRERA
0 question about this device. Answer the ones you know or ask your own.
Ask a new question about this device
Download the instructions for your Blender in PDF format for free! Find your manual No 655 - CARRERA and take your electronic device back in hand. On this page are published all the documents necessary for the use of your device. No 655 by CARRERA.
USER MANUAL No 655 CARRERA
For having placed your trust in CARRERA – and for giving us the opportunity to prove you right with our blender with automatic cooking function.
Everything is driven by one idea.
Each CARRERA appliance follows a clear concept.
No consideration of existing gender roles, no pink for women or blue for men. Since when did quality and performance have a gender?
We create technology maximising user friendliness, handling and aesthetics and bringing performance to life. Directly when switching on the appliance and even after many years. Performance is not just delivered by the motor alone, but results from the skilful interplay of each individual component.
We just call it the CARRERA boost.
Although we have not reinvented the wheel, we had the courage to do right what is crucial and to dispense with everything that is unimportant.
That is our style. And you will rediscover it in each further CARRERA appliance.
CONTENT
01.Appliance Parts 26
02. Scope of Delivery 27
03. Safety Instructions 28
04. About these Instructions 31
05.Before First Use 32
06. First Use 33
07. Cleaning and Care 37
08. Declaration of Conformity 39
09. Troubleshooting 39
10. Technical Data 41
11. Disposal 41
12. Warranty and Service 42
01. APPLIANCE PARTS
1 Dosing cap with capacity indication (up to 100ml )
2 Lid with refill opening (safety closure)
3 Glass jar with 1.75 l capacity (cold); 1.40 l capacity (warm)
4 Blade insert (4 stainless steel wing blades)
5 Hot plate with non-stick coating
6 On/off switch
7 Motor block with LED-illuminated operating buttons
8 LED-illuminated rotary control and control knob with display: time, temperature and mixing speed
9 Built-in cord wrap
10 Non-slip feet
A Thick and/or chunky soups
B Delicate soups
C Sauces
D Manual mode
E Steam cooking mode
F Ice crushing function
G Cleaning programme
H START/STOP button
I PULSE/MODE button
J Time display
K Temperature display
L SET button
M Speed display
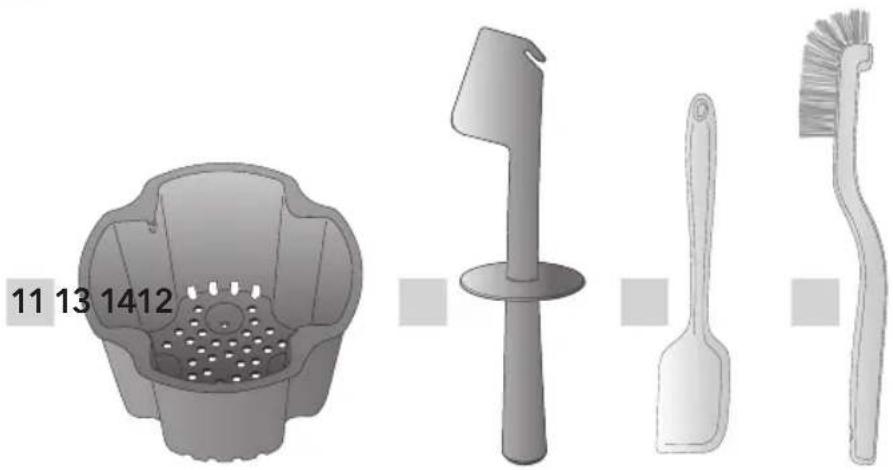
02. SCOPE OF DELIVERY
- Carefully remove the appliance and the accessories from the packaging.
- Check the scope of delivery for completeness and possible transport damages.
- Keep the original packaging. You may store the appliance in it if you are not going to use it for a prolonged period of time.
When unpacking the appliance, make sure that the following parts are included:
11 Insert for steam cooking
12 Plastic scraper for glass jar
13 Silicon scraper for dosing cap
14 Cleaning brush
03. SAFETY INSTRUCTIONS
Intended use
Use the blender with automatic cooking function exclusively for blending and preparing cold and hot ingredients and dishes such as soups, sauces and smoothies. It is also possible to crush ice.
The appliance is designed for private home use in the kitchen.
Foreseeable misuse
Do not use the blender for crushing very hard food such as bones, nuts, frozen meat etc.
DANGER of injury! Do not use the appliance for any purpose other than as originally intended.
Instructions for a safe operation
- Appliances can be used by persons with reduced physical, sensory or mental capabilities or lack of experience and knowledge if they have been given supervision or instruction concerning use of the appliance in a safe way and understand the hazards involved.
- The appliance shall not be used by children.
Children shall not play with the appliance. - Keep the appliance and its cord out of reach of children.
- If the mains power cable of this appliance should become damaged, it must be replaced by the manufacturer, the manufacturer's customer service department or a similarly qualified specialist, in order to avoid any hazards.
- This appliance is not intended to be operated using an external timer clock or a separate remote control system.
- The blades of the stainless steel wing knives are very sharp. Handle them with care in order to avoid any risk of injury.
- Care shall be taken when handling the sharp cutting blades, emptying the bowl and during cleaning.
-
Always wait for the knife or disc to stop before removing the jar from the motor block or the lid from the jar.
-
Never put your fingers into the jar and never touch the blades whilst the appliance is connected to the mains.

DANGER for children
Packing materials are not children's toys. Children should not be allowed to play with the plastic bags: there is a risk of suffocation.

DANGER to and from pets and livestock
Electrical appliances can represent a hazard to pets and livestock. In addition, animals can also cause damage to the appliance. For this reason you should keep animals away from electrical appliances at all times.

DANGER! Risk of electric shock due to moisture
Protect the appliance from moisture, water drops and water spray. The motor block, the glass jar, the cord and the mains plug must not be immersed in water or other liquids.
- Do not allow water to overflow and collect on the connector between glass jar and motor base.
- If liquid gets into the appliance, remove the mains plug immediately. Have the appliance checked before reusing.
- If the appliance has fallen into water, pull out the mains plug immediately, and only then remove the appliance from the water. Do not use the appliance again, and have it checked by a specialist.
- Never touch the appliance with wet hands.

DANGER! Risk of electric shock
Do not use the appliance if the appliance or the power cable has any visible damage, or if the appliance has previously been dropped.
Lay the power cable such that no one can step on it, get caught on it, or trip over it.
- Connect the mains plug only to a correctly installed, easily accessible wall socket with an earthing contact with voltage corresponding to the rating plate. The socket must remain easily accessible even after connection. Apart from that, it must be protected by a 16A circuit breaker.
- Always unplug the appliance after use, before assembly and disassembly, before removing the food and before cleaning. Never leave the appliance unattended whilst connected to the mains supply.
- Ensure that the power cable cannot be damaged by sharp edges or hot points.
-
Ensure that the power cable cannot be trapped or crushed.
-
To avoid any risk, do not make modifications to the product. Repairs must be carried out by a specialist workshop or the Service Centre.
- To pull the mains plug out of the wall socket, always pull on the mains plug, and never on the power cable.
- Disconnect the mains plug from the wall socket, ... after every use, ... if there is a fault, ... when you are not using the appliance, ... before you clean the appliance and ... during thunderstorms.

WARNING! Risk of injury
The glass jar must only be filled when the appliance is switched off.
- The appliance must only be started if the glass jar is undamaged, properly fixed and closed.
- Do not reach into and do insert any cutlery or other utensils into the glass jar whilst the appliance is running or still connected.
- Ensure that the blender is switched off (pull mains plug) before removing the glass jar from the motor base.

DANGER of burns
WARNING! Hot surface
The accessible surfaces become hot whilst the appliance is operating as well as after use. Do not touch the surfaces marked with the "hot surface warning symbol".
- Make sure that the glass jar is closed with the lid when cooking or mixing hot ingredients.
- Allow the appliance to cool down completely before cleaning or storing it.
- Touch the glass jar by the handle and use oven mitts.

CAUTION! Risk of material damage
Only use the original accessories.
- Never place the appliance on hot surfaces (e.g. hot plates) or near heat sources or open fire.
- Do not store any food or liquids in the glass jar. Empty and clean the glass jar after each use.
- Do not overload the appliance. If the motor is suddenly running slower, whilst possibly noticing a minor odour development due to the motor overload, switch the appliance off and carefully remove part of the contents. After that, restart the device and proceed with the preparation.
- Do not exceed the maximum quantity indicated on the glass jar: 1.4 l for hot preparations, 1.75 l for cold preparations.

WARNING! In spite of observing the maximum quantities, high speeds may nevertheless cause the contents to flow out over the spout.
- Do not start the appliance without content.
- Never move the appliance during operation.
- Never leave the appliance unattended during operation.
- Do not use chemical descalers or coffee machine descalers for the glass jar. Otherwise, the surface of the hot plate might get damaged.
- Do not expose the appliance to temperatures below -10^ or above +40^ .
- Do not fill cold or ice water into the glass jar if it is still hot - the glass might get damaged due to the high temperature difference.
- CAUTION! The glass jar is heavy.
04. ABOUT THESE INSTRUCTIONS
- Before using the appliance for the first time, read the Instructions for Use carefully and ensure you comply with the safety instructions!
- The appliance must only be used as described in these instructions.
The manufacturer or dealer is not liable for damages arising from any use contrary to the intended purpose. - Keep these instructions for reference.
- If you pass the appliance on to someone else, please include these instructions.
Warnings in these instructions
If necessary, the following warnings will be used in these operating instructions:

DANGER! High risk: Failure to observe this warning may result in injury to life and limb.

WARNING! Moderate risk: Failure to observe this warning may result in injury or serious material damage.

CAUTION: Low risk: Failure to observe this warning may result in minor injury or material damage.
NOTE: Circumstances and specifics that must be observed when handling the appliance.
05. BEFORE FIRST USE
Before first use
- Unpack the appliance and remove all packaging material.
- Clean the glass jar carefully ( "Cleaning and Care").
- Make sure that all parts - especially the connections on the underside of the glass jar - are completely dry before assembling the appliance.
- After assembly, fill the glass jar with 0.5 l of water and heat it for 3 minutes. Smoke or light odour may be generated, which is perfectly normal at this stage.
Assembly
- Place the lid on the glass jar and fix it by pressing it down.
- Insert the dosing cap into the refill opening of the lid.

CAUTION: Always make sure that the lid and dosing cap are properly fixed before starting the appliance.
- Hot steam may escape through the dosing cap whilst the appliance is heating. This is normal, which is why the dosing cap must be handled with care.
- Be careful when filling hot liquids into the blender since these may spurt out due to steam suddenly escaping from the appliance.
-
Do not remove the lid whilst the water is boiling.
-
Considering the locking mechanism, place the glass jar on the motor block.

CAUTION! Risk of material damage
The glass jar must be carefully placed on the motor block.
In the event that it has not been inserted properly, there is a danger that the connecting elements for the locking mechanism get damaged and that the appliance is no longer operable.
Disassembly
- Disconnect the mains plug to switch off the appliance.
- Carefully remove the glass jar, without turning it, from the motor block.

WARNING! Risk of burns
If the glass jar is filled with hot contents, be especially careful when removing it from the motor block.
- Remove the lid from the glass jar. To do so, hold the handle firmly and use the other hand to remove the lid at the designated area.
- Pull the dosing cap out of the lid.
06. FIRST USE
For further information and recipes, visit www.carrera.de
- After having attached the glass jar to the base of the appliance, connect the appliance to the mains.
- Fill the chopped foods into the glass jar and add the desired quantity of liquid, close the lid and also insert the dosing cap into the lid.
- The display will be activated by pressing the ON/OFF button 6; this enables the selection of the desired programme by turning the rotary control to position +/- .
- The selected programme will be indicated by a line below the programme symbol.
- Press the START/STOP button H to start and/or stop the selected programme.
- During the automatic programme sequences, you may activate the blending process manually by pressing the PULSE/MODE button I at any time (see manual mixing).
Automatic cooking programmes A / B / C
Temperature, duration and blending speed are preset in the automatic cooking programmes.
| Programme Temp | erature up to approx. | Duration (min.) | Blending speed Heat | retention programme |
| A Thick/ chunky soups | 100°C 30 min. | Low | Blend 6-8 times | Yes, for 20 min. without stirring. |
| B Thin soups | 100°C 30 min. | Medium | Blend up to 20 times | Yes, for 20 min. with stirring for 1 s |
| C Sauces | 80°C 20 min. | High | Blend up to 40 times | No |
- You may interrupt and/or continue the programme at any time using START/STOP H.
- During the programme sequence you may add further ingredients by removing the dosing cap and adding the ingredients through the opening.
- If you accidentally open the lid with the safety closure in this situation, the programme will be interrupted automatically whilst CLOSE will be flashing on the display, requesting you to reattach the lid properly.
- Upon completion of programmes A and B, the heat retention programme will be activated automatically.
- At the end of the cooking programmes, a signal will sound 5 times and the display will show the 20 min. of time for the heat retention programme as well as the current temperature.
- If no programme is selected within 10 minutes after completion of the automatisms, the appliance will automatically switch off.
Programme M - Manual mode D
Manually defining the temperature, duration and blending speed
- Time setting from 1-60 minutes.
- Speed setting from 7.000-20.000 (in 4 steps): 7.000, 10.000, 15.000 and 20.000 (display without rpm).
-
Temperature setting in 3 steps: OFF, 80 and 100 degrees (display without ^ C ).
-
"M" (manual mode) D is selected using the control knob; the SET button L lights up; press the SET button.
- The time digits are flashing; use the control knob to select the time; the control knob is held and the time increased/reduced; press the SET button.
- The speed digits are flashing; use the control knob to set the speed; press the SET button.
- The temperature digits are flashing; use the control knob to set the temperature; press the SET button. Start or correct.
- "Change programme mode" is active again; press the SET button again; manual settings can be made as previously.
- Press the START/STOP button H; the blender starts and stops as soon as the set time has expired. Press the START/STOP button again if you would like to abort the process.
- The cooking process stops with a sound signal (5x) and automatically switches to the heat retention mode (20 minutes).
NOTES:
When using the manual mode, the interval between mixing and cooking must be selected according to the TEMP setting (the higher the temperature, the
more often must be stirred/mixed. Otherwise, the food will burn to the hot plate).
The actual speed will not be shown on the display until the appliance is mixing; the display can indicate the speed in steps of 1000; if the speed changes, the display will also change according to the speed of the appliance.
How to blend cold dishes in manual mode
- Place the blender on a stable, flat surface.
- Start by filling the liquid ingredients into the glass jar and then add the remaining ingredients. Thus, the ingredients will be mixed more evenly.
- Place the glass jar on the motor block and connect the appliance to the mains.
- Close the glass jar with the lid.
NOTE: Further ingredients may be added during the blending process. To do so, lift the dosing cap out of the lid and add the ingredients through the opening. Before blending, reclose the lid with the dosing cap.
- To activate the display, turn on the appliance with the ON/OFF switch 6
- Use the control knob to select programme M . Set the speed and use the PULSE/MODE button to mix in pulses until the desired consistency has been reached.
- After use, unplug and enjoy your meal.
NOTES:
When preparing cold ingredients, the glass jar may be filled up to the 1.75 I marking.
Do not store any food or liquids in the glass jar. Empty and clean the glass jar after each use.

CAUTION: Do not overload the blender. If the motor runs too slowly, switch off the appliance immediately and pull the mains plug. Carefully remove part of the contents and proceed with the preparation.
For avoid overload the appliance in manual mode: max. blending time 30 seconds.
Steam cooking mode E
- Fill the glass jar with approx. 500ml of water up to just below the insert.
- Select programme E using the rotary control.
-
SET button L lights up on the display; press the SET button and use the rotary control to select the desired cooking time (1-40 min). Confirm your selection by pressing SET again. Further settings cannot be adjusted.
-
Start the programme with START/STOP. The liquid is being heated to approx. 100^ .

WARNING! Too little water may result in the steam completely evaporating through the spout. It is thus imperative to observe a minimum filling quantity of at least 350ml of water for 40 minutes.

CAUTION: Mind the cooking degree. Even at the end of the steam cooking programme, the heat retention programme will be automatically activated for 20 minutes.
Crushing ice F
- Fill the glass jar with ice cubes.
-
Select programme F and press the START/STOP button H to start the programme.
-
The ice cubes will be crushed intermittently at the highest possible blending speed within 1 minute.
- Depending on your taste you may also use this programme for your smoothie, or as well prepare it using the manual mixing function.

CAUTION: In programme F, the blender runs at full power. Do not leave the appliance whilst this programme is running.
Manual blending PULSE/MODE I
- Using the PULSE/MODE button I, this function may be activated at any time, not just in the steam cooking mode.
- You may control the blending process depending on how long you press and hold this button and the food consistency present in the glass jar. Avoid overloading the motor if the foods are not yet cooked/hard and press and hold the button only briefly. Repeat the process more often instead. If the foods have not yet been cooked sufficiently, only blend again after repeated boiling.
NOTES:
- For avoid overload the appliance in manual mode: max. blending time 30 seconds.
- As an additional motor overheat / overload protection, the manual blending process will be interrupted automatically after 30 s. Please unplug the appliance and let it completed cool down before turn on again.
-
Keep in mind that the manual mixing function cannot be activated during the heating process. Due to the design of the appliance, it is not possible to blend and heat at the same time.
-
The appliance is equipped with a heat retention function. It remains active for 20 minutes after completion of programmes A / B / D + E; the temperature is 80^ .
The temperature and the remaining heat retention time are shown on the display. Programme B is the only programme during which the blender mixes and stirs at intervals during the heat retention period.
- The appliance only works with properly closed glass jar. The blending process will be interrupted immediately when the lid is being lifted.
- The blender is equipped with electronic temperature control. The heat will increase and decrease during the cooking process.
- Any food sticking to the glass jar must be removed during the cooking process using the plastic scraper 12. To do so, slide the scraper through the lid opening and take off the food sticking to the glass wall.

CAUTION:
It is vital to ensure that the lid and dosing cap remain closed when cooking or mixing hot ingredients.
- No parts except for the included plastic scraper 12 must be inserted into the glass jar during the blending process. Contact with the rotating knife may have fatal consequences.
- Use the silicone scraper 13 only after the glass jar has been removed from the motor base.
07. CLEANING AND CARE

DANGER!
Danger to life due to electric shock!
Danger to life when live wires or parts are touched! The following safety instructions must therefore be observed:
Always unplug before cleaning.
- Never immerse the appliance in water.

WARNING!
Risk of burns caused by hot appliance parts!
Parts of the appliance may still be hot and cause burns even after the appliance has been switched off. It is thus vital to allow the appliance to cool down completely before cleaning it.
CAUTION!
Observe the following safety instructions to avoid damages and dangers resulting from improper use:
- To keep food from drying on the glass jar, the appliance must be cleaned before first use and after each further use.
- Do not store any food or liquids in the glass jar.
- Protect the appliance from dust, dirt and lint.
- Do not use harsh or abrasive cleaning agents.
- The motor block must only be wiped with a slightly damp cloth or sponge and dried using a soft cloth.
Manual cleaning
- Pull the glass jar upwards to remove it from the motor block.
- Fill the glass jar with hot water, add a little washing-up liquid and clean it.

CAUTION: The blades of the wing knives are very sharp. Handle with care when cleaning them.
To avoid damaging the heating elements, do not immerse the glass jar in water.
- Clean the lid and dosing cap in hot water with a little washing-up liquid.
- Rinse all parts (except for the motor base with power cord and plug and the glass jar) with clear water and allow them to dry well.
Automatic cleaning programme G
- Fill 0.5 l of lukewarm water into the glass jar, add a little washing-up liquid and attach the lid including the dosing cap.
- Attach the glass jar to the motor block and connect the appliance to the mains.
- To activate the display, turn on the appliance with the ON/OFF switch 6
- Use the rotary control to select the automatic cleaning programme G
- Use the START/STOP button H to activate the cleaning programme.
- The appliance will blend the cleaning solution and then heat it to approx. 90^ .
- During the remaining time of 3 minutes, the appliance will blend the liquid with short interruptions until the end of the programme. Thus, food residues below the knife will also be removed well.
- After completion of the programme, unplug and proceed with manual cleaning, if required.
- All parts must be well dried off. Make sure that the seal on the lid is dry and properly seated.
08. DECLARATION OF CONFORMITY

The CE mark was applied in accordance with the corresponding European directives.
The declaration of conformity is held by the distributor:
(This is not a service address!)
09. TROUBLESHOOTING

DANGER! Never attempt to repair the appliance yourself. Always remove the mains plug from the socket whenever a fault occurs.
| Fault Cause Remedy | ||
| No function 1. The glass jar has not been properly placed on the motor block. 2. The lid has not been properly attached. 3. There is not enough liquid in the glass jar. | 1. Press the glass jar down. 2. The lid must be properly attached to the glass jar. 3. Add more liquid. | |
| The appliance stopped in the middle of the programme (during operation) | 1. The lid is loose. 2. The liquid level is too low due to the vaporisation during cooking. 3. The liquid has exceeded the maximum fill level. 4. The jar has come loose from the base. | 1. The lid must be properly attached to the glass jar. 2. Add more liquid through the filling hole and restart with START/STOP. 3. Pour out a little liquid. 4. Press the jar down and the process will continue immediately. |
| The ingredients are too large after completion of the cycle (ingredients have not been blended well) | 1. Maybe the pieces were too large. 2. The wrong programme was selected. 3. Too little water was added. | 1. After the cooking programme, use the blending function again. 2. Try another programme. 3. Refill enough water. |
| The ingredients are hard after the cooking cycle (in- gredients have not been cooked well) | 1. The ingredients are too large. 2. The wrong programme was selected. 3. Too much water or food. 4. Some food must be cooked longer. | 1. Cut the ingredients into small pieces before fill- ing them into the jar. 2. Try another programme. 3. Try again with smaller quantities. 4. Select the heating function until the food has been cooked com- pletely. |
| The soup is not hot and the cooking cycle has appar- ently been abort- ed | 1. There was too much hot liquid in the jar. The blending movement caused the soup to reach the upper overflow sensor. | 1. Pour out a small quantity and select the heating function. |
| The ingredients are burnt and stick to the bottom | 1. Caused by too much sugar or starch. 2. Too much food and too little liquid. | 1. Use the correct quantity of sugar or starch. 2. Try again with a different quantity. |
10. TECHNICAL DATA
| Article type CRR-655 | |
| Article number 16466011 | |
| Mains voltage 220-240V~, 50-60 Hz | |
| Protection class | ⊕/class I |
| Cooking function | 1000 W |
| Blender | 500 W |
| Revolutions per minute 19.000 | |
| Speed (manual mode) 7.000; 10.000; | 15.000; 20.000 |
| Temperature (manual mode) | OFF; 80°C; 100°C |
| Timer (manual mode) 1-60 min. |
CARRERA is a registered trademark. In the course of product improvements, we reserve the right to make technical and visual changes to the appliance and its accessories.
11. DISPOSAL

This symbol indicates that, in the European Union, the product must be disposed of at a separate waste collection point. This applies to the product and all accessories marked with this symbol. Products marked as such may not be discarded with normal domestic waste, but must be taken to a collection point for recycling electrical and electronic appliances.

Packaging
If you want to dispose of the packaging, make sure you comply with the environmental regulations applicable in your country.
12. WARRANTY AND SERVICE
As manufacturer, we are responsible for the quality and functionality of our products. For this appliance, we provide a 24-month warranty with effect from the date of purchase.
Within this warranty period, we will, at our sole option and free of charge, remedy all defects based on material or manufacturing faults either by repair or replacement of the appliance.
The warranty services will only be rendered upon presentation of the proof of purchase.
This warranty is applicable in the Federal Republic of Germany and in the European countries where this CARRERA product is sold with our authorisation. A list of countries of the service partners authorised by us including their respective contact data can be found on our website www.carrera.de/service.
The following are exempt from warranty: Components subject to normal wear and tear. Defects affecting the value or usability of the appliance insignificantly only.
Defects caused by improper handling or insufficient maintenance and care of the appliance, defects due to non-compliance with the applicable safety precautions and data stated on the type plate as well as defects due to interventions by non-authorised persons and the use of any replacement parts other than the original replacement parts or damages caused by accidents such as fire, water or other external influences. Damages due to commercial use.
The warranty period will not be extended by the replacement of the appliance. In any case, it will expire 24 months from the date of purchase.
NOTE: The statutory warranty rights of the consumer will not be reduced or amended by the warranty.
Please refer to our service page www.carrera.de/service to learn more about warranty processing, claims or FAQ.
In case of questions about the appliance as well as to order spare parts or for support in warranty processing, contact our authorised service partners.