
Luxara 60 - Dishwasher Klarstein - Free user manual and instructions
Find the device manual for free Luxara 60 Klarstein in PDF.

| Product type | Built-in dishwasher |
| Brand | Klarstein |
| Model | Luxara 60 |
| Capacity | 14 place settings |
| Dimensions (H x W x D) | 82 x 60 x 55 cm |
| Net weight | 42 kg |
| Rated voltage | 220-240 V |
| Frequency | 50 Hz |
| Rated power | 1900 W |
| Permissible water pressure | 0.04 - 1.00 MPa |
| Wash programs | Eco, Intensive, Quick, Crystal, Pre-rinse, Self-cleaning, Upper half, Lower half |
| Energy class | B |
| Energy consumption (Eco program) | 0.645 kWh |
| Water consumption (Eco program) | 9.6 L |
| Eco program duration | 3h55min |
| Noise level | 42 dB(A) - Class B |
| Special functions | Delayed start, automatic door opening, adjustable water softener, salt and rinse aid indicators |
| Tub material | Stainless steel |
| Safety | Child lock, automatic standby after 15 min, leak protection (code E05) |
| Supplied accessories | Salt funnel, anti-moisture stickers, fixing screws, hose support |
| Maintenance | Removable filters, detachable spray arms, regular cleaning of seals |
| Repairability | Spare parts available on manufacturer's website, intervention by qualified technician recommended |
Frequently Asked Questions - Luxara 60 Klarstein
User questions about Luxara 60 Klarstein
0 question about this device. Answer the ones you know or ask your own.
Ask a new question about this device
Download the instructions for your Dishwasher in PDF format for free! Find your manual Luxara 60 - Klarstein and take your electronic device back in hand. On this page are published all the documents necessary for the use of your device. Luxara 60 by Klarstein.
USER MANUAL Luxara 60 Klarstein
CLEANINGCI LEANINGLE ANINGLEAN NINGCLEAN NGCLEANINGCI CLEANINGCI LEANINGLE ANINGLEAN
KLARSTEIN
www.klarstein.eu

bar
| Category | Value | |---|---| | Category 1 | 100 | | Category 2 | 100 | | Category 3 | 100 | | Category 4 | 100 | | Category 5 | 100 | | Category 6 | 100 | | Category 7 | 100 | | Category 8 | 100 | | Category 9 | 100 | | Category 10 | 100 | | Category 11 | 100 | | Category 12 | 100 | | Category 13 | 100 | | Category 14 | 100 | | Category 15 | 100 | | Category 16 | 100 | | Category 17 | 100 | | Category 18 | 100 | | Category 19 | 100 | | Category 20 | 100 | | Category 21 | 100 | | Category 22 | 100 | | Category 23 | 100 | | Category 24 | 100 | | Category 25 | 100 | | Category 26 | 100 | | Category 27 | 100 | | Category 28 | 100 | | Category 29 | 100 | | Category 30 | 100 | | Category 31 | 100 | | Category 32 | 100 | | Category 33 | 100 | | Category 34 | 100 | | Category 35 | 100 | | Category 36 | 100 | | Category 37 | 100 | | Category 38 | 100 | | Category 39 | 100 | | Category 40 | 100 | | Category 41 | 100 | | Category 42 | 100 | | Category 43 | 100 | | Category 44 | 100 | | Category 45 | 100 | | Category 46 | 100 | | Category 47 | 100 | | Category 48 | 100 | | Category 49 | 100 | | Category 50 | 100 | | Category 51 | 100 | | Category 52 | 100 | | Category 53 | 100 | | Category 54 | 100 | | Category 55 | 100 | | Category 56 | 100 | | Category 57 | 100 | | Category 58 | 100 | | Category 59 | 100 | | Category 60 | 100 | | Category 61 | 100 | | Category 62 | 100 | | Category 63 | 100 | | Category 64 | 100 | | Category 65 | 100 | | Category 66 | 100 | | Category 67 | 100 | | Category 68 | 100 | | Category 69 | 100 | | Category 70 | 100 | | Category 71 | 100 | | Category 72 | 100 | | Category 73 | 100 | | Category 74 | 100 | | Category 75 | 100 | | Category 76 | 100 | | Category 77 | 100 | | Category 78 | 100 | | Category 79 | 100 | | Category 80 | 100 | | Category 81 | 100 | | Category 82 | 100 | | Category 83 | 100 | | Category 84 | 100 | | Category 85 | 100 | | Category 86 | 100 | | Category 87 | 100 | | Category 88 | 100 | | Category 89 | 100 | | Category 90 | 100 | | Category 91 | 100 | | Category 92 | 100 | | Category 93 | 100 | | Category 94 | 100 | | Category 95 | 100 | | Category 96 | 100 | | Category 97 | 100 | | Category 98 | 100 | | Category 99 | 100 | | Total (Total) = [sum of bars] / [values] * (sum of bars + bars) * (sum of bars + bars) * (sum of bars + bars) * (sum of bars + bars) * (sum of bars + bars) * (sum of bars + bars) * (sum of bars + bars) * (sum of bars + bars) * (sum of bars + bars) * (sum of bars + bars) * (sum of bars + bars) * (sum of bars + bars) * (sum of bars + bars) * (sum in brackets) * (sum in brackets) * (sum in brackets) * (sum in brackets) * (sum in brackets) * (sum in brackets) * (sum in brackets) * (sum in brackets) * (sum in brackets) * (sum in brackets) * (sum in brackets) * (sum in brackets) * (sum in brackets) * (sum in brackets) * (sum in brackets) * (sum in brackets) * (sum in brackets) * (total).* (sum in brackets) * (sum in brackets) * (sum in brackets) * (sum in brackets) * (sum in brackets) * (sum in brackets) * (sum in brackets) * (sum in brackets) * (sum in brackets) * (sum in brackets) * (sum in brackets) * (sum in brackets) * (total).* (sum in brackets) * (sum in brackets) * (sum in brackets) * (sum in brackets)Lieber Kunde, liebe Kundin,
INHALT
Bedienung Tasten
Methode 2:
flowchart
graph LR
    A["Table with Hand gestures"] --> B["Step 1: Hand gesture application"]
    B --> C["Step 2: Screen placement and cleaning"]
    C --> D["Step 3: Screen placement and cleaning"]
Abschlusskontrolle
flowchart
graph LR
    A["Outdoor Storage with Waste"] --> B["Recyclable Bag"]
    B --> C["Recyclable Bag with Stiff"]
    C --> D["Recyclable Bag with Stiff with Cover"]
    D --> E["Recyclable Bag with Stiff with Cover"]
Wasserenthärter
flowchart
graph LR
    A["Start"] --> B["Gnomon with bell jar"]
    B --> C["Press mechanism with valve"]
    C --> D["Final press mechanism"]
Wasserhärte
natural_image
Cross-sectional diagram of a mechanical assembly with rollers and housing (no text or labels)natural_image
Pure diagram of vertical panels mounted on a horizontal base, no text or symbols presentnatural_image
Diagram showing a structural change before and after transformation, with no visible text or symbolsnatural_image
Pure diagram of a washing machine connected to a drain with tubing (no text or symbols)natural_image
Simple line drawing of a fish and a circular object above a surface, with no text or symbols present.natural_image
Abstract geometric pattern with vertical bars and a horizontal line, no text or symbols presentnatural_image
Simple line drawing of a kitchen appliance with sound waves (no text or symbols)natural_image
Simple line drawing of a trash bin with smokestacks (no text or symbols)VERLETZUNGSGEFAHR!
natural_image
Simple line drawing of a container with a downward arrow indicating rotation (no text or symbols)flowchart
graph LR
    A["Initial Component"] --> B["Reactor with Internal Motor"]
    B --> C["Intermediate Component"]
    C --> D["Final Motor or Pump"]
WARNUNG

PRODUKTDATENBLATT (EN60436)
Name: Customer service
Website: https://www.elektronik-star.de/Info/Impressum/
E-Mail-Adresse: info@electronic-star.de
Telefonnummer: +49303001385500
Anschrift:
Mühlenstraße 25
10243 Berlin
Deutschland
natural_image
Symbol of a trash bin with crossed lines and a horizontal bar below (no text or labels)Congratulations on the purchase of your device. Please read the following instructions carefully and follow them to prevent potential damage. We accept no liability for damage caused by disregarding the instructions and improper use. Please scan the QR code to access the latest operating instructions and further information about the product.

CONTENTS
Safety Instructions 50
Appliance Overview 54
Control panel and buttons 56
Installation 58
Connecting the water inlet hose 62
Connecting the drainage hose 63
Securing the dishwasher 65
Dimensions and installation 66
Dishwasher usage 67
Loading the dishwasher correctly 72
Loading the baskets (EN 60436) 75
Quick user guide 78
Rinsing programmes (EN 60436) 79
Cleaning and care 82
Troubleshooting and Error codes 84
Product data sheets (EN60436) 90
Disposal Considerations 91
Manufacturer & Importer (UK) 91
TECHNICAL DATA
| Rated voltage 220–240 V | |
| Frequency 50 Hz | |
| Rated power 1900 W | |
| Water pressure 0.04-1.00 MPa | |
| Product netto weight 42kg |
SAFETY INSTRUCTIONS
WARNING
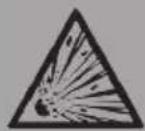
Risk of explosion! Under certain conditions, hydrogen gas can form in a hot water system that has not been used for more than two weeks. HYDROGEN GAS IS HIGHLY EXPLOSIVE! If the dishwasher has not been used for a long time, open all hot water taps and let the water run for a few minutes before using the dishwasher. This will allow any accumulated hydrogen gas to escape from the system. As the gas can ignite, avoid naked flames and do not smoke
during this time.
• Installation and repair must only be carried out by a qualified technician This appliance is intended for use in domestic and similar applications such as:
- staff kitchen areas in shops, offices and other work environments;
- farm houses;
- by customers in hotels, motels and other residential type environments;
- bed and breakfast type environments.
- This appliance may be used by children 8 years of age and older and by persons with reduced physical, sensory or mental capabilities or lack of experience and knowledge, if they have been given supervision or instruction concerning the safe use of the appliance and have understood the hazards involved.
- Do not allow children to play with the appliance.
- Do not allow children to clean or service the appliance without supervision. (For EN60335-1)
- This appliance is not intended for use by persons (including children) with reduced physical, sensory or mental capabilities, or lack of experience and knowledge, unless they have been given supervision or instruction concerning use of the appliance by a person responsible for their safety. (For IEC60335-1)
- Packing material may be hazardous to children!
• Children should be supervised to ensure that they do not play with the appliance.
• This appliance is intended for indoor use only.
• To reduce the risk of electric shock, do not immerse the appliance, cord or plug in water or other liquids. Before cleaning or servicing the unit, unplug it and wipe with a soft cloth moistened with mild soap, then wipe with a dry cloth.
- If the power cord is damaged, it must be replaced by the manufacturer or its service agent or a similarly qualified person to avoid danger.
- Do not modify the plug supplied if it does not fit the outlet.
- Have a qualified electrician install a suitable outlet.
- Do not abuse, sit or stand on the dishwasher door or rack.
- Do not operate the dishwasher unless all panels are in place.
- Open the door very carefully when the dishwasher is running, as there is a risk of water splashing out.
- Do not place heavy objects on or stand on the door when it is open. The machine could tip forward.

CAUTION
Risk of injury! When loading the machine, take special care to place sharp objects in the machine so that they do not damage the door seal. Sharp knives must be placed in the knife basket with the handle up. Knives and other objects with sharp points must be placed in the basket with the point down or horizontally.
- Some dishwasher detergents are highly alkaline. They can be very dangerous if swallowed. Avoid contact with the skin and eyes, and keep children away from the dishwasher when the door is open.
- Check for detergent residue at the end of the cycle.
- Do not wash plastic items unless they are marked "dishwasher safe" or equivalent.
- For unmarked plastic items, check the manufacturer's recommendations.
- Use only detergent and rinse aid recommended for use in an automatic dishwasher.
- Never use soap, laundry detergent or hand soap in your dishwasher.
- Do not leave the door open as this may increase the risk of tripping.
- Do not bend or flatten the power cord excessively or dangerously during installation.
- Do not tamper with the controls.
- The appliance must be connected to the main water valve using new hose kits. Do not reuse old sets.
- In order to save energy, the machine automatically switches off after 15 minutes in stand-by mode without any user interaction.
- The maximum number of place settings to be washed is 10.
- The maximum permissible inlet water pressure is 1 MPa. The minimum permissible inlet water pressure is 0.04 MPa.

WARNING
Risk of suffocation! Children could injure themselves on the packaging materials and old appliances. When disposing of the old appliance, make sure that you cut off the power cable and render the door lock unusable.
Earthing instructions
- This appliance must be earthed. In the event of a malfunction or breakdown, earthing reduces the risk of electric shock by providing a path of least resistance for the electric current. This unit is equipped with a grounding plug.
- The plug must be connected to a suitable outlet that is installed and earthed in accordance with all local codes and regulations.
- Failure to properly connect the equipment grounding conductor may result in electric shock.
- If you are in any doubt as to whether the equipment is properly grounded, consult a qualified electrician or service representative.
Precautions for use
Installation
• Install the product on a sturdy, horizontal surface.
- Do not place the drain hose under the dishwasher during installation.
Operation
- If you are not going to use the dishwasher for a long time, please turn off the tap and unplug it.
- Do not place items on top of the machine.
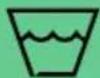
- Do not wipe or apply liquid detergent or bleach (chlorine bleach, oxygen bleach, etc.) to the product's surface. Failure to follow these instructions may result in corrosion or discolouration of the body coating.
- The water discharged from the dishwasher may be hot; do not touch it.
- In winter, if the drainage and inlet hoses freeze, thaw them before use.
- Never place your hands, feet or metal objects under or behind this machine.
- Do not wash tableware contaminated with chemicals.
- Do not close the dishwasher door while it is in automatic door opening mode.
Maintenance
- If edible oil splashes onto the external surface of the machine, wipe it clean immediately.
- Do not use cleaning agents containing alcohol, diluents, bleach, benzene, flammable liquids or abrasives to clean the exterior of this product. These substances may cause discolouration or damage electrical components.
APPLIANCE OVERVIEW
Note: To get the best performance from your dishwasher, read all the instructions before using it for the first time.
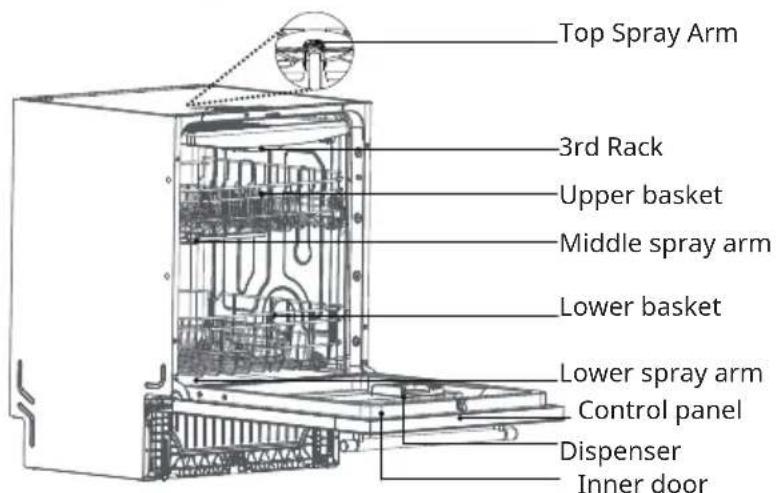
Note: Pictures are only for reference, your models may be different.
Accessories
 |  | ||
| 1 x salt hopper 3 x magic stickers | |||
 | 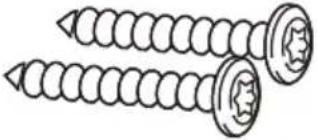 | ||
| 1 x moisture-proof sticker 4 x ST3.5x30 screws (for fixing the dishwasher) | |||
Note: Due to continuous product upgrades, differences may exist between the product pictured below and the actual product. Please refer to the actual product.
CONTROL PANEL AND BUTTONS

Operation buttons
| 1 Power | Press this button to turn on the dishwasher. Press this button for 3 seconds while the dishwasher is running to enter the standby mode |
| 2 Program | Press this button to select the appropriate washing program, the program indicator will be lit |
| 3 Digital Display | Displays warning indicators, program details, salt and rinse aid information |
| 4 Delay button Delay of the start time | |
| 5 Start/ Pause button Pausing the current washing program for up to 5 hours | |
Operation button explanation
Power button
- Press the power button to turn the device on or off.
- While in operation, press and hold the Power button for three seconds to enter standby mode.
Program button
- After starting up, press the Program button to select programmes, and the display will alternately show the current program code (Px) and the washing time (x:xx).
- On the second boot, the default display shows the last washing program, and the desired program can be re-selected.
- During the washing operation, press the program button to view the current washing program code Px; the display will show the current washing program code Px for three seconds, after which it will switch to showing the remaining washing time x:xx.
- The washing program has a power-off memory function. After being powered off and on again, it will resume the previous drainage stage and continue running.
Digital display
| Display category Display content | |
| Program code Px | |
| Program washing time x:xx | |
| Delay washing program H:xx | |
| Door opening prompt dr | |
| Error code Exx | |
| Softening salt prompt | |
| Rinse aid prompt |
Rinse aid: The indicator light comes on to show that rinse aid needs to be added. Once the rinse aid has been added, the light goes out.
Softening salt: The indicator light comes on to show that softening salt needs to be added. Once the salt has been added, the light goes out.
INSTALLATION
Each dishwasher undergoes a water test during production to ensure it meets the required standard. The first time you turn on the dishwasher, you may notice water droplets inside. Please rest assured that this will not affect the performance of the product.
professionals
WARNING: Electrical Shock Hazard!
Disconnect electrical power before installing dishwasher. Failure to do so could result in death or electrical shock. The installation of the pipes and electrical equipments should be done by
Electrical requirements
Please look at the rating label to know the rating voltage and connect the dishwasher to the appropriate power supply. Use the required fuse 10A/13A/16A, time delay fuse or circuit breaker recommended and provide separate circuit serving only this appliance.
Electrical connection
Ensure that the voltage and frequency of the power supply correspond to those on the rating plate. Only connect the plug to a properly earthed socket. If the socket to which the appliance is to be connected is not suitable for the plug, replace the socket and do not use adapters or the like, as these may cause overheating and burns.
Note: Ensure that proper earthing exists before use.
Installation requirements
• Installation or movement must be carried out by a professional, and unauthorised disassembly, modification or repair is prohibited. A new hose assembly should be used to connect to the water source.
- Unauthorised installation may result in electric shock, fire and water leakage.
- If air switches with protective devices or leakage protection switches are not installed, or are installed incorrectly, electric shock may result.
- Please check that the installation of the power circuit, fuse, socket and switch meets national power supply standards and the requirements of the purchased machine. Check that there is satisfactory grounding and safety protection and that the water source and drainage device meet the placement and use requirements.
- Ensure that the voltage on site meets the requirements; the machine can only operate safely and normally at the rated voltage.
- Ensure that the length of the drainage pipe meets the usage requirements.
- Ensure that all required materials, the platform on which to place the machine and any other necessary accessories are ready. If special accessories are required, you can consult the after-sales service provider about customising them.
Note:
The dishwasher must be installed near water inlet and drainage ports.
The dishwasher must be installed horizontally.
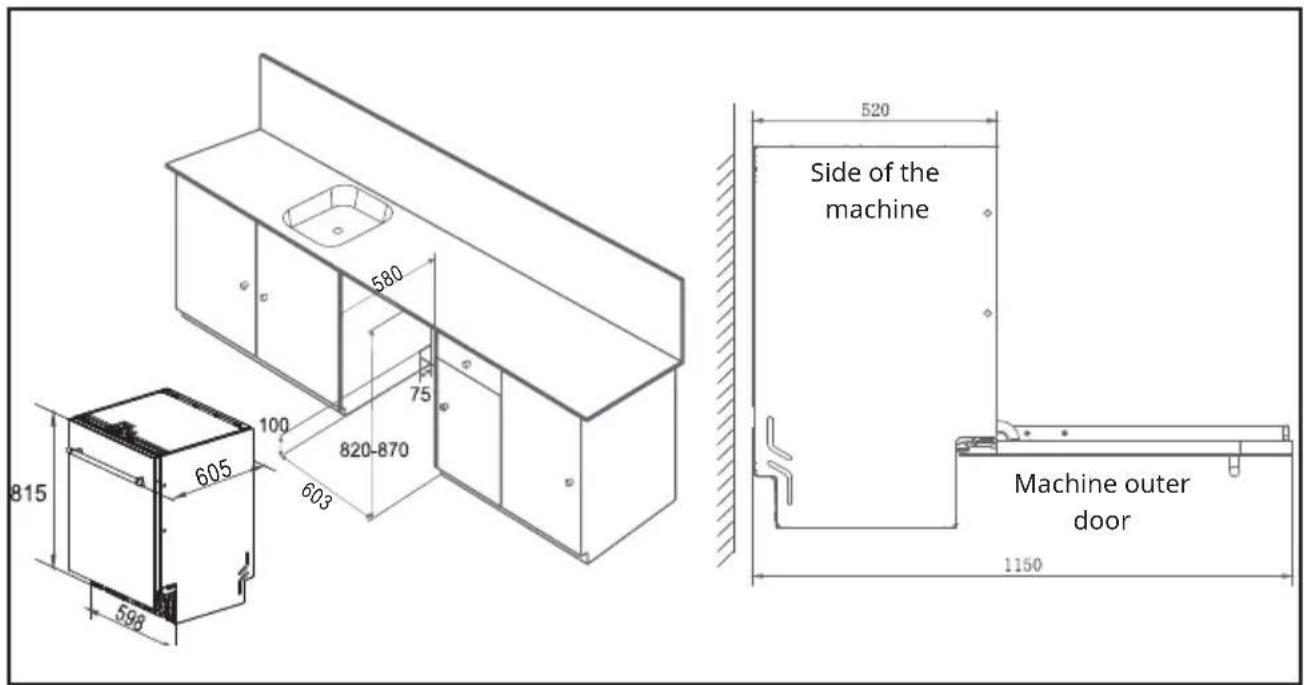
Once installed, ensure that the dishwasher door opens smoothly.
The figures below show the dimensions of the counter on which the dishwasher is installed, as well as the space required to open the dishwasher door.
Installation steps

CAUTION
Please try using the dishwasher first to confirm that it is working properly, to avoid the need for repeated disassembly and assembly.
This dishwasher is designed for built-in installation only.
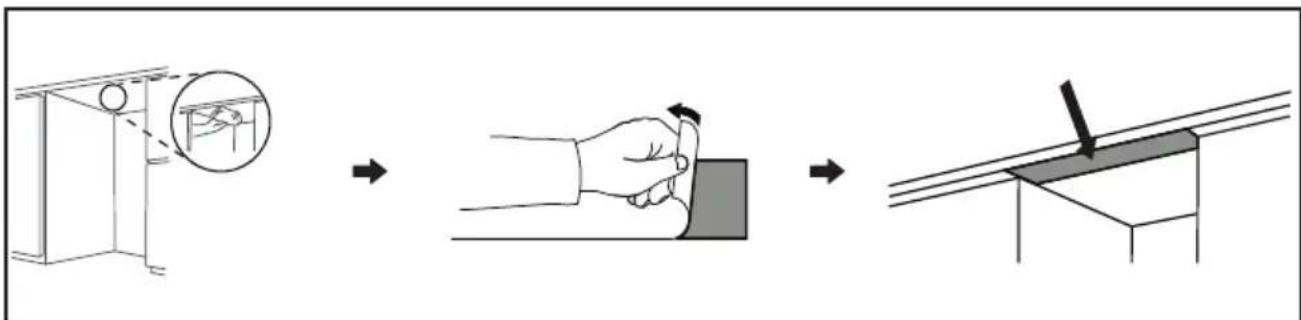
Installing of the moisture-proof stickers
• To prevent dampness on the top of the cabinet when opening the dishwasher, a moisture-proof sticker should be placed on the inside of the cabinet lid.
- Ensure that the inner surface of the cabinet top where the sticker will be installed is clean and dry.
- Remove the protective film from the back of the sticker.
- Then apply the sticker to the inner surface of the cabinet top.
Adjusting the balance of the machine
- To ensure stability when placing the dishwasher, adjust the feet to maintain balance.
- Place the dishwasher on a firm, level surface.
- Use a slotted screwdriver to adjust the front two feet. Turn the foot clockwise to raise it and anticlockwise to lower it. There is an adjustable foot at the back of the dishwasher. Turn the foot clockwise to lower it and anticlockwise to raise it.
CONNECTING THE WATER INLET HOSE
- When connecting to the inlet port, make sure that the inlet hose is not bent or squeezed.
- If the tap water hose is new or has not been used for a long time, turn on the tap and allow the water to flow for a while until it is clear and free of impurities, before connecting it to the dishwasher inlet hose.
- This machine can be supplied with hot or cold water. However, the temperature of the hot water supply must be maintained below 60^ .
- Do not disconnect or remove the inlet hose from the machine during installation.
- Before disconnecting the water supply hose, turn off the water supply and unscrew the water inlet hose from the faucet.
- The safety inlet hose contains electrical circuits and components that must not be cut or damaged.
- Connect the dishwasher inlet hose to the kitchen inlet port.
- The type of inlet pipe required depends on the type of machine being used.
- Refer to the following figure for instructions on how to connect the safety inlet hose and normal inlet hose.
- Connect the dishwasher inlet hose to the kitchen inlet port.
- The type of inlet pipe required depends on the type of machine being used. Refer to the following figure for instructions on how to connect the safety inlet hose and normal inlet hose.
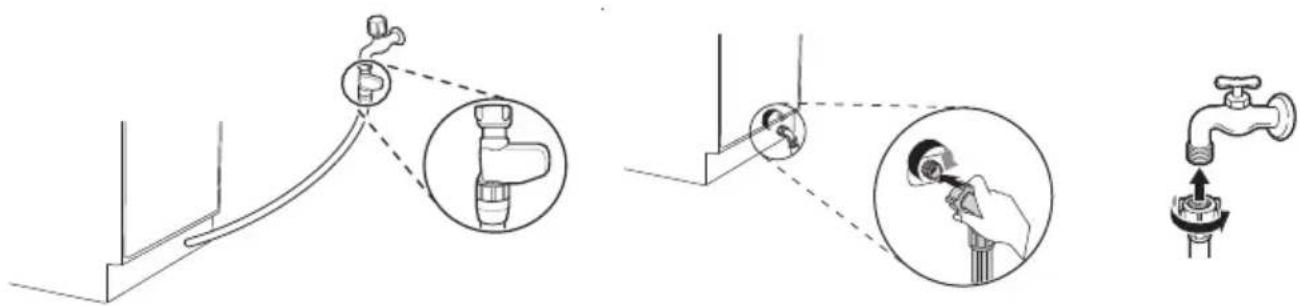
Safety inlet hose Normal inlet hose
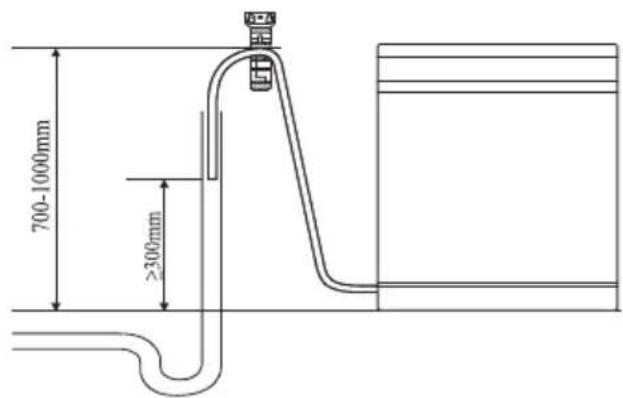
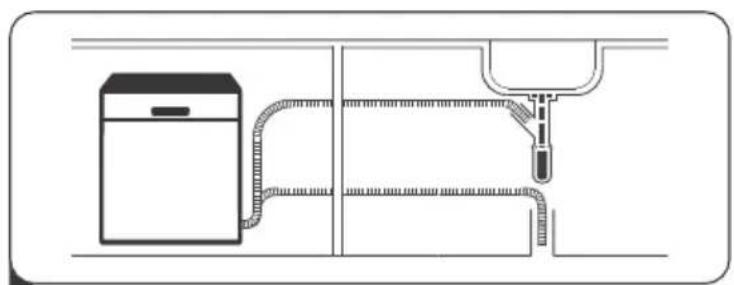
CONNECTING THE DRAINAGE HOSE
Please use the drainage pipe connection provided. The end of the drainage hose can be secured using a drainage hose bracket. There are two methods that can be used to connect to the household drainage system.
CAUTION

Make sure that the drainage hose is not bent, squeezed or tangled.
Use the new drain and inlet hoses provided with the dishwasher. The old hose components cannot be reused.
Do not allow the end of the drainage hose to become immersed in water, as this could cause sewage to flow back.
Keep the exposed parts of the inlet and outlet hoses away from heat sources and sharp edges, and avoid long-term exposure to direct sunlight.
Method 1:
Connect the outlet end of the drainage hose to the sink pipeline and secure it to the lower cabinet surface using the drainage hose bracket.
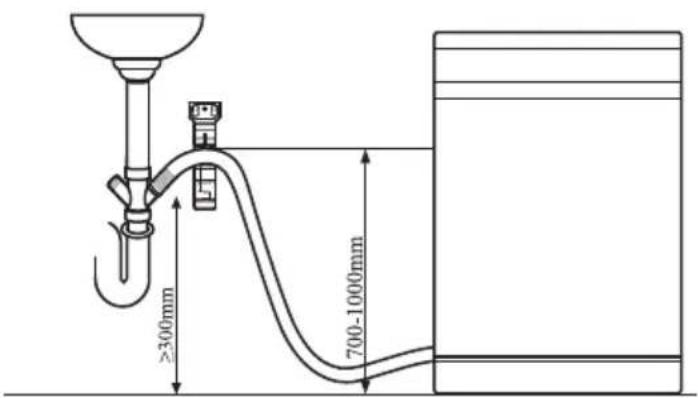
Method 2:
When connecting the drainage hose to a separate sewer, ensure that the connection point is airtight. Otherwise, odour leakage may occur. The riser pipe should have a diameter of at least 40 mm.
Connection of the power supply
The voltage and frequency of the power supply must match the specifications indicated on the nameplate on the machine.
- Ensure that the power socket is properly grounded.
- Keep the exposed part of the power cord away from heat sources and sharp objects, and avoid long-term exposure to direct sunlight.
- A dedicated power socket must be used (it is not permitted to share the same socket with other high-power appliances).
- Do not use extension cords or dual connectors.
- The plug must be inserted into the correct socket, which should be correctly installed and earthed in accordance with all local standards and regulations.
- Only qualified maintenance personnel can perform maintenance on the equipment. Repairs carried out by inexperienced personnel may cause personal injury or serious malfunctions. Please contact your local service centre.
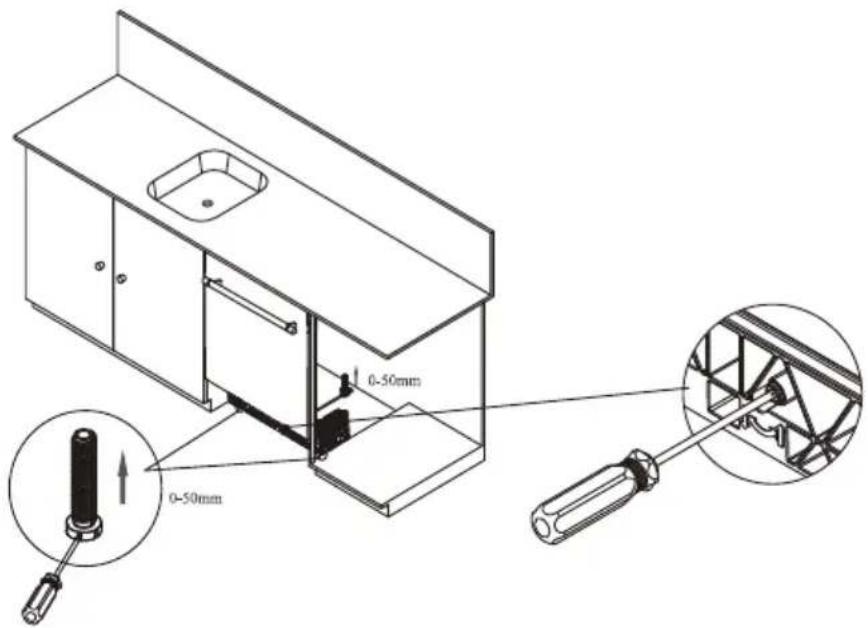
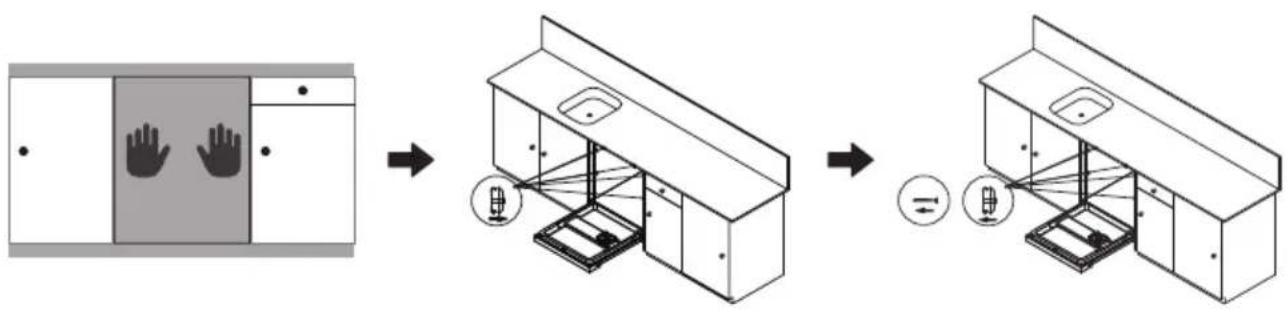
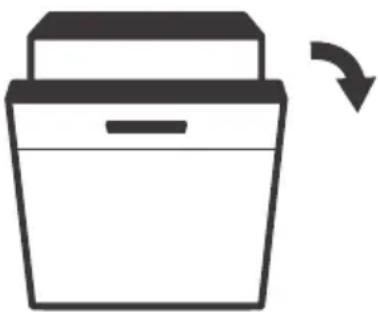
SECURING THE DISHWASHER
- First, please connect the water and electricity for a trial operation. Do not fix the machine until you are sure that there are no problems with it.
- Push the dishwasher horizontally into the cabinet.
- Remove the decorative cover around the dishwasher.
- Secure the dishwasher to the cabinet using the four ST3.5x30 screws provided with the machine and replace the decorative cover in the screw hole slot.
- Choose any two of the four screw holes at the front for fixing, according to the actual installation situation.
flowchart
graph LR
    A["Table with Hand gestures"] --> B["Step 1: Hand gesture applied to cabinet"]
    B --> C["Step 2: Lighting system with hand icons"]
    C --> D["Step 3: Lighting system with hand icons and light source"]
Final inspection
Test the dishwasher for proper operation:
- Turn on the power.
- Then turn on the water supply to the house.
- If the machine has been properly levelled, the door should open and close smoothly without making a loud noise.
- Operate the Pre-Rinse program once (if there is no Pre-Rinse program, please use the Rapid program) to verify that the machine is operating correctly and to check for leaks.R
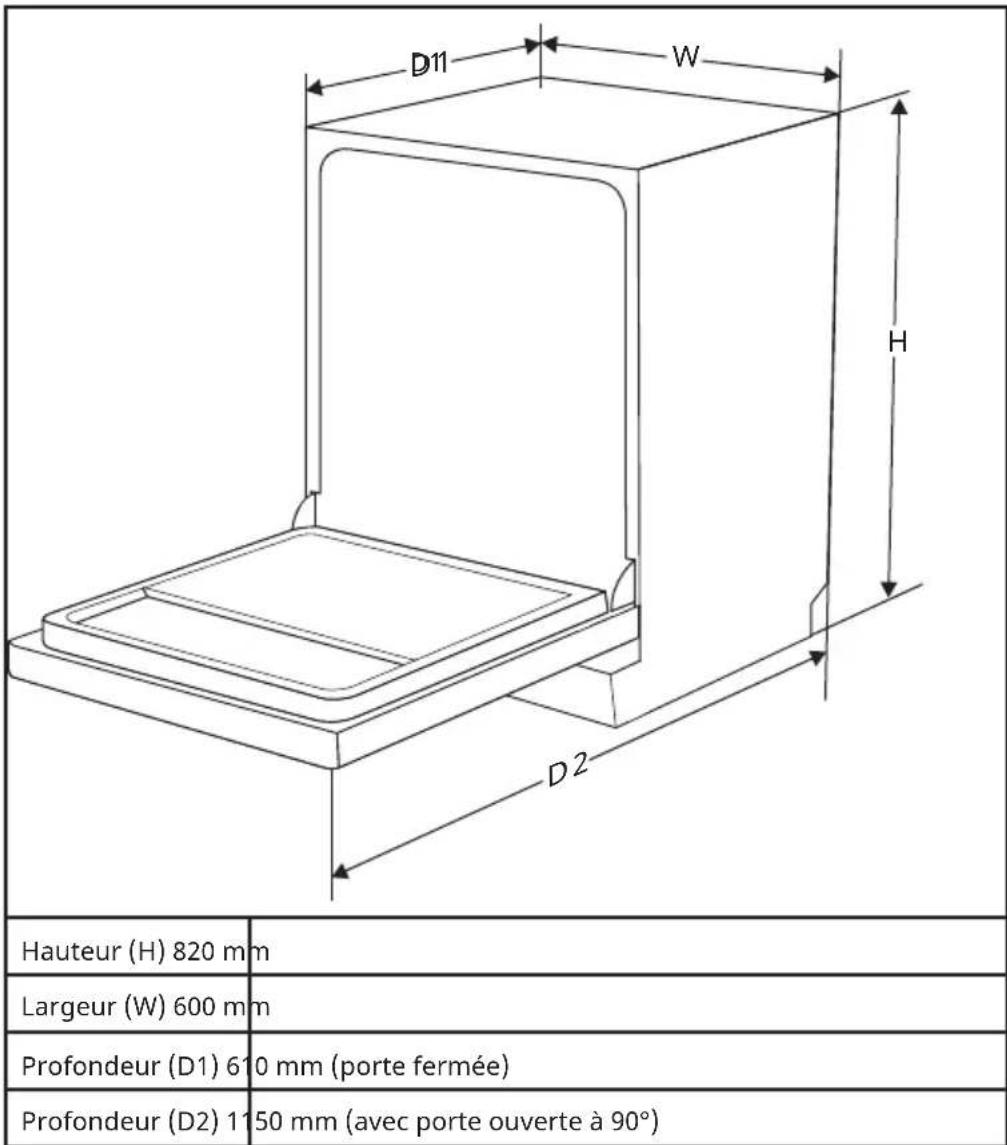
DIMENSIONS AND INSTALLATION
Dimensions:
| Height (H) 820 mm | |
| Width (W) 600 mm | |
| Depth (D1) 610 mm (with closed door) | |
| Depth (D2) 1150 mm (with door open 90°) |
Notes on installation
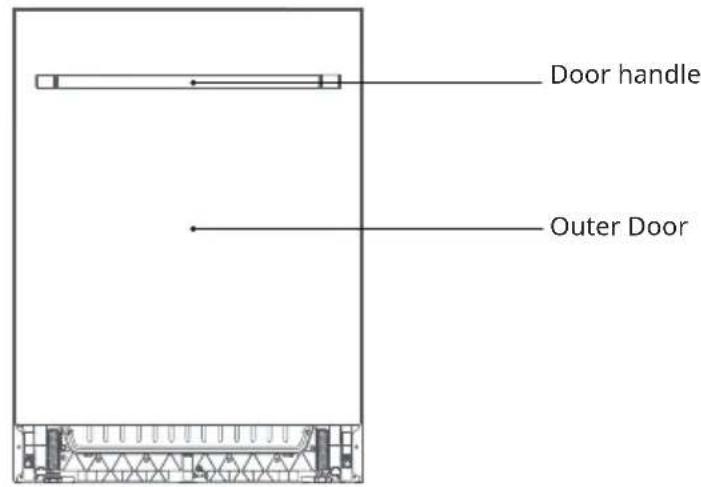
- There should be less than 5 mm of space between the top of the dishwasher and the built-in cabinet. The same applies to the outer door, which is aligned with the cupboard.
- If the dishwasher is in the corner of the built-in cupboard, there should be enough space to open the door.
DISHWASHER USAGE
Rinse aid
- Please read the instructions and safety warnings on the rinse aid packaging carefully before use.
- Only use a rinse aid designed for dishwashers.
- If any rinse aid spills when you add it, please wipe it up straight away with a dry cloth to avoid excessive foam during the next wash, which will affect the washing performance.
Effect of rinse aid
Rinse aid reduces the surface tension of water to prevent water marks from forming on tableware. It also helps water to evaporate quickly during the drying stage, improving drying efficiency and creating a sparkling finish.
Service conditions
If the indicator light *on the display panel is on, please top up the tank in a timely manner.
Rinse aid usage
- Once added, the rinse aid can be used multiple times. Once poured, the liquid level should not exceed the "MAX" marking line.
- The amount of rinse aid used can be determined by the drying effect on the tableware. If there is too much moisture on the surface of the tableware, the rinse aid setting should be increased. Conversely, if white and blue deposits appear on the surface of the tableware, the dosage should be reduced and the setting lowered.
Steps for adding rinse aid
- Follow the arrow to open the rinse aid box lid.
- Add rinse aid to the container.
- Then close the lid of the rinse aid box.
flowchart
graph LR
    A["Air Conditioner Unit"] --> B["Fan Fan"]
    B --> C["Speaker"]
    C --> D["Vibration System"]
    D --> E["Air Conditioner Unit"]
Rinse aid setting
- After turning on the machine, press and hold the Programme and Delay buttons simultaneously for five seconds to enter setting mode. A prompt sound will be heard at the same time.
- The machine will then enter the rinse aid setting state. The default setting for the rinse aid is d3, displayed as 1:d3.
- Press the Programme button to cycle through the rinse aid settings. After selection, press the Start/Pause button to save the set data successfully, and the set gear will be memorised by the program. At the same time, the machine will enter the soft water setting mode.
- When the soft water setting is successful, exit and enter the program selection state.
Example:
- Setting it to 1:d0 means that the rinse aid will not be distributed and the rinse aid indicator light will remain off.
- Setting it to 1:d3 means that the rinse aid dosage is 3.6 ml; the larger the number, the greater the dosage.
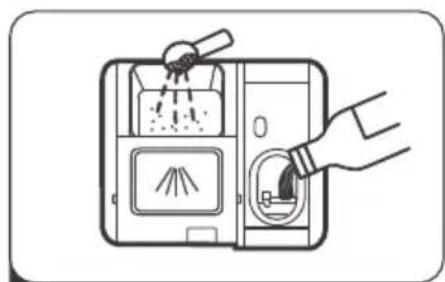
Dishwasher Detergent
- Please read the instructions and safety precautions on the detergent packaging carefully before use.
- Only use detergents designed for dishwashers, such as dishwasher detergent. Do not replace them with liquid detergent, disinfectant, etc.
- Pay attention to the expiry date on the dishwasher detergent packaging. Expiry or caking due to moisture will affect the cleaning or drying effect. Therefore, if you are not ready to wash, do not add dishwasher detergent to avoid insufficient dissolution due to moisture.
Function of dishwasher detergent
Dishwasher detergent uses its chemical components, such as biological enzymes, to soften and break down oil stains and food residues on tableware. This makes them easy to wash away with water when they are detached from the surface of the tableware.
Usage conditions and dosage
Dishwasher detergent is essential for cleaning tableware and should be added in a moderate amount each time you use the dishwasher. For specific usage instructions, please refer to the "Washing Program" section of the manual.
Steps for adding dishwasher detergent
-
Press down the dispenser button.
-
The lid of the dishwasher detergent box will automatically pop off.
- Add dishwasher detergent to the dishwasher bin.
- Then close the lid of the detergent box.

flowchart
graph LR
    A["Device Placement"] --> B["Cleaning"]
    B --> C["Cleaning Tool"]
    C --> D["Final Installation"]
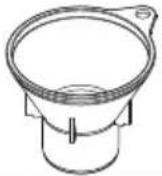
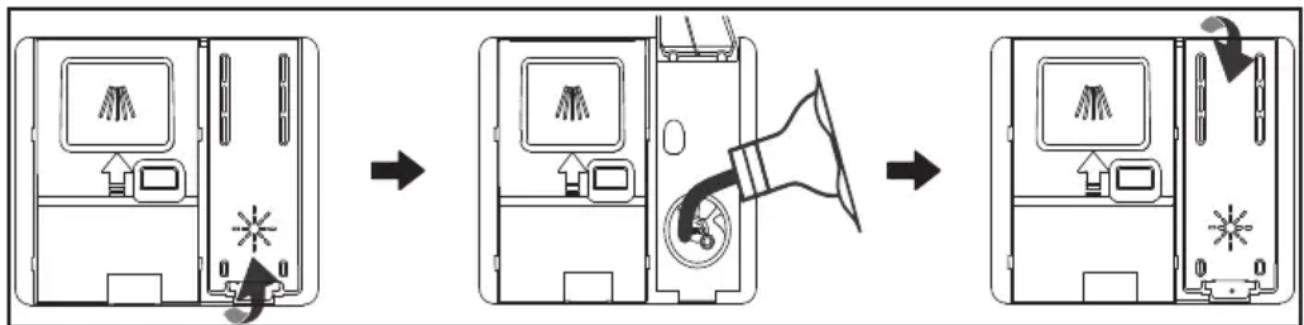
Water Softener
The water softener must be set manually using the water hardness dial. The purpose of the water softener is to remove minerals and salts from the water, which would be harmful or detrimental to the operation of the appliance.
The more minerals there are, the harder your water will be.
The softener should be set according to the hardness of the water in your area. Your local water authority can advise you on the hardness of the water in your area.
- When using the appliance for the first time, add specialised salt to the water softener's salt chamber, followed by about 400 ml of clean water. When the salt shortage indicator light comes on again, simply add more salt; no additional water is required.
- Never add detergents, rinse aids or other substances to the salt chamber, as this could damage the system.
- Only use salt designed for dishwashers and do not use industrial or edible salt; otherwise, it may damage the water softener and reduce its lifespan.
- Avoid saltwater overflow when adding salt to the water softener. If there is an overflow, please immediately run the washing program to flush it out and avoid internal corrosion of the dishwasher.
Note: The water softening function can only be achieved when there is the salt in the water softener. When the salt indicator light on the display panel is lit, please add it in a timely manner.
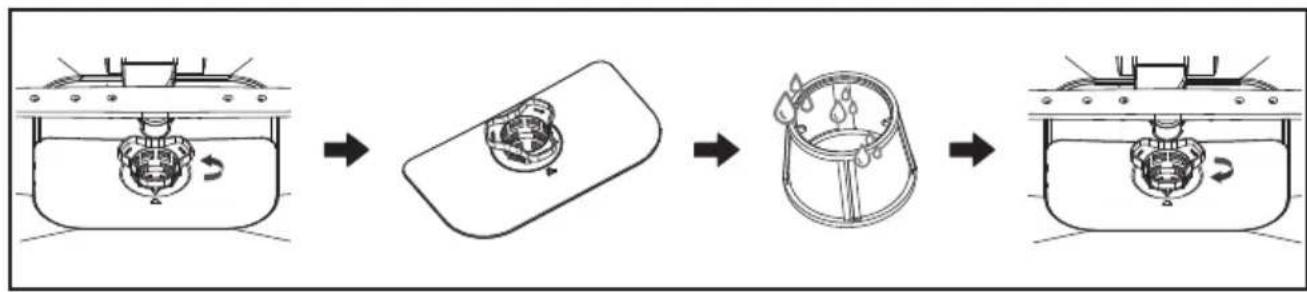
Steps for adding specific salt
- Turn anticlockwise to open the water softener cover.
- Insert the salt bucket and add approximately 800 g of salt, which can be used multiple times.
- After adding the salt, fill the water softener with water, taking care not to let it overflow.
- Finally, rotate the cover clockwise and tighten it to prevent salt leakage, which could corrode the tub.

flowchart
graph LR
    A[" gears"] --> B[" presser "]
    B --> C[" presser "]
    C --> D[" presser "]
    D --> E[" presser "]
    style A fill:#f9f,stroke:#333
    style B fill:#ccf,stroke:#333
    style C fill:#cfc,stroke:#333
    style D fill:#fcc,stroke:#333
    style E fill:#ffc,stroke:#333
Water hardness
- The following table shows the relationship between water hardness and water treatment levels in different regions.
- Please consult your local water company to find out your water hardness level, and then set your gear accordingly using the table below.
- Once the correct setting has been selected, the dishwasher will automatically perform the water softening function.
| Water hardness | Gear setting A Gear setting B | |||
| ^^1) | ^ ^ mmol/l | 2) | ||
| 0-5 0-9 0 | -6 0-0.94 2:h0 | 2:H1 | ||
| 6-11 10-2 | 0 7-14 1.0-2.0 | 2:h1 2:H2 | ||
| 12-17 21-3 | 0 15-21 2.1-3. | 0 2:h2* 2:H3* | ||
| 18-22 31-4 | 0 22-28 3.1-4. | 0 2:h3 2:H4 | ||
| 23-34 41-6 | 0 29-42 4.1-6. | 0 2:h4 2:H5 | ||
| 35-55 61-9 | 8 43-69 6.1-9. | 8 2:h5 2:H6 | ||
1 German hardness level
^2 International hardness level
* Factory setting
Note: The salt container may only be refilled when the salt warning light (☐) on the control panel is illuminated. Depending on how well the salt dissolves, the salt warning light may remain lit even when the salt container is full. If there is no salt warning light on the control panel (for some), you can estimate when to add salt to the softener by looking at the cycles the dishwasher has run. If salt has spilled, run a soak or quick programme to remove it.

WARNING
Only use salt specifically designed for dishwasher use!
Any other type of salt not specifically designed for dishwasher use, especially table salt, will damage the water softener. In the event of damage caused by the use of unsuitable salt, the manufacturer will not be liable for any damage.

WARNING
Only add salt before running a cycle!
This will prevent any salt grains or salty water that may have been spilled from remaining on the bottom of the machine for any length of time, which can cause corrosion
Water softener gear setting
- After turning on the machine, press and hold the Programme and Delay buttons simultaneously for five seconds to enter setting mode. A prompt sound will play at the same time. First, the rinse aid setting will be displayed, followed by the water softener setting once the process is complete. Press the Programme button to adjust the settings for the water softener in sequence. Press the Start/Pause button to save the settings successfully, and the program will memorise the selected setting.
- When set to 2:H0/H1, no water softening will occur and the salt deficiency indicator icon will remain off.
- Water softener regeneration usually takes about 15 minutes after the washing process. After 15 minutes, when the display screen flashes at 0:00, the machine will automatically shut down.
Automatic door opening and closing
- In standby mode, press and hold the Program and Delay buttons for 10 seconds to display "do1".
- Short press the Program button once to switch to "do0".
- Press the Start/Pause button to complete the setting, which indicates that the automatic door opening function is turned off.
- If the automatic door opening function needs to be turned on again, perform the above operations.
LOADING THE DISHWASHER CORRECTLY
- Consider buying utensils that are labelled as dishwasher safe.
- For certain items, choose a programme with the lowest possible temperature.
- To prevent damage, do not remove glass and cutlery from the dishwasher immediately after the programme has finished.
For washing the following types of cutlery/crockery
Are not suitable
- Cutlery with wooden, horn or mother-of-pearl handles
- Plastic items that are not heat resistant
- Older cutlery with glued parts that are not heat resistant
• Glued cutlery or crockery - Pewter or cooper items
- Crystal glass
• Steel items subject to rusting - Wooden plates
- Items made of synthetic fibres
Limited suitability
- Some types of glass may become dull after a large number of washes
• Silver and aluminium items tend to discolour with washing
• Glass patterns may fade with frequent machine washing
Recommendations for loading the dishwasher
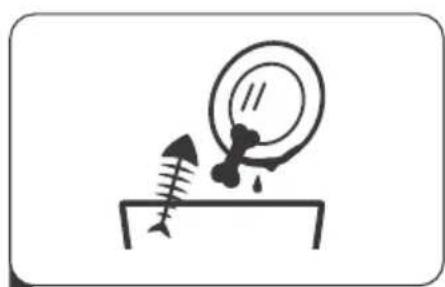
Scrape off large amounts of food. Soften the remains of burnt food in pans. It is not necessary to rinse dishes under running water.
For best dishwasher performance, follow these loading guidelines.
(Features and appearance of baskets and cutlery baskets may vary depending on your model).
Place items in the dishwasher as follows:
- Items such as cups, glasses, pots/pans, etc. must face down.
- Curved or hollow items should be placed at an angle to allow water to drain.
- All utensils are stacked securely and cannot tip over.
- All items are placed so that the spray arms can rotate freely during washing.
- Load hollow items such as cups, glasses, pans, etc. Place hollow items such as cups, glasses, pans etc. with the opening facing downwards so that water cannot collect in the container or on a deep base.
- Dishes and cutlery should not be stacked or overlapping. Glasses should not touch each other to avoid damage.
- The upper basket is designed to hold more delicate and lighter crockery such as glasses, coffee and tea cups.
- Long knives stored upright are a potential hazard!
- Long and/or sharp cutlery, such as carving knives, must be placed horizontally in the top basket.
- Do not overload your dishwasher. This is important for good results and reasonable energy consumption.
Note: Very small items should not be washed in the dishwasher as they can easily fall out of the basket.
Removing the dishes
To prevent water dripping from the upper basket into the lower basket, we recommend that you empty the lower basket first, followed by the upper basket.
CAUTION
Risk of burns as items will be hot! To prevent damage, do not remove glasses and cutlery from the dishwasher for about 15 minutes after the programme has finished.
Loading the upper basket
The upper basket is designed to hold more delicate and lighter dishware such as glasses, coffee and tea cups and saucers, as well as plates, small bowls and shallow pans (as long as they are not too dirty). Position the dishes and cookware so that they will not get moved by the spray of water.
natural_image
Technical line drawing of a mechanical component with rollers and housing (no text or symbols)Loading the lower basket
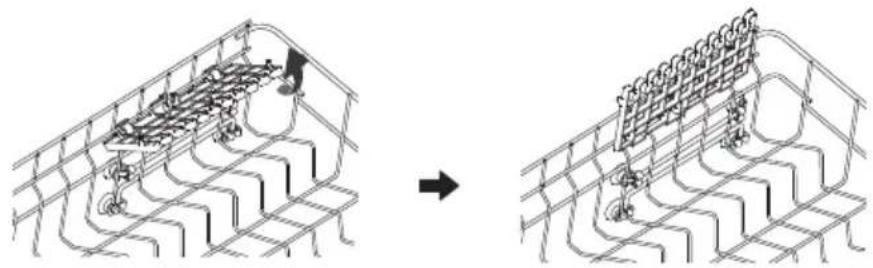
We recommend that you place large and difficult-to-clean items in the lower basket, such as pots, pans, lids, serving dishes and bowls, as shown in the illustration below. It is preferable to place serving dishes and lids on the side of the racks to avoid blocking the rotation of the upper spray arm.
The maximum diameter recommended for plates in front of the dispenser is 19 cm, so as not to obstruct the opening of the dispenser. To prevent damage, do not remove glasses and cutlery from the dishwasher for about 15 minutes after the programme has finished.

natural_image
Pure diagram of vertical slats arranged in a grid pattern with no text or symbolsLoading the 3rd rack placement
The cutlery should be placed separately in the 3rd rack in the appropriate positions. Avoid nesting of cutlery to prevent poor cleaning performance.
LOADING THE BASKETS (EN 60436)
3rd Rack placement
| A | Teaspoon |
| B | Soup spoon |
| C | Dessert spoon |
| D | Serving fork |
| E | Serving spoon |
| F | Knife |
| G | Fork |
| H | Gravy ladle |
Top crockery basket
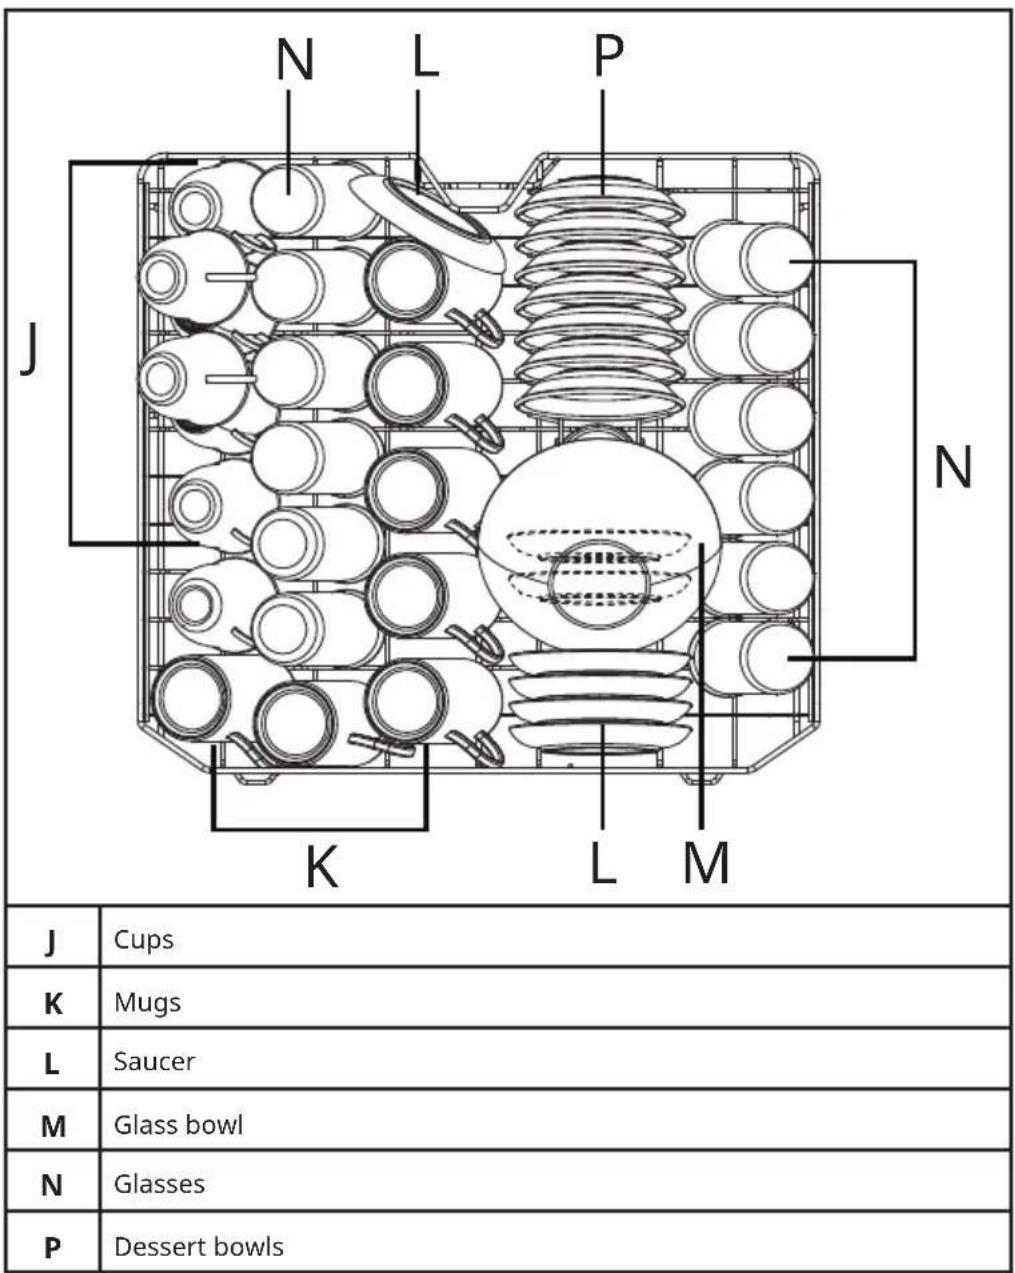
Cup holder
The cup holder and the space underneath it can be used to store small mugs and glasses, as well as larger tableware items such as cooking spatulas and serving spoons. When not in use, the cup holder can be folded away.
natural_image
Diagram showing a mechanical assembly before and after transformation, with no visible text or symbols.| Q | Soup plates |
| R | Dinner plates |
| S | Oval plates |
| T | Oven pot |
| U | Melamine bowl |
| V | Dessert plates |
| W | Glasses |
| X | Melamine dessert plates |
| Y | Small pot |
QUICK USER GUIDE
Please read the corresponding content in the instruction manual for the detailed operating method.
natural_image
Pure diagram of a water supply system with a pump and tubing, no text or symbols present1 Install the dishwasher (see section "Installation")
natural_image
Simple line drawing of a fish on a surface with a magnifying glass above it (no text or symbols)2 Remove larger residues from dishes and avoid pre-rinsing.
3 Load the baskets.
natural_image
Illustration of a hand inserting a plug into a device with a tray and screen (no text or symbols)4 Fill the dispenser with detergent and rinse aid.
natural_image
Simple line drawing of a refrigerator with sound waves (no text or symbols)5 Select a suitable program and start the dishwasher.
RINSING PROGRAMMES (EN 60436)
The table below shows which programmes are best for different levels of food residue and how much detergent is needed. The consumption values and programme times are for guidance only, except for the ECO programme.
| Main program Program description | Consumption | Parameters | |||
| Dishwasher Powder (g) (Prewash/ wash only) | Dish-washer Block | Water Consumption (L)) | Maximum temperature (°C) | ||
| Eco | Mildly dry or oily and viscous food residue, suitable for daily use tableware. | 0/22 1 9.6 | 48 | ||
| Intensive | Food residue with heavy oil stains or sticky dry stains, suitable for washable tableware. | 5/30 1 16 | 70 | ||
| Rapid | For food residue that is light, less oily, and not dry and for tableware that is cleaned immediately after meals. | 25 1 10 | 50 | ||
| Crystal | For light food residue that is not stubborn, and for the tableware that is not sensitive to high temperature. | 30 1 9.5 | 55 | ||
| Pre-rinse | Pre-rinse the dry and viscous food residue before washing it with the appropriate program. | // 3.5 / | |||
| *Self-cleaning | The machine runs a cleaning program for the inner tub and pipelines to keep the appliance clean for long-term use. | 1 1 9.5 | 65 | ||
| Main program | Program description | Consumption | Parameters | ||
| Dishwasher Powder (g) (Prewash/wash only) | Dish-washer Block | Water Consumption (L)) | Maximum temperature (°C) | ||
| Upper half | For small amounts of food residue with moderate or viscous oil stains, using only the top and middle spray arms, it is for the scenario of small amount of tableware, which is washed once a meal. | 5/25 1 14.2 | 60 | ||
| Lower half | For small amounts of food residue with moderate or viscous oil stains, using only the top and lower spray arms, it is for the scenario of small amount of tableware, which is washed once a meal. | 5/25 1 14.2 | 60 | ||
1) Please select the program based on the degree of dirtiness and washing needs of the tableware.
(2) Actual use may result in differences in the washing effect due to variations in the environment, type of tableware and placement method.
(3) The program includes an auto door opening and drying function.
(4) Users can choose to turn the automatic door drying function on or off; the factory default is on. If you wish to disable this function during use, please follow the instructions.
Note: The ECO programme is suitable for cleaning normally soiled crockery, is the most efficient programme for this use in terms of combined energy and water consumption and is used to assess compliance with EU eco-design legislation.
Adding dishes later
You can add a forgotten dish at any time before the detergent dispenser opens. If this happens, follow the instructions below:
- Open the dishwasher door to pause the wash.
- When the spray arms have stopped working, you can open the door fully.
- Add the forgotten dishes.
- Close the door to restart the dishwasher.
flowchart
graph LR
    A["Container"] --> B["Brush"]
    B --> C["Printer"]
    C --> D["Printer"]
natural_image
Simple line drawing of a bucket with steam rising from top (no text or symbols)RISK OF INJURY!
It is dangerous to open the door during operation as you may be scalded by the hot steam.
Auto open
After washing, the door will open automatically to achieve a better drying effect.
natural_image
Simple line drawing of a bin with a recycling arrow (no text or symbols)Note: The dishwasher door must not be blocked when the automatic door opening is set, as this could disrupt the door lock functionality.
CLEANING AND CARE
External care
Door and door seal
Regularly clean the door seals with a soft damp cloth to remove food residue. When the dishwasher is loaded, food and drink residue may drip onto the sides of the dishwasher door. These surfaces are outside the washing chamber and are not reached by the water from the spray arms. Any deposits should be wiped off before closing the door.
Control panel
- If cleaning is required, the control panel should only be wiped with a soft damp cloth.
- To prevent water entering the door lock and electrical components, do not use any type of spray cleaner.
- Never use abrasive cleaners or scouring pads on the exterior surfaces as they may scratch the finish. Some paper towels may also scratch or leave marks on the surface.
Internal care
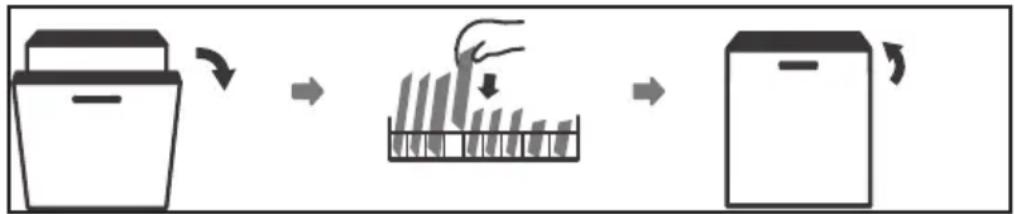
Filtering system
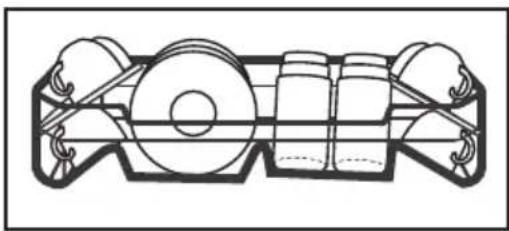
The filter prevents large foreign objects from entering the drainage pump in the washing water. These objects may otherwise block the filter screen. It is composed of three screens: a cylindrical one, a flat one and a micro one.
- After each wash, check the filter screens for residue.
- As shown in the diagram, unscrew the cylindrical filter screen and remove the entire filtering device.
- Remove any residue and thoroughly rinse the filter screen with water.
- Reinstall the filtering device in reverse order, aligning the arrow marks after closing.
Note: Pictures are only for reference, different models of the filtering system and spray arms may be different.
flowchart
graph LR
    A["Initial Component"] --> B["Internal Component"]
    B --> C["Final Assembly with Internal Component"]
    style A fill:#f9f,stroke:#333
    style B fill:#ccf,stroke:#333
    style C fill:#cfc,stroke:#333

WARNING
Do not over-tighten the filters. Replace the filters securely to prevent coarse debris from entering the system and causing a blockage. Never use the dishwasher without filters. Incorrect filter replacement can reduce the performance of the machine and damage dishes and utensils. Reassemble the filters in the reverse order of removal, replacing the filter element.
Spray arm cleaning
Dirt in the washing-up water can block the spray arms.
- Check that the spray arm nozzle is not blocked.
- Loosen the middle spray arm.
- Remove the lower spray arm facing upwards.
- Rinse the spray arms thoroughly with water.
- Reinstall the spray arm.

flowchart
graph LR
    A["Component Position"] --> B["Actuator"]
    B --> C["Reservoir"]
    C --> D["Valve Assembly"]
    D --> E["Final Assembly"]
TROUBLESHOOTING AND ERROR CODES
| Problem Potential cause Solution | ||
| The dishwasher does not start. | Fuse blown, or the circuit break tripped. | Replace fuse or reset circuit breaker.Remove any other appliances sharing the same circuit with the dishwasher. |
| Power supply is not turned on. | Make sure the dishwasher is turned on and the door is closed securely. Make sure the power cord is properly plugged into the wall socket. | |
| Water pressure is low. | Check that the water supply is connected properly and the water is turned on. | |
| Door of dishwasher not properly closed. | Make sure to close the door properly and latch it. | |
| No water is pumped out of the dishwasher. | Twisted or trapped drain hose. | Check the drain hose. |
| The filter is clogged. Check the filter system. | ||
| The drain is blocked. | Check the kitchen sink to make sure it drains well. If the problem is the sink not draining, you may need a plumber rather than a dishwasher service. | |
| Foam in the tub. | Wrong detergent. | Use only the special dishwasher detergent to avoid suds. If this happens, open the dishwasher and allow the suds to evaporate. Add 1 cup of cold water to the bottom of the dishwasher. Close the dishwasher door and select any cycle. The dishwasher will start by draining the water. When it has finished, open the door and check that the suds have disappeared. Repeat if necessary. Check that the sink is draining well. If the problem is the sink not draining, you may need a plumber rather than a dishwasher service. |
| Spilled rinse aid | Always wipe up rinse aid spills immediately. | |
| Stained tub interior | Detergent containing colouring agents may have been used. | Check that the detergent does not contain colouring agents. |
| White film on inside surface | Hard water minerals. | To clean the interior, use a damp soft cloth with dishwasher detergent and wear rubber gloves. Never use anything other than dishwasher detergent as this may cause foam or suds to form. |
| Rust stains on cutlery | The affected items are not corrosion resistant. | Avoid washing non-corrosive items in the dishwasher. |
| A program has not been run after dishwasher salt has been added. Traces of salt have entered the wash cycle. | Always run a program without dishes after adding salt. Do not select the Turbo function (if available) after adding dishwasher salt. | |
| The lid of the softener is loose. | Make sure the softener lid is secure. | |
| Knocking noise in the dishwasher | A spray arm hits an item in a basket. | Interrupt the program and rearrange the items which are obstructing the spray arm. |
| Rattling noise in the dishwasher | Items are loose in the dishwasher. | Interrupt the program and rearrange the items of crockery. |
| Knocking noise in the water pipes | This can be caused by on-site installation or pipe diameter. | This will not affect the performance of the dishwasher. If in doubt, contact a qualified installer. |
| The dishes are not clean | The dishes are not loaded properly. | Refer to the "Load the dishwasher correctly" section. |
| The program was not powerful enough. | Select a more intensive program. | |
| Not enough detergent was dispensed. | Use more detergent, or change your detergent. | |
| Items are blocking the movement of the spray arms. | Rearrange the items so that the spray can rotate freely. | |
| The filter assembly is not clean or is not properly seated in the cabinet base. | This may cause the spray arm jets to clog. | |
| Cloudiness on glassware | Combination of soft water and too much detergent. | If you have soft water, use less detergent and select a shorter cycle to wash the glassware and get it clean. |
| White spots appear on dishes and glasses. | Hard water area can cause scale deposits. Combination of soft water and too much detergent. | If you have soft water, use less detergent and select a shorter cycle to wash and clean the glassware. |
| Black or grey marks on dishes | Aluminum utensils have rubbed against dishes. | Use a mild abrasive cleaner to remove these marks. |
| Detergent left in dispenser | Dishes block detergent dispenser. | Re-Load the dishes properly. |
| The dishes aren't drying | Improper loading. | Wear gloves when there is detergent residue on dishes to avoid skin irritation. |
| Dishes are removed too soon. | Do not empty the dishwasher immediately after washing. Open the door slightly to allow steam to escape. Remove dishes when the interior temperature is safe to touch. Empty the lower basket first to prevent water from falling from the upper basket. | |
| Wrong program has been selected. | With a short program, the washing temperature is lower, decreasing the cleaning performance. Choose a program with a long washing time. | |
| Use of cutlery with a low-quality coating. | These items are more difficult to drain. Cutlery or dishes of this type should not be washed in a dishwasher. | |
Note: Self-repair or repair by an unqualified repair person may pose a serious risk to the safety of the user of the equipment and may invalidate the warranty.

WARNING
If overflow occurs, turn off the main water supply before calling the service-center. If there is water in the base pan because of an overfill or small leak, the water should be removed before restarting the dishwasher.
Error Codes
If there is a malfunction the dishwasher will display an error code. The following table shows possible error codes and their causes.
Note: If there is an error code that cannot be solved, please request professional assistance.
| Error code | Meaning Possible causes Solutions | ||
| E01 | Water Inlet Fault:The machine displays the “E01” fault code and starts flashing. The buzzer sounds a fault warning tone. | The water pressure is too low or the faucet is not turned on. | Ensure that the water tap is turned on.Check that the water supply pressure is greater than 0.04 MPa.Ensure that the water inlet hose is not bent.Please contact a professional maintenance engineer for repairs. |
| E02 | Temperature sensor fault:The machine displays the “E02” fault code and flashes. The buzzer sounds a fault warning tone. | Temperature sensor short circuit. | Please contact a professional maintenance engineer for repairs. |
| E03 | Heating circuit fault:The machine displays the “E03” fault code and flashes. The buzzer sounds a fault warning tone. | Heating circuit error. | Please contact a professional maintenance engineer for repairs. |
| E04 | The machine displays the “E04” fault code and flashes. The buzzer sounds a fault warning tone. | Abnormal connection between the main board and the display board. | Please contact a professional maintenance engineer for repairs. |
| E05 | Flow error:The machine displays the “E05” fault code and flashes. The buzzer sounds a fault warning tone. | Water leackage. Turn off the | water and electricity supplies, clear the drainage hose and avoid bending or cracking it.Please ensure that the machine is installed on a flat surface.Please contact a professional maintenance engineer for repairs. |
| Error code | Meaning Possible causes Solutions | ||
| E06 | Shunt valve fault: The machine displays the “E06” fault code and flashes. The buzzer sounds a fault warning tone. | Abnormal motor operation of the water distribution vave. | Please contact a professional maintenance engineer for repairs. |
| E07 | Inlet valve fault: The machine displays the “E07” fault code and flashes. The buzzer sounds a fault warning tone. | Abnormality of the inlet solenoid valve. | Please contact a professional maintenance engineer for repairs. |
| E08 | Turbidity sensor fault: The machine displays the “E08” fault code and flashes. The buzzer sounds a fault warning tone. | The turbidity sensor detects an abnormality. | Please contact a professional maintenance engineer for repairs. |
| E09 | Washing motor fault: The machine displays the “E09” fault code and flashes. The buzzer sounds a fault warning tone. | The washing motor detects an abnormality. | Please contact a professional maintenance engineer for repairs. |
| E10 | Inlet fan fault: The machine displays the “E10” fault code and flashes. The buzzer sounds a fault warning tone. | The inlet fan detects an abnormality. | Please contact a professional maintenance engineer for repairs. |
| E11 | Exhaust fan fault: The machine displays the “E11” fault code and flashes. The buzzer sounds a fault warning tone. | The exhaust fan detects an abnormality. | Please contact a professional maintenance engineer for repairs. |
 | Salt deficiency reminder | The amount of softening salt added to the dispenser is too low. | Add softening salt. |
 | Rinse aif deficiency reminder | The amount of the rinse aid is too low. | Add rinse aid. |
| Error code | Meaning Possible causes Solutions | ||
 | Water inlet fault reminder | The water pressure is too low or the faucet is not turned on. | Ensure that the water tap is turned on.Check that the water supply pressure is greater than 0.04 MPa.Ensure that the water inlet hose is not bent.Please contact a professional maintenance engineer for repairs. |
PRODUCT DATA SHEETS (EN60436)
| Product Information SheetCOMMISSION DELEGATED REGULATION (EU) 2019/2017 with regard to energy labelling of household dishwashers | |||
| Supplier's name or trade mark: Klarstein | |||
| Supplier's address: Customer service, Mühlenstraße 25, 10243 Berlin, DE | |||
| Model identifier: 10048268 | |||
| General product parameters: | |||
| Parameter Value Parameter Value | |||
| Rated capacity(a)(ps) | 14 Dimensions in cm | Height 82 | |
| Width 60 | |||
| Depth 55 | |||
| EEI(a) | 37,9 Energy efficiency class(a) | B | |
| Cleaning performance index(a) | 1,130 Drying performance index(a) | 1,070 | |
| Energy consumption in kWh [per cycle], based on the eco programme using cold water fill. Actual energy consumption will depend on how the appliance is used. | 0,645 Water consumption in litres [per cycle], based on the eco programme. Actual water consumption will depend on how the appliance is used and on the hardness of the water. | 9,6 | |
| Programme duration(a)(h:min) | 3:55 Type | Built-in | |
| Airborne acoustical noise emissions(a)(dB(A) re 1 pW) | 42 Airborne acoustical noise emission class(a) | B | |
| Off-mode (W) (if applicable) | 0,49 Standby mode (W) (if applicable) | 0,49 | |
| Delay start (W) (if applicable) | 3,99 Networked standby (W) (if applicable) | - | |
| Minimum duration of the guarantee offered by the supplier: 24 months | |||
| Additional information: | |||
| Weblink to the supplier's website, where the information in point 6 of Annex II to Commission Regulation (EU) 2019/2022 is found: https://use.berlin/10048268 | |||
(a) for the eco programme.
Model placed on the Union market from 01/12/2025.

EPREL registration number: 2504930
https://eprel.ec.europa.eu/qr/2504930
Supplier: Chal -Tec GmbH (Authorised representative)
Website:
Customer care service:
Name: Customer service
Website: https://www.elektronik-star.de/Info/Impressum/
Email: info@electronic-star.de
Phone: +49303001385500
Address:
Mühlenstraße 25
10243 Berlin
Germany
DISPOSAL CONSIDERATIONS

natural_image
Symbol of a trash bin with crossed lines and a horizontal bar below (no text or labels)If there is a legal regulation for the disposal of electrical and electronic devices in your country, this symbol on the product or on the packaging indicates that this product must not be disposed of with household waste. Instead, it must be taken to a collection point for the recycling of electrical and electronic equipment. By disposing of it in accordance with the rules, you are protecting the environment and the health of your fellow human beings from negative consequences. For information about the recycling and disposal of this product, please contact your local authority or your household waste disposal service.
MANUFACTURER & IMPORTER (UK)
Chal-Tec GmbH, Mühlenstraße 25, 10243 Berlin, Germany.
Contact: info@electronic-star.de
Estimado cliente:
ÍNDICE
Alinear la máquina
natural_image
Diagram showing a person using a tool to observe a mechanical component, with an inset close-up of the tool (no text or symbols present)Manguera de entrada normal

Método 2:
flowchart
graph LR
    A["Receipts with items"] --> B["Packaging with a lamp"]
    B --> C["Shipping with a megaphone"]
    C --> D["Product with a bag and fan icon"]
flowchart
graph LR
    A["Device with monitor, keyboard, fan"] --> B["Insert key"]
    B --> C["Close-up of keyboard"]
    C --> D["Reassembly with hand cursor"]
    D --> E["Device with monitor, keyboard, fan"]
    E --> F["Insert lock button"]
Ablandador de agua
natural_image
Technical line drawing of a mechanical component with rollers and housing (no text or symbols)natural_image
Pure diagram of vertical panels arranged in a grid pattern with no text or symbolsnatural_image
Diagram showing a mechanical assembly before and after transformation, with no visible text or symbols.natural_image
Pure technical diagram of a mechanical or electrical component with no text, numbers, or symbolsnatural_image
Simple line drawing of a fish and a bowl on a table, no text or symbols presentnatural_image
Illustration of a hand inserting a plug into a device with a screen and plug, showing internal components (no text or symbols)natural_image
Simple line drawing of a refrigerator with sound waves (no text or symbols)natural_image
Simple line drawing of a trash bin with smokestacks (no text or symbols)natural_image
Simple line drawing of a container with a downward arrow indicating rotation (no text or symbols)flowchart
graph LR
    A["Initial Component"] --> B["Reactor with Internal Motor"]
    B --> C["Intermediate Component"]
    C --> D["Final Motor or Pump"]
ADVERTENCIA
natural_image
Symbol of a trash bin with crossed lines indicating no waste, and a solid rectangle below (no text or labels)SOMMAIRE
Boutons de commande
RACCORDEMENT DU TUYAU D'ARRIVÉE D'EAU
Méthode 2 :
flowchart
graph LR
    A["Hand Placement with Hand"] --> B["Disinfection with Hand"]
    B --> C["Disinfection with Infection"]
Inspection finale
DIMENSIONS ET INSTALLATION
Dimensions :
flowchart
graph LR
    A["Outdoor Storage with Waste"] --> B["Recyclable Collection"]
    B --> C["Recyclable Disposal with Dust Removal"]
    C --> D["Recyclable Washing with Dish and Washer"]
    D --> E["Recyclable Sewer with Air Bag and Plastic Bottle"]
Adoucisseur d'eau
natural_image
Cross-sectional diagram of a mechanical assembly with rollers and housing (no text or labels)natural_image
Pure diagram of a vertical structure with diagonal panels, no text or symbols presentnatural_image
Diagram showing a structural change before and after transformation, with no visible text or symbolsnatural_image
Pure technical diagram of a piping system with a cabinet and valve (no text or symbols)natural_image
Simple line drawing of a fish and a bowl on a table, no text or symbols presentnatural_image
Illustration of a hand inserting a plug into a device with cleaning steps (no text or symbols)natural_image
Simple line drawing of a refrigerator with sound waves (no text or symbols)natural_image
Simple line drawing of a bucket with a lid and two small items on top (no text or symbols)RISQUE DE BLESSURE !
natural_image
Simple line drawing of a container with a downward arrow indicating rotation (no text or symbols)flowchart
graph LR
    A["Initial Component"] --> B["Reactor with Internal Motor"]
    B --> C["Intermediate Component"]
    C --> D["Final Motor or Pump"]
MISE
EN
GARDE
flowchart
graph LR
    A["Valve with valve"] --> B["Actuator"]
    B --> C["Valve with valve"]
    C --> D["Close-up of bolt"]
    D --> E["Valve with bolt"]
Nom: Customer service
Site web: https://www.elektronik-s tar.de/Info/Impressum/
Courriel: info@electronic-star.de
Téléphone: +49303001385500
Adresse:
Mühlenstraße 25
10243 Berlin
Allemagne
INFORMATIONS SUR LE RECYCLAGE
natural_image
Symbol of a trash bin with crossed lines and a horizontal bar below (no text or labels)INDICE
Metodo 2:
flowchart
graph LR
    A["Hand Placement with Hand"] --> B["Disinfection with Hand"]
    B --> C["Disinfection with Infection"]
Ispezione finale
flowchart
graph LR
    A["Add Airfare to first box"] --> B["Add Airfare to second box"]
    B --> C["Add Airfare to third box"]
    C --> D["Add Airfare to fourth box"]
    style A fill:#f9f,stroke:#333
    style B fill:#f9f,stroke:#333
    style C fill:#f9f,stroke:#333
    style D fill:#f9f,stroke:#333
flowchart
graph LR
    A["Outdoor Storage with Waste"] --> B["Recyclable Air Filter"]
    B --> C["Recyclable Air Filter with Dust Removal"]
    C --> D["Recyclable Air Filter with Air Capture"]
    D --> E["Recyclable Air Filter with Air Discharge"]
Addolcitore d'acqua
natural_image
Technical line drawing of a mechanical component with rollers and housing (no text or symbols)natural_image
Pure diagram of vertical panels arranged in a grid pattern with no text or symbolsnatural_image
Diagram showing a structural change before and after transformation, with no visible text or symbolsnatural_image
Pure diagram of a water supply system with a pump and tubing, no text or symbols presentnatural_image
Simple line drawing of a fish and a bowl on a surface, no text or symbols presentnatural_image
Illustration of a hand inserting a plug into a device with a screen and antenna (no text or symbols)natural_image
Simple line drawing of a refrigerator with sound waves (no text or symbols)natural_image
Simple line drawing of a bucket with a lid and steam bubbles (no text or symbols)natural_image
Simple line drawing of a container with a downward arrow indicating rotation (no text or symbols)Nome: Customer service
Sito web: https://www.elektronik-s tar.de/Info/Impressum/
E-mail: info@electronic-star.de
natural_image
Symbol of a trash bin with crossed lines indicating no waste or discharge, and a solid black rectangle below (no text or labels)
- Lieber Kunde, liebe Kundin,
- INHALT
- Methode 2:
- Abschlusskontrolle
- Wasserenthärter
- Wasserhärte
- VERLETZUNGSGEFAHR!
- WARNUNG
- PRODUKTDATENBLATT (EN60436)
- Anschrift:
- CONTENTS
- SAFETY INSTRUCTIONS
- WARNING
- CAUTION
- Earthing instructions
- Precautions for use
- Installation
- Operation
- Maintenance
- APPLIANCE OVERVIEW
- Accessories
- CONTROL PANEL AND BUTTONS
- Operation button explanation
- Power button
- Program button
- Digital display
- WARNING: Electrical Shock Hazard!
- Electrical requirements
- Electrical connection
- Installation requirements
- Note:
- Installation steps
- Installing of the moisture-proof stickers
- Adjusting the balance of the machine
- CONNECTING THE WATER INLET HOSE
- CONNECTING THE DRAINAGE HOSE
- Method 1:
- Method 2:
- Connection of the power supply
- SECURING THE DISHWASHER
- Final inspection
- Test the dishwasher for proper operation:
- DIMENSIONS AND INSTALLATION
- Notes on installation
- DISHWASHER USAGE
- Rinse aid
- Effect of rinse aid
- Service conditions
- Rinse aid usage
- Steps for adding rinse aid
- Rinse aid setting
- Example:
- Dishwasher Detergent
- Function of dishwasher detergent
- Usage conditions and dosage
- Steps for adding dishwasher detergent
- Water Softener
- Steps for adding specific salt
- Water hardness
- Only add salt before running a cycle!
- Water softener gear setting
- Automatic door opening and closing
- LOADING THE DISHWASHER CORRECTLY
- For washing the following types of cutlery/crockery
- Are not suitable
- Limited suitability
- Recommendations for loading the dishwasher
- Place items in the dishwasher as follows:
- Removing the dishes
- Loading the upper basket
- Loading the lower basket
- Loading the 3rd rack placement
- LOADING THE BASKETS (EN 60436)
- Cup holder
- QUICK USER GUIDE
- RINSING PROGRAMMES (EN 60436)
- Adding dishes later
- RISK OF INJURY!
- Auto open
- CLEANING AND CARE
- External care
- Door and door seal
- Control panel
- Internal care
- Filtering system
- Spray arm cleaning
- TROUBLESHOOTING AND ERROR CODES
- Error Codes
- PRODUCT DATA SHEETS (EN60436)
- DISPOSAL CONSIDERATIONS
- MANUFACTURER & IMPORTER (UK)
- Estimado cliente:
- ÍNDICE
- Alinear la máquina
- Método 2:
- Ablandador de agua
- ADVERTENCIA
- SOMMAIRE
- RACCORDEMENT DU TUYAU D'ARRIVÉE D'EAU
- Méthode 2 :
- Inspection finale
- DIMENSIONS ET INSTALLATION
- Adoucisseur d'eau
- RISQUE DE BLESSURE !
- MISE
- EN
- GARDE
- Adresse:
- INFORMATIONS SUR LE RECYCLAGE
- INDICE
- Metodo 2:
- Ispezione finale
- Addolcitore d'acqua
Brand : Klarstein
Model : Luxara 60
Category : Dishwasher