
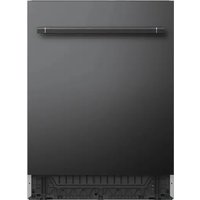
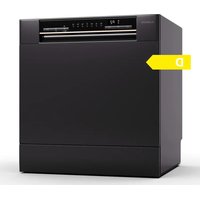
Havasia Flow 6 - Dishwasher Klarstein - Free user manual and instructions
Find the device manual for free Havasia Flow 6 Klarstein in PDF.

| Product type | Freestanding dishwasher |
| Brand | Klarstein |
| Model | Havasia Flow 6 |
| Capacity | 6 place settings |
| Dimensions (H × W × D) | 438 × 550 × 518 mm |
| Weight | Approx. 30 kg |
| Power supply | 220-240 V, 50 Hz |
| Energy consumption (eco cycle) | 0.613 kWh |
| Energy class | F |
| Water consumption (eco cycle) | 6.5 L |
| Noise level | 49 dB(A) |
| Wash programs | Intensive, Universal, Eco, Glass, Party, 90 min |
| Delayed start | Yes, up to 24 hours |
| Filtration system | Coarse particle filter and fine filter |
| Safety | Door lock, leak protection, automatic stop when opened |
| Tub material | Stainless steel |
| Display | LED screen |
| Adjustable water softener | Yes, 6 levels |
| Warranty | 24 months |
| Maintenance | Regular cleaning of filters and seals |
Frequently Asked Questions - Havasia Flow 6 Klarstein
User questions about Havasia Flow 6 Klarstein
0 question about this device. Answer the ones you know or ask your own.
Ask a new question about this device
Download the instructions for your Dishwasher in PDF format for free! Find your manual Havasia Flow 6 - Klarstein and take your electronic device back in hand. On this page are published all the documents necessary for the use of your device. Havasia Flow 6 by Klarstein.
USER MANUAL Havasia Flow 6 Klarstein
CLEANINGCI LEANINGLE ANINGLEAN NINGCLEAN NGCLEANINGCI CLEANINGLE LEANINGLE ANINGLEAN
KLARSTEIN
www.klarstein.com

bar
| Category | Value | |---|---| | Category 1 | 100 | | Category 2 | 100 | | Category 3 | 100 | | Category 4 | 100 | | Category 5 | 100 | | Category 6 | 100 | | Category 7 | 100 | | Category 8 | 100 | | Category 9 | 100 | | Category 10 | 100 | | Category 11 | 100 | | Category 12 | 100 | | Category 13 | 100 | | Category 14 | 100 | | Category 15 | 100 | | Category 16 | 100 | | Category 17 | 100 | | Category 18 | 100 | | Category 19 | 100 | | Category 20 | 100 | | Category 21 | 100 | | Category 22 | 100 | | Category 23 | 100 | | Category 24 | 100 | | Category 25 | 100 | | Category 26 | 100 | | Category 27 | 100 | | Category 28 | 100 | | Category 29 | 100 | | Category 30 | 100 | | Category 31 | 100 | | Category 32 | 100 | | Category 33 | 100 | | Category 34 | 100 | | Category 35 | 100 | | Category 36 | 100 | | Category 37 | 100 | | Category 38 | 100 | | Category 39 | 100 | | Category 40 | 100 | | Category 41 | 100 | | Category 42 | 100 | | Category 43 | 100 | | Category 44 | 100 | | Category 45 | 100 | | Category 46 | 100 | | Category 47 | 100 | | Category 48 | 100 | | Category 49 | 100 | | Category 50 | 100 | | Category 51 | 100 | | Category 52 | 100 | | Category 53 | 100 | | Category 54 | 100 | | Category 55 | 100 | | Category 56 | 100 | | Category 57 | 100 | | Category 58 | 100 | | Category 59 | 100 | | Category 60 | 100 | | Category 61 | 100 | | Category 62 | 100 | | Category 63 | 100 | | Category 64 | 100 | | Category 65 | 100 | | Category 66 | 100 | | Category 67 | 100 | | Category 68 | 100 | | Category 69 | 100 | | Category 70 | 100 | | Category 71 | 100 | | Category 72 | 100 | | Category 73 | 100 | | Category 74 | 100 | | Category 75 | 100 | | Category 76 | 100 | | Category 77 | 100 | | Category 78 | 100 | | Category 79 | 100 | | Category 80 | 100 | | Category 81 | 100 | | Category 82 | 100 | | Category 83 | 100 | | Category 84 | 100 | | Category 85 | 100 | | Category 86 | 100 | | Category 87 | 100 | | Category 88 | 100 | | Category 89 | 100 | | Category 90 | 100 | | Category 91 | 100 | | Category 92 | 100 | | Category 93 | 100 | | Category 94 | 100 | | Category 95 | 100 | | Category 96 | 100 | | Category 97 | 100 | | Category 98 | 100 | | Category 99 | 100 | | Total (Total) = [sum of bars] / [values] * (sum of bars + bars) * (sum of bars + bars) * (sum of bars + bars). The values in the table represent the sum of the bars and the corresponding sum of the bars. There is no additional data series or multiple categories. The values are estimated based on the provided code.INHALTSVERZEICHNIS
natural_image
Line drawing of a hand using a tool to adjust or install a water level (no text or symbols present)flowchart
graph LR
    A["Initial state: hands holding salt"] --> B["Salt with a container labeled 'SALT'"]
    B --> C["Extraction step: hand pouring salt into a container"]
    C --> D["Final state: hands holding salt"]
natural_image
Five black and white circular symbols arranged horizontally on a white background (no text or labels)natural_image
Symbol of a trash bin crossed with a diagonal line, no text or numbers presentBerlin Brands Group UK Limited
PO Box 42
272 Kensington High Street
London, W8 6ND
United Kingdom
Dear Customer,
Congratulations on purchasing this device. Please read the following instructions carefully and follow them to prevent possible damages. We assume no liability for damage caused by disregard of the instructions and improper use. Scan the QR code to get access to the latest user manual and more product information.

CONTENTS
Safety Instructions 36
Display and Key Functions 38
Installation 39
Installation 46
Before first Use 48
Loading the Dishwasher 53
Washing Programmes (EN 60436) 54
Commissioning and Operation 55
Cleaning and Care 57
Troubleshooting 59
Product Data Sheet 63
Disposal Considerations 64
Manufacturer & Importer (UK) 64
SAFETY INSTRUCTIONS
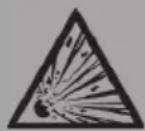
WARNING
Risk of explosion! Under certain conditions, Hydrogen gas may be produced in a hot-water system that has not been used for two weeks or more. HYDROGEN GAS IS EXPLOSIVE. If the hot-water system has not been used for such a period, before using the dishwasher turn on all hot-water faucets and let the water flow from each for several minutes. This will release any accumulated hydrogen gas. As the gas is fl ammable, do not smoke or use an open flame during this time.
- Do not abuse, sit on, or stand on the door or dish basket of the dishwasher.
- Do not touch the heating element during or immediately after use.
- Do not operate your dishwasher unless all enclosure panels are properly in place.
- Open the door very carefully if the dishwasher is operating. There is a risk of water squirting out.
- Do not place any heavy objects or stand on the door when it is open. The appliance could tip forward.
- When using your dishwasher, you should prevent plastic items from contacting with heating element.
- Check that the detergent receptacle is empty after completion of the wash cycle.
- Do not wash plastic items unless they are marked dishwasher safe or the equivalent.
- For plastic items not so marked, check the manufacturer's recommendations.
- Use only detergent and rinse additives designed for an automatic dishwasher.
- Never use soap, laundry detergent, or hand washing detergent in your dishwasher.
- Other means for disconnection from the supply must be incorporated in the fixed wiring with at least 3 mm contact separation in all poles.
- Keep children away from detergent and rinse aid, keep children away from the open door of the dishwasher, there could still be some detergent left inside.
- Young children should be supervised to ensure that they do not play with the appliance.
- This device may be only used by children 8 years old or older and persons with limited physical, sensory and mental capabilities and / or lack of experience and knowledge, provided that they have been instructed in use of the device by a responsible person who understands the associated risks.
-
Dishwasher detergents are strongly alkaline. They can be extremely dangerous if swallowed. Avoid contact with skin and eyes, and keep children away from the dishwasher when the door is open.
-
The door should not be left in the open position since this could present a tripping hazard.
- If the supply cord is damaged, it must be replaced by the manufacturer or its service agent or a similarly qualified person in order to avoid a hazard.
- Please dispose of packing materials properly.
- During installation, the power supply must not be excessively or dangerously bent or flattened.
- Do not tamper with controls.
- The appliance is to be connected to the water mains using new hose sets, and the old hose-sets
- should not be reused.
- Make sure that the carpet must not obstruct the openings at the bottom base.
- Use the dishwasher only for its intended function.
- The dishwasher is intended for indoor use only.
- The dishwasher is not designed for commercial use. It is intended for use in domestic households and in similar working and residential environments.

CAUTION
Risk of injury! Locate sharp items so that they are not likely to damage the door seal. Load sharp knives with the handles up to reduce the risk of cut-type injuries. Warning: Knives and other utensils with sharp points must be loaded in the basket with their points down or placed in a horizontal position.

WARNING
Risk of suffocation! Packaging material could be dangerous for children! For disposing of package and the appliance please go to a recycling centre. Cut off the power supply cable and make the door closing device unusable.
DISPLAY AND KEY FUNCTIONS
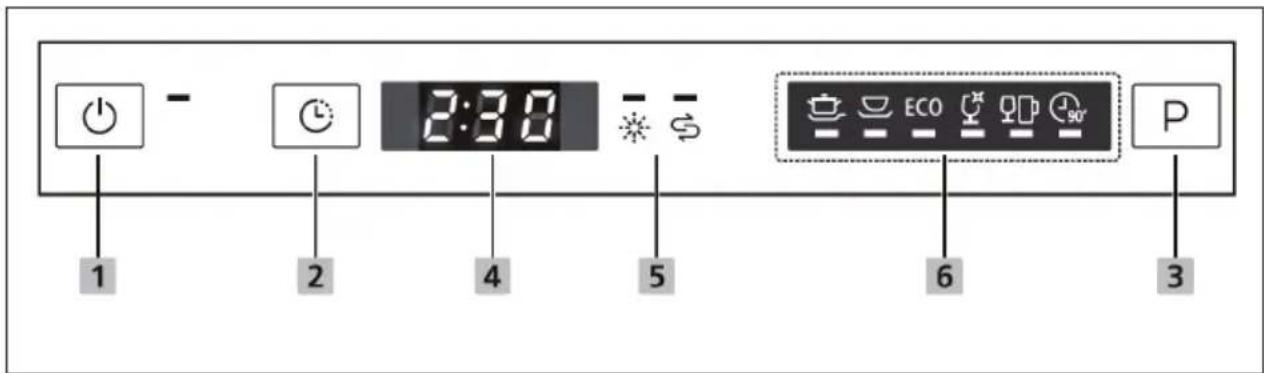
| 1 | On/Off Press this | key to switch on your dishwasher. | |
| 2 | Delay | Press the delay key to increase the start delay time. Delay the start of the dishwasher for up to 24 hours in 1-hour increments. Once you have set the Start Delay time, close the door. | |
| 3 | Programme | Press this key to select the appropriate wash programme. The display for the selected programme lights up. | |
| 4 | Display | Displays the remaining time, delay time, error codes and other information. | |
| 5 | Warning light | [SY3H] | Rinse aid: when the relevant symbol appears on the screen, it means that the rinse aid is almost empty and needs to be topped up. |
 | Rinsing salt: if the relevant symbol appears on the screen, it means that the rinse aid needs to be topped up. | ||
| 6 | Programmes |  | Intensive: For heavily soiled pots and pans as well as for dishes with dried food leftovers. |
 | Universal: For normally soiled loads such as pots, plates, glasses and slightly soiled pans. | ||
 | Eco: Standard programme for crockery with a normal degree of soiling. Environmentally friendly programme, as it is very energy and water saving. | ||
| [HAB3] | Glass: For light soiling and glasses. | ||
| [BC3D] | Party crockery: For freshly soiled coffee cups or glasses. | ||
 | 90 minutes: For dishes with a normal degree of soiling which should be cleaned quickly. | ||
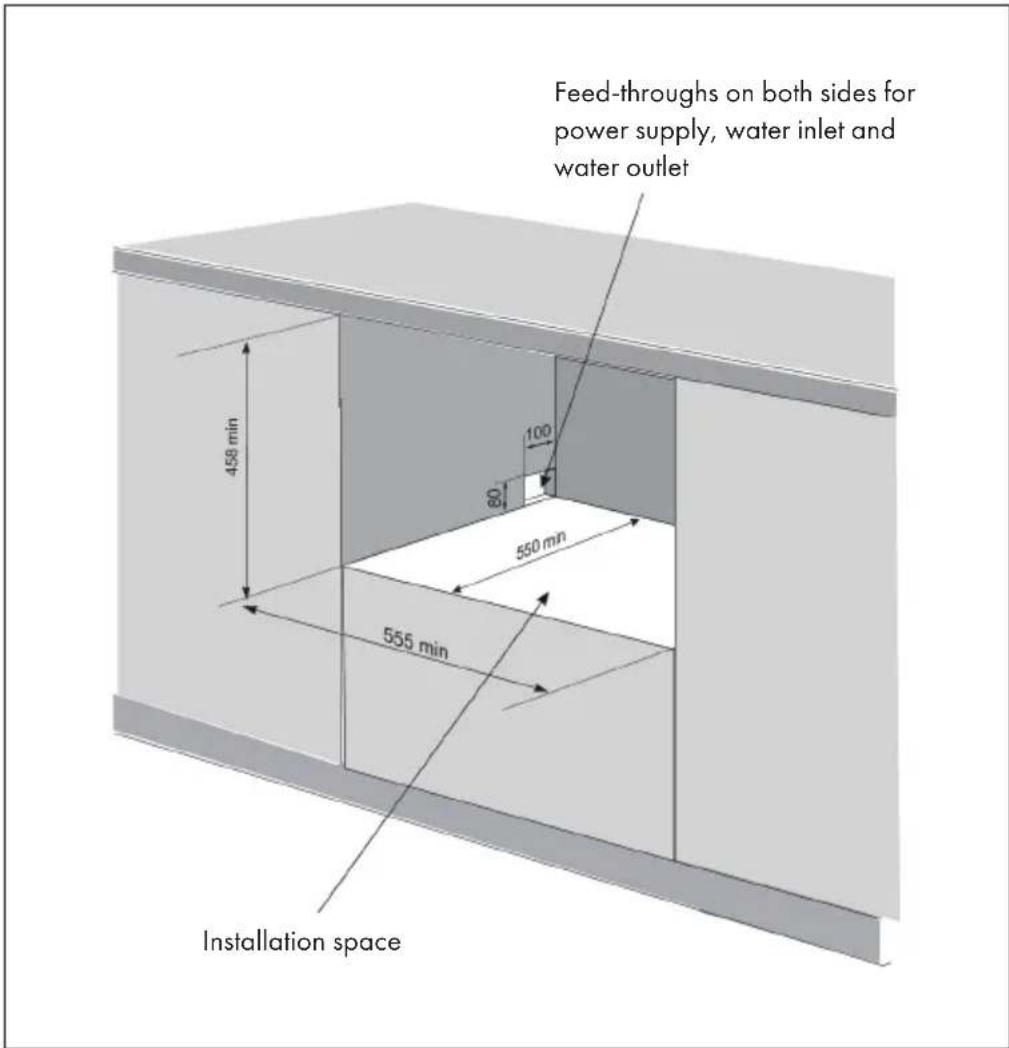
INSTALLATION
- The installation position of dishwasher should be near the existing inlet and drain hoses and power cord.
- One side of the cabinet sink should be chosen to facilitate the connection of drain hoses of the dishwasher.
Positioning the appliance
Position the appliance in the desired location. The back should rest against the wall behind it, and the sides, along the adjacent cabinets or wall. The dishwasher is equipped with water supply and drain hoses that can be positioned to the right or the left to facilitate proper installation.
Power connection
Ensure the voltage and frequency of the power being corresponds to those on the rating plate. Only insert the plug into an electrical socket which is earthed properly. If the electrical socket to which the appliance must be connected is not appropriate for the plug, replace the socket, rather than using a adaptors or the like as they could cause overheating and burns.
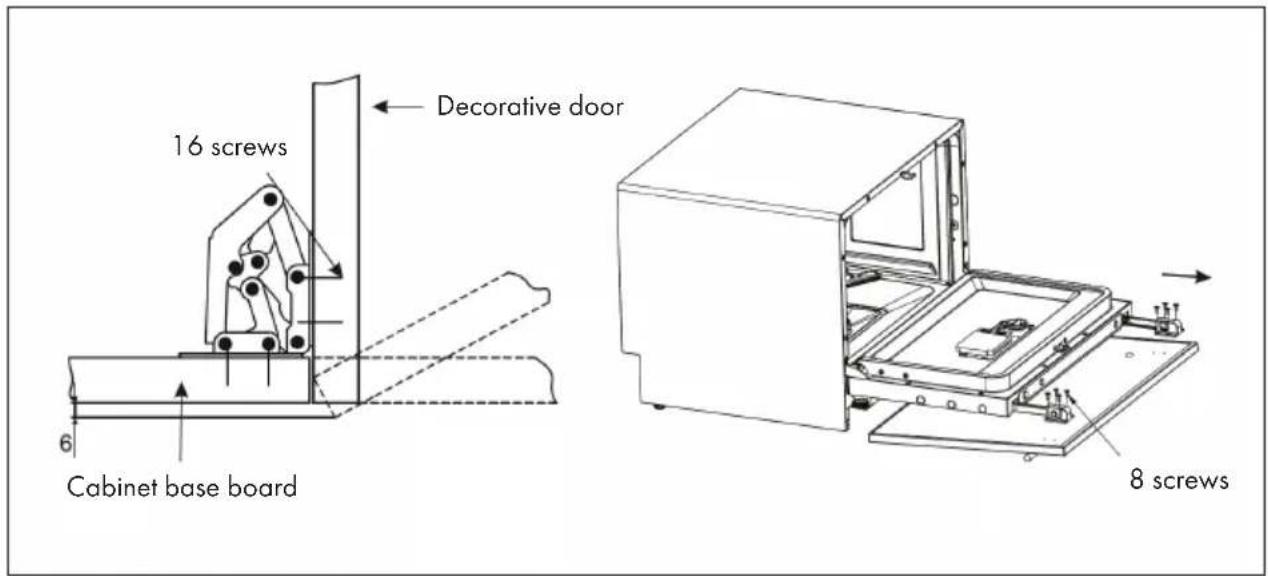
Installation without decorative door
Installation with decorative door
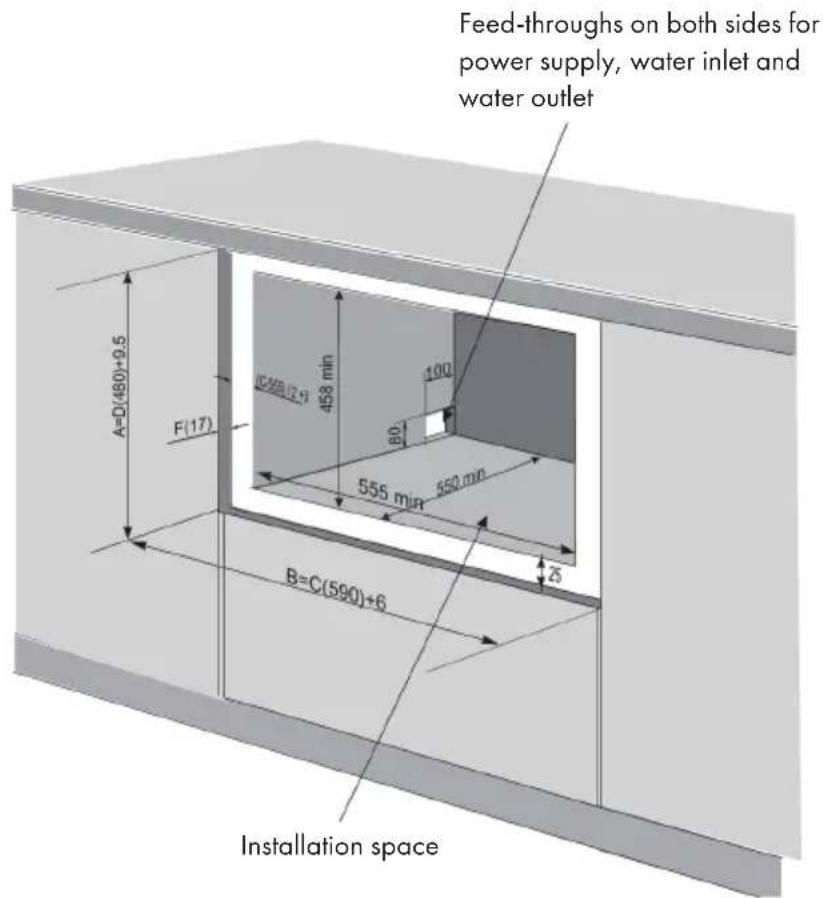
Decorative door
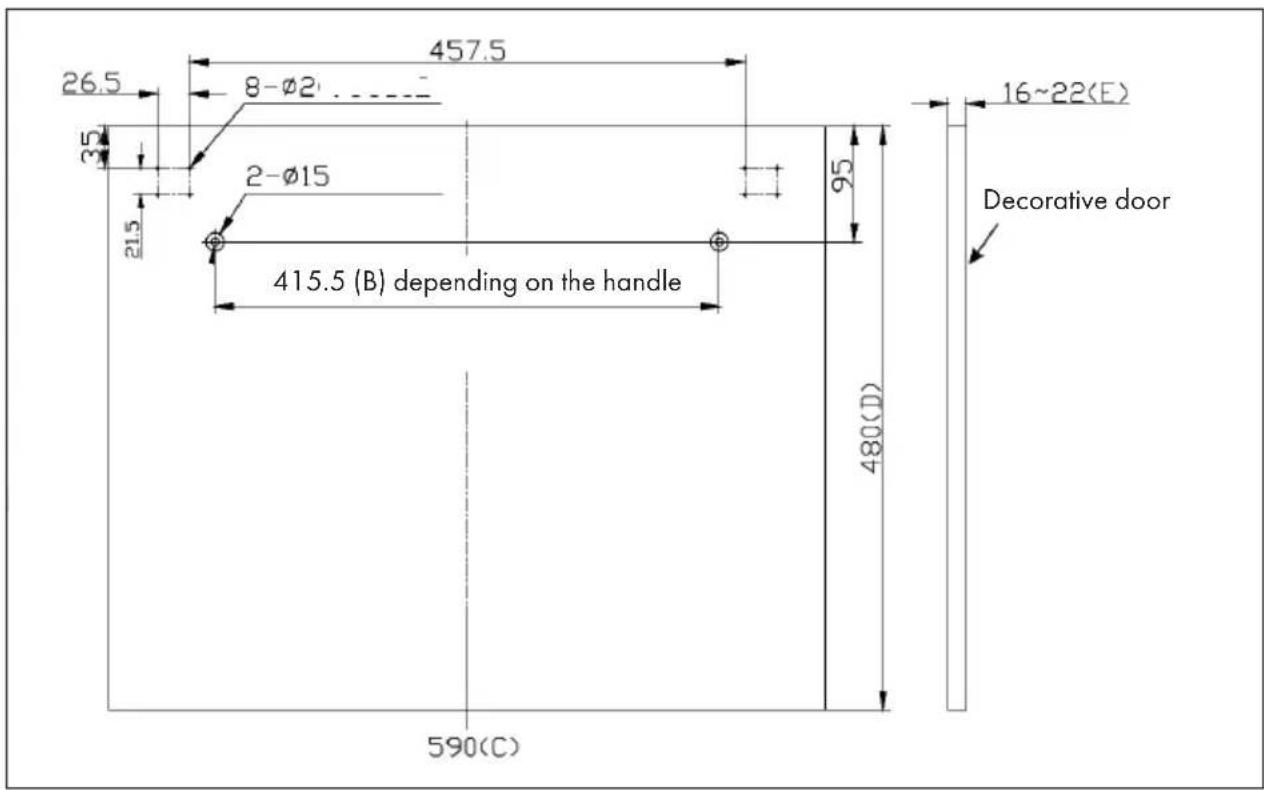
• The weight of the door panel should be at least 3 kg and at most 4 kg.
• Dimensions A and B depend on the handle.
- Dimensions C, D and E depend on the environment.
• The range for dimension E is 16-22 mm.
Attaching the decorative door (if necessary)
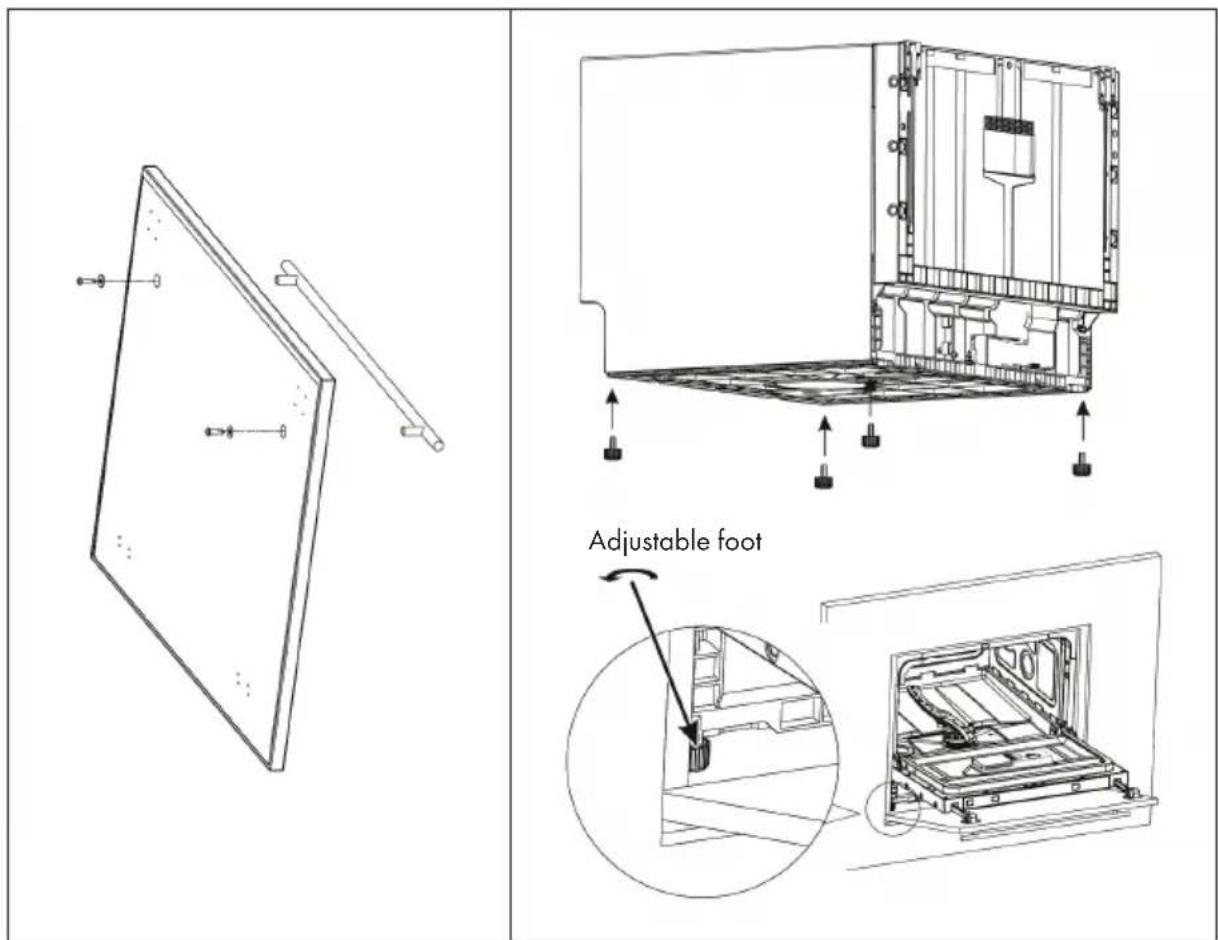
Place the dishwasher in the opening, but not completely. Align the feet with the support surface first, then place the appliance completely inside.
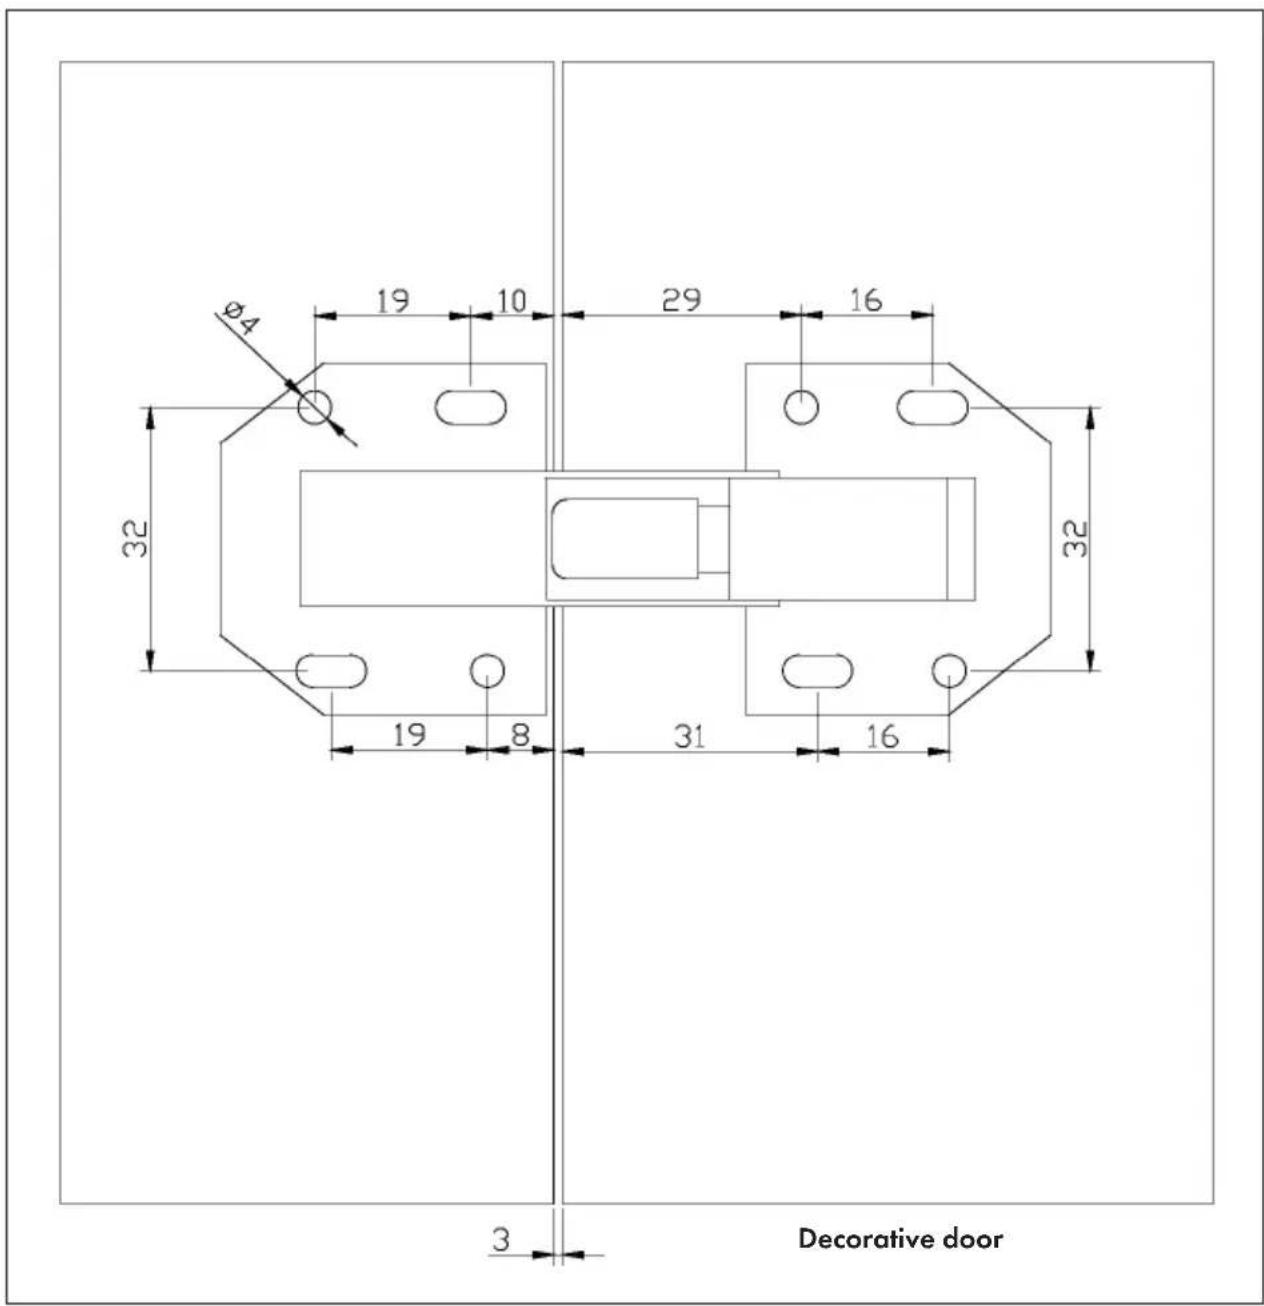
Proceed as in the picture below. First mount the hinges between the cabinet support and the door panel with a total of 16 screws.
INSTALLATION
Preparation
- The installation position of dishwasher should be near the existing inlet and drain hoses and power cord.
- One side of the cabinet sink should be chosen to facilitate the connection of drain hoses of the dishwasher.
Positioning the Appliance
Position the appliance in the desired location. The back should rest against the wall behind it, and the sides, along the adjacent cabinets or wall. The dishwasher is equipped with water supply and drain hoses that can be positioned to the right or the left to facilitate proper installation.
Power Connection
Ensure the voltage and frequency of the power being corresponds to those on the rating plate. Only insert the plug into an electrical socket which is earthed properly. If the electrical socket to which the appliance must be connected is not appropriate for the plug, replace the socket, rather than using a adaptors or the like as they could cause overheating and burns.
Water Supply Hose
The appliance must be connected to the water mains using new hose-sets. The old hose-sets should not be reused. Water pressure must be between 0,04 MPa and 1 MPa. If the pressure is below the minimum consult our Service Department for advice.
- Connection: Pull The safety supply hoses completely out from storage compartment located at rear of dishwasher. Turn water fully on before starting the dishwasher. Tighter the screws of the safety supply hose to the faucet with thread 34 inch.
- Disconnection: Turn off the water. Unscrew The safety supply 2 hose from the faucet.
natural_image
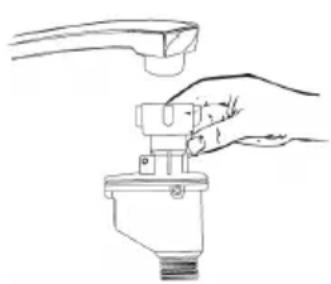
Line drawing of a hand using a tool to adjust or install a component (no text or symbols present)Note: Connect the cold water supply hose to a threaded 3/4(inch) connector and make sure that it is fastened tightly in place. If the water pipes are new or have not been used for an extended period of time, let the water run to make sure that the water is clear and free of impurities. If this precaution is not taken, there is a risk that the water inlet can get blocked and damage the appliance.
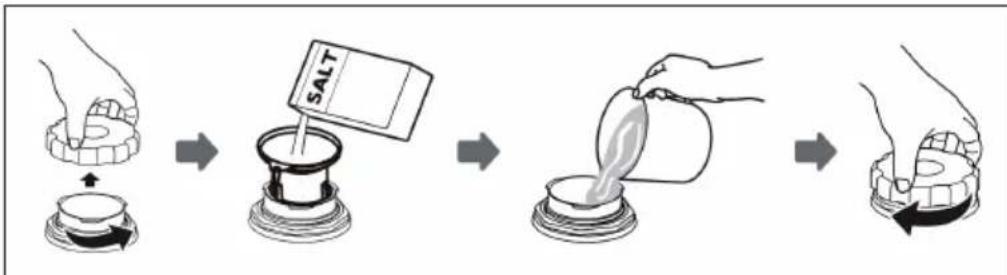
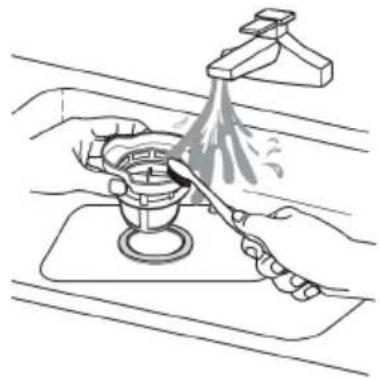
- If your model does not have a salt container, you can skip this section. Always use salt suitable for dishwashers. The salt container is located underneath the lower dish compartment and should be filled as follows:
- Only use salt that is explicitly suitable for use in dishwashers. Any other type of salt, especially table salt, will damage the container. Damage caused by the use of inappropriate salt is not covered by the manufacturer's warranty.
- Fill the appliance into the container only before starting the dishwasher. This prevents salt or salt water, which may have been spilled, from remaining on the bottom of the dishwasher for a longer period of time and causing wear and tear.
Filling the rinsing salt container
flowchart
graph LR
    A["Hand holding salt"] --> B["Salt with salt"]
    B --> C["Add salt"]
    C --> D["Add liquid"]
    D --> E["Add container"]
- Remove the basket and unscrew the reservoir cap.
- Place the end of the funnel (supplied) into the hole and pour in about 1kg of dishwasher salt.
- Before first wash, fill the salt container to its maximum limit with water, It is normal for a small amount of water to come out of the salt container.
- After filling the container, screw back the cap tightly.
- The salt warning light will stop being after the salt container has been filled with salt.
- Immediately after filling the salt into the salt container, a washing program should be started (We suggest to use a short program). Otherwise the filter system, pump or other important parts of the machine may be damaged by salty water. This is out of warranty.
Important notes
- The salt container must only be refilled when the salt warning light in the control panel comes on. Depending on how well the salt dissolves, the salt warning light may still be on even though the salt container is filled.
- If there is no salt warning light in the control panel (for some Models), you can estimate when to fill the salt into the softener by the cycles that the dishwasher has run. If salt has spilled, run a soak or quick program to remove it.
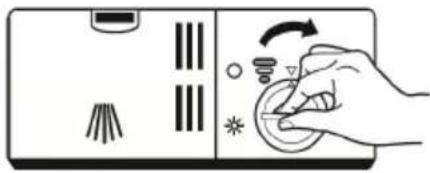
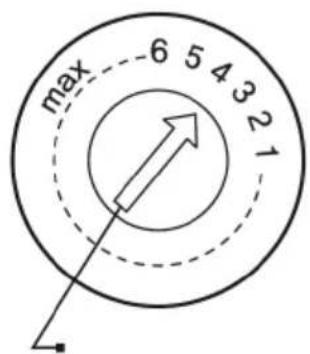
Adjusting the salt consumption
- Open the door, switch on the appliance;
- Within 60 seconds after the appliance was switched on press the Program button for more than 5 seconds to enter the water softener setting mode.
- Press the Program button again to select the proper set according to your local environment. The setting will change in the following sequence: H1>H2>H3>H4>H5>H6.
- Press the Power button to end the setting mode.
| Water hardness level | Setting on the water softener | Digital Display stalls | |
| ^^1 | mmol/ l^2 | ||
| 0-5 0-0.9 | 1 H1 | ||
| 6-11 1.0-2.0 2 H2 | |||
| 12-17 2.1-3.0 3 H3 | |||
| 18-22 | 3.1-4.0 | 4* | H4 |
| 23-34 | 4.1-6.1 5 H5 | ||
| 35-45 | 6.2-8.0 6 H6 | ||
^1 German degree of measurement for the water hardness
^2 International unit for water hardness
* Factory setting
Note: Without any operation in five seconds, the machine will exit from set mode, the machine is into standby status.
Rinse aid
During the final rinse of the dishes, the rinse aid ensures that no drops form on the dishes which could leave stains and streaks. The drying process is also improved as water droplets can roll off the dishes. This dishwasher is designed to use liquid rinse aid.
Only use rinse aid that is specially designed for dishwashers. Never fill the dispenser compartment with other substances (such as dishwasher detergent, etc.) as this would damage the appliance.
Topping up the rinse aid
Regardless of the warning light on the control panel, the level of the rinse aid can be judged by the colour of the optical level indicator next to the cap. The darker the cap, the fuller the rinse aid compartment. The colour of the dark spot decreases with increasing use of the rinse aid. The rinse aid compartment should always be at least 14 full. The colour change is as follows:

natural_image
Five black and white circular symbols arranged horizontally (no text or labels)Filling the rinse aid reservoir
| 1 | 2 |
 |  |
| Remove the rinse aid reservoir cap by rotating it counterclockwise. | Carefully pour in the rinse-aid into its dispenser, whilst avoiding it to overflow. |
| 3 | |
 | Close the rinse aid reservoir cap by rotating it clockwise.Note: Clean up any spilled rinse aid with an absorbent cloth to avoid excessive foaming during the next wash. |
Adjusting the rinse aid reservoir
Turn the rinse aid indicator dial to a number between 1 and 4. The higher the number, the more rinse aid the dishwasher uses. If the dishes are not drying properly or are spotted, adjust the dial to the next higher number until your dishes are spot-free. Reduce it if there are sticky whitish stains on your dishes or a bluish film on glassware or knife blades.
Filling the detergent dispenser
| 1 | 2 |
 | 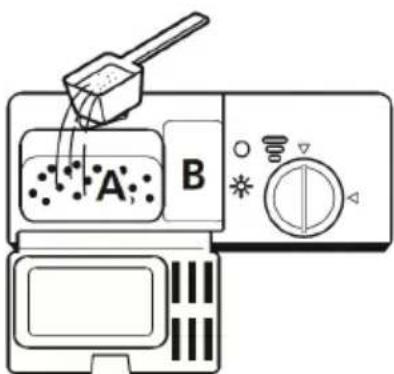 |
| Press the release catch on the detergent dispenser to open the cover. | Add detergent into the larger cavity (A) for the main wash cycle. For more heavily soiled wash loads, also add some detergent into the smaller cavity (B) for the pre-wash cycle. |
| 3 | |
 | Close the cover and press on it until it locks into place.Note: Be aware that depending on the soiling of water, setting may be different. Please observe the manufacturer's recommendations on the detergent packaging. |
LOADING THE DISHWASHER
- Consider buying utensils which are identified as dishwasher-proof.
• Use a mild detergent. - For particular items, select a programme with as low a temperature.
- To prevent damage, do not take glass and cutlery out of the dishwasher immediately after the programme has ended.
Unsuitable Cutlery and Dished
| Are not suitable Are of limited suitability | |
| Cutlery with wooden, horn china or mother-of- pearl handlesPlastic items that are not heat resistantOlder cutlery with glued parts that is not temperature resistantBonded cutlery items or dishesPewter or copper itemsCrystal glassSteel items subject to rustingWooden plattersItems made from synthetic fibres | Some types of glasses can become dull after a large number of washesSilver and aluminium parts have a tendency to discolour during washingGlazed patterns may fade if machine washed |
Hints on Loading the Dishwasher
Scrape off any large amounts of leftover food. Soften remnants of burnt food in pans It is not necessary to rinse the dishes under running water. Place objects in the dishwasher in following way:
- Items such as cups, glasses, pots/pans, etc. are face down.
- Curved items, or those with recesses, should be loaded at a slant so that water can run off.
- All utensils are stacked securely and can not tip over.
- All utensils are placed in the way that the spray arms can rotated freely during washing.
- Dishes and items of cutlery must not lie inside one another, or cover each other.
• To avoid damage to glasses, they must not touch. - Load large items which are most difficult to clean into the basket.
- Long and/or sharp items of cutlery such as carving knives must be positioned horizontally in the basket.
- Do not overload your dishwasher. This is important for good results and for
- Reasonable energy consume.
WASHING PROGRAMMES (EN 60436)
| Program Description Rinsing cycle | Detergent Pre/Main | Time (min) | Energy (kWh) | Water (L) | ||
 Intensive Intensive | For heavily soiled items such as pots, pans and dishes with dried food leftovers. | Prewash (50°C)Wash (70°C)RinseRinseRinse (70°C)Drying | 4/10 g 140 | 1.200 9.6 | ||
 Universal Universal | For insensitive, normally soiled everyday cro-ckery. | PrewashWash (60°C)RinseRinse (70°C)Drying | 4/10 g 120 | 1.050 7.7 | ||
| ECO(*EN 60436) | For normally soiled parts, such as pots, plates, glasses and slightly soiled pans. | PrewashWash (45°C)Rinse (65°C)Drying | 14 g 230 | 0.613 6.5 | ||
| Glass | For lightly soiled loads, such as glass and fine ceramics. | Wash (45°C)RinseRinse (60°C)Drying | 14 g 75 | 0.650 5.8 | ||
| Party | For slightly soiled crockery and glass. | Wash (45°C)RinseRinse | 12 g | 20 | 0.390 | 7.0 |
| 90 min. | For lightly soiled crockery and glass. | Wash (65°C)RinseRinseRinse (70°C)Drying | 14 g | 90 | 1.100 6.6 | |
| *EN 60436: The ECO program was used for the test run in accordance with EN 60436. | ||||||
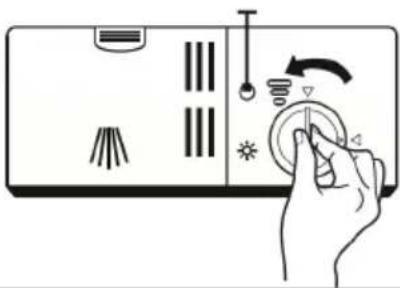
COMMISSIONING AND OPERATION
Starting the washing process
- Draw out the lower and upper basket, load the dishes and push the basket back. It is commended to load the lower basket first, then the upper one.
- Pour in the detergent.
- Insert the plug into the socket.
- Make sure that the water supply is turned on to full pressure.
- Open the door, Press the Power button.
- Choose a program, the responding light will turn on. Then close the door, the dishwasher will start its cycle.
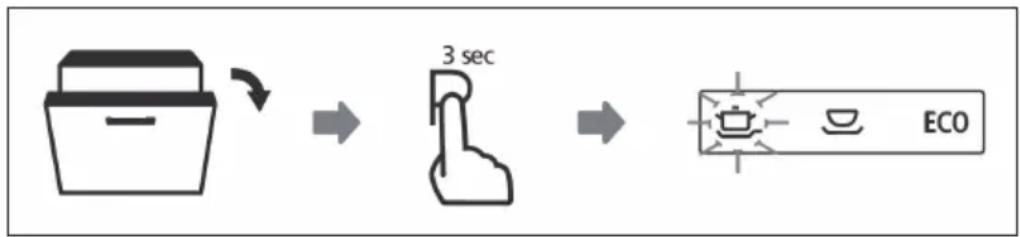
Changing the programme
A program can only be changed if the device has been running for a short time. Otherwise the dishwasher detergent may already have been released and the dishwasher may already be full of water. If this is the case, the appliance must be reset and the dispenser must be refilled with dishwashing detergent. Proceed as follows to reset the dishwasher:
- Open the door a little to stop the dishwasher. After the spray arm stopped working, you can open the door completely.
- Press Program button more than three seconds the machine will be in program selection mode.
- You can change the program to the desired cycle setting.
flowchart
graph LR
    A["Container"] -->|3 sec| B["Hand"]
    B --> C["ECO"]
Adding forgotten dishes
Forgotten dishes can be placed in the dishwasher before the dishwasher dispenser compartment opens. If this is the case, follow these steps:
- Open the door a little to stop the washing.
- After the spray arms stopped working, you can open the door completely.
- Add the forgotten dishes.
- Close the door.
- The dishwasher will start running again.
flowchart
graph LR
    A["Container"] --> B["Bar Chart"]
    B --> C["Machine"]

WARNING
Danger of burns! It is dangerous to open the door during operation as the hot steam can scald you.
CLEANING AND CARE
Door and door seal
Clean the door seals regularly with a damp cloth to remove food residues. When filling the dishwasher, food residues may stick to the sides of the dishwasher door. These surfaces are on the outside and cannot be reached by the spray arms. Always remove these residues before closing the door.
Control panel
Only rub the control panel with a soft and damp cloth.
Do not use any spray cleaners to prevent water from getting behind the door seal or into the electrical components of the appliance.
Do not use aggressive cleaning agents or scouring sponges on the outer surfaces of the unit as they may scratch the coating. Note that some paper towels may also scratch the surface or leave marks on it.
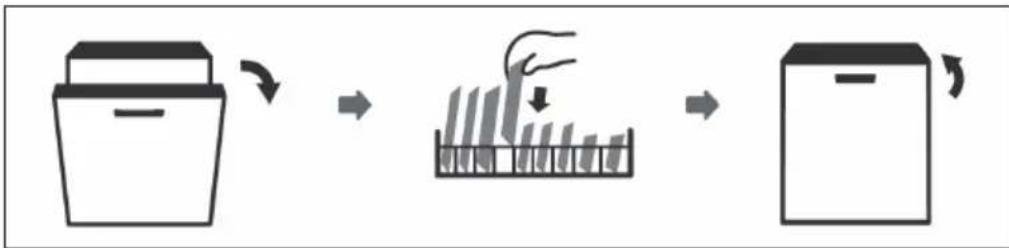
Filter system
The filter system is located at the bottom of the dishwasher. Residues from the washing cycle remain in the filter. The accumulation of residues can lead to clogging of the filters. The filters should therefore be checked regularly and, if necessary, cleaned under running water. Follow the steps below to clean the filters:
Note: The illustrations are for orientation only and may differ from your model.
| 1 | 2 |
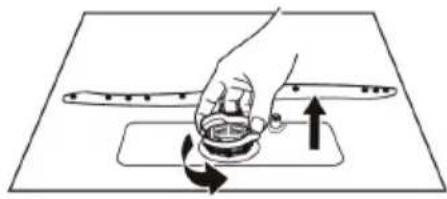 | 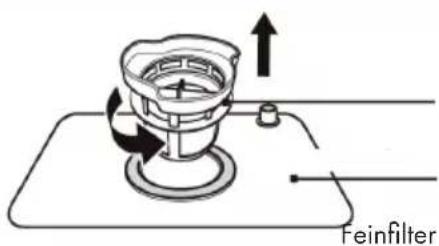 |
| Hold the coarse filter and rotate it anticlockwise to unlock the filter. Lift the filter upwards and out of the dishwasher. | Lift fine filter up from main filter Prauptfilter |
| 3 | 4 |
 | 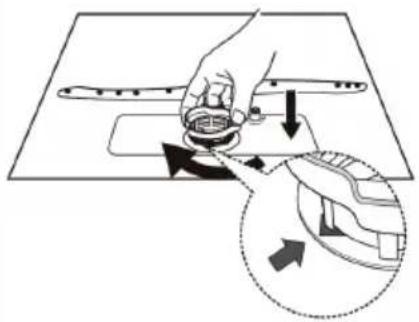 |
| Larger food remnants can be cleaned by rinsing the filter under running water. For a more thorough clean, use a soft cleaning brush. | Reassemble the filters in the reverse order of the disassembly, replace the filter insert, and rotate clockwise to the close arrow. |
- Do not over tighten the filters. Put the filters back in sequence securely, otherwise coarse debris could get into the system and cause a blockage.
- Never use the dishwasher without filters in place. Improper replacement of the filter may reduce the performance level of the appliance and damage dishes and utensils.
Notes on solvents or abrasive cleaning
To clean the exterior and rubber parts of the dishwasher, do not use solvents or abrasive cleaning products. Only use a cloth with warm soapy water. To remove spots or stains from the surface of the interior, use a cloth dampened with water an a little vinegar, or a cleaning product made specifically for dishwashers.
When not in use for a longtime
It is recommend that you run a wash cycle with the dishwasher empty and then remove the plug from the socket, turn off the water supply and leave the door of the appliance slightly open. This will help the door seals to last longer and prevent odors from forming within the appliance.
TROUBLESHOOTING
| Problem Possible Causes | Solution | |
| Dishwasher doesn't start. Fuse blown, or the circuit breaker tripped. | Replace fuse or reset circuit breaker. Remove any other appliances sharing the same circuit with the dishwasher. | |
| Power supply is not turned on. | ||
| Make sure the dishwasher is turned on and the door is closed securely. Make sure the power cord is properly plugged into the wall socket. | ||
| Door of dishwasher not properly closed. | ||
| Closed dishwasher making sure that door latches. | ||
| Water not pumped from dishwasher. | Kink in drain hose. Check drain hose. | |
| Filter clogged. Check coarse filter. | ||
| Kitchen sink clogged. Check kitchen sink to make sure it is draining well. If problem is kitchen sink not draining ,you may need a plumber rather than a serviceman for dish- washer. | ||
| There are rust stains on cutlery. | The affected items are not corrosion resistant. | Don't wash corrosive items in the dishwasher. |
| A programme was not run after dishwasher salt was added. Traces of salt have got into the wash cycle. | Always run the Quick wash programme, without any crockery in the dishwasher and without selecting the Turbo function (if present), after adding dishwasher salt. | |
| The lid of softer is loose. Check the lip .Ensure the fix is fine. | ||
| Stained tub interior. Detergent with colourant was used. | Make sure that the detergent is the one without colourant. | |
| White film on inside surface. | Hard water minerals. To clean the interior, use a damp sponge with dishwasher detergent and wear rubber gloves. Never use any other cleaner than dishwasher detergent for the risk of foaming or suds. | |
| Knocking noise in the wash cabinet. | The spray arm is knocking against an item in a basket. | Interrupt the programme, and rearrange the items which are obstructing the spray arm. |
| Rattling noise in the wash cabinet. | Item of crockery are insecure in the wash cabinet. | Interrupt the programme, and rearrange the items of crockery. |
| Knocking noise in the water pipe. | This may be caused by on-site installation or the cross-section of the piping. | This has no influence on dishwasher function. If in doubt, contact a suitably qualified plumber. |
| Suds in the tub. Improper detergent Use only dishwashing | detergent that is suitable for dishwashers. If there is any foam in the tub, open the door and let the foam evaporate. Add some cold water to the tub and close the door. Run some washing program to remove the residue. | |
| Spilled rinse-aid Always wipe up rinse-aid spills immediately. | ||
| The dishes are not clean. The | dishes weren't properly invited. | Follow the instructions for loading the dishwasher. |
| The program was not strong enough. | Use the intensive program. | |
| Too little detergent Use more | detergent or use a different detergent. | |
| Objects block the spray arms. | Place the dishes in the appliance so that the spray arms are not obstructed. | |
| The filter system is dirty or incorrectly inserted. | Clean the filters or insert them correctly. Clean the spray arms. | |
| The dishes are not drying. In | correct loading. Follow the instructions for loading the dishwasher. | |
| Too little rinse aid. Increase the rinse volume. | ||
| The dishes were removed too early. | Leave the dishes in the dishwasher for about 15 minutes after cleaning.Open the door so that the damp air can escape. | |
| Wrong program. In short programs, the washing and drying temperature is lower. Use a program with a longer running time. | ||
| Cutlery with inferior coating. | Such dishes and cutlery are not suitable for the dishwasher. | |
| Cloudiness on glassware. | Combination of soft water and too much detergent. | Use less detergent if you have soft water and select a shortest cycle to wash the glassware and to get them clean. |
| Black or gray marks on dishes. | Aluminium utensils have rub- bed against dishes. | Use a mild abrasive cleaner to eliminate those marks. |
| Detergent left in dispenser cups. | Dishes block detergent cups. | Re-loading the dishes properly. |
Error Codes
When some malfunctions come on, the appliance will display error codes to warn you:
| Code | Meaning Possible Cause | |
| E1 | The water inlet takes a very long time. | The tap is not open, the water inlet is restricted or the water pressure is too low. |
| E3 | The required temperature is not reached. | Heating element malfunction. |
| E4 | The dishwasher runs out. | One element of the dishwasher is leaking. |
| Ed | Communication between main PBC and screen PBC is interrupted. | Short circuit or broken communication cable. |
Information according to Regulation (EU) No. 2019/2017
| Name or trademark of the producer: Klarstein | ||||
| Address of the producer: Wallstraße 16, 10179 Berlin, Deutschland. | ||||
| Item number: 10032915A | ||||
| General product parameters: | ||||
| Parameter Value Parameter | Value | |||
| Standard place settings 6 Dimensions | n mm | Height 438 | ||
| Width 550 | ||||
| Depth 518 | ||||
| EEI 61.9 Energy efficiency class F | ||||
| Cleaning performance index | 1.13 | Drying performance index | 1,07 | |
| Energy consumption in kWh [per cycle], based on the eco programme using cold water fill. Actual energy consumption will depend on how the appliance is used. | 0.613 | Water consumption in litres [per cycle], based on the eco program. Actual water consumption will depend on how the appliance is used and on the hardness of the water. | 6,5 | |
| Program duration (h:min) | 3:50 | Type | Free-standing | |
| Airborne acoustical noise emissions (dB(A) re 1 pW) | 49 | Airborne acoustical noise emission class | C | |
| Off-mode (W) | 0.49 | Standby mode (W) | 0 | |
| Delay start (W) (if applicable) | 1 | Networked standby (W) (if applicable) | 0 | |
| Minimum duration of the guarantee offered by the manufacturer: 24 months | ||||
| Additional information: | ||||
| Weblink to the supplier's website, where the information in point 6 of Annex II to Commission Regulation (EU) 2019/2022 is found: www.klarstein.co.uk | ||||
DISPOSAL CONSIDERATIONS
natural_image
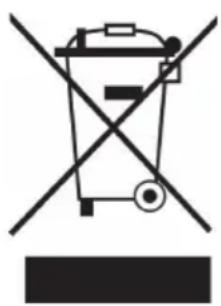
Symbol of a trash bin crossed with a diagonal line, no text or numbers presentIf there is a legal regulation for the disposal of electrical and electronic devices in your country, this symbol on the product or on the packaging indicates that this product must not be disposed of with household waste. Instead, it must be taken to a collection point for the recycling of electrical and electronic equipment. By disposing of it in accordance with the rules, you are protecting the environment and the health of your fellow human beings from negative consequences. For information about the recycling and disposal of this product, please contact your local authority or your household waste disposal service.
MANUFACTURER & IMPORTER (UK)
Manufacturer:
Chal-Tec GmbH, Wallstrasse 16, 10179 Berlin, Germany.
Importer for Great Britain:
Berlin Brands Group UK Limited
PO Box 42
272 Kensington High Street
London, W8 6ND
United Kingdom
INHALTSVERZEICHNIS
natural_image
Line drawing of a hand using a tool to press or install a mechanical component (no text or symbols present)flowchart
graph LR
    A["Person mixing bowl with salt"] --> B["Salt being added"]
    B --> C["Add salt into a container"]
    C --> D["Heating salt from a jar"]
    D --> E["Final packaging with salt"]
natural_image
Five black and white circular symbols arranged horizontally on a white background (no text or labels)natural_image
Symbol of a trash bin crossed with a diagonal line, no text or numbers presentBerlin Brands Group UK Limited
PO Box 42
272 Kensington High Street
London, W8 6ND
United Kingdom
Chère cliente, cher client,
SOMMAIRE
natural_image
Line drawing of a hand turning a valve into a bulb (no text or symbols)flowchart
graph LR
    A["Person holding a cup with a lid"] --> B["Add salt to a container"]
    B --> C["Salt being added to the cup"]
    C --> D["Add salt into a container"]
    D --> E["Final mixing of salt into a container"]
natural_image
Five black and white circular symbols arranged horizontally (no text or labels)FICHE DE DONNÉES PRODUIT
natural_image
Symbol of a trash bin crossed with a diagonal line, no text or numbers presentBerlin Brands Group UK Limited
PO Box 42
272 Kensington High Street
London, W8 6ND
United Kingdom
Gentile cliente,
INDICE
natural_image
Line drawing of a hand using a tool to adjust or install a light bulb (no text or symbols present)flowchart
graph LR
    A["Person holding a cup with a lid"] --> B["Add salt to a container"]
    B --> C["Salt being added to the cup"]
    C --> D["Add salt into a jar with liquid, producing a final container"]
natural_image
Simple diagram with five black and white circles arranged horizontally (no text or symbols)natural_image
Symbol of a trash bin crossed out by a diagonal line, with no text or labels present.PRODUTTORE E IMPORTATORE (UK)
Produttore:
Chal-Tec GmbH, Wallstraße 16, 10179 Berlino, Germania.
Berlin Brands Group UK Limited
PO Box 42
272 Kensington High Street
London, W8 6ND
United Kingdom

bar
| Category | Value | | :--- | :--- | | Category 1 | 100 | | Category 2 | 100 | | Category 3 | 100 | | Category 4 | 100 | | Category 5 | 100 | | Category 6 | 100 | | Category 7 | 100 | | Category 8 | 100 | | Category 9 | 100 | | Category 10 | 100 | | Category 11 | 100 | | Category 12 | 100 | | Category 13 | 100 | | Category 14 | 100 | | Category 15 | 100 | | Category 16 | 100 | | Category 17 | 100 | | Category 18 | 100 | | Category 19 | 100 | | Category 20 | 100 | | Category 21 | 100 | | Category 22 | 100 | | Category 23 | 100 | | Category 24 | 100 | | Category 25 | 100 | | Category 26 | 100 | | Category 27 | 100 | | Category 28 | 100 | | Category 29 | 100 | | Category 30 | 100 | | Category 31 | 100 | | Category 32 | 100 | | Category 33 | 100 | | Category 34 | 100 | | Category 35 | 100 | | Category 36 | 100 | | Category 37 | 100 | | Category 38 | 100 | | Category 39 | 100 | | Category 40 | 100 | | Category 41 | 100 | | Category 42 | 100 | | Category 43 | 100 | | Category 44 | 100 | | Category 45 | 100 | | Category 46 | 100 | | Category 47 | 100 | | Category 48 | 100 | | Category 49 | 100 | | Category 50 | 100 | | Category 51 | 100 | | Category 52 | 100 | | Category 53 | 100 | | Category 54 | 100 | | Category 55 | 100 | | Category 56 | 100 | | Category 57 | 100 | | Category 58 | 100 | | Category 59 | 100 | | Category 60 | 100 | | Category 61 | 100 | | Category 62 | 100 | | Category 63 | 100 | | Category 64 | 100 | | Category 65 | 100 | | Category 66 | 100 | | Category 67 | 100 | | Category 68 | 100 | | Category 69 | 100 | | Category 70 | 100 | | Category 71 | 100 | | Category 72 | 100 | | Category 73 | 100 | | Category 74 | 100 | | Category 75 | 100 | | Category 76 | 100 | | Category 77 | 100 | | Category 78 | 100 | | Category 79 | 100 | | Category 80 | 100 | | Category 81 | nan | | Category 82 | nan | | Category 83 | nan | | Category 84 | nan | | Category 85 | nan | | Category 86 | nan | | Category 87 | nan | | Category 88 | nan | | Category 89 | nan | | Category 90 | nan | | Category 91 | nan | | Category 92 | nan | | Category 93 | nan | | Category 94 | nan | | Category 95 | nan | | Category 96 | nan | | Category 97 | nan | | Category 98 | nan | | Category 99 | nan | | Total (Total) | nan | | Total (Category) | nan | | Total (Category) | nan | | Total (Category) | nan | | Total (Category) | nan | | Total (Category) | nan | | Total (Category) | nan | | Total (Category) | nan | | Total (Category) | nan | | Total (Category) | nan | | Total (Category) | nan | | Total (Category) | nan | | Total (Category) | nan | | Total (Category) | nan |
KLARSTEIN

- INHALTSVERZEICHNIS
- Dear Customer,
- CONTENTS
- SAFETY INSTRUCTIONS
- WARNING
- CAUTION
- DISPLAY AND KEY FUNCTIONS
- INSTALLATION
- Positioning the appliance
- Power connection
- Installation without decorative door
- Installation with decorative door
- Preparation
- Water Supply Hose
- Filling the rinsing salt container
- Important notes
- Adjusting the salt consumption
- Rinse aid
- Topping up the rinse aid
- Filling the rinse aid reservoir
- Adjusting the rinse aid reservoir
- Filling the detergent dispenser
- LOADING THE DISHWASHER
- Hints on Loading the Dishwasher
- COMMISSIONING AND OPERATION
- Starting the washing process
- Changing the programme
- Adding forgotten dishes
- CLEANING AND CARE
- Door and door seal
- Control panel
- Filter system
- Notes on solvents or abrasive cleaning
- When not in use for a longtime
- TROUBLESHOOTING
- Error Codes
- DISPOSAL CONSIDERATIONS
- MANUFACTURER & IMPORTER (UK)
- Manufacturer:
- Importer for Great Britain:
- SOMMAIRE
- FICHE DE DONNÉES PRODUIT
- Gentile cliente,
- INDICE
- PRODUTTORE E IMPORTATORE (UK)
- Produttore:
- KLARSTEIN
Brand : Klarstein
Model : Havasia Flow 6
Category : Dishwasher