
R8 Akku - Robot vacuum T.I.P. - Free user manual and instructions
Find the device manual for free R8 Akku T.I.P. in PDF.

| Product Type | Robotic pool cleaner |
| Brand | T.I.P. |
| Model | R8 Akku |
| Power Supply | Lithium-ion battery 7.3 V / 7800 mAh |
| Motor Power | 40 W |
| Runtime | Up to 90 min |
| Charging Time | 3.5 h |
| Suction Capacity | 4,800 l/h |
| Max. Pool Area | 50 m² |
| Max. Immersion Depth | 2.5 m |
| Max. Water Temperature | 35 °C |
| Net Weight | 5 kg |
| Protection Rating (robot) | IPX8 |
| Protection Rating (charger) | IP20 |
| Package Contents | Robot, ring with rope, hook, power supply unit, instruction manual |
| Main Functions | Automatic cleaning of floor and walls, adjustable jets to change direction, automatic stop when battery is low |
| Maintenance and Cleaning | Clean the filter regularly after use, do not use aggressive solvents |
| Safety | Lithium-ion battery with overcharge protection, stops if jammed, do not use when people or animals are in the water |
| Spare Parts and Repairability | Spare parts available at www.tip-pumpen.de, repairs possible by customer service |
| Warranty | Legal warranty, wear parts excluded |
| General Information | For private domestic use only, do not clean seawater or hazardous liquids |
Frequently Asked Questions - R8 Akku T.I.P.
User questions about R8 Akku T.I.P.
0 question about this device. Answer the ones you know or ask your own.
Ask a new question about this device
Download the instructions for your Robot vacuum in PDF format for free! Find your manual R8 Akku - T.I.P. and take your electronic device back in hand. On this page are published all the documents necessary for the use of your device. R8 Akku by T.I.P..
USER MANUAL R8 Akku T.I.P.
natural_image
Exterior view of a modern robotic device with blue wheels and a green control panel (no text or symbols visible)
Translation of original operating instructions
Battery-powered pool robot

Akumulatorski bazenski robot
GB EC declaration of conformity We, T.I.P. Technische Industrie Produkte GmbH, Siemensstr. 17, D-74915 Waibstadt, declare in our sole responsibility that the products identified below comply with the basic requirements imposed by the EU directives specified below including all subsequent amendments: 2006/42/EC, 2014/30/EU, 2011/65/EU, 2023/1542/EU.
natural_image
Line drawing of a futuristic robot with two arrows pointing to the body part (no text or symbols present)
natural_image
Line drawing of a robotic car with attached power outlet (no text or symbols)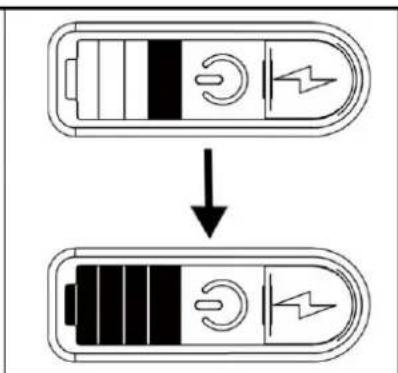
Abb. 1
Abb. 2
flowchart
graph LR
    A["Top Left: Device with sensor icon"] <--> B["Top Right: Sensor icon with button icon"]
    B --> C["Bottom Right: Robot interior with control panel and directional arrows"]
Abb. 3
Abb. 4
Abb. 5
flowchart
graph TD
    A["Water Supply"] --> B["Battery"]
    B --> C["Car Body"]
    C --> D["Engine"]
    D --> E["Final Vehicle Assembly"]
Abb. 6
Congratulations for buying your new device from T.I.P.!
Please read through these operating instructions carefully to make sure that you can fully benefit from all features.
We hope you will enjoy your new device!
Table of contents
- General safety information.... 1
- Technical Data 2
- Range of use.... 3
- Scope of delivery 3
- Commissioning .... 3
- Maintenance 5
- Warranty 6
- How to order spare parts....7
- Service 7
1. General safety information
Please read through these operating instructions carefully and make yourself conversant with the control elements and the proper use of this product. We shall not be liable in the case of damage caused as a result of the non-observance of instructions and provisions of the present operating instructions. Any damage caused as a result of the non-observance of the instructions and regulations contained in the present operating instructions shall not be covered by the warranty terms. Please keep these operating instructions in a safe place and hand them on together with the device should you ever dispose of it.
Persons not familiar with the contents of these manual may not use this device.
The device must not be used by children.
The device may be used by persons with reduced physical, sensory or mental capabilities or lack of experience and / or knowledge if they have been supervised or instructed in the safe use of the equipment and have understood the resulting hazards. Children are not allowed to play with the device. Keep the appliance and its cord out of reach of children.
The pump must not be used when people or animals are in the water.
Notes and instructions with the following symbols require particular attention:

Any non-observance of these instructions involves the danger of bodily harm to people and/or damage to property.

Any non-observance of this instruction bears the risk of an electrical shock which may cause damage to persons or property.
Please inspect the device for damage occurred during transportation. In case of damage, the retailer has to be informed immediately, at the latest within 8 days after the date of purchase.
In addition to the basic safety precautions for avoiding accidents, please note the following:

- ATTENTION: Before performing any installation or maintenance tasks, disconnect the electrical device from the power source by pulling the plug out of the socket outlet or stop the charging process.
-
Prior to connecting the device to the mains supply, ensure that the charge cable and the device are not damaged in any way.
-
Parts of the packaging can be dangerous (e.g. the plastic bags) - therefore keep these out of reach of children, people who not responsible for their actions and animals.
- Only use accessories that are included in the scope of delivery, or only those that are specified in the operating manual. The use of accessories that have not been approved may impair safety.
- Any use of the device that is not described in this manual may be dangerous and must therefore be avoided.
- Take care not to hold the suction nozzle against any sensitive part of the body (such as the eyes, mouth or ears) when the device is in operation.
-
The device must be correctly assembled with all parts before use.
-
Never touch the power supply unit with wet hands.
- Switch off the device before maintenance, cleaning, a filter change and after use. Do not leave the device unattended, do not leave it within the reach of children or people who are not responsible for their actions.
- In case of incidents (e.g. contact with cleaning agents or chemicals) clean the machine with plenty of clean water.
- Never leave the device unattended during operation.
- Do not clean the device with a water jet.
- Carefully check whether the housing or other parts of the device are damaged; if so, do not use the device under any circumstances and contact the customer service department for repairs.
- If you are using the charging adapter, ensure that it lies on a dry, splash-proof surface or is used indoors.
- Service and repairs shall only be carried out by qualified personnel. Defective parts of the device shall only be replaced with original parts.
- The manufacturer is not responsible for any damage to persons or objects caused by improper use of the device, or by a failure to follow the instructions provided in this manual.
1.1. Safety information for devices with lithium ion batteries
DANGER
Do not expose units or batteries to high temperatures (e.g. direct sunlight, heating). Do not cover ventilation openings.
Do not charge units unattended (danger of overcharging). If possible, stay close by when charging.
If there are signs of defects or damage (e.g. sudden drop in performance, strong heating of the unit, deformation or melting points on the housing, escaping of liquid), do not switch on the unit and, if necessary, disconnect it from the power supply.
Non-intended use or improper mechanical stress (e.g. dropping, crushing) can change the internal assembly of the lithium batteries. This can lead to internal short circuits, bursting or fires long after the charge has been applied. Please contact the dealer in order to avoid accidents or our customer service center to have the device checked and repaired if necessary.
Wash any affected areas with tap water if battery fluid from inside the device comes into contact with skin or clothing.
Contact with the battery fluid can cause injury.
Retain the original packaging of the unit and use it for any transport.
- Technical Data
| Model | R8 Akku |
| Motor | 40 watts |
| Battery voltage | 7.3 V (lithium ion) |
| Battery capacity | 7,800 mAh |
| Degree of protection / protection class (robot) | IPX8 / III |
| Degree of protection / protection class (charger) | IP20 / II |
| Max. flow rate | 4,800 l/h |
| Max. pool size | 50 m^2 |
| Max. running time | 90 min. |
| Charging voltage | 12 V DC |
| Charging time | 3.5 h |
| Max. submersion depth | 2.5 m |
| Max. medium temperature | 35 °C |
| Net weight | 5 kg |
| Article No. | 30469 |
3. Range of use
This device is intended for private use at home and not for commercial or industrial purposes. Use the device to clean and remove fine-grained dirt particles, algae and sand.

The device is not suitable for the cleaning of salt water, faecal matter, flammable, corrosive or other hazardous liquids. The pumped liquid must not exceed or undershoot the maximum or minimum temperatures specified in the technical data.
4. Scope of delivery
T.I.P. Battery-powered pool robot, ring with rope, hook, power supply and operating manual.
If possible, keep the packing until the warranty period has expired. Please dispose of the packing materials in an environmental-friendly manner.
5. Commissioning
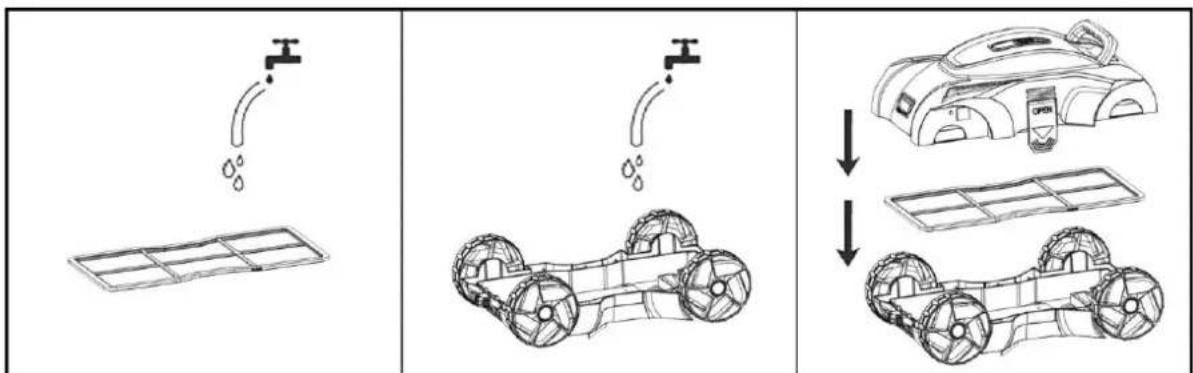
5.1. Charging
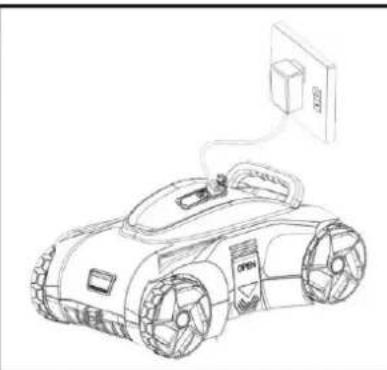
Before initial operation, the device must be fully charged for approx. 3.5 hours using the cable supplied through connection with a standard household socket (230 V) in an indoor area.
To do this, open the charging lock and plug in the charging cable. Ensure that both the charging connection and charging plug are dry and clean. The charging status is displayed on the top of the device. To do this, press and hold the ON/OFF button until you hear a sound. You can recognize the charging status by the number of illuminated bars.
Once the device is fully charged (all bars light up), remove the charging cable and make sure that the charging connection is tightly closed again. (Fig. 1)
natural_image
Line drawing of a robotic car with a handle and two arrows pointing to it (no text or symbols present)
natural_image
Line drawing of a robotic car with attached electrical outlet (no text or symbols)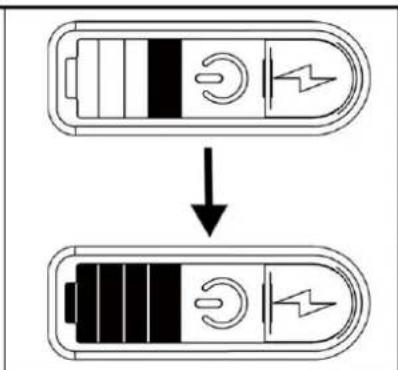
Fig.1
5.2. Before first use
Shorten the cord attached to the plastic ring to approx. the depth of the pool. Then attach the cord of the plastic ring on the handle of the pool robot.
5.3. Starting the device
Ensure that the top cover of the unit is firmly attached to the housing.
Press and hold the ON/OFF button until you hear a sound.
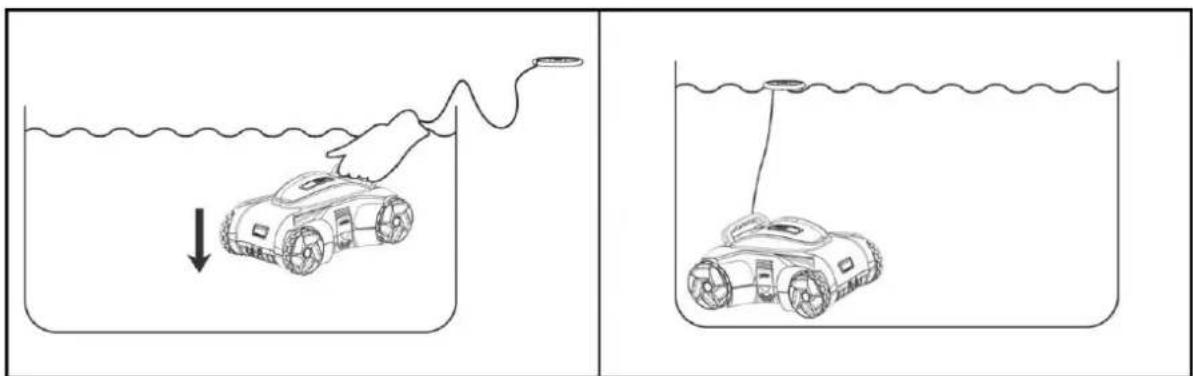
Immerse the device carefully and slowly under water and allow it to fill up. The appliance will now beep twice briefly. Now lower it carefully (Fig. 2).
If you do not hold it in the water, a tone will sound again after approx. 30 seconds, indicating that the appliance has been switched off.
natural_image
Two-panel line drawing showing a robotic car being pulled down in a beaker while submerged in water, with no text or symbols present.Fig. 2
5.4. Possible change of direction of travel
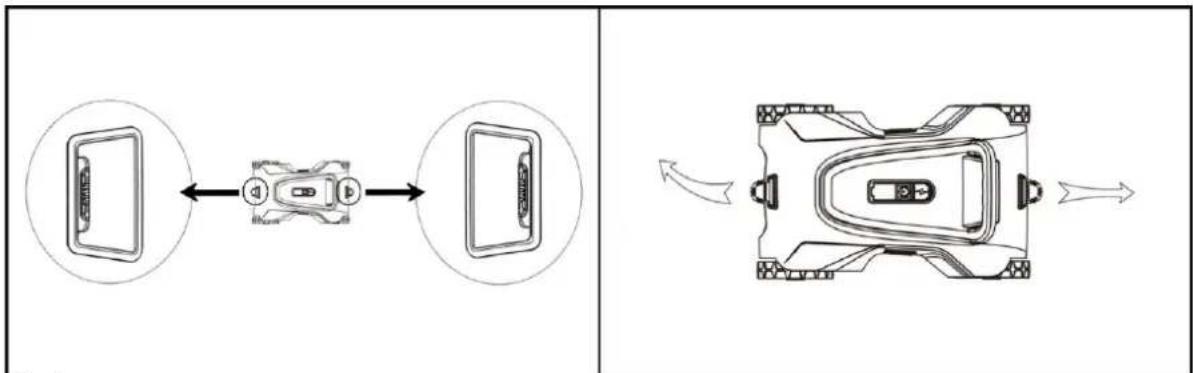
There is an adjustable control nozzle on the front and rear of the cleaner for the drive in the water. By adjusting the two nozzles, the direction of travel can be changed. If the preset travel angle is not satisfactory, stop the cleaner, carefully remove it from the water and then bring the control nozzles into the correct position (Fig. 3). Now carefully put the cleaner back into the pool and start the cleaning process again.
flowchart
graph LR
    A["Top Left Panel: Device with screen icon"] <--> B["Top Right Panel: Display mode with speaker icon"]
    B --> C["Bottom Right Panel: Rear control panel with directional arrows indicating playback mode"]
Fig. 3
The direction of travel changes automatically within a fixed time interval Both control nozzles alternate continuously.
Adjustment of the control nozzles:
- The forward/reverse nozzles are set differently (straight & right or left):
The cleaner always travels straight ahead in one direction, and after changing direction to the right or left (depending on the setting)
■ Suitable for most pools
- Both sides are set the same (each turned in the same direction):
- The cleaner moves in an arc to the left - even after changing direction
■ Suitable for circular pools
- Both sides are straight:
- The cleaner always moves straight forward and back again.
- Is not suitable, as no area change can take place
The aforementioned settings are the recommended default settings. Other settings may be more suitable for your pool.
5.5. Removing the device
When the battery is drained, the cleaner stops automatically. Attach the hook to your rod (not included). Using the plastic ring, pull the robot carefully towards you and to the surface. Make sure that the underside is facing the pool wall. Press the ON/OFF button to switch off the appliance.
Slowly take the pool robot out of the pool by the handle and hold the pool robot over the pool to allow the water inside to run out. (fig. 4)
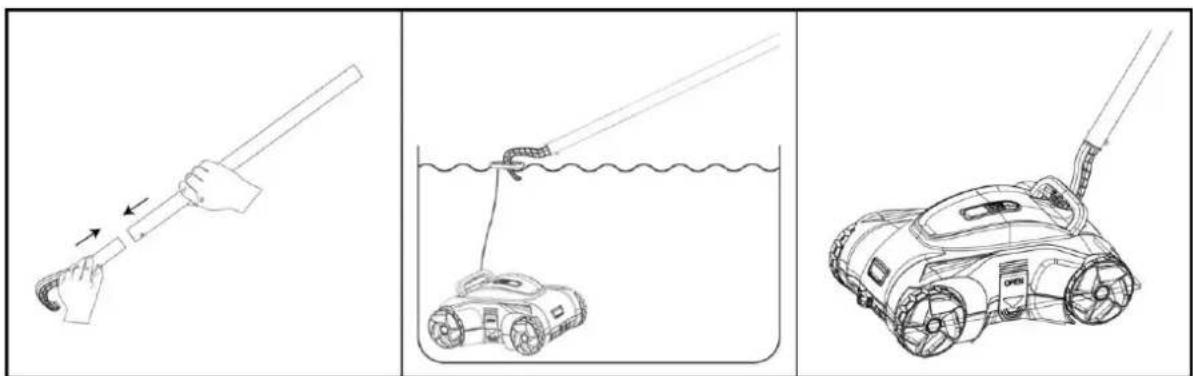
Fig.4
6. Maintenance
6.1 Maintenance and cleaning

Do not use aggressive solvents or cleaning agents.
6.2 Filter cleaning
- Do not perform maintenance and cleaning during the charging process.
- Place the cleaner on a level surface.
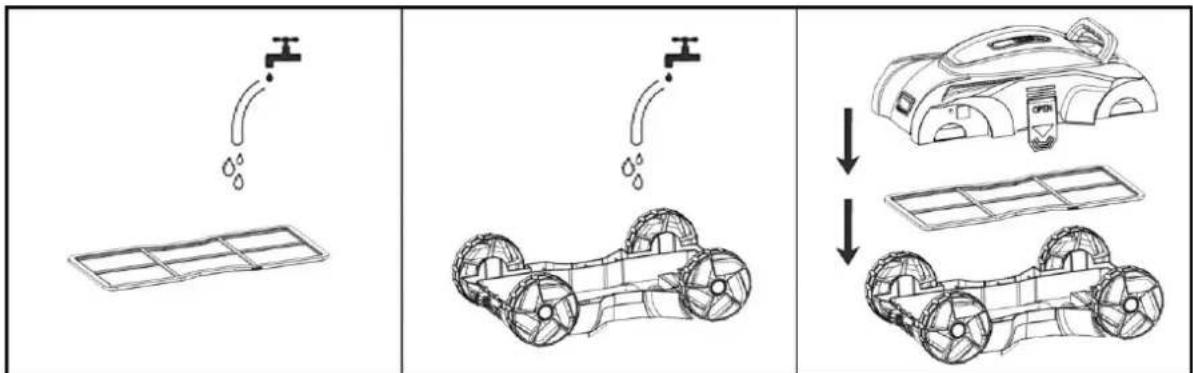
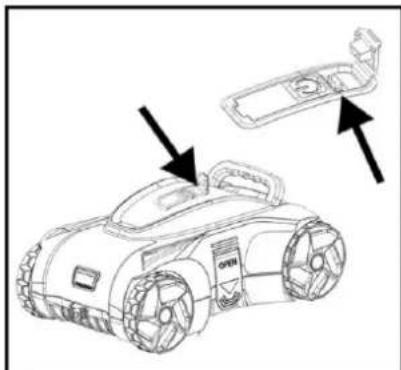
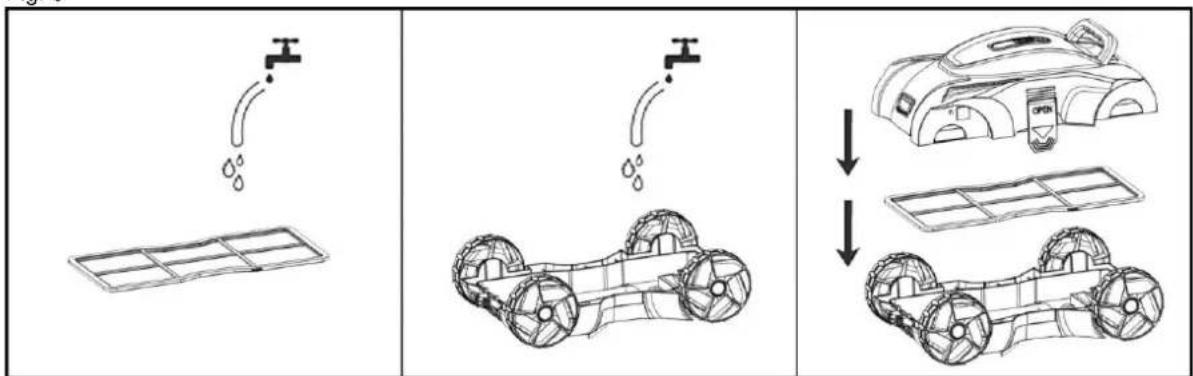
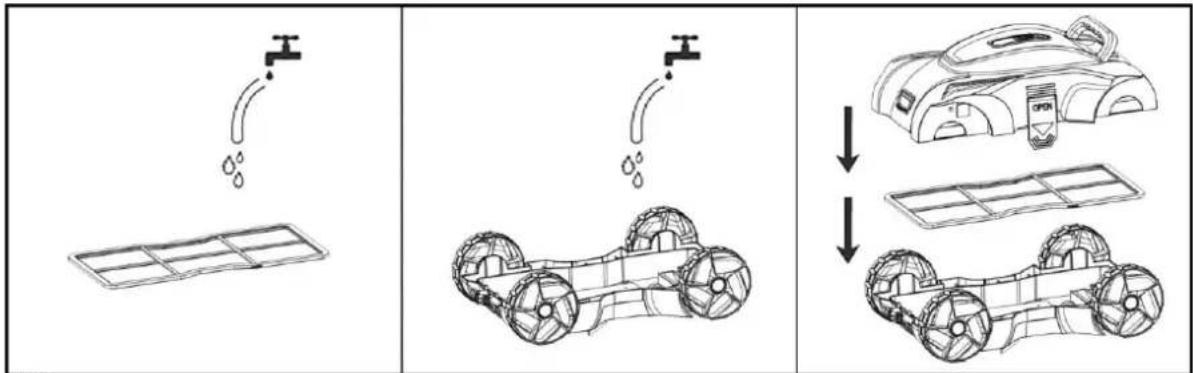
- Open the unit at the two fixing points to be able to remove the cover and filter insert (Fig. 5).
- Remove all dirt and water from inside the device (Fig. 6).
- The cleaning intervals depend on the degree of soiling of the water.
- Assemble the device in the reverse order to ready it for use again (Fig. 6). Ensure that the filter and motor head are in the correct position when assembling.
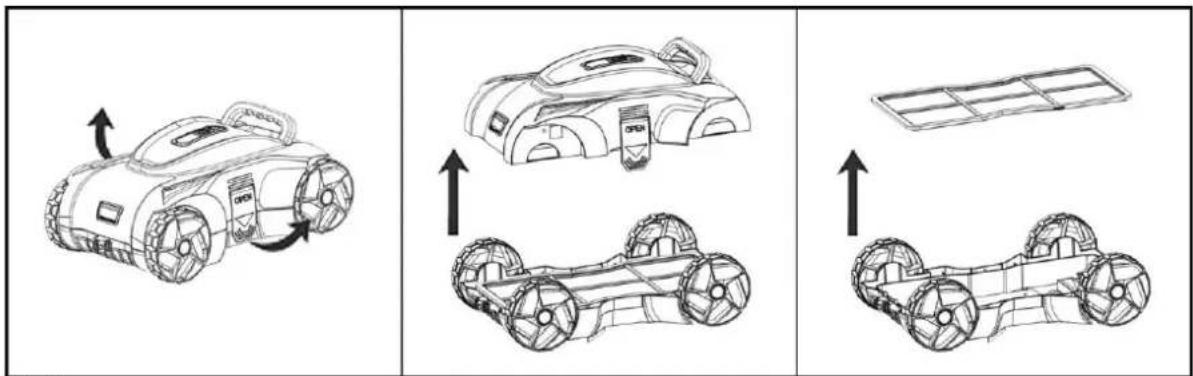
Fig. 5

flowchart
graph TD
    A["Water tank with water drop"] --> B["Car with wheels"]
    C["Water pump with water drop"] --> D["Car with wheels"]
    E["Water pump with water drop"] --> F["Car with wheels"]
Fig. 6
6.3 Help in case of faults
| Fault | Possible cause | Remedy |
| 1. The device does not absorb the dirt. | 1. The battery is flat.2. Impeller is blocked.3. Impeller is damaged.4. Filter is full. | 1. Recharge the battery.2. Switch off the vacuum cleaner and carry out a visual inspection. In the event of a blockage, rectify the cause.3. Contact the customer service department.4. Clean the filter. |
| 2. Dirt comes out of the filter. | 1. The check valve is damaged.2. The filter is damaged. | 1. Replace it with a new check valve.2. Replace it with a new filter. |
| 3. The device cannot be charged. | 1. The battery is damaged.2. The device is damaged. | 1. Contact the customer service department.2. Replace it with a new charger. |
| 4. The unit does not achieve complete coverage of the pool area | 1. Unsuitable adjustment of the control nozzles2. Pool filter system running | 1. Set the control nozzles differently.2. Switch off the pool filter system. |
6.4 Storage
- The battery discharges itself during storage. The battery, charged to approximately 30 - 50% of its capacity, must be stored at room temperature.
- ATTENTION! Higher temperatures during storage may reduce the battery life.
- The battery must be charged at least once every three months when it is not in use.
- Disconnect the device from the power source during storage.
- Drain all water from the device before storage.
- Store the device in a dry and frost-proof place.
7. Warranty
The present device was manufactured and inspected according to the latest methods. The seller warrants for faultless material and workmanship in accordance with the legal regulations of the country in which the device was purchased. The warranty period begins with the day of the purchase and is subject to the provisions below: Within the period of warranty, all defects which are to be attributable to defective materials or manufacturing will be eliminated free of charge. Any complaints are to be reported immediately upon their detection.
The warranty claim becomes void in the case of interventions undertaken by the purchaser or by third parties. Damage resulting from improper handling or operation, incorrect setting-up or storage, inappropriate connection or installation or Acts of God or other external influences are excluded from warranty.
Parts being subject to wear and tear, such as the pump wheel (impeller), mechanical shaft seals, membranes and pressure switch are excluded from warranty.
All parts were manufactured using maximum care and high-quality materials and are designed for a long lifecycle. It should be understood, however, that the wear and tear depends on the kind of use, the intensity of use and the internals of maintenance. Complying with the installation and maintenance information contained in the present operating instructions will therefore considerably contribute to a long lifecycle of these wearing parts. In case of complaints, we reserve the option of repairing or replacing the defective parts or replace the entire device. Replaced parts will pass into our property.
Claims for liquidated damages are excluded unless they are caused by wilful acts or negligence on the side of the manufacturer.
The warranty does not provide for any claims beyond those referred to above. The warranty claim has to be evidenced by the purchaser in the form of the submission of the sales receipt. The present warranty commitment is valid in the country in which the device was purchased.
Please note:
- Should your device fail to function properly, please verify first whether an operating error or another cause is present which cannot be attributed to a defect of the device.
- In case you have to take or send in your defective device for repair, please be sure to enclose the following documents:
Sales receipt (sales slip).
– A description of the occurring defect (a description as accurate as possible will expedite the repair work).
- In case you have to take or send in your defective device for repair, please remove any attached parts which do not belong to the original condition of the device. If any attached parts of this kind should be missing upon the return of the device, we shall not be liable for them.
8. How to order spare parts
The fastest, most simple and cheapest way of ordering spare parts is through the internet. On our website www.tip-pumpen.de you will find a convenient spare part shop where you can order spare parts with just a couple of clicks. In addition, this is also the place where we publish comprehensive information and valuable tips on our products and accessories, introduce new devices and present current trends and innovations in the range of pump technology.
9. Service
In the case of warranty claims or malfunction, please contact your point of sale.
A current operating manual is available as required as a PDF file via e-mail: service@tip-pumpen.de
Disposal and recycling of packaging
The device is in packaging designed to prevent transport damage. This packaging is raw material and can therefore be reused. However, since special transport regulations apply to devices with lithium-ion batteries, the original packaging should be retained throughout the entire service life of the device, for possible transport or shipping. After this, it can be fed back into the raw material cycle.
Disposal of the device
If the device must be disposed of, please ensure that it is completely discharged.
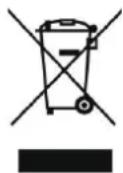
Lithium-ion batteries are hazardous waste and are marked with the crossed-out wheeled bin symbol. The symbol indicates to end users that batteries should not be disposed of with household waste, but should be collected separately. Used batteries can be returned free of charge to the point of sale, the recycling centre or the retailer's disposal system.
To prevent short circuits and the associated heating, lithium-ion batteries must never be stored or transported unprotected in bulk. Appropriate measures must be taken to prevent short circuits.
For EC countries only
Do not throw electric appliances in your dustbin!
According to EU guideline 2012/19/EU concerning old electric and electronic appliances and its implementation in national law, such appliances must be collected separately and fed into an environment-friendly recycling system. Please consult your local waste management system for advice on recycling.
Chère cliente, cher client,
natural_image
Line drawing of a robotic car with a handle and two arrows pointing to it (no text or symbols present)
natural_image
Line drawing of a robotic car with attached electrical outlet (no text or symbols)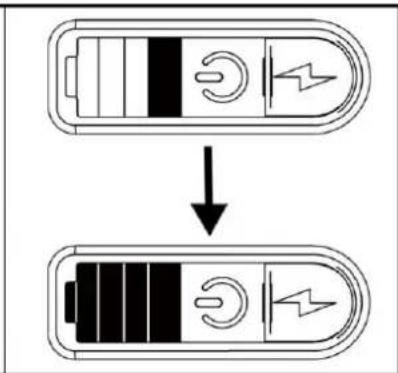
Fig.1
Fig. 2
natural_image
Three-step line drawing showing a hand holding a tool, a submerged robot in water, and a robotic arm (no text or symbols)Fig.4
Fig. 5

flowchart
graph TD
    A["Water tank with water drop"] --> B["Car with water transfer"]
    B --> C["Car with water transfer"]
    C --> D["Car with water transfer"]
Fig. 6
natural_image
Line drawing of a robotic car with two arrows pointing to the side of its body (no text or symbols present)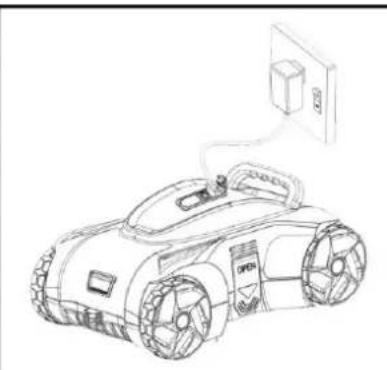
natural_image
Line drawing of a futuristic robotic car with visible wheels and a wall-mounted power outlet (no text or symbols)
Fig.1
natural_image
Two-panel line drawing showing a car being pulled down in a container with a hand pulling it; no text or symbols present.Fig. 2
flowchart
graph LR
    A["Device with sensor"] <--> B["Device with sensor"]
    B --> C["Device with sensor"]
    D["Top-view diagram"] --> E["Top view with sensor and control components"]
Fig. 3
Fig 4
Fig. 5

flowchart
graph TD
    A["Water Supply"] --> B["Battery"]
    B --> C["Car Body"]
    C --> D["Vehicle Assembly"]
    D --> E["Assembly Vehicle"]
    style A fill:#f9f,stroke:#333
    style B fill:#ccf,stroke:#333
    style C fill:#cfc,stroke:#333
    style D fill:#fcc,stroke:#333
    style E fill:#ffc,stroke:#333
Fig. 6
natural_image
Line drawing of a robotic car with two arrows pointing to the side of its body (no text or symbols present)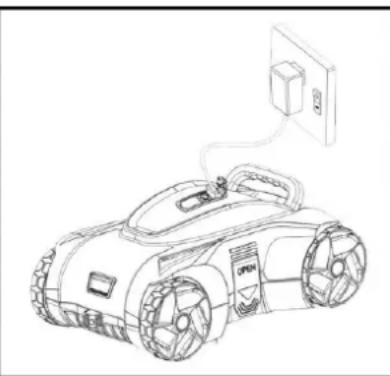
natural_image
Line drawing of a robotic car connected to an electrical outlet (no text or symbols)
Fig.1
Fig. 2
flowchart
graph LR
    A["Top Left: Device with sensor icon"] <--> B["Top Right: Internal components with icons"]
    B --> C["Bottom Right: Robot with sensor icon and directional arrows indicating motion"]
Fig. 3
Fig. 4
Fig. 5
flowchart
graph TD
    A["Water tank"] --> B["Car with water displacement"]
    B --> C["Car assembly with water displacement"]
Fig. 6
natural_image
Line drawing of a robotic car with two arrows pointing to the side of its body (no text or symbols present)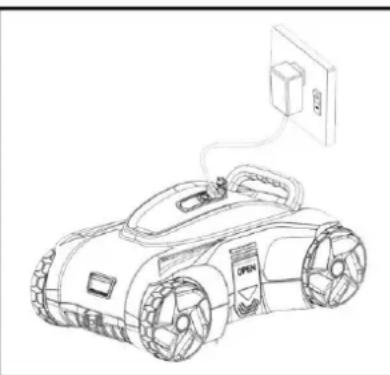
natural_image
Line drawing of a robotic car with power cord and attached electrical outlet (no text or symbols)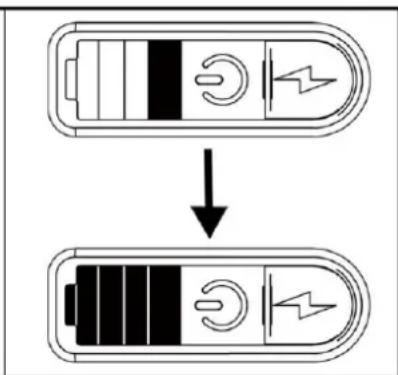
- ábra
2.àbra
- ábra
natural_image
Three-step line drawing showing a hand holding a tool, a submerged robot in water, and a small robotic device (no text or symbols)- ábra
- ábra

flowchart
graph TD
    A["Water Pump"] --> B["Car with repeated wheels"]
    B --> C["After absorption: Car with open lid, repeated wheels"]
- ábra
natural_image
Line drawing of a robotic car with two arrows pointing to the side of its body (no text or symbols present)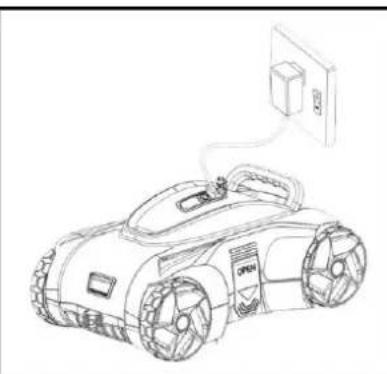
natural_image
Line drawing of a robotic car with attached electrical outlet (no text or symbols)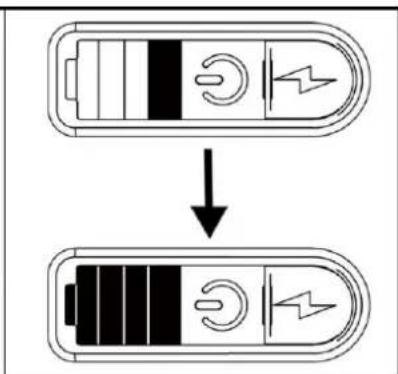
Rys. 1
Rys. 2
natural_image
Three-step line drawing showing a hand holding a tool, a submerged robot in water, and a robotic car with attached arm (no text or symbols)Rys. 4
Rys. 5
flowchart
graph TD
    A["Water tank with water drop"] --> B["Car with wheels and water flow"]
    B --> C["Car with battery and water drop"]
    C --> D["Car with battery and water drop"]
Rys. 6
natural_image
Line drawing of a robotic car with attached electrical outlet (no text or symbols)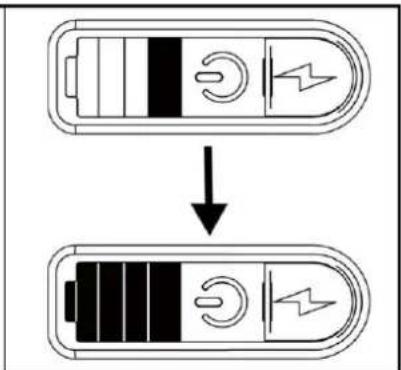
SI.1
natural_image
Two-panel line drawing showing a robotic car being pulled down in a beaker with a hand pulling it; no text or symbols present.SI. 2
natural_image
Three-step line drawing showing a hand holding a tool, a submerged robot in water, and a robotic arm (no text or symbols)SI.4
SI. 5
flowchart
graph TD
    A["Solar Panel"] --> B["Water Supply"]
    B --> C["Car with repeated wheels"]
    C --> D["Assembly of Car with water displacement"]
    D --> E["Final Assembly with wheels"]
SI. 6
Email: service@tip-pumpen.de
D-74915 Waibstadt / Germany
Tel.: +49 (0) 7263 9125-0
Fax: +49 (0) 7263 9125-85
- Table of contents
- General safety information
- Safety information for devices with lithium ion batteries
- DANGER
- Range of use
- Scope of delivery
- Commissioning
- Charging
- Before first use
- Starting the device
- Possible change of direction of travel
- Adjustment of the control nozzles:
- Removing the device
- Maintenance
- Maintenance and cleaning
- Filter cleaning
- Help in case of faults
- Storage
- Warranty
- Please note:
- How to order spare parts
- Service
- Disposal and recycling of packaging
- Disposal of the device
- For EC countries only
Brand : T.I.P.
Model : R8 Akku
Category : Robot vacuum