
Power+ LM1912E - Lawn mower EGO - Free user manual and instructions
Find the device manual for free Power+ LM1912E EGO in PDF.

| Product Type | 56 V lithium-ion cordless lawn mower |
| Model | EGO Power+ LM1912E |
| Voltage | 56 V --- |
| Cutting width | 47 cm |
| Deck size | 51 cm |
| Cutting height | 20 - 80 mm (7 positions) |
| Grass bag capacity | 55 L |
| Weight (with bag and battery BA6720T) | 26.3 kg |
| Blade model | AB1901 |
| Blade brake | Yes (electric, stops in 3 seconds) |
| Blade speed modes | Mode 2 (high performance), Mode 1 (balanced), Mode ECO (quiet and long runtime) |
| Guaranteed sound power level | 94 dB(A) |
| LED lighting | Front LED headlights |
| Power supply | 56 V lithium-ion battery (not included, model BA6720T recommended) |
| Self-propulsion | Variable (available on SP version, not specified for this model) |
| Recommended operating temperature | 0 °C - 40 °C |
| Recommended storage temperature | -20 °C - 70 °C |
| Protection rating | IPX4 (splashes) |
| Folding handle | Yes, 3 operating positions + storage position |
| Maintenance | Clean deck after each use; removable blade (torque 50-60 Nm) |
| Safety | Electric brake, overheat and overload protection, motor stops if handle is unlocked |
| Warranty | See EGO policy at egopowerplus.eu |
Frequently Asked Questions - Power+ LM1912E EGO
User questions about Power+ LM1912E EGO
0 question about this device. Answer the ones you know or ask your own.
Ask a new question about this device
Download the instructions for your Lawn mower in PDF format for free! Find your manual Power+ LM1912E - EGO and take your electronic device back in hand. On this page are published all the documents necessary for the use of your device. Power+ LM1912E by EGO.
USER MANUAL Power+ LM1912E EGO
natural_image
Line drawings of two EGO lawn mawls with front wheels and wheels (no text or symbols)LM1710E/LM1710E-SP LM1910E/LM1910E-SP
56 VOLT LITHIUM-ION CORDLESS MOWER
EN 56 volt lithium-ion cordless mower 7
natural_image
Line drawing of a portable electronic device with control panel and ventilation slots (no text or symbols)B
D
natural_image
Technical line drawing of a vehicle chassis with no visible text or symbols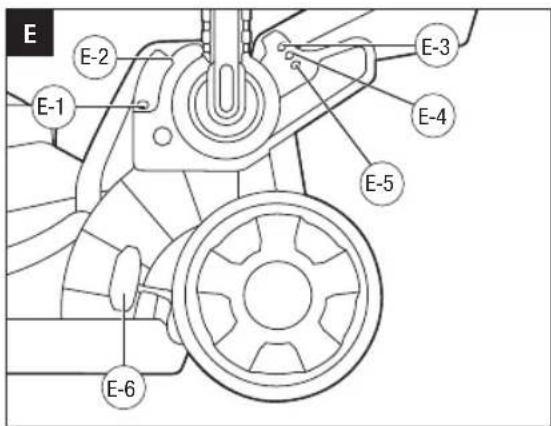
natural_image
Diagram of a hand inserting a component into a vehicle chassis, showing mechanical parts and a directional arrow (no text or symbols)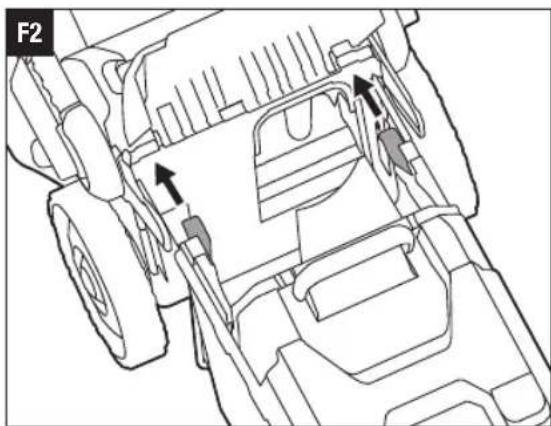
natural_image
Technical line drawing of a vehicle's internal components, showing no text or symbols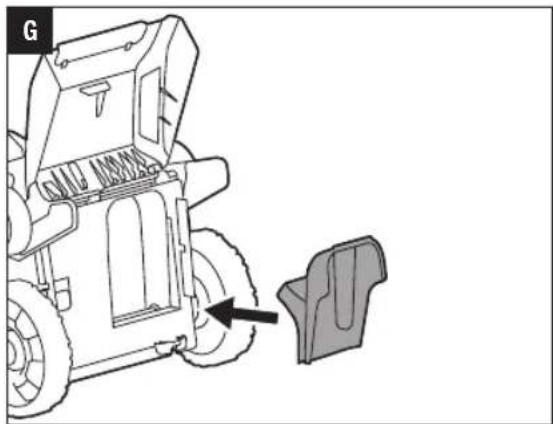
natural_image
Line drawing of a tractor with a mechanical component inserted, showing no text or symbols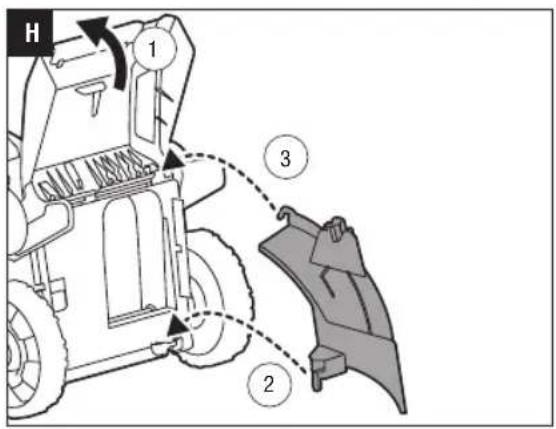
natural_image
Technical line drawing of a mechanical clamp or bracket assembly (no text or symbols)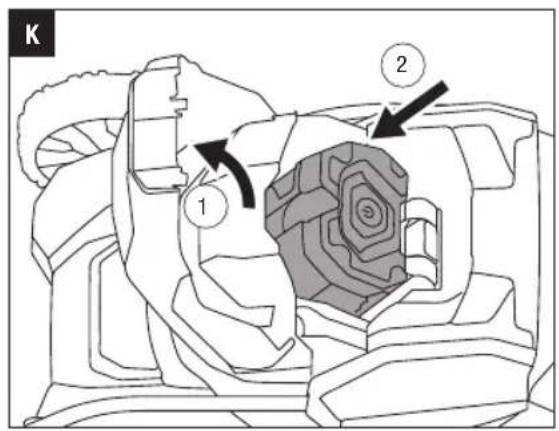

natural_image
Technical line drawing of a mechanical clamp or bracket assembly (no text or symbols)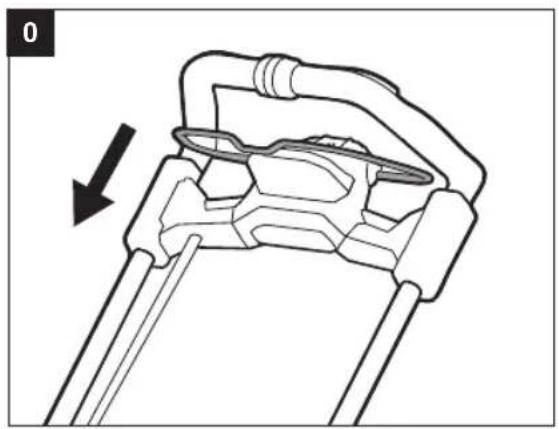
natural_image
Mechanical component diagram showing a lever mechanism with an arrow indicating motion (no text or symbols)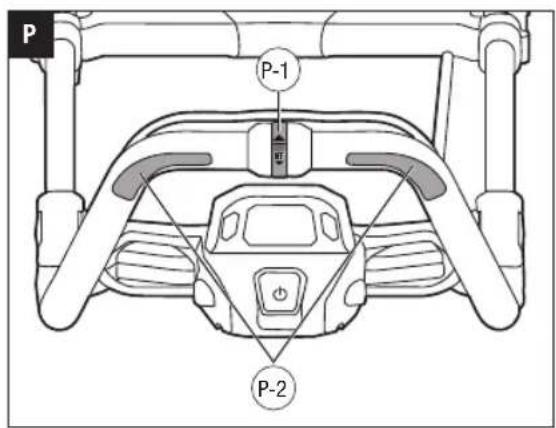
natural_image
Line drawing of a robotic car with visible engine and wheels (no text or symbols)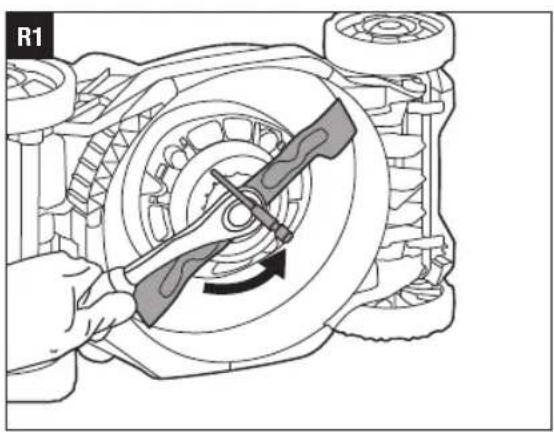
natural_image
Mechanical assembly diagram showing a hand operating a rotating component with a tool, no text or symbols present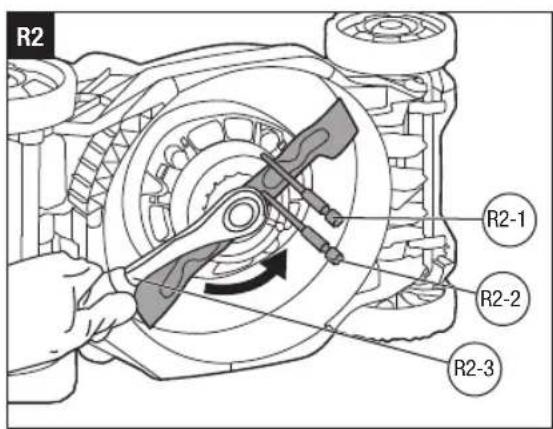
natural_image
Mechanical assembly diagram showing hands operating a gear mechanism within a bearing housing (no text or symbols visible)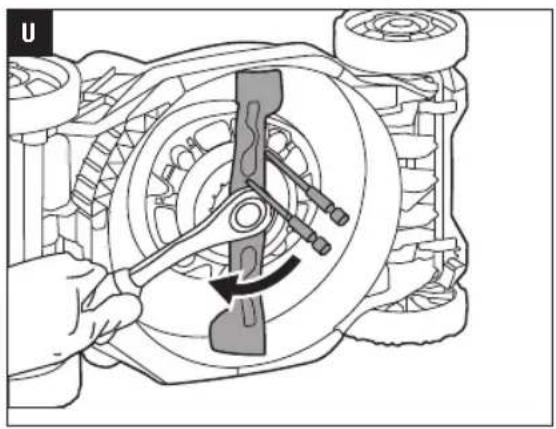
natural_image
Mechanical assembly diagram showing a hand operating a rotating component with a curved arrow indicating rotation (no text or symbols present)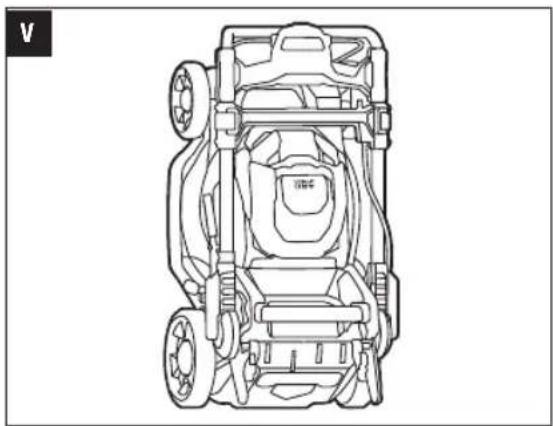
natural_image
Technical line drawing of a vehicle chassis with visible motors and structural components (no text or symbols)
natural_image
Technical line drawing of a vehicle chassis with visible internal components and wheels (no text or symbols)EGO Europe GmbH
The Anchorage, 34 Bridge Street Reading, RG1 2LU, United Kingdom
READ ALL INSTRUCTIONS!
EN
Intended use: The product is intended for manual lawn mowing:
- Use only for mowing dry grass. Do not mow wet grass.
- Do not use it for any other purposes.
WARNING: Be sure to read and understand all safety instructions in this Operator's Manual, including all safety alert symbols such as "DANGER", "WARNING" and "CAUTION" before using this machine. Failure to follow all instructions listed below may result in electric shock, fire, and/or serious personal injury.
SAFETY SYMBOLS

Safety Alert

To reduce the risk of injury, user must read and understand operator's manual before using this product.
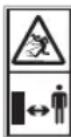
Beware of thrown objects – keep bystanders away. Disconnect battery before maintenance.


Keep hands and feet away. Keep hands and feet away from the blades


Guaranteed sound power level. Do not stare at operating lamp


This product is in accordance with applicable UK legislation.

This product is in accordance with applicable EC directives.
IPX4 Protection from splashing water

Waste electrical products should not be disposed of with household waste. Take to an authorized recycler.
mm Millimeter V Volt

Direct Current cm Centimeter
kg Kilogram
EN SPECIFICATIONS
| Model Number LM1710E | LM1710E-SP | ||
| Self Propel System No Yes | |||
| Voltage | 56 V--- 56 V--- | ||
| Recommended Operating Temperature: | 0°C - 40°C 0°C | -40°C | |
| Recommended Storage Temperature: | -20°C - 70°C | -20°C - 70°C | |
| Optimum Charging Temperature | 5°C - 40°C 5°C | -40°C | |
| Blade Speed Mode | 2 | ||
| 1 | |||
| ECO | |||
| Cutting Height 20-80mm | 20-80mm | ||
| Cutting Height Positions 7 | 7 | ||
| Deck Size 46cm | 46cm | ||
| Cutting Width | 42cm | 42cm | |
| Grass Bag Volume | 55L | 55L | |
| Mower Weight (with grass bag and battery BA6720T) | 25.4 kg | 27.7 kg | |
| Blade Model | AB1701 AB1701 | ||
| Blade Brake YES | YES | ||
| Measured sound power level L_WA | 90 dB(A)K=0.7 dB(A) | 90 dB(A)K=0.7 dB(A) | |
| Sound pressure level at operator's ear L_PA | 77 dB(A)K=3 dB(A) | 77 dB(A)K=3 dB(A) | |
| Guaranteed sound power level L_WA (measured according to 2000/14/EC) | 91 dB(A) | 91 dB(A) | |
| Valuation of vibration a_h : | Left handle | ≤2.5 m/s2K=1.5 m/s2 | ≤2.5 m/s2K=1.5 m/s2 |
| Right handle | ≤2.5 m/s2K=1.5 m/s2 | ≤2.5 m/s2K=1.5 m/s2 | |
| Model Number LM1910E | LM1910E-SP | ||
| Self Propel System No Yes | |||
| Voltage | 56 V--- 56 V | --- | |
| Recommended Operating Temperature: | 0°C - 40°C 0°C | -40°C | |
| Recommended Storage Temperature: | -20°C - 70°C | -20°C - 70°C | |
| Optimum Charging Temperature | 5°C - 40°C 5°C | -40°C | |
| Blade Speed Mode | 2 | ||
| 1 | |||
| ECO | |||
| Cutting Height 20-80mm | 20-80mm | ||
| Cutting Height Positions 7 | 7 | ||
| Deck Size 51cm | 51cm | ||
| Cutting Width | 47cm | 47cm | |
| Grass Bag Volume | 55L | 55L | |
| Mower Weight (with grass bag and battery BA6720T) | 26.3 kg | 28.7 kg | |
| Blade Model | AB1901 AB1901 | ||
| Blade Brake YES | YES | ||
| Measured sound power level L_WA | 93 dB(A)K=0.7 dB(A) | 93 dB(A)K=0.7 dB(A) | |
| Sound pressure level at operator's ear L_PA | 80 dB(A)K=3 dB(A) | 80 dB(A)K=3 dB(A) | |
| Guaranteed sound power level L_WA (measured according to 2000/14/EC) | 94 dB(A) | 94 dB(A) | |
| Valuation of vibration a_n : | Left handle | ≤2.5 m/s2K=1.5 m/s2 | ≤2.5 m/s2K=1.5 m/s2 |
| Right handle | ≤2.5 m/s2K=1.5 m/s2 | ≤2.5 m/s2K=1.5 m/s2 | |
The declared vibration total value has been measured in accordance with a standard test method and may be used for comparing one tool with another; B-1 Bottom Clip B-3 Side Clips B-2 Frame
The declared vibration total value may also be used in2) Align the ribs with the mounting slots on the bag cover a preliminary assessment of exposure. and press the rib down until you hear a "click" (Fig. C).
WARNING:
- that the vibration emission during actual use of the machine can differ from the declared value depending on the ways in which the machine is used; and
- of the need to identify safety measures to protect the operator that are based on an estimation of exposure in the actual conditions of use (taking account of all parts of the operating cycle such as the times when the machine is switched off and when it is running idle in addition to the trigger time).
PACKING LIST (FIG.A1 & A2)
DESCRIPTION
KNOW YOUR MOWER (Fig. A1 & A2)
- Handle
- Side Rail
- Handle-locking Clamp
- Rear Discharge Door
- Lift Handle
- Battery Compartment Cover
- LED Headlights
- Front Wheel
- Deck
- Cutting-height Adjustment Knob
- Rear Wheel
- Quick-adjust Lever
- Grass Bag
- Self-propel Trigger (LM1710E-SP/LM1910E-SP only)
- Self-propel Speed Dial (LM1710E-SP/LM1910E-SP only)
- Blade Rotation Trigger
- Blade Speed Mode Button
- Power Button
- LED Headlights Button
- Mower Status Indicator
- Mower Status Icon
- Blade Speed Indicator
- Blade Icon
OPERATION
ASSEMBLING THE GRASS BAG
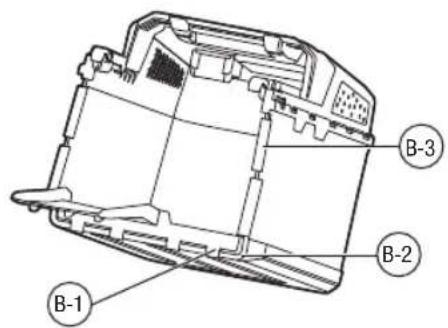
1) Assemble the two side clips and the bottom clip to the frame (Fig. B).
| B-1 Bottom Clip B-3 Side | Clips | |
| B-2 Frame |
EN
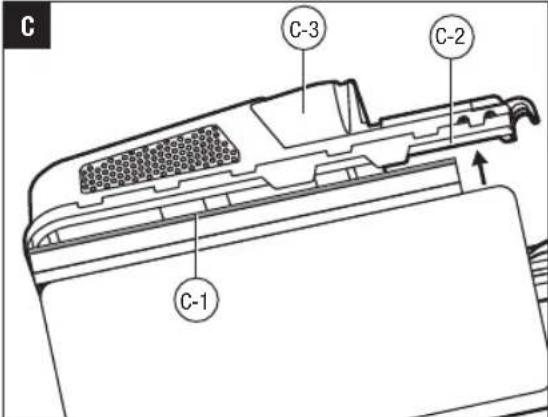
n2) Align the ribs with the mounting slots on the bag cover and press the rib down until you hear a "click" (Fig. C).
| C-1 Ribs C-3 Bag Cover | ||
| C-2 Mounting Slot |
NOTICE: Under normal usage, bag material is subject to wear. To reduce the risk of injury, frequently inspect the bag assembly and replace if there are any signs of wear or deterioration. Use only grass bags manufactured for this mower.
ADJUSTING THE FOLDABLE HANDLE
WARNING: Do not attempt to start the mower until the handle has been locked at one of the three preset operating positions (UPPER OPERATING POSITION, MIDDLE OPERATING POSITION and LOWER OPERATING POSITION).
Your mower is shipped with the handle in the compact, LOCKED STORAGE POSITION (Fig. D).
1) Press and hold the quick-adjust lever to release the handle from the LOCKED STORAGE POSITION.
2) Lift the handle from its folded position, then release the lever. Gently pivot the handle upward until you hear and feel the lock pin engage in one of the following different positions as shown in the Fig. E.
| E-1 | Locked Storage Position | E-4 | Middle Operating Position |
| E-2 | Grass Bag Attachment/Removal Position | E-5 | Lower Operating Position |
| E-3 | Upper Operating Position | E-6 | Cutting Height Adjusting Knob |
ATTACHING THE GRASS BAG
WARNING: Do not at any time make any adjustment to the lawn mower without first stopping the motor, removing the battery pack and waiting for the blade to stop rotating.
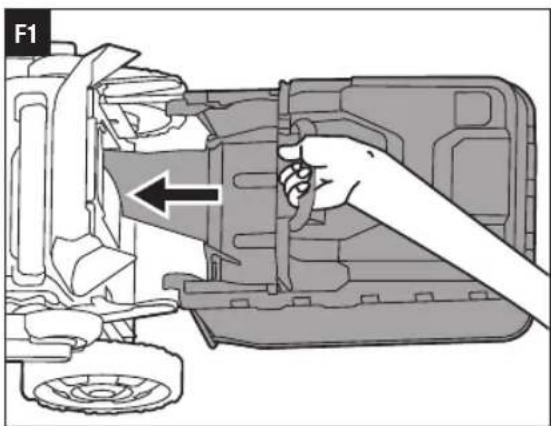
To attach/remove the grass bag (Fig. F1 & F2) Insert the board of the grass bag into the mower and hang the grass bag on the mower.
NOTICE: Remove the mulching insert (sold separately) or side-discharge chute (sold separately) from the mower before attaching the grass bag to the mower.
EN
To attach/remove the mulching insert (sold separately) (Fig. G)
Lift the rear-discharge door and insert the mulching insert into the mower. To remove, just pull it out. Lastly, release the rear-discharge door.
To attach/remove the side-discharge chute (sold separately) (Fig. H)
Install the side-discharge chute into the mower as shown in Fig. H.
NOTICE: Remove the mulching insert (sold separately) from the mower before attaching the side-discharge chute to the mower.
ADJUSTING THE CUTTING HEIGHT (Fig. E)
WARNING: Keep your feet away from the deck when adjusting its height. The mower can be set to 7 cutting heights between 20mm and 80mm. Choose the proper cutting height according to the types and conditions of the grass.
NOTICE: When moving the tool, make sure the cutting height is adjusted at the position of 3 or higher. Failure to do so, could result in the damage of the blade.
ATTACHING/DETACHING THE BATTERY PACK (Fig. K)
USE ONLY WITH THE BATTERY PACKS AND CHARGERS LISTED IN FIG. A3
CHARGE BEFORE FIRST USE.
WARNING: If any parts are broken or missing, do not attempt to attach the battery pack to the mower or operate the mower until the broken or missing parts are replaced. Failure to do so could result in serious injury.
■ To attach
Push the battery pack into the battery compartment until you hear a "click".
■ To detach
Depress the battery-release button in the battery compartment.
NOTICE: Make sure that the latch on the mower snaps into place and that the battery pack is secured to the mower before starting operation.
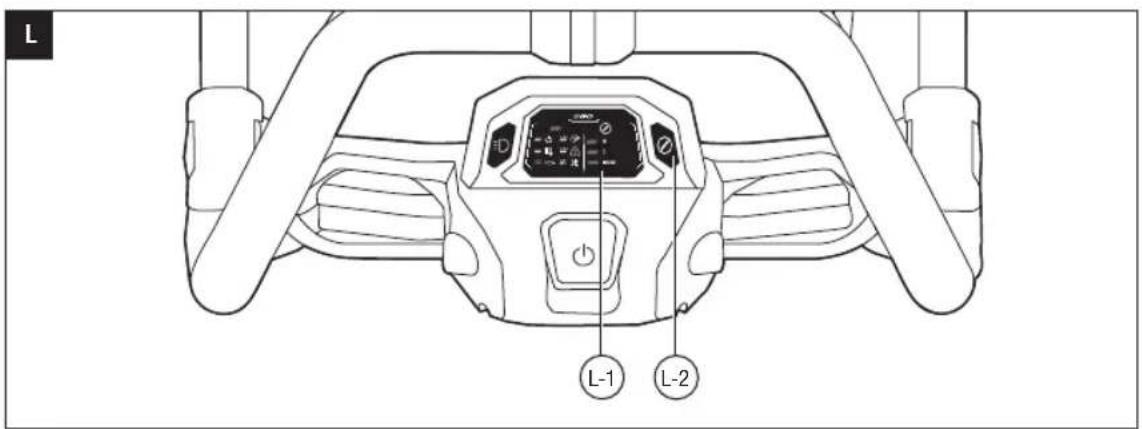
SELECTING BLADE SPEED MODE (Fig. L)
■ Mode 2 is high blade speed mode for high-lift performance to improve suction force and cutting performance.
■ Mode 1 is the best balance between performance and runtime.
■ Model ECO provides the lowest noise level and longest runtime from your battery pack.
Select among mode 2, 1 or ECO by sequentially pressing the blade speed mode button.
NOTE: The default blade speed mode is mode 1.
| L-1 | Blade Speed Indicator | L-2 | Blade Speed Mode Button |
STARTING/STOPPING THE MOWER
WARNING: Do not use the mower in the rain.
WARNING: The operation of any lawn mower can result in foreign objects being thrown into your or others' eyes, which can damage eyes severely. Always wear safety glasses while operating the mower or while performing any adjustments or repairs on the mower.
NOTICE: The blade will continue to rotate for a few seconds after the mower is turned off. Allow the motor/blade to stop rotating before starting it again. Do not rapidly turn the mower off and on.
WARNING: Stop the blade if the mower has to be tilted for transportation when crossing surfaces other than grass and when transporting the mower to and from the area to be mowed.
WARNING: Do not tilt the mower when starting switching on the motor, except if the mower has to be tilted for starting. In this case, do not tilt it more than absolutely necessary and lift only the part which is away from the operator.
Before using, always visually inspect to see that the blade and blade bolt are not worn or damaged. Replace worn or damaged blade and bolt in sets to preserve balance.
Check for blockage of the cutting blade
- To prevent blockage, keep the cutting blade and mower deck clean. Remove grass clippings, leaves, dirt and any other accumulated debris before and after each use.
- When blockage happens, stop the mower and remove the battery pack, then remove any build-up of grass and leaves on or around the drive shaft and motor fan. Wipe the mower clean with a damp cloth.
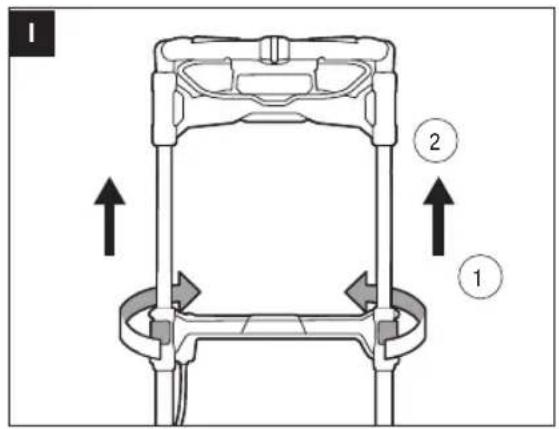
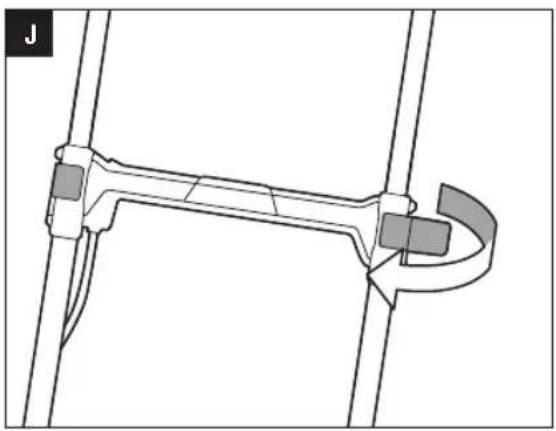
NOTICE: The motor cannot be started unless:
■ The handle is locked into one of the three operating positions, see ADJUSTING THE FOLDABLE HANDLE.
■ The side rails are fully extended (Fig. I).
■ Both green handle-locking clamps are securely closed (Fig. J).
CAUTION: Do not attempt to override the operation of the power button and bail switch.
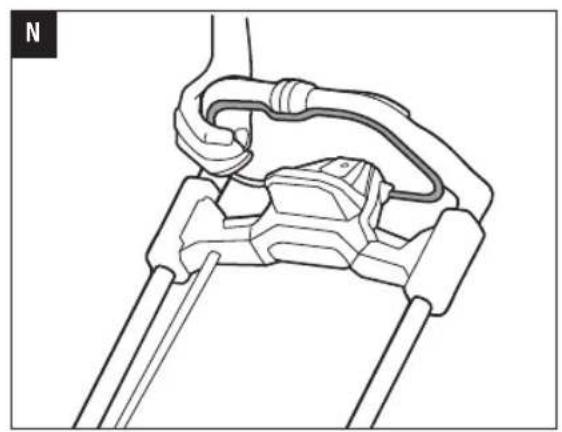
To start the mower (Fig. M & N)
- Attach the battery pack to the mower and close the battery compartment cover.
- Press the power button to illuminate the dashboard, and the mower status indicator – the blade speed indicator for mode 1 will light up.
- Press the blade speed mode button to select the desired speed.
- Press and hold the power button.
- With the power button pressed, pull the blade rotation trigger to meet the handle and release the power button.
To stop the mower (Fig. 0)
- Fully release the blade rotation trigger.
- The electric brake in the Automatic Braking Mechanism will stop the blade rotation within 3 seconds of the blade rotation trigger release.
VARIABLE-SPEED SELF-PROPEL SYSTEM (only for model LM1710E-SP/LM1910E-SP) (Fig. P)
LM1710E-SP/LM1910E-SP is equipped with variable-speed, self-propel capability. This self-propel system is independent from the blade rotation.
NOTE: The self-propel system cannot be started unless the handle is locked into one of the three operating positions.
To operate the self-propel system without blade rotation
- Press the power button to illuminate the dashboard.
- Slightly rotate the self-propel speed-control knob forward until a click can be heard, then pull the self-propel trigger to meet the handle to start the self-propel function.
- To turn the self-propel off, release the self-propel trigger.
| P-1 | Self-propel Speed Dial | P-2 Self-propel Trigger |
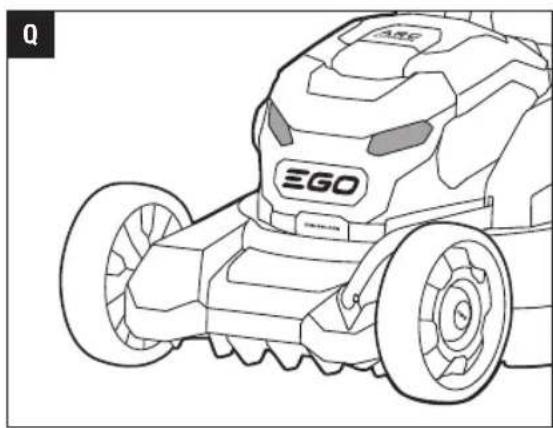
LED HEADLIGHTS (Fig. Q)
To turn on the headlights, press the headlights button.
The headlights provide bright light in front of the mower.
To turn off the headlights, press the button again.
MOWER STATUS INDICATOR (Fig. A2)
The mower status indicator on the dashboard displays the working status of the mower.
EN
| Indicator Description | Meaning Action | ||
 | Solid green | Mower is working properly. | None required. |
 | Flashing green | The side rails are not fully extended. | Stop the mower and make sure that the side rails are fully extended. |
| The handle is not locked in an operating position. | Stop the mower and make sure that the handle is locked in one of the three operating positions. | ||
 | Flashing red | Low battery charge. | Stop the mower and charge the battery pack. |
 | Solid orange | Mower is overheated. | Release the bail switch, wait until the mower temperature drops below 80 °C.See “MOWER HIGH-TEMPERATURE PROTECTION” below. |
 | Flashing orange | The mower is overloaded. | 1. Remove the battery pack, then check if grass has accumulated beneath the deck. Clean if necessary.2. Slow down your stride when cutting.3. Raise the cutting height.4. If above solutions do not work, please contact EGO Customer Service.See “MOWER OVERLOAD PROTECTION” below. |
 | Flashing red/green alternately | The mower electronics error. | Contact EGO Customer Service. |
MOWER HIGH-TEMPERATURE PROTECTION
If the mower temperature exceeds 90 °C during operation, the temperature protection circuit will immediately shut off the mower to prevent overheating damage.
The mower status indicator will glow solid orange. Release the blade rotation trigger and wait until the overheated mower cools down and the status indicator turns green, then restart the mower.
MOWER OVERLOAD PROTECTION
To prevent overload conditions, do not try to remove too much grass at one time. Slow down your stride or raise the cut height.
Your mower has built-in overload circuit protection. When the mower is overloaded, the motor will stop and the mower status indicator on the dashboard will flash orange.
MAINTENANCE
WARNING: To avoid serious personal injury, always switch off the mower, remove the battery pack, and ensure that all moving parts have come to a complete standstill. before cleaning, performing any maintenance or transporting the mower.
⚠ WARNING: Always maintain the machine regular maintenance.
WARNING: Stop the machine, and remove the battery pack to make sure that all moving parts have come to a complete stop after striking a foreign object and to inspect the machine for damage and make repairs before restarting and operating the machine.
WARNING: Stop the machine, and remove the battery pack to make sure that all moving parts have come to a complete stop, if the machine starts to vibrate abnormally, and then to immediately inspect for damage, replace or repair any damaged parts and to check for and tighten any loose parts.
WARNING: When servicing, use only identical replacement parts. Use of any other parts may create a hazard or cause product damage. To ensure safety and reliability, all repairs should be performed by a qualified service technician.
CLEANING THE MOWER
The underside of mower deck should be cleaned after each use, as grass clippings, leaves, dirt and other debris will accumulate.
Remove any buildup of grass and leaves on or around the drive shaft and motor fan. Wipe the mower clean with a damp cloth.
REMOVING/INSTALLING THE BLADE
WARNING: Always protect your hands by wearing heavy gloves or wrapping the cutting edges with rags or other materials when performing any maintenance on the mower blade. Always remove the battery pack when servicing or transporting the mower.
■ To remove the blade following Fig. R1.
NOTICE: If the bolt rotates with the motor shaft when loosening the bolt, turn the fan by hand to align the through holes in the fan with the holes in the blade, and place another metal rod into the aligned holes (Fig. R2).
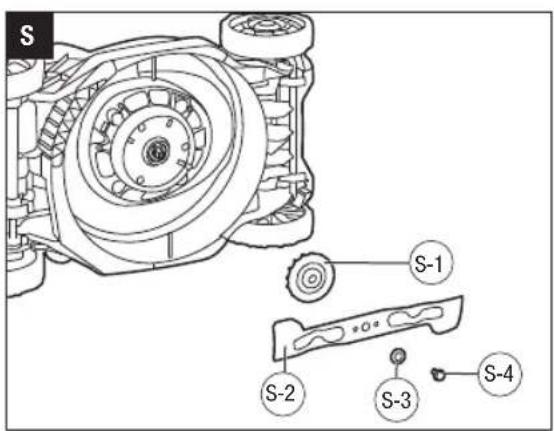
■ To install the blade
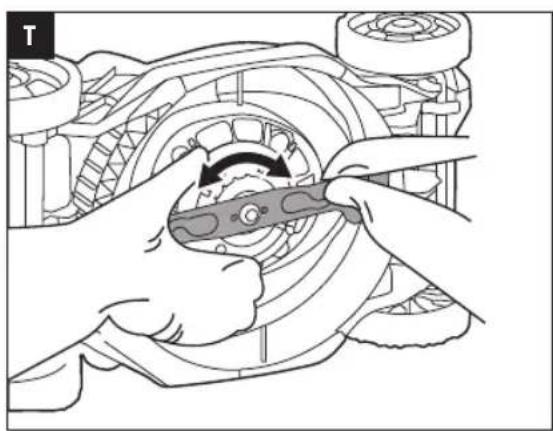
Following the assembly sequence in Fig. S, with the fan blade towards deck and the printed blade side towards outside, align the through holes in the fan with the holes in the blade (Fig. T) and then tighten the blade as Fig. U shown.
| R2-1 Stabilizer 1 S-2 Blade | |
| R2-2 Stabilizer 2 S-3 Flange | |
| R2-3 14mm Wrench S-4 Bolt | |
| S-1 Fan |
EN
NOTICE: The recommended torque for tightening the blade bolt is 50-60 N.m.
STORING THE MOWER
■ Remove the battery pack from the mower and store it in a cool, dry and clean location. Do not store it next to corrosive materials, such as fertilizer or rock salt.
■ Store the mower in a covered, enclosed space, that is cool and dry and out of the reach of children.
■ Do not cover the lawn mower with a solid plastic sheet. Plastic coverings trap moisture around the mower, which causes rust and corrosion.
■ The mower can be stored upright or flat. (Fig. V & W).
WARNING: If the mower tips over from the upright position, mower damage or personal injury may result. Always keep the mower stable and out of the reach of children when it is in the upright position. If possible, lay it flat for storage.
Protecting the environment
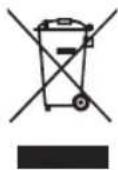
Do not dispose of electrical appliances as unsorted municipal waste, use separate collection facilities.
Contact your local government for information regarding the collection systems available.
If electrical appliances are disposed of in landfills or dumps, hazardous substances can leak into the groundwater and get into the food chain, damaging your health and well-being.
EN TROUBLESHOOTING
| PROBLEM | CAUSE SOLUTION | |
| The mower or self-propel function fails to start. | ■ The battery pack charge is depleted.■ The battery pack is not properly inserted into the battery compartment.■ The handle is not locked in an operating position and the mower status indicator flashes green.■ The mower deck is clogged with grass and debris.■ The self-propel speed dial is in the lowest (OFF) position. | ■ Charge the battery pack.■ Insert the battery pack into battery compartment until you hear a "click".■ Stop the mower and make sure the handle is locked in one of the operating positions.■ Clean the mower deck and ensure that the blade has freedom of movement.■ Slightly rotate the self-propel speed dial forward, then press the self-propel trigger. |
| The mower cuts unevenly. | ■ The blade is dull.■ The grass-cutting height is not set properly.■ The blade is assembled incorrectly.■ The blade speed mode is not set properly. | ■ Sharpen or replace the blade.■ Move the deck height to a higher setting.■ Reassemble the blade, following the section “REMOVING/INSTALLING THE BLADE” in this manual.■ Select a proper blade speed mode. |
| The mower does not mulch properly. | ■ Wet grass clippings are sticking to the underside of the deck.■ The mower is set to cut too much grass at once.■ The blade speed mode is not set properly. | ■ Wait until the grass dries before mowing.■ Raise the deck to a higher cutting height setting.■ Select a mode 1 or ECO speed mode. |
| The mower unexpectedly stops while mowing. | ■ The battery pack charge is depleted.■ Mower is overloaded and the mower status indicator flashes orange.■ Mower deck is clogged with grass and debris.■ The battery pack or mower circuitry is too hot. If the mower is overheated the mower status indicator glow solid orange.■ The blade speed mode is not set properly.■ The mower electronics error and the mower status indicator flashes red/green alternately. | ■ Charge the battery pack.■ Check if grass has accumulated beneath the deck and clean if needed. Raise the cutting height or slow down the mowing.■ Unclog the mower deck. Raise the cutting height and/or cut a narrower swath.■ Allow the battery pack or mower to cool down.■ Select the blade speed to a lower setting.■ Contact EGO service center. |
| There is excessive vibration. | ■ The cutting blade is loose.■ The cutting blade is unbalanced.■ The cutting blade is bent.■ The motor shaft is bent.■ The mower is set to cut too much grass at once.■ The blade speed mode is not set properly. | ■ Tighten the blade bolt.■ Contact the EGO service center.■ Replace the blade.■ Contact the EGO service center.■ Raise the deck to a higher cutting height setting.■ Set the blade speed to a lower setting. |
| The motor works but the blade doesn’t cut the grass. | ■ The blade is not tightened to the required torque. | ■ Re-tighten the blade. The recommended torque for the blade bolt is 50-60 N.m. |
EN
WARRANTY
EGO WARRANTY POLICY
Please visit the website egopowerplus.eu for full terms and conditions of the EGO Warranty policy.
LISTA DE PEÇAS (IMAGEM A1 E A2)
DESCRIÇÃO
LED KOPLAMPEN (afb. Q)

Likestrøm cm Centimeter
kg Kilogram
SPESIFIKASJONER
| Modellnummer LM1710E | LM1710E-SP | ||
| Selvgående system Ingen | Ja | ||
| Spenning | 56 V --- 56 V | --- | |
| Anbefalt driftstemperatur: | 0°C-40°C 0°C-40°C | ||
| Anbefalt lagringstemperatur: | -20°C-70°C -20°C-70°C | ||
| Optimal ladetemperatur 5-40 °C 5-40 °C | |||
| Bladhastighetsmodus | 2 | ||
| 1 | |||
| ∅KO | |||
| Klippehøyde 20-80 mm | 20-80 mm | ||
| Klippehøydeposisjoner 7 | 7 | ||
| Dekkstørrelse 46 cm 46 | cm | ||
| Skjærebredde | 42 cm | 42 cm | |
| Volum på gresspose | 55L | 55L | |
| Gressklipperens vekt (med gressoppsamler og batteri BA6720T) | 25,4 kg | 27,7 kg | |
| Bladmodell | AB1701 | AB1701 | |
| Bladbrems | JA | JA | |
| Målt lydeffektnivå L_WA | 90 dB(A)K=0,7 dB(A) | 90 dB(A)K=0,7 dB(A) | |
| Lydtrykknivå ved operatørens øre L_PA | 77 dB(A)K=3 dB(A) | 77 dB(A) K=3 dB(A) | |
| Garantert lydeffektnivå L_WA (målt i henhold til 2000/14/EF) | 91 dB(A) 91 dB(A) | ||
| Verdsettelse av vibrasjon a_h : | Venstre håndtak | ≤2,5 m/s ^2 K=1,5 m/s ^2 | ≤2,5 m/s ^2 K=1,5 m/s ^2 |
| Høyre håndtak | ≤2,5 m/s ^2 K=1,5 m/s ^2 | ≤2,5 m/s ^2 K=1,5 m/s ^2 | |
| Modellnummer LM1910E | LM1910E-SP | ||
| Selvgående system Ingen | Ja | ||
| Spenning | 56 V--- 56 V | --- | |
| Anbefalt driftstemperatur: | 0°C-40°C 0°C-40°C | ||
| Anbefalt lagringstemperatur: | -20°C-70°C -20°C-70°C | ||
| Optimal ladetemperatur 5-40 °C 5-40 °C | |||
| Bladhastighetsmodus | 2 | ||
| 1 | |||
| ∅KO | |||
| Klippehøyde 20-80 mm | 20-80 mm | ||
| Klippehøydeposisjoner 7 | 7 | ||
| Dekkstørrelse 51 cm 51 | cm | ||
| Skjærebredde | 47 cm | 47 cm | |
| Volum på gresspose | 55L | 55L | |
| Gressklipperens vekt (med gressoppsamler og batteri BA6720T) | 26,3 kg | 28,7 kg | |
| Bladmodell | AB1901 | AB1901 | |
| Bladbrems | JA | JA | |
| Målt lydeffektnivå L_WA | 93 dB(A)K=0,7 dB(A) | 93 dB(A)K=0,7 dB(A) | |
| Lydtrykknivå ved operatørens øre L_PA | 80 dB(A)K=3 dB(A) | 80 dB(A)K=3 dB(A) | |
| Garantert lydeffektnivå L_WA (målt i henhold til 2000/14/EF) | 94 dB(A) 94 dB(A) | ||
| Verdsettelse av vibrasjon a_n : | Venstre håndtak | ≤2,5 m/s ^2 K=1,5 m/s ^2 | ≤2,5 m/s ^2 K=1,5 m/s ^2 |
| Høyre håndtak | ≤2,5 m/s ^2 K=1,5 m/s ^2 | ≤2,5 m/s ^2 K=1,5 m/s ^2 | |
NO
三GO
POLITYKA GWARANCYJNA EGO
zs8m6d3m0g0u s0y0s3g0s/zs9g6g0s
الص implementing Agricultural Policy: Agricultural Policy is a direct relationship between the primary and secondary policies. The primary policy is to be implemented by the Ministry of Agriculture, which is not to be applied to the other primary policy.
تنظيف الجزارة
natural_image
Line drawing of a lawn mower with visible blades and wheels (no text or symbols)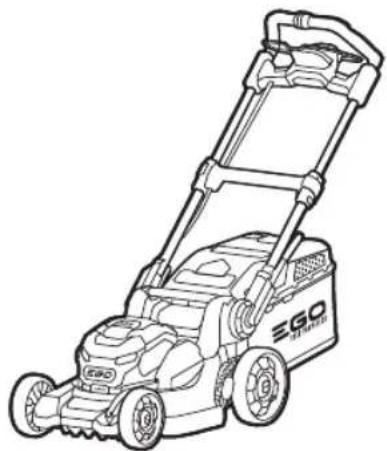
natural_image
Line drawing of a lawn mower with visible ladders and wheels (no text or symbols)LM1710E/LM1710E-SP
LM1910E/LM1910E-SP
He


- LM1710E/LM1710E-SP LM1910E/LM1910E-SP
- VOLT LITHIUM-ION CORDLESS MOWER
- READ ALL INSTRUCTIONS!
- SAFETY SYMBOLS
- WARNING:
- PACKING LIST (FIG.A1 & A2)
- DESCRIPTION
- KNOW YOUR MOWER (Fig. A1 & A2)
- OPERATION
- ASSEMBLING THE GRASS BAG
- ADJUSTING THE FOLDABLE HANDLE
- ATTACHING THE GRASS BAG
- EN
- To attach/remove the mulching insert (sold separately) (Fig. G)
- To attach/remove the side-discharge chute (sold separately) (Fig. H)
- ADJUSTING THE CUTTING HEIGHT (Fig. E)
- ATTACHING/DETACHING THE BATTERY PACK (Fig. K)
- USE ONLY WITH THE BATTERY PACKS AND CHARGERS LISTED IN FIG. A3
- CHARGE BEFORE FIRST USE.
- SELECTING BLADE SPEED MODE (Fig. L)
- STARTING/STOPPING THE MOWER
- Check for blockage of the cutting blade
- To start the mower (Fig. M & N)
- To stop the mower (Fig. 0)
- VARIABLE-SPEED SELF-PROPEL SYSTEM (only for model LM1710E-SP/LM1910E-SP) (Fig. P)
- To operate the self-propel system without blade rotation
- LED HEADLIGHTS (Fig. Q)
- MOWER STATUS INDICATOR (Fig. A2)
- MOWER HIGH-TEMPERATURE PROTECTION
- MOWER OVERLOAD PROTECTION
- MAINTENANCE
- CLEANING THE MOWER
- REMOVING/INSTALLING THE BLADE
- STORING THE MOWER
- Protecting the environment
- EN TROUBLESHOOTING
- WARRANTY
- EGO WARRANTY POLICY
- LISTA DE PEÇAS (IMAGEM A1 E A2)
- DESCRIÇÃO
- LED KOPLAMPEN (afb. Q)
- 三GO
- POLITYKA GWARANCYJNA EGO
- zs8m6d3m0g0u s0y0s3g0s/zs9g6g0s
Brand : EGO
Model : Power+ LM1912E
Category : Lawn mower