
D-8 - Beard trimmer Andis - Free user manual and instructions
Find the device manual for free D-8 Andis in PDF.


User questions about D-8 Andis
0 question about this device. Answer the ones you know or ask your own.
Ask a new question about this device
Download the instructions for your Beard trimmer in PDF format for free! Find your manual D-8 - Andis and take your electronic device back in hand. On this page are published all the documents necessary for the use of your device. D-8 by Andis.
USER MANUAL D-8 Andis
natural_image
Black and white photo of a hairbrush with a V-neck design and 'ANTIS' logo on the base (no additional text or symbols)Item pictured may differ from actual product
natural_image
Line drawing of a circular mechanical component with two protrusions, labeled 'AUSTRALIA' below (no other text or symbols)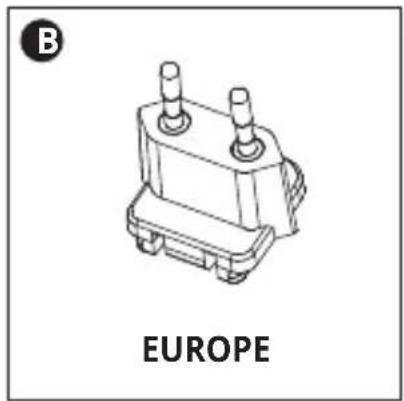
natural_image
Line drawing of a mechanical component labeled 'EUROPE' (no additional text or symbols)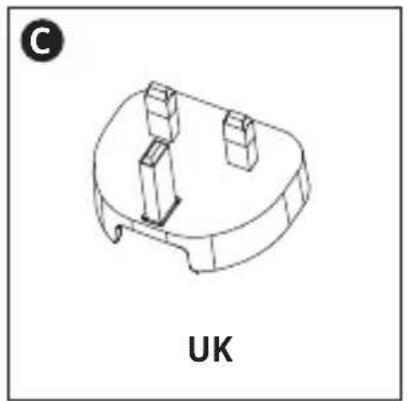
natural_image
Technical line drawing of a mechanical component labeled 'UK' (no other text or symbols)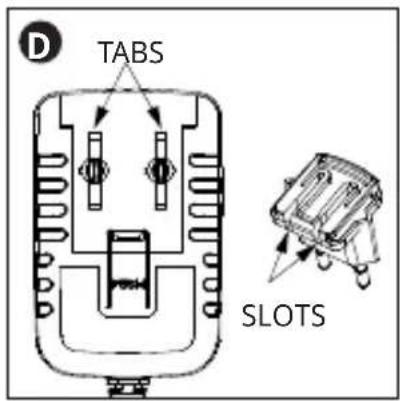
text_image
D TABS SLOTS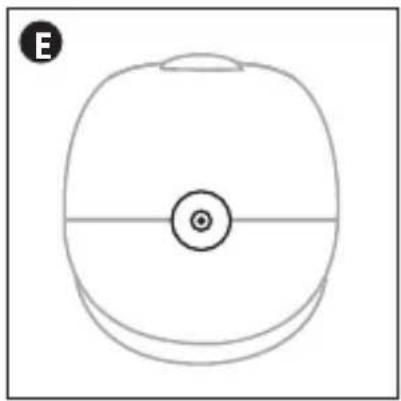
natural_image
Simple line drawing of a circular object with a central dot and a small rectangular top, no text or symbols present.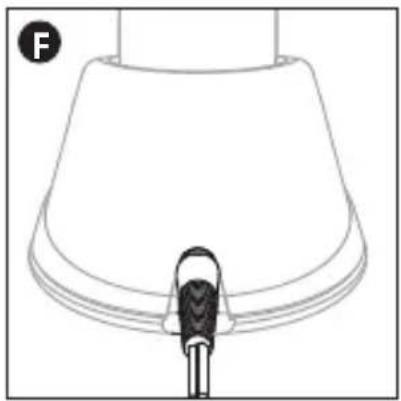
natural_image
Line drawing of a lampshade with a black handle and a small metallic object at the base (no text or symbols)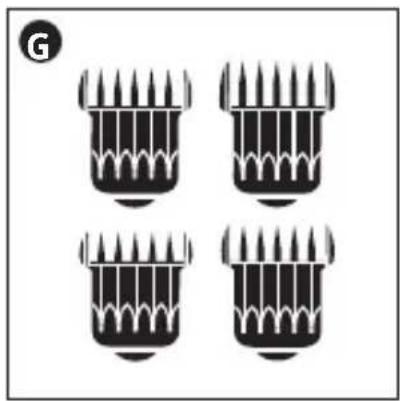
natural_image
Four identical black-and-white icons of a hairbrush with pointed tips, arranged in a 2x2 grid (no text or symbols)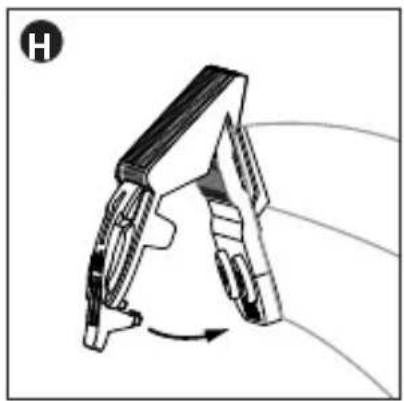
natural_image
Diagram of a mechanical device with rotating arm and curved handle (no text or symbols)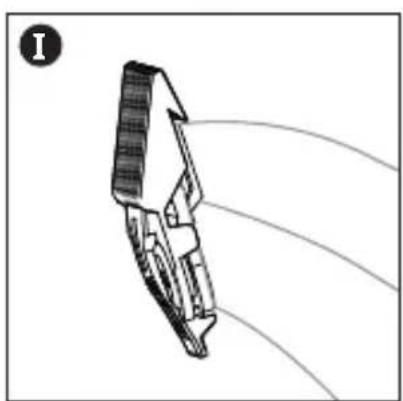
natural_image
Diagram of a mechanical component with motion lines, no visible text or symbols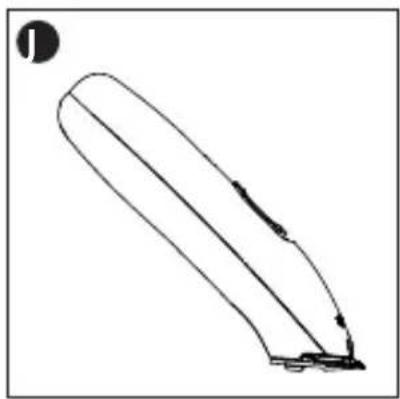
natural_image
Simple line drawing of a pen-like object with a curved handle and base, no text or symbols present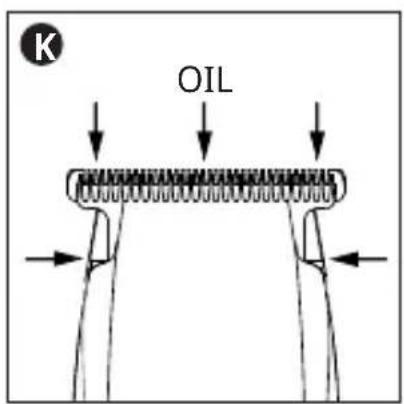
text_image
K OIL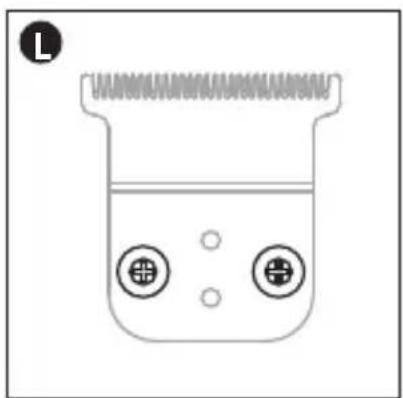
natural_image
Simple line drawing of a container with two circular components and a spring-like top (no text or symbols)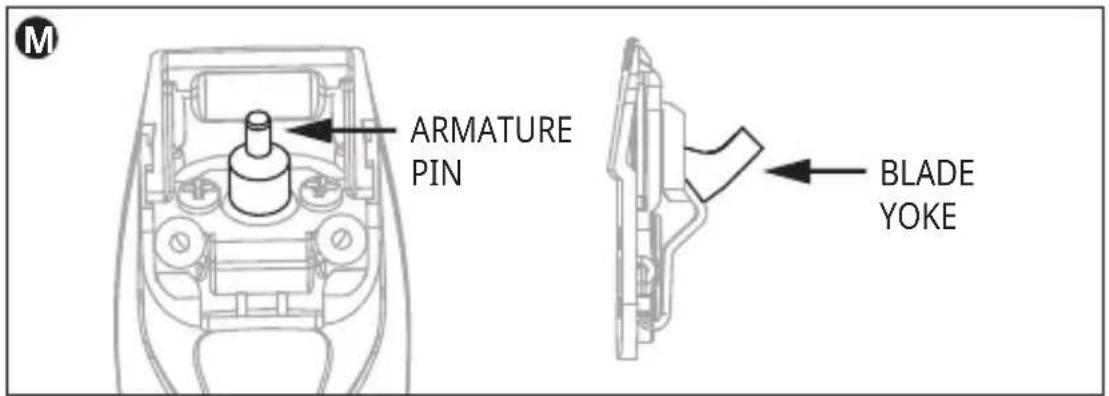
text_image
M ARMATURE PIN BLADE YOKEPlease read the following instructions before using your new Andis trimmer. Give it the care that a fine precision built instrument deserves and it will give you years of service.
ORIGINAL INSTRUCTIONS
This appliance is designed to be used in commercial areas.
IMPORTANT SAFEGUARDS
When using an electrical appliance, basic precautions should always be followed, including the following: Read all instructions before using the Andis trimmer. This product not for use by children.
DANGER: To reduce the risk of electric shock:
- Do not reach for an appliance that has fallen into water. Unplug immediately. Never use appliance near water.
- Do not use while bathing or in a shower.
- Do not place or store appliance where it can fall or be pulled into a tub or sink. Do not place in or drop into water or other liquid.
- Always unplug this appliance from the electrical outlet immediately after using. Unplug by holding and pulling on plug, not cord.
- Unplug this appliance before cleaning, removing, or assembling parts.
WARNING: To reduce the risk of burns, fire, electric shock, or injury to persons:
- An appliance should never be left unattended when plugged in.
- This appliance can be used by children aged from 8 years and above and persons with reduced physical, sensory or mental capabilities or lack of experience and knowledge if they have been given supervision or instruction concerning use of the appliance in a safe way and understand the hazards involved.
-
Children should be supervised to ensure that they do not play with the appliance.
-
Use this appliance only for its intended use as described in this manual. Do not use attachments not recommended by Andis.
- Never operate this appliance if it has a damaged cord or plug, if it is not working properly, if it has been dropped or damaged, or dropped into water. Return the appliance to an Andis authorized service station for examination or repair.
- Keep the cord away from heated surfaces.
- Never drop or insert any object into any opening. Insert only recharging transformer plug into trimmer receptacle.
- Do not use outdoors or operate where aerosol (spray) products are being used or where oxygen is being administered.
- Do not use this appliance with a damaged or broken blade or comb, as injury to the skin may occur.
- Always attach plug to appliance first, then to outlet. To disconnect turn control to OFF then remove plug from outlet.
- WARNING: During use, do not place or leave appliance where it may be 1) damaged by an animal or 2) exposed to the weather.
- The battery in this trimmer is designed to provide maximum trouble-free life. However, like all batteries, it will eventually wear out. Do not disassemble trimmer and attempt to replace battery.
- This appliance contains batteries that are non-replaceable.
- Batteries can be harmful to the environment if disposed of improperly. Many communities offer recycling or battery collection. Contact your local government about disposal practices in your area.
-
When discarding old batteries, cover battery terminals with heavy-duty adhesive tape to prevent short circuits.
WARNING: Do not attempt to destroy or disassemble trimmer or remove any of its components. Also, never touch metal terminals with metal objects and/or body parts, as short circuit may result. Keep away from children. Failure to comply with these warnings could result in fire or serious injury. -
This appliance is only to be used with the power supply unit provided with the appliance.
- 'This appliance is only supplied at safety extra low voltage corresponding to the marking on the appliance.
- Keep the appliance dry.
SAVE THESE INSTRUCTIONS
REFER TO PAGE 2 FOR FIGURES.
UNIVERSAL AC/DC POWER ADAPTER
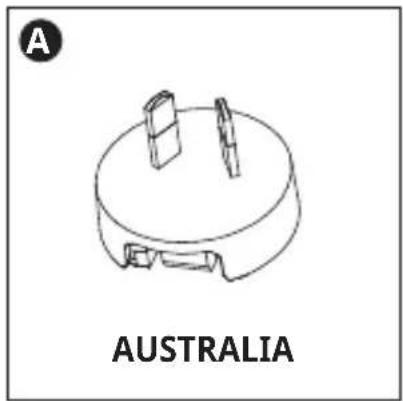
The unit/charging stand is equipped with a universal AC/DC power adapter. Three interchangeable input plugs are included for use in most countries around the world (Figures A-C). Plugs may vary by kit.
REMOVING INPUT PLUG:
- Unplug AC/DC power adapter from wall outlet.
- While pressing down on button located on input plug, gently push up on plug until it releases from power adapter.
REPLACING INPUT PLUG:
- To replace input plug, align tabs on the AC/DC power adapter with slots on input plug (Figure D).
- Gently push input plug into power adapter until it snaps into place.
OPERATING INSTRUCTIONS
- The battery is not intended to be replaced by the user.
- The battery must be removed from the appliance before it is scrapped.
- The appliance must be disconnected from the supply mains when removing the battery.
• The battery is to be disposed of safely.
CHARGING TRIMMER
The AC adapter is intended for use with Andis model D-8 lithium-ion battery with a rated capacity of 3.7V -2.8 Wh. Remove the trimmer and AC adapter from the carton. Plug the AC adapter into a 240V AC outlet, or according to your local power standards. Plug the adapter cord directly into the bottom of the trimmer (Figure E). The trimmer on/off switch must be in the OFF position for the battery to charge. The green light on the trimmer will turn on.
The trimmer has not been charged at the factory. Please charge the trimmer for 2 hours before the first use for maximum performance.
You can keep the trimmer plugged into the adapter when not in use. The adapter will maintain the battery at full charge. The green light will turn OFF when the battery is fully charged. We recommend that the adapter be unplugged if the trimmer won't be used for seven or more days.
USING CHARGING STAND
Plug the adapter cord into the receptacle on the back of the charging stand (Figure F). Place trimmer in the charging stand. The green light on the charger will turn ON. The on/off switch on the trimmer must be in the OFF position for the battery to charge.
FAILURE TO CHARGE
- Make sure voltage is present at the wall outlet (confirm with an appliance you know is working).
- Make sure on/off switch on the trimmer is OFF.
- Check to make sure adapter cord is plugged firmly into trimmer or charging stand. Twist the adapter cord slightly to ensure good electrical connection.
- If failure to charge still exists, return trimmer to Andis or an Andis authorized service station for examination and repair or replacement.
CORDED OPERATION
If the trimmer powers OFF in the middle of a trimming job, the power cord can be attached to continue use in corded operation. When the trimmer is running with the power cord attached, the green light will remain off, even if the battery is partially or fully discharged. The trimmer will not charge while in use with the cord attached.
USING ATTACHMENT COMBS
(Some models do not have combs and sizes will vary by kit)
Your trimmer comes complete with 4 attachment combs: 1/16", 1/8", 1/4" and 3/8" (Figure G). To use, slide front of attachment comb over the teeth of the blade. Snap comb down over back of blade (Figures H & I). Use the trimming guide to find the approximate lengths of cut. Different blade angles in relation to the skin, thickness and texture of the hair will vary the cutting length.
TRIMMING GUIDE
| Description Trimming Direction | Approximate Length of Cut | |
| Standard Andis Blade | With hair grainAgainst hair grain | 1/16" (1.6 mm)1/32" (0.8 mm) |
| 1/16" Attachment Comb | With hair grainAgainst hair grain | 3/16" (4.8 mm)3/32" (2.4 mm) |
| 1/8" Attachment Comb | With hair grainAgainst hair grain | 1/4" (6.4 mm)1/8" (3.2 mm) |
| 1/4" Attachment Comb | With hair grainAgainst hair grain | 3/8" (9.5 mm)1/4" (6.4 mm) |
| 3/8" Attachment Comb | With hair grainAgainst hair grain | 1/2" (12.7 mm)3/8" (9.5 mm) |
USER MAINTENANCE
Cleaning and user maintenance shall not be made by children without supervision.
The internal mechanism of your trimmer has been permanently lubricated at the factory. Other than the recommended maintenance described in this manual, no other maintenance should be performed, except by Andis Company or an Andis Authorized Service Station.
CARE AND SERVICING OF YOUR ANDIS TRIMMER BLADES
The blades should be oiled before, during, and after each use. If your trimmer blades leave streaks or slow down, it's a sure sign that the blades need oil. The trimmer should be held in the position shown in Figure J to prevent oil from getting into the motor. Place a few drops of Andis Clipper Oil on the front and side of the cutter blades (Figure K). Wipe excess oil off the blades with a soft dry cloth. Spray lubricants contain insufficient oil for good lubrication, but are an excellent trimmer coolant. Always replace broken or nicked blades to prevent injury. You can clean the excess hair from your blades by using a small brush or old toothbrush. To clean the blades we suggest immersing the blades only into a shallow pan of Andis Clipper Oil, while the trimmer is running. Any excess hair and dirt that has accumulated between the blades should come out. After cleaning, turn your trimmer off, dry the blades with a dry cloth and start clipping or trimming again.
REPLACEMENT (REMOVAL) OF BLADE SET
Your trimmer has a preset tension assembly on the blade set. To remove blade set from your trimmer, remove from charger base. Turn the trimmer upside down so teeth of blades are facing down. You may wish to set the trimmer on a flat surface while performing these operations. Using a phillips type screwdriver, unscrew the two blade screws (Figure L). Remove blade set from trimmer. Install new blade set, making sure the blade yoke cradles the armature pin on trimmer (Figure M). There is no need to adjust blade tension before use, as tension has been preset at the factory. Align screw holes of blade set to screw inserts on trimmer housing. Replace the screws. Before tightening down blade screws, check alignment of blade set to housing, making sure that they are parallel. Tighten down screws.
USE GUIDELINES FOR LITHIUM-ION BATTERIES
- The lithium-ion battery included with your trimmer does not develop a "memory effect" like a nickel-metal hydride (NiMH), or nickel cadmium (NiCd) battery. You can return the trimmer to the charger at any time for a full charge, or even use the battery before a charge cycle is complete. Like most rechargeable batteries, lithium-ion batteries perform best when used frequently.
- For maximum battery life, store the trimmer in a partially discharged condition if the unit will be unused for several months. To discharge the battery, run the trimmer until it automatically shuts off.
- Avoid locating the trimmer near heat vents, radiators, or in direct sunlight. Optimum charging will result where the temperature is stable. Sudden increases in temperature can result in the battery receiving less than a full charge.
- Many factors influence lithium-ion battery life. A battery that has received heavy use or is more than a year old may not give the same run-time performance as a new battery pack.
- New lithium-ion batteries, unused for a period of time, may not accept a full charge. This is normal and does not indicate a problem with the battery or charger. The battery will accept a full charge after several cycles of trimmer use and recharging.
- Disconnect the charger or the trimmer from the AC outlet if extended periods of non-use are anticipated.
DISPOSAL OF BATTERY PACKS
As a consumer you are legally obliged to dispose of batteries and battery packs as special waste. Information regarding how to remove the battery pack from the relevant device at the end of its life can be found on page 139. After removing the battery pack, the device must be disposed of and may NOT be used again.
CAREFUL! RISK OF INJURY CAUSED BY DEFECTIVE, LEAKY BATTERY PACK!
The battery pack used contains substances that may cause injury if they come into contact with skin or are inhaled. If a battery pack has leaked in your device, you may only remove it from the device while wearing rubber gloves, then it should be placed in a closed container and sent for proper disposal. In accordance with the European directive 2013/56/EU, defective battery packs/batteries must be collected separately and sent for environmentally-friendly recycling. The following disposal options are available: – By way of dealers; – By way of a return station with the GRS symbol; – By way of community provided special waste collection containers. Other disposal information can be obtained from your community or city administration.
CORRECT DISPOSAL OF THIS PRODUCT
This marking indicates that this product should not be disposed with other household wastes throughout the EU. To prevent possible harm to the environment or human health from uncontrolled waste disposal, recycle it responsibly to promote the sustainable reuse of material resources. To return your used device, please use the return and collection systems or contact the retailer where the product was purchased. They can take this product for environmental safe recycling.
BLADE & CLIPPER/TRIMMER REPAIR SERVICE
When the blades of your Andis clipper/trimmer become dull after repeated use, it is advised to purchase a new set of blades available through your Andis supplier. Some blade sets can be resharpened - contact your Andis supplier or the Andis Company for information on resharpening. If you wish your clipper/trimmer to be serviced as well, contact your Andis supplier. If you have a problem contacting your Andis supplier contact the Andis Company customer service department at 1-262-884-2600 or email at info@andisco.com.
ENERGY CONSUMPTION INFORMATION (MEXICO)
Energy consumption per unit of time under normal conditions of operating the equipment: 2.41 Wh Standby energy consumption per unit of time of the equipment: 0.05 Wh
Quantity of product or service offered by the equipment, per unit of energy consumed: Not
Applicable
CAUTION: Never handle your Andis trimmer while you are operating a water faucet and never hold your trimmer under a water faucet or in water. There is danger of electrical shock and damage to your trimmer. ANDIS COMPANY will not be responsible in case of injury due to this carelessness.
MISE AU REBUT CORRECTE DE CE PRODUIT
JUISTE AFVOER VAN DIT PRODUCT
TROCA (REMOÇÃO) DO CONJUNTO DE LÂMINA
KORREKT AVHENDING AV DETTE PRODUKTET
UNIWERSALNY ZASILACZ SIECIOWY
natural_image
Illustration of a hand using a screwdriver to adjust a shoe component (no text or symbols present)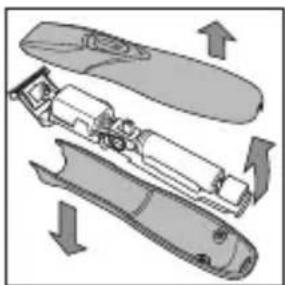
natural_image
Exploded view diagram of a mechanical device showing internal components and directional arrows (no text or labels)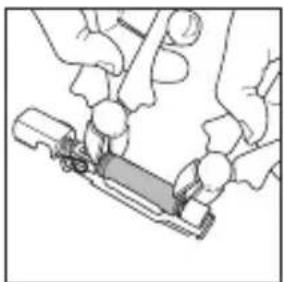
natural_image
Illustration of hands using a tool to adjust or install a mechanical component (no text or symbols visible)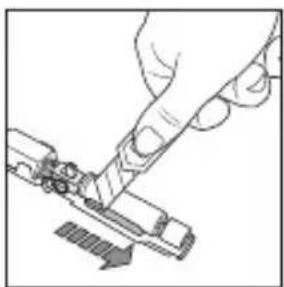
natural_image
Illustration of a hand using a tool to cut or mark a mechanical component (no text or symbols visible)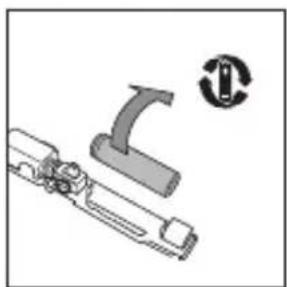
natural_image
Mechanical assembly diagram showing a lever and gear mechanism with a circular symbol (no text or labels)This appliance conforms to requirements of Low Voltage Directive 2014/35/EU, EMC Directive 2014/30/EU, Machinery Directive 2006/42/EC. A-weighted sound pressure level < 70 dB(A). Vibration level < 2.5 m/s ^2 .
Deinze, Belgium 9800
32 9 330 2064
info@hairco.be
KOLL GROOMING PRODUCTS BVBA
Senator A. Jeurissenlaan 1155
ZonhovenBelgium3520
32 89 35 34 21
admin@koll-groomingproducts.be
MEDINI NV
Legeweg 157i
Oostkamp, Belgium 8020
32 50 433 442
info@medini.be
TRANSGROOM NV
Moenkouterstaat 4
Moen, Belgium 8552
32 56 252010
info@transgroom.com
BULGARIA
ET "BIOMED - NIKOLAY GOLOMEHOV"
Grebenetz #6 St.
Sofia, Bulgaria 1680
359 2 859 8323
info@biomedbg.com
ILIADA EOOD
Blvd. Tsarigradsko Shossee 137 Bsm
Center Floor 4
Sofia, Bulgaria 1784
35929768410
chdelmas@iliada.bg
CYPRUS
ARVO TRADING CO. LTD.
PO Box 22175
4, Gevgelis Str.
Nicosia, Cyprus 1071
357 2237 4818
info@arvo.com.cy
D. CHR. SUPPLIES LTD.
V.A.T. Number 10383546q
Giochan Strauss 6,3060
Limassol, Cyprus 3048
357 998 09837
d.chrysostomou@hotmail.com
THAVATRACO ENTERPRISES
PO Box 51815
Limassol, Cyprus 3508
9357 25 338 129
thavatraco@cytanet.com.cy
CZECH REPUBLIC
PALAS IMPORT S.R.O.
Jirovcova 916/63
Ceske Budejovice
Czech Republic 370 04
420 387 426441
Randers Soe, Denmark 8960
45 86421333
lars@thordal.dk
VIKING DANMARK
Koldkaergaard
Agro Food Park 12
Aarhus N, Denmark DK-8200
service-clients@chadog.fr
JIKA - GRIMAUD GELARD
P.A. La Grignardais
Pleslin, France 22490
33 2 96271047
info@gg-jk.com
SAINT GERMAIN FRANCE
6 Rue Fortia
Marseille, France 13001
33 6 84 04 68 47
tarek.belaroussi@stgermain-dz.com
SAREF
Rue de Fleurenne
Zl de Blanquefort
Attn: Michel Fontes
Blanquefort, France 33295
33 5 56955161
saref.commande@gmail.com
GERMANY
EBIMEX
Im Westesch 19
Wilsum, Germany 49849
49 5945 655
info@ebimex.de
ERICH HARTKOPF GMBH & CO. KG
Backershof 13-15
Solingen, Germany 42699
49 212 221460
info@ehaso.de
Solingen, Germany 42651
49 212 25010
Koln-Dellbruck, Germany 51069
49 221 9689 788
info@meissner-koeln.de
TIERBUDE NALBACH GMBH
Hauptstrasse 199
Nalbach, Germany 66809
49 6838 974 1282
info@tierbude-grosshandel.com
Solingen, Germany 42653
49 212 383288463
info@ust-germany.com
GREECE
NIKOLAOS HATZIMICHAEL
79-81 Socratous Str.
Athens, Attica Greece 10432
302105233823
nikos.hatzimichael@yahoo.com
YIANNIS TSOMBARIS
47 Marni St.
Athens, Greece 10438
302105226671
yiannist@otenet.gr
HUNGARY
GHISLANDI & TARSAI
Parkwest, Dublin 12, Ireland
353 1 620 5943
salonsavers@gmail.com
CASTLELACK CANINE PRODUCTS
Lakefield House
Castlelack, Bandon
Co. Cork, Ireland
353 21 7330138
info@ccpdogs.ie
DUGGAN VETERINARY SUPPLIES
Holycross Thurles
Co. Tipperary, E41 A093, Ireland
353 504 43169
sales@dugganvet.ie
VETEQUIP LTD.
Unit C1, Clane Buisness Park
Clane Co. Kildare, Ireland
353 87 267 0137
info@vetequipment.ie
ITALY
ANGELOFRANCESCHINI S.R.L.
Via Ca Ricchi 15
San Lazzaro Di Savena, Italy 40068
393486833744
luca.beghelli@alpha-vet.it
CAMON SPA
Alessandria, Italy 15100
39 013 12 64774
lipolla@libero.it
COLTELLERIE MILANESI SAS
Via Solari 56 Int.
Milano, Italy 20144
39 02 422 2291
thomashaupt@coltelleriemilanesi.it
SILVER TRADING
Via Volturno 36-38
Roma, Italy 00185
39 3511169452
silvertradingitaly@gmail.com
MOROCUTTI GIOVANNI SRL
Via Cassala 64
Brescia, Italy 25126
30 0571 542421
anna.morocutti@morocutti.it
PET ENERGY S.R.L.
Via Mazzini, 83
Alpignano (To), Italy 10091
info@petenergy.it
PORRINI GROUP SRL
Kaunas, Lithuania 50351
370 675 81214
purchase@groziospektras.lt
KRINONA, UAB
Raudondvario Pl. 162
Kaunas,LithuaniaLT-47174
370 759025
Justina@krinona.lt
MALTA
EXCEED
122, St. Thomas St.
Fgura Fgr, Malta 1604
356 793 22949
noelledarmanin@hotmail.com
NORIVA LTD.
351 Mallia Haus, Htajriet St.
Mosta Mst., Malta 3068
356 214 13112
info@noriva.com.mt
SALON SERVICES LTD.
Somnium, Tower Rd.
Swatar, Birkirkara, Malta BKR4011
356 21 449236
simone@salonsmalta.com
NETHERLANDS
1 SUPPLY B.V.
Assen, Netherlands 9403 AZ
31 85 016 0890
office@1supply.nl
KNEZEVIC IMPORT EN EXPORT BV
Lorentzweg 7
Spijkenisse, Netherlands 3208LJ
31 181 617833
info@trim.nl
OKDV GROOMING PRODUCTS
Max Havelaardreef 170
Oosterhout, Netherlands 4906 BD
31 162 459 499
okdv@xs4all.nl
VEE SERVICE IDAC BV
Thomas Edisonweg 36
Drunen, Netherlands 5151DJ
31 416 379 955
info@veeserviceidac.nl
POLAND
4 PAWS IZABELA LEGOWIK
Orla 8 St.
Tuchola, Poland 89-500
48 52 334 6455
biuro@germapol.pl
F.P.H.U. SEWING S.C.
Ul. Kowaniec 55
Nowy Targ, Poland 34-400
48 18 2669333
biuro@sewing.pl
GROOMERSHOP MACIEJ TOMASZEWSKI
Pianowo 38
Koscian, Poland 64-000
48 504 399582
Krakow, Poland 31-228
48 123 535088
R. Teixeira Gomes, Lt 18 Cv/B
Lagos, Portugal 8600-587
351 282 761 524
geral@4rumos.pt
CANIAGUEDA - PRODUTOS PARA ANIMAIS
office@daisy-medical.ro
REDHEAD DISTRIBUTION SRL
Bld. Constantin Brancusi Nr. 163
Ap. 21f
Cluj-Napoca, Romania 400000
40 746 110 522
zsolt.deak@yahoo.com
SC LATODIS COM SRL
Centru St. No 636, Bl. 21
Parter Poiana Campina
Prahova, Romania 107425
40 244 371 995
office@latodis-med.com
SLOVAKIA
BELORA, S.R.O.
Langsfeldova 24
Bratislava, Slovakia 81104
421 905 616 859
jzidek@belora.sk
PROFIKOZMETIKA, S.R.O.
Mengusovce 94
Menqusovce, Slovakia 059 36
421 908 988 136
Box 100, Astorp, Sweden S-265 22
info@dogman.se
BRATT TRADING AB - ANIMAL
Studiovagen 8
Tyreso, Sweden 135 48
4687129510
info@bratt-trading.se
BRATT TRADING AB - B&B
Studiovagen 8
Tyreso, Sweden 135 48
4687129510
info@bratt-trading.se
LYCKLIGA FARET SKARSLIPERI
Prastavagen 254
Hoganas, Sweden 263 91
46 42 722 83
info@lyckliga.nu
NEXT2VET AB
Ostra Zinkgatan 2
Ystad, Sweden SE-271 39
46 411 555730
info@next2vet.se
SCANDIVET AB
Granitgatan 2
Enkoping, Sweden 749 40
46 171 857 70
info@scandivet.se
SWEVET AB
Forskaregatan 1 D Se - 275 37
Sjobo, Sweden 275 37
46 77 121 5500
kundtjanst@swevet.se
ZOOSUPPORT SKANDINAVIA AB
Kistagangen 20 B
164 40 Kista, Sweden
358 45 630 6119
email@mustigroup.com
UNITED KINGDOM
AH UK ANIMAL HEALTH (PVT) LTD.
College Mains Rd.
Dumfries, DG2 ONU
United Kingdom
44 1387 274854
enquiries@covetrus.com
1 Greencroft Industrial Park
Guardian Industrial Estate
Pattenden Lane
Marden, Kent TN12 9QD
United Kingdom
44 1622 834325
burtonsgrooming@burtons.uk.com
BURTONS MEDICAL EQUIPMENT LTD.
Guardian Industrial Estate
Pattenden Lane
Marden, Kent TN129QD
United Kingdom
44 1622 834344
info@burtons.uk.com
CHRISTIES DIRECT LTD.
16 Finvoy Rd.
Ballymoney, Co Antrim BT53 7JE
United Kingdom
support@christiesdirect.com
DIAMOND EDGE LTD.
126 Gloucester Rd.
Brighton, BN1 4BU
United Kingdom
44 1273 605922
diamondedge@btconnect.com
GROOMERS LTD SPUK
137 Seventh St.
New Greenham Park Newbury Berkshire
RG19 6HN
United Kingdom
andis.styling@groomers-online.com
GROOMERS LTD.
137 Seventh St.
New Greenham Park
Newbury - Berkshire RG19 6HN United
Kingdom
customer.service@groomers-online.com
IMS (EURO) LTD.
Unit 46, Europa Business Park
Bird Hall Lane, Cheadle Heath
Stockport SK3 OXA
United Kingdom
44 161 428 1440
info@imseuro.co.uk
PARMA AB
PO Box 412
Bandhagen, SE - 12470
United Kingdom
46 8 773 0045
info@parma.se
SALLY SALON SERVICES (SBH)
Ground Floor
Inspired
Easthamstead Rd. Bracknell
RG12 1YQ
United Kingdom
info@salon-services.com
Unit 4 Lakeside Business Units
Block Fen, Mepal
Cambridgeshire
United Kingdom
44 1354 691830
post@simpsons-online.co.uk
To find an Andis Authorized Service Station or access this manual online go to andis.com
© 2024 ANDIS COMPANY
1800 Renaissance Blvd. Sturtevant, WI 53177 USA
1-262-884-2600 | info@andisco.com
FORM #560254
PRINTED IN USA
FLAT SIZE: 8.5"W X 6.5"H
FOLDED SIZE: 4.25"W X 6.5"H
MIN SIZE: 4.25"W X 6.5"H