YT-85225 - Lawn mower Yato - Free user manual and instructions
Find the device manual for free YT-85225 Yato in PDF.

| Product type | Cordless lawn mower |
| Brand | Yato |
| Model | YT-85225 |
| Rated voltage | 36 V DC |
| Cutting width | 430 mm |
| Cutting height | 25 to 75 mm |
| Rated rotation speed | 2900 min-1 |
| Sound pressure level (LpA) | 72.8 dB(A) ± 3.0 |
| Sound power level (LwA) | 87.1 dB(A) ± 2.95 |
| Vibration level (left handle) | 0.34 m/s² ± 1.5 |
| Vibration level (right handle) | 0.37 m/s² ± 1.5 |
| Weight | 13.5 kg |
| Grass catcher capacity | 50 L |
| Protection class | IPX1 |
| Power supply | 2 Li-Ion batteries 36 V (not included) |
| Insulation class | III |
| Delivery contents | Lawn mower, grass catcher, 2 keys, manual (without battery and charger) |
Frequently Asked Questions - YT-85225 Yato
User questions about YT-85225 Yato
0 question about this device. Answer the ones you know or ask your own.
Ask a new question about this device
Download the instructions for your Lawn mower in PDF format for free! Find your manual YT-85225 - Yato and take your electronic device back in hand. On this page are published all the documents necessary for the use of your device. YT-85225 by Yato.
USER MANUAL YT-85225 Yato
natural_image
Close-up of mechanical components including a cylindrical rod and mechanical clamping device (no visible text or symbols)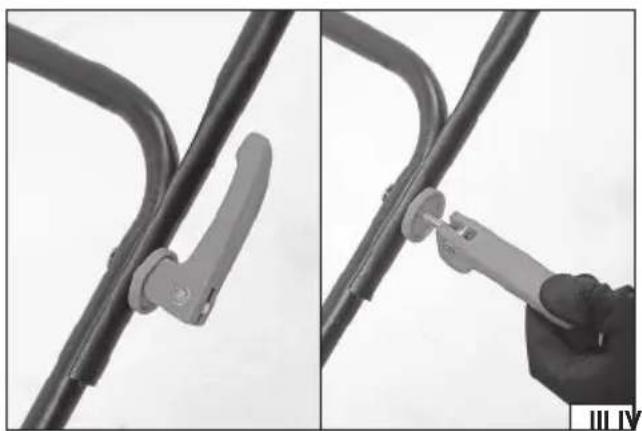
natural_image
Two-panel image showing a hand holding a tool interacting with a metal bracket (no text or symbols visible)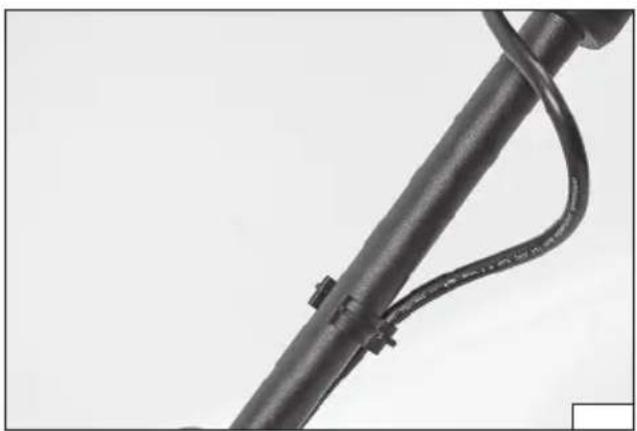
natural_image
Close-up of a black metal pipe with curved insulation and connectors (no text or symbols visible)
natural_image
Close-up of a person's torso and head with a dark fabric, partially covered by a white object (no visible text or symbols)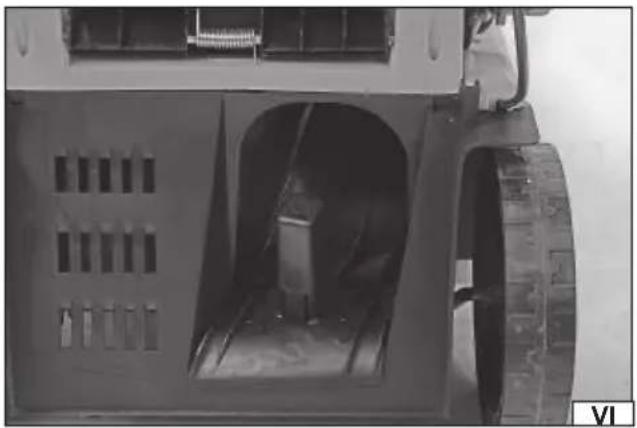
natural_image
Close-up of a mechanical component with internal cavities and a tire, no visible text or symbols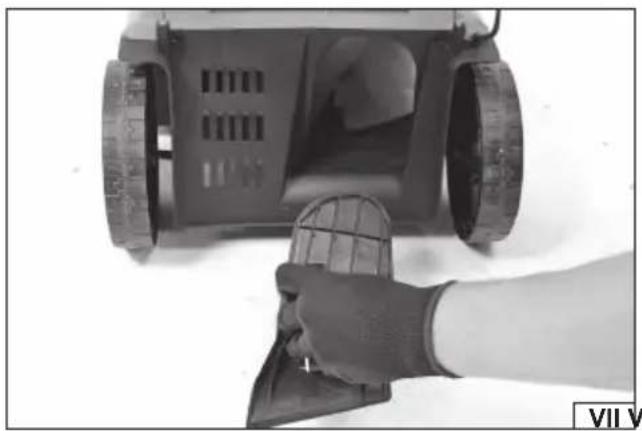
natural_image
Close-up of a hand cleaning a small robotic device with a mesh cover (no visible text or symbols)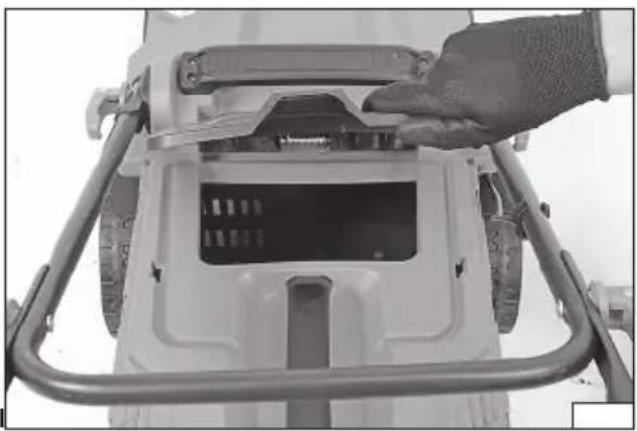
natural_image
Close-up of a hand adjusting a white mechanical component with metal brackets (no visible text or symbols)natural_image
Close-up of a small electric lawn mower with visible wiring and mounting brackets (no text or symbols)
natural_image
Close-up of a gloved hand inserting a small electronic component into a device housing (no visible text or symbols)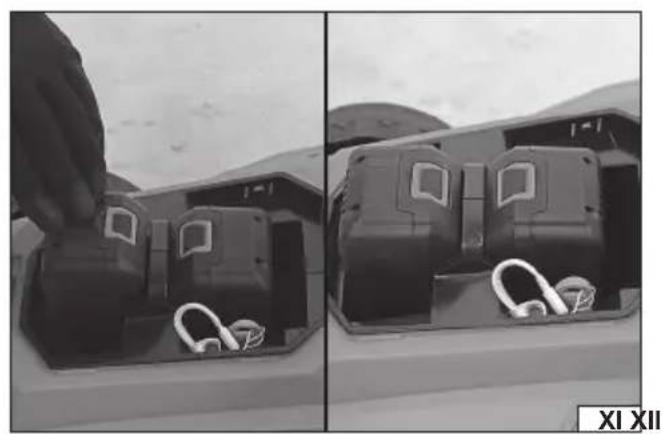
natural_image
Two-panel black-and-white photo showing a hand inserting a component into a device casing, with no visible text or symbols.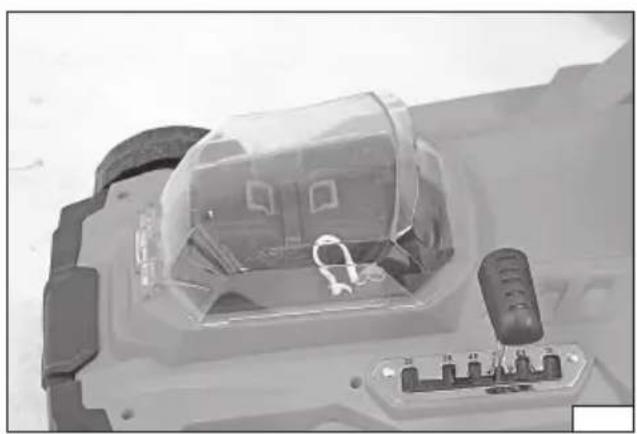
natural_image
Close-up of a spacecraft's cockpit with visible internal components and control panel (no text or symbols)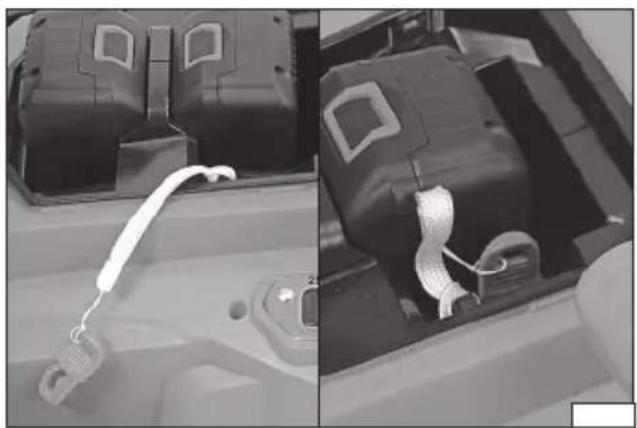
natural_image
Close-up of a battery pack with attached cable and connector, showing internal components (no visible text or symbols)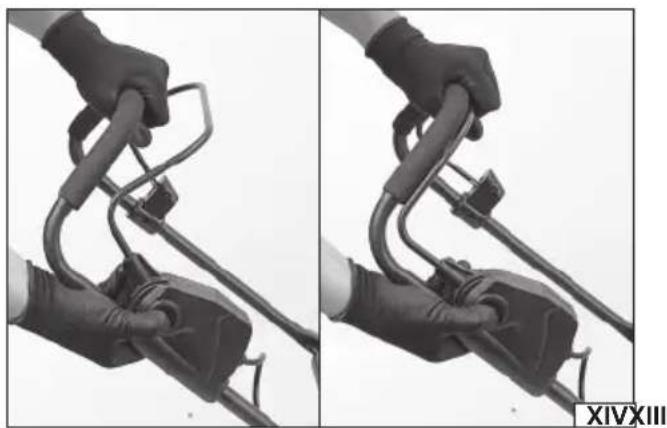
natural_image
Two-panel black-and-white photo showing hands holding a flexible cable or hose, no text or symbols visible.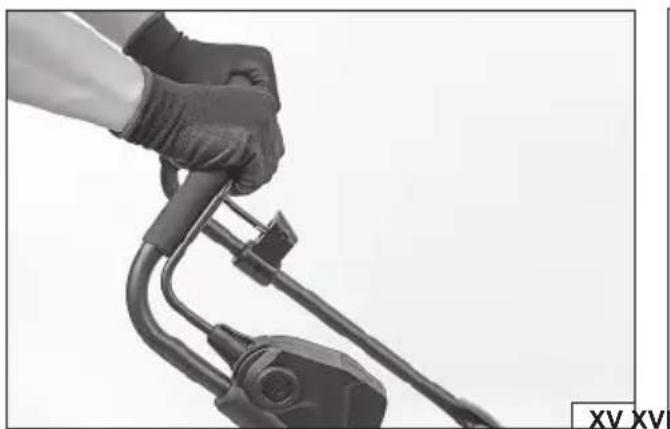
natural_image
Close-up of a hand holding a flexible electric plug plug (no text or symbols visible)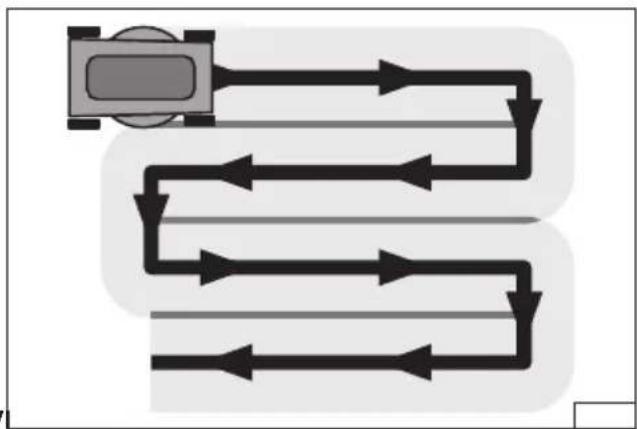
flowchart
graph TD
    A["Start"] --> B{Process 1}
    B --> C["Process 2"]
    C --> D{Process 3}
    D --> E["End"]
    style A fill:#f9f,stroke:#333
    style B fill:#ccf,stroke:#333
    style C fill:#cfc,stroke:#333
    style D fill:#fcc,stroke:#333
    style E fill:#ffc,stroke:#333
natural_image
Close-up of a mechanical component with a central blade and circular housing, marked with an arrow and number 10 (no readable text or symbols)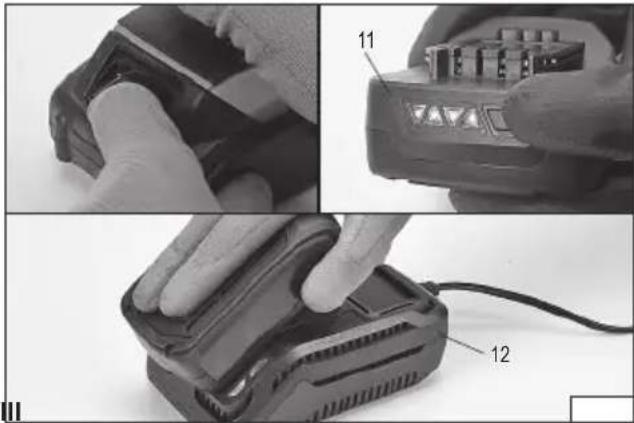
natural_image
Three-panel photo showing hands operating a battery pack and charging case, with numbered annotations (11, 12) indicating components.PL
- motor cover
- blade cover
- wheel
- battery compartment
- power switch
- power switch lock
- cutting height adjustment
- grass discharge chute cover
- grass catcher/hopper
- blade
- battery
- charger
DE
Read the operating instruction
Wear protective goggles
Wear hearing protectors
Beware of ejected objects
Stay away from bystanders
Before adjustment, cleaning, maintenance, switch off the device and remove the batteries from the device.
Do not expose to precipitation
Attention - Do not touch the rotating blade!
Zgomotul - puterea L _u
Ruido - potencia L.
This symbol indicates that waste electrical and electronic equipment (including batteries and storage cells) cannot be disposed of with other types of waste. Waste equipment should be collected and handed over separately to a collection point for recycling and recovery, in order to reduce the amount of waste and the use of natural resources. Uncontrolled release of hazardous components contained in electrical and electronic equipment may pose a risk to human health and have adverse effects for the environment. The household plays an important role in contributing to reuse and recovery, including recycling of waste equipment. For more information about the appropriate recycling methods, contact your local authority or retailer.
WYPOSAŻENIE PRODUKTU
The cordless lawnmower is used for lawn care. The wide range of grass cutting heights allows for versatile use. Large diameter wheels make moving the lawnmower easier. Thanks to the electric power supply, the operation of the lawnmower is much quieter than the operation of combustion-motor-driven equipment. Because of the batteries, there is no need for an electric cable. Proper, reliable and safe operation of the appliance depends on appropriate use, that is why you should
Read this entire instructions manual before the first use and keep it for future reference.
The supplier shall not be held liable for any damage or injury resulting from improper use of the product, failure to observe the safety regulations and recommendations of this instructions manual. Use of the product for purposes other than those for which it was intended shall cause the loss of the user's rights to the warranty and statutory warranty.
PRODUCT ACCESSORIES
The product is delivered complete; however, the preparatory actions described in the further part of this instructions manual must be carried out before starting work. The YT-85224 and YT-85224 lawnmowers are supplied with batteries and a charger. The YT-85223 and YT-85225 lawnmowers are supplied without batteries and a charger.
TECHNICAL DATA
| Parameter Unit Value Value | |||
| Part no. YT-85222, YT-85223 YT-85224, YT-85225 | |||
| Rated voltage [V DC] 36 36 | |||
| Cutting width [mm] 370 430 | |||
| Cutting height [mm] | 25-75 | 25 -75 | |
| Rated rpm | [min-1] | 2900 | 2900 |
| Noise level | |||
| Sound pressure LpA ± K | [dB(A)] | 76.1 ± 3.0 | 72,8 ± 3,0 |
| Sound power LwA ± K | [dB(A)] | 89.2 ± 2.31 | 87,1 ± 2,95 |
| Vibration level ah ± K (left/right hand grip) | [m/s2] | 0.54 ± 1.5 / 0.68 ± 1.5 | 0,34 ± 1,5 / 0,37 ± 1,5 |
| Electric insulation class | III | III | |
| Protection rating | IPX1 | IPX1 | |
| Weight | [kg] | 13.5 13.5 | |
| Grass catcher capacity | [l] | 35 50 | |
| Battery type | Li-ION | Li-ION | |
| Battery capacity* | [Ah] | 4 | 4 |
| Battery energy | [Wh] | 72 72 | |
| Charger* | |||
| Input voltage | [V~] | 220 – 240 | 220 – 240 |
| Mains frequency | [Hz] | 50/60 | 50/60 |
| Rated power | [W] | 60 60 | |
| Output voltage | [V] 21 D.C. | 21 D.C. | |
| Output current | [A] | 2.4 | 2.4 |
| Charging time** | [h] | 2 | 2 |
* only for models equipped with a battery and charger
** the specified charging time applies only to the battery with the capacity listed in the table
The declared noise emission value has been measured using the standard test method and can be used to compare one tool to another. The declared noise emission value can be used in the preliminary exposure assessment.
The declared total vibration value has been measured using the standard test method and can be used to compare one tool to another. The declared total vibration value can be used in the initial exposure assessment.
Caution! The vibration emission during tool operation may differ from the declared value, depending on the manner the tool is used. Caution! Safety measures to protect the operator, which are based on an assessment of exposure under actual conditions of use (including all parts of the work cycle, such as the time when the tool is switched off or idle and the activation time), must be specified.
EN
SAFETY INSTRUCTIONS FOR USE OF LAWNMOWERS
IMPORTANT!
READ CAREFULLY BEFORE USE
KEEP FOR FUTURE REFERENCE
Manual
Read the instructions carefully. Familiarise yourself with the controls and proper use of the tool. If you are going to pass the tool on to another person, always attach the manual to the tool.
Never allow children or persons who have not read the manual to operate the tool. National regulations may specify the exact age of the operator.
Never work when anyone else, especially children or pets, is around. Before starting work, designate a safety zone within which bystanders and pets will not be allowed.
Remember that it is the operator or the user who is responsible for accidents or hazards to other people or the environment.
Preparation
Always wear sturdy footwear and long trousers when mowing. Do not operate the tool barefoot or when wearing open toe sandals. Avoid wearing damaged clothing which is too loose or has hanging straps or ribbons. Loose clothing parts can be caught by the tool's moving parts which can lead to injuries.
Carefully check the area where the tool will be operated and remove any objects which could get into the tool. Caught objects can cause damage to the tool, or can be ejected at high speed, which poses a threat to the operator and the environment.
Always check the blades, bolts and the blades' assembly equipment for wear or damage before use. Replace worn-out or damaged parts in sets to maintain balance. Replace damaged or illegible plates.
Inspect the power supply cord and extension cord for damage or wear before use. If the cord is damaged during use, disconnect it from the direct power supply. DO NOT TOUCH THE CORD BEFORE DISCONNECTING THE POWER SUPPLY. Do not use the tool if the cord is defective or damaged.
Check the power supply battery for damage before use. If the battery is worn out or shows signs of mechanical wear disconnect it from the device socket. Do not use the device if the battery is damaged or destroyed.
Operation
Mow only in daylight or in good artificial lighting. Improper lighting of the workplace can lead to accidents.
Avoid mowing wet grass.
When on a slope, always make sure your feet are set firmly.
Walk, never run.
Mow across the slopes, never up or down. This will make control of the tool much easier.
Take special care when changing driving direction on a slope.
EN
Do not mow on excessively inclined slopes.
Pay special attention when reversing or pulling the tool towards you.
Turn off the drive of the cutting element(s) if the tool must be tilted when moving it on surfaces other than grassy surface and when transported to and from the mowing.
Do not use the unit with damaged covers or housings or without a safety device, such as the enclosed grass covers and/or bins.
Switch on the engine carefully in accordance with the instructions, paying attention to whether your feet are away from the cutting element.
Do not tilt the tool when starting the engine, except when it requires tilting during starting. In this case, do not tilt more than necessary and lift only the part which is away from the operator.
Do not start the unit while standing in front of the discharge opening. If the machine is designed to work only with a grass container, always fit the container correctly before starting work.
Keep your hands and feet away from rotating parts. Keep an eye on the ejection port at all times to ensure that it is not blocked. Keep a constant check on how full the grass bin is, avoid overfi lling.
Do not move the tool with the motor running.
Stop the tool and pull the plug from the socket. Make sure that all moving parts are not in motion.
Stop the unit and remove the locking assembly. Ensure that all moving parts are stationary
- every time you step away from the tool;
- before cleaning or pushing the outlet,
- before checking, cleaning or repairing the tool;
- after it being hit by a foreign object. Check that the tool is not damaged and, if necessary, repair it before restarting and operating.
If the tool starts to vibrate excessively (check immediately):
- check for damage;
- replace or repair any damaged part;
- check and tighten any loose parts.
Maintenance and storage
Keep all nuts, bolts and screws in good condition to ensure safe tool operation.
Check the grass bin frequently for wear or damage. Objects caught in the blade can be thrown into the bin at high speed. This can cause damage to the bin.
In the case of multi-blade tools, be careful, as rotation of one cutting element may cause rotation of other blades.
Use caution when adjusting the tool to avoid fingers getting between the tool's moving blades and fixed parts.
Always leave the unit to cool down before the next start-up.
Be careful when performing any work on the blades, even when the drive is switched off as the blades can still rotate. Always wait for the blades to come to a complete stop before proceeding with any activities.
Replace worn-out or damaged parts to ensure safety of operation. Use original spare parts and equipment only.
Recommendations for class II tools
The tool must be powered by a residual current device (RCD) with a tripping current of 30 mA or less.
Risks related to noise and vibrations
The tool is designed to reduce the risk of exposing the user to noise and vibration as much as possible. However, it is not possible to completely eliminate these hazards. Additionally, people in the vicinity of the operating tool are also exposed to noise hazards.
However, the risks associated with the above-mentioned hazards can be reduced by observing the following guidelines:
- the product should be used in accordance with its intended use, described in the instructions manual;
- make sure that the tool is in good condition and is regularly maintained;
- use proper and well-sharpened cutting tools;
- use a fi rm grip on the product handle;
- plan work so that frequent breaks can be incorporated.
Residual risks
Even if all safety precautions are followed during operation, the potential risk of injury remains. The following risks remain in relation to the design of the product.
Vibration-related injuries caused by prolonged operation of the tool, incorrect manner of work, or work with an improperly maintained tool.
Injuries caused by an unexpected impact from hidden, ejected objects.
PRODUCT OPERATION
Preparing for operation
Unpack the product by removing all packaging components. It is recommended to retain the packaging, which can be of use when transporting or storing the product.
Check that no part of the product has been damaged during transport. In case of damage detection, such as cracks or deformations, it will disqualify the product from further use until it is repaired or damaged components are replaced.
It is recommended to place all the components on a flat, hard, and clean surface.
Use personal protective equipment such as protective gloves, eye protection, and protective clothing during assembly.
Caution! Before performing the lawnmower assembly, make sure that the product is disconnected from the power supply. The batteries must be disconnected from the lawnmower.
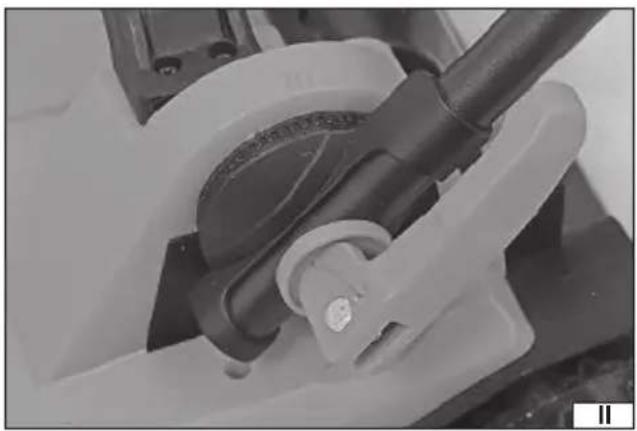
Attach lower handle brackets near rear wheels using the levers. The levers press the handle bracket against the housing by means of gears (II). It is possible to position the bracket at one of three angles. Ensure that the indicator on the outer pinion points to the same marker on both sides of the housing.
Secure the handle to the brackets with a lever. Be sure to use a shim under each lever (III).
The handle should face upwards and the switch should be on the right side of the mower when the operator is standing behind it. Make sure that the cable connecting the power switch to the lawnmower is not tangled or strained. The cable must be attached to the bracket or handle with a special holder (IV).
Caution! If the lever presses too weak on the bracket, it should be opened and then turned clockwise when open. If the lever cannot be closed completely, it must be opened and then turned counterclockwise when open. The degree of tightness of the lever should be selected so that it can be opened and closed without the use of tools and, at the same time, no self-opening occurs when it is closed. Periodically check the tightness of the lever.
Make sure that the hooks of the catcher cover are put on a bar around the grass catcher inlet (V).
The mower can be used with or without the bin. The discharge opening of the grass cuttings is plugged (VI). In the case of using
EN
without the bin, make sure that the cap is in place and that the outlet cover is closed and secures the cap against falling out before starting.
Warning! Operation without the bin without the properly installed cap and closed outlet cover is prohibited. It is forbidden to work without the bin with the outlet hole covered only by a cover.
When working with the bin, the outlet cap must be completely removed (VII).
Attach the grass catcher to the lawnmower housing. Lift the grass discharge chute cover, hold the cover in maximum top position, and attach the catcher on the hooks of the rear wall of the lawnmower housing (VIII). Lower the catcher cover and check that its edges are in the cavities at the top of the catcher cover (IX).
To disassemble the catcher, follow the above procedure in the reverse order.
Mowing height adjustment (X)
The lawnmower is equipped with a lever that allows you to change the cutting height easily and quickly. Slide the lever to the side by pulling it out of the guide seat. Then move forwards or backwards and, once the desired height has been set, move the lever to the side, locking its position in the guide seat.
Warning! If you need to change the cutting height during operation, always switch off the lawnmower first, wait for the blade to stop, remove the key from the socket and disconnect the batteries from the lawnmower and then change the cutting height. Accidental starting of the blade during a height adjustment may result in serious injury.
Connecting the lawnmower to the power supply
The tool is powered by two batteries. It will not start if one of the batteries is not installed in the tool or is flat. The batteries in the tool are connected in series, which means that the tool is supplied with the sum of their rated voltages. It is recommended that both batteries have the same capacity and are charged to the same level. The batteries used to supply the tool should also have the same level of wear. It is not recommended to connect a flat battery with a new one, even if both batteries are charged to the same level and have the same capacity. Failure to comply with the above recommendations will result in shorter operating times and faster wear of the batteries used to supply the tool.
Lift the cover of the battery compartment. Slide the battery into one of the seats so that its latch is outside the seat. Slide the battery into the seat until the latch engages. Repeat for the second battery (XI). Make sure that the batteries will not disconnect on its own during operation. Close the battery seat cover (XII). The cover should be closed at all times during operation. It reduces the risk of contamination of the battery seats during operation. Disconnect the battery by pressing and holding the latch and then pulling the battery out of the seat.
Starting and stopping the lawnmower
Place the lawnmower on a flat, level, and hard surface. Make sure that there are no obstacles underneath the lawnmower that could come into contact with the blade.
The mower is equipped with a key that must be inserted into the socket located in the battery compartment (XIII). The key has been designed so that it is only possible to insert the socket in the correct way. The key has been attached to the case with tape, reducing the risk of getting lost. If the key is not placed correctly in the socket, it will not be possible to start the mower. The key must be removed from the socket every time the mower is not used for mowing.
The power switch is equipped with a lock to prevent accidental activation of the device by pressing the power switch.
Press and hold the lock button in the middle of the power switch and then pull both power switch levers to the handle (XIV). After starting the mower, release pressure on the lock button and press the switch against the handle with both hands (XV).
Releasing the pressure on the power switch levers will stop the lawnmower. The blade may still rotate for a while.
Operation of the lawnmower
Before starting work, prepare the grass mowing area. Check that there are no obstacles in the mowing area that could be caught by the blade and damage the lawnmower, or be ejected and pose a risk to an operator or bystanders.
Check that there are no electrical cables in the work area that could be cut by the blade. Damage to an electrical cable presents a risk of electric shock, which can lead to serious injury or death.
Make sure that there are no bystanders or pets in the work area. If such persons appear during operation, stop the lawnmower immediately and only then warn people of the danger.
Check the grass length and adjust the cutting height. Never cut more than 1/3 of the grass length. If the grass is very long, it should be cut in stages. Mowing must be carried out regularly to ensure that the grass length does not exceed the capabilities of the lawnmower.
Never cut wet grass. Wet grass tends to stick inside the product, which interferes with its accumulation in the catcher. Wet grass can also cause slipping and falling.
Check all lawnmower components before starting work. In case the damage is detected, do not start work before removing the damage or replacing the damaged components with new ones. Make sure that the ventilation openings are clear. If necessary, clean them with a soft cleaning tool or brush. Do not use sharp or metal objects for cleaning the product ventilation openings.
Check the tightness of the screw connections. Tighten if necessary.
Check that the handlebars are clean, free of grease and other contamination. If necessary, clean them with a soft cloth.
EN
Take regular breaks during work to avoid fatigue and overwork. This will allow better product control and reduce the risk of accidents.
Caution! Always push the lawnmower while working; never pull towards yourself. Pulling the lawnmower causes the operator to move backwards, which means he does not control the area behind him. In addition, when pulling the mower backwards, the blades can catch the power cord.
Push the lawnmower slowly; always walk, never run. This will give you better control of the lawnmower and reduce the response time to unexpected events.
During mowing, move along the rows (XVI). Rows should be kept equal in width, slightly overlapping so as not to leave any space.
Take special care when changing the direction.
When cutting the grass near the flower beds, move around them.
Empty the catcher regularly during operation.
When finished, switch off the mower, wait for the blade to stop, then remove the key from the socket, disconnect the batteries and wait for the mower to cool down, then proceed with maintenance.
Caution! If a foreign object hits the lawnmower during operation, Switch off the mower immediately, wait for the blade to stop, remove the key from the socket and then disconnect the batteries and wait for the mower to cool down. Then check the lawnmower for damage. If the damage is detected, it is forbidden to continue working before removing the damage. Excessive vibration during operation can be caused by the lawnmower damage. In that case, stop working, disconnect the batteries, and check the product.
Safety instructions for battery charging
Caution! Before starting charging, make sure that the power unit body, cable and plug are not cracked or damaged. It is forbidden to use a defective or damaged charging station and power unit! Use only the supplied charging station and power unit to charge the batteries. The use of another power unit may result in fire or damage to the tool. The battery should only be charged in a closed, dry room, protected against unauthorised access, especially by children. Do not use the charging station and power unit without the constant supervision of an adult! If you need to leave the room where the product is being charged, disconnect the charger from the mains by removing the power unit's plug from the mains socket. If smoke, suspicious odours, etc. are escaping from the charger, remove the charger plug from the mains socket immediately!
The device is supplied with an uncharged battery and should therefore be charged according to the procedure described below with the included power unit and charging station before use. Li-ion (lithium-ion) batteries do not have the so-called “memory effect”, which means they can be recharged at any time. However, it is recommended to discharge the battery during normal operation and then charge it to full capacity. If, due to the nature of work, it is not possible to use the battery in such a manner every time, it should be done at least every several work cycles. Never discharge any batteries by short-circuiting the battery plates, as this will cause irreparable damage! In addition, do not check the battery charge status by short-circuiting the electrodes and checking their sparking.
Storing the battery
Ensure the proper storage conditions to extend the battery's life. The battery can withstand approximately 500 charge-discharge cycles. Store the battery at a temperature ranging from 0^ to 30^ at a relative air humidity of 50% . Charge the battery to approx. 70% of its total capacity to store it for a longer period of time. In case of prolonged storage, the battery should be periodically charged once a year. Do not over-discharge the battery as this will shorten its life and may cause irreparable damage.
During storage, the battery will gradually discharge due to leakage. The self-discharge process depends on the storage temperature – the higher the temperature is, the faster the discharge process is. If the batteries are stored incorrectly, the electrolyte may leak. In case of leakage, secure the leak with a neutralising agent. In the case of electrolyte contact with eyes, rinse eyes thoroughly with water, and immediately seek medical attention. It is not allowed to use the tool with a damaged battery.
If the battery is completely worn, return it to a specialist waste disposal centre.
Transporting the batteries
Lithium-ion batteries are treated as hazardous goods according to legal regulations. The user of the tool can transport the product together with the battery and the batteries alone by land. In that case, no additional conditions have to be met. If you entrust transport to third parties (e.g. a courier company), follow the regulations regarding the transport of hazardous goods. Before shipping, please contact a properly qualified person.
It is not allowed to transport damaged batteries. For the duration of transport, remove the demountable batteries from the product and secure the exposed contacts, e.g. by covering them with insulation tape. Protect the batteries in the packaging in such a way that they do not move inside the packaging during transport. National regulations for the transport of hazardous materials must also be observed.
Charging the battery
Caution! Before charging, disconnect the charging station power unit from the mains by removing the plug from the mains socket. In addition, clean the battery and battery clamps of dirt and dust with a soft, dry cloth.
The battery has a built-in charge indicator. The LEDs will light up by pressing the button (XVI), the more of them come on, the more charged the battery is. If the LEDs do not light up when the button is pressed, the battery is discharged.
EN
Disconnect the battery from the tool.
Slide the battery into the charger socket (XVIII).
Plug the charger into a mains socket.
The red LED will light up, which indicates the charging process.
When charging is complete, the red LED will turn off and the green LED will light up to indicate that the battery is fully charged.
Pull the power unit plug out of the mains socket.
Pull the battery out of the charging station by pressing the battery latch button.
Caution! If the green LED lights up when the charger is connected to the mains, the battery is fully charged. In this case, the charger will not start the charging process.
PRODUCT MAINTENANCE
Caution! Make sure that the product is disconnected from the power supply before starting any maintenance works. The batteries must be disconnected from the lawnmower. Remove the key from the socket.
Always wear protective gloves during all maintenance works.
If the maintenance procedure is not contained in the instructions manual, it means that it should be performed at an authorised service centre.
Clean the product after each use. Remove any residual grass with a soft cleaning tool, brush or cloth. Clean the ventilation openings to ensure that they are clear.
Dirt that is difficult to remove can be cleaned with an air jet with a pressure of up to 0.3 MPa.
Never use chemicals, alkaloids, abrasives, or aggressive detergents to clean the product. The product cannot be cleaned with a water jet or by immersion in water.
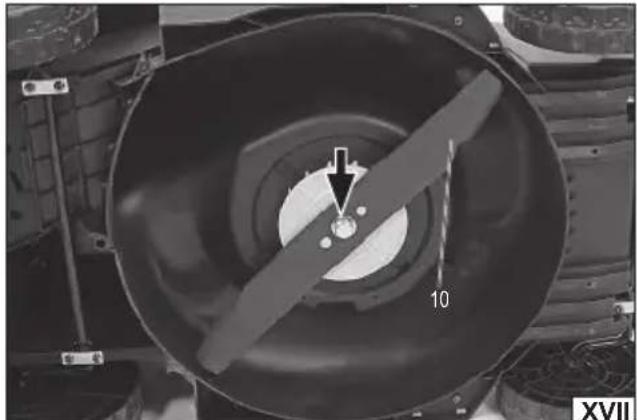
Check for wear and damage to the lawnmower blade. If excessive wear or damage is observed, replace the blade with a new one. Always replace the blade with the original one, identical to the one installed in the lawnmower at the factory. Only the use of original spare parts can maintain product safety. The blade should be replaced by an experienced user. To do this, contact an authorised service centre of the manufacturer.
Use the wrench to unscrew (counterclockwise) the blade mounting screw (XVII) and remove it together with the washer.
Remove the old blade. If necessary, clean the blade holder. Mount the new blade ensuring the direction of the blade. The arrow indicating the direction of the blade rotation should comply with the direction of the motor rotation.
Secure the blade by tightening the screw (clockwise) firmly and securely.
After each use and cleaning of the blade, the cutting edges should be covered with a thin layer of light machine oil. This will reduce corrosion and increase blade life.
The blade should be replaced every two years or 50 hours.
After each operation, the grass catcher must be removed and emptied of the grass. The catcher can be cleaned with lukewarm water with suds. After cleaning, leave the catcher in the working position until completely dry.
If the internal cable connecting the product power switch to the motor is damaged, it must be replaced by an authorised service centre of the manufacturer. The cable cannot be repaired and must be replaced entirely. It is forbidden to operate the product with a damaged cable.
STORAGE AND TRANSPORT
Caution! Always disconnect the product from the power supply before storing or transporting it. Disconnect the batteries and remove the key from the socket. Clean according to the instructions.
Store in the dark, dry, frost-free, and well-ventilated areas. The place of storage should protect the tool from access by children. The product should be stored at a temperature between 10^ C and 30^ C. It is recommended that the product is stored in its original packaging or another packaging that protects it from dust.
Before transporting the product, set the highest cutting height. Transport the product by carrying it by the handles. Protect the product from impacts and strong vibrations during transport. Secure the product against slipping or tipping over during transport.
PRODUKTBESCHREIBUNG
CARACTÉRISTIQUES DU PRODUIT
Transport van accu's
Transport akumulatora
EN IEC 62841-4-3:2021 + A11:2021
EN IEC 55014-1:2021
EN IEC 55014-2:2021
DECLARATION OF CONFORMITY
0824/YT-85222/EC/2024
We declare and guarantee with full responsibility that the following products:
Cordless lawn mower; 36 V d.c.; 2900 min ^-1 ; 370 mm; item no. YT-85222, YT-85223
Cordless lawn mower; 36 V d.c.; 2900 min ^-1 ; 430 mm; item no. YT-85224, YT-85225
meet requirements of the following European Standards / Technical Specifications:
EN 62841-1:2015 + A11:2022
EN IEC 62841-4-3:2021 + A11:2021
EN IEC 55014-1:2021
EN IEC 55014-2:2021
and fulfill requirements of the following European Directives:
2006/42/EC Machinery and safety elements
2014/30/EU Electromagnetic compatibility (EMC) Directive
2011/65/EU Restriction of the Use of Certain Hazardous Substances
Serial number: concern all serials numbers of item(s) mentioned in this declaration
The person authorized to compile the technical file:
Tomasz Zych
(Place and date of issue)

(Name and signature of authorized person)
TOYA S.A.
DECLARATION OF CONFORMITY
0824/YT-85222/EC/2024
We declare and guarantee with full responsibility that the following products:
Cordless lawn mower; 36 V d.c.; 2900 min ^-1 ; 370 mm; item no. YT-85222, YT-85223
Cordless lawn mower; 36 V d.c.; 2900 min ^-1 ; 430 mm; item no. YT-85224, YT-85225
fulfil requirements of the following European Directive: 2000/14/WE
Conformity assessment procedure:
Manufacturer quality-control system
Measured sound power level on an equipment representative for this type: 87,1 dB(A)
Guaranteed sound power level for this equipment: 96 dB(A)
conformity and references of the other Community Directives applied:
2006/42/EC Machinery and safety elements
2014/30/EU Electromagnetic compatibility (EMC) Directive
2011/65/EU Restriction of the Use of Certain Hazardous Substances
Wrocław, 2024.08.27
(Place and date of issue)

(Name and signature of authorized person)
TOYA S.A.
EN IEC 62841-4-3:2021 + A11:2021
EN IEC 55014-1:2021
EN IEC 55014-2:2021