
OI6111ER - Oven Atag - Free user manual and instructions
Find the device manual for free OI6111ER Atag in PDF.

User questions about OI6111ER Atag
0 question about this device. Answer the ones you know or ask your own.
Ask a new question about this device
Download the instructions for your Oven in PDF format for free! Find your manual OI6111ER - Atag and take your electronic device back in hand. On this page are published all the documents necessary for the use of your device. OI6111ER by Atag.
USER MANUAL OI6111ER Atag
instructions for use electric oven
OX/OG/OS/O160..E
OX/OG/OS/OI60..G
OX/OG/OS/O160..L
Ol61.E
gon 00000185100
ATAG
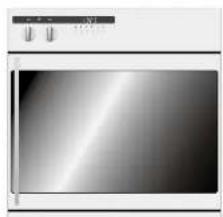
uw oven
beschrijving
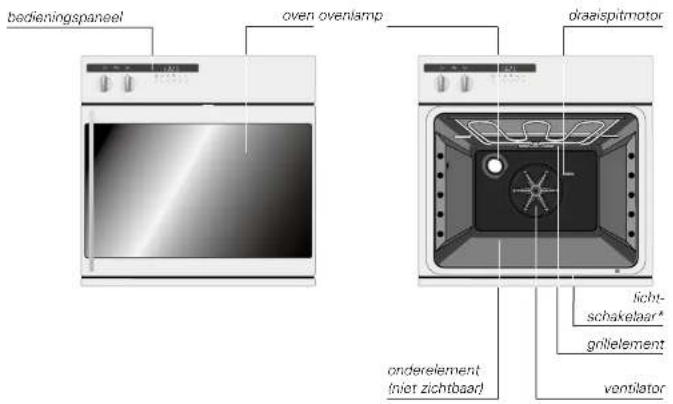
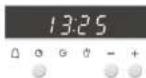
bedieningspaneel (.60..G/L)
RefaiTeIe la programmation.
m = 311
A
1
1
1
1
1
1
einstellungen
12 × 3
17:35
13.5
总
Librun
- 实验原理
图1
(一)2005年
A
一、重要提示
m = 311 ;
1
m = 311 ;
1
1
- 实验原理
m = 311 ;
1
1
1
1
1
1
einstellungen
a_1^ * = 2
17:35
13.5
总
Librun
图1
(一)2005年
A
一、重要提示
m = 311 ;
1
oven functions* (See for more information page 11)
turboc hot air
infra, top and bottom heat
bottom heat
* if present
economy gnl
maxi grid
lighting
A preheat
clock functions
kitchen timer
cooking time
end time
manual control
- subtracting time
+ adding time
your oven description

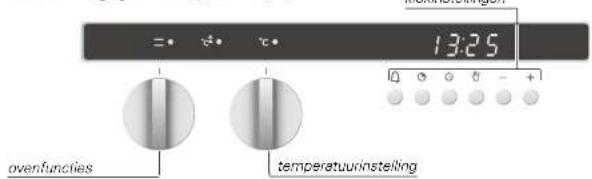
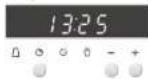
control panel (.60.E/.61.E)
oven functions temperature setting
timer (max. 120 min.)
indicator lights
Lights up when a function has been selected
Lights up when the oven is preheated
Lights up when fast preheating has been selected
oven functions (See for more information page 11)
turbo; hot air
economygrill
inifra: top and bottom heat
maxi grill
bottom heat
fast preheating
fighting
your oven foreword
The controls for this oven are very easy. What we particularly want to do in this manual is give you an idea of all the possibilities the oven has.
The various functions are arranged for easy reference in the controls section. You will also find some useful hints for baking and roasting.
Separate installation instructions have been enclosed for installing the appliance. These installation instructions also include safety instructions for installing and connecting up the appliance.
Please keep this manual carefully as any subsequent user will also find it very useful.
We wish you much pleasure with your oven!
introduction
You have chosen an Atag oven.
Optimum ease of use and simple operation were the most important factors in the development of this product.
By pressing start twice, you select the oven's turbo function - an oven function with a wide range of applications. Your favourite recipes will definitely give excellent results on this setting. All you have to do is adjust the temperature.
The extensive range of settings available enables you to select exactly the method of cooking that you have in mind. The oven functions are arranged in a logical sequence on the control panel.
your oven contents
safety
what you should pay attention to 4-5
bringing the oven into operation
before you start cooking 6
operating
switching on 7-10
cooking information
oven functions 11
accessories 12
optional accessories 12
tips for baking and roasting 13-14
roasting 15
grilling 16-17
tables 18-20
maintenance
cleaning 21
faults
what should I do if... 22
environmental aspects
disposal of packaging and appliance 23
safety what you should pay attention to
safety what you should pay attention to
general
This oven is extremely safe. As with all products, however, there are a number of things you have to pay attention to.
The appliance must only be installed by a registered installer.
For safety tips about the installation, we refer you to the instructions in the accompanying installation instructions.
Repairs must only be carried out by an authorised service engineer.
Never open the appliance's casing and do not alter the mechanical and/or electrical structure of the appliance. This could result in dangerous situations (touching live components) and faults.
Do not use the appliance if it is damaged.
If the connecting lead is damaged, it should be replaced by the manufacturer's service department or by someone at least similarly qualified, in order to avoid dangerous situations.
The power supply to the appliance should be turned off when it is being repaired or cleaned. Remove the plug from the socket or switch off the protective device in the meter cupboard.
Warning: Disconnect mains power from the unit before replacing the oven lamp (see 'Faults' page 22).
For electrical safety reasons, the appliance must not be cleaned using high-pressure cleaners or steam cleaners.
Be careful with the leads of electrical appliances, such as mixers. They can get caught in the door of the hot oven.
This oven has been designed for domestic use. You should only use it for cooking food.
during use
The oven is extremely well insulated.
Despite this, there is always some transfer of heat, as a result of which the outside of the oven heals up.
This heating fails we within the standard limits.
The oven has a fan that cools the oven housing.
Make sure that the food is always heated sufficiently. The time required for this depends on various factors, such as the quantity and type of food. Any bacteria in the food will only be killed if the food is heated to a temperature greater than 70^ for at least 10 minutes. Allow the food to cook for a bit longer if you are not sure whether the food has been heated sufficiently.
Never heat food in unopened tins. Pressure will build up inside the tin and may cause it to explode.
If the oven is used at the maximum temperature for a long time (when grilling, for example), the glass panel in the oven door may become hot. Take care if there are any children nearby.
During use the oven will become hot. Make sure you do not touch the oven elements by accident.
Do not use the oven for storing flammable or easily deformable materials.
When cooking dishes that contain alcohol, the alcohol can evaporate due to the high temperatures. The vapour can catch fire if it comes into contact with a hot oven element.
Never cover the bottom of the oven with aluminium foil and do not place any baking trays or tins on it. The foil checks the heat, which may result in damage to the enamel and inferior cooking results.
Never pour water into the oven when it is hot. This could cause damage to the enamel.
Frozen products such as pizzas should preferably be cooked on the grid shelf, covered with greaseproof paper. If the baking tray is used, it may become deformed due to the great difference in temperature.
bringing the oven into operation
before you start cooking
operation
switching on
cleaning the oven and accessories
Remove the accessories from the oven and clean the accessories and the inside of the oven with a mild cleaning agent.
Switch the oven on for an hour at 250^ (see page 7). Protective greases used during manufacture will then be removed.
remark
When your oven is heated strongly for the first time, it will have a 'new' smell. This is normal. Switch the extractor hood on if necessary.
After the oven has cooled down, clean it with warm water.
setting the time
If you have not set a time, 0.00 and the word 'AUTO' will blink.
1 There is a normal clock on the display that shows the time. Press the and buttons at the same time.
2 Press the ++ buttons until the correct time is reached. 'AUTO' keeps blinking.
3 Press the button.

The time has been set and the appliance is set to manual control.
switching on without the clock

selecting a function

setting the temperature
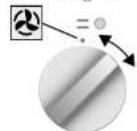
1 Press the button to set the oven to manual control. The 'hand' symbol can be seen in the display.
2 Select an oven function by turning the knob to the required symbol. The oven has not yet been switched on.
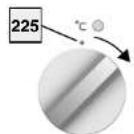
3 Select the temperature required. The temperature is continuously adjustable. The oven has now been switched on.
timer

setting the time
The timer only gives a signal when the time has elapsed. It does not switch the oven off.
1 Press the button and keep it pressed. 0.00 and light up.
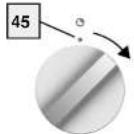
2 Set the time with the - / + buttons.
lights up. The time appears five seconds after release of the button.
operation switching on
switching on
functions
1 Select an oven function.
selecting function
temperature
2 Set the temperature required.
setting the
temperature
cooking time
3 Set the cooking time.
The indicator lights above the knobs light up.
If you do not wish to set a cooking time, you turn the knob to
setting the time
switching off
1 Turn the knobs to
The indicator lights go out.
attention!
The oven will only function if the timer is set to, or if a time has been set.
operation switching on
switching on with the clock


selecting a function
setting the temperature
The oven switches off automatically when the cooking time has elapsed.
1 Select an oven function by tuming the knob to the required symbol.
2 Select the temperature required.
The temperature is continuously adjustable.
3 Press the button and keep it pressed.
0.00 appears in the display and AUTO' lights up.
setting the cooking time
4 Press the -7+ buttons until the correct cooking time has been reached.
The time appears again five seconds after release of the button. 'AUTO' and light up.
The oven has been switched on and it gives a signal when the cooking time has elapsed. The oven then switches off automatically.
operation switching on
cooking information oven functions
delaying the start time/setting the finish time

selecting a function
You can delay the time at which the oven switches on. Put a dish in the oven. Set the cooking time and the time at which the dish has to be ready. The oven calculates the start time itself and switches off automatically when the cooking time has elapsed.
1 Select an oven function by turning the knob to the symbol required.
2 Select the required temperature. The temperature is continuously adjustable.
3 Press the button and keep it pressed. 00 appears in the display and "AUTO" lights up.
setting the temperature
setting the cooking time
4 Press the + buttons until the correct cooking time has been reached. The time appears again five seconds after release of the button. 'AUTO' and light up. The oven has been switched on.
5 Press the button and keep it pressed. The display shows the earliest possi
6 Press the + buttons until the correct finish time has been reached. AUTO lights up and goes out. The oven switch and off automatically. A signal can also be heard.
switching off
setting manual control
1 Turn the function and temperature knobs to 0. The indicator lights go out and the appliance has been switched off.
2 Press the button. The appliance is set to manual control.
turbo; hot air

You can cook on various levels at the same time. Thanks to the intensive heat transfer, you can select a temperature approx. 20^ lower than stated for conventional recipes.
infra; top and bottom heat

Infra is meant for cooking on one level. Place the dish in the middle of the oven for the traditional method of cooking. The dishes rise well and get a nice brown colour.
bottom heat

Only the bottom heat is switched on. This setting is suitable for giving tart and pizza bases a bit of extra cooking. Switch to this setting at the end of a baking process.
economy grill

Use the economy grill when there is only a dish in the middle of the oven or when using the rotisserie. The thermostat also controls the grill. As a result, the element will not be red continuously, but only from time to time.
maxi grill

Use the maxi grill for large portions - for a fully-covered grid shelf, for example. The thermostat also controls the grill. As a result, the element will not be red continuously, but only from time to time.
preheating

Use this function if you want to preheat the oven extra fast. NB: Never use this setting for cooking food. Only place the food in the oven after the oven has first been preheated.
cooking information optional accessories
cooking information tips for baking and roasting

For grilling and for baking with baking tins.

For baking dough without a tin and for roasting meat. The roasting tin can also be slid under the grid shelf and used as a drip-tray.
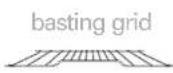
With a recess in the grid for basting meat. Fits on the roasting tin and the support frame.
For baking dough without a tin and for roasting meat. Never rinse the baking tray under cold water immediately after use; it may crack.

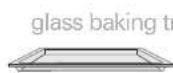
For the glass baking tray and the baking tray/roasting tin.
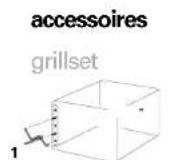
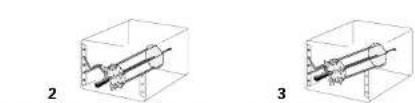
For grilling on the rotisserie or the grill set.
1 Slide a grid shelf and drip-tray onto shelf level 1.
2 Hook the support into the side (1)
3 Push the grill set into the rear wall (2).
4 Place the spit on the support (3).
5 Remove the handle and close the door.
introduction
In the tables on pages 18, 19 and 20 inclusive you will find information about cooking times, temperatures and shelf heights. The times and temperatures in the tables are averages. If necessary, you can use slightly different values in order to cook more than one dish at the same time.
energy-conscious use of the oven
Open the oven door as little as possible.
Cook dishes with approximately the same cooking temperatures (apple tart and an oven dish, for example) at the same time on the same grid shelf, or one above the other with the turbo function. You can also braise meat at the same time.
Cook several dishes one after the other Ian oven dish after a cake, for example. The cooking time for the second dish can often be shortened by 10 minutes because there is so much heat still in the oven.
Thanks to the oven insulation, dishes with a longer cooking time (more than an hour) can finish cooking using the residual heat in the oven. Switch the oven off 10 minutes earlier than is indicated, but leave the door shut.
preheating
Preheating is not generally necessary, except for dishes with a cooking time of less than 30 minutes or when the recipe indicates it. You can warm the oven extra quickly using the special preheating setting.
empty oven
Take everything that is not required for cooking out of the oven.
cooling down
Switch the oven off before taking the cooked dish out of it. Close the oven door and let the oven cool down.
cooking information
tips for baking and roasting
cooking information
roasting
oven dishes
You can, in principle, use any dish that is heatproof. Do not rinse glass dishes under cold water directly after use. The sudden temperature difference may cause the glass to crack. Use dark or black baking tins. These conduct heat better and allow the food to cook more evenly.
do not cover the bottom of the oven
Covering the bottom of the oven - for example, with aluminium foil or a baking tray - may result in overheating and damage to the enamel.
setting the time
Select a cooking time 5 minutes shorter than that given in the recipe. This enables you to check whether the dish or cake is cooked and has a good colour before the end. If not, close the oven door and check it again a little later. The door should be opened and closed slowly, and preferably not before three-quarters of the cooking time has elapsed.
keeping warm
You can use the oven to keep warm food that has already been cooked. Select the turbo function and a temperature of 80^ . Cover food that you want to keep warm, to stop it drying out.
door switch (only ..60..L)
The door switch operates independently of the oven functions. When you open the oven door, the oven lighting comes on.
roasting meat
Large pieces of meat weighing more than 1kg are the most suitable. The meat becomes evenly crisp on the outside, with almost no loss of weight as a result.
- Rub the meat with salt and seasoning 15 minutes beforehand. Use 80 to 100g of butter or fat (or a mixture of both) per 500g of meat for roasting.
cooking times
- Flat, thin pieces need on average 5 minutes less cooking time than thick or rolled pieces of meat.
- Larger pieces of meat need 15 to 20 minutes cooking time longer per 500 g of extra weight.
In the table on page 18 you will find the roasting temperatures for various types of meat with a weight of approx. 1.5kg
cooking
- Place the meat in a roasting tin and pour hot butter and/or fat over it. If the meat has a layer of fat, place this facing upwards during roasting. Baste meat without a layer of fat every 15 minutes. Baste meat with a layer of fat every 30 minutes.
If the gravity becomes too dark, add a few spoonfuls of water every now and then during roasting. - After cooking, allow the meat to rest for 10 minutes - covered with aluminium foil - before carving it.
cooking information grilling
cooking information grilling
general tips
- When grilling meat, game, poultry and fish, the meat or fish is soaked immediately, preserving the nutrients and flavour. Butter and oil are not necessary, therefore. Thick pieces of small cuts of meat, thin fish steaks or whole fish are the most suitable.
- The skewers are used for even grilling of smaller pieces of meat and vegetables, such as satay, kebabs and shashiaks.
tips for meat
Only use good quality meat. Allow 100-200 g of meat or 150-250 g of meat on the bone per person.
Always place a suitable roasting tin under the food to catch any crisps of fat. If necessary, dry the meat with kitchen paper before placing it under the grill.
- For food with a long grilling time, such as rolled meat and chicken, pour ± 250ml of water into the roasting tin.
tips for fish
- Allow 150-200 g of steaks or whole fish or 100-150 g of filleted fish per person. For larger fish, have the head removed.
- Wash the fish. Dry it with kitchen paper. Score thick fish. Place the fish on the grid shelf and slide a roasting tin underneath.
garnishes and sauces
Garnishes - such as slices of apple, pineapple or tomato halves, for example - can also be grilled.
- Place slices of cheese on the meat at the last minute and allow it to melt. Only salt and pepper the meat after grilling it. How thick the meat is determines its position under the grill. In general, thin pieces of meat should be put in a high position (always at least 5 cm away from the grill) and thicker pieces, which must be cooked right through, somewhat lower.
- Turn thinner pieces of meat with a pair of tongs. Use oven gloves. Do not prick the meat, because this will cause loss of meat juices. In the case of grilled meat, where no gravy is formed, a sauce or herb butter can be served separately if desired.
- Do not cut grilled meat or suchlike immediately, but allow it to cool for a few minutes first. There will then be less loss of meat juices when you do cut it.
labels
These are guidelines. The temperature and time may vary, as they depend among other things on the quantity, type of mould and desired colour.
cooking information labels
cooking information labels
baking
| turbo infra | time | ||||
| oven temp. °C shelf* | oven temp. °C shelf* | min. | |||
| cake mixture | |||||
| cake | 140 - 150 | 2 | 160 - 170 | 2 | 65 - 70 |
| deep cake | 140 - 160 | 2 | 160 - 180 | 2 | 70 - 80 |
| gingerbread | 140 - 150 | 2 | 160 - 170 | 2 | 65 - 75 |
| fruit cake (baking tray) | 150 - 170 | 3 | 180 - 200 | 3 | 35 - 45 |
| fruit cake (loose-bottomed tin) | 150 - 170 | 2 | 160 - 180 | 2 | 45 - 55 |
| cake base | 150 - 170 | 3 | 180 - 200 | 3 | 20 - 30 |
| small cake | 150 - 170 | 3 | 180 - 200 | 3 | 15 - 25 |
| sponges | |||||
| sponge cake | 150 - 170 | 3 | 170 - 190 | 3 | 40 - 50 |
| Swiss roll | 160 - 180 | 3 | 180 - 200 | 3 | 15 - 20 |
| shortcrust pastry | |||||
| apple pie | 165 - 175 | 2 | 180 - 200 | 2 | 50 - 60 |
| cheesecake | 150 - 170 | 2 | 180 - 200 | 2 | 70 - 80 |
| pie base | 150 - 170 | 3 | 180 - 200 | 3 | 15 - 25 |
| shortbread biscuits | |||||
| - on 1 level | 150 - 160 | 3 | 170 - 180 | 3 | 15 - 18 |
| - on 2 levels | 150 - 160 | 2 + 4 | - | - | 15 - 18 |
| yeast mixtures | |||||
| flan | 180 - 190 | 3 | 200 - 220 | 3 | 30 - 40 |
| bread | 200 - 210 | 2 | 220 - 230 | 2 | 30 - 40 |
| pizza | 190 - 210 | 3 | 210 - 230 | 3 | 20 - 36 |
| choux pastry | |||||
| profiteroles | 190 - 200 | 3 | 210 - 220 | 3 | 20 - 30 |
| puff pastry | 190 - 210 | 3 | 200 - 220 | 3 | 15 - 25 |
| oven dishes/grats | |||||
| raw ingredients | 160 - 180 | 2 | 180 - 200 | 2 | 60 - 80 |
| pre-cooked ingredients** | 160 - 180 | 2 | 180 - 200 | 2 | 30 - 40 |
| only "au gratin" | 180 - 200 | 2 | 180 - 200 | 2 | 20 - 30 |
| lasagne | 170 - 190 | 2 | 190 - 210 | 2 | 35 - 45 |
from bottom to top
** The ingredients here are still hot. If the ingredients have been pre-cooked but have been allowed to cool, the baking time should be extended.
roasting
| turbo infra time | |||||
| meat (1,5 kg) oven temp. °C shelf* oven temp. °C shelf* min. | |||||
| veal | |||||
| veal fricandeau 150 - 160 2/3 170 - 180 2/3 60 - 65 | |||||
| rolled veal 150 - 160 2/3 170 - 180 2/3 80 - 90 | |||||
| stuffed breast of veal | 150 - 160 | 2/3 | 170 - 180 | 2/3 | 80 - 90 |
| beef | |||||
| sirloin undercut 200 - 210 2/3 220 - 230 2/3 20 - 25 | |||||
| roast beef 200 - 220 2/3 220 - 240 2/3 30 - 35 | |||||
| rolled loin 150 - 160 2/3 170 - 180 2/3 55 - 65 | |||||
| rolled rib 150 - 160 2/3 170 - 180 2/3 85 - 95 | |||||
| aitchbone 150 - 160 2/3 170 - 180 2/3 35 - 45 | |||||
| pork | |||||
| pork fricandeau | 150 - 160 | 2/3 | 170 - 180 | 2/3 | 80 - 90 |
| rolled pork loin | 150 - 160 | 2/3 | 170 - 180 | 2/3 | 80 - 90 |
| marrled rolled pork | 150 - 160 | 2/3 | 170 - 180 | 2/3 | 90 - 100 |
| lamb | |||||
| leg of lamb, pink | 150 - 160 | 2/3 | 200 | 2/3 | 50 - 60 |
| leg of lamb, done | 150 - 160 | 2/3 | 170 - 180 | 2/3 | 85 - 100 |
| rolled lamb | 150 - 160 | 2/3 | 170 - 180 | 2/3 | 95 - 110 |
| shoulder of lamb | 150 - 160 | 2/3 | 170 - 180 | 2/3 | 95 - 110 |
| poultry (1 kg) | |||||
| chicken | 160 - 170 | 2 | 170 - 180 | 2 | 50 - 60 |
| young turkey (2 - 3 kg) | 160 - 170 | 1 | 170 - 180 | 1 | 120 - 180 |
| duck (wild) | 160 - 170 | 2/3 | 170 - 180 | 2/3 | 50 - 60 |
| game | |||||
| hare | 160 - 170 | 2/3 | 170 - 180 | 2/3 | 110 - 120 |
| rabbit | 160 - 170 | 2/3 | 170 - 180 | 2/3 | 90 - 120 |
* from bottom to top
cooking information labels
maintenance cleaning
grilling
| chops 200 - 225 4 / 5 - 12 - 16 | ||
| lamb cutlets 200 - 225 5 - 7 - 8 | ||
| sausages | 200 - 225 4 / 5 - 16 - 20 | |
| hamburger | 200 - 225 5 - 14 - 17 | |
| shashlik | 200 - 225 6 - | 6 - 10 |
| fish fillet (thin) | 200 - 225 6 - 8 - 10 | |
| fish (steak) | 200 - 225 4 / 5 - | 10 - 15 |
| toast | 200 - 225 5 - 2 - 4 | |
| toast, with topping | 200 - 225 4 - 4 - 5 | |
| chicken (1 kg) | - | 200 - 225 |
| rolled pork (1 kg) | - | 200 - 225 |
| rolled beef (1 kg) | - | 200 - 225 |
Turn the dishes halfway through the grilling time.
Use the enamelled baking tray as a drip tray when grilling.
cleaning after use
For cleaning both the inside and the outside of the oven, it is best to use a mild cleaning agent (washing-up liquid) and a damp cloth.
Dry with kitchen paper or a dry cloth.
Never use abrasive agents. These may harm the enamel or cause scratches.
stubborn stains

You can remove stubborn stains with a liquid abrasive or oven cleaner. Remove burnt-on food inside the oven with a glass scraper.
The glass panel on the inside of the door is removable. If the oven has been built in under the worktop, it may be that the glass panel cannot be taken out of the door. You can clean the window on the inside by sliding a cloth between the two panes. The glass panel's guides on the inside of the oven door may become discoloured if they come into contact with oven cleaner. Read the directions on the packaging of the oven cleaner before use.
cleaning accessories
Use a mild cleaning agent. Dry the accessory well with a dry cloth. Any burnt-on food on the grill set can be removed using steel wool.
grill reflector plate
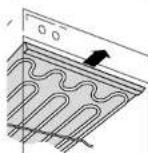
The oven is equipped with a removable grill reflector plate. When you want to clean the plate, you must pull it straight towards you out of the oven.
When putting the grill reflector plate back, take care that the two studs slot into the element.
faults
what should I do if...
environmental aspects
disposing of packaging and appliance
If the appliance does not work properly, this does not always mean that it is defective. Try to deal with the problem yourself first. Phone the service department if the advice given below does not help.
| fault | cause | solution |
| The clock does not work. | No power supply. | Insert the plug in the socket.Switch on the two-way and off switch in the meter cupboard. |
| Fuse in the meter cupboard defective. | Replace the fuse. | |
| Oven or grill does not heat up. | Fuse in the meter cupboard defective. | Replace the fuse. |
| End-time set. | The oven switches on automatically. | |
| Temperature is not correct. | Temperature set incorrectly. | Set the oven temperature again. |
| Thermostat defective. | Switch oven off and phone the service department. | |
| Oven light not on. | End-time set. | The light will come on when the door is opened and when the oven switches on. |
| No power supply. | Insert the plug in the socket.Switch on the two-way and off switch in the meter cupboard. | |
| Bulb defective. | Switch oven off and replace the bulb.Disconnect the appliance from the power supply by removing the plug from the socket or by turning the two-way and off switch in the meter cupboard or by removing the fuse.You can snap the glass cover out of the side wall of the oven.The bulb is then accessible.Replace it with a new bulb 230 V-50 Hz-300 °C/25 W. |
Oven switches off suddenly.
Working-time limiter has switched the oven off.
Reset the oven.
In the manufacturing of this appliance use has been made of durable materials.
The appliance packaging is recyclable. The following may have been used:
cardboard;
- paper;
polythene film (PEI);
CFC-free polystyrene (PS hard foam);
polypropylene tape (PP).
Dispos of these materials in a responsible manner and in accordance with government regulations.
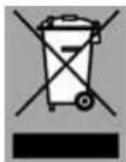
On the data plate is put the symbol of a crossed-out wheeled dustbin.
This means that at the end of its working life, the product must not be disposed of as urban waste. It must be taken to a special local authority differentiated waste collection centre or to a dealer providing this service.
Disposing of a household appliance separately avoids possible negative consequences for the environment and health deriving from inappropriate disposal and enables the constituent materials to be recovered to obtain significant savings in energy and resources.
As a reminder of the need to dispose of household appliances separately, the product is marked with a crossed out wheeled custbin.