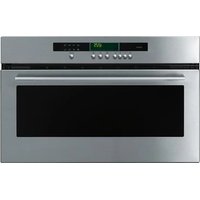
SX111MU - Oven Atag - Free user manual and instructions
Find the device manual for free SX111MU Atag in PDF.

User questions about SX111MU Atag
0 question about this device. Answer the ones you know or ask your own.
Ask a new question about this device
Download the instructions for your Oven in PDF format for free! Find your manual SX111MU - Atag and take your electronic device back in hand. On this page are published all the documents necessary for the use of your device. SX111MU by Atag.
USER MANUAL SX111MU Atag
natural_image
Front view of a stainless steel oven with a digital display (no visible text or symbols)instructions for use steam oven
qbe 9651 - 3582

natural_image
Three people preparing food together, one holding a spoon and another using a tool (no visible text or symbols)ATAG
ATAG
uw stoomoven
beschrijving
uw stoomoven
voorwoord

text_image
bedieningspaneel deur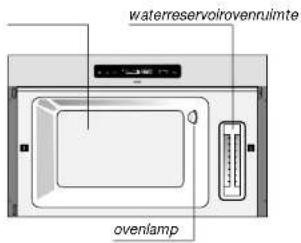
text_image
waterreservoirovenruimte ovenlampbedieningspaneel
natural_image
Wireframe diagram of a grid structure with a circular component on top (no text or symbols)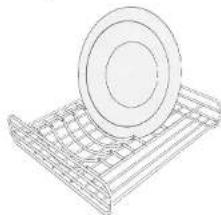
natural_image
Line drawing of a metal rack with a circular component on top (no text or symbols)text_image
Technical diagram showing a washing machine with labeled parts A and B, including a magnified inset view.natural_image
Diagram of a microwave oven with control panel and two separate views of the lid (no text or symbols)natural_image
Two wire mesh storage racks, one with a circular top and the other a circular lid on top (no text or symbols)natural_image
Technical line drawing of a refrigerator with an inset view showing internal components (no text or symbols)natural_image
Two wire mesh models of a metal tray with circular and circular features, one upright and one tilted (no text or symbols)text_image
Technical diagram of a refrigerator with labeled parts A and B, showing internal components and directional arrows.natural_image
Diagram of a microwave oven with control panel and two separate views of the lid (no text or symbols)text_image
control panel door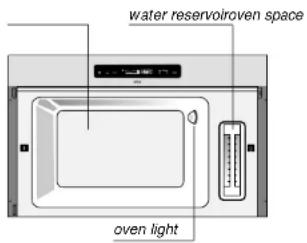
text_image
water reservoiroven space oven lightcontrol panel
text_image
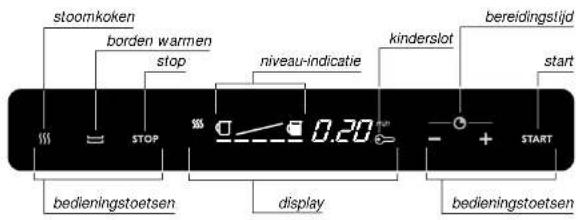
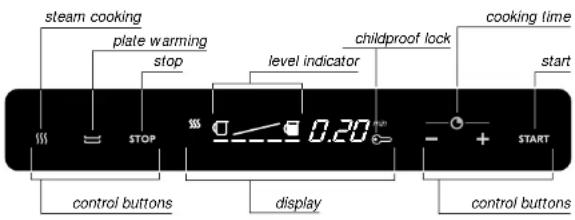
steam cooking plate warming stop level indicator childproof lock cooking time start STOP 0.20 min control buttons display control buttons STARTThe controls for this oven are very easy. What we particularly want to do in this manual is give you an idea of all the possibilities this appliance has.
The various functions are arranged for easy reference in the operation section. In the use section, you will find information about using the accessories. In the maintenance section, you can read about how you can keep the appliance in tip-top condition.
A separate installation guide has been enclosed for installing the appliance. This installation guide also includes safety instructions for installing and connecting up the appliance.
Please keep this manual carefully, since any subsequent user will also find it very useful.
We wish you much pleasure with your oven!
your steam oven introduction
your steam oven contents
You have chosen an Atag steam oven.
Optimum ease of use and simple operation were the most important factors in the development of this product.
Once you have placed the food in the steam oven and switched the appliance on, you do not have to pay it any more attention. Stirring is not necessary and the food cannot burn. So you can concentrate fully on the food you are cooking by conventional methods.
Do you want to warm plates? You can do that as well. The steam oven keeps the plates warm until you take them out.
safety
what you should pay attention to 4
operation
preparation 5
operation
steam cooking 6
warming plates 7
extra facilities
childproof lock 8
cooking information
accessories 9
maintenance
cleaning 10 - 11
oven light 12
faults
what should I do if... 13 - 14
environmental aspects
disposal of packaging and appliance 15
safety what you should pay attention to
operation preparation
general
Always fill the reservoir with water before starting to steam cook.
Do not use distilled water. It is not suitable for consumption.
Remove the accessories from the steam oven and clean it with a mild cleaning agent.
For safety tips in relation to the installation, we refer you to the instructions in the accompanying installation guide.
Repairs must only be carried out by an authorised service engineer.
Never open the appliance's casing and do not alter the mechanical and/or electrical structure of the appliance. This could result in dangerous situations (touching live components) and faults.
Do not use the appliance if it is damaged.
The appliance should be disconnected from the mains before being repaired or cleaned. Remove the plug from the socket or turn the switch in the meter cupboard to zero.
For electrical safety reasons, the appliance must not be cleaned using high-pressure cleaners or steam cleaners.
This steam oven has been designed for domestic use. You should only use it for cooking food and warming plates.
introduction
The steam oven has two functions: steam cooking and warming plates. You can also set the cooking time. This page and the following ones tell you how to use the steam- and plate-warming functions.
removing the water
reservoir
tip
In areas with very hard water, it is best to use bottled water.
maximum level
level indicator

half full
The amount of water in the reservoir is shown in the display. When the 'empty jug' symbol blinks, the reservoir is empty. A sound signal is heard. The door can be opened.

nearly empty
If you remove the jug, the sound signal stops.
Fill the water reservoir and put it back.
When the door is closed, the steam cooking is resumed.
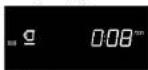
empty
switching on

selecting steam cooking

setting the cooking time

start
1 Press the steam cooking symbol.
The steam symbol and the standard cooking time (25 minutes) light up in the display.
2 Set the cooking time using the + / - button.
You can select a cooking time of between 10 and 60 minutes.
3 Press the start button.
The display shows:
– the function selected;
– the water level in the reservoir;
– the cooking time remaining.
switching off

steam symbol blinks
Three minutes before the end of the cooking time, the level indicator disappears from the display.
Steaming has stopped. The steam escapes from the oven space. While the steam is escaping, the steam symbol blinks. The end of the cooking time is indicated by a sound signal.
The food is kept warm until you open the door or press the stop button. The sound signal also stops then.

stop
1 Press the stop button.
2 Take the food out of the steam oven.
Attention: the food is hot!
3 Empty the water reservoir.
4 the bottom and the door of the steam oven.
The fan continues to run for two minutes after the door has been opened.
interrupting the steaming process
We advise against interrupting the steaming process. Only do so if it is necessary - for example, to top up the reservoir.
1 Press the stop button.
The program stops. The waiting time remaining appears in the display; the steam symbol blinks.
2 Close the door.
After the door has been closed, the steam cooking is resumed.
warming plates
1 Press the plate warming button.
The symbol and the standard time (30 minutes) light up in the display.
2 Set the time using the + / - button.
You can select a time of between 10 and 60 minutes.
3 Press the start button.
The display shows:
- the function selected;
– the water level in the reservoir; - the time remaining.
tip
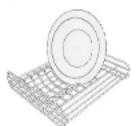
plate rack
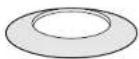
It is best to put the plates into the plate rack outside the oven (maximum diameter 25 cm).
extra facilities
childproof lock
cooking information
accessories

key symbol lights up
The appliance is fitted with a childproof lock. If the childproof lock is switched on, the controls cannot be used.
locking
Press the stop button for approx. 5 seconds.
The key symbol lights up in the display: you hear a signal.
unlocking
Press the start button for approx. 5 seconds.
The key symbol goes out; you hear a signal.
To save energy, the symbol goes out after ten minutes. If you touch a button, the key symbol lights up again.
introduction
When steaming, you can use the accessories supplied. You can also use dishes made of heatproof glass, pottery, china or plastic. Do not use cardboard plates or dishes, since they are not moistureproof.
dishes
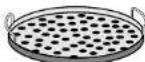
Use the dish together with the perforated dish to recover cooking liquid. You can use this cooking liquid as a basis for a sauce.
Attention: the cooking liquid is hot!
Steam rice and pasta without the perforated dish. You can arrange asparagus on a dish and cook it in the steam oven.
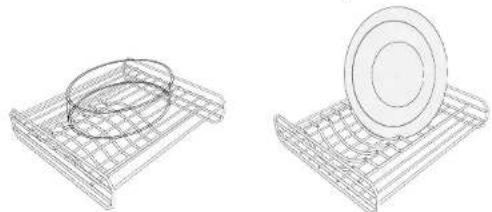
grid shelf with plate rack
The shelf is also used as a plate rack.
natural_image
Two wire mesh models of a metal tray, one circular and one circular, with no text or symbols.plate rackgrid shelf
maintenance cleaning
maintenance cleaning
after use
Steaming is a clean process. However, from the point of view of hygiene, it is sensible to empty the water reservoir after each use and clean it, together with the inside of the oven.
Wipe the inside of the oven with a damp sponge. Then dry it with a cloth.
Rinse out the water reservoir after use. Use some washing-up liquid, if necessary. Rinse with clean water.
Clean the accessories with a mild cleaning agent. The accessories may also be cleaned in a dishwasher.
periodically
screening plate
Depending on how hard the water is, scale may form on the heating element.
1 Open the door of the steam oven.
2 Remove the grid shelf and the screening plate from the oven space.
3 Carefully pull the steam pipe towards you and remove it.
4 Clean the heating element with vinegar.
5 Put the components back in reverse order.
attention
Never use bleach or scouring powders and scourers.
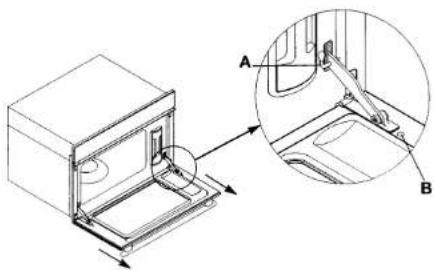
removing the door
The door can be removed, to make it easier to clean the oven.
text_image
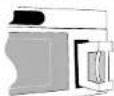
Technical diagram showing a washing machine with labeled parts A and B, including an inset view of the door mechanism.1 Open the door.
2 Place the pins (A) in the openings in the hinges (see detail).
3 Remove the screws (B).
4 Remove the door.
Put the door back in the reverse order.
Do not forget to remove the pins (A) from the hinges before closing the door again.
maintenance
oven light
faults
what should I do if...
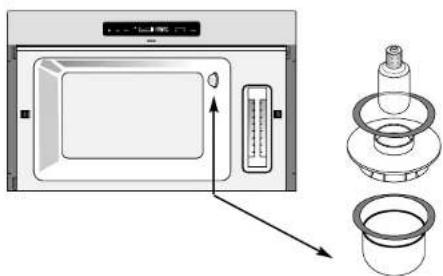
replacing the light bulb
light bulb: 15 W; 300 °C; 220/240 V; fitting E14.
natural_image
Diagram of a microwave oven with control panel and two separate parts (no text or symbols)Take care: Switch the appliance off first before you touch the light bulb. The light bulb is at the rear right of the oven (see illustration).
1 Turn the protective cover a quarter turn to the left.
2 Unscrew the light bulb.
3 Replace the light bulb.
4 Put the protective cover back again.
Make sure that the seals are in the correct place.
If the appliance does not work properly, this does not always mean that it is defective. Try to deal with the problem yourself first. Phone the service department if the advice given below does not help.
| fault | cause | solution |
| Level-indicator blinks even when reservoir is full. | The reservoir has not been fitted correctly. | Fit the reservoir correctly. |
| The detection system is defective. | Phone the service department. | |
| Display does not light up when one of the six control buttons has been pressed. | No power supply. | Put the plug into the socket. |
| Fuse in the meter cupboard defective. | Replace the fuse. | |
| Electronics defective. | Phone the service department. | |
| Oven light not on. | Appliance not switched on. | Switch the appliance on. |
| Light bulb defective. | Switch oven off and replace the light bulb. | |
| No power supply. | Put the plug in the socket. | |
| Fuse in the meter cupboard defective. | Replace the fuse. | |
| Water or steam leaks from oven. | Door not closed properly. | Close the door correctly. |
| Door seal defective. | Phone the service department. | |
| Irregular buzzing noise during cooking. | You can hear the pump. | This is normal. |
faults
what should I do if...
environmental aspects
disposal of packaging and appliance
| fault | cause | solution |
| Message F1 appears. | Fault in the electronic component of the oven. | Phone the service department. |
| Message F2 appears. | The heating element is not working properly. | Phone the service department. |
| Message F3 appears. | The water reservoir has not been fitted properly. | Press the 'stop' button.Open the oven door. Fit the water reservoir correctly.Select the steam- or plate-warming function again. |
Phone the service department if the message keeps appearing.
The appliance's packaging is recyclable. The following may be used:
- cardboard;
• polyethylene film (PE);
• CFC-free polystyrene (PS rigid foam).
Dispose of these materials responsibly and in accordance with government regulations.
The government can also provide information about the responsible disposal of discarded domestic appliances.