YT-82071 - Screwdriver Yato - Free user manual and instructions
Find the device manual for free YT-82071 Yato in PDF.


| Product type | Electric screwdriver |
| Brand | Yato |
| Model | YT-82071 |
| Rated voltage | 230-240 V~ |
| Rated frequency | 50 Hz |
| Rated power | 550 W |
| No-load speed | 0-5500 min⁻¹ |
| Screw capacity (strip) | 3.5 x 25-55 mm |
| Tool holder | Hexagonal 6.35 mm (1/4") |
| Weight | 1.8 kg |
| Sound pressure level | 81.9 ± 3.0 dB(A) |
| Sound power level | 92.9 ± 3.0 dB(A) |
| Vibration level | 0.53 ± 1.5 m/s² |
| Insulation class | II |
| Protection degree | IPX0 |
| Included accessories | 2 heads (single screws and strip), screwdriver bits, extension adapter |
| Main functions | Screwing and unscrewing, rotation direction change, trigger lock, depth adjustment |
| Safety | Double insulation, overload clutch, trigger lock |
| Maintenance and cleaning | Clean with a dry cloth or compressed air (max 0.3 MPa); do not use chemical products |
| Spare parts and repairability | Use only original spare parts; repair by an authorized service center |
Frequently Asked Questions - YT-82071 Yato
User questions about YT-82071 Yato
0 question about this device. Answer the ones you know or ask your own.
Ask a new question about this device
Download the instructions for your Screwdriver in PDF format for free! Find your manual YT-82071 - Yato and take your electronic device back in hand. On this page are published all the documents necessary for the use of your device. YT-82071 by Yato.
USER MANUAL YT-82071 Yato
natural_image
Exterior view of a YATO electric drill putter (no text or symbols visible on the tool body)CE
natural_image
Black YATO 3D-printed electric drill putter with visible trigger and handle (no text or symbols on body)PL DE RU UA LT LV CZ SK HU RO ES FR IT NL GR
natural_image
Close-up of a mechanical tool with a drill bit and handle, showing internal components (no text or symbols visible)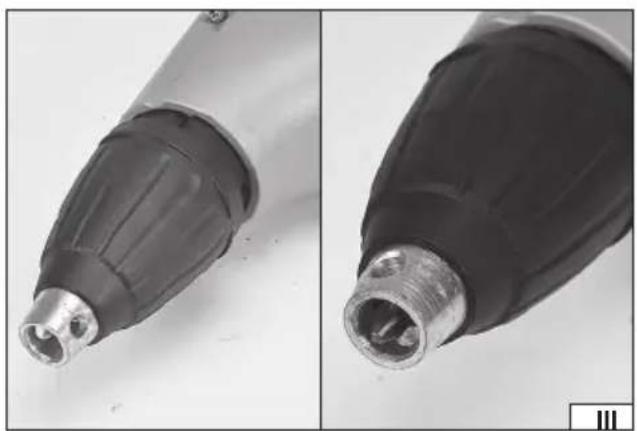
natural_image
Close-up of two black industrial torch holders with metallic caps, shown from side and top views (no text or symbols visible)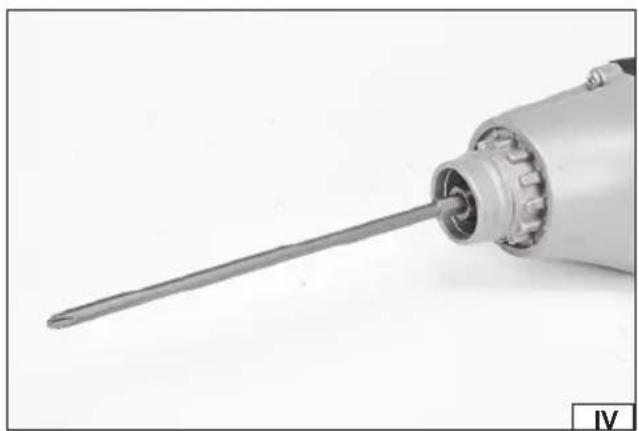
natural_image
Close-up of a precision screwdriver tip with a metallic blade, shown against a plain background (no text or symbols visible)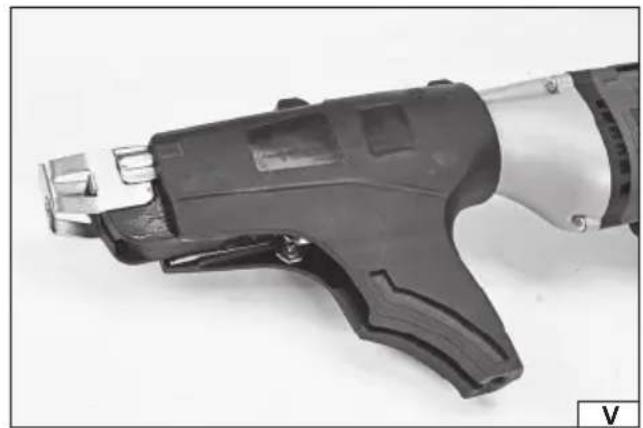
natural_image
Close-up of a black and silver handheld tool with metallic joints and a small metallic end cap (no visible text or symbols)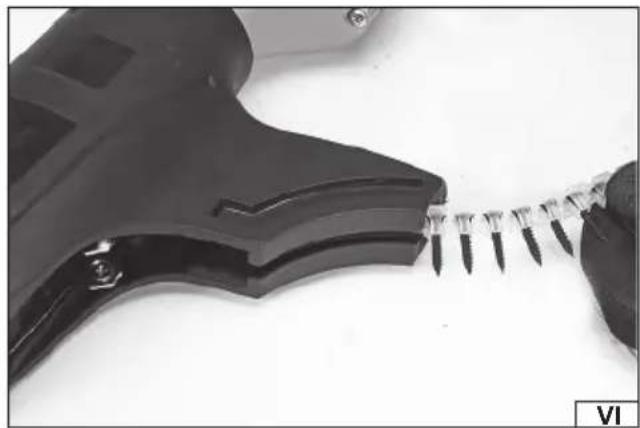
natural_image
Close-up of a black electrical fuse with screwdriver inserted, held by gloved hands (no text or symbols visible)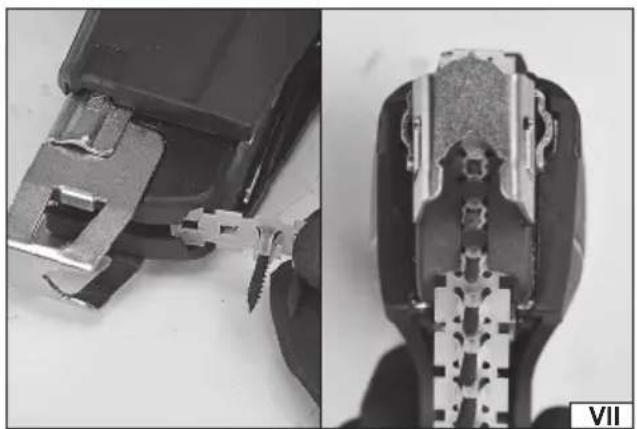
natural_image
Close-up of a mechanical component with disassembled parts, showing internal structure and assembly (no text or symbols visible)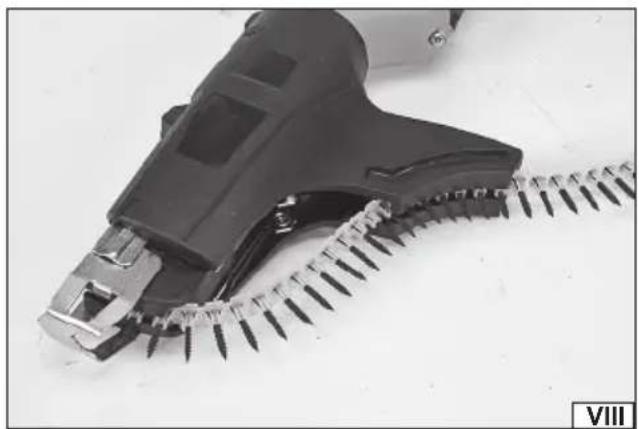
natural_image
Close-up of a black handheld tool with metal clips attached to a coiled spring-like object (no text or symbols visible)natural_image
Close-up of a mechanical component with internal cavities and a metallic bracket (no visible text or symbols)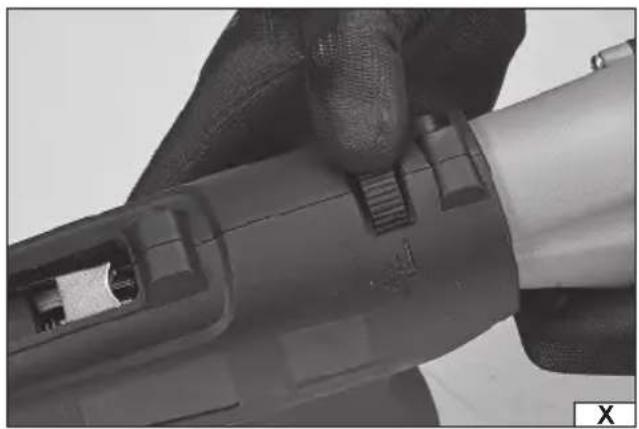
natural_image
Close-up of a hand holding a cylindrical electronic device with visible internal components (no text or symbols)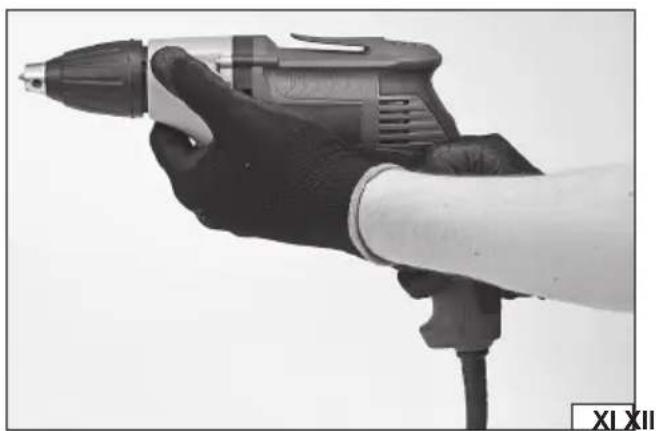
natural_image
Close-up of a hand holding a handheld electric drill pen, wearing black gloves (no visible text or symbols)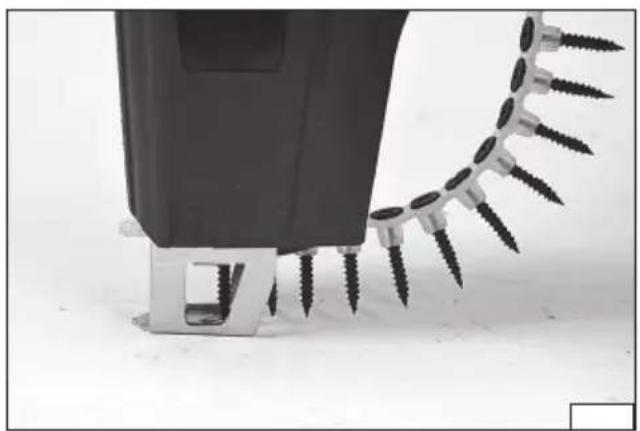
natural_image
Close-up of a mechanical component with multiple metal screws attached, no visible text or symbols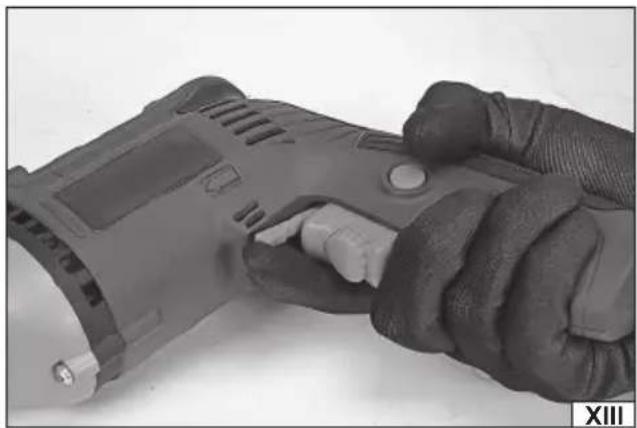
natural_image
Close-up of a hand holding a black cylindrical device with a knob, no visible text or symbols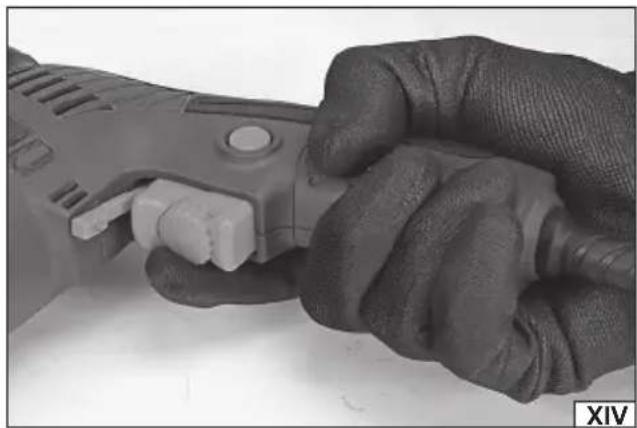
natural_image
Close-up of a hand using a power tool to adjust a component (no visible text or symbols)PL
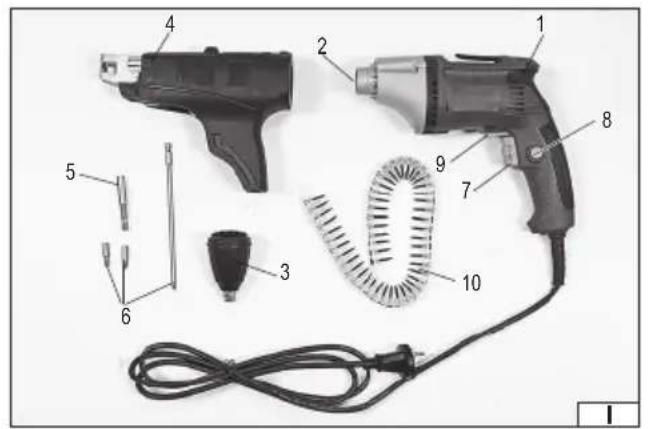
- screwdriver
- tool chuck
- single screw attachment
- screw strip attachment
- extension adapter
- screwdriver bit
- electric power switch
- power switch lock
- rotation direction switch
- screw strip
DE
Read the operating instruction
Wear protective goggles
Schutzbrille tragen
Wear hearing protectors
Gehörschutz tragen
Second class of insulation
This symbol indicates that waste electrical and electronic equipment (including batteries and storage cells) cannot be disposed of with other types of waste. Waste equipment should be collected and handed over separately to a collection point for recycling and recovery, in order to reduce the amount of waste and the use of natural resources. Uncontrolled release of hazardous components contained in electrical and electronic equipment may pose a risk to human health and have adverse effects for the environment. The household plays an important role in contributing to reuse and recovery, including recycling of waste equipment. For more information about the appropriate recycling methods, contact your local authority or retailer.
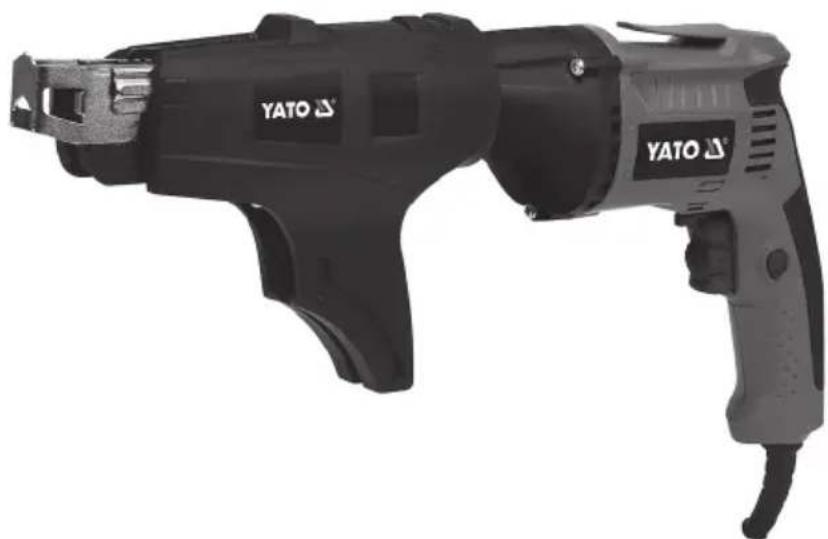
The electric screwdriver is a standard power tool with class II insulation designed to screw and unscrew screws using commercially available screwdriver bits. It is possible to screw in gypsum boards, wood, and wood-based materials. The correct, reliable, and safe operation of the tool depends on its proper use, therefore:
Read this entire instructions manual before the first use of the tool and keep it for future reference.
The supplier shall not be liable for any damage resulting from failure to comply with the safety instructions and recommendations specified in this instructions manual.
ACCESSORIES
The tool is equipped with two attachments: one for working with single screws and the other — for working with screw strips. Screwdriver bits designed to work with both types of attachments are included. Screws are not supplied with the tool.
TECHNICAL PARAMETERS
| Parameter Unit Value | ||
| Part number YT-82071 | ||
| Rated voltage [V~] 230 - 240 | ||
| Rated frequency [Hz] 50 | ||
| Rated power [W] 550 | ||
| Rated speed [min] | -1 0 - 5500 | |
| Size of the screw from the screw strip (diam. x length) [mm] | 3.5 x | 25 - 55 |
| Tool chuck | [mm / ‘] | - hexagonal 6.35 / 1/4 |
| Weight | [kg] | 1.8 |
| Noise level | ||
| - sound pressure LmA ± K | [dB(A)] | 81.9 ± 3.0 |
| - power LWA ± K | [dB(A)] | 92.9 ± 3.0 |
| Vibration level | [m/s2] | 0.53 ± 1.5 |
| Insulation class | II | |
| Protection rating | IPX0 |
GENERAL WARNINGS FOR THE SAFETY OF POWER TOOLS
Warning! Read all safety warnings, illustrations and specifications provided with this power tool. Failure to do so may result in electric shock, fire or serious injury.
Keep all warnings and instructions for future reference.
The term "power tool" used in warnings applies to all tools driven by power both wired and wireless.
Workplace safety
Keep the workplace well-lit and clean. Disorder and poor lighting can be causes of accidents.
Do not work with power tools in an environment with an increased risk of explosion, containing flammable liquids, gases or vapors. Power tools generate sparks that can ignite dust or fumes.
Children and third persons should not be allowed to enter the workplace. Loss of concentration can result in loss of control.
Electrical safety
The plug of the electric cable must match the power socket. You must not modify the plug in any way. Do not use any plug adapters with earthed power tools. An unmodified plug that fits the outlet reduces the risk of electric shock.
Avoid contact with earthed surfaces such as pipes, radiators and coolers. Grounding the body increases the risk of electric shock.
Do not expose power tools to contact with atmospheric precipitation or moisture. Water and moisture that gets inside the power tool increases the risk of electric shock.
Do not overload the power cable. Do not use the power cord to carry, pull or unplug the power plug from the power outlet.
Avoid contact of the power cable with heat, oils, sharp edges and moving parts. Damage or entanglement of the power cord increases the risk of electric shock.
In the case of working outside closed rooms, use extension cords intended for work outside closed rooms. The use of an extension cord adapted for outdoor use reduces the risk of electric shock.
EN
When using a power tool in a humid environment is unavoidable as a protection against supply voltage use a residual current device (RCD). The use of RCD reduces the risk of electric shock.
Personal safety
Stay alert, pay attention to what you do and keep common sense while working with the power tool. Do not use a power tool when you are tired or under the influence of alcohol or medication. Even a moment of inattention while working can lead to serious personal injury.
Use personal protective equipment. Always wear eye protection. The use of personal protective equipment such as dust masks, anti-slip safety shoes, helmets and hearing protection reduce the risk of serious personal injury.
Prevent accidental operation. Make sure that the electric switch is in the “off” position before connecting to the power supply and / or battery, lifting or moving the power tool. Moving the power tool with the finger on the switch or powering the power tool, when the switch is in the “on” position can lead to serious injuries.
Before turning on the power tool remove any keys and other tools that were used to adjust it. The key left on the rotating parts of the power tool can lead to serious injuries.
Do not reach and do not lean too far. Keep the right attitude and balance all the time. This will allow easier control over the power tool in case of unexpected work situations.
Dress accordingly. Do not wear loose clothing or jewelry. Keep your hair and clothing away from moving parts of the power tool. Loose clothing, jewelry or long hair can be caught by moving parts.
If the devices are fitted for the connection of dust extraction or dust collection, make sure that they are connected and used properly. The use of dust extraction reduces the risk of dust hazards.
Do not let the experience acquired from frequent use of the tool resulted in carelessness and ignoring safety rules. Carefree action can cause serious injuries in a fraction of a second.
Use and care of the power tool
Do not overload the power tool. Use the power tool appropriate for the selected application. The right power tool will provide a better and safer job if used according to the designed load.
Do not use the power tool, if the electric switch does not allow switching on and off. Power tool, which cannot be controlled by means of a power switch is dangerous and must be returned for repair.
Disconnect the plug from the power socket and / or remove the battery if it is detachable from the power tool before adjusting, changing accessories or storing the tool. Such preventive measures will allow you to avoid accidentally turning on the power tool.
Keep the tool out of the reach of children, do not let people who do not know how to operate the power tool or these instructions use a power tool. Power tools are dangerous in the hands of untrained users.
Maintain power tools and accessories. Check the tool for mismatches or jams of moving parts, damage to parts and any other conditions that may affect the operation of the power tool. Damage must be repaired before using the power tool. Many accidents are caused by incorrectly maintained tools.
Keep cutting tools sharp and clean. Properly maintained cutting tools with sharp edges are less prone to jamming and are easier to control when working.
Use power tools, accessories and inserted tools etc. in accordance with these instructions, taking into account the type and conditions of work. The use of tools for work other than designed is likely to result in a dangerous situation.
Handles and gripping surfaces must be dry, clean and free from oil and grease. Slippery handles and gripping surfaces do not allow for safe operation and control of the tool in dangerous situations.
Repairs
Repair the power tool only in authorized facilities using only original spare parts. This ensures proper operation safety of the power tool.
ADDITIONAL PRECAUTIONS
Hold the power tool by its insulated grip surfaces while performing operations where the connecting part may come into contact with concealed wiring or its cable. If the connecting part comes into contact with the live cable, it may cause the exposed metal parts of the power tool to become live and electrocute the operator.
PREPARING FOR OPERATION
Caution! All activities related to attaching and replacing working tools, installing covers and guides, adjusting etc. should be carried out with the tool disconnected from the supply voltage. For this reason, before proceeding with such activities: Pull the tool power cord plug out of the power socket!
Screwdriver assembly for work with single screws
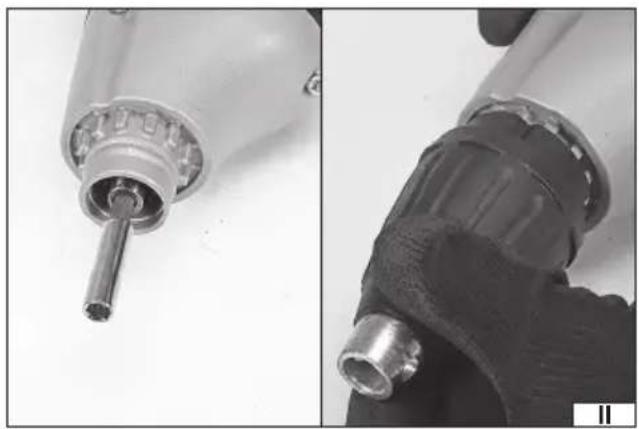
Slide the extension adapter (II) into the socket of the screwdriver.
Install the cover of the screwdriver bit holder (II). Push the cover all the way so that the fixing spline is completely invisible (III). Install the short screwdriver bit (III) in the adapter socket. You can install the screwdriver bit of any length. However, only when
EN
using a standard short bit of approx. 25 mm in length, when screwing, the cover will rest on the surface and prevent the conical screw head from protruding above the surface into which it is being screwed.
The screwdriver is ready for use.
Screwdriver assembly for work with screw strip
Slide the long screwdriver bit (IV) into the socket of the screwdriver. The screwdriver is supplied with the most commonly used cross-head screwdriver bit. In case the bit of different shape is needed, the bit must be of the same length but have a circular cross-section.
Install the screw strip attachment (V). Push the attachment all the way so that the fixing spline is completely invisible.
Slide the screw strip into the guide in the attachment (VI) and then move it to the guide in the front of the attachment. Slide the strip in until the first screw is in the centre of the attachment opening (VII).
The strip installed as on the figure (VIII) will ensure smooth movement of the screw strip.
A button is located in the attachment front. Pressing and holding this button (IX) allows for the extension of the metal guide, which is marked with numbers. The number indicates the length of the screw in millimetres.
At the rear of the guide, there is a knob (X), which allows you to adjust the screw screwing depth within the range set by the guide extension. The arrows and the screw symbol next to the knob show the rotation direction to increase or decrease the screwing depth.
Caution! Regardless of the chosen version of the screwdriver equipment, it is recommended to carry out screwing tests on waste material with the same hardness as the target material. The test will allow you to select the desired screwing depth precisely.
Always hold the screwdriver with both hands (XI) when screwing. A strong and firm grip will allow you to control the tool. If the screw is caught, the tool can rotate in the opposite direction to the spindle rotation. A strong and firm grip will prevent the screw-driver from being pulled out of the operator's hands.
When using the screw strip attachment, place the front part of the guide to the screwing area (XII). Then press the power switch and after starting the motor, press the screwdriver to the screwing area. After screwing, move the screwdriver away from the screwing area. The strip will be moved automatically so that the next screw in the strip is opposite to the screwdriver bit.
You can change the screwdriver rotation direction by means of the switch located above the power switch (XIII). Arrows on the screwdriver housing show the direction of screwing or unscrewing screws with right-hand thread.
By turning the knob located on the power switch (XIV), the degree of its pressing is decreased. The less the power switch is pressed, the lower the motor speed. The arrow on the knob shows the rotation direction. Rotating the knob in the direction of the "+" symbol increases the speed while rotating in the direction of the "-" symbol decreases the speed.
Power switch lock operation
It is recommended to use the power switch lock in case of prolonged screwing. To do this, while pressing the power switch, press the lock button with your thumb and release the power switch.
To deactivate the lock, press the electric power switch.
Tips for screwing and unscrewing
In the case of screwing, it is recommended to make a guide hole with the diameter of the screw head. Otherwise, the materials into which the screws will be screwed may be damaged.
You can screw properly selected screws in soft materials without making the hole. Still, it is recommended to perform a screwing test on a waster material. The screws for direct screwing should have sharp ends; this will facilitate screwing.
In the case of screwing in small and light components, they must be fastened, e.g. with clamps or vices, before starting work.
Always put the screwdriver bit to the screw head first then turn on the tool. Otherwise, the screwdriver bit or the screw may be damaged. It can also lead to dangerous situations and serious injuries.
The screwdriver does not start to rotate the spindle with the screwdriver bit holder until it is lightly pressed together with the screw to the material into which the screw is screwed. It is possible to adjust the rotational speed by pressing the electric power switch.
Maximum speed is achieved by pressing the power switch as far as it goes.
Drilling
It is forbidden to drill using the screwdriver.
The screwdriver is equipped with an anti-overload clutch that starts to operate when the screwdriver reaches its maximum torque.
Therefore, during drilling, the drill bit may stop, crack or destroy the processed material.
MAINTENANCE AND OVERHAUL
ATTENTION! Before any adjustment, technical service or maintenance operations unplug the tool. Once the operations have been finished, the technical conditions of the tool must be assessed by means of external evaluation and inspection of the following
EN
elements: body and handle, conductor with a plug and deflection, functioning of the electric switch, patency of ventilation slots, sparking of brushes, noise level of functioning of bearings and gears, start-up and smoothness of operation. During the guarantee period, the user cannot dismantle the electric tools or change any sub-assemblies or elements, since it will cancel any guarantee rights. All irregularities detected at overhaul or during functioning of the tools are a signal to have the tool repaired at a service shop. Once the functioning has been concluded, the casing, ventilation slots, switches, additional handle and protections must be cleansed with a stream of air (at a pressure not exceeding 0.3 MPa), with a brush or a cloth without any chemical substances or cleaning liquids. Tools and handles must be cleansed with a clean cloth.
GERÄTEBESCHREIBUNG
DECLARATION OF CONFORMITY
0423/YT-82071/EC/2023
We declare and guarantee with full responsibility that the following products:
Drywall screwdriver; 230-240 V\~; 50 Hz; 550 W; 0 - 5500 min -1 ; 6,3 mm; item no. YT-82071
meet requirements of the following European Standards / Technical Specifications:
EN 62841-1:2015
EN 62841-2-2:2014
EN IEC 55014-1:2021
EN IEC 55014-2:2021
EN IEC 61000-3-2:2019 + A1:2021
EN 61000-3-3:2013 + A1:2019 + A2:2021
and fulfill requirements of the following European Directives:
2006/42/EC Machinery and safety elements
2014/30/EU Electromagnetic compatibility (EMC) Directive
2011/65/EU Restriction of the Use of Certain Hazardous Substances
Serial number: concern all serials numbers of item(s) mentioned in this declaration
The last two digits of the year in which the CE marking was affixed: 21
Year of production: 2023
The person authorized to compile the technical file:
Tomasz Zych
TOYA S.A., ul. Sołtysowicka 13 - 15, 51-168 Wrocław, Poland
Wrocław, 2023.04.03
(Place and date of issue)
(Name and signature of authorized person)
TOYA S.A.



- PL
- DE
- ACCESSORIES
- TECHNICAL PARAMETERS
- GENERAL WARNINGS FOR THE SAFETY OF POWER TOOLS
- Workplace safety
- Electrical safety
- EN
- Personal safety
- Use and care of the power tool
- Repairs
- ADDITIONAL PRECAUTIONS
- PREPARING FOR OPERATION
- Screwdriver assembly for work with screw strip
- Power switch lock operation
- Tips for screwing and unscrewing
- Drilling
- MAINTENANCE AND OVERHAUL
- GERÄTEBESCHREIBUNG
- DECLARATION OF CONFORMITY
Brand : Yato
Model : YT-82071
Category : Screwdriver