YT-82802 - Screwdriver Yato - Free user manual and instructions
Find the device manual for free YT-82802 Yato in PDF.

| Brand | Yato |
| Model | YT-82802 |
| Product type | Cordless impact driver |
| Power supply | 18 V DC, 3 Ah lithium-ion battery |
| Charger | Input 220-240 V ~ 50/60 Hz, output 21.4 V DC, 2 A, 50 W |
| Charging time | 1.5 h |
| No-load speed | 0 - 1600 / 0 - 2600 min⁻¹ |
| Impact frequency | 0 - 4400 min⁻¹ |
| Max torque | 180 / 250 Nm |
| Tool holder | 1/2" (12.7 mm) |
| Weight | 1.3 kg |
| Sound pressure level | 86.0 ± 3.0 dB |
| Sound power level | 97.0 ± 3.0 dB |
| Vibration | 7.58 ± 1.5 m/s² |
| Main functions | Screwing and unscrewing with impact, electronic speed and torque adjustment, battery charge indicator, intermittent mode for unscrewing |
| Maintenance and cleaning | Clean with a dry cloth; do not use chemicals. Regularly check the condition of the housing, ventilation slots, and cord |
| Safety | Wear safety glasses, hearing protection and gloves. Do not use in explosive atmospheres. Disconnect the battery before adjustment |
| General information | Impact driver for DIY, supplied with battery and charger. Do not use adapters. Warranty: refer to after-sales service |
Frequently Asked Questions - YT-82802 Yato
User questions about YT-82802 Yato
0 question about this device. Answer the ones you know or ask your own.
Ask a new question about this device
Download the instructions for your Screwdriver in PDF format for free! Find your manual YT-82802 - Yato and take your electronic device back in hand. On this page are published all the documents necessary for the use of your device. YT-82802 by Yato.
USER MANUAL YT-82802 Yato
natural_image
YATO-branded electric drill putter with black and gray casing (no visible text or symbols on body)CE
PL EN DE RU UA LT LV CZ SK HU RO ES FR IT NL GR

natural_image
Three-panel black-and-white photo showing hands operating a battery pack and a charging case, with no visible text or symbols.
natural_image
Two black-and-white photos showing hands operating a drill press and a mechanical component, no visible text or symbols.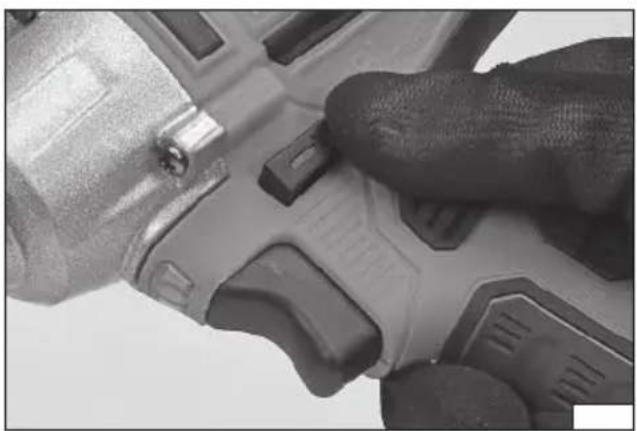
natural_image
Close-up of a hand using a power tool to adjust or install a component (no visible text or symbols)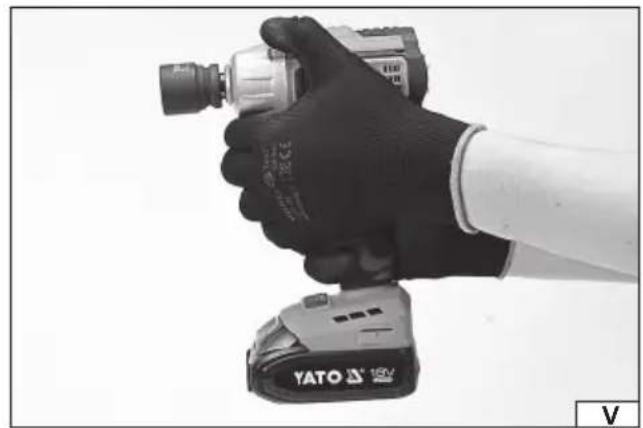
natural_image
Hand holding a YATO 160V power tool, no visible text or symbols on the device itself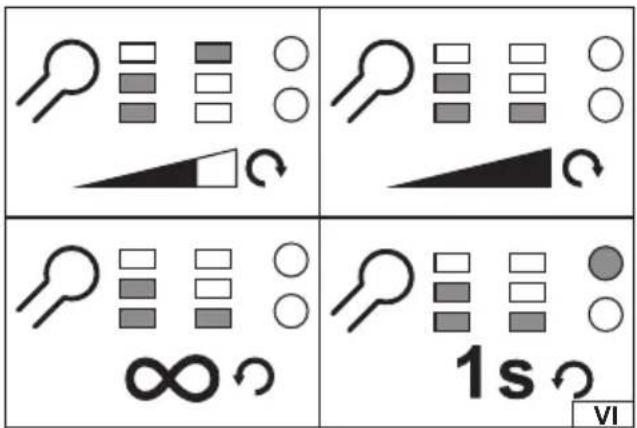
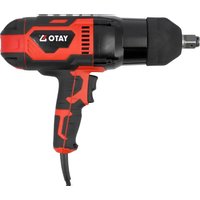
- impact wrench
- tool handle
- battery
- battery charger
- battery latch
- switch
- switch of the revs direction
- battery charge indicator
- control panel
DE
Read the operating instruction
Wear protective goggles
Schutzbrille tragen
Wear hearing protectors
Gehörschutz tragen
This symbol indicates that waste electrical and electronic equipment (including batteries and storage cells) cannot be disposed of with other types of waste. Waste equipment should be collected and handed over separately to a collection point for recycling and recovery, in order to reduce the amount of waste and the use of natural resources. Uncontrolled release of hazardous components contained in electrical and electronic equipment may pose a risk to human health and have adverse effects for the environment. The household plays an important role in contributing to reuse and recovery, including recycling of waste equipment. For more information about the appropriate recycling methods, contact your local authority or retailer.
CHARAKTERYSTYKA WYROBU
The impact wrench is a versatile tool, that does not require an external power source, it is portable, designed for the DIY users. It should be used only for is crewing in and out bolts and nuts with left-hand and right-handed thread, by using a variety of screwdriver bits. Through the impact mechanism the impact wrench offers much higher torque than a typical cordless screwdriver drill. Its special advantages would be appreciated by the DIYs who make a variety of assembly and finishing works. A correct, reliable and safe functioning of the electric tool depends on its proper use, so:
Before you proceed to operate the device, read the manual thoroughly and keep it.
The supplier will not be held responsible for any damage resulting from the safety regulations and the recommendations indicated hereby not being observed.
EQUIPMENT
The product is supplied in a complete state and requires no assembly. Together with the product there are provided: the rechargeable battery and charging station (charger).
TECHNICAL PARAMETERS
| Parameter Unit of measurement Value | ||
| Catalogue number YT-82802 | ||
| Operating voltage [V] 18 DC | ||
| Rotation (idle) [min] | ^-1 ] 0 - 1600 / 0 - 2600 | |
| Impact frequency [min] | ^-1 ] 0 - 4400 | |
| Maximum torque [Nm] 180 / 250 | ||
| Noise level | ||
| - acoustic pressure [dB] | 86,0 ± 3,0 | |
| - LWA power | [dB] | 97,0 ± 3,0 |
| Protection grade | IPX0 | |
| Insulation class | III | |
| Level of vibration (drilling / screwdriveting) | [m/s2] | 7,58 ± 1,5 |
| Mass | [kg] | 1,3 |
| Tool handle | ["/mm] | 1/2 / 12,7 |
| Battery | Li-Ion | |
| Capacity of the battery | [Ah] | 3 |
| Charger | ||
| Input voltage | [V] | 220 - 240 |
| Mains frequency | [Hz] | 50 / 60 |
| Rated power | [W] | 50 |
| Output voltage | [V] | 21,4 DC |
| Input current | [A] | 2 |
| Time of charging** [h] | 1,5 |
** charging time applies only to the battery with a capacity listed in table
GENERAL WARNINGS FOR THE SAFETY OF POWER TOOLS
Warning! Read all safety warnings, illustrations and specifications provided with this power tool. Failure to do so may result in electric shock, fire or serious injury.
Keep all warnings and instructions for future reference.
The term "power tool" used in warnings applies to all tools driven by power both wired and wireless.
Workplace safety
Keep the workplace well-lit and clean. Disorder and poor lighting can be causes of accidents.
Do not work with power tools in an environment with an increased risk of explosion, containing flammable liquids, gases or vapors. Power tools generate sparks that can ignite dust or fumes.
Children and third persons should not be allowed to enter the workplace. Loss of concentration can result in loss of control.
EN
Electrical safety
The plug of the electric cable must match the power socket. You must not modify the plug in any way. Do not use any plug adapters with earthed power tools. An unmodified plug that fits the outlet reduces the risk of electric shock.
Avoid contact with earthed surfaces such as pipes, radiators and coolers. Grounding the body increases the risk of electric shock.
Do not expose power tools to contact with atmospheric precipitation or moisture. Water and moisture that gets inside the power tool increases the risk of electric shock.
Do not overload the power cable. Do not use the power cord to carry, pull or unplug the power plug from the power outlet.
Avoid contact of the power cable with heat, oils, sharp edges and moving parts. Damage or entanglement of the power cord increases the risk of electric shock.
In the case of working outside closed rooms, use extension cords intended for work outside closed rooms. The use of an extension cord adapted for outdoor use reduces the risk of electric shock.
When using a power tool in a humid environment is unavoidable as a protection against supply voltage use a residual current device (RCD). The use of RCD reduces the risk of electric shock.
Personal safety
Stay alert, pay attention to what you do and keep common sense while working with the power tool. Do not use a power tool when you are tired or under the influence of alcohol or medication. Even a moment of inattention while working can lead to serious personal injury.
Use personal protective equipment. Always wear eye protection. The use of personal protective equipment such as dust masks, anti-slip safety shoes, helmets and hearing protection reduce the risk of serious personal injury.
Prevent accidental operation. Make sure that the electric switch is in the “off” position before connecting to the power supply and / or battery, lifting or moving the power tool. Moving the power tool with the finger on the switch or powering the power tool, when the switch is in the “on” position can lead to serious injuries.
Before turning on the power tool remove any keys and other tools that were used to adjust it. The key left on the rotating parts of the power tool can lead to serious injuries.
Do not reach and do not lean too far. Keep the right attitude and balance all the time. This will allow easier control over the power tool in case of unexpected work situations.
Dress accordingly. Do not wear loose clothing or jewelry. Keep your hair and clothing away from moving parts of the power tool. Loose clothing, jewelry or long hair can be caught by moving parts.
If the devices are fitted for the connection of dust extraction or dust collection, make sure that they are connected and used properly. The use of dust extraction reduces the risk of dust hazards.
Do not let the experience acquired from frequent use of the tool resulted in carelessness and ignoring safety rules.
Carefree action can cause serious injuries in a fraction of a second.
Use and care of the power tool
Do not overload the power tool. Use the power tool appropriate for the selected application. The right power tool will provide a better and safer job if used according to the designed load.
Do not use the power tool, if the electric switch does not allow switching on and off. Power tool, which cannot be controlled by means of a power switch is dangerous and must be returned for repair.
Disconnect the plug from the power socket and / or remove the battery if it is detachable from the power tool before adjusting, changing accessories or storing the tool. Such preventive measures will allow you to avoid accidentally turning on the power tool.
Keep the tool out of the reach of children, do not let people who do not know how to operate the power tool or these instructions use a power tool. Power tools are dangerous in the hands of untrained users.
Maintain power tools and accessories. Check the tool for mismatches or jams of moving parts, damage to parts and any other conditions that may affect the operation of the power tool. Damage must be repaired before using the power tool.
Many accidents are caused by incorrectly maintained tools.
Keep cutting tools sharp and clean. Properly maintained cutting tools with sharp edges are less prone to jamming and are easier to control when working.
Use power tools, accessories and inserted tools etc. in accordance with these instructions, taking into account the type and conditions of work. The use of tools for work other than designed is likely to result in a dangerous situation.
Handles and gripping surfaces must be dry, clean and free from oil and grease. Slippery handles and gripping surfaces do not allow for safe operation and control of the tool in dangerous situations.
Repairs
Repair the power tool only in authorized facilities using only original spare parts. This ensures proper operation safety of the power tool.
SCREWDRIVERS SAFETY WARNINGS
Hold the power tool by insulated gripping surfaces, when performing an operation where the fastener may contact hidden wiring or its own cord. Fastener contacting a "live" wire may make exposed metal parts of the power tool "live" and could give the operator an electric shock.
PREPARATION FOR WORK
ATTENTION! All the operations mentioned in this point must be realised with the power supply off.
- the battery must be disconnected from the tool!
Safety recommendations for battery loading
Attention! Before loading may start make sure the body of the charger, the cable and the plug are not broken or damaged. It is prohibited to use a damaged loading dock and charger! For the purpose of loading batteries only the charging dock and the charger provided may be used. Using another charger may be a cause of fire or damage the tool. Batteries may be charged only in a dry room, protected from unauthorised persons, particularly children. Do not use the charging dock and the charger without permanent supervision of an adult! If it is necessary to leave the room where loading is taking place, it is required to disconnect the charger from the mains, removing the charger from the mains socket. In case when smoke comes out of the charger, or a strange smell is emitted, etc., it is required to immediately remove the plug of the charger from the mains socket!
The drill and automatic return screwdriver is provided with an unloaded battery, so before work may commence, it is required to charge it following the procedure below, using the charger and charging dock provided. Li-ION batteries do not show the so called “memory effect”, so it is allowed to charge them at any moment. However, it is recommended to discharge them during normal work, and then load them to their full capacity. If due to the nature of the task it is not possible to do so each time, then it is required to do it at least from time to time. Under no circumstances is it allowed to discharge the batteries short-circuiting the electrodes, since this would cause irreversible damage! It is also prohibited to check the load of the batteries, short-circuiting the electrodes for sparking.
Storage of the battery
In order to prolong the life of the battery, it is required to provide adequate storage conditions. The batteries can go through approximately 500 „loading - discharging” cycles. The battery must be stored between 0 and 30°C, at the relative humidity of 50%. In order to store the battery for a prolonged period, it is required to charge it to approximately 70% of its capacity. In case of prolonged storage, it is required to recharge the battery once a year. Do not permit excessive discharging of the battery, since this would reduce its life and may cause irreversible damage.
During storage, the battery will be gradually unloading due to leakage conductance. The process of automatic unloading depends on the temperature of storage, since the higher the temperature, the fastest the process. In case of incorrect storage of batteries, there is a danger of electrolyte leakage. In case of leakage, it is required to protect the leakage with neutralizing agent. In case of contact of electrolyte with the eyes, it is required to rinse the eyes abundantly, and then immediately seek medical assistance. It is prohibited to use a tool with a damaged battery.
In case the battery is completely worn out, it is required to deposit it at a special point dedicated to disposal of such waste.
Transport of the batteries
Lithium-ion batteries are in accordance with legal regulations treated as dangerous waste. The user of the tool may transport the tool with the battery or only batteries by land. Then no additional conditions must be complied with. In transport is realised by third parties (for example dispatch through courier service), then it is required to proceed in accordance with regulations for transport of dangerous materials. Before shipment, contact an authorised person.
It is prohibited to transport damaged batteries. During transport the battery must be removed from the tool, and the exposed contacts protected, e.g. with insulating tape. Protect the batteries so that they do not move inside the package during transport. It is also required comply with the national regulations for transport of dangerous materials.
Charging the battery
Attention! Before charging you should disconnect the charger from the mains by unplugging the power supply plug from the mains. In addition, you should clean the battery and its terminals of dirt and dust with a soft, dry cloth.
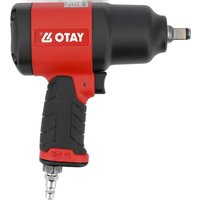
The battery has a built-in charge indicator. When you press the button, LEDs will light up (II), the more LEDs will light up, the more fully the battery pack is charged. If the button is pressed and the LEDs are off it means that the battery is discharged.
Disconnect the battery from the tool.
Push the battery in the charger socket (II).
Plug the charger into a mains socket.
When the red LED lights up, it means the loading process.
When charging is complete, the red LED goes off, and green LED lights up, indicating a full charge of the battery.
Unplug the charger from the mains outlet.
Remove the battery from the charging station, by pressing the battery latch button.
Attention! If, when the charger is connected to the power supply, the green LED is on, this indicates a fully charged battery. In this case, the charger does not start charging.
ATTENTION! The installation of the equipment may be done only with disconnected power supply. Disconnect the battery from the tool!
Working with the socket impact wrenches
Before you start screwing the bolt or nut with the wrench, you should by hand screw the bolt or nut on the thread (at least two turns).
Make sure that you correctly choose the size of socket wrench for item, which is tightened or loosened. Bad selection of size may result in damage of the key or nut or bolt.
Tightening and loosening
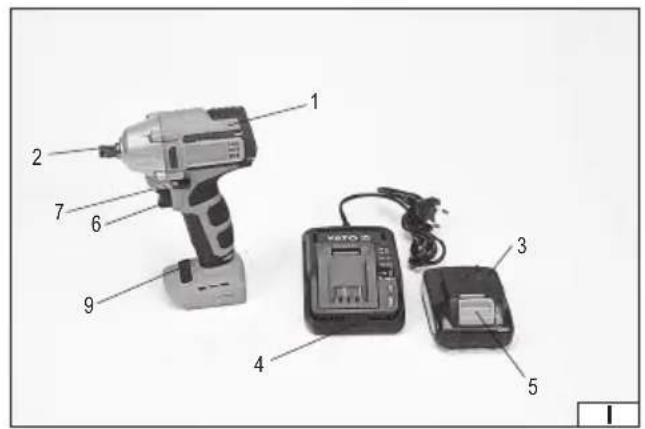
Install on the driver the corresponding socket (III).
Select the correct direction of rotation by pressing the switch (IV). The arrow on the switch indicates the direction of linear motion of nut or bolt during operation.
Connect the battery to the tool.
Grasp the tool with both hands (V).
Push the socket wrench on the nut or bolt head.
Press the switch and hold it. The pressing on the switch allows you to adjust the speed of the key. The greater pressure force on the switch, the higher the rotational speed of the key.
In the case of tightening, after reaching the maximum torque, the overload clutch engages and the driver drive is disconnected.
You should then release the switch and wait for the complete cessation of engine rotation,
When loosening, make sure that the moment, of what the nut has been tightened, does not exceed the maximum torque of wrench. In this case the overload clutch also engages and it may not be possible to unscrew the nut.
After unscrewing you should release the pressure on the control switch and wait for the complete cessation of engine rotation.
After finishing work, you should disconnect the tool from mains and start maintenance.
Control panel (VI)
The tool allows electronic control via a button and LEDs. Various functions are available depending on the direction of rotation. By setting the driver's clockwise rotation it is possible to set slow and fast turns, and hence the corresponding smaller and larger rotational element. The button should be pressed while any LEDs on the control panel are illuminated. The lighting of the upper diode in the middle column allows you to set the idle speed and lower the torque. The lighting of the bottom diode in the middle column allows you to set faster revolutions and higher torque. When setting the counter-clockwise rotation of the driver it is possible to set the key in intermittent or continuous operation. Lighting up the lower diode in the middle column and the upper diode in the right column allows intermittent operation. Only the bottom diode in the middle column lights up, it means continuous operation. Intermittent operation is intended for loosening nuts or bolts. In this mode, pressing the switch only results in a short start of the driver's rotation. After this, release the pressure on the switch and press it again to start the rotation of the driver.
The left column of LEDs indicates the battery charge level. The more LEDs lit, the higher the battery charge.
Operating of the tool
The depth of switch push determines the revs speed and torque. The tool does not have option to set the preset speed and torque. You should enter the tip in socket screw or impose on the nut, and then swithc on the device. This will prevent damage to the fasteners or to the tip. It will also reduce the risk of injuries.
In the case of screwing bolts in the surface, it is recommended that you perform a pilot hole with a diameter of core screws. This will prevent the destruction of the material during screwing. It is also possible to screw without a pilot hole. During both types of screwing in you should begin with a small revs speed and possibly increase it in the course of work.
In the case of screw connections, for example, when screwing in the coated screws in threaded holes or when you screw on the nuts on the threaded pins you should perform the first few turns by hand, key or a screwdriver. Only after ensuring the correct screwing in of one element in the second, you may ready to work a screw impact wrench. In the case of screwing the threaded elements it is not recommended to exert too much pressure on the impact wrench. This can lead to the destruction of the thread.
After tightening the elements, it will start the hammer mechanism, what will be indicated by "bumps" the revving mechanism, in this case, you should release your pressure on the switch and cease further tightening the components. Continuing to tighten can lead to the destruction of connecting elements.
Using attachments
The tool must not be used to power working attachments.
Additional information
During work do not exert excessive pressure on the processed material and do not make violent moves, so as to avoid any damage to the working tool and the drill.
EN
Make regular breaks during work.
Do not overstress the tool. The temperature of the external surfaces must not exceed 60^ C.
Once the work has been concluded, turn the drill off, remove the battery and carry out maintenance tasks and inspection.
MAINTENANCE AND OVERHAUL
ATTENTION! Before any adjustment, technical service or maintenance operations unplug the tool. Once the operations have been finished, the technical conditions of the tool must be assessed by means of external evaluation and inspection of the following elements: body and handle, conductor with a plug and deflection, functioning of the electric switch, patency of ventilation slots, sparking of brushes, noise level of functioning of bearings and gears, start-up and smoothness of operation. During the guarantee period, the user cannot dismantle the electric tools or change any sub-assemblies or elements, since it will cancel any guarantee rights. All irregularities detected at overhaul or during functioning of the tools are a signal to have the tool repaired at a service shop. Once the functioning has been concluded, the casing, ventilation slots, switches, additional handle and protections must be cleansed with a stream of air (at a pressure not exceeding 0.3 MPa), with a brush or a cloth without any chemical substances or cleaning liquids. Tools and handles must be cleansed with a clean cloth.
DE
CHARAKTERISTIK DES ERZEUGNISSES
Transport van accu's
DECLARATION OF CONFORMITY
1224/YT-82802/EC/2024
We declare and guarantee with full responsibility that the following products:
Cordless impact screwdriver 18 V d.c., 1/2" / 12,7 mm, 0 - 2600 min ^-1 ; 250 Nm; item no. YT-82802
meet requirements of the following European Standards / Technical Specifications:
EN 62841-1:2015 + A11:2022
EN 62841-2-2:2014
EN IEC 55014-1:2021
EN IEC 55014-2:2021
and fulfill requirements of the following European Directives:
2006/42/EC Machinery and safety elements
2014/30/EU Electromagnetic compatibility (EMC) Directive
2011/65/EU Restriction of the Use of Certain Hazardous Substances
Serial number: concern all serials numbers of item(s) mentioned in this declaration
The person authorized to compile the technical file:
Agnieszka Rędziak
(Place and date of issue)
V-CE PREZES ZARZADU
JAN SZMIDT
(Name and signature of authorized person)
TOYA S.A.