— Air Conditioning — Mode d'emploi PDF")
LIFE P901 (MD 37732) - Air Conditioning MEDION - Free user manual and instructions
Find the device manual for free LIFE P901 (MD 37732) MEDION in PDF.

| Product type | Mobile monobloc air conditioner |
| Model | MEDION LIFE P901 (MD 37732) |
| Cooling power | 9 000 BTU (2.637 kW) |
| Maximum recommended area | 32 m² |
| Refrigerant | R290 (propane), 170 g |
| Operating modes | Cooling, fan, dehumidification, sleep |
| Fan speed | 2 levels (low/high) |
| Power supply | 220-240 V ~ 50 Hz, 1005 W |
| Dimensions (W x H x D) | 31.5 x 70 x 31 cm |
| Weight | Approx. 22.5 kg |
| Noise level | ≤ 65 dB(A) |
| Airflow | 330 m³/h |
| Dehumidification capacity | Approx. 1 L/h |
| Timer | Automatic on/off from 1 to 24 h |
| Remote control | Yes, range ~6 m, AAA batteries included |
| Connectivity | Wi-Fi 2.4 GHz, MEDION Life+ app, compatible with Alexa/Google Assistant |
| Filters | 2 washable filters (clean every 2 weeks) |
| Condensate drainage | Integrated tank + drainage hose for continuous draining |
| Window kit included | Yes, adaptable to casement, roof, and sliding windows |
| Safety | Automatic defrost, overload protection, child lock |
| Energy class | Not specified in manual (EER = 2.62) |
Frequently Asked Questions - LIFE P901 (MD 37732) MEDION
User questions about LIFE P901 (MD 37732) MEDION
0 question about this device. Answer the ones you know or ask your own.
Ask a new question about this device
Download the instructions for your Air Conditioning in PDF format for free! Find your manual LIFE P901 (MD 37732) - MEDION and take your electronic device back in hand. On this page are published all the documents necessary for the use of your device. LIFE P901 (MD 37732) by MEDION.
USER MANUAL LIFE P901 (MD 37732) MEDION
natural_image
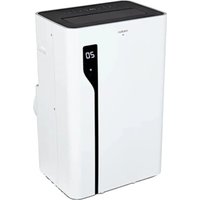
White portable air conditioner unit with ventilation slots and a 'medion' logo on the front (no other text or symbols visible)Smarte mobile Klimaanlage Climatiseur mobile intelligent Slimme mobiele airconditioning Aire acondicionado móvil inteligente Aria condizionata mobile intelligentea Smart mobile air conditioner
MEDION LIFE P901 (MD 37732)
Inhaltsverzeichnis
DE
natural_image
Line drawing of a cylindrical object with concentric grooves, mounted on a rectangular base (no text or symbols)Abb. 8 - Montage Abluftadapter
natural_image
Diagram of a coiled spring with a flanged head and internal structure, showing rotational motion (no text or symbols)Abb. 9 - Montage Fensterkit-Adapter
natural_image
Diagram of a portable air conditioner unit with airflow direction indicated by an arrow (no text or symbols present)Abb. 10 - Installation am Fenster
natural_image
Technical line drawing of a mechanical device with ventilation duct and fan (no text or symbols)flowchart
graph TD
    subgraph Left_Circuit
        A["A"] --> M["M"]
        B["B"] --> M
        M --> A
    end
    subgraph Right_Circuit
        A2["A"] --> M2["M"]
        B2["B"] --> M2
        M2 --> A2
    end
Abb. 12 - Montage Kippfenster

Abb. 13 - Montage Dachfenster
natural_image
Line drawing of a room interior with a wall-mounted air conditioner unit and directional arrows indicating airflow or movement (no text or symbols)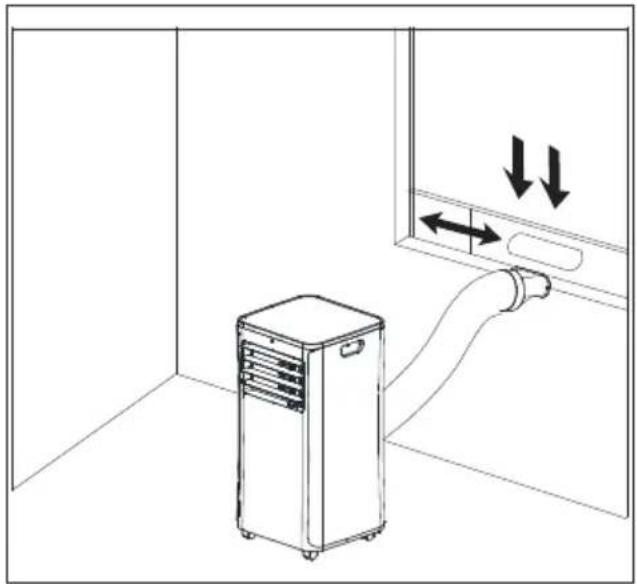
natural_image
Line drawing of an air conditioner unit in a room with directional arrows indicating airflow or movement (no text or symbols)Abb. 15 - vertikale Schiebefenster Abb. 16 - horizontale Schiebefenster


natural_image
Close-up of a grid-patterned panel with circular indentations, placed on a solar panel (no text or symbols visible)Abb. 18 – Filtersiebe
natural_image
Illustration of a hand spraying water onto a black surface with a faucet (no text or symbols)Abb. 19 – Filtersiebe reinigen

WARNUNG!
Verletzungsgefahr!
Verschlüsselung: WEP/WPA/WPA2/WPA3
Fig. 1 - Face avant
natural_image
Line drawing of a cylindrical object with concentric grooves, mounted on a rectangular base (no text or symbols)natural_image
Technical line drawing of a mechanical spring component with a circular housing and directional arrow indicating rotation (no text or symbols)natural_image
Diagram of an air conditioner unit with airflow path, showing internal components and a door (no text or symbols)natural_image
Technical line drawing of a mechanical device with ventilation slots and a cylindrical inlet (no text or symbols)flowchart
graph TD
    subgraph Left_Circuit
        A["A"] --> M["M"]
        M --> B["B"]
        M --> A
    end
    subgraph Right_Circuit
        A2["A"] --> M2["M"]
        M2 --> B2["B"]
        M2 --> A2
    end
natural_image
Line drawing of a room interior with a server unit and directional arrows indicating airflow or movement (no text or symbols)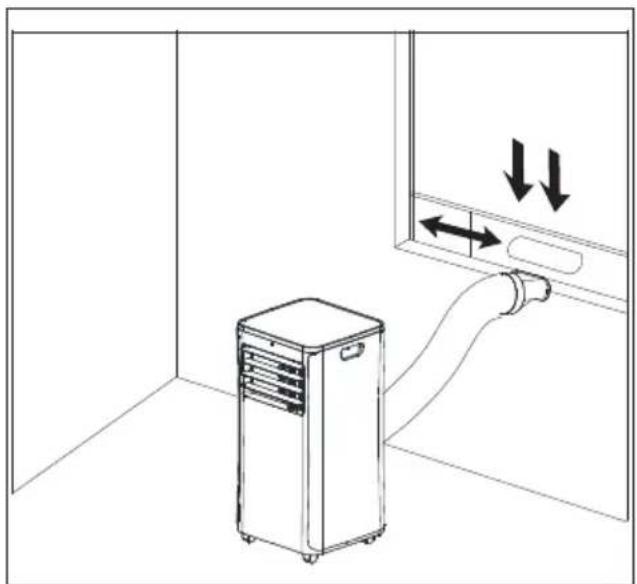
natural_image
Line drawing of an air conditioner unit connected to a wall-mounted pipe, with directional arrows indicating airflow or movement (no text or symbols)
natural_image
Close-up of a grid-patterned panel with circular indentations, placed on a dark surface (no text or symbols visible)Fig. 18 - Filtres
natural_image
Illustration of a hand spraying liquid onto a black surface with a faucet (no text or symbols)Cd = cadmium, Hg = mercure, Pb = plomb.
WAARSCHUWING! Brandgevaar!
WAARSCHUWING! Explosiegevaar!
natural_image
Line drawing of a cylindrical object with concentric grooves, mounted on a rectangular base (no text or symbols)natural_image
Technical line drawing of a mechanical component with a circular base and threaded end, showing internal structure and rotation arrow (no text or symbols)natural_image
Diagram of a hand inserting air ducts into a wall-mounted device (no text or symbols)natural_image
Technical line drawing of a mechanical device with a cylindrical component and ventilation slots (no text or symbols)flowchart
graph TD
    subgraph Left_Circuit
        A["A"] --> M["M"]
        M --> B["B"]
        M --> A
    end
    subgraph Right_Circuit
        A2["A"] --> M2["M"]
        M2 --> B2["B"]
        M2 --> A2
    end
natural_image
Line drawing of a room interior with a portable air conditioner unit and a wall-mounted pipe, no text or symbols present.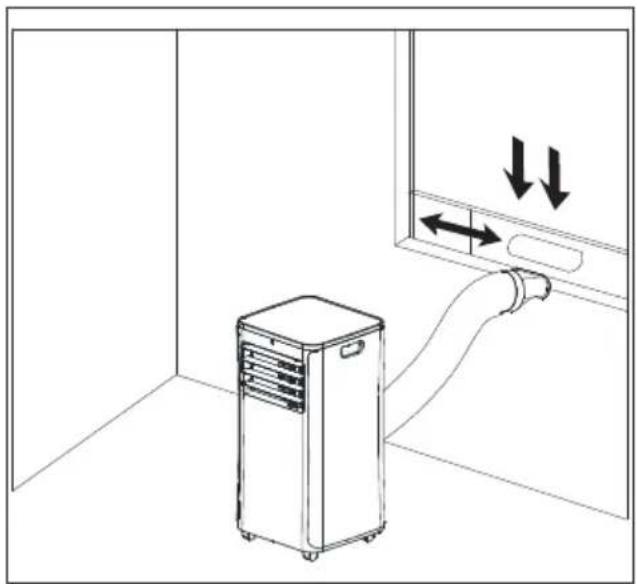
natural_image
Line drawing of an air conditioner unit in a room with directional arrows indicating airflow or movement (no text or symbols)
9.3. Sprakbesturing via Amazon Alexa of Google Assistant
natural_image
Close-up of a grid-patterned panel with circular patterns, placed on a solar panel (no text or symbols visible)natural_image
Illustration of a spray gun spraying liquid onto a black surface (no text or symbols)Afb. 19 – Filterzeven reinigen

WAARSCHUWING!
Gevaar voor letsel!
Codering: WEP/WPA/WPA2/WPA3
| Frequentiebereik/MHz Kanaal Max. zendvermogen / dBm | |
| Wifi 2,4 GHz 2400 - 2483,5 1 - 13 < 20 | |
| Bluetooth® 2,4 GHz 2402-2480 --- < 20 | |
15. Productinformatieblad
Cd = cadmium, Hg = kwikzilver, Pb = lood.
natural_image
Line drawing of a cylindrical object with concentric grooves, mounted on a rectangular base (no text or symbols)natural_image
Technical line drawing of a mechanical spring component with a circular housing and directional arrow indicating rotation (no text or symbols)natural_image
Line drawing of an air conditioner unit with a piping bag attached to the door (no text or symbols)natural_image
Technical line drawing of a mechanical device with ventilation grilles and a cylindrical inlet (no text or symbols)flowchart
graph TD
    subgraph Left_Circuit
        A["A"] --> M["M"]
        M --> B["B"]
        M --> A
    end
    subgraph Right_Circuit
        A2["A"] --> M2["M"]
        M2 --> B2["B"]
        M2 --> A2
    end
natural_image
Line drawing of a room interior with a server unit and airflow path, no text or symbols present
natural_image
Line drawing of an air conditioner unit connected to a wall-mounted hose, with directional arrows indicating airflow or movement (no text or symbols)Fig. 15 - Ventanas correderas verticales Fig. 16 - Ventanas correderas horizontales


natural_image
Close-up of a grid-patterned fabric or panel with no visible text or symbolsFig. 18 - Filtros
natural_image
Illustration of a hairdryer spraying liquid onto a black surface (no text or symbols)Fig. 1 - Lato anteriore

Fig. 2 - Lato posteriore
natural_image
Line drawing of a cylindrical object with concentric grooves, mounted on a rectangular base (no text or symbols)natural_image
Technical line drawing of a mechanical component with a circular base and threaded spring, showing no text or symbols.natural_image
Diagram of a portable air conditioner unit with airflow path, no text or symbols presentnatural_image
Technical line drawing of a mechanical device with ventilation grilles and a cylindrical inlet (no text or symbols)flowchart
graph TD
    subgraph Left_Circuit
        A["A"] --> M["M"]
        M --> B["B"]
        M --> A
    end
    subgraph Right_Circuit
        A2["A"] --> M2["M"]
        M2 --> B2["B"]
        M2 --> A2
    end
Fig. 12 – Montaggio con finestre a vasistas
natural_image
Line drawing of a room interior with a server unit and airflow path, no text or symbols present
natural_image
Line drawing of an air conditioner unit connected to a wall-mounted hose, with directional arrows indicating airflow or movement (no text or symbols)Fig. 15 - finestre scorrevoli verticali Fig. 16 - finestre scorrevoli orizzontali


natural_image
Close-up of a grid-patterned panel with circular patterns, partially overlaid on a black-and-white photo of solar panels (no text or symbols visible)Fig. 18 - Filtri
natural_image
Illustration of a spray gun dispensing liquid onto a black surface (no text or symbols)1. Information about this user manual ....183
1.1. Explanation of symbols ...... 183 FR
2. Proper use 183
3. Safety instructions 183
3.1. Power supply 184
3.2. Information on refrigerant 186 ES
3.3. Product-specific hazards 187
3.4. Noise emissions 188 IT
3.5. Storing/transporting....188
3.6. Handling batteries....188
4. Package contents 190
5. Appliance overview 191
6. Preparing/setting up the appliance 194
6.1. Mounting the exhaust air hose....194
6.2. Mounting the window kit ....196
6.3. Adjusting slats on the air outlet....199
6.4. Inserting batteries in the remote control 199
7. Operation....199
7.1. Switch the appliance on/off....199
7.2. Setting mode....200
7.3. Setting the timer....201
7.4. Button lock 202
7.5. Emptying the condensate tank....202
7.6. Mounting the condensate drain hose 203
8. Safety functions....203
8.1. Automatic defrosting....203
8.2. Overload protection 203
9. App control 203
9.1. System requirements 204
9.2. Setting up the app/connecting to the air conditioner....204
9.3. Voice control via Amazon Alexa or Google Assistant 204
10. Troubleshooting ....205
11. Cleaning 207
11.1. Cleaning the filter strainers....208
12. Prolonged non-use and storage 209
13. Technical specifications.... 210
14. Information on WLAN/Bluetooth ^® 210
15. Product data sheet 211
16. EU declaration of conformity 211
17. Disposal....212
18. Service information....213
19. Legal Notice 214
1. Information about this user manual

Thank you for choosing our product. We hope you enjoy using this appli-ance.
Please read the safety instructions and the user manual carefully before using the appliance for the first time. Note the warnings on the appliance and in the user manual.
Always keep the user manual close to hand. If you sell the appliance or give it away, please ensure that you also pass on this user manual. It is an essential component of the product.
1.1. Explanation of symbols
If a block of text is marked with one of the warning symbols listed below, the hazard described in that text must be avoided to prevent the potential consequences described there from occurring.
DANGER!
Warning: risk of fatal injury!
WARNING!
Warning: risk of possible fatal injury and/or serious irreversible injuries!
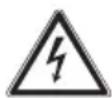
WARNING!
Warning: risk of electric shock!
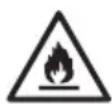
WARNING!
Warning: danger due to combustible and/or highly flammable substances!

CAUTION!
Warning: risk of minor and/or moderate injuries!

NOTICE!
Follow these instructions to prevent damage to the appliance!

More detailed information about using the appliance!

Read the user manual before using the appliance!
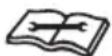
Follow repair instructions!
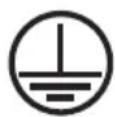
Protective earthing symbol (for protection class I)
Symbol for alternating current (AC)
2. Proper use
This appliance is used for cooling the air in enclosed indoor spaces.
The appliance is only intended for private use and not for industrial/commercial use.
Please note that we shall not be liable in cases of improper use:
▶ Do not modify the appliance without our prior consent. Use only auxiliary appliances approved or supplied by us.
▶ Only use replacement parts or accessories that we have supplied or approved.
Comply with all the information in this user manual, especially the safety instructions. Any other use is considered improper and can cause personal injury or property damage.
3. Safety instructions
- Keep the appliance and its accessories out of the reach of children.
■ This appliance can be used by children of 8 years and older, and by people with reduced physical, sensory or mental capacity, or with a lack of experience and/or knowledge, but only with proper supervision, or if they have been told how to use the appliance safely, and have understood the risks involved if they use it improperly.
■ Children must not be allowed to play with the appliance.
■ Cleaning and user maintenance must not be carried out by children.
■ Children do not recognise the dangers that can arise when handling electrical appliances. Please be particularly careful while using the appliance if there are children nearby.
■ Children younger than 8 must be kept away from the appliance and the mains cable.
§.1. Power supply
WARNING! Risk of electric shock/ short circuit!
There is a risk of electric shock/short circuit from live parts.
■ Do not immerse the appliance in water or other liquids or hold it under running water because this could cause an electric shock.
■ Only connect the appliance to a properly installed and easily accessible socket that is close to where you are using the appliance. The local mains voltage must correspond to the technical specifications for the appliance.
■ Unplug the appliance's mains plug from the power socket:
- when you are cleaning the appliance
- if you are no longer using the appliance
- if the appliance is left un- attended
– during thunderstorms.
■ Always hold the plug to pull it out and never pull the mains cable.
■ Do not place the appliance near to sinks and do not expose it to water droplets or spray.
■ Use the appliance indoors only.
■ Do not allow the mains cable to come into contact with hot objects or surfaces.
■ Do not use if the appliance if the appliance or the mains cable is visibly damaged or if the appliance has been dropped.
■ Check the appliance and the mains cable for damage before using the appliance for the first time, and after each use.
■ Completely unwind the mains cable.
■ Do not kink or crush the mains cable.
■ Contact our Service team without delay if the appliance has been damaged during transport.
■ Under no circumstances should you make any changes to the appliance yourself. Do not attempt to open and/or repair a part of the appliance yourself.
■ The mains cable must exclusively be repaired by a professional workshop or contact the Service Centre in order to avoid any hazards.
■ Never touch the plug withES damp or wet hands.
■ Do not expose the appliance to extreme conditions.
Avoid:
– high humidity or wet conditions
- extremely high or low temperatures
- direct sunlight
- naked flames
- mechanical vibrations or shocks
- excessive dust
– lack of ventilation, e.g. in a cupboard or bookshelf.
■ Make sure that the appliance is switched off before plugging in the mains plug.
■ Never unplug the mains plug from the socket while the appliance is running.
■ Do not use multi-plugs.
■ Immediately turn off the appliance and remove the mains plug if you notice an unpleasant smell (smell of burning).
■ Do not use flammable cleaning agents.
■ Do not use agents other than those recommended by the manufacturer to speed up the thawing process or for cleaning.
■ Ensure the mains cable does not become a tripping hazard – do not use an extension cable.
■ Place the appliance in an upright position on a stable, level surface.
■ Place the appliance only on the floor.
■ Do not operate the appliance without the filter strainers in place.
3.2. Information on refrigerant
The refrigerant R290 used in this appliance does not have any harmful effect on the ozone layer (ODP), a negligible greenhouse effect (GWP) and is available worldwide. Due to its energy-efficient properties, R290 is ideally suited as a refrigerant for this application. Due to the high flammability of the refrigerant, special precautions must be taken.

WARNING!
Risk of fire!
The refrigeration system of the appliance contains the natural refrigerant propane (R290).
■ Do not damage the refrigerant circuit.
■ During operation, storage and installation, the room should have an area of at least 7 m² in order to ensure an adequate amount of air in case of damage to the refrigeration system.
■ If the refrigeration system has nevertheless become damaged, ventilate the room. Evacuate the room. Avoid naked flames and ignition sources. Have the appliance repaired by a qualified technician before using it again.
■ Tampering with the refrigerant circuit is prohibited and invalidates the warranty.
■ Do not use agents other than those recommended by the manufacturer to speed up the thawing process or for cleaning.
■ Extremely flammable gas: Avoid naked flames, sparks
and ignition sources when using, maintaining and disposing of the appliance.
■ Contains pressurised gas; can explode when heated.
In the event of a fire, do not extinguish any leaking gas until the leak can be safely eliminated. 3.
■ During repair and maintenance work (or when working with heat on the appliance): Keep a powder or CO ^2 fire extinguisher nearby for emergencies.
■ Store the appliance in a well-ventilated place away from sunlight.
■ Do not remove safety signs, stickers or labels from the appliance and ensure they are legible.
■ Ensure that national gas regulations are complied with.
■ Use the appliance only with the intended refrigerant R290.
WARNING!
Possible damage to the appliance!
■ Only allow maintenance and repair work to be carried out on the refrigerant circuit by
a qualified technician according to the manufacturer's specifications.
■ For repair instructions, please contact the Service Centre. Components may only be replaced with identical repair parts.
3.3. Product-specific hazard
■ Do not place your fingers or other objects into the openings for the air outlet.
■ Do not use the appliance in a room where flammable gases may leak.
■ Do not use the appliance in the bathroom or in other damp environments.
■ Caution with long hair: It can be sucked in by the air flow!
■ Always place and transport the appliance in an upright position. Never use the appliance in an inclined position.
■ Do not use spray cans near the appliance.
■ Never cover the air inlets and air outlets.
■ If you use the condensate drain hose on the condensate drain opening, make
sure it is properly mounted and not warped or bent.
■ Make sure that no fabrics such as curtains or similar are hanging or lying near the appliance which could get caught in the appliance.
■ Do not operate the appliance on uneven surfaces or near steps. Avoid tipping the appliance (e.g. due to edges on the floor) during use.
■ Do not operate the appliance in the immediate vicinity of heat sources such as radiators, heat accumulators, ovens or other appliances that generate heat.
■ Check all screw and plug connections at regular intervals!
■ Tighten up loose screws and correct the hold of the plug connections.
■ Do not carry the appliance, while it is in use.
■ Do not place or put any objects on the appliance.
■ Do not climb or sit on the appliance.
■ Do not use the appliance in potentially explosive atmospheres. This includes petrol stations, fuel storage areas
and areas where solvents are processed. This appliance must also not be used in areas with particle-laden air (for example flour or wood dust).
3.4. Noise emissions
■ The sound pressure level of the appliance is less than 66 dB(A).
3.5. Storing/transporting
■ Where possible, always transport the appliance up-right. After transportation, only connect to the mains and turn on after 24 hours so that the refrigerant circuit can settle after transportation.
■ Always empty the condensate tank and the conden-
Isate drain hose before storage and transportation.
3.6. Handling batteries
The remote control is bat- tery-operated. Please note the b- following:
■ Avoid contact with battery acid. If battery acid comes into contact with skin, eyes or mucous membranes, rinse the affected areas with plenty of clean water and
consult a doctor as soon as possible.
- Keep new and used batteries out of the reach of children.
■ Stop using the remote control if you cannot close the battery compartment securely, and keep it well away from children.

WARNING!
Risk of explosion!
There is a risk of explosion if batteries are replaced incorrectly!
■ Only replace batteries with those of the same or an equivalent type.
■ Never try to recharge non-rechargeable batteries. Risk of explosion!
■ Store batteries in a cool, dry place. Strong direct heat can damage batteries. Do not expose the appliance to sources of intense heat.
■ Never short-circuit batteries.
■ Never throw batteries into a fire.
■ Remove leaking batteries from the appliance immediately. Clean the contacts before inserting new batter-
ies. Battery acid can cause chemical burns!
DE
■ Always remove flat batteries from the appliance.
■ If the appliance is not going to be used for long periods, ES remove the batteries.
■ Before inserting the batteries, check that the contacts in the appliance and on the batteries are clean and, if necessary, clean them.
■ Always use new batteries of the same type. Never use old and new batteries together.
■ Pay attention to the polarity (+/-) when inserting the batteries.
4. Package contents

DANGER!
Risk of choking and suffocation!
Packaging film can be swallowed or used improperly, creating a risk of choking and suffocation.
- Keep all packaging materials used (film, plastic bags, pieces of polystyrene, etc.) out of the reach of children.
■ Do not allow children to play with the packaging material.
Remove the product from the packaging and remove all packaging material.
▶ Please check the package contents to ensure that all items are included. If anything is missing, please contact us within 14 days of purchase.
The mobile air conditioner must be checked for damage before each use.
The following items are supplied with your product:
• Mobile air conditioner MD 37732
- Castors (4 pieces, pre-assembled)
• Exhaust air hose approx. 1.8 m
- Exhaust air hose adapter
- Condensate drain hose
- Window kit
- Window kit adapter
- Extendible window kit for sliding windows
- Remote control incl. 2 x micro batteries, type AAA LR03 1.5 V
- Short manual
5. Appliance overview
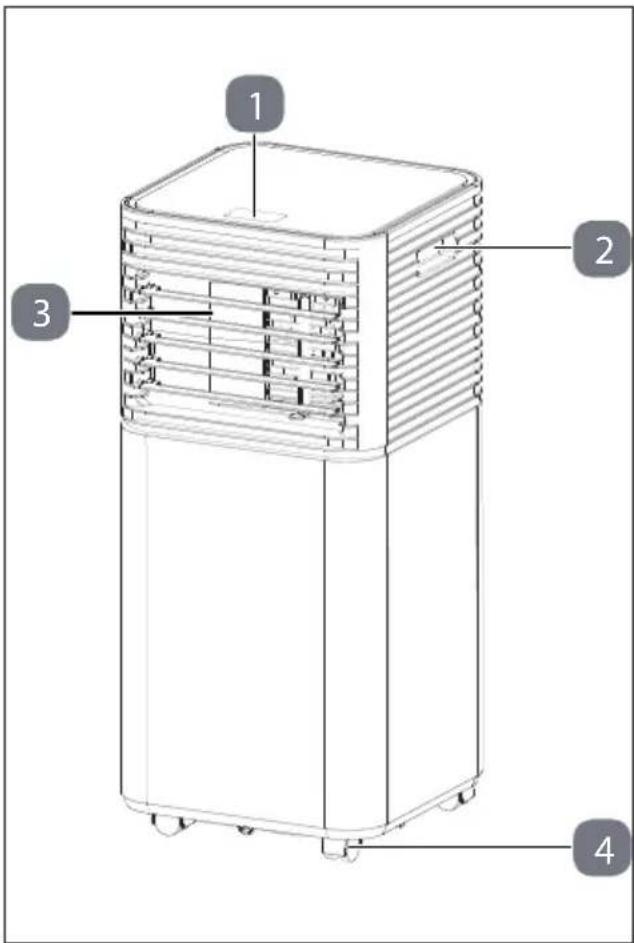
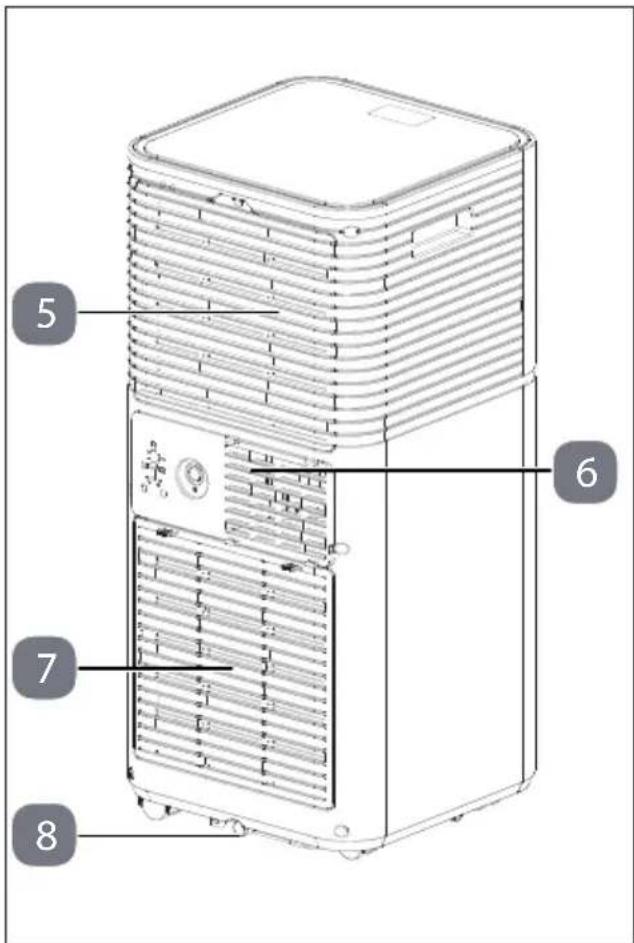
Fig. 1 - Front

Fig. 2 - Back
- Control panel
- Handle
- Air outlet with manually adjustable slats
-
Castors
-
Upper suction opening with filter strainer
- Exhaust air opening
- Lower suction opening with filter strainer
- Condensate drain opening
flowchart
graph TD
    A["9"] --> B["1"]
    C["112"] --> D["2"]
    E["141"] --> F["3"]
    G["6"] --> H["4"]
    I[" "] --> J[" "]
    K[" "] --> L[" "]
    M[" "] --> N[" "]
    O[" "] --> P[" "]
    Q[" "] --> R[" "]
    S[" "] --> T[" "]
    U[" "] --> V[" "]
    W[" "] --> X[" "]
    Y[" "] --> Z[" "]
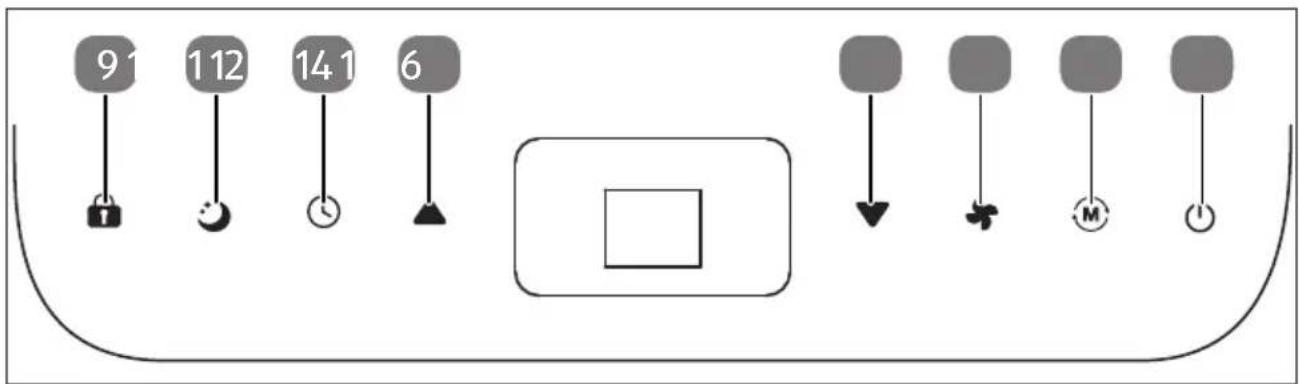
Fig. 3 - Control panel
- Lock: Switch the button lock on/off
- Sleep: Switch sleep mode on/off
- Timer: Set timer (automatic start/stop)
-
▲ Up: Increase temperature/timer/display
-
▼ Down: Reduce temperature/timer
- Speed: Set fan speed
- M Mode: Set mode
- Power: Switch the appliance on/off
flowchart
graph TD
    A["20"] --> B["Sun"]
    C["3"] --> D["Fire"]
    E["19"] --> F["Lock"]
    G["18"] --> H["Water"]
    I["17"] --> J["Wire"]
    K["24"] --> L["Clock"]
    M["25"] --> N["Flower"]
    O["26"] --> P["Fire"]
Fig. 4 - Display options
- Wireless network enabled
- Display window
- Key lock enabled
- Sleep mode enabled
- 5 in mode enabled
-
Cooling mode enabled
-
Dehumidification mode enabled
- Timer enabled
- ✦ Low fan speed enabled
- High fan speed enabled
flowchart
graph TD
    A["27"] --> B["28"]
    A --> C["29"]
    A --> D["30"]
    A --> E["31"]
    A --> F["32"]
    B --> G["+"]
    C --> H["▼"]
    D --> I["+"]
    E --> J["○"]
    F --> K["○"]
    G --> L["▲"]
    H --> M["↓"]
    I --> N["+"]
    J --> O["+"]
    K --> P["+"]
    L --> Q["33"]
    M --> R["34"]
    N --> S["35"]
    O --> T["36"]
    P --> U["37"]
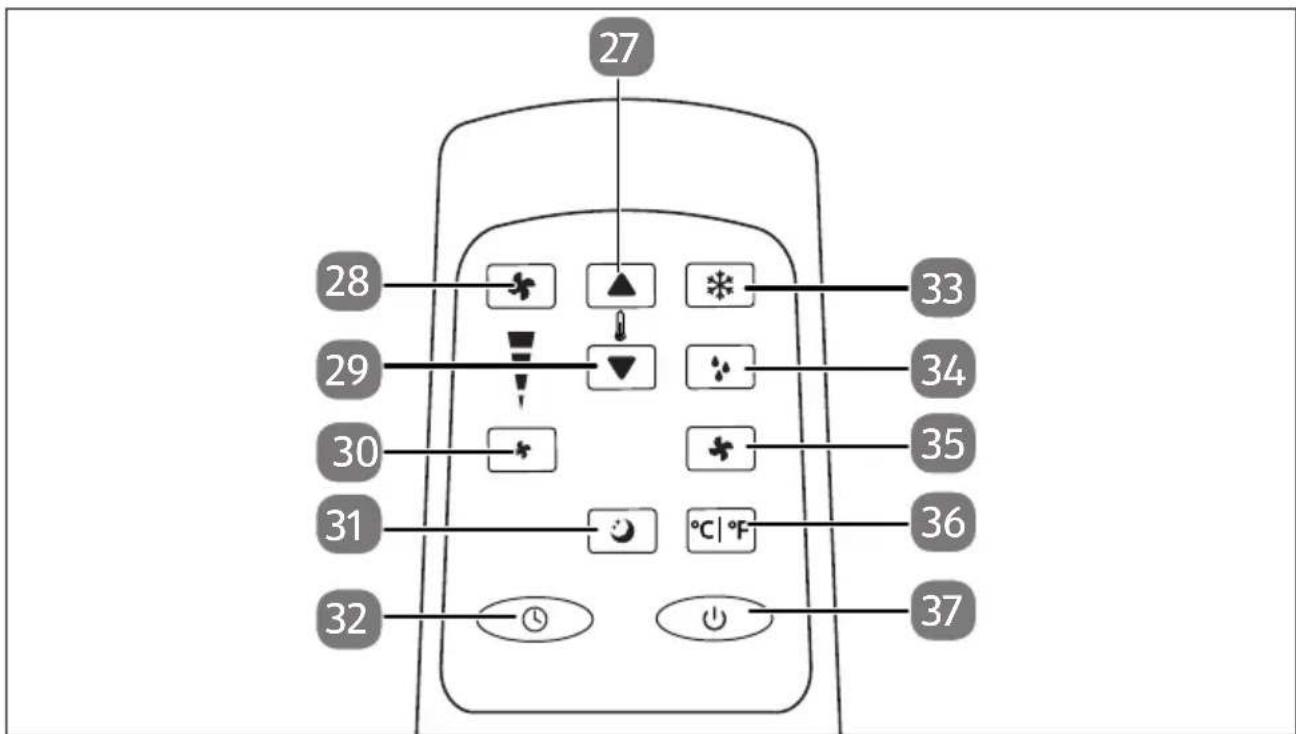
Fig. 5 - Remote control
- ▲ Increase temperature/timer
- ✦ Set high fan speed
- ▼ Reduce temperature/timer
- * Set low fan speed
-
🙏 Switch on sleep mode
-
ⓣ Switch on the timer
- ✿ Switch on cooling mode
- mode Switch on dehumidification
- ✦ Switch on fan mode
- °C | °F Change display type (°C or °F)
- ⏻ Switch the appliance on/off
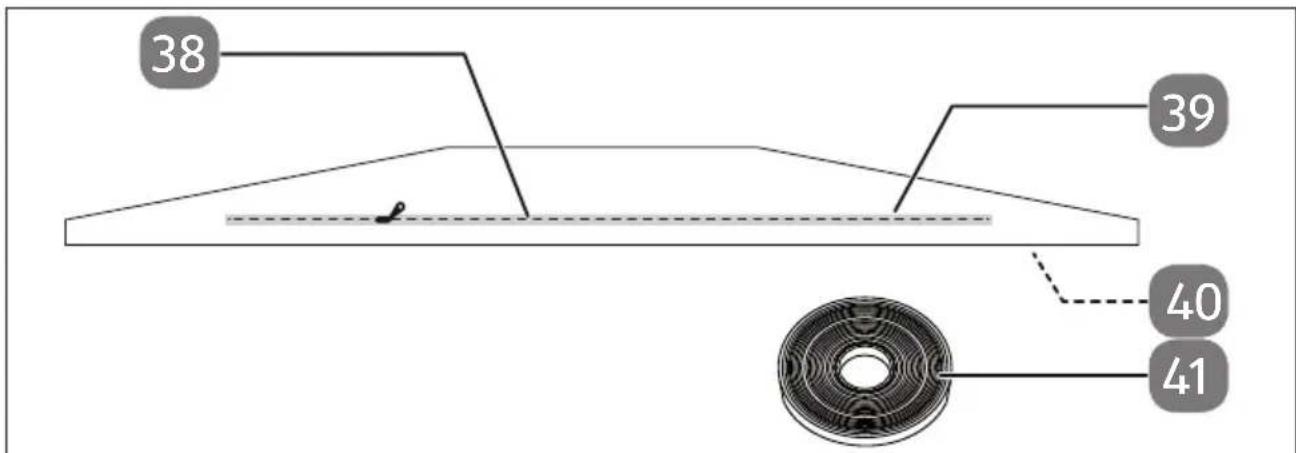
Fig. 6 - Window kit
- Zip
-
Textile seal
-
Hook and loop strip (not shown, at the edge of the textile seal)
-
Hook and loop fastener
6. Preparing/sett ing up the appliance
Remove all packaging material and check the appliance for any damage before you put it into operation.

WARNING!
Risk of fire!
The refrigeration system of the appliance contains the natural refrigerant propane (R290).
■ During operation, storage and installation, the room should have an area of at least 7 m^2 in order to ensure an adequate amount of air in case of damage to the refrigeration system.
- Please refer to the safety instructions under "Information on refrigerant".
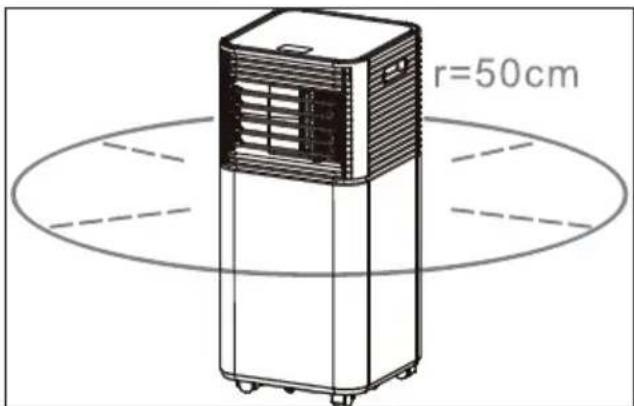
Fig. 7 - Appliance clearance
Place the appliance on a stable, level surface with an area of at least 50 cm clearance around the appliance to ensure good air circulation.
Leave the appliance in a vertical position for at least 24 hours before switching on.
▶ Operate the appliance at an ambient temperature between 5^ C and 35^ C.
▶ Follow the instructions in "3.3. Product-specific hazards" on page 187.
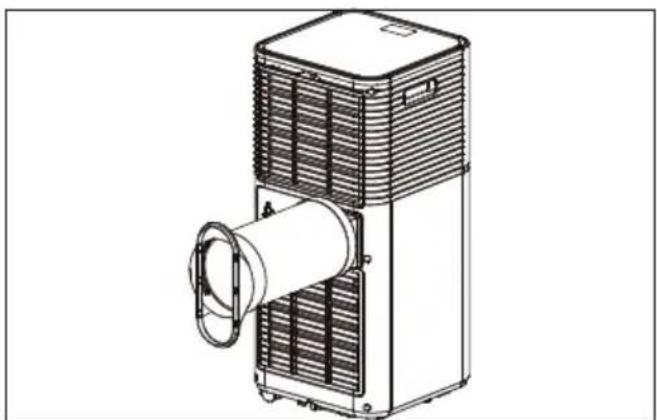
6.1. Mounting the exhaust air hose
The exhaust air coming from the mobile air conditioner must be directed outside so that the exhaust air can escape from the room.
Do not replace or extend the exhaust air hose, as this will result in reduced efficiency or the appliance being shut down due to low counterpressure.
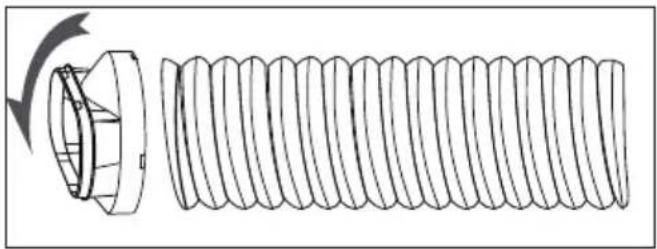
Mount the exhaust air hose adapter with the end of the exhaust air hose.
natural_image
Line drawing of a cylindrical object with concentric grooves, mounted on a rectangular base (no text or symbols)Fig. 8 - Mounting the exhaust air adapter
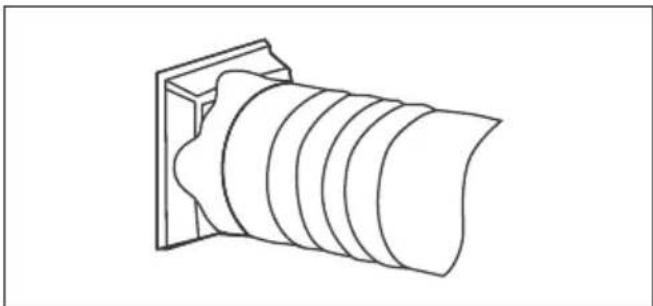
Mount the window kit adapter to the other end of the exhaust air hose.
natural_image
Technical line drawing of a coiled spring with a flanged end (no text or symbols)Fig. 9 - Mounting the window kit adapter
Adjust the window kit to the size of your window. You can mount the window kit on a bottom-hung window or a roof window. Further information is available at "6.2. Mounting the window kit" on page 196.
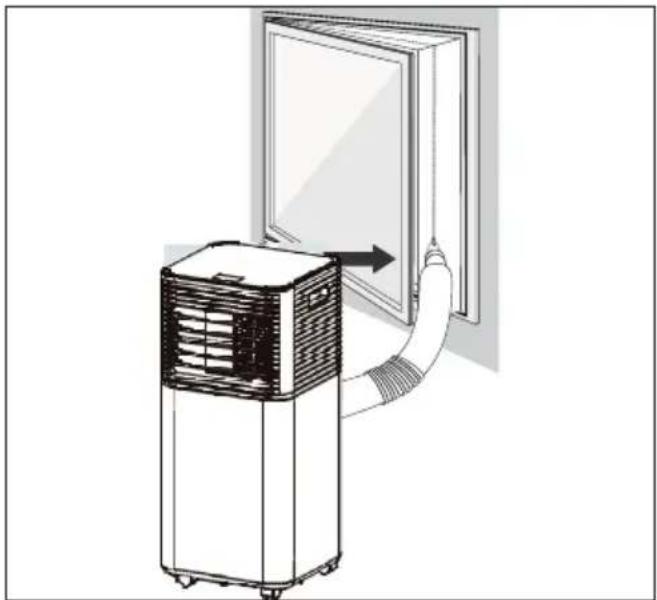
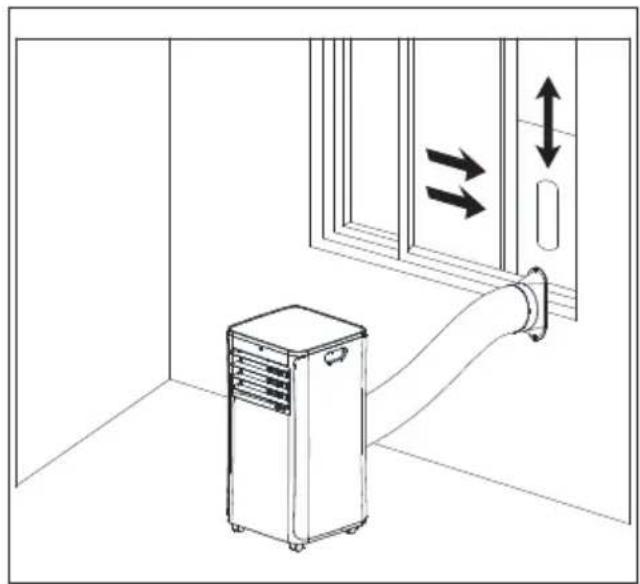
Place the appliance near a window or door. If necessary, carefully pull out the exhaust air hose. We recommend keeping the length of the hose as short as possible.
▶ Guide the exhaust air hose including the window kit adapter through the zip opening in the window kit.
▶ Then close the zip as far as possible.
▶ Close your window to attach the window kit to the window.
If necessary, secure the window kit with adhesive tape. We recommend sealing the gap between the adapter and the sides of the window for maximum efficiency.
natural_image
Diagram of a portable air conditioner unit connected to a wall-mounted door, showing airflow direction (no text or symbols)Fig. 10 - Window installation
▶ Slide the exhaust air hose over the exhaust air opening of the air conditioner
Adjust the length of the flexible exhaust air hose.
Avoid bends in the hose.
natural_image
Technical line drawing of a mechanical device with a cylindrical component and heat exchanger (no text or symbols)Fig. 11 - Exhaust air hose position
Adjust the slats on the air outlet (see "6.3. Adjusting slats on the air outlet" on page 199).
▶ Switch the appliance on.
6.2. Mounting the window kit
6.2.1. Mounting for bott om-hung and roof windows

You can also use the appliance without the window kit. Then hang the exhaust air hose out of the window and close it as far as possible so that no warm air can flow back.
Attach the window kit to the window to prevent outside air from entering and to prevent exhaust air from the air conditioner.
flowchart
graph TD
    subgraph Left_Circuit
        A["A"] --> M["M"]
        B["B"] --> M
        M --> A
    end
    subgraph Right_Circuit
        A2["A"] --> M2["M"]
        B2["B"] --> M2
        M2 --> A2
    end
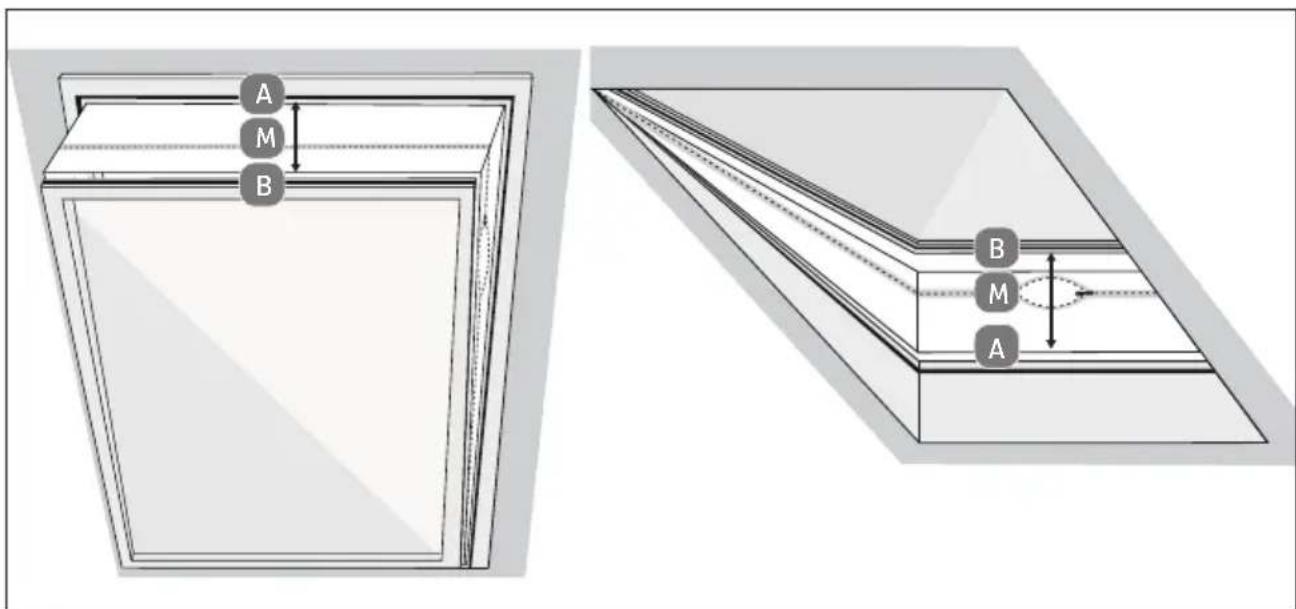
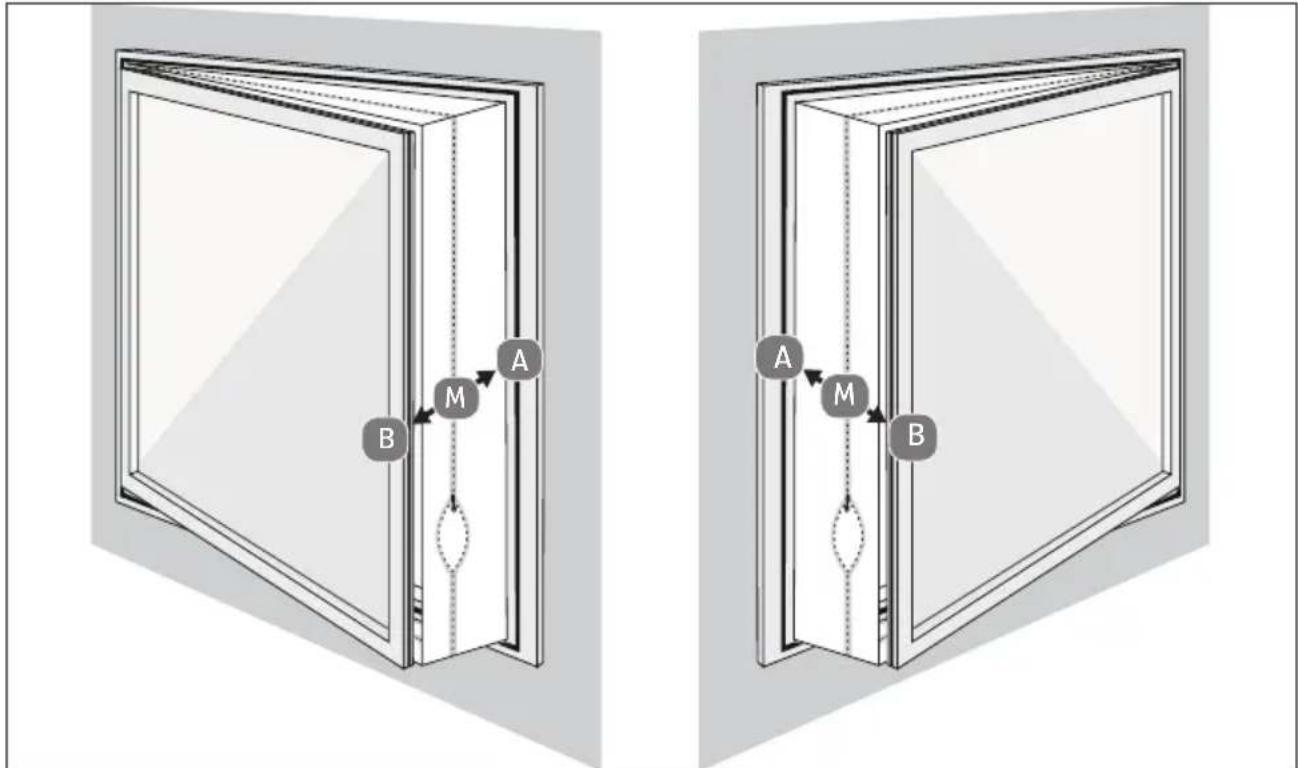
Fig. 12 - Mounting on bottom-hung window
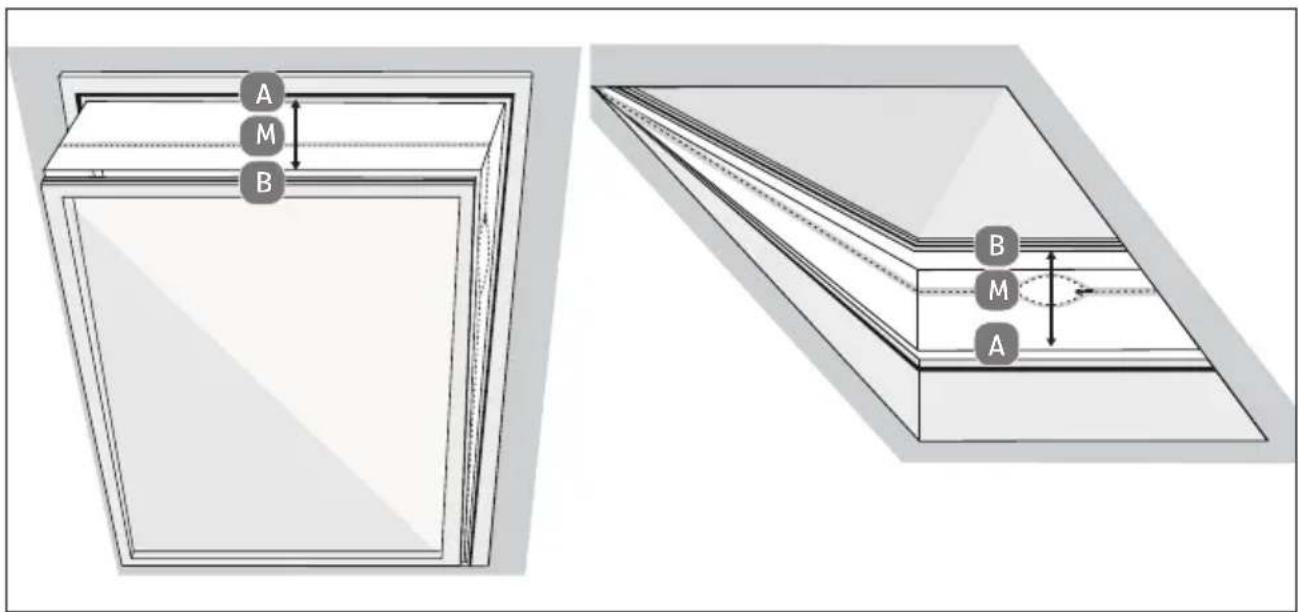
Fig. 13 - Mounting on roof window
▶ Open the window.
▶ Mark the centre (M) of the textile window seal
▶ Mark the centre of the window frame.
▶ Adhere the hook and loop fastener to the window frame of the bottom-hung window (inside, on the side where the window handle is located), about 1 cm from the edge.
▶ First, attach the hook and loop fastener completely on side (A) and then on side (B), starting in the centre. When mounting, point (A) must be exactly opposite point (B).
When closing the window, care must be taken to ensure that the textile seal between the sash and the window frame is not jammed.
▶ Preferably open the zip at the places marked "S" and attach the exhaust air hose there.
Route the exhaust air hose as straight as possible.
▶ Do not bend the exhaust air hose.
6.2.2. Mounting in sliding windows

The extendible window kit can only be used with sliding windows.
▶ Loosen the wing nut until there is enough space between part A of the window kit and the slider. (See Fig. 14 Step I).
Insert the two parts of the window kit A & B into each other so that the slider engages in the groove of part B of the window kit.
Adjust the window kit to the desired size by pushing the window kit together or pulling it apart and tighten the wing nut again. (See Fig. 14 Step II).
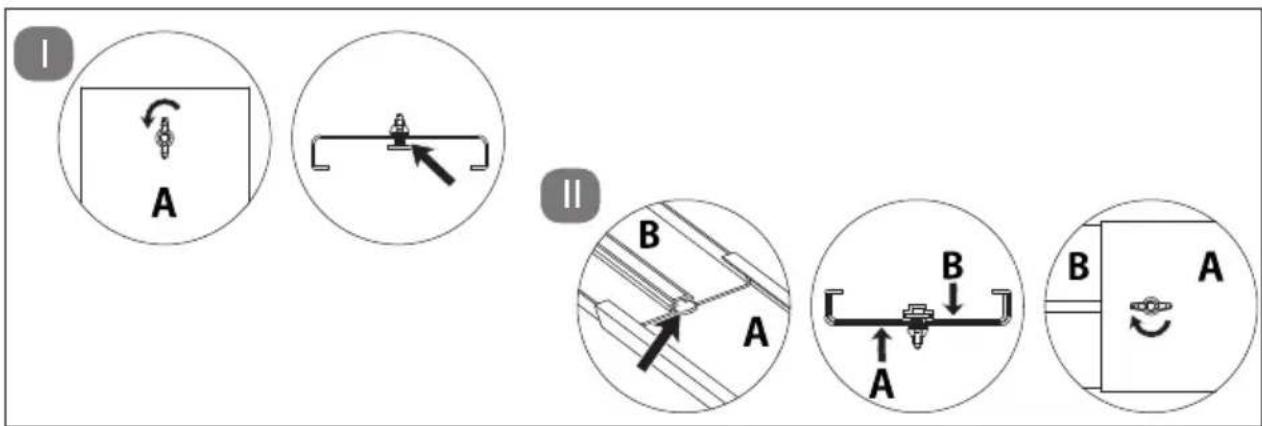
Fig. 14 - Adjusting the size of the window kit
Insert the window kit into the window guide of the sliding window.
▶ Close the window to fix the window kit in the window.
▶ Attach the exhaust air hose to the opening of the window kit.
natural_image
Interior view of a room with a portable air conditioner unit and a wall-mounted pipe, showing directional arrows (no text or symbols)
natural_image
Line drawing of an air conditioner unit in a room with directional arrows indicating airflow or movement (no text or symbols)Fig. 15 - Vertical sliding windows Fig. 16 - Horizontal sliding windows

If necessary, secure the window kit with adhesive tape to improve the tightness.

You can also use the appliance without a window guide. Hang the exhaust air hose out of the window and close it as far as possible so that no warm air can flow back.
Route the exhaust air hose as straight as possible.
▶ Do not bend the exhaust air hose.
6.3. Adjusting slats on the air outlet

WARNING!
Risk of injury!
Risk of cuts due to rotating rotor blades.
■ Do not put your fingers or objects through the protective grille in the housing.
■ Switch the appliance off and pull out the mains plug from the socket before adjusting the slats.
▶ Grab the handle on the bottom slat and move it either up or down to adjust the desired position of the slats.
6.4. Inserting batteries in the remote control
Two micro batteries, type AAA LR03 1.5 V, are inserted in the remote control.
Replace the batteries if the appliance fails to react to commands from the remote control properly. Then follow these steps:
▶ Press down the catch on the back of the remote control and remove the flap from the battery compartment.
Remove the two batteries from the battery compartment.
▶ Dispose of the old battery in accordance with legal requirements.
Insert two new micro batteries, type AAA LR03 1.5 V, into the battery compartment. Make sure that the battery polarity is correct.
▶ Slide the flap fully back into the remote control.
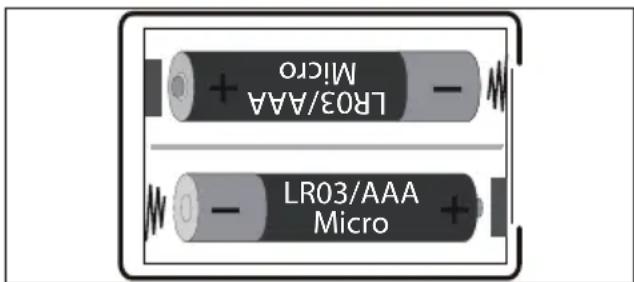
Fig. 17 - Battery compartment
7. Operation
▶ Plug the mains plug into a suitable socket.

After you have inserted the plug, you will hear a beep. The appliance is then in stand-by mode.
7.1. Switch the appliance on/off
▶ Press the ⏻ or ⏻ SWITCH APPLIANCE ON/OFF button to switch on the appliance.
During operation, press the ⏻ or SWITCH APPLIANCE ON/OFF button again to switch off the appliance.
▶ Wait approx. 3 minutes after switching off the appliance before switching it on again.
7.2. Setting mode
▶ Press the Ⓜ SET OPERATING MODE button on the air conditioning unit to switch between the operating modes. The indicator light switches between the different operating modes.
Alternatively, you can select the desired operating mode using the remote control. The following operating modes are possible:
- ENABLE COOLING MODE
- ENABLE FAN MODE
- ENABLE DEHUMIDIFICATION MODE
7.2.1. Cooling mode
This operating mode is used for cooling the indoor air.
▶ Select the cooling mode on the air conditioner or using the remote control. The operating light ✦ lights up.
Press the ▲ or INCREASE TEMPERATURE/TIMER button to increase the temperature.
▶ Press the button ▼ or REDUCE TEMPERATURE/TIMER to reduce the temperature.
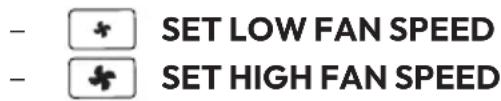
Press the SET FAN SPEED button to set a high or low fan speed.
When the fan speed is high, the operating light lights up.
When the fan speed is low, the operating light ✿ lights up.
Alternatively, you can select the fan speed via the remote control. The following fan speeds are possible:
- SET LOW FAN SPEED
- SET HIGH FAN SPEED

Cooling mode switches off automatically if the room temperature is lower than the set temperature. The appliance continues to ventilate. If the room temperature rises, cooling mode resumes.
7.2.2. Fan operation
This operating mode is used for circulating the indoor air, but not for cooling.
▶ Select the fan mode on the air conditioner or using the remote control. The operating light lights up.
Press the SET FAN SPEED button to set a high or low fan speed.
When the fan speed is high, the operating light lights up.
When the fan speed is low, the operating light ✿ lights up.
Alternatively, you can select the fan speed via the remote control. The following fan speeds are possible:

The temperature and sleep mode cannot be set in fan mode.
7.2.3. Dehumidifi cation mode
This operating mode is used to reduce the humidity in the room.
▶ Select the dehumidification mode on the air conditioner or using the remote control. The operating light lights up.
- Keep doors and windows closed for better dehumidification performance.

The temperature, sleep mode and fan speed cannot be set in dehumidification mode.
7.2.4. Sleep mode

In sleep mode, the fan speed is reduced and the operating lights are dimmed.
Sleep mode can only be enabled in cooling mode.
▶ Select the cooling mode on the air conditioner or using the remote control. The operating light ✦ lights up.
Press the 🎨 or ACTIVATE SLEEP MODE button to activate sleep mode. The operating light 🎨 lights up.
7.3. Sett ing the timer
7.3.1. Automatic switch-on
You can set the period of time until the air conditioner automatically switches on in stand-by mode.
Press the 📊 or button to set the desired length of time (1 to 24 hours) until the air conditioner automatically switches on.
The operating light ⏻ lights up and "01" (=1 hour) flashes on the display.
▶ Press the ▲ or INCREASE TEMPERATURE/TIMER button to increase the timer.
▶ Press the ▼ or REDUCE TEMPERATURE/TIMER button to reduce the timer.
When the hour display stops flashing, your setting is confirmed.
The appliance switches on automatically after the set time has elapsed.
To switch off the timer, press the or button again. The operating light ☐ goes out.
7.3.2. Automatic switch-off
When the appliance is switched on, you can set the period of time to automatic switch-off.
▶ Press the 📊 or button to set the desired time period (1 to 24 hours).
The operating light ⏻ lights up and "01" (=1 hour) flashes on the display.
Press the ▲ or INCREASE TEMPERATURE/TIMER button to increase the timer.
Press the ▼ or REDUCE TEMPERATURE/TIMER button to reduce the timer.
When the hour display stops flashing, your setting is confirmed.
The appliance switches off automatically after the set time has elapsed.
To switch off the timer, press the or button again.
The operating light ⏰ goes out.
7.4. Butt on lock
▶ Press and hold the button for approx. 3 seconds to switch the button lock on or off.
The operating light lights up when the key lock is activated.
The buttons cannot be operated.
7.5. Emptying the condensate tank

CAUTION!
Risk of injury!
There is a risk to health!
■ Do not drink the condensate.

NOTICE!
Material damage!
There is a possibility of material damage due to accidental overflow of condensate.
■ Do not leave the appliance unattended when emptying the condensate tank.
During cooling, in dehumidification mode and in the event of high humidity, condensate liquid accumulates in the air conditioner. The condensate tank must be checked regularly and emptied if necessary.
▶ Switch off the appliance.
Remove the seal from the condensate drain opening.
Connect the condensate drain hose properly and make sure that it is not kinked and is free of obstacles (not clogged).
Place the outlet of the condensate drain hose over a drain or a suitable container (e.g. bucket).
▶ Ensure that the condensate can drain out of the appliance unhindered.
Do not submerge the outlet of the condensate drain hose in water because an air lock may form in the hose.
To prevent leakage of condensate:
Since the negative pressure of the condensate tank inside the air conditioner is high, tilt the condensate drain hose down towards the ground (approx. 20^ gradient).
Align the condensate drain hose so that it is straight to avoid a siphon in the hose.
7.6. Mounting the condensate drain hose
During continuous operation and unsupervised operation of the air conditioner, the condensate drainage hose supplied must be connected in dehumidification mode and during cooling. The condensate can be automatically drained into a suitable container or drain.
Remove the seal from the condensate drain opening.
Connect the condensate drainage hose securely and properly and make sure it is not kinked and free of obstacles.
Place the outlet of the condensate drainage hose over a drain or container and ensure that the water can flow out of the appliance unhindered.
Do not submerge the end of the hose in water; otherwise there may be an 'airlock' in the hose.
To prevent water from leaking, please note that the hose must have a gradient of at least 20%.
- Secure the hose on the drain or container to prevent uncontrolled water outflow, as the water pressure is very strong and can move the hose.
8. Safety functions
8.1. Automatic defrosting
At low room temperatures, frost may form on the evaporator during operation. The appliance starts defrosting automatically and the ⏻ Power indicator light flashes.
- When the appliance is operated in cooling or dehumidifying mode, the ambient temperature sensor detects that the temperature of the evaporator coil is below -1 °C. Once the compressor stops operating for 10 minutes or the coil temperature has risen to 7 °C, the appliance starts back in cooling mode.
- If the appliance is operated in dehumidification mode and the temperature sensor detects that the temperature of the evaporator is below 40 °C and the difference between the appliance internal temperature and the room temperature is below 19 °C, the appliance starts defrosting for 5 minutes after 20 minutes and the ⏻ Power indicator light flashes.
8.2. Overload protection
In the event of a power failure, there is a 3-minute delay until compressor restart to protect the compressor.
9. App control
To make full use of your air conditioner, download the MEDION® Life+ app free of charge from the Google Play Store® or Apple® App Store onto your smartphone/tablet.
Simply scan the following QR code or visit the Play Store (Android™) or App Store (iOS®) and search for "MEDION Life+".

A customer account is required to use the app. For this, you need a valid email address. Please follow the instructions in the app.
9.1. System requirements
• Smartphone/tablet with WLAN 802.11 b/g
• 2.4 GHz WLAN network
- Android™ platform 9 or higher
- iOS 14 or higher
- MEDION® Life+ app

The MEDION® Life+ app can only be used to control the appliance using a 2.4 GHz WLAN network. A 5 GHz WLAN network cannot be used for operation.
9.2. Setting up the app/connecting to the air conditioner
Connect the air conditioner to the mains and turn it on.
▶ Open the MEDION® Life+ app.
▶ Press and hold the button on the appliance for 3 seconds until the WLAN symbol starts to flash on the display.
If you have not yet registered a appliance in the MEDION® Life+ app, tap the Add appliance button.
If you have already integrated an appliance in the app, click on the + button.
▶ Select the Climate from the list.
▶ Select the MEDION Air Conditioner MD37732 model from the overview list.
Now follow the further instructions in the app to connect.
9.3. Voice control via Amazon Alexa or Google Assistant
You can operate your appliance via voice control using Amazon Alexa or Google Assistant.
▶ Open your Alexa app or Google Assistant and add the MEDION® Life+ app as a skill.
▶ Follow the instructions in the relevant app, sign in with your MEDION customer account and confirm the connection between the Life+ app and the Alexa app or Google Assistant.
▶ After authorisation, you can operate your appliance via voice control.
10. Troubleshooting
If the appliance stops working properly, please refer to the troubleshooting table shown below to see if you can resolve the problem yourself.
Never attempt to repair the appliance yourself. If a repair is necessary, please contact our Service Centre or a suitable authorised repair workshop.
Only allow maintenance and repair work to be carried out on the refrigerant circuit by a qualified technician according to the manufacturer's specifications.
For repair instructions, please contact the Service Centre. Components may only be replaced with identical repair parts.
| Problem Possible cause Troubleshooting | ||
| The appliance is not working. | The mains plug is not properly inserted. | |
| The earthed mains socket is faulty. | ||
| The room temperature is too low / too high. | ||
| The room temperature is lower than the set cooling temperature. | ||
| The room temperature is too low for dehumidification mode. | ||
| The remote control is not working. | The batteries are not inserted properly. | |
| You are more than 5 metres away from the appliance. | ||
| The path between the remote control and the infrared sensor is not clear. | ||
| The remote control is not directed at the sensor. | ||
| The batteries are flat. ▶ Replace the batteries. | ||
| Problem Possible cause Troubleshooting | ||
| The appliance does not cool down properly. | Windows or doors are open so that warm air can enter the room. | ▸ Close the windows and doors. |
| The filters are very dirty. ▶ | Clean the filters as described under the section on cleaning the filters. | |
| The air outlet is blocked. ▶ | Leave at least 50 cm of space around the appliance in all directions to ensure adequate ventilation. | |
| The operating mode and temperature are not set correctly. | ▸ Set the operating mode and temperature to the correct value. | |
| The exhaust air hose is not mounted correctly. | ▸ Mount the exhaust air hose properly. | |
| Water leaks out of the appliance. | Overflow when moving the appliance. | ▸ Empty the water tank before transportation. |
| Condensate drain hose kinked. | ▸ Straighten the condensate drain hose. | |
| The appliance is very noisy. | The appliance is on an uneven surface. | ▸ Place the appliance on a hard, smooth surface. |
| There are loose, vibrating parts. | ▸ Secure and fasten the parts. | |
| The noise sounds like running water. | ▸ Noise is caused by flowing refrigerant. That is normal. | |
| The compressor is not working. | Cooling mode protection is active. | ▸ Turn off the appliance and wait 3 minutes before turning it on again. |
| The overheating protection is active. | ||
| Error indicator E0 Communication error between main PCB and display PCB | ▸ Check the cables for damage. | |
| Error indicator E1 Failure of the ambient temperature sensor | ▸ Check the connection. Clean or replace temperature sensor. Contact Service Centre if necessary. | |
| Error indicator E2 Failure | of the coil temperature sensor | ▸ Check the connection. Clean or replace temperature sensor. Contact Service Centre if necessary. |
| Error indicator Ft | Condensate level too high | ▸ Empty the integrated collection tray by removing the seal on the condensate drain opening and draining the condensate into a suitable condensate tank. |
11. Cleaning

WARNING!
Risk of electric shock!
There is a risk of electric shock due to live parts.
■ The appliance must not be immersed in water or other liquids, or held under running water, because this could cause an electric shock.
■ Unplug the mains plug from the socket before you start cleaning the appliance.
■ Make sure that no liquids enter the appliance.

WARNING!
Risk of injury!
There is a risk of cuts due to contact with sharp-edged rotor blades inside the housing.
■ Do not disassemble the appliance to clean the rotor blades.

NOTICE!
Damage to the appliance!
The improper use of cleaning agents on the appliance may damage the surfaces.
■ Do not use chemical solutions or cleaning agents because these may damage the surface or the labels on it.
■ Do not use aggressive, chemical or abrasive cleaning agents and do not use hard sponges.
▶ Press the ⏻ or button again to switch off the appliance.
▶ Pull the mains plug out of the socket.
Clean the housing only with a soft, damp cloth or a soft, thin kitchen towel.
Moisten the cloth with mild soapy water to remove stubborn dirt.
Dry the housing carefully before switching on the appliance.
11.1. Cleaning the fi Iter strainers

NOTICE!
Damage to the appliance!
Dust collects on the filter strainers and restricts the air flow. The restricted air flow reduces the efficiency of the appliance. In case of excessive accumulation of dust, the filter can be blocked and material damage to the appliance can occur.
■ Clean the filter strainers regularly (at least every 2 weeks) as described below.
■ Never operate the appliance without the filter strainers in place; otherwise the evaporator inside may become contaminated.
▶ Press the ⏻ or button again to switch off the appliance.
▶ Pull the mains plug out of the socket.
Remove the top and bottom filter strainer from the appliance.
▶ Use a vacuum cleaner to vacuum dust from the filter strainers.
natural_image
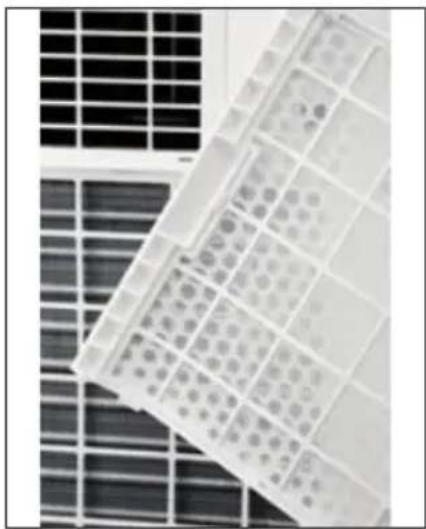
Close-up of a grid-patterned panel with circular patterns, placed on a solar panel (no text or symbols visible)Fig. 18 - Filter strainers
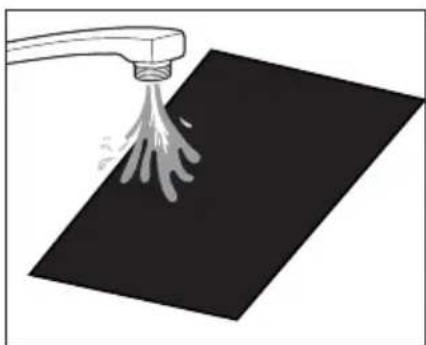
▶ Turn the filter strainers around and rinse the filter screens under running water. Run the water in the opposite direction of the air flow through the filter screen.
▶ Set the filter strainers aside and allow them to air dry completely.
natural_image
Illustration of a hand spraying water onto a black surface with a spray can (no text or symbols)Fig. 19 – Cleaning the filter strainers

WARNING!
Risk of injury!
There is a risk of cuts due to contact with the sharp-edged evaporator surface when installing the filter strainers.
■ Do not touch the sharp-edged evaporator surface with your bare hands.
Insert the dried filter strainers back into the appliance.
12. Prolonged non-use and storage
If the appliance is not used for a prolonged period, the appliance must be cleaned and fully dried.

NOTICE!
Damage to the appliance!
The evaporator inside the appliance must be dried before storage to prevent damage to components or mould formation.
■ Switch off the appliance, remove the mains plug from the socket.
■ Empty the condensate tank, clean the appliance as described under "Cleaning".
Place the appliance in a dry, well-ventilated place for several days to dry, or use the ventilation operating mode to dry for a few hours until the condensate discharge is dry.
▶ Press the ⏻ or SWITCH APPLIANCE ON/OFF button to switch on the appliance.
▶ Select the fan mode on the air conditioner or using the remote control. The operating light ✿ lights up.
- Keep the appliance running in fan mode for a few hours so that it dries completely from the inside.
▶ Press the (I) or SWITCH APPLIANCE ON/OFF button to switch off the appliance.
▶ Pull the mains plug out of the socket.
Remove the exhaust air hose and window kit.
Remove and clean the filter strainers and allow them to dry out completely.
Insert the filter strainers back into the frames provided for this in the housing.
Remove the batteries from the remote control.
If possible, store the appliance and accessories in the original packaging in a dark, ventilated, dry and frost-free interior.
- Store the appliance in a room without continuously operating heat sources (for example naked flames, gas appliance or electric heating).
13. Technical specifications
| Air conditioner | |
| Model MD 37732 | |
| Power supply AC 220–240 V, 50 Hz | |
| Rated power 1005 watts | |
| Fuse 4.5 A | |
| Cooling capacity 9000 BTU | |
| Refrigerant R290 | |
| Refrigerant quantity 170 g | |
| Power levels 2 | |
| Maximum room size Approx. 32 m2 | |
| Air throughput 330 m3/h | |
| Dehumidification performance Approx. 1 l/h | |
| Dimensions (W × H × D) | 31.5 x 70 x 31 cm |
| Weight | Approx. 22.5 kg |
| Operating volume | ≤ 65 dB(A) |
| Remote control | 2 x micro batteries, type AAA LR03 1.5 V (included in package contents)Range: approximately 6 m |
  www.tsv.comID 1111310397 www.tsv.comID 1111310397 | |
14. Information on WLAN/Bluetooth®
Frequency range: 2.4 GHz
WLAN standard: 802.11 b/g/n
Encryption: WEP/WPA/WPA2/WPA3
| Frequency range/MHz | Channel | Max. transmitting power/dBm |
| WLAN 2.4 GHz 2400 – 2483.5 | 1–13 | < 20 |
| Bluetooth® 2.4 GHz 2402 – 2480 | --- | < 20 |
- Product data sheet
| Symbol Value Unit | |||
| Manufacturer designation MD 37732 | |||
| Rated power in cooling mode P | rated | 2.637 kW | |
| Rated output in heating mode P | rated | 2.050 | |
| Rated power consumption in cooling mode P | EER | 1.005 kW | |
| Rated power consumption in heating mode P | COP | 0.835 | |
| Rated coefficient of performance in cooling mode EERd | 2.62 | ||
| Rated coefficient of performance in heating mode COPd | -- | ||
| Power consumption in operating state Temperature controller off | P_TO | -- | |
| Power consumption in standby mode P | SB | 0.5 | W |
| Power consumption of single-duct/double-duct air-conditioners (specified separately for cooling mode and heating mode) | DD: Q_DD SD: Q_SD | SD: 1.003-- | kWh/h |
| Sound power level | L_WA | 65 | dB(A) |
| Global Warming Potential | GWP | 3 | |
| Contact address for further information: | medion GmbH, Am Zehnthof 77, 45307 Essen, Germany | ||
16. EU declaration of conformity

medion GmbH hereby declares that the radio equipment type MD 37732 complies with the Directive 2014/53/EU [(RE Directive), as well as the Directive 2009/125/EC (ecodesign Directive) and the Directive 2011/65/EU (RoHS Directive)]. The complete EU declaration of conformity is available at: www.medion.com/conformity.
17. Disposal

PACKAGING
Your appliance has been packaged to protect it from damage in transit. The packaging is made of materials that can be recycled in an environmentally friendly manner.

Observe the following packaging material label regarding waste separation with the abbreviations (a) and numbers (b):
1–7: plastics/20–22: paper and cardboard/80–98: composite materials

(Only for France)
The “Triman” symbol tells the consumer that the product can be recycled, is covered by an extended system of manufacturer’s responsibility and must be sorted by material type in France.
APPLIANCE
All old appliances marked with the symbol shown must not be disposed of in normal household waste.
In accordance with Directive 2012/19/EU, the appliance must be properly disposed of at the end of its service life.
This involves separating the materials in the appliance for the purpose of recycling as well as minimising the environmental impact and negative effects on human health.
Take old appliances to an electrical scrap collection point or a recycling centre.
Contact your local waste disposal company or your local authority for more information on this subject.

The refrigerant R290 must not enter the environment.
BATTERIES
Batteries that carry the symbol illustrated must not be disposed of in ordinary household waste.
In accordance with Regulation 2023/1542, batteries must be disposed of properly at the end of their service life.
They may contain toxic heavy metals and are subject to hazardous waste treatment.
The chemical symbols of the heavy metals are as follows:
Cd = cadmium, Hg = mercury, Pb = lead.
You are legally obliged to return old batteries and rechargeable batteries after use. Therefore, please return used batteries and rechargeable batteries free of charge to a retailer or a municipal collection point.
Batteries and rechargeable batteries may contain substances that are harmful to human health and the environment. The negative effects can only be avoided if old batteries and rechargeable batteries are collected and recycled separately.
Take particular care when handling batteries and rechargeable batteries containing lithium, as there is an increased risk of fire if they are used incorrectly. Tape the poles to prevent an external short circuit.
Use batteries with a long service life or rechargeable batteries to reduce the generation of waste from old batteries.
Follow the storage instructions and avoid completely discharging and recharging the battery to extend its service life.
In addition, batteries or electrical and electronic devices with batteries or rechargeable batteries must not be left in public areas in order to avoid littering. Check options for reusing batteries instead of disposing of them, for example by repairing the battery.
18. Service information
Please contact our Customer Service team if your device ever stops working the way you want or expect it to. There are several ways for you to contact us:
- In our Service-Community, you can meet other users, as well as our staff, and you can exchange your experiences and pass on your knowledge there.
You will find our Service-Community at community.medion.com.
• Alternatively, use our contact form at www.medion.com/contact.
- You can also contact our Service team via our hotline or by post.
| Opening times Hotline number UK | |
| Mon – Fri: 08.00 – 20.00Sat – Sun: 10.00 – 16.00 | 1 0333 3213106 |
Service address
MEDION Electronics Ltd. 120 Faraday Park, Faraday Road, Dorcan Swindon SN3 5JF, Wiltshire United Kingdom

You can download this and many other sets of operating instructions from our service portal at www.medionservice.com.
We have stopped providing printed copies of our warranty terms and conditions as part of our commitment to sustainability, but you can access the warranty terms and conditions on our service portal.
You can also scan the QR code on the side of the screen, to download the operating instructions onto your mobile device from the service portal.
19. Legal Notice
Copyright 2026
Date: 06. February 2026
All rights reserved.
These operating instructions are protected by copyright.
Mechanical, electronic and any other forms of reproduction are prohibited without the written permission of the manufacturer.
Copyright is owned by the company:
medion GmbH
Am Zehnthof 77
45307 Essen
Germany
Please note that you cannot use the address above for returns. Please always contact our Customer Service team first.
DE
FR
NL
ES
IT
EN