
DrumFit X-Bike Neo Ultra - Indoor bike trainer CECOTEC - Free user manual and instructions
Find the device manual for free DrumFit X-Bike Neo Ultra CECOTEC in PDF.

| Product Type | Indoor Bike Trainer |
| Brand | Cecotec |
| Model | DrumFit X-Bike Neo Ultra |
| Maximum User Weight | 100 kg |
| Equipment Class | HB (household use) |
| Screen Power Supply | 2 AAA batteries (included) |
| Resistance Type | Adjustable by knob (magnetic/friction) |
| Emergency Brake | Press firmly on the resistance knob |
| LCD Screen Functions | SCAN, TIME, SPEED, DISTANCE, CALORIES, ODOMETER, PULSE |
| Heart Rate Sensor | Pulse sensors on the handlebars (fork) |
| Adjustments | Seat height and tilt, handlebar height, resistance, stabilization |
| Included Accessories | Tablet holder, assembly tools, batteries, manual |
| Intended Use | Domestic, indoor, non-therapeutic |
| Assembly | Assembly required, instructions provided, QR code for video |
| Maintenance | Clean with a damp cloth and non-abrasive detergent; periodic lubrication of pedals; check screws every 2-3 weeks |
| Troubleshooting | Check screen connections, replace batteries |
| After-Sales Service | Contact Cecotec SAV at +34 9 63 21 07 28 |
| Warranty | In accordance with applicable regulations, repairs by qualified personnel |
| Recycling | Appliance and batteries must not be disposed of with household waste; follow local regulations |
Frequently Asked Questions - DrumFit X-Bike Neo Ultra CECOTEC
User questions about DrumFit X-Bike Neo Ultra CECOTEC
0 question about this device. Answer the ones you know or ask your own.
Ask a new question about this device
Download the instructions for your Indoor bike trainer in PDF format for free! Find your manual DrumFit X-Bike Neo Ultra - CECOTEC and take your electronic device back in hand. On this page are published all the documents necessary for the use of your device. DrumFit X-Bike Neo Ultra by CECOTEC.
USER MANUAL DrumFit X-Bike Neo Ultra CECOTEC
natural_image
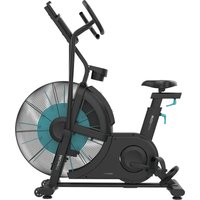
Exterior view of a black and white outdoor exercise bike with a cross-shaped body, mounted on a metal frame against a solid teal background (no text or symbols visible)Safety instructions 7
-
Parts and components 47
-
Before use 47
-
Assembly 48
-
Operation 49
-
Information on exercising 51
-
Cleaning and maintenance 52
-
Technical specifications 52
-
Disposal of old electrical and electronic appliances 53
-
Technical support and warranty 53
-
Copyright 53
SOMMAIRE
Please, keep this instruction manual in a safe place for future
reference or new users.
- Read the entire manual before assembling and using the machine. Safe and efficient use can be only achieved if the machine is properly assembled, maintained, and used. It is your responsibility to make sure every user is informed about the warnings and precautions stated in this instruction manual.
- Before starting a training session, it is recommended that you consult your doctor if you have any adverse health or physical condition that may pose a risk to your safety or make it difficult to use the bike properly. Your doctor's advice is essential if you are taking medication that affects your heart rate, blood pressure, or cholesterol level.
- Be aware of your body signals. Incorrect or excessive exercise can deteriorate your health. Stop exercising if you experience any of the following symptoms: pain, tightness in your chest, irregular heartbeat, extreme shortness of breath, dizziness, or nausea. If you experience any of these conditions, you should consult your doctor before continuing with your training.
- This machine can be used by children aged 8 years and above and persons with reduced physical, sensory, or mental capabilities or lack of experience and knowledge if they have been given supervision or instruction concerning the use of the machine in a safe way and understand the hazards involved. Children must not play with the machine. Cleaning and user maintenance should not be carried out by unsupervised children.
- Keep children and animals away from the assembling area, as small parts could cause risk of suffocation if swallowed.
- Keep children and pets away from the machine. Do not allow children to use it and/or play with the machine. It is designed
for adults only.
- Use the equipment on a solid, even surface with a protective cover for your floor or carpet.
- Check that the screws and nuts are securely fastened before using the machine.
- The safety level of the machine can be only maintained through regular examination for damage and/or signs of wear and tear.
- Use the machine as indicated in this instruction manual. If you find any defective component while assembling or checking the machine, or if you hear any unusual noise coming from the equipment during use, stop using it. Do not use the equipment until the problem has been solved.
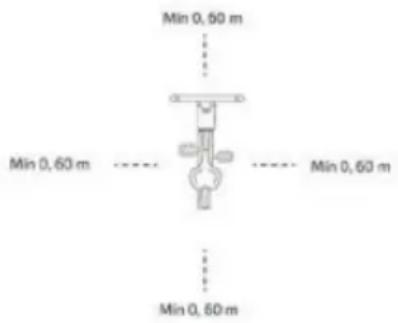
- Make sure you have enough space to lay out the parts before starting. Leave a free space of at least 0.6 m in front of all access areas of the machine in case of emergency. You can share the access areas with another machine nearby. Always ensure there are not any objects blocking the entrance and exit of the machine.
- Wear suitable clothing while using the machine. Avoid wearing loose clothing which may get caught in the equipment.
- WARNING: this training machine is not suitable for high-precision purposes. This equipment is HB class.
- WARNING: this machine operates by means of a flywheel.
Be careful when in motion and ensure that it completely stops before getting down, as the inertia of the flywheel and pedals could cause injury to yourself or others.
- Maximum user weight: 100 kg.
- It is not recommended for outdoor use.
- This machine is designed for domestic use only and is not intended for bars, restaurants, farmhouses, hotels, motels, and offices.
- The bike is not suitable for therapeutic use.
- Care must be taken when lifting or moving the equipment so as not to injure your back. Always use proper lifting techniques and/or assistance.
- WARNING: the heart rate sensors may be inaccurate, as it is not a medical device. Sensors can give you estimated heart rate information. If you feel any discomfort, stop exercising immediately. It may be dangerous for your health. If it persists, go immediately to the nearest medical centre.
- If repairs are required, please consult your supplier for further information or contact Cecotec Customer Service.
- If any parts protrude from the machine, they may interfere with the user's movement.
Instructions on batteries
- Do not burn or expose the batteries to high temperatures, as they may explode.
- Leaks from the batteries can occur under extreme conditions. Do not touch any liquid that leaks from the batteries. If the liquid gets into contact with skin, wash immediately with soap and water. If the liquid gets into the eyes, wash them immediately with clean water for a minimum of 10 minutes and seek medical attention. Wear gloves to handle the battery and dispose of it immediately in accordance with
local regulations.
- Avoid contact between the batteries and small metal objects such as paper clips, coins, keys, nails, or screws.
- Do not tamper with the batteries in any way.
- The batteries must be removed for safe disposal of the machine.
- Keep the batteries out of the reach of children when there is a risk of ingestion.
- Battery ingestion can cause burns, soft-tissue perforation, and death. It can cause severe burns within two hours of the ingestion.
- In case of battery ingestion, please seek medical help immediately.
- The batteries' power supply terminals must not be short-circuited.
- If the machine is to be stored for a long period of time, it is advisable to remove the batteries.
- The batteries must be inserted in the correct position. When replacing batteries, check the polarity.
INSTRUCTIONS DE SÉCURITÉ
Paso 1
Fig. 2.
- Round head screw (4)
- Curved washer (6)
- Cap nut (4)
- Rear stabiliser (1)
- Right pedal (1)
- Saddle-adjustment knob (1)
- Nut (5)
- Plain washer (9)
- Pressure washer (6)
- M8x20 mm Allen screw (4)
- Backrest (1)
- Rear armrest (1)
- Saddle (1)
- Front handlebar (1)
- M8x35 mm Allen screw (2)
- Tablet-holder tube (1)
- Tablet holder (1)
- LCD monitor (1)
- Screw (1)
- LCD monitor support (1)
- Main frame (1)
- Left pedal (1)
- Front stabiliser (1)
- Saddle support (1)
- M8x40 mm Allen screw (2)
- Screw (1)
Please note
The graphics in this manual are schematic representations and may not exactly match the product.
2. BEFORE USE
- This machine is packaged in a way as to protect it during transport. Take the machine out of its box and remove all packaging materials. You can keep the original box and other packaging elements in a safe place. This will help you prevent product damage when transporting it in the future. In case the original packaging is disposed of, make sure all
ENGLISH
packaging materials are recycled accordingly.
- Make sure all parts and components are included and in good conditions. If there is any piece missing or in bad conditions, contact the official Cecotec Technical Support Service immediately.
Box content
- DrumFit X-Bike Neo Ultra exercise bike
- Tools for assembly
- Batteries 2 x AAA
- Instruction manual
3. ASSEMBLY
Scanning the following QR code, you can view the complete assembly of the machine.

Step 1
Fig. 2.
Attach the 2 stabilisers (4 and 23) to the main frame (21) using 4 cap nuts (3), curved washers (2), and round-head screws (1).
Step 2
Fig. 3.
The pedals (5) & (22) are marked "L" and "R"- Left and Right. Place them in their appropriate crank arms. The right crank arm is on the right side of the bike, when sitting on it. Note that the right pedal should be screwed clockwise, while the left pedal must be screwed anti-clockwise.
Step 3
Fig. 4.
Align the saddle (13) with the saddle support (24). Adjust the angle of the saddle. Fix it tightly with nuts and plain washers (7, 8).
Insert the saddle support (24) into the main frame (21) and line up the holes. Fix the saddle into position with the saddle-adjustment knob (8). The height of the saddle can be adjusted after
completely assembling the exercise bike.
Step 4
Fig. 5.
Fix the backrest (11) to the saddle support (24) with two Allen screws (25), plain washers (8), and nuts (7).
Step 5
Fig. 6.
Remove the nuts, washers, and screws from the rear armrest (12). Fix the armrest to the backrest support with these parts.
Make sure the handlebar faces forward.
Step 6
Fig. 7.
Fasten the front handlebar (14) to the main frame (21) with two Allen screws M8x35 (15) and curved washers (2).
Step 7
Fig. 8.
Remove the screw (19) from the LCD monitor support (20). Fix the LCD monitor support with the screw. Slide the LCD monitor (18) into the LCD monitor support and plug it in.
Step 8
Fig. 9.
Align the tablet-holder tube (16) with the holes in the main frame (21) and fix it with two Allen screws (10), pressure washers (9), and plain washers (8).
Fix the tablet holder to its tube with the screw (26).
4. OPERATION
Getting on and off the exercise bike
- Before getting on the bike, make sure the pedals are properly attached. Stand next to the bike and pass the leg that is closer to it over the frame to sit on the saddle, then insert your feet in the toe clips in the pedals.
- To get off the exercise bike, do the previous step in reverse order.
Resistance adjustment
- The pedalling resistance can be adjusted with the tension-adjustment knob under the handlebars. To increase resistance, turn the knob clockwise. To reduce resistance, turn the
ENGLISH
knob counterclockwise.
- Press the knob to use it as an emergency brake.
Assembling the saddle
- To adjust the height of the saddle, remember that the correct position is the one in which your waist is not tilted to the side when the pedal is in the lower position and the foot is perfectly inserted in the toe clips.
- For a correct use of the machine and to avoid possible injuries in the knees, the horizontal adjustment of the saddle is extremely important. The correct position is the one in which, when the two pedal cranks are in the horizontal position, your front knee is right over the pedal centre.
- Adjust the saddle properly to ensure maximum efficiency and comfort during exercise. The saddle is in the correct position if the user has a slightly bent knee when one of the pedals is at a 90 degree angle relative to the ground.
- To adjust the saddle height, simply loosen the M1 lock knob, raise or lower the seat to the desired height, and tighten the knob.
- To adjust the saddle position, turn the N1 fixing nut, move the saddle backwards or forwards to the desired position, and tighten it.
Adjusting the handlebar
- Make sure the handlebar height is approximately at the same height as the saddle. Remember that this parameter will depend on the biomechanics and physiology of the user. If you feel uncomfortable in this position or your knees touch the handlebar, you should increase the height slightly.
- To adjust the handlebar height, simply loosen the M1 locking knob, adjust the handlebar to the desired height, and tighten the knob.
Levelling the exercise bike
To level the exercise bike on the ground, turn the knobs at the ends of each stabiliser to raise or lower the levellers and prevent the bike from wobbling.
Emergency brake
In the event of an emergency requiring a complete braking of the exercise bike, the resistance knob must be pushed inwards firmly until the bike stops completely.
Troubleshooting
If no number appears on the computer, make sure all connections are correct.
LCD display
- Operating button
- Reset: Hold the button for over 3 seconds to reset all values, except the Odometer.
Functions
- SCAN: press this button until the monitor displays "SCAN". The LCD monitor will automatically alternate between TIME, SPEED, DISTANCE, CALORIES, and ODOMETER.
- TIME: press this button until the monitor displays "TIME". The LCD monitor will count up your workout time.
- SPEED: press this button until the monitor displays "SPEED". The LCD monitor will show the current speed.
- DISTANCE: press this button until the screen displays "DIST". The LCD monitor will show the distance pedalled.
- CALORIE: press this button until the monitor displays "CAL". The LCD monitor will show the calorie consumption.
- ODOMETER: press this button until the monitor displays "ODO". The LCD monitor will show the total distance.
- PULSE: press this button until the monitor displays "PULSE". The user's current heart rate will be displayed in beats per minute. Place the palms of your hands on both contact pads and wait for 30 seconds for an accurate reading.
Warnings:
- The LCD monitor will turn on automatically if the exercise bike is in motion. If you stop exercising for over 3 minutes, the LCD screen will turn off.
- If the LCD screen does not display data properly, re-install it or replace its batteries.
- The computer uses two AA or UM-3 batteries.
5. INFORMATION ON EXERCISING
A proper workout should consist of the following three phases:
- Warm-up: consisting of 5 to 10 minutes of stretching and light exercise. A proper warm-up increases your body temperature, heart rate, and circulation in preparation for exercise. Fig. 10
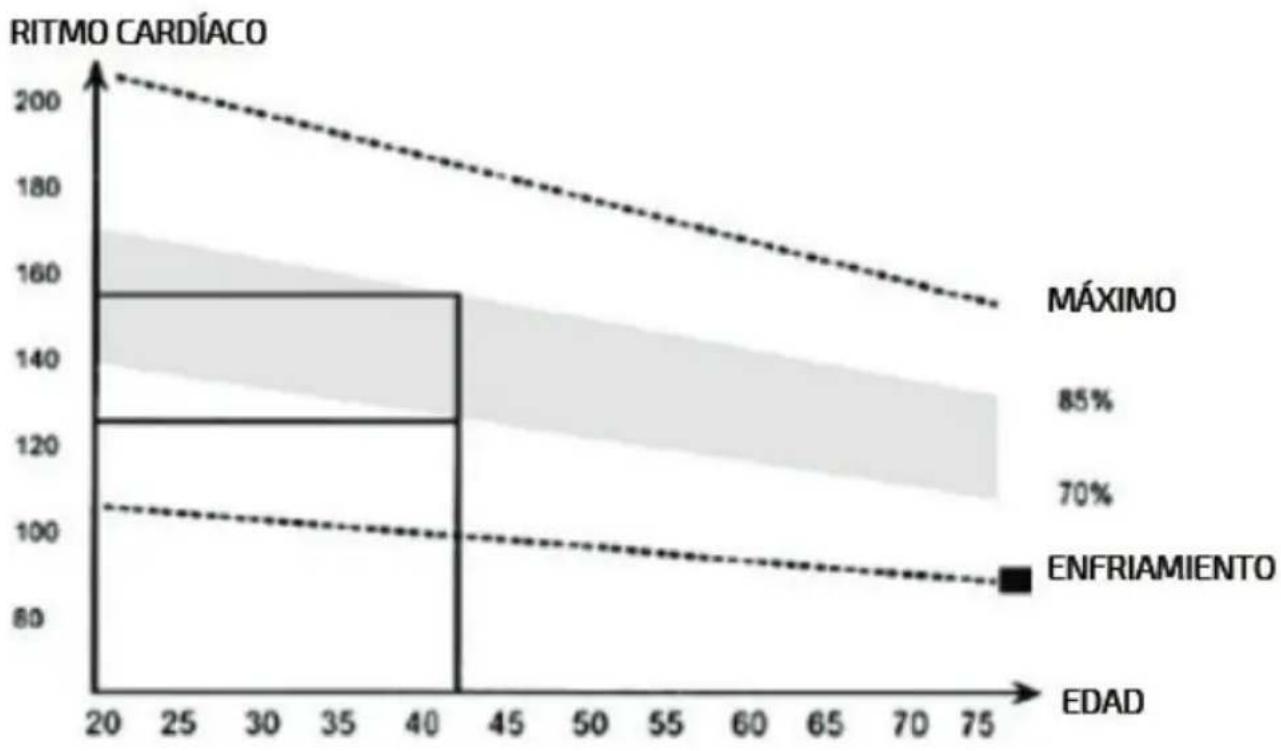
- Training: consisting of 20 to 30 minutes of exercise.
(Note: during the first few weeks of exercise do not keep your heart rate high for more than 20 minutes). Fig. 11
- Cool-down: 5 to 10 minutes of stretching exercises. This will increase the flexibility of your muscles and will help prevent injuries. Fig. 10
Workout routine
To maintain or improve your physical condition, exercise three times per week, with at least one day of rest between workouts. After a few months of regular exercise, you may exercise up to five times a week, if desired. Keep in mind that the key to success is making exercise a
ENGLISH
regular and enjoyable part of your everyday life.
6. CLEANING AND MAINTENANCE
Warning
The frequency of cleaning and maintenance indicated is a guideline. It will depend on the frequency and intensity of the user.
- Examine the equipment periodically in order to detect any issue, such as loose bolts.
- Lubricate the moving parts periodically to prevent premature wear.
- Inspect and tighten all parts before using the machine. Replace any defective parts immediately, and do not use the machine again until it is in perfect working condition.
- The machine can be cleaned using a slightly damp cloth and mild non-abrasive detergent. Do not use solvents.
- Do not try to repair the product by yourself. Should you have any difficulty with the assembly or operation of the exercise bike, or if you think that any part is missing, contact the official Cecotec Technical Support Service.
- You must check the screw condition every two or three weeks.
- If cranks get loose:
- Remove the trim.
- Reinforce lightly with a ring spanner.
- Place the trim back on.
- Once a month, apply oil in the interior part of the pedals.
- After lubricating some of the moving parts, run the machine normally for at least half a minute.
- You can clean the rest of the parts with a slightly damp cloth
7. TECHNICAL SPECIFICATIONS
Model: DrumFit X-Bike Neo Ultra
Reference: EU01_007072
Maximum user weight: 100 kg
Technical specifications may change without prior notification to improve product quality.
Made in China | Designed in Spain
8. DISPOSAL OF OLD ELECTRICAL AND ELECTRONIC APPLIANCES
This symbol indicates that, according to the applicable regulations, the product and/or batteries must be disposed of separately from household waste. When this product reaches the end of its shelf life, you should dispose of the cells/batteries/accumulators and take them to a collection point designated by the local authorities. For detailed information on the most appropriate way to dispose of electrical and electronic equipment and/or batteries, consumers should contact their local authorities.
Compliance with the above guidelines will help protecting the environment.
9. TECHNICAL SUPPORT AND WARRANTY
Cecotec shall be liable to the end user or consumer for any lack of conformity that exists at the time of delivery of the product under the terms, conditions, and deadlines established by the applicable regulations.
It is recommended that repairs be carried out by qualified personnel.
If at any moment you detect any problem with your product or have any doubt, do not hesitate to contact the official Cecotec Technical Support Service at +34 963 210 728.
10. COPYRIGHT
The intellectual property rights over the texts in this manual belong to CECOTEC INNOVACIONES, S.L. All rights reserved. The contents of this publication may not, in whole or in part, be reproduced, stored in a retrieval system, transmitted, or distributed by any means (electronic, mechanical, photocopying, recording or similar) without the prior authorization of CECOTEC INNOVACIONES, S.L.
FRANÇAIS
1. PIÈCES ET COMPOSANTS
Img. 1.
Étape 1
Img. 2.
Schritt 1
Abb. 2.
Referenz: EU01_007072
Passaggio 1
Fig. 2.
Passo 1
Fig. 2.
Stap 1
Afb. 2.
Krok 1
Rys. 2.
Krok 1
Obr. 2.
MODEL: DrumFit X-Bike Neo Ultra Reference: EU01_007072
Fig./Img./Abb./Afb./Rys/Obr.1
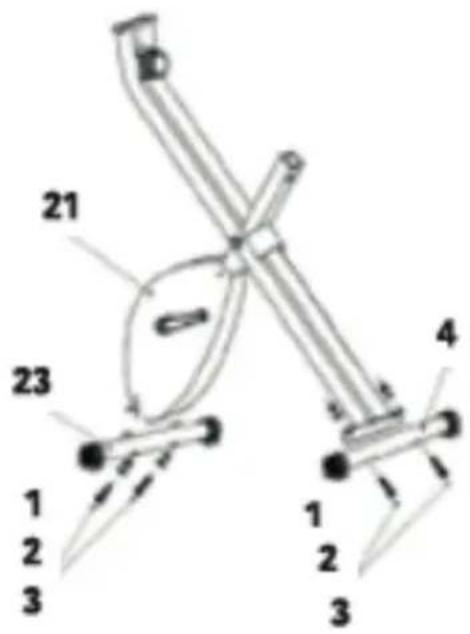
Fig./Img./Abb./Afb./Rys/Obr.2
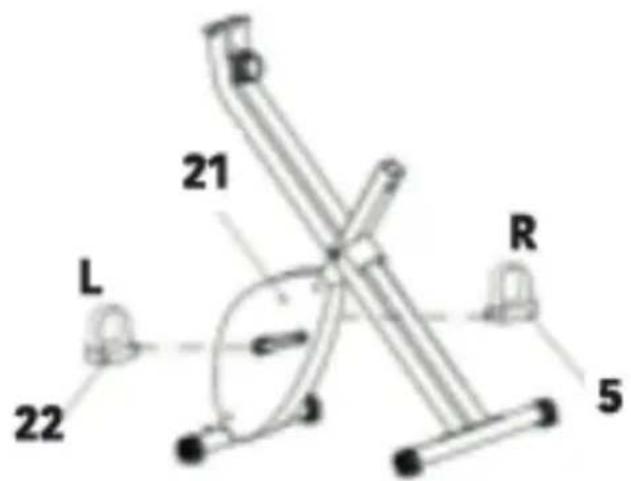
Fig./Img./Abb./Afb./Rys/Obr.3
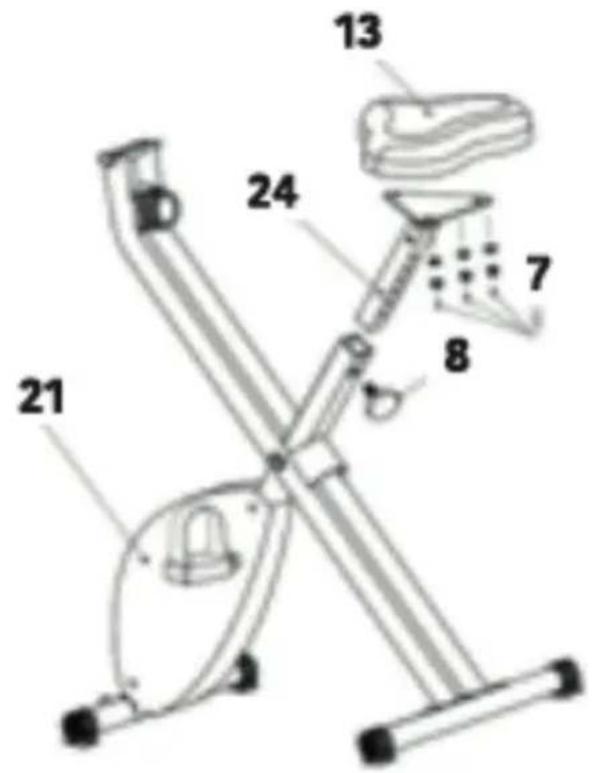
Fig./Img./Abb./Afb./Rys/Obr.4
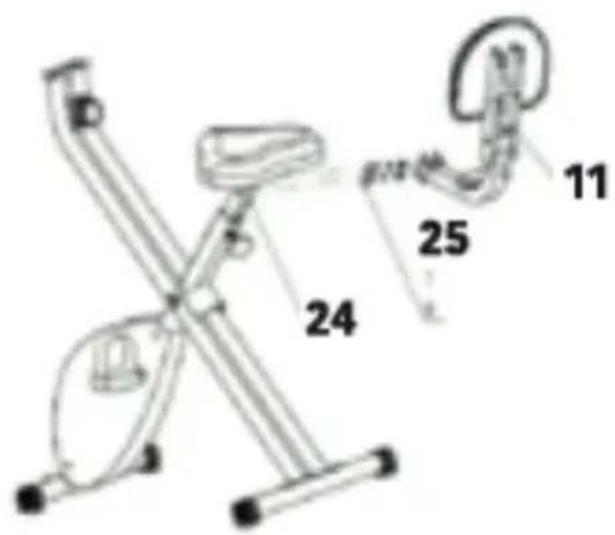
Fig./Img./Abb./Afb./Rys/Obr.5
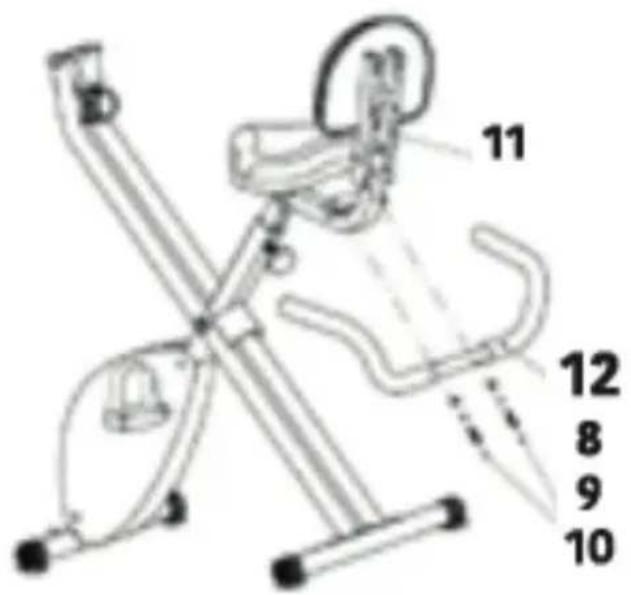
Fig./Img./Abb./Afb./Rys/Obr.6

Fig./Img./Abb./Afb./Rys/Obr.7
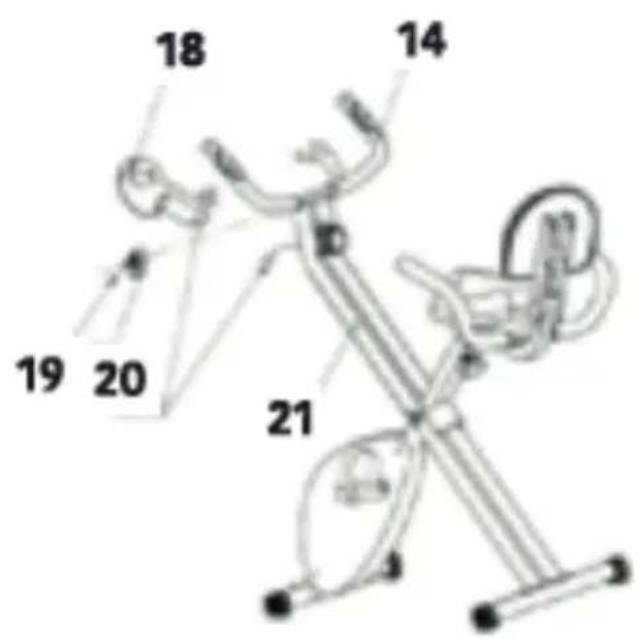
Fig./Img./Abb./Afb./Rys/Obr.8
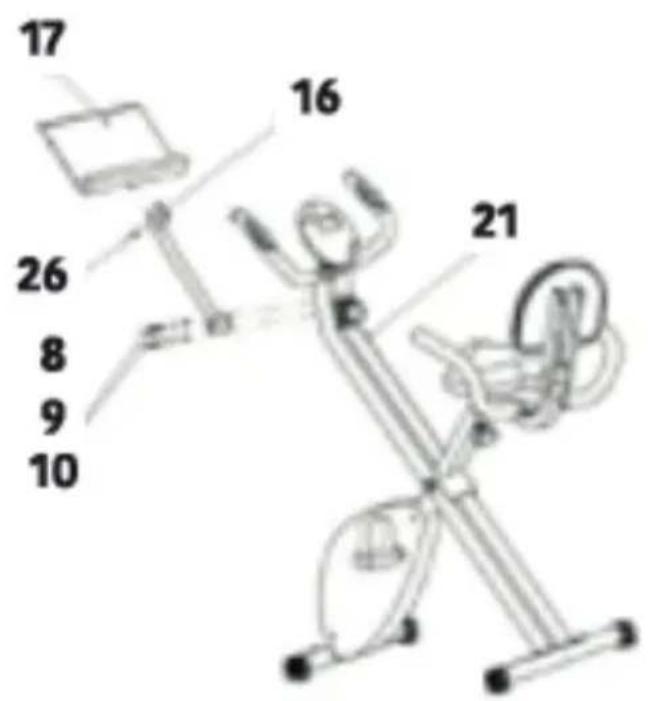
Fig./Img./Abb./Afb./Rys/Obr.9
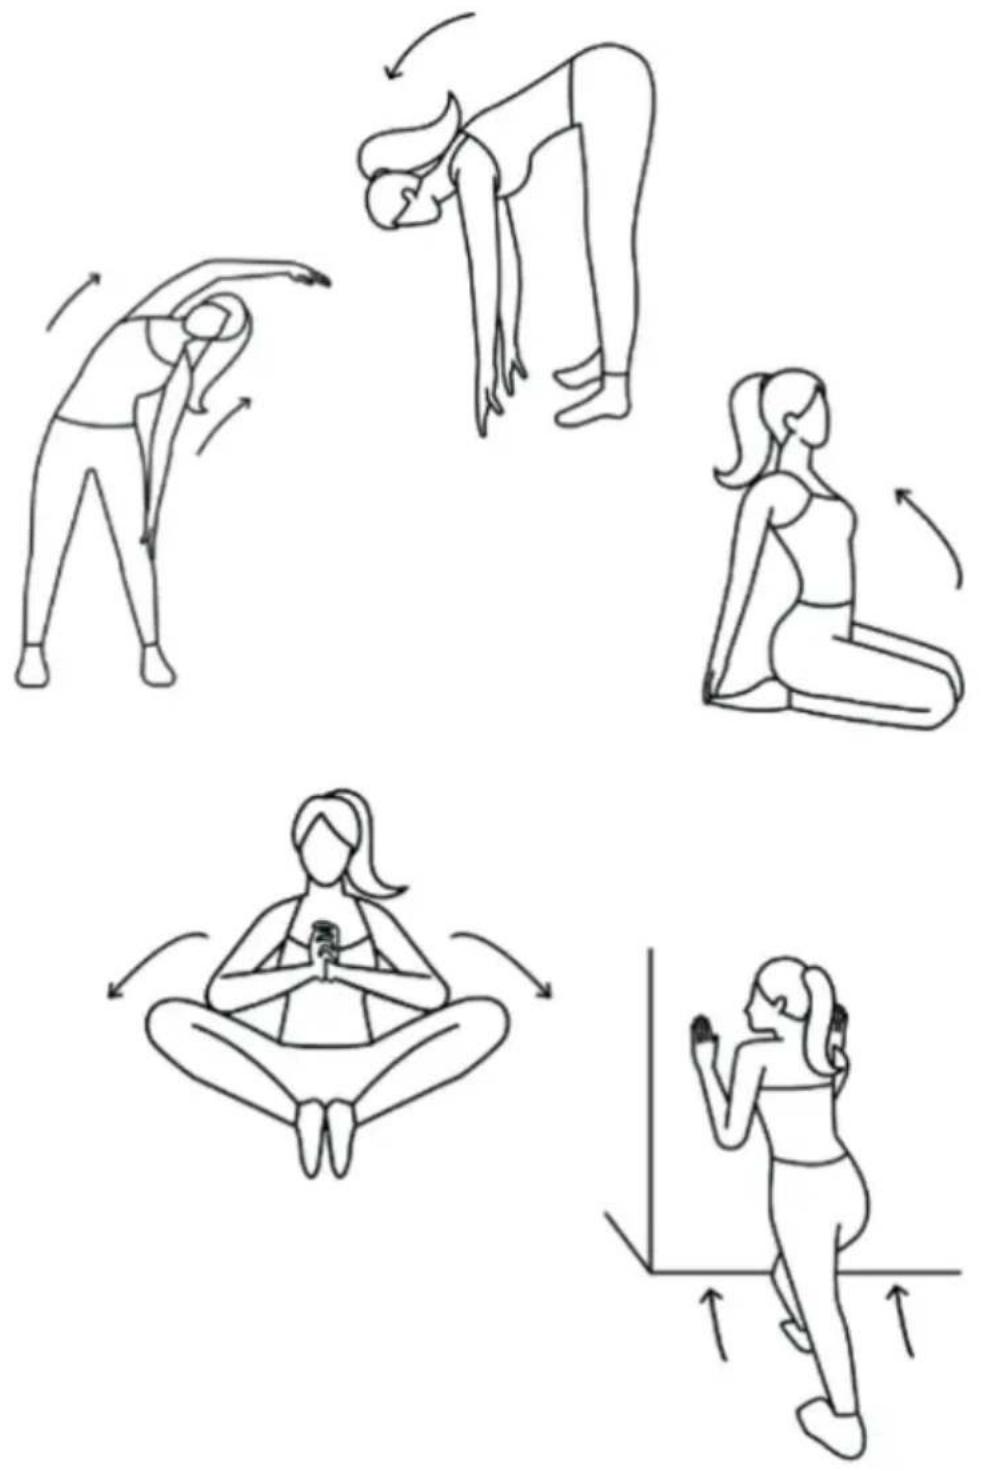
Fig./Img./Abb./Afb./Rys/Obr.10
line
| EDAD | RITMO CARDÍACO | | ---- | -------------- | | 20 | 160 | | 40 | 140 | | 75 | 100 |Fig./Img./Abb./Afb./Rys/Obr.11
www.cecotec.es


- SOMMAIRE
- Instructions on batteries
- INSTRUCTIONS DE SÉCURITÉ
- Paso 1
- Please note
- BEFORE USE
- ENGLISH
- Box content
- ASSEMBLY
- Step 1
- Step 2
- Step 3
- Step 4
- Step 5
- Step 6
- Step 7
- Step 8
- OPERATION
- Getting on and off the exercise bike
- Resistance adjustment
- Assembling the saddle
- Adjusting the handlebar
- Levelling the exercise bike
- Emergency brake
- Troubleshooting
- LCD display
- Functions
- Warnings:
- INFORMATION ON EXERCISING
- Workout routine
- CLEANING AND MAINTENANCE
- Warning
- TECHNICAL SPECIFICATIONS
- DISPOSAL OF OLD ELECTRICAL AND ELECTRONIC APPLIANCES
- TECHNICAL SUPPORT AND WARRANTY
- COPYRIGHT
- FRANÇAIS
- PIÈCES ET COMPOSANTS
- Img. 1.
- Étape 1
- Schritt 1
- Passaggio 1
- Passo 1
- Stap 1
- Krok 1
Brand : CECOTEC
Model : DrumFit X-Bike Neo Ultra
Category : Indoor bike trainer