
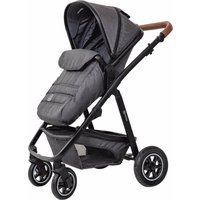
Duo - Stroller BabyGO - Free user manual and instructions
Find the device manual for free Duo BabyGO in PDF.

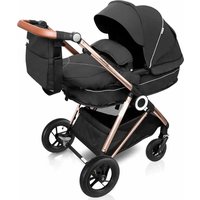
| Brand | BabyGO |
| Model | Duo |
| Product Type | Convertible tandem stroller |
| Frame material | Aluminum |
| Recommended age | 0 to 36 months (bassinet from birth, seat from 6 months) |
| Maximum supported weight | 15 kg (seat), 9 kg (bassinet), 5 kg (basket) |
| Child weight (standing platform) | Up to 20 kg |
| Number of recline positions | 3 positions |
| Restraint system | Height-adjustable 5-point harness |
| Parking brake | Lockable brake pedal |
| Front wheel lock | Yes, locking lever |
| Wheels | Removable front and rear |
| Folding | Compact one-hand folding with lock |
| Height-adjustable handle | Yes, with secondary lock |
| Adapters included | Adapters A (single), adapters B & C (tandem), car seat adapters |
| Accessories included | Bassinet, seat, canopy, apron, mattress, rain cover, diaper bag |
| Fabric care | Hand wash at 30°C, natural drying, no bleach |
| Frame care | Clean with dry cloth, lubricate moving parts |
| Storage | Store in a dry place, avoid high heat and prolonged sunlight |
| Safety | Always use harness, apply brake when stopped, do not leave unattended |
| Certification | Complies with current safety standards |
Frequently Asked Questions - Duo BabyGO
User questions about Duo BabyGO
0 question about this device. Answer the ones you know or ask your own.
Ask a new question about this device
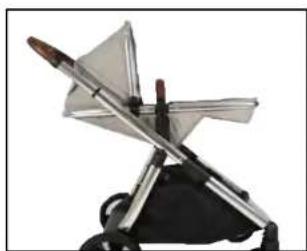
Download the instructions for your Stroller in PDF format for free! Find your manual Duo - BabyGO and take your electronic device back in hand. On this page are published all the documents necessary for the use of your device. Duo by BabyGO.
USER MANUAL Duo BabyGO
natural_image
Abstract logo design with a stylized lowercase 'b' inside a cloud-like outline (no text or symbols)TWINNER 2
Zwillings - Kinderwagen
MONTAGEANLEITUNG
Twin Pushchair
INSTRUCTION MANUAL
Poussettes jumelles
MODE D'EMPLOI

babyGO
BabyGo Baby Products GmbH
Am Bahndamm 1-3
natural_image
Line drawing of a stroller with handlebars and wheels (no text or symbols)TWINNER 2
Seite 04 - 27
DEUTSCH
Page 28 - 51
ENGLISH
Page 52 - 75
FRANCE
babyGO

babyGO

natural_image
Line drawing of a baby stroller with wheels and handle (no text or symbols)DE
BEDIENUNGSANLEITUNG
Liebe Eltern:
natural_image
Close-up of hands using a black mechanical device to adjust a black wheel (no text or symbols visible)natural_image
Close-up of a black stroller with wheels and a handle, no visible text or symbolsnatural_image
Close-up of a hand using a tool to adjust a metallic component (no visible text or symbols)natural_image
Close-up of hands using a tool to adjust or install a metal component, no visible text or symbolsnatural_image
Close-up of hands adjusting a black tire with a white arrow pointing to the seam (no text or symbols visible)natural_image
Close-up of a black stroller with four wheels (no text or symbols visible)natural_image
Close-up of a hand holding a small mechanical component with a red circle highlighting a feature (no text or symbols visible)natural_image
Close-up of hands adjusting a black tire with a white arrow pointing to the seam (no text or symbols visible)natural_image
3D rendering of a black rectangular electronic device with open lid (no text or symbols visible)natural_image
Black rectangular battery pack with white insulation, isolated on white background (no text or symbols)natural_image
Close-up of hands installing or adjusting a black plastic component with red arrows (no visible text or symbols)natural_image
Two white and black plastic bags with internal compartments, one open showing a small object (no text or symbols visible)natural_image
Close-up of hands holding a dark rectangular object with a metallic cover, no visible text or symbolsnatural_image
Close-up of a hand holding a white, curved object with black edges, possibly a food item or container (no visible text or symbols)natural_image
Close-up of a car's seatbelt being held, with a magnified inset showing the cable being inserted (no text or symbols visible)natural_image
Close-up of hands using a black tool to connect a zipper (no visible text or symbols)natural_image
Person adjusting a white cream tube with black straps (no text or symbols visible)natural_image
Close-up of a hand holding a transparent plastic tray with black buttons, containing a light-colored surface (no text or symbols visible)natural_image
Close-up of hands adjusting a black seatbelt with a white arrow pointing to the seat (no text or symbols visible)natural_image
Close-up of a hand adjusting a black leather seat cover (no visible text or symbols)natural_image
Close-up of a hand holding a mechanical device with a black clip, against a plain white background (no text or symbols visible)natural_image
Close-up of a hand using a tool to lift a metal bicycle (no visible text or symbols)natural_image
Close-up of a hand holding a small object over a metal frame, with no visible text or symbols.natural_image
Close-up of a medical or laboratory procedure showing a syringe inserted into a container with a red bulb inserted (no visible text or symbols)natural_image
Illustration of a person adjusting a mechanical device on a stand (no text or symbols visible)natural_image
Close-up of a mechanical component with a curved pipe or ring, no visible text or symbolsnatural_image
Close-up of a hand holding a metal bicycle handle attached to a stroller (no visible text or symbols)natural_image
Close-up of a hand holding a transparent mechanical device with a tool, against a plain white background (no text or symbols visible)natural_image
Close-up of a baby stroller with metal frame and black cushion (no text or symbols visible)natural_image
Close-up of a mechanical device with a triangular frame and a black base (no visible text or symbols)natural_image
Close-up of a black stroller with visible wheels and a white arrow pointing to the side (no text or symbols)natural_image
Close-up of a red sneaker pressing down on a white surface, with a white arrow pointing upward (no text or symbols visible)natural_image
Close-up of a hand adjusting a black bicycle seatbelt with a metallic clip (no text or symbols visible)natural_image
Close-up of a hand adjusting a black bicycle seatbelt with a white arrow indicating the handle (no text or symbols visible)natural_image
Close-up of hands holding a mechanical component, no visible text or symbolsnatural_image
Close-up of hands adjusting a mechanical component (no visible text or symbols)natural_image
Close-up of a white quilted garment with black straps and an arrow pointing to a detail (no visible text or symbols)natural_image
Close-up of a white quilted coat with two buttons and directional arrows indicating movement or positioning (no text or symbols)natural_image
Close-up of a hand holding a black cylindrical object with red arrows indicating motion or assembly (no visible text or symbols)natural_image
Close-up of a black stroller with a hand holding a yellow belt, showing a red arrow indicating motion (no text or symbols visible)natural_image
Close-up of a black mechanical device with a hand adjusting its cable and a black arrow pointing to a component (no visible text or symbols)natural_image
Close-up of a black mechanical device with visible structural components and a red tag (no text or symbols)natural_image
Two black plastic mechanical components with flanges, shown against a white background (no text or symbols)natural_image
Close-up of a hand holding a mechanical device with an arrow pointing to a component (no visible text or symbols)natural_image
Two black baby strollers with arms and legs, displayed side by side (no text or symbols visible)natural_image
Close-up of a mechanical component with a red circle highlighting a feature, no visible text or symbolsnatural_image
Two black abstract arms forming a symmetrical cross shape against white background (no text or symbols)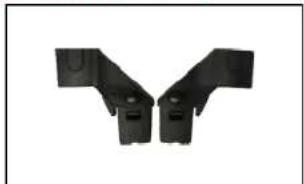
natural_image
Two black plastic mechanical brackets with mounting holes, arranged in a Y-shape (no text or symbols visible)natural_image
Close-up of a hand adjusting a black bicycle seatbelt mechanism (no visible text or symbols)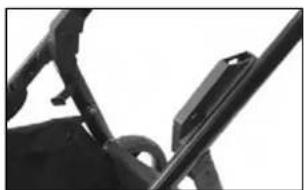
natural_image
Close-up of a mechanical component with no visible text or symbolsnatural_image
Hand placing a red button on a black plastic object (no text or symbols visible)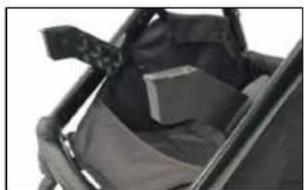
natural_image
Close-up of a black mechanical device with a cushioned seat and attached straps (no visible text or symbols)natural_image
Close-up of a hand adjusting a white and black medical device with a small inset image showing a device (no visible text or symbols)natural_image
Illustration of a baby stroller with a white canopy and black body, showing a downward arrow (no text or symbols)natural_image
Close-up of a black safety belt with a small white mascot inserted, held by a person (no visible text or symbols)natural_image
Black and white photo of a two-wheeled baby stroller with a metal rod (no text or symbols visible)natural_image
Line drawing of a baby stroller with wheels and handle (no text or symbols)EN
INSTRUCTION MANUAL
Dear Parents: Thank you for purchasing the Carry Cot.
Please read and follow all instructions before using the Carry Cot.
• Light Pushchair
• With multi position of reclining
• Aluminum frame
• with lockable brake
• Suitable for new born baby
• Applicable Age Grade for children 0-36
• Easy one handle folding system
months
- 5-Point-Harness-system
• Maximum Load: 15 kgs
- Moveable bumper bar
WARNING! Read the Instruction carefully before use and keep them for future reference.
TWINNER 2
PARTS
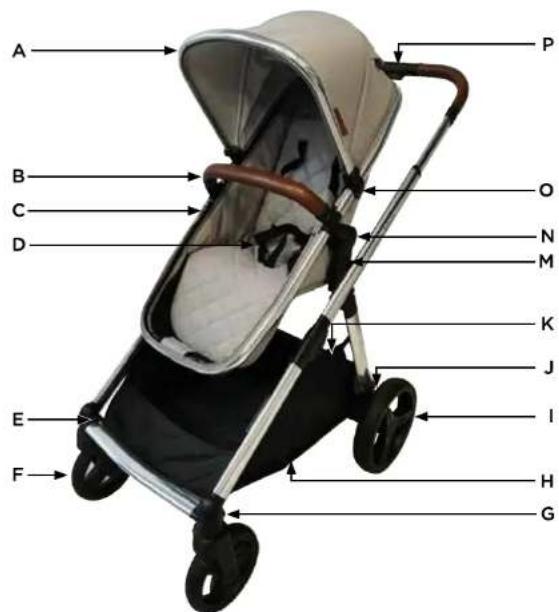
A. Canopy
B. Bumper Bar
C. Seat/Carrycot
D. Seat Harness
E. Front Wheel Disassembly Button
F. Front Wheel
G. Front Wheel Lock
H. Shopping Basket
- Rear Wheel
J. Rear Wheel Disassembly Button
K. Brake
L. Chassis
M. Seat Disassembly Button
N. Seat Recline Button Campy
O. Canopy Connector
P. Handlebar Adjustor and
Fold Mechanism

babyGO
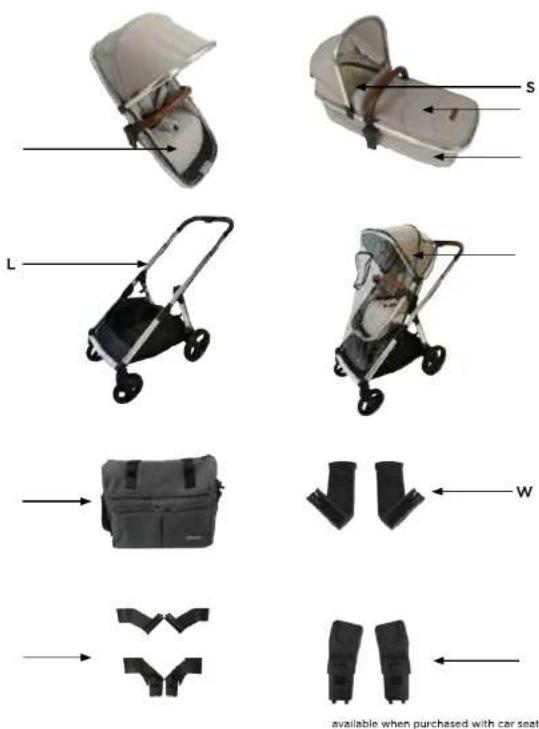
Q. Carrycot Fabrix
R. Carrycot Apron
5. Carrycot Mattress
T. Seat Unit Fabric
U. Rain Cover
V. Changing Bag
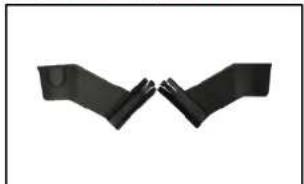
W. Adaptors A
X. Twins Adapters B & C
Y. Car Seat Adapter (available when purchased with car seat pack in car set carton)
Carrycot Cover

Mattress Carrycot
Main body fabric
Carrycoat ABS board
Carrycot side wall support board
ASSEMBLY STEP
Unfolding the Frame
1. Pull the tab located on the side of the pram frame to disengage the lock.
2. Lift the frame to unfold.
3. Once unfolded, ensure that it is locked in place. Attach poppers in shopping basket before use.
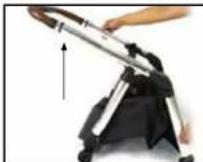
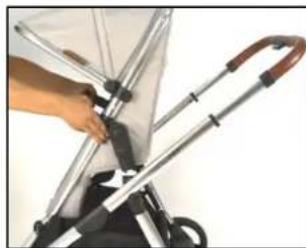
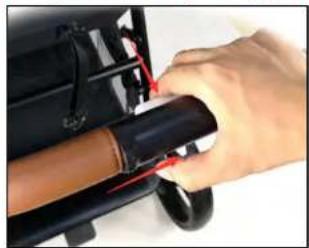
Adjusting the Handle Height

1. Slide the secondary lock, lo cated on the underneath of the handle to the right, then press down or the larger button on the top of the handle.
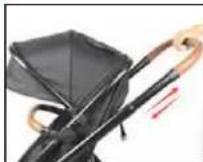
2. Once theyure both engaged, move the handle upwards or downwards as desired.
3. Ensure the handle is locked in place before use.
TWINNER 2

babyGO
TWINNER 2
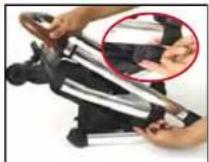
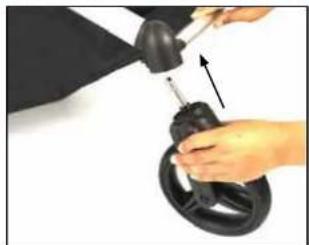
Front Wheel Installation Rear Wheel Installation
natural_image
Close-up of hands using a mechanical tool to adjust or install a black circular component (no visible text or symbols)
natural_image
Close-up of a black stroller with two wheels and a handle (no text or symbols visible)- Fit the front wheel pin into the hole located in the front wheel housing, located on the underside of the front of the pram frame.
- Repeat the process with the other side, and ensure both wheels are locked in place before use.
Removing the Front Wheels Removing the Rear Wheels
natural_image
Close-up of a hand holding a metallic tool with a red arrow pointing to the tip of a black object (no text or symbols visible)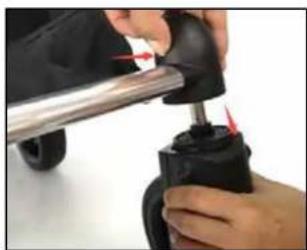
natural_image
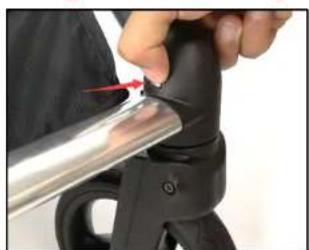
Close-up of hands using a tool to adjust or install a mechanical component (no visible text or symbols)- Press the metal clip located on the inner edge of the front wheel housing.
- Once engaged, pull the wheel downwards to remove. 2.
natural_image
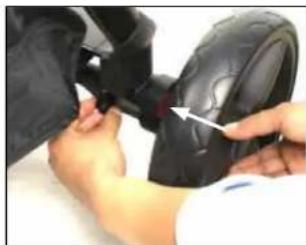
Close-up of hands adjusting a black tire with a white arrow pointing to the seam (no text or symbols visible)- Fit the rear wheel into the hole located in the rear wheel housing, located on the back of the pram frame.
natural_image
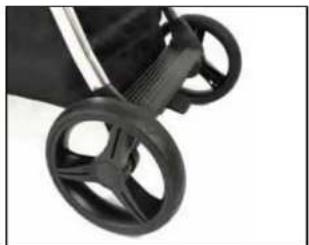
Close-up of a black stroller with four wheels (no text or symbols visible)- Repeat on the other side, and ensure both wheels are locked in place before use.
natural_image
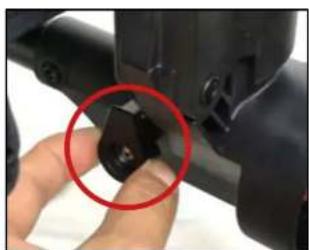
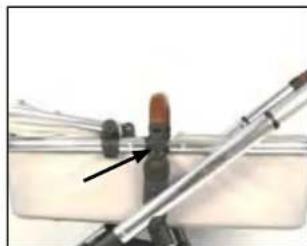
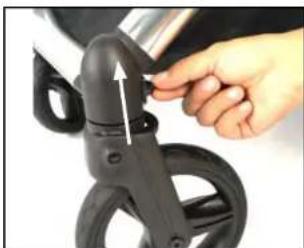
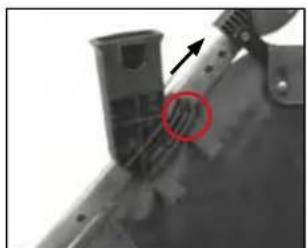
Close-up of a hand holding a small mechanical component with a red circle highlighting a detail (no text or symbols visible)Pull the button located at the rear of the wheel housing, shown in the image above, outwards.

natural_image
Close-up of hands adjusting a black tire with a white arrow pointing to the component (no text or symbols visible)Pull the wheel away from the housing to remove.

babyGO
TWINNER 2
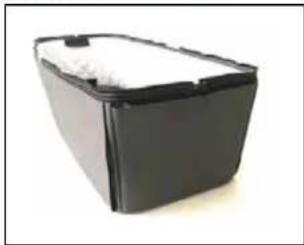
INSTALLATION CARRYCOAT
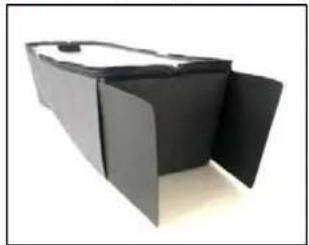
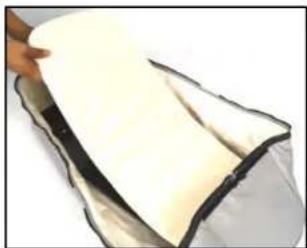
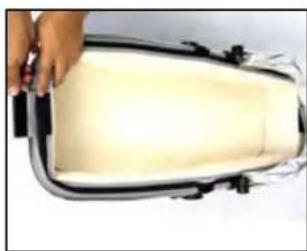
Carrycot side wall set up Inserting the carrycot base board and mattress
natural_image
3D rendering of a black rectangular electronic device with open lid (no text or symbols visible)- Open the Velcro on the side panel pockets, and put the side wall support boards inside as shown.
natural_image
Black rectangular container with white foam top, isolated on white background (no text or symbols)- Seat the Velcro opening.
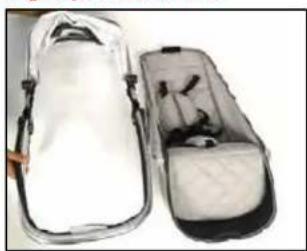
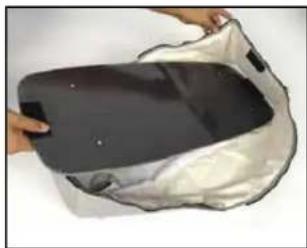
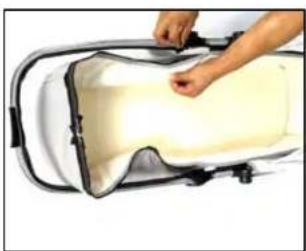
Removing the seat fabric from the frame Fitting carrycot fabric to frame
natural_image
Close-up of hands installing or adjusting a black plastic strip with red markings (no visible text or symbols)- Locate the velcro tabs located at the edges of the hood and footrest of the seat, open to find the zippers underneath and unzip.
natural_image
Two open athletic bags with black and white designs, one partially open showing internal components (no text or symbols visible)- Once fully unzipped, remove the seat from the frame, 8.
natural_image
Close-up of hands holding a dark rectangular object with a metallic cover, partially covered by a white plastic casing (no text or symbols visible)- Place the base board into the inside of the carrycot fabric, ensuring to match the vecro tabs with those on each side.
natural_image
Close-up of a hand holding a white, curved object with black edges, possibly food or material (no visible text or symbols)- Place the mattress on top of the base board.
natural_image
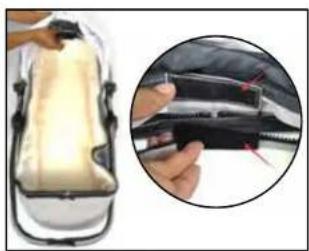
Close-up of a car seat cover with a magnified inset showing the handle and seat (no text or symbols visible)- Place the frame in position around the carrycot fabric, ensuring that the velcro tabs match up correctly.
natural_image
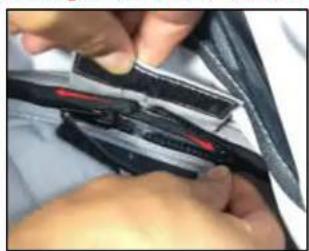
Close-up of hands using a black plastic tool to connect a zipper (no visible text or symbols)Attach the upper end of the carrycot to the hood side of the frame using the zipper.

babyGO
natural_image
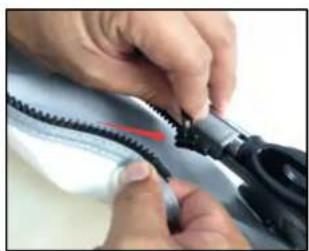
Person adjusting a white cream-filled container with black handles (no text or symbols visible)- Then, using the second zip, attach the bottom end of the carrycot to the lower end of the frame.
natural_image
Close-up of a hand holding a white rectangular object with black tags, possibly a container or device (no visible text or symbols)- Cover all zippers by securing the velcro tabs over them, at the top and bottom end.
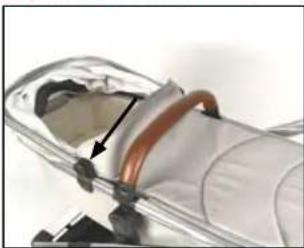
Canopy Installation Fitting the Bumper Bar
natural_image
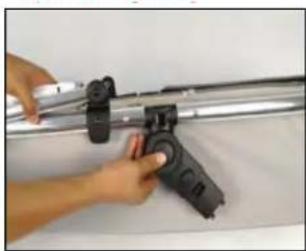
Person adjusting a black seatbelt device with a white arrow pointing to the seat (no text or symbols visible)11 Attach the canopy connector clips on either side of the hood to the seat frame, positioning over the pin shown in the image. Once in position, clip into place.
natural_image
Close-up of a hand adjusting a black leather seat cover (no visible text or symbols)- Secure the canopy to the frame using the zip.
TWINNER 2
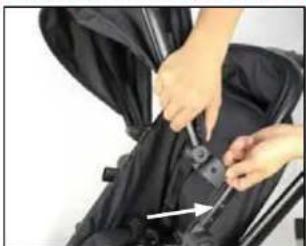
Fitting Carrycot to Frame
natural_image
Close-up of a hand holding a mechanical device with a black clip, no visible text or symbols- Press the circular buttons on either side of the frame, and adjust the adapter to a vertical position.

natural_image
Close-up of a hand using a tool to lift a bicycle seat frame (no visible text or symbols)- Line up the adapters with the pushchair frame and push down until you hear a click. To remove, press the lowest but ton on the adapter inwards, and lift off the frame.
natural_image
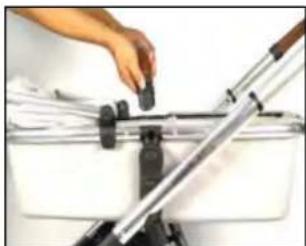
Close-up of a hand adjusting a small black object on a metal stand, with no visible text or symbols.- Match up the bumper bar to the connectors on the frame of the carrycot frame, and insert until you hear a click.
natural_image
Close-up of a medical or laboratory procedure showing a pen inserted into a glass container with a red object and an arrow pointing to it (no visible text or symbols)- To remove, press the buttons on either side of the bumper bar.

babyGO
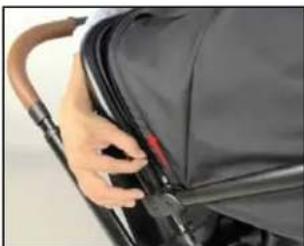
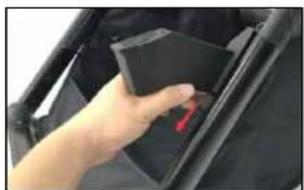
Fitting the Carrycot Apron Fitting and removing the seat unit from the frame
natural_image
Illustration of a person using a handheld device to lift a car (no text or symbols visible)- Attach the carrycot apron to the carrycot using the zip.
natural_image
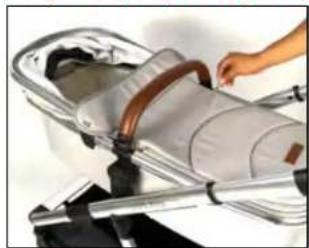
Close-up of a mechanical component with a curved pipe inserted into a transparent housing (no visible text or symbols)- Once the zip is secured, attach the snap buttons on either side to the hood connector to keep it in place.
TWINNER 2
FUNKTIONS
natural_image
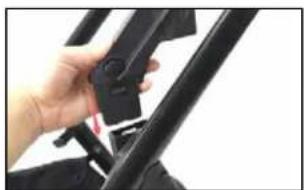
Close-up of a hand holding a metal bicycle handle attached to a stroller (no visible text or symbols)- To fit the seat unit to the frame, line up the adapters to the frame and press down until you hear a click.
natural_image
Close-up of a hand holding a metallic mechanical device with a lever mechanism (no visible text or symbols)- To remove, press the lowest button on the adapter inwards, and lift off the frame.
Seat Reclining Adjustment
natural_image
Close-up of a baby pumproller with a brush and filter blade (no text or symbols visible)- To adjust the recline of the stroller, press the two recline but tons inwards simultaneously.
natural_image
Close-up of a metallic object resembling a stylized airplane or rocket with a pointed tip, mounted on a black base (no visible text or symbols)- Move the seat to the desired position, you will hear a click when it is secured. There are 3 recline positions.

babyGO
TWINNER 2
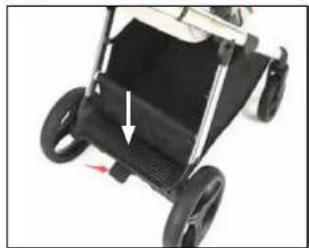
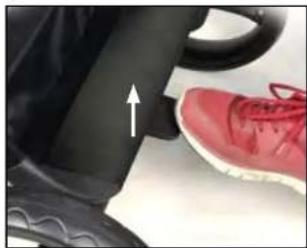
Using the brakes Using the seat harness
natural_image
Close-up of a black stroller with visible wheels and a white arrow pointing to the side (no text or symbols)- To apply the brake simply push down.
natural_image
Close-up of a red sneaker pressing down on a white surface, with a white upward arrow indicating motion (no text or symbols visible)- To remove the brake function lift upwards.
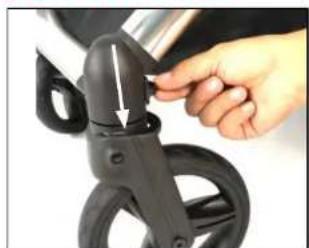
Engaging the Front Wheel Lock
natural_image
Close-up of a hand adjusting a black bicycle seatbelt with a metallic clip (no text or symbols visible)- To engage the front wheel lock, push the lever downwards on both sides.
natural_image
Close-up of a hand adjusting a black bicycle seatbelt with a white arrow indicating the handle (no text or symbols visible)To disengage, lift the lever upwards.
NOTE: Please ensure that the front wheels are locked when using on rough terrain.

natural_image
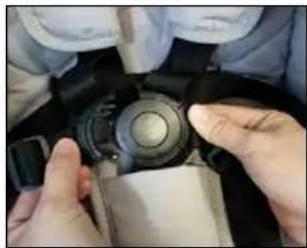
Close-up of hands holding a mechanical component, possibly a valve or pump, with no visible text or symbols.- Press the button in the centre of the buckle to release the hair ness.
natural_image
Close-up of hands adjusting a camera lens on a dark surface (no visible text or symbols)- To connect the harness, press both side straps in to the centre buckle, until you hear a dick.
natural_image
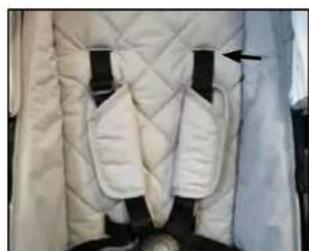
Close-up of a white quilted jacket with black straps and a black arrow pointing to the chest area (no text or symbols visible)- To adjust the height of the shoulder straps, release straps by accessing from the zip on back of seat unit.
natural_image
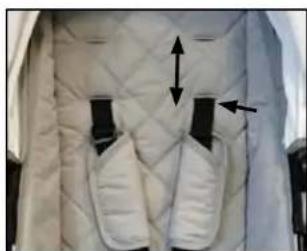
Close-up of a white quilted coat with black buttons and directional arrows indicating movement or positioning (no text or symbols)- Replace the harness into the desired position, and lock into place. 2.

babyGO
TWINNER 2
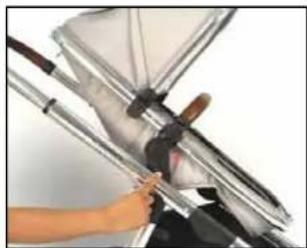
Folding the Stroller Using the Adapters A for Single Plus Toddler Mode
natural_image
Close-up of a hand holding a black cylindrical object with red arrows indicating movement or force (no visible text or symbols)- Slide the secondary lock, located on the underneath of the handle to the right, then press down on the larger button on the top of the handle.
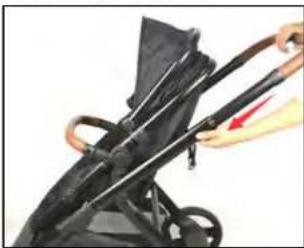
natural_image
Close-up of a black stroller with a red arrow indicating motion (no text or symbols visible)- Push the handle down to the lowest position, to release the lock. 2.
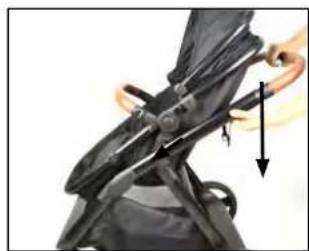
natural_image
Close-up of a mechanical device with a black lever and directional arrow indicating motion (no text or symbols)- Push downwards on the handle, towards the floor until the frame is folded.
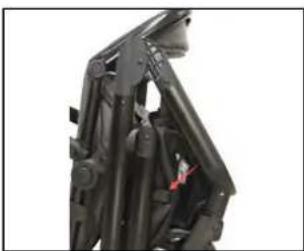
natural_image
Close-up of a black mechanical device with visible structural components and a red tag (no text or symbols)- Ensure the frame is locked.
ADAPTERS
natural_image
Two black plastic mechanical components with angled ends, no visible text or symbols- Locate the Adapters A.

natural_image
Close-up of a hand holding a mechanical device with an arrow pointing to a component (no visible text or symbols)Attach them to the chassis by sliding downwards. Repeat on both sides, ensuring that both adapters are secured.
natural_image
Two black toy strollers with arms and wheels, displayed side by side (no text or symbols visible)- Line up the carrycot, seat unit or car seat (with car seat adapters) with the Adapters A and secure in place by pusching downwards until the is an audible „click”.
natural_image
Close-up of a mechanical component with a red circle highlighting a feature, no visible text or symbols- To remove the adapters, lift the cclip at the top of each adapter and slide upwards.

babyGO
TWINNER 2
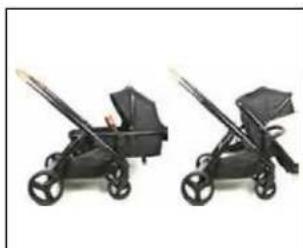
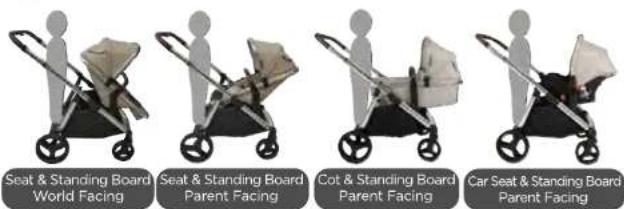
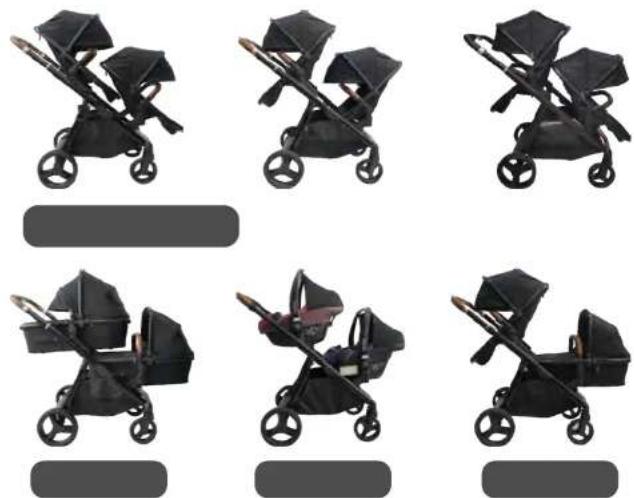
AVAILABLE MODES
Single Modes Tandem Modes
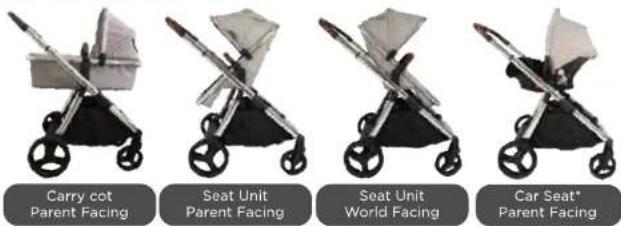
* available when purchased with car seat
Single Plus Toddler Modes

babyGO
INSTALLATION TANDEM MODES
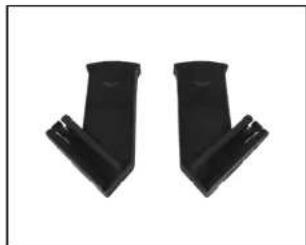
Using the Twins Adapters B & C in different orientation
natural_image
Two black arms facing each other, forming a symmetrical hand gesture (no text or symbols)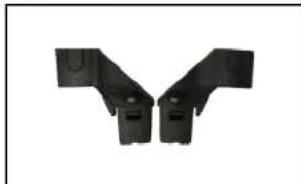
natural_image
Two black plastic mechanical brackets arranged in a Y-shape (no text or symbols visible)Insert the Rear seat adapter on both sides into hinge points until you hear the 'click'
natural_image
Close-up of a hand adjusting a black bicycle seatbelt (no visible text or symbols)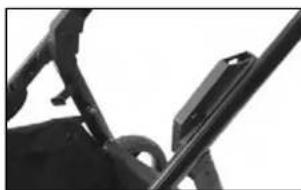
natural_image
Close-up of a mechanical component with no visible text or symbolsInsert the Front seat adapter on both sides into until you hear the 'click'
natural_image
Hand placing a red button into a black plastic container (no text or symbols visible)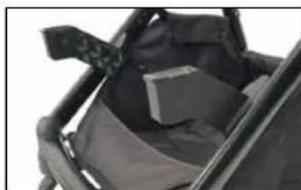
natural_image
Close-up of a black mechanical device with a gray cushion and attached straps (no visible text or symbols)WARNING: Make sure the seat adaptors have been installed onto frame properly before using.
TWINNER 2
INSTALLATION CAR SEAT MODES
Fitting the Single Car Seat
natural_image
Close-up of a person adjusting a white and black body with small accessories (no visible text or symbols)- Firstly, fit the Car Seat Adapters on the to the car seat by lining them up on both sides and pushing upwards until secure.
natural_image
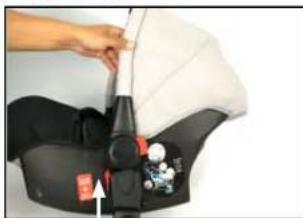
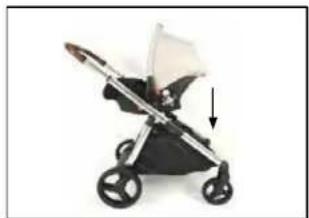
Illustration of a baby stroller with a white canopy and black body, showing a downward arrow (no text or symbols)- Line up the adapters with the chassis and push downwards until there is an audible "click". To remove press the Seat Disassembly Bottom on the adapters and lift off the cassis.
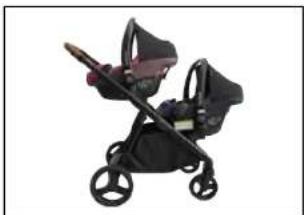
Fitting the car seats during Tandem Mode

natural_image
Close-up of a black safety belt with a small white object inserted, showing no text or symbols.- Firstly, fit the Car Seat Adapters on the car seats by lining them up on both sides and pusing upwards until secure.
natural_image
Black and maroon baby stroller with two wheels and a handle (no text or symbols visible)- Once the Twins Adapters B&C in place, line up the car seats with the car seat adapters in place, and secure by pushing downwards until there is an audible oclicku. To remove the car seat adaptor, press down on the red car seat indicator button and the centre of the car seat and pull firmly on the adaptor to remove.

babyGO
IMPORTANT
READ CAREFULLY AND READ CAREFULLY AND KEEP THESE INSTRUCTIONS FOR FUTURE REFERENCE
The carry cot unit is suitable from birth. It is suitable for a child who cannot sit up unaided, roll over and cannot push itself up on its hands and knees. The seat unit is suitable for children from 6 months up to 22 kgs (or 4 years whichever comes first).
Using the carry cot on the chassis:
- WARNING This product is only suitable for a child who cannot sit up unaided.
- WARNING Only use on a firm, horizontal level and dry surface.
- WARNING Do not let other children play unattended near the carry cot. WARNING Do not use if any part of the carry cot is broken, torn or missing. Never use the carry cot on a stand.
• Maximum weight of the child is 9kg. - Before carrying or lifting the carry cot, please check to ensure the handle is securely attached and in the correct position.
- The head of the child in the carry cot should never be lower than the body of the child.
- Do not add an additional mattress to the carry cot.
- This carry cot is not intended to use on its own as a sleeping unit, it is ONLY to be used with the chassis.
Using the Seat unit on the chassis:
- WARNING The seat unit is not suitable for children under 6 months.
- WARNING Always use the restraint system.
- WARNING Always use the crotch strap in combination with the waist belt.
- WARNING Use a harness as soon as the child can sit unaided.
- WARNING Never leave the child unattended.
- WARNING Ensure that all the locking devices are engaged before use.
- WARNING Do not let the child play with this product.
- WARNING This product is not suitable for running or skating.
TWINNER 2
- WARNING Check that the pram body, seat unit or car seat attachments are correctly engaged before use.
- WARNING To avoid injury ensure that the child is kept away when unfolding and folding this product.
- WARNING To avoid the risk of suffocation, keep all plastic packaging and materials out of reach from children.
- WARNING Do not use if any part of the product is broken, torn or missing.
General:
- WARNING Keep away from fire and other sources of strong heat. Ensure your child wears a correctly fitted and adjusted harness at all times.
- Use the parking brake when stationary and when removing or placing the child into the stroller.
- Do not let the child stand on the standing board unattended. Do not let the child play or climb on the standing board. Maximum weight for the standing board is 20kg.
- Any additional load attached to the pushchair will affect the stability and safety of the vehicle.
- Only use the seat unit, carrycot and car seat provided with the
- Travel system. Do not use replacement parts or accessories other than those approved by Ickle Bubba.
- The car seat provided does not replace a cot or bed and should your child need to sleep, then it should be placed in a suitable pram body, cot or cot bed.
- A basket is provided for the carriage of goods up to a maximum weight of 5kg.
- Store in a safe place away from children.
- The stroller may be folded with the shopping basket still attached but all contents must be removed. Failure to do so could damage stroller and contents of shopping basket.
- Rain cover must be removed when indoors and in hot weather to prevent overheating and possible risk of suffocation.
- Never allow children to stand on the footrest. The footrest is not a step.

babyGO
MAINTENANCE
• Storage - Please store the stroller dry. Do not store the stroller in a damp or hat environment. Never leave in sunlight for prolonged periods as some fabrics may fade
- Chassis - Always check the stroller for any wear or damage. Regularly lubricate all moving parts. Polish meta! work with a clean dry cloth.
- Wheels - Use a soft brush or cloth to clean.
- Seat Unit & Carry cot outer - Spange clean with warm soapy water. Rinse with clean water to avoid staining. Dry naturally away from direct heat and prolonged sunlight. Do not use strong detergents or bleach.
- Canopy & Shopping basket - Handwash at 30degree. Dry naturally away from direct heat and prolonged sunlight. Do not use strong detergents or bleach.
- Seat liner & Carry cot mattress removable cover - Handwash only up to 30degrees. Do not tumble dry. Do not iron, Do not dry clean. Do not use strong detergents or bleach.


TWINNER 2
DE
EN
报

babyGO

natural_image
Line drawing of a baby stroller with wheels and handle (no text or symbols)FR MODE D'EMPLOI
natural_image
Close-up of hands using a mechanical tool to adjust or install a black circular component (no visible text or symbols)
natural_image
Close-up of a black stroller with two wheels and a handle (no text or symbols visible)natural_image
Close-up of a hand using a tool to adjust a metallic cylindrical component (no text or symbols visible)
natural_image
Close-up of hands using a tool to adjust or install a mechanical component (no visible text or symbols)natural_image
Close-up of hands adjusting a black tire with a white arrow pointing to the seam (no text or symbols visible)
natural_image
Close-up of a black stroller with four wheels (no text or symbols visible)natural_image
Close-up of a hand holding a small mechanical component with a red circle highlighting a feature (no text or symbols visible)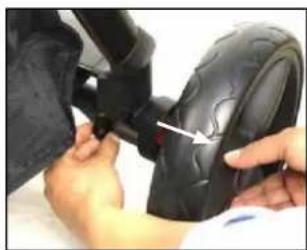
natural_image
Close-up of hands adjusting a black tire with a white arrow pointing to the component (no text or symbols visible)natural_image
3D rendering of a black rectangular electronic device with open lid (no text or symbols visible)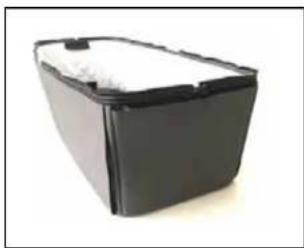
natural_image
Black rectangular battery casing with white foam lid, isolated on white background (no text or symbols)natural_image
Close-up of hands adjusting a black leather buckle with red marking (no visible text or symbols)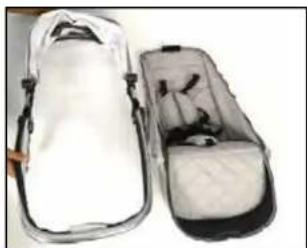
natural_image
Two open athletic bags with black buttons and white covers, one partially open showing internal compartments (no text or symbols visible)natural_image
Close-up of a hand holding a dark rectangular object with a metallic cover, placed on a plain surface (no text or symbols visible)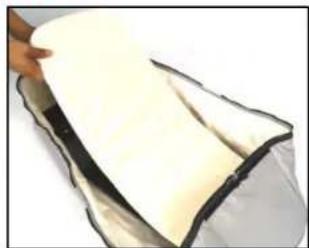
natural_image
Close-up of a hand holding a white, curved object with black edges, possibly a food item or container (no visible text or symbols)natural_image
Close-up of a car hood with a hand holding a tool, alongside a close-up of the interior panel showing internal components (no visible text or symbols)
natural_image
Close-up of hands using a pliers to connect a black cable with a red wire (no visible text or symbols)natural_image
Person adjusting a white cream-filled container with black handles (no text or symbols visible)natural_image
Close-up of a hand holding a white rectangular object with black tags, possibly a container or device (no visible text or symbols)natural_image
Person adjusting a black seatbelt with a white arrow pointing to the seat (no text or symbols visible)natural_image
Close-up of a hand adjusting a black leather seatbelt with a handle (no visible text or symbols)natural_image
Close-up of a hand holding a mechanical device with a black clip, no visible text or symbolsnatural_image
Close-up of a hand using a metal bench to lift a bicycle (no visible text or symbols)natural_image
Close-up of a hand adjusting a mechanical component with a metal lever (no visible text or symbols)natural_image
Close-up of a medical or laboratory procedure with a pen and tubing, no visible text or symbolsnatural_image
Illustration of a person using a handheld device to lift a car (no text or symbols visible)natural_image
Close-up of a mechanical component with a copper ring and black base, no visible text or symbolsnatural_image
Close-up of a hand holding a metal umbrella with a black plastic seat, next to a stroller (no visible text or symbols)natural_image
Close-up of a hand holding a metal tool next to a transparent cylindrical device (no visible text or symbols)natural_image
Close-up of a baby pumproller with a black base and metal tray, no visible text or symbolsnatural_image
Close-up of a mechanical device with transparent blades and a black base (no visible text or symbols)natural_image
Close-up of a black stroller with wheels and a white arrow pointing to the side (no text or symbols visible)natural_image
Close-up of a red sneaker pressing down on a white surface, with a white arrow pointing upward (no text or symbols visible)natural_image
Close-up of a hand adjusting a black bicycle seatbelt with a white plastic clip (no text or symbols visible)natural_image
Close-up of a hand adjusting a black bicycle seatbelt with a white arrow indicating the handle (no text or symbols visible)natural_image
Close-up of hands holding a mechanical component, no visible text or symbolsnatural_image
Close-up of hands adjusting a mechanical component (no visible text or symbols)natural_image
Close-up of a white quilted jacket with black straps and a black arrow pointing to the chest area (no text or symbols visible)natural_image
Close-up of a white quilted coat with two black buttons and directional arrows indicating movement or positioning (no text or symbols)natural_image
Close-up of a hand holding a black cylindrical object with red arrows indicating movement or force (no visible text or symbols)natural_image
Close-up of a black stroller with a red arrow indicating motion (no text or symbols visible)natural_image
Close-up of a black mechanical device with a directional arrow indicating motion (no visible text or symbols)natural_image
Close-up of a black mechanical device with attached brackets and a red tag (no visible text or symbols)natural_image
Two black plastic mechanical components with flanges and mounting holes (no text or symbols visible)natural_image
Close-up of a hand holding a mechanical device with an arrow pointing to a component (no visible text or symbols)natural_image
Two black strollers with different designs, displayed side by side (no text or symbols visible)natural_image
Close-up of a mechanical component with a red circle highlighting a feature, no visible text or symbolsModes Single Plus Toddler
natural_image
Two black robotic arms facing each other, forming a symmetrical hand gesture (no text or symbols)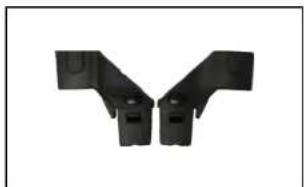
natural_image
Two black plastic mechanical components arranged in a V-shape (no text or symbols visible)natural_image
Close-up of a hand holding a black bicycle seatbelt (no visible text or symbols)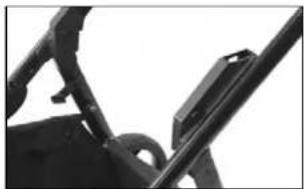
natural_image
Close-up of a mechanical bracket and lever mechanism (no visible text or symbols)natural_image
Hand placing a black plastic component into a black container (no visible text or symbols)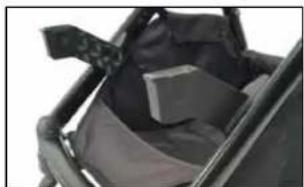
natural_image
Close-up of a black mechanical component with a textured surface and attached straps (no visible text or symbols)natural_image
Close-up of a person adjusting a white medical device with a black seatbelt, no visible text or symbolsnatural_image
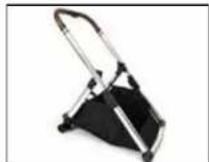
Model of a baby stroller with a white canopy and black body, shown in side profile (no text or symbols visible)natural_image
Close-up of a person's seatbelt with a black belt and small figurines, no visible text or symbolsnatural_image
Black stroller with two handles and a silver tray, no visible text or symbols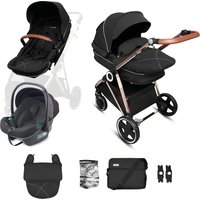

- MONTAGEANLEITUNG
- INSTRUCTION MANUAL
- MODE D'EMPLOI
- TWINNER 2
- DE
- BEDIENUNGSANLEITUNG
- EN
- babyGO
- ASSEMBLY STEP
- INSTALLATION CARRYCOAT
- FUNKTIONS
- ADAPTERS
- AVAILABLE MODES
- INSTALLATION TANDEM MODES
- INSTALLATION CAR SEAT MODES
- IMPORTANT
- READ CAREFULLY AND READ CAREFULLY AND KEEP THESE INSTRUCTIONS FOR FUTURE REFERENCE
- Using the carry cot on the chassis:
- Using the Seat unit on the chassis:
- General:
- MAINTENANCE
- FR MODE D'EMPLOI
Brand : BabyGO
Model : Duo
Category : Stroller