
Cozy Rider - Stroller BabyGO - Free user manual and instructions
Find the device manual for free Cozy Rider BabyGO in PDF.

| Product Type | Stroller |
| Brand | BabyGO |
| Model | Cozy Rider |
| Safety Standard | EN1888 |
| Maximum Recommended Weight (child) | 15 kg |
| Unfolded Dimensions (approx.) | 95 x 60 x 105 cm |
| Folded Dimensions (approx.) | 85 x 60 x 35 cm |
| Stroller Weight (approx.) | 8.5 kg |
| Frame Materials | Aluminum alloy |
| Fabric Materials | Polyester |
| Number of Wheels | 4 (2 swivel front, 2 fixed rear) |
| Brake | Central foot brake (rear axle) |
| Restraint System | 5-point harness |
| Canopy | Yes, with UV 50+ protection and Peek-a-Boo window |
| Included Accessories | Tray, cup holder, storage basket |
| Car seat adapter compatibility | Maxi Cosi, Cybex, Clek, Nuna |
| Adjustable Handle | Yes (push/pull mode) |
| Reclining Backrest | Yes |
| Folding | Yes, with locking system |
| Care | Clean with damp cloth and mild detergent |
| Warranty | 12 months |
Frequently Asked Questions - Cozy Rider BabyGO
User questions about Cozy Rider BabyGO
0 question about this device. Answer the ones you know or ask your own.
Ask a new question about this device
Download the instructions for your Stroller in PDF format for free! Find your manual Cozy Rider - BabyGO and take your electronic device back in hand. On this page are published all the documents necessary for the use of your device. Cozy Rider by BabyGO.
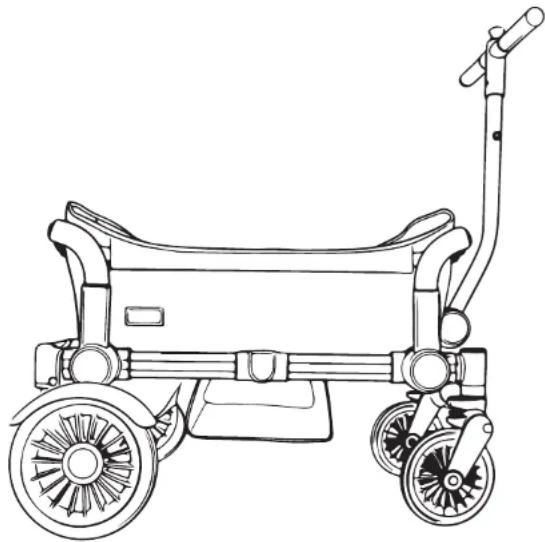
USER MANUAL Cozy Rider BabyGO
natural_image
Abstract logo design with a stylized lowercase 'b' inside a cloud-like shape, no text or symbols present.COZY RIDER
Bollerwagen
BEDIENUNGSANLEITUNG
Handcart
ASSEMBLY INSTRUCTIONS
chariot à main
ASSEMBLY INSTRUCTIONS
Handkar
ASSEMBLY INSTRUCTIONS

BabyGo Baby Products GmbH
Am Bahndamm 1-3
natural_image
Line drawing of a stroller with wheels and handle (no text or symbols)COZY RIDER
Seite 04 - 21
DEUTSCH
Page 22 - 39
ENGLISH
Page 40 - 57
FRANCE
Page 58 - 75
NEDERLANDS

babyGO

babyGO
natural_image
Line drawing of a two-wheeled toy car with wheels and a handle (no text or symbols)natural_image
Technical line drawing of a mechanical component with a central hub and side rail (no text or symbols)natural_image
Line drawing of a mechanical component with a central wheel and side flange (no text or symbols)natural_image
Pure mechanical diagram showing a gear or cam mechanism without any text, numbers, or symbolsnatural_image
Line drawing of a car tire being struck by a hand (no text or symbols)natural_image
Line drawing of a hand holding a bicycle tire, no text or symbols present
natural_image
Line drawing of a hand gripping a bicycle wheel (no text or symbols)natural_image
Top-down schematic of a mechanical component with no visible text or symbols
natural_image
Simple line drawing of a cable or clamp securing a bag (no text or symbols)natural_image
Line drawing of a medical procedure with surgical instrument (no text or labels)
natural_image
Line drawing of a hand holding a cylindrical object with a strap (no text or symbols)natural_image
Three-step line drawing of a person's seatbelt device, showing progressive assembly from seat to seat (no text or symbols)1. Um das Verdeck anzubringen:
natural_image
Line drawing of a backpack and seat (no text or symbols)natural_image
Three-step line drawing showing hand positioning and tool manipulation (no text or symbols)1. Um das Tablett anzubringen:
natural_image
Line drawing of a hand pressing down on a curved object with an upward arrow (no text or symbols)natural_image
Line drawing of a mechanical device with no visible text or symbolsnatural_image
Line drawing of a mechanical device with two arms and a central hub (no text or symbols)natural_image
Two identical line drawings of a robotic hand gripping a small object, no text or symbols present.natural_image
Line drawings of two mechanical components, one with handle and neck, the other with feet and legs (no text or symbols)natural_image
Technical line drawing of a mechanical joint or bracket assembly (no text or symbols)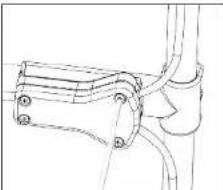
natural_image
Technical line drawing of a mechanical bracket or clamp assembly (no text or symbols)natural_image
Technical line drawing of a mechanical joint or connector assembly (no text or symbols)natural_image
Technical line drawing of a mechanical clamp or bracket assembly (no text or symbols)natural_image
Simple line drawing of a car's side mirror and dashboard (no text or symbols)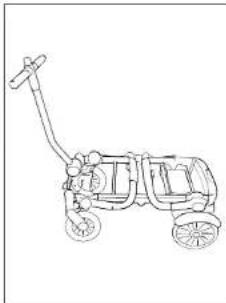
natural_image
Line drawing of a wheeled vehicle with wheels and a handle (no text or symbols)natural_image
Line drawing of a vehicle chassis with wheels and structural components (no text or symbols)natural_image
Line drawing of a person riding a bicycle with wheels and a wheel (no text or symbols)natural_image
Line drawing of a child pushing a small wheeled cart with a long pole, alongside an adult figure (no text or symbols)natural_image
Line drawing of two people in stroller-like mobility poses, one walking and the other seated (no text or symbols)natural_image
Simple line drawing of a mechanical frame or bracket structure (no text or symbols)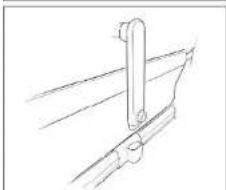
natural_image
Pure technical line drawing of a mechanical bracket or support structure without any text, numbers, or symbolsnatural_image
Two technical line drawings of a mechanical bracket or support structure, showing internal components and mounting points (no text or symbols)natural_image
Pure mechanical diagram showing hands operating a bracket (no text or symbols)natural_image
Line drawing of a two-wheeled toy car with wheels and a handle (no text or symbols)EN INSTRUCTION MANUAL
Dear Parents:
Thank you for purchasing the handcart.
Please read and follow all instructions before using the handcart.
WARNING! Read the Instruction carefully before use and keep them for future reference.
COZY RIDER
IMPORTANT
READ CAREFULLY AND KEEP THESE INSTRUCTIONS FOR FUTURE REFERENCE
This product has been tested to EN1888 Never leave the child unattended.

- Fall hazard: To prevent serious injuries from falling or sliding out, always utilize the safety harness and ensure your child is correctly positioned.
• Never leave your child unattended. - Never park your stroller on a hill with your child inside.
- Never place purses, shopping bags, parcels, or accessory items on the handle or canopy.
- Never sit or stand on the side wall panels of the stroller.
- Never sit or stand on the folded seat backs of the stroller.
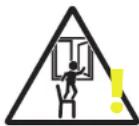
- Never use your stroller while ascending or descending stairs or using an escalator.
- Never allow your child to crawl under the user-supplied car seat when attached.
- Never use your stroller without rear wheel safety fenders in place.
- Never make any alterations or modifications to your stroller with products or accessories not supplied by the manufacturer as this may cause instability or structural damage not covered under warranty.
• Always ensure that your child is properly positioned by using the safety harness at all times.
• Always lock the brakes while taking your child in or out of the

babyGO
stroller.
• Always check that your stroller is fully open and locked before use.
• Always keep hands away from moving wheels.
- Always check that all accessories and attachment devices are correctly attached before use.
• Always keep fingers away from moving parts when folding, unfolding, or adjusting the stroller to prevent entrapment or pinching.
COZY RIDER
WARRANTY
The warranty period starts from the date of purchase and is valid for a period of 12 months. The warranty is only applicable to the original owner and is not transferable. The warranty is only applicable to products that have not been adapted by the user. In the case of any defects, the owner is required to return the product to the retailer. If the retailer can not solve the problem, he must return the product, complete with a clear description of the complaint and a validated purchase receipt to the manufacturer. Exchanger or return can not be demanded. Repairs do not constitute an extension to the warranty term. The manufacturer is not liable for any damages other than those on products supplied.
No warranty is given if:
• The product is not supplied complete with the validated purchase receipt to the manufacturer.
- Defects are caused by misuse or maintenance which differ from that indicated in the instruction manual.
• Repairs are carried out by third parties.
• Defects are caused by neglect.
- Damage or removal of any serial number is found.
• If there is normal wear and tear which may be expected from everyday use.
- The stated warranty terms and conditions have not been satisfied.

babyGO
MAINTENANCE
CLEANING
• Frame and wagon fabric: Wipe with a damp cloth and allow to dry.
• To clean your wagon frame, handlebar, fenders, and wheels:
- Wipe with a damp cloth and a mild cleaning solution, then dry thoroughly. DO NOT use abrasives.
• To clean your snack tray and cupholders:
- Wash in the sink or with a hose.
- Wipe with a damp cloth using a mild cleaning solution, then dry thoroughly. DO NOT use abrasives.

COZY RIDER
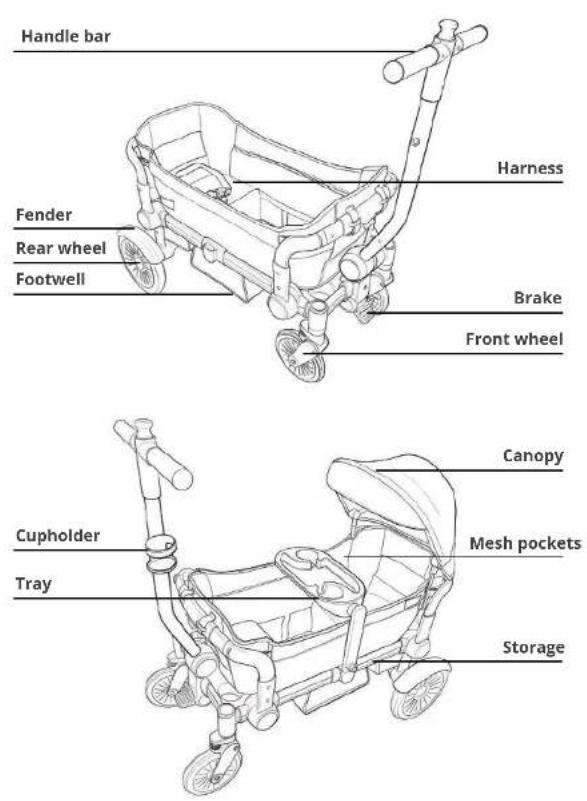
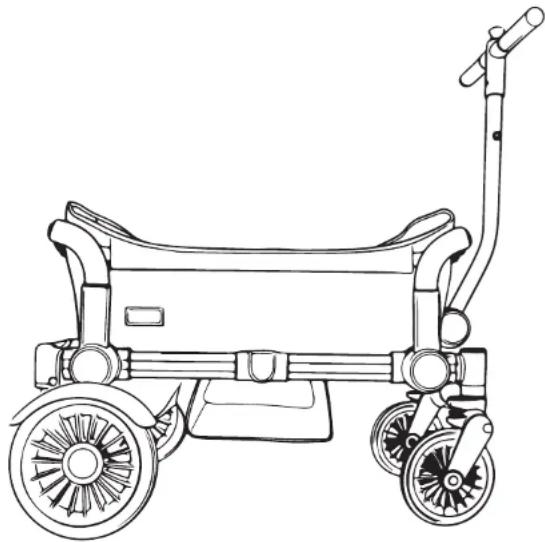
PARTS

babyGO
COZY RIDER
FENDERS
natural_image
Technical line drawing of a mechanical component with a central tire and curved body (no text or symbols)- For ease of installation, fenders are interchangeable for left and right sides.
To attach fenders:
- Slot each fender into a wheel of arch. - Ensure that the bottom of the fender locks securely into the open slot in the rear axel mount. You will hear a CLICK when fender is secured in place.

natural_image
Line drawing of a mechanical component with a central hub and flange (no text or symbols)- To remove fender: Pull fenders in an upward direction until fender detaches from rear axle mount.
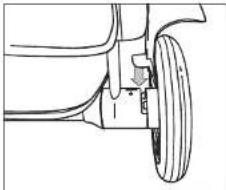
REAR WHEELS WAGON FABRIC
natural_image
Pure mechanical diagram showing a gear or cam mechanism without any text, numbers, or symbols- To attach rear wheels: Push the rear wheel post into the rear wheel housing until CLICK is hear. Repeat on the opposite side.
natural_image
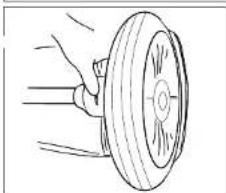
Line drawing of a car tire being held by a hand (no text or symbols)- To remove the rear wheels: Press the button located below wheel housing and pull the wheel outward until it is released. Repeat on opposite side.
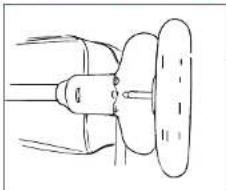
FRONT WHEELS
natural_image
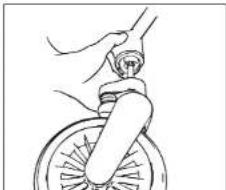
Line drawing of a hand holding a bicycle tire, no text or symbols present- To attach front swivel wheels: Push the front wheel post into the front wheel housing until CLICK is heard. Repeat on the opposite side.

natural_image
Line drawing of a hand gripping a bicycle wheel (no text or symbols)- To remove front swivel wheels: Press the button located below wheel housing and pull the wheel outward until it is released. Repeat on opposite side.
natural_image
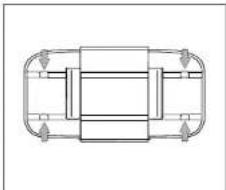
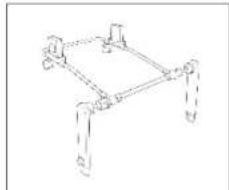
Top-down schematic of a mechanical component with no visible text or symbols1. To attach your wagon seat to the frame:
- Locate the 4 velcro loops at the base of the wagon seat (2 loops in the rear & 2 loops in de front).
- Loop and secure the velcro loops around the frame base.
- There will be 2 velcro loops that will need to loop through slots that are part of the bonus storage area.

natural_image
Simple line drawing of a cable or clamp securing a bag (no text or symbols)2 After securing the velcro loops:
- Locate the 8 d-rings on the wagon seat.
- Loop the webbing straps around the front and rear seat backs.
- Loop the webbing straps around the side interiors of the seat backs.
- Fasten the d-rings to the fabric loops.

babyGO
COZY RIDER

natural_image
Line drawing of a medical procedure with surgical instrument (no text or labels)
natural_image
Line drawing of a hand holding a cylindrical object with a strap (no text or symbols)3. To remove the wagon fabric:
- Unfasten d-rings from fabric loops. - Pull apart velcro loops to detach.
CANOPY
natural_image
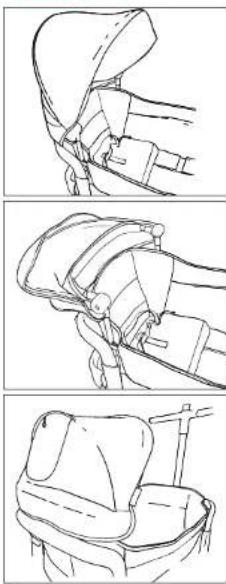
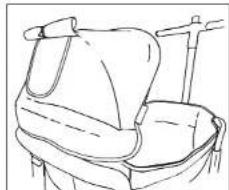
Three-step line drawing of a person's seatbelt device, showing progressive assembly from seat to seat (no text or symbols)1. To attach the canopy:
- Locate posts on each side of the canopy. - Slide the canopy posts into side housing on the seat backs. - Canopy is extendable and offers UPF 50+ protection.
-
To remove the canopy: Pull both sides of the canopy posts until the canopy fully releases from housings.
-
Use: Pull forward to use canopy; push backwards to retract.
natural_image
Line drawing of a backpack and seat (no text or symbols)4 To open the peek-a-boo window:
- Pull upwards on the window flap until it is fully opened. - To secure the position, roll up the window flap and loop the toggle through the elastic cord to keep it in place.
TRAY & CUPHOLDER
natural_image
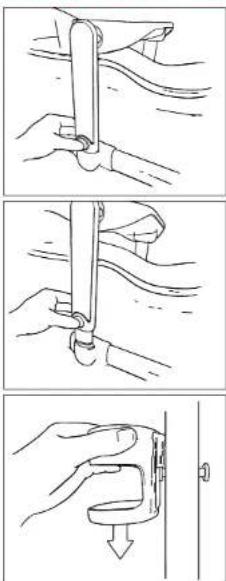
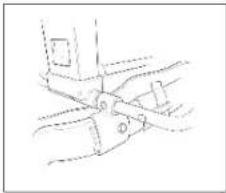
Three-step line drawing showing hand positioning and tool insertion (no text or symbols)1. To attach the tray:
- Assemble the tray by attaching the 2 vertical posts to each side of the tray. - Locate tray attachment points on frame. If there are caps on the attachment points, remove and store them away. - Insert the tray posts at attachment points until CLICK is hear.
- To remove the tray: Press on the buttons located on side posts and pull to release the tray.
3. To attach cupholder:
- Slide the cupholder into attachment points located on the handle bar. - Push the cup holder in a downward motion to secure in place. - Push the cup holder in a downward motion to secure in place.

babyGO
natural_image
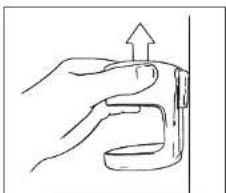
Line drawing of a hand pressing down on a mechanical component with an upward arrow (no text or symbols)- To remove the cupholder: Pull the cupholder in an upward motion to release.
HARNESS
natural_image
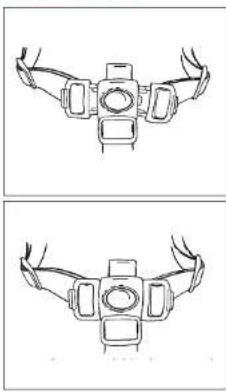
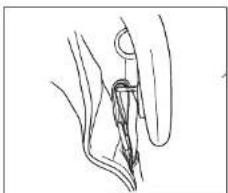
Two identical line drawings of a camera frame with no text, numbers, or symbolsBefore placing your child in the wagon, press the brake pedal down until it clicks into the locked position.
- Position your child in the wagon and place the crotch belt between their legs.
- Fasten both waist belts to the buckle on each side of the crotch belt until you hear a CLICK on both sides.
- Ensure the buckle is away from your child's skin to avoid a pinch when securing the buckle.
- Tighten the waist belt so that the harness is snug against your child.
- To tighten the waist belt, feed the anchored end of the waist belt upthrough the buckle to form a loop. Pull the free end of the waist belt.
- To loosen the waist belt, feed the free end of the waist belt up through the buckle to form a loop. Enlarge the loop by pulling on the end of the loop toward the buckle. Pull the anchored end of the waist belt to shorten the free end of the waist belt. Repeat this step to loosen the other waist belt.
IMPORTANT: CHECK AND ENSURE THE HARNESS IS SECURELY ATTACHED BY PULLING IT AWAY FROM YOUR CHILD; THE RESTRAINT SYSTEM SHOULD REMAIN SECURELY FASTENED.
COZY RIDER
BRAKES
natural_image
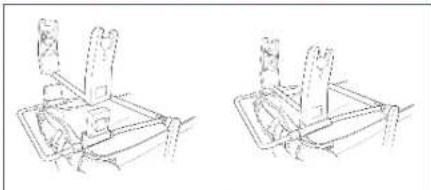
Four sequential line drawings of a robotic arm and a pelvic prosthetic leg, showing mechanical assembly (no text or symbols)1. To engage brakes:
- Apply a light downward pressure on the bottom section of the linked brake lever located in the middle of the rear wheel axle.
- Check to make sure the brakes are in a fully locked position. The wagon should not move when pushed.
2. To release brakes:
- Apply a light downward pressure on the top section of the linked brake lever located in the middle of the rear wheel axle.

babyGO
COZY RIDER
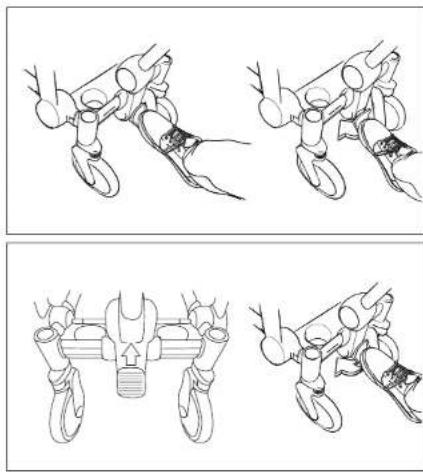
FIX THE BRAKES HOW TO FOLD
natural_image
Technical line drawing of a mechanical bracket assembly (no text or symbols)
natural_image
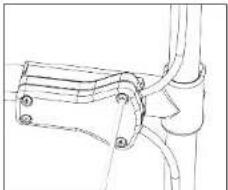
Technical line drawing of a mechanical bracket or clamp assembly (no text or symbols)- Use the cross screw to open the cap.
- Fix the screw toward A direction properly.

natural_image
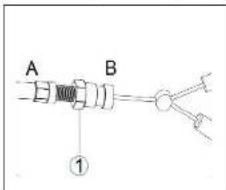
Technical line drawing of a mechanical joint or connector assembly (no text or symbols)- Replace the wire back, position as above showing.
natural_image
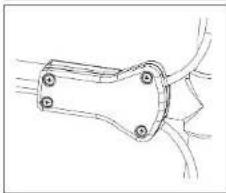
Technical line drawing of a mechanical clamp or bracket assembly (no text or symbols)- Screw the cap properly.

natural_image
Line drawing of a hand holding a mailbox (no text or symbols)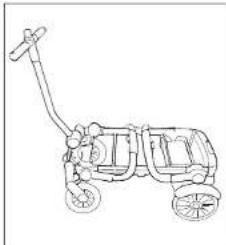
natural_image
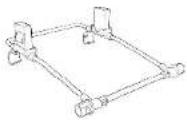
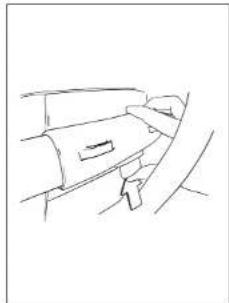
Line drawing of a vehicle chassis with wheels and a handle (no text or symbols)- Remove any accessories attached to the wagon, including the canopy and snack tray.
- Locate the release button below each seat back.
- Push the buttons to release the seat back and push downwards.
natural_image
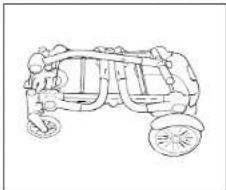
Line drawing of a vehicle chassis with wheels and suspension components (no text or symbols)- Pull the knob to release the handle bar and push downward.
UPRIGHT STORAGE
natural_image
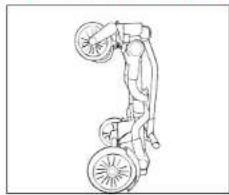
Line drawing of a person riding a bicycle with two wheels (no text or symbols)- To store you wagon upright, place on a hard and flat surface when using the standing storage position.

babyGO
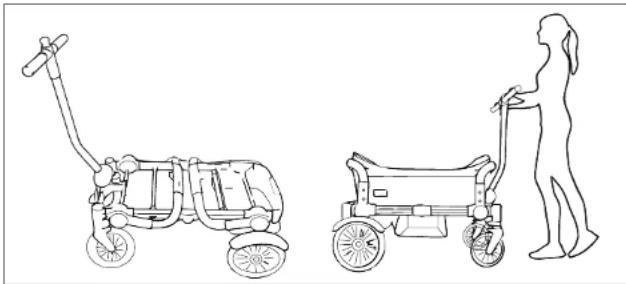
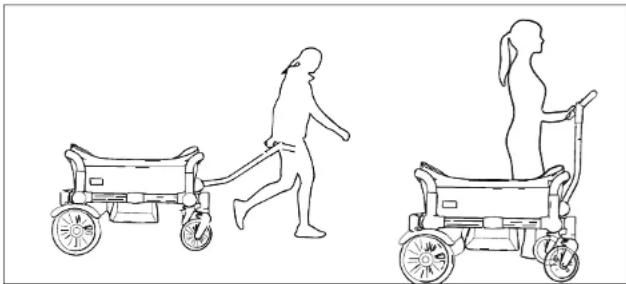
PUSH AND PULL MODES
natural_image
Line drawing of a child pushing a small wheeled cart with a long pole, alongside an adult figure (no text or symbols)Push mode: To set the wagon in push mode, pull the knob and lock the handle upright.
natural_image
Line drawing of two children in stroller-like mobility poses, one pulling a cart and the other standing with a girl (no text or symbols)Pull mode: To set the wagon in pull mode, pull the knob to unlock and drop the handle.
COZY RIDER
CAR SEAT ADAPTER
(SOLD SEPARATELY)
IMPORTANT
This product has been tested to EN1888 Never leave the child unattended.

- Never leave children unattended. Failure to follow these warnings and instructions could result in serious injury or death.
- Never use infant car seat adapter as a handle to lift the wagon.
- Never place infant in the car seat before you have firmly attached the car seat to the wagon.
- Never remove the infant car seat from the wagon frame with the infant in the car seat.
- Always verify that the car seat adapter is correctly installed and firmly secured into the wagon before installing an infant car seat.
- Weight limitations: this product is recommended only for instants within the height and weight limits of the infant car seats specified in the car seat manual.
- Always use infant car seat restraint system and harness as recommended by the car seat manufacturer.
- Please review these instructions carefully to ensure the safety of your child when installing the car seat adapter. If any hardware is missing or becomes lost, please do not use!

babyGO
MAINTENANCE
- Wipe with a damp cloth and let dry.
- For a more thorough cleaning, rinse with a hose or hand wash with a mild detergent and dry thoroughly.
- Do not use abrasives. Do not put in dishwasher.
COMPATIBILITY
This car seat adapter is compatible with infant car seat brands listed below:
- babyGO
- Maxi Cosi
• Cybex
• Clek
• Nuna
PARTS


COZY RIDER
ASSEMBLY

natural_image
Simple line drawing of a mechanical frame or support structure (no text or symbols)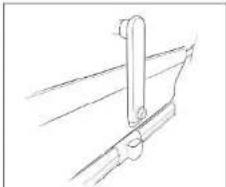
natural_image
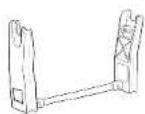
Pure technical line drawing of a mechanical bracket or support structure without any text, numbers, or symbols1.
Attach both of the posts of (A) to part (B).
- Once posts are attached, insert posts into port plugs until CLICKI is heard. Please ensure that all accessory port plugs have been removed.
ATTACH ADAPTER TO WAGON
natural_image
Two technical line drawings of mechanical components or brackets, no text or symbols present- Attach part (C) to the assembled car seat adapter until CLICK! is heard.
natural_image
Pure mechanical diagram showing hands operating a bracket (no text or symbols)- Secure the two clips over the seat back of the wagon. Ensure the clips are firmly secured until CLICK! is heard.

babyGO
natural_image
Line drawing of a two-wheeled toy car with wheels and a handle (no text or symbols)FR INSTRUCTIONS
Chers parents,
natural_image
Line drawing of a vehicle's rear wheel assembly (no text or symbols)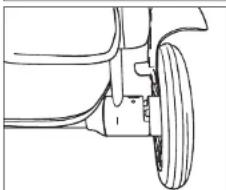
natural_image
Line drawing of a mechanical component with a central wheel and side ribs (no text or symbols)natural_image
Pure mechanical diagram showing a gear or cam mechanism without any text, numbers, or symbols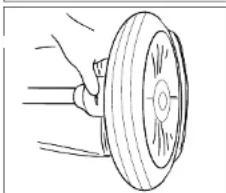
natural_image
Line drawing of a car tire being held by a hand (no text or symbols)natural_image
Line drawing of hands holding a bicycle tire, no text or symbols present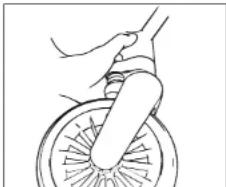
natural_image
Line drawing of a hand gripping a bicycle wheel (no text or symbols)natural_image
Top-down schematic of a vehicle or mechanical component with no visible text, numbers, or symbols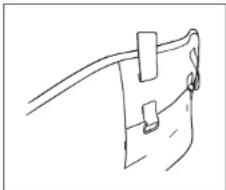
natural_image
Simple line drawing of a cable or clamp with two clips attached to a bag (no text or symbols)
babyGO
COZY RIDER
natural_image
Line drawing of a medical procedure with surgical instrument (no text or labels)
natural_image
Line drawing of a hand holding a cylindrical object with a strap (no text or symbols)natural_image
Three-step line drawing of a person's seatbelt device, showing front, side, and back views (no text or symbols)natural_image
Line drawing of a backpack and seat (no text or symbols)natural_image
Three-step line drawing showing hand positioning and tool manipulation (no text or symbols)natural_image
Line drawing of a hand pressing down on a curved object with an upward arrow (no text or symbols)natural_image
Line drawing of a mechanical component with no visible text or symbolsnatural_image
Two identical line drawings of a robotic arm with hooks and legs, no text or symbols present.natural_image
Line drawings of two mechanical components, one with handle and neck, the other with legs and feet (no text or symbols)natural_image
Technical line drawing of a mechanical joint or bracket assembly (no text or symbols)
natural_image
Technical line drawing of a mechanical bracket or clamp assembly (no text or symbols)natural_image
Technical line drawing of a mechanical joint or connector assembly (no text or symbols)natural_image
Technical line drawing of a mechanical clamp or bracket assembly (no text or symbols)natural_image
Simple line drawing of a vehicle or vehicle interior with no text, numbers, or symbols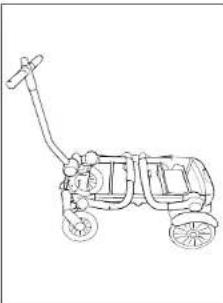
natural_image
Line drawing of a wheeled cart with wheels and a handle (no text or symbols)natural_image
Line drawing of a vehicle chassis with wheels and structural components (no text or symbols)natural_image
Line drawing of a person riding a bicycle with two wheels (no text or symbols)natural_image
Line drawing of a child pushing a small wheeled cart with a long pole, alongside an adult figure (no text or symbols)natural_image
Line drawing of two people in a shared electric scooter, one pulling a cart and the other standing upright (no text or symbols)natural_image
Technical line drawings of mechanical components with no visible text or symbolsCOZY RIDER
INSTRUCTIONS DE MONTAGE
natural_image
Simple line drawing of a mechanical frame or support structure (no text or symbols)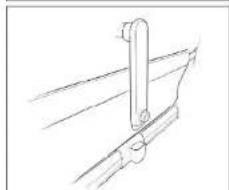
natural_image
Pure technical line drawing of a mechanical bracket or support structure without any text, numbers, or symbolsnatural_image
Two technical line drawings of a mechanical bracket or support structure (no text or symbols)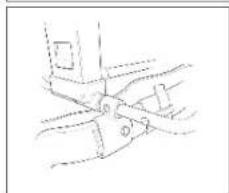
natural_image
Pure mechanical diagram showing hands operating a bracket with no text or symbolsnatural_image
Line drawing of a two-wheeled toy car with wheels and a handle (no text or symbols)NL INSTRUCTIES
Beste ouders,
natural_image
Technical line drawing of a mechanical component with a central tire and curved body (no text or symbols)natural_image
Line drawing of a mechanical component with a central wheel and side flange (no text or symbols)natural_image
Pure mechanical diagram showing a gear or cam mechanism without any text, numbers, or symbolsnatural_image
Line drawing of a car tire with a hand operating the wheel (no text or symbols)natural_image
Line drawing of a hand holding a bicycle wheel, no text or symbols present
natural_image
Line drawing of a hand gripping a bicycle wheel (no text or symbols)natural_image
Line drawing of a medical procedure with surgical instrument (no text or labels)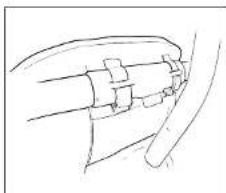
natural_image
Line drawing of a hand holding a cylindrical object with a strap (no text or symbols)natural_image
Three-step line drawing of a person's seatbelt device, showing front, side, and back views (no text or symbols)1 Om de kap te bevestigen:
natural_image
Line drawing of a scooter seat with a canopy and seatbelt (no text or symbols)natural_image
Line drawing of a backpack and seat (no text or symbols)natural_image
Three-step line drawing showing hand positioning and tool insertion (no text or symbols)natural_image
Line drawing of hands using a tool to lift or adjust a cylindrical object (no text or symbols)natural_image
Line drawing of a hand pressing down on a curved object with an upward arrow (no text or symbols)natural_image
Line drawing of a mechanical device with no visible text or symbolsnatural_image
Two identical line drawings of a robotic arm with hooks and legs, no text or symbols present.natural_image
Line drawings of two mechanical components, one with handle and neck, the other with feet and legs (no text or symbols)- Om de remmen los te maken:
natural_image
Technical line drawing of a mechanical joint or bracket assembly (no text or symbols)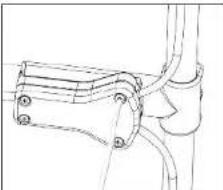
natural_image
Technical line drawing of a mechanical bracket or clamp assembly (no text or symbols)natural_image
Technical line drawing of a mechanical joint or connector assembly (no text or symbols)natural_image
Technical line drawing of a mechanical clamp or bracket assembly (no text or symbols)- Draai de dop stevig vast.
natural_image
Simple line drawing of a vehicle or vehicle interior with no text, numbers, or symbols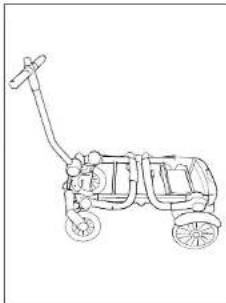
natural_image
Line drawing of a wheeled cart with wheels and a handle (no text or symbols)natural_image
Line drawing of a vehicle chassis with wheels and structural components (no text or symbols)natural_image
Line drawing of a person riding a bicycle with two wheels (no text or symbols)natural_image
Line drawing of a child pushing a wheeled cart with a long pole, alongside an adult figure (no text or symbols)natural_image
Line drawing of two people in a rowing cart, one walking and the other sitting on a stroller (no text or symbols)

- COZY RIDER
- Um das Verdeck anzubringen:
- Um das Tablett anzubringen:
- EN INSTRUCTION MANUAL
- IMPORTANT
- READ CAREFULLY AND KEEP THESE INSTRUCTIONS FOR FUTURE REFERENCE
- babyGO
- stroller.
- WARRANTY
- No warranty is given if:
- MAINTENANCE
- CLEANING
- FENDERS
- To attach fenders:
- REAR WHEELS WAGON FABRIC
- FRONT WHEELS
- To attach your wagon seat to the frame:
- After securing the velcro loops:
- To remove the wagon fabric:
- To attach the canopy:
- To open the peek-a-boo window:
- To attach the tray:
- To attach cupholder:
- To engage brakes:
- To release brakes:
- FIX THE BRAKES HOW TO FOLD
- UPRIGHT STORAGE
- CAR SEAT ADAPTER
- (SOLD SEPARATELY)
- COMPATIBILITY
- 1.
- FR INSTRUCTIONS
- INSTRUCTIONS DE MONTAGE
- NL INSTRUCTIES
- Om de kap te bevestigen:
Brand : BabyGO
Model : Cozy Rider
Category : Stroller