
Levels - High chair BabyGO - Free user manual and instructions
Find the device manual for free Levels BabyGO in PDF.

| Brand | BabyGO |
| Model | Levels |
| Category | High chair for children |
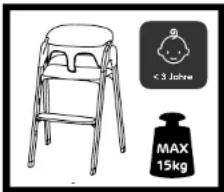
| Usage | Child from 6 to 36 months capable of sitting without assistance, max weight 15 kg |
| Safety standard | EN14988:2017+A1:2020 |
| Materials | Steel (tubes), leatherette (cover), plastic |
| Adjustments | Adjustable footrest on 5 positions, adjustable tray on 2 positions, adjustable safety harness |
| Folding | Yes, with unlocking buttons |
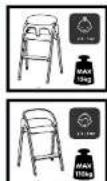
| Adult mode | Convertible into adult chair (max weight 110 kg) |
| Maintenance | Clean with a soft dry or slightly damp cloth; do not wash the cushions |
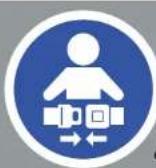
| Safety | 5-point restraint system, adult supervision mandatory, do not use if the child cannot sit alone |
| Warranty | 12 months from the date of purchase |
| Spare parts | Screws, tubes, backrest, seat, tray, footrest, cover, safety harness |
| Repairability | Repairs possible with original parts approved by the manufacturer |
Frequently Asked Questions - Levels BabyGO
User questions about Levels BabyGO
0 question about this device. Answer the ones you know or ask your own.
Ask a new question about this device
Download the instructions for your High chair in PDF format for free! Find your manual Levels - BabyGO and take your electronic device back in hand. On this page are published all the documents necessary for the use of your device. Levels by BabyGO.
USER MANUAL Levels BabyGO
natural_image
Abstract logo design with a stylized lowercase 'b' inside a cloud-like outline (no text or symbols)LEVELS STEEL
Levels
MONTAGEANLEITUNG
Levels
ASSEMBLY INSTRUCTIONS
Levels
MANUEL D'INSTRUCTIONS
Levels
HANDLEIDING

babyGO
BabyGo Baby Products GmbH
Am Bahndamm 1-3
natural_image
Line drawing of a four-legged stool with a seat and handle (no text or symbols)DE MONTAGEANLEITUNG
Liebe Eltern.
natural_image
Line drawing of a three-legged tool with adjustable arms and legs (no text or symbols)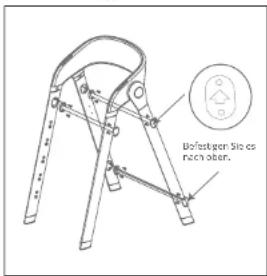
natural_image
Line drawing of a tripod-mounted device with a bucket and handle (no text or symbols)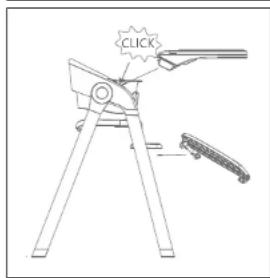

natural_image
Technical line drawing of a mechanical clamp or lever assembly (no text or symbols)LEVELS STEEL
natural_image
Diagram of a mechanical linkage or connector with red directional arrows indicating movement (no text or symbols)BABYSITZ ENTFERNT
natural_image
Line drawing of a four-legged stool with a seat and handle (no text or symbols)EN
INSTRUCTION MANUAL
Dear Parents:
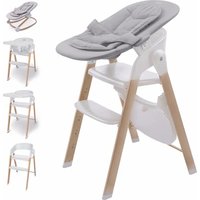
Thank you for purchasing this high chair.
Please read and familiarize yourself with this manual before using the child high chair.
WARNING! Read the instruction manual carefully before use and keep it for future reference.
LEVELS STEEL
IMPORTANT
PLEASE READ THIS INSTRUCTION MANUAL CARE- FULLY AND KEEP IT FOR FUTURE REFERENCE.
• European Standard: EN14988:2017+A1:2020 (27/10/2023)
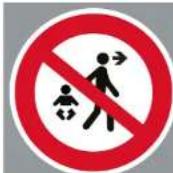
- Ensure the child is always supervised and never left unattended.
- Use the restraint system in high chairs to prevent falls.
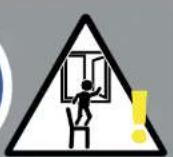
- Avoid climbing risks by keeping the product away from objects that a child could climb.
- Ensure all components are properly fitted and adjusted before use.
- Be cautious of open fires and strong heat sources near the product.
- Be aware of tilting risks if the child can push against structures with their feet.
• Regularly inspect the product for security and stability.
- Ensure harnesses are correctly fitted.
- Do not move or lift the product with the child inside.
• Use the product only when the child can sit unaided.
- Keep children away during assembly and disassembly to prevent injuries.
- The high chair is suitable for children who can sit unaided up to 3 years or a maximum of 15kg .
- Do not use the product if any parts are broken, torn, or missing.
- Keep the product away from windows to prevent the risk of falling.
- Use only accessories or replacement parts approved by the manufacturer.
- Follow the manual to ensure child safety; misuse may compromise safety.
- Ensure all users are familiar with how to operate the chair properly.
- The product should be used on flat, stable ground to prevent overturning; do not overload the tray.
- Keep the chair clean, dry, and stored in a cool, dry environment.
- Clean with a soft cloth and avoid direct sunlight to prevent aging and fading.
- Regularly check and repair any loose or missing parts, such as shrapnel and screws.
• Falling hazard: Prevent your child from climbing on the product.

babyGO
HIGH CHAIR WARNINGS
• Always ensure the child is securely fastened in the chair; never leave them unattended.
• This product is designed for children aged 6 to 36 months.
- The safety belt must be used when the child is seated in the chair to prevent falls or sliding.
- Do not use this product until your baby can sit up independently.
- Avoid removing or adjusting any parts of the chair while your baby is seated in it.
• This product is intended for children who can
sit up unaided, up to 3 years old or a maximum weight of 15 kg.
- Ensure children are kept at a safe distance during the unfolding and folding of the product to prevent injuries.
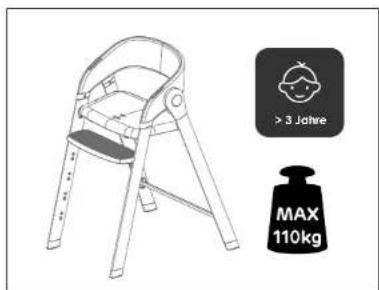
ADULT CHAIR WARNINGS
- Do not use this product for babies unable to sit independently.
- Avoid removing or adjusting any part of the chair while your baby is seated in it.
• This product is designed for children over 3 years old or with a maximum weight of 110kg. - Ensure children are kept at a safe distance when unfolding and folding the product to prevent injury.
- Position the product away from windows to prevent the risk of falls or strangulation hazards from blind or curtain cords.
- Ensure all assembly fittings are securely tightened at all times.
- Use only manufacturer-approved spare parts for replacements or repairs.
- When used as seating, the restraint system must be removed, hidden, or covered as applicable to ensure safety.

• Damage Inspection: Regularly inspect the chair for cracks, splinters, loose parts, or other visible damage. Ensure that all connecting elements are secure and stable
- Screws and Nuts: Check the screws and nuts of the high chair to ensure they are tightly fastened. Loose or loosened connections can compromise the stability of the chair.
- Adjustable Parts: If the high chair has adjustable parts, such as the seat or footrest, make sure they function properly and securely lock in place.
- Straps and Safety Belts: If the high chair has straps or safety belts, regularly check them for tears, wear, or damage. Ensure they function correctly to keep your child safe.
- Paint or Surface Treatment: Examine the paint or surface treatment of the high chair for signs of wear or damage. Any damage should be repaired promptly to protect the wood from moisture or other harm.
CLEANING
The chair should be cleaned with a clean and dry cloth. In case of more serious stains you can use a slightly damp, though not soaking, clean cloth.
*Do not wash the cushions.
WARRANTY
The warranty period starts from the date of purchase and is valid for a period of 12 months. The warranty is only applicable to the original owner and is not transferable. The warranty is only applicable to products that have not been adapted by the user. In the case of any defects, the owner is required to return the product to the retailer. If the retailer can not solve the problem, he must return the product, complete with a clear description of the complaint and a validated purchase receipt to the manufacturer. Exchanger or return can not be demanded. Repairs do not constitute an extension to the warranty term. The manufacturer is not liable for any damages other than those on products supplied.
No warranty is given if:
• The product is not supplied complete with the validated purchase receipt to the manufacturer.
- Defects are caused by misuse or maintenance which differ from that indicated in the instruction manual.
• Repairs are carried out by third parties.
• Defects are caused by neglect.
• Damage or removal of any serial number is found.
• If there is normal wear and tear which may be expected from everyday use.
- The stated warranty terms and conditions have not been satisfied.

babyGO
LEVELS STEEL
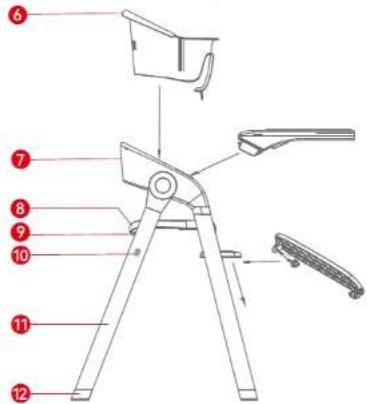
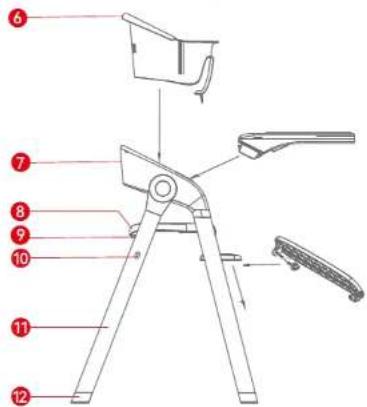
PARTS
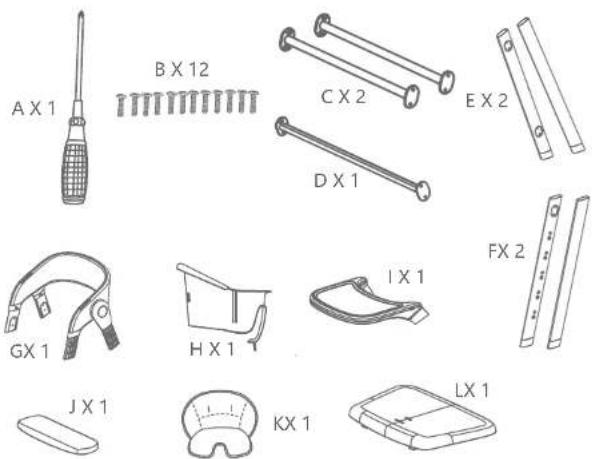
A. Screwdriver
B. Screws(for tubes)
C. Supporting Tubes (under the seat)
D. Rear Supporting Tube
E. Rear Leg Tubes
F. Front Leg Tubes
G. Backrest
H. Baby Seat
- Tray
J. Footrest
K. Leather Case
L. Seat Plate
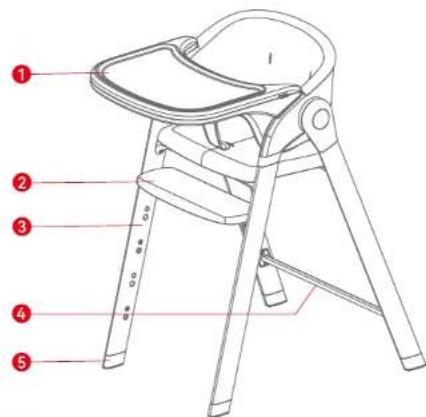
- Tray
- Footrest
- Front leg tub
- Rear support
tube - Front foot
- Baby seat
- Backrest
- Seat Plate
- Fold button
- Tray hook
- Back leg tube
- Back foot

babyGO
INSTALLATION
natural_image
Line drawing of a three-legged tool with metal handles and a curved handle (no text or symbols)
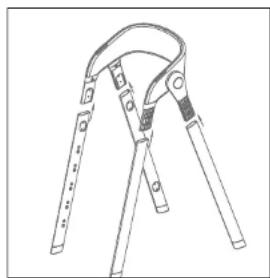
LEG TUBE INSTALLATION
-
Insert 2 front leg tubes and 2 rear leg tubes into the corresponding connectors at backrest. Next insert 4 screws into the corresponding holes in the direction of the arrow(screws B are installed on the front leg tubes and screws C are installed on the rear leg tubes). At last tighten the screws and fix them.
-
Place the 3 supporting tubes on the corresponding hole of the leg tube, as shown by arrow. Then fasten 3 tubes with screws (for tubes).
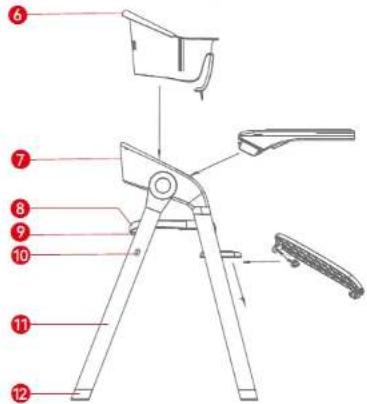
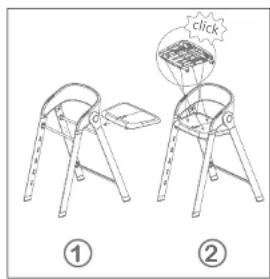
BOTTOM SEAT INSTALLATION
- Fasten the seat plate to the support tube
natural_image
Line drawing of a tripod-mounted device with a bucket and handle (no text or symbols)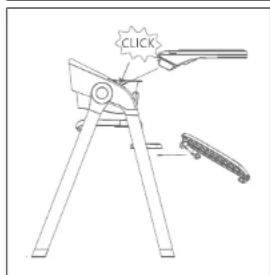
natural_image
Technical line drawing of a mechanical clamp or lever assembly (no text or symbols)LEVELS STEEL
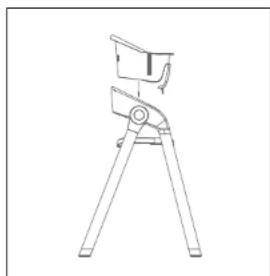
- Buckle the baby seat into the backrest and the seat plate.
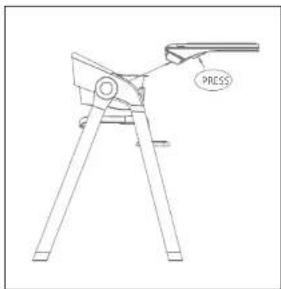
FOOTREST AND TRAY INSTALLATION
- Insert the tray into the corresponding hole, once you hear a _click, the tray is correctly fitted and locked
Insert the footrest into the hole on the inside of the front leg tube. Then fix the footrest with two screws. The footrest can be adjusted with 5 positions.
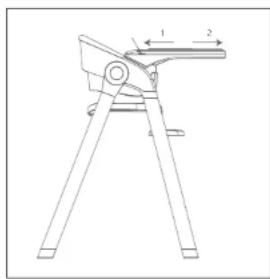
- Press the buttons on the both sides of the plate simultaneously, which can be adjusted in 2 positions.

babyGO
LEVELS STEEL
WARNING: CHILDREN MUST SAFTEY HARNESS WHEN USING CHAIR!
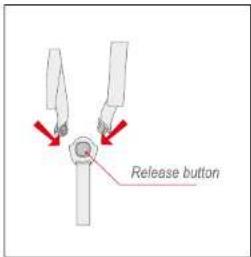
USE OF THE SAFETY BELT
- Insert the plug into the buckles until hear click: Press the buckles of harness to open it.
natural_image
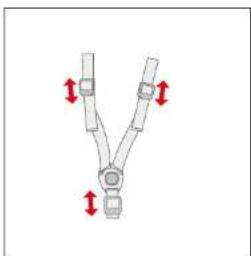
Diagram of a mechanical linkage or connector with red directional arrows indicating movement (no text or symbols)SEAT BELT LENGTH ADJUSTMENT
- The seat belt has an adjustable buckle to adjust the length of the seat belt according to the height of the child.
REMOVESAFETY BELT
TRAY REMOVED
- Press the two buttons on both sides of the bottom of the tray, then remove it upward.
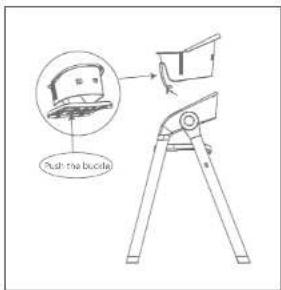
BABY SEAT REMOVED
- Push the buckle at the bottom of the seat forward and upward, then lift the baby seat upward.

babyGO
FOLDING
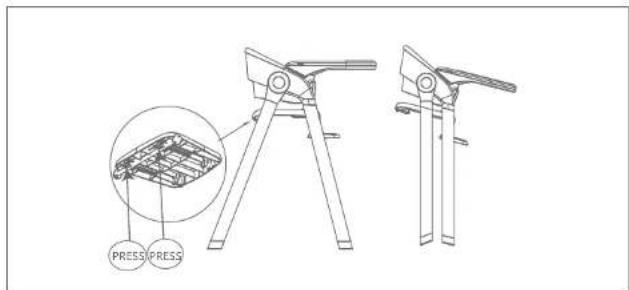
- Press the both buttons on the bottom of the seat simultaneously, then fold the rear leg tube forward.
ADJUSTING THE FEET
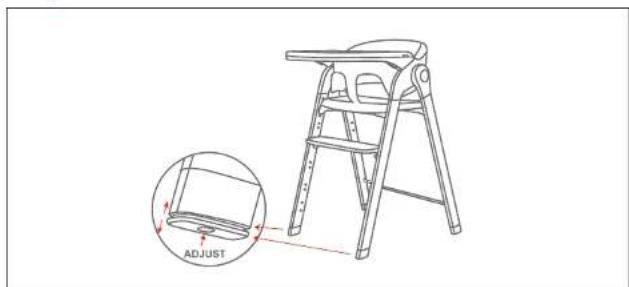
- You can adjust the front chair legs in height using the screw. This allows the chair to adapt optimally to uneven floors and prevents wobbling. Simply loosen or tighten the screws to set the desired height.
LEVELS STEEL
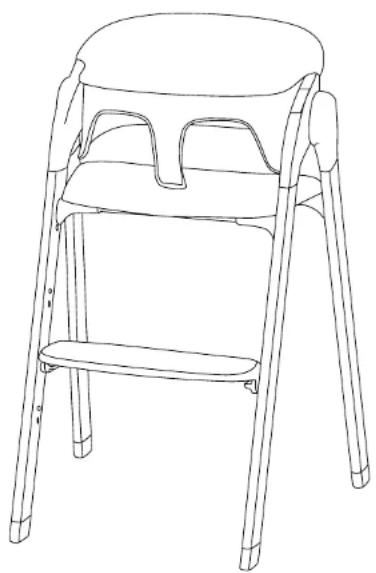
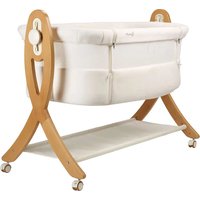
ADULT CHAIR/CHILD CHAIR MODE
- This is the mode of the adult chair/child chair. Reverse operation to return to high chair mode.

babyGO
natural_image
Line drawing of a four-legged stool with a seat and handle (no text or symbols)FR
MANUEL D'INSTRUCTIONS
Chers parents,

natural_image
Line drawing of a three-legged tool with adjustable arms and legs (no text or symbols)INSTALLATION DES TUBES DE JAMBE
natural_image
Line drawing of a tripod-mounted device with a bucket and handle (no text or symbols)natural_image
Technical line drawing of a mechanical device with labeled parts (no text or symbols)natural_image
Diagram of a mechanical linkage or connector with red directional arrows indicating movement (no text or symbols)AJUSTEMENT DE LA LONGUEUR DE LA CEINTURE DE SÉCURITÉ
natural_image
Line drawing of a four-legged stool with a seat and handle (no text or symbols)NL HANDLEIDING
Beste ouders:
KINDERSTOEL WAARSCHUWINGEN

natural_image
Line drawing of a three-legged tool with adjustable arms and legs (no text or symbols)INSTALLATIE VAN DE POOTBUIS
natural_image
Line drawing of a tripod-mounted device with a bucket and handle (no text or symbols)

natural_image
Technical line drawing of a mechanical clamp or lever assembly (no text or symbols)natural_image
Diagram of a mechanical linkage or connector with red directional arrows indicating movement (no text or symbols)AANPASSING VAN DE LENGTE VAN DE VEILIGHEIDSGORDEL
natural_image
Line drawing of a four-legged stool with a seat and handle (no text or symbols)DNK
BRUGSANVISNING
Kære forældre:
natural_image
Line drawing of a three-legged tool with adjustable arms and legs (no text or symbols)MONTERING AF BENR∅RET
natural_image
Line drawing of a tripod-mounted device with a bucket and handle (no text or symbols)natural_image
Technical line drawing of a mechanical device with tripod base and lever mechanism (no text or symbols)natural_image
Diagram of a mechanical linkage or connector with red directional arrows indicating movement (no text or symbols)JUSTERING AF SIKKERHEDSSELENES LÆNGDE
BABYSÆDET FJERNET
- LEVELS STEEL
- MONTAGEANLEITUNG
- ASSEMBLY INSTRUCTIONS
- MANUEL D'INSTRUCTIONS
- HANDLEIDING
- babyGO
- DE MONTAGEANLEITUNG
- BABYSITZ ENTFERNT
- EN
- INSTRUCTION MANUAL
- IMPORTANT
- PLEASE READ THIS INSTRUCTION MANUAL CARE- FULLY AND KEEP IT FOR FUTURE REFERENCE.
- HIGH CHAIR WARNINGS
- ADULT CHAIR WARNINGS
- CLEANING
- WARRANTY
- No warranty is given if:
- LEG TUBE INSTALLATION
- BOTTOM SEAT INSTALLATION
- FOOTREST AND TRAY INSTALLATION
- WARNING: CHILDREN MUST SAFTEY HARNESS WHEN USING CHAIR!
- USE OF THE SAFETY BELT
- SEAT BELT LENGTH ADJUSTMENT
- REMOVESAFETY BELT
- TRAY REMOVED
- BABY SEAT REMOVED
- FR
- INSTALLATION DES TUBES DE JAMBE
- AJUSTEMENT DE LA LONGUEUR DE LA CEINTURE DE SÉCURITÉ
- NL HANDLEIDING
- KINDERSTOEL WAARSCHUWINGEN
- INSTALLATIE VAN DE POOTBUIS
- AANPASSING VAN DE LENGTE VAN DE VEILIGHEIDSGORDEL
- DNK
- BRUGSANVISNING
- MONTERING AF BENR∅RET
- JUSTERING AF SIKKERHEDSSELENES LÆNGDE
- BABYSÆDET FJERNET
Brand : BabyGO
Model : Levels
Category : High chair