
Harmony - Stroller BabyGO - Free user manual and instructions
Find the device manual for free Harmony BabyGO in PDF.

| Product Type | Stroller |
| Brand | BabyGO |
| Model | Harmony |
| Maximum child weight | 22 kg (up to 4 years) |
| Maximum bassinet weight | 9 kg (0 to 6 months) |
| Maximum basket weight | 5 kg |
| Recommended age | From birth to 4 years |
| Safety standards | EN1888-1:2018+A1:2022, EN1888-2:2018+A1:2022, EN1466:2014+AC:2015 |
| Seat orientation | Reversible (forward or rear-facing) |
| Harness | 5-point restraint system with shoulder pads |
| Brake | Rear pedal brake |
| Front wheels | Swivel with directional lock |
| Rear wheels | Fixed |
| Backrest | Adjustable to 3 positions |
| Footrest | Height adjustable |
| Handle | Height adjustable |
| Folding | Compact, one-hand possible |
| Care and cleaning | Clean with mild soap and brush; do not wash the stroller |
| Warranty | 12 months (non-transferable) |
| Included parts | Canopy, front bar, basket, bassinet (depending on version), seat |
Frequently Asked Questions - Harmony BabyGO
User questions about Harmony BabyGO
0 question about this device. Answer the ones you know or ask your own.
Ask a new question about this device
Download the instructions for your Stroller in PDF format for free! Find your manual Harmony - BabyGO and take your electronic device back in hand. On this page are published all the documents necessary for the use of your device. Harmony by BabyGO.
USER MANUAL Harmony BabyGO
natural_image
Abstract logo design with a stylized lowercase 'b' inside a cloud-like outline (no text or symbols)HARMONY
Kinderwagen
BEDIENUNGSANLEITUNG
Stroller
ASSEMBLY INSTRUCTIONS
Poussette
ASSEMBLY INSTRUCTIONS
Kinderwagen
ASSEMBLY INSTRUCTIONS

BabyGo Baby Products GmbH
Am Bahndamm 1-3
natural_image
Line drawing of a car's steering wheel and dashboard (no text or symbols)HARMONY
Seite 04 - 17
DEUTSCH
Page 18 - 31
ENGLISH
Page 32 - 45
FRANCE
Page 46 - 59
NEDERLANDS

babyGO

babyGO
natural_image
Line drawing of a baby stroller and two children's baskets (no text or symbols)- To ensure your baby is protected from accidental injury, please check and maintain the stroller regularly.
- Please use a brush cleaner to clean the seat fabric and use household soap or neutral detergent to clean other parts.
- Please do not store in direct sunlight or rain.
- Regularly check for loose screws, damaged parts, or broken stitching. If necessary, replace the damaged parts.
- Please use it according to the instruction manual carefully to avoid causing unnecessary damage.
CLEANING
Please note that the stroller should not be washed, but rather cleaned with mild cleaning agents. Use a brush cleaner for the seat fabric and household soap or neutral detergent for other parts. Avoid washing the stroller to prevent damage. Never use abrasive, ammonia based, bleach based or spirit type cleaners. Ensure the product is fully dry before use or storage.


HARMONY
TEILE
natural_image
Illustration of two hand positions (a and b) showing a wheel with a curved arrow indicating rotation or motion, no text or symbols present.natural_image
Line drawing of a baby stroller and two smaller household baskets (no text or symbols)EN INSTRUCTION MANUAL
Dear Parents:
Thank you for purchasing the stroller.
Please read and follow all instructions before using the stroller.
WARNING! Read the Instruction carefully before use and keep them for future reference.
HARMONY
IMPORTANT
READ CAREFULLY AND KEEP THESE INSTRUCTIONS FOR FUTURE REFERENCE
This product has been tested to EN1888-2:2018+A1:2022,
EN1888-1:2018+A1:2022 and EN1466:2014+AC:2015
Never leave the child unattended.

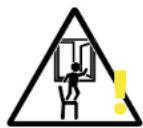
- Never leave your child unattended.
- Ensure that all locking devices are engaged before use.
- To avoid injury, ensure that your child is kept away when unfolding and folding this product.
- Do not let your child play with this product.
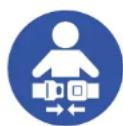
• Always use the restraint system. - Check that the pram body or seat unit attachment devices are correctly engaged before use.
• This product is not suitable for running or skating. - Lock the stroller when placing and removing the children.
- Regularly check for any visible breaks on the handle and the base.
- The carrycot is suitable for children aged 0-6 months up to 9kg.
- The maximum loading weight for the basket is 5kg.
- This baby stroller is designed and tested to be used with the carry-cot and seat unit.
- Do not use more than 1 mat in the carrycot. Do not use a mat thicker than 20mm.
- Any load attached to the handle, backrest, or sides of the vehicle will affect its stability.
- Do not carry more than one child in this baby stroller.

babyGO
- Any extra accessories are not allowed without the seller's permission; only use replacement parts supplied and approved by the manufacturer.
- This pram body is suitable for a child who cannot sit up unaided, roll over, or push itself up on its hands and knees. Maximum weight of the child: 9kg.
- This vehicle does not replace a cot or a bed. If your child needs to sleep, they should be placed in a suitable pram body, cot, or bed.
- Never use this product on a stand.
- Use only on a firm, horizontal, level, dry surface.
- Do not let other children play unattended near the carrycot.
- Do not use if any part of the carrycot is broken, torn, or missing.
- Do not place the carrycot near an open fire or other source of strong heat.
- Do not add another mattress on top of the mattress provided or recommended by the manufacturer.
- The vehicle is suitable for children up to 22 kg or 4 years old, whichever comes first.
HARMONY
WARRANTY
The warranty period starts from the date of purchase and is valid for a period of 12 months. The warranty is only applicable to the original owner and is not transferable. The warranty is only applicable to products that have not been adapted by the user. In the case of any defects, the owner is required to return the product to the retailer. If the retailer can not solve the problem, he must return the product, complete with a clear description of the complaint and a validated purchase receipt to the manufacturer. Exchanger or return can not be demanded. Repairs do not constitute an extension to the warranty term. The manufacturer is not liable for any damages other than those on products supplied.
No warranty is given if:
• The product is not supplied complete with the validated purchase receipt to the manufacturer.
- Defects are caused by misuse or maintenance which differ from that indicated in the instruction manual.
• Repairs are carried out by third parties.
• Defects are caused by neglect.
- Damage or removal of any serial number is found.
• If there is normal wear and tear which may be expected from everyday use.
- The stated warranty terms and conditions have not been satisfied.

babyGO
MAINTENANCE
MAINTENANCE
- To ensure your baby is protected from accidental injury, please check and maintain the stroller regularly.
- Please use a brush cleaner to clean the seat fabric and use household soap or neutral detergent to clean other parts.
- Please do not store in direct sunlight or rain.
- Regularly check for loose screws, damaged parts, or broken stitching. If necessary, replace the damaged parts.
- Please use it according to the instruction manual carefully to avoid causing unnecessary damage.
CLEANING
Please note that the stroller should not be washed, but rather cleaned with mild cleaning agents. Use a brush cleaner for the seat fabric and household soap or neutral detergent for other parts. Avoid washing the stroller to prevent damage. Never use abrasive, ammonia based, bleach based or spirit type cleaners. Ensure the product is fully dry before use or storage.


HARMONY
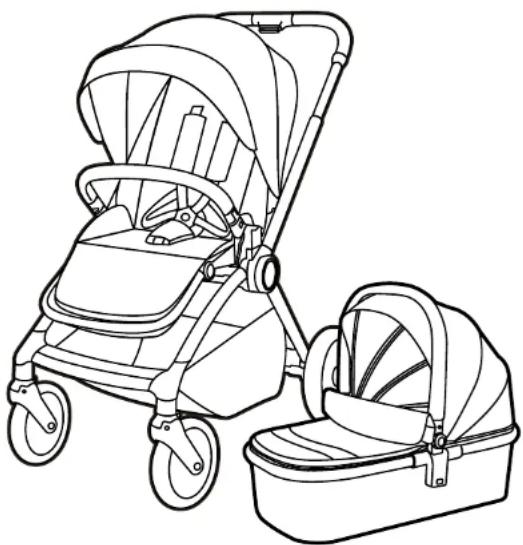
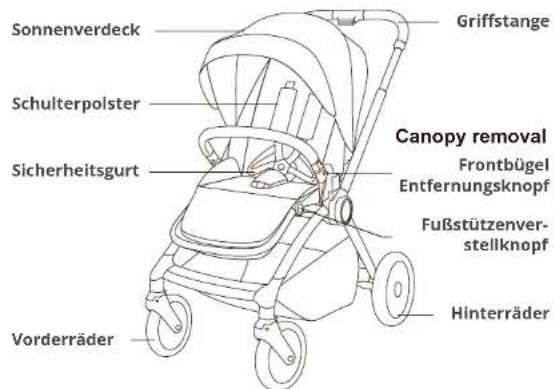
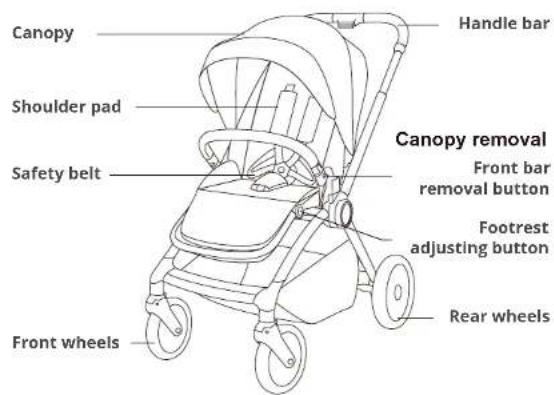
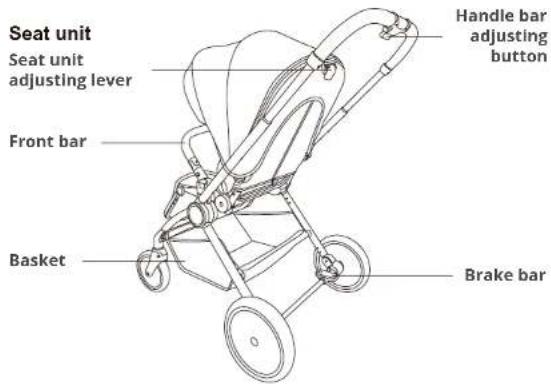
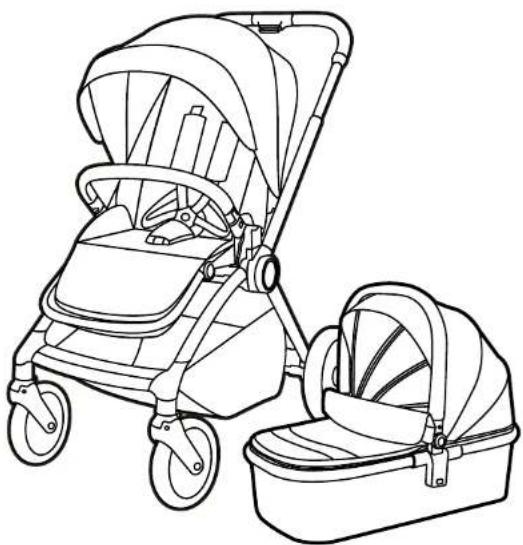
PARTS

babyGO
UNFOLDING AND INSTALLING
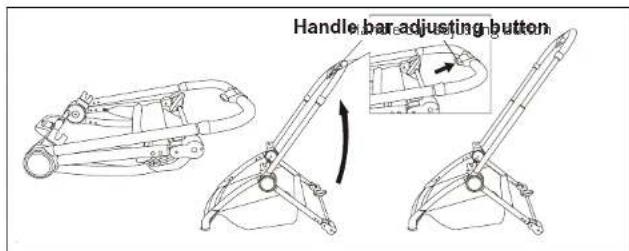
- Unfolding the chassis: As shown in the picture, hold the handlebar with one hand and lift upwards until you hear a click sound, indicating that the chassis is now securely locked in the upright position. Check the safety of the chassis. Press the button on the handlebar to adjust its height.
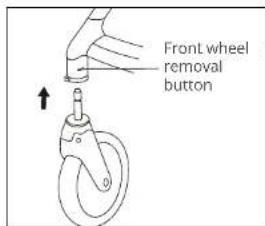
- Installing the front wheels: As shown in the picture, place the front wheels inside the front wheel bracket until you hear a "click," indicating the correct assembly. Follow the same installation method on the other side. When disassembling, press the button on the front wheels while pulling them outwards. Repeat the same disassembly method on the other side.
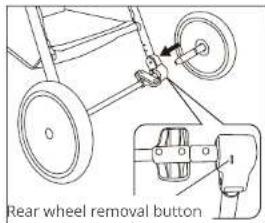
- Installing the rear wheels: As shown in the picture, place the rear wheels inside the rear wheel bracket until you hear a "click," Indicating the correct assembly. Follow the same Installation method on the other side. When disassembling, press the button on the rear wheels while pulling them outwards. Repeat the same disassembly method on the other side.
HARMONY
- Installing the front bar: As shown in the pictures, Insert the bumper bar connector into the socket of the bar until you hear a "click," indicating the correct installation. Press both sides of the removal button together to remove the front bar.
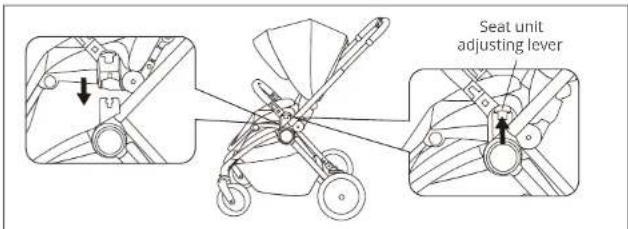
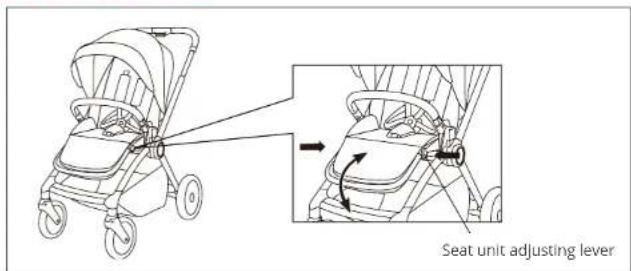
- Installing the seat unit: The seat unit can be installed facing both forward and backward directions. As shown in the picture: ensure that the fixed plugs on both sides are parallel before use. Then insert them separately into the corresponding fixed sockets on both sides, right and left, until you hear a "click," indicating the correct installation. If disassembly is necessary, pull the removal lever on both the left and right sides simultaneously. Then lift the seat unit upwards.

babyGO
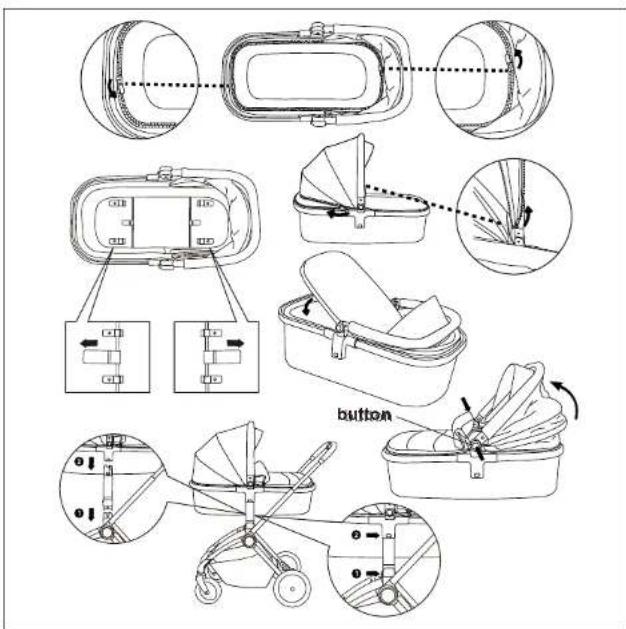
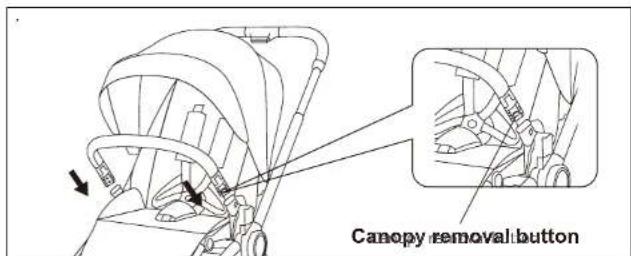
- Using the carrycot: Open the zipper inside the carrycot to expose the support rods. Extend them and ensure they are fixed at the bottom. Place the cotton pad inside. Press the adjustment buttons to open the canopy. Attach the carrycot adaptors to the frame and install the carrycot. Listen for a ,clicking' sound to confirm security. To remove, press the buttons on both sides and lift the carrycot. Remove the adaptor by pressing the adapter button and lifting it up.
ATTENTION:
- This product is only suitable for children who are not yet able to stand on their own.
- Only suitable for solid, horizontal, dry road surfaces.
• The child's head should be higher than their body in the carrycot. - Ensure the handle is in the correct position before carrying or lifting.
• The carrycot must be used in conjunction with the adaptors.
HARMONY
USE SAFETY BELT
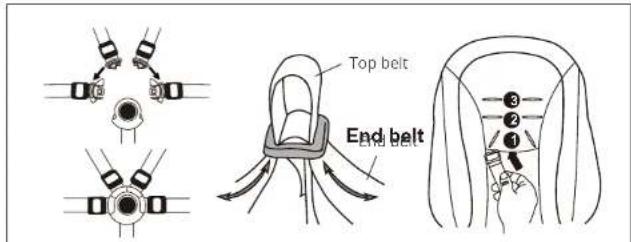
As shown in the picture, insert the safety button into the buckle socket until you hear a "click," indicating it's locked. Press the secondary safety button inward to release. Pull the plug outward to open it. For length adjustment, shorten the top ring belt, then lengthen the tail belt and lock it. For shoulder belt adjustment, fasten the seat belt. Pass the buckle through the front of the seat pocket to the back plate, ensuring the safety buckle lies flat against the back of the seat pocket. This secures the shoulder strap reliably to the seat pocket.
USE WHEELS
natural_image
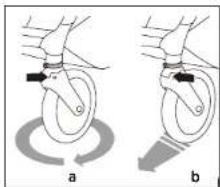
Illustration of two hand positions (a and b) showing a wheel with a curved arrow indicating rotation or motion, no text or symbols present.- Front wheels rotation: As depicted in the picture, pull the rotary button outward to enable free rotation of the wheel. For front wheel orientation, pull the rotary button inward to set the wheel in the desired orientation, as shown in the picture.
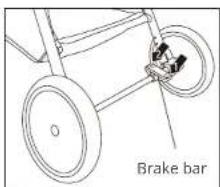
- Rear wheel brake: As shown in the picture, step on the brake bar to position "1" to engage the brake, indicating it's now locked. Step on the brake bar to position "2" to release the brake, allowing the stroller to move normally. Attention: When the stroller is stationary, it must be in the locked (braking) state.

babyGO
USE BACKREST ANGEL
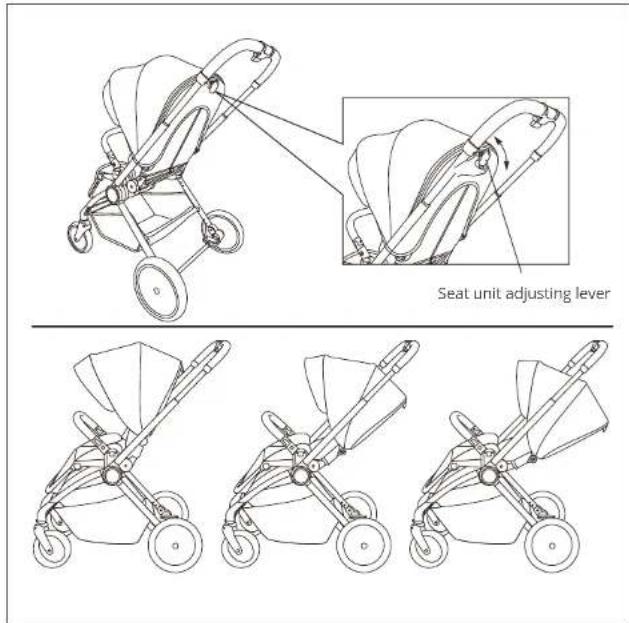
Backrest angle adjustment: As depicted in the picture, pull the angle adjustment lever up and down to adjust the backrest to three different angles.
HARMONY
USE HANDLE BAR

As the picture shown, pinching in the height adjusting button, then can adjust the handle bar height.
USE FOOTREST
As shown in the picture, simultaneously press the adjustment button to adjust the footrest up and down.

babyGO
HARMONY
FOLDING INSTRUCTION
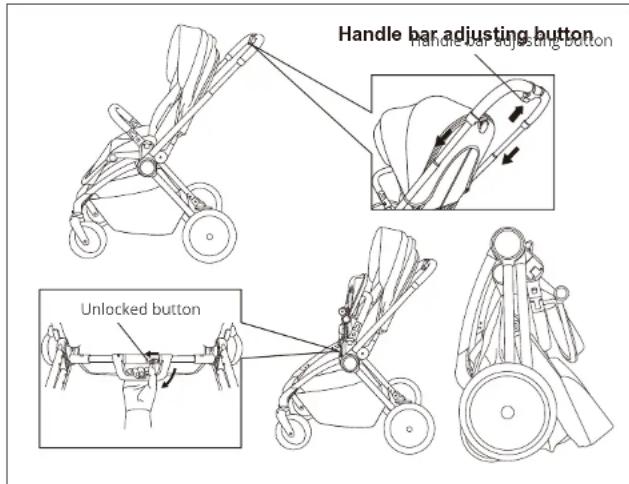
Forward folding: As shown in the picture, when the seat unit is used in the forward direction, pull the handlebar into the lowest position. Simultaneously push the footrest upwards. Unlock the button to the left with your thumb, hold the handle, and lift the stroller up at the same time. Then, the stroller can be folded.

Reverse folding: As shown in the picture, when the unit is used in the reverse direction, pull the handlebar into the lowest position. Simultaneously adjust the backrest level and fold the backrest forward. Unlock the button to the left with your thumb, and hold the handlebar while you open it. Lift up the stroller, and now you can put it away.

babyGO
natural_image
Line drawing of a stroller and baby box (no text or symbols)FR INSTRUCTIONS
Chers parents,
natural_image
Line drawing of a baby stroller with wheels and seat (no text or symbols)natural_image
Illustration of a hand using a wheelwheel to interact with a curved arrow, labeled (a) and (b), showing motion direction (no text or symbols beyond labels)natural_image
Line drawing of a baby stroller and two smaller household baskets (no text or symbols)NL INSTRUCTIES
Beste ouders,
natural_image
Illustration of two hand positions (a and b) showing a wheel with a curved arrow indicating rotation or motion, no text or symbols present.


Brand : BabyGO
Model : Harmony
Category : Stroller