
PuraFina - Water filter Klarstein - Free user manual and instructions
Find the device manual for free PuraFina Klarstein in PDF.

| Product type | Under-sink water filter with reverse osmosis |
| Brand | Klarstein |
| Model | PuraFina |
| Dimensions (W x H x D) | 443 x 356 x 132 mm |
| Power supply | 100-240 V ~ 50/60 Hz |
| Power consumption | 60 W / 80 W depending on model |
| Required water pressure | 0.1 - 0.4 MPa |
| Drinking water flow rate | 1.3 L/min (60W model) or 1.56 L/min (80W model) |
| Total nominal capacity | 2000 L |
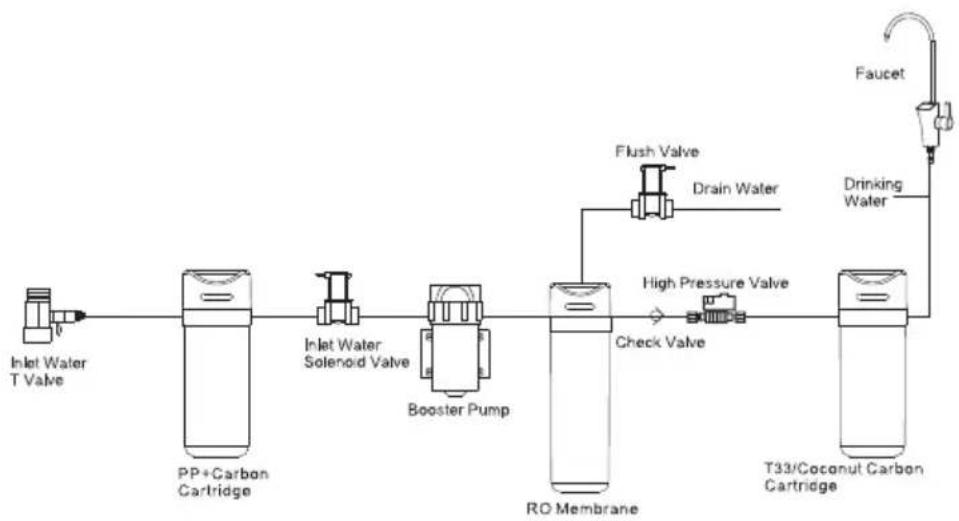
| Filtration stages | 3 stages: PP + carbon filter, RO membrane, T33/coconut carbon filter |
| RO membrane precision | 0.0001 µm |
| Cartridge lifespan | PP+carbon filter: 6-12 months; RO membrane: 24 months; T33 filter: 6-12 months |
| Operating ambient temperature | 4 °C to 40 °C |
| Ambient humidity | Up to 90% |
| Water source | Tap water supply |
| Maintenance | Regular cartridge replacement; do not use solvents or harsh detergents |
| Safety | Automatic shutdown in case of error; power cut off during prolonged inactivity |
| Repairability | Repair only by authorized personnel |
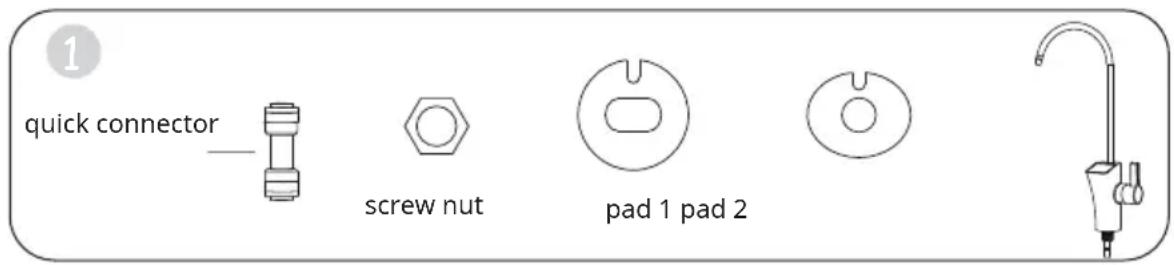
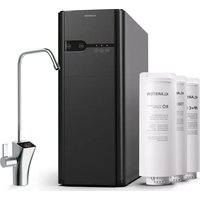
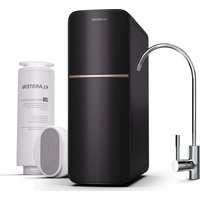
| Included accessories | Filter cartridges, quick-connect fittings, T-valve, faucet |
Frequently Asked Questions - PuraFina Klarstein
User questions about PuraFina Klarstein
0 question about this device. Answer the ones you know or ask your own.
Ask a new question about this device
Download the instructions for your Water filter in PDF format for free! Find your manual PuraFina - Klarstein and take your electronic device back in hand. On this page are published all the documents necessary for the use of your device. PuraFina by Klarstein.
USER MANUAL PuraFina Klarstein
Undersink Water Filter
ONNNNNNNNNNNNNNNNNNNNNNNNNNNNNNNNNNNNNNNNNNNNNNNNNNNNNNNNNNNNNNNNNNNNNNNNNNNNNNNNNNNNNNNNNNNNNNNNNNNNNNNNNNNNNNNNNNNNNNNNNNNNNN
KLARSTEIN
www.klarstein.com


Stage 3: T33/Coconut Carbon Cartridge: Absorb odour and improve the taste of drinking water.
Berlin Brands Group UK Limited
PO Box 42
272 Kensington High Street
London, W8 6ND
United Kingdom
Dear Customer,
Congratulations on purchasing this equipment. Please read this manual carefully and take care of the following hints on installation and use to avoid technical damages. Any failure caused by ignoring the items and cautions mentioned in the operation and installation instructions are not covered by our warranty and any liability. Scan the QR code to get access to the latest user manual and more product information.

CONTENTS
Product Specifications 17
Product Introduction 18
Safety Instructions 18
Installation 19
Cartridge Installation 20
Installation of water inlet and outlet 21
Operation 22
Maintenance 23
Troubleshooting 24
Technical Drawings 25
Disposal Considerations 26
Manufacturer & Importer (UK) 26
PRODUCT SPECIFICATIONS
| Article number 10045512, 1004551 | 3 10045514, 10045515 | |
| Power supply 100-240 V~ 50/60 Hz | ||
| Rated power 60 W 80 W | ||
| Water pressure 0.1-0.4 MPa | ||
| Drinking water rate 1.3 L/min 1.56 | L/min | |
| Rated capacity of purified water 200 L | ||
| Applicable conditions Temperature | 4-40 °C Ambient humidity below 90% | |
| Water Source Municipal water | ||
PRODUCT INTRODUCTION
Stage 1: PP+Carbon Filter: Removes dirt, corrosion, sediment, red worms, sand and other physical particles to protect the RO membrane.
Stage 2 :RO Membrane: Reverse osmosis membrane with the filtration precision 0.0001 m removes bacterial, virus, antibiotics and other harmful substances, heavy metal and pesticide residues from water.
Stage 3: T33/Coconut Carbon Cartridge: Absorb odour and improve the taste of drinking water.
SAFETY INSTRUCTIONS
- Do not use other accessories which are not permitted by manufacturer to avoid any damage of machine.
- Please check the machine and all accessories before installation.
Children are only permitted to maintain the machine under guardian supervision. - If malfunctions appear, please cut off the power, close the inlet water valve immediately, do not keep the machine in working mode.
- This machine shall be repaired by authorised and skilled personnel only.
- The production capacity of pure water is dependent on the feed water quality, pressure and temperature. Abnormal values will result in a lower flow rate.
- Avoid direct sunlight.
- Do not place in conditions below 4^ .
- Do not place near flammables and explosives.
- When errors occur, immediately cut off power and water supply.
- Keep away from children.
- Do not disassemble the machine without guidance of professional personnel to avoid machine leakage or damage.
- Please use in condition of 4 - 40^
- Please cut off the water source and power supply if not using for over 24 hours.
- Only use accessories and cartridges from original manufacturer to make sure the machine works well.
- Only professional personnel can repair and maintain the machine.
INSTALLATION
This machine shall be installed by authorised and skilled personnel only.
Please check all accessories before installation.
Requirements of installation conditions
- The machine is equipped with a booster pump and shall be used with tap water only.
- Please use the right adapterfor voltage 100 V-240 V.
- Make sure the installation place is clean and not in the proximity of direct sunlight, high humidity, flammables, explosives or unsafe electrical equipment.
Attention: Please pay attention to the safety when drilling and make sure there is no hidden water pipe, electric wire and gas tube.
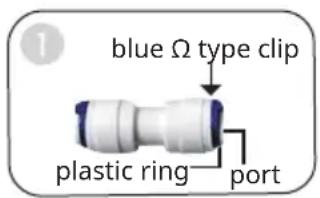
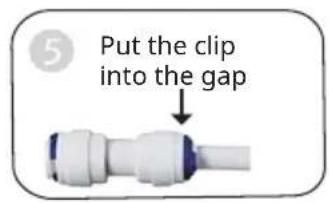
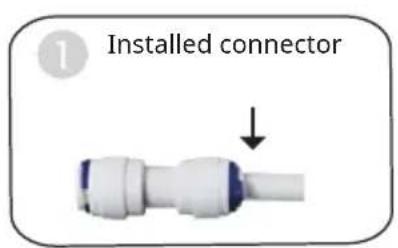
Installation of the Quick Connector
Quick connector ports are adopted on the inlet and outlet of the machine. A quick connector is a port which can connect quickly and firmly without any tools.
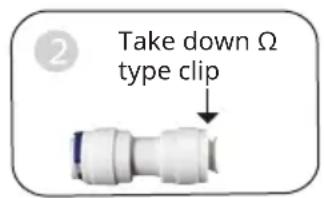
- Firstly, pull out the -type clip on the port, push the movable plastic ring to the port, make it attaching to the port to move the plastic plunge or PE pipe.
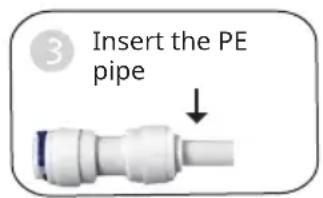
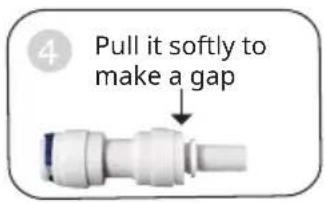
- Insert the PE pipe to the end of the port, then pull slightly to make a gap between the movable plastic ring and the port. Finally insert the -type clip in the gap.
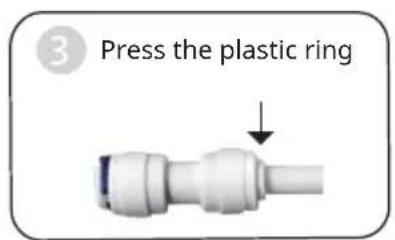
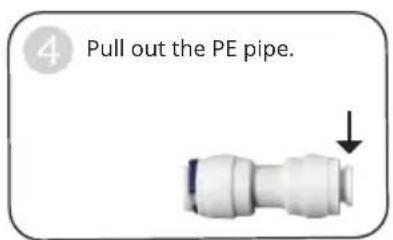
- When taking the PE pipe from quick connector, first pull out the -type clip. Push the movable plastic ring to the port to make it attaching the port. Then you can pull out the PE pipe.
Disconnect and connect of PE pipe and quick connector
Detach the Omega-type clip, trim the PE pipe to achieve a smooth end, and insert it into the quick connector. Next, give it a slight tug to verify that the PE pipe has been securely sealed by the O-ring within the quick connector. Lastly, insert the clip to hold it in position.
To disconnect
Take down the type clip. Make the plastic ring attaching to the port. Pull out the PE pipe.

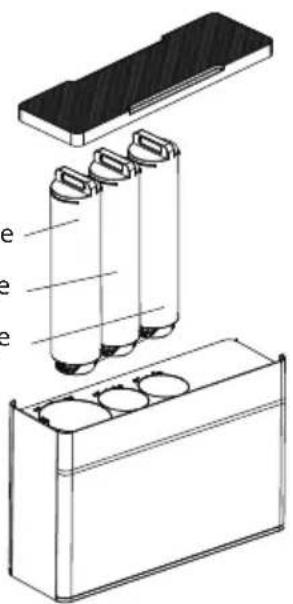
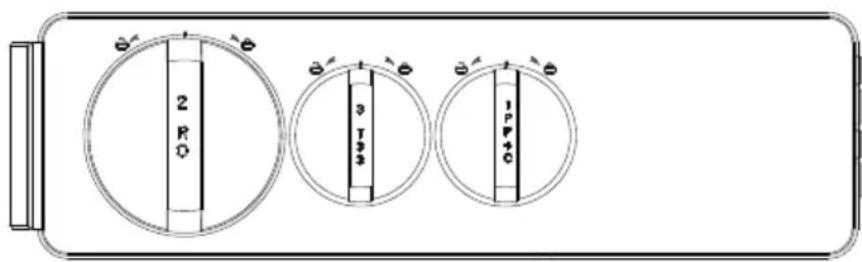
CARTRIDGE INSTALLATION
- Press top button "Open", take the lid down and put aside
- Take out the cartridges from carton,remove the outer plastic packing.
- Install cartridges according to the instructions an the top cover.
- After installation, put the lid back an machine.
RO membrane
Coconut carbon cartridge
PP +Carbon cartridge
INSTALLATION OF WATER INLET AND OUTLET
Installation place
Place the machine on a flat and stable surface.
1. Installation of inlet water T valve
Clean the installation area, close the inlet water valve, take apart the faucet or angle valve, then connect the inlet water T valve. Finally connect to the original faucet or angle valve.
Attention: Connection of screw thread should be sealed with tape or 0 ring to avoid leakage.
2. Connection of inlet water port:
Connect one side of PE pipe to the inlet water valve, and another side to the inlet water port on the machine.
3. Installation of faucet
According to the required place of faucet, drill a 012-mm hole on the stainless steel sink. Then fix the faucet.
4. Connection of drinking water port
Connect directly with the connecting rod of faucet. Cut the 1/4" PE pipe to a suitable length, one side insert to the quick connector and the other side connect to the port of drinking water on the machine.
5. Connection of drain water port
Take a suitable length of 1/4'' PE pipe to connect with the port of drain water on the machine. And connect another side to the drain line and fix the PE pipe to avoid drop.
6. Flush the cartridge
Install all the cartridges before flushing.
- Flushing of PP+C cartridge: After all the installation, turn on the purified water tap to flush PP+C filter about 10-20 minutes until the water is clean, then turn off the purified water tap.
- Flushing of T33 cartridge: After all the installation, turn on the drinking water tap to flush about 10-20 minutes until the water is clean.
Attention
- If there is no water coming from the tap, please check the power supply.
- Flush filter cartridges according to instruction before first usage.
OPERATION
General Instructions
When using for the first time, please open the faucet and the inlet water valve. When water is running from tap, close the tap for 30 minutes and check for leakages. If there are no leaks, you can use the machine normally. In normal user mode, keep the power connected, open and close the faucet.
When using the machine after a longer period of no usage, please open the faucet and flush cartridges according to the instructions.
Operation
The machine is equipped with an LED display. When connecting the power supply, the machine buzzes once and goes into rinse mode.
1. Rinse
- Auto rinse: Every time the power supply is connected, the machine will flush automatically. If the machine is not used for more than 72 hours, the machine will flush automatically.
- When flushing, the booster pump, the inlet water solenoid valve and the drain water are all in working mode, flushing lasts for 15 seconds. This will be indicated on the front panel.
- If you press the"Select" button once, the machine will flush for 30 seconds.
2. Purify
Turn an the water tap and start filtering, the inlet water solenoid valve and booster pump start working, this is indicated an the front panel.
3. Fault
When continuously filtering or rinsing for 30 minutes, the fault light turns red while buzzing for 6 seconds until the problems are solved to connect the power again.
4. Cartridge life
Filter life time is indicated an the front panel. Over time and usage the bars will lower. When the last bar is arrived, a 10 second alarm goes off. After that, for 3 more times, every half an hour an alarm goes off.
5. Replace cartridge
Press "Reset" button for 3 seconds until you hear a sound. You are in replacement mode now. To switch between cartridges, push "Select" once. Select the cartridge to be changed and press "Reset" button for 3 seconds until you hear a sound.
MAINTENANCE
Cartridge replacement time
| Cartridge PP + carbon filter RO membrane TT33/Coconut | |||
| Carbon cartidge | |||
| Replacement Time | 6-12 months 18 months | 12 months | |
Attention:
- Depending on the inlet water quality, please change 1 st stage cartridge accordingly.
- If the TDS level in the drinking water increases rapidly, the RO membrane needs to be changed soon.
- T33 is for improving the taste of drinking water. If the water taste becomes bad or when the cartridge life is expired, please replace the T33 cartridge.
Replacing the cartridges
Please change the cartridges regularly to maintain an effective and efficient filtration.
- Close the water inlet. cut off the power supply and open the faucet until water stops running.
- Remove the lid and put aside. Remove and install the cartridges as described.
Please replace the cartridge in turn and make sure in right position. The cartridge life will be different according to the area, water quality, season and working time. Please change them in time as actual usage.
Maintaining the machine
When cleaning the machine, do not use soap, detergent and strong volatile solvent like thinner, gasoline and alcohol, it will cause the cracks and color change. Do not wash the machine directly in water.
TROUBLESHOOTING
| Common Malfunction Possible Reason Solutions | ||
| Very little or no water flow. | PE pipe is bent. Straighten. | pipe. |
| Inlet water T valve is shut down. | Wait for the water source supply. | |
| Source water is shut down. | Wait for the water source supply. | |
| PP+C cartridge is blocked. | Replace the cartridge. | |
| Water pressure is low. Add | pressure boost treatment. | |
| Feed water temperature is lower than required. | Increase feed water temperature. | |
| Machine does not work. | Electricity fault. Check power supply. | |
| Adaptor loses efficiency. Replace the adaptor. | ||
| Machine short of water. Check feed water. If feed water is OK, reconnect power supply. | ||
| Water taste is abnormal. | Not using for a long time. | Flush the cartridge for 5 minutes. If this does not solve the problem, replace the cartridges. |
| Poor feed water quality. Check feed water quality. | ||
| Cartridges not replaced for a long time. | Replace the cartridges. | |
| Noises during machine operation | Power and voltage do not match. | Call professional personnel to check and repair. |
| Feed water flow to little In | increase feed water flow rate. | |
| Adaptor is damaged. Call | professional personnel to check and repair | |
| Failure caused on water pump. | Call professional personnel to check and repair | |
Explosion drawing of parts
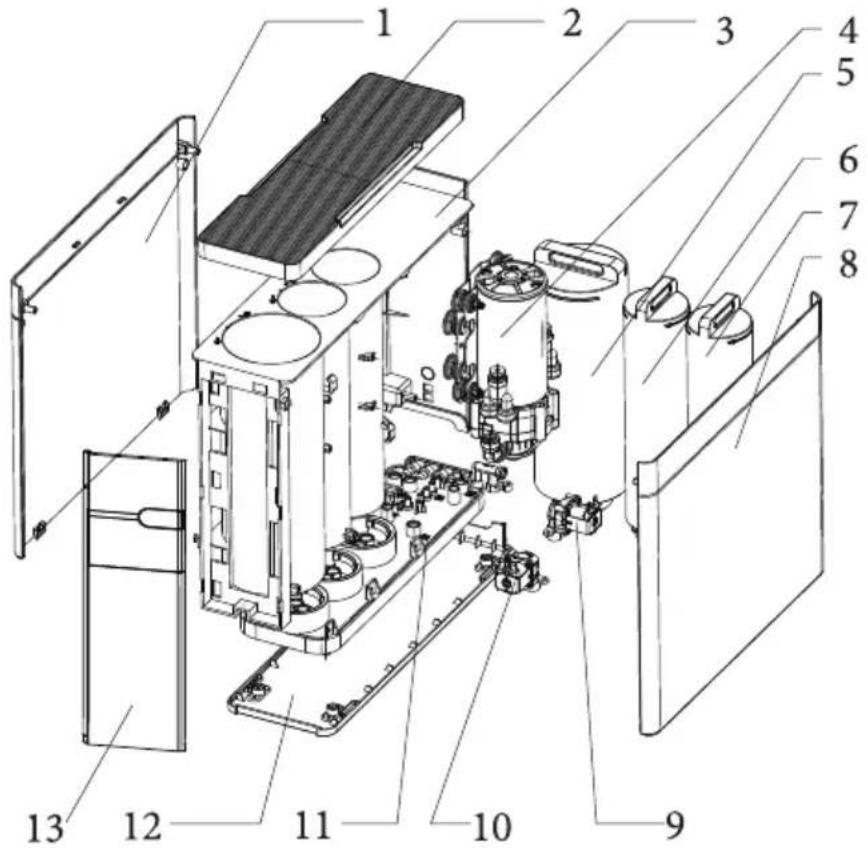
1 Left board
2 Lid
3 Body cover
4 Booster pump
5 RO membrane
6 T33/Coconut carbon cartridge
7 PP+carbon cartridge
8 Right board
9 Flush valve
10 Inlet water solenoid valve
11 Integrated water board
12 Bottom base
13 LED display
Electric principle diagram
DISPOSAL CONSIDERATIONS

If there is a legal regulation for the disposal of electrical and electronic devices in your country, this symbol on the product or on the packaging indicates that this product must not be disposed of with household waste. Instead, it must be taken to a collection point for the recycling of electrical and electronic equipment. By disposing of it in accordance with the rules, you are protecting the environment and the health of your fellow human beings from negative consequences. For information about the recycling and disposal of this product, please contact your local authority or your household waste disposal service.
This product contains batteries. If there is a legal regulation for the disposal of batteries in your country, the batteries must not be disposed of with household waste. Find out about local regulations for disposing of batteries. By disposing of them in accordance with the rules, you are protecting the environment and the health of your fellow human beings from negative consequences.
MANUFACTURER & IMPORTER (UK)
Manufacturer:
Chal-Tec GmbH, Wallstrasse 16, 10179 Berlin, Germany.
Importer for Great Britain:
Berlin Brands Group UK Limited
PO Box 42
272 Kensington High Street
London, W8 6ND
United Kingdom
Cher client, chere clientele,
Berlin Brands Group UK Limited
PO Box 42
272 Kensington High Street
London, W8 6ND
United Kingdom
Gentile clientele,
PRODUTTORE E IMPORTATORE (UK)
Produttore:
Chal-Tec GmbH, Wallstraße 16, 10179 Berlin, Germania.
Berlin Brands Group UK Limited
PO Box 42
272 Kensington High Street
London, W8 6ND
United Kingdom
Estimado cliente:


- Dear Customer,
- CONTENTS
- PRODUCT SPECIFICATIONS
- PRODUCT INTRODUCTION
- SAFETY INSTRUCTIONS
- INSTALLATION
- Requirements of installation conditions
- Installation of the Quick Connector
- Disconnect and connect of PE pipe and quick connector
- To disconnect
- CARTRIDGE INSTALLATION
- INSTALLATION OF WATER INLET AND OUTLET
- Installation place
- Installation of inlet water T valve
- Connection of inlet water port:
- Installation of faucet
- Connection of drinking water port
- Connection of drain water port
- Flush the cartridge
- Attention
- OPERATION
- General Instructions
- Rinse
- Purify
- Fault
- Cartridge life
- Replace cartridge
- MAINTENANCE
- Attention:
- Replacing the cartridges
- Maintaining the machine
- Explosion drawing of parts
- Electric principle diagram
- DISPOSAL CONSIDERATIONS
- MANUFACTURER & IMPORTER (UK)
- Gentile clientele,
- PRODUTTORE E IMPORTATORE (UK)
- Produttore:
- Estimado cliente:
Brand : Klarstein
Model : PuraFina
Category : Water filter