
MT 170 FLQ - Solar panel DOMETIC - Free user manual and instructions
Find the device manual for free MT 170 FLQ DOMETIC in PDF.

| Product type | Solar panel |
| Model | MT 170 FLQ |
| Brand | Dometic |
| Rated power (Wp) | 170 W |
| Daily yield | 750 Wh/day |
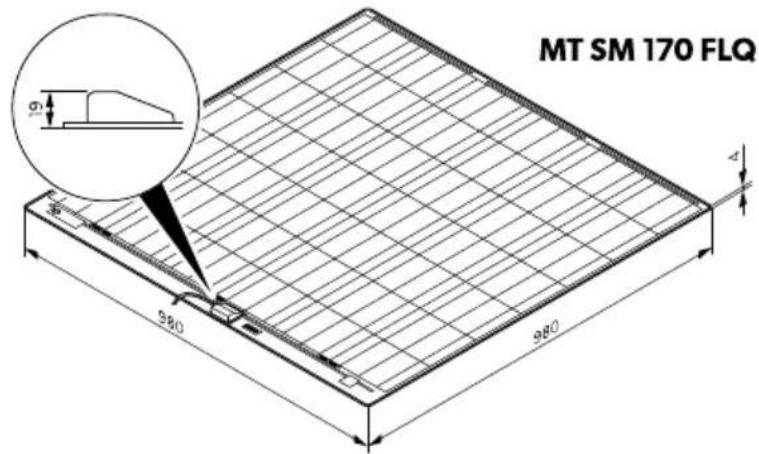
| Dimensions (L × W × H) | 980 mm × 980 mm × 19 mm |
| Weight | 5.2 kg (complete system) |
| Solar charge controller | Included, model SC330 |
| Output voltage | 12 V DC |
| Intended use | Caravans, motorhomes, boats; stationary or mobile |
| Wind resistance | Up to 225 km/h |
| Certifications | CE |
| Material | Tempered glass, aluminum frame |
| Installation | Mounting on flat or slightly curved roof |
| Maintenance & cleaning | Clean with a soft, damp cloth; avoid high-pressure cleaners |
| Safety | Do not touch live contacts; cover during installation; do not step on panel |
| Repairability | Not repairable; replace if damaged |
| Warranty | Statutory warranty; contact retailer |
Frequently Asked Questions - MT 170 FLQ DOMETIC
User questions about MT 170 FLQ DOMETIC
0 question about this device. Answer the ones you know or ask your own.
Ask a new question about this device
Download the instructions for your Solar panel in PDF format for free! Find your manual MT 170 FLQ - DOMETIC and take your electronic device back in hand. On this page are published all the documents necessary for the use of your device. MT 170 FLQ by DOMETIC.
USER MANUAL MT 170 FLQ DOMETIC
MOBILE POWER SOLUTIONS
FLAT LIGHT KITS, FLAT LIGHT KITS Q
natural_image
Illustration of various electronic components including a solar panel, cable, connectors, and a device (no text or symbols present)MT 120 FL, MT240-2 FL, MT 150 FL, MT 300-2 FL, MT 170 FLQ, MT 340-2 FLQ
EN
Solar system
Installation and Operating Manual....7
DE
Solaranlage
© 2025 Dometic Group. The visual appearance of the contents of this manual is protected by copyright and design law. The underlying technical design and the products contained herein may be protected by design, patent or pending patent. The trademarks mentioned in this manual belong to Dometic Sweden AB. All rights are reserved.
1
2
EN
3
4
5
flowchart
graph TD
    A["1. Block insertion"] --> B["2. Interaction with pad"]
    B --> C["3. Activation vial"]
    C --> D["4. Time range adjustment: 10 min - 2 h"]
6
EN
7

8
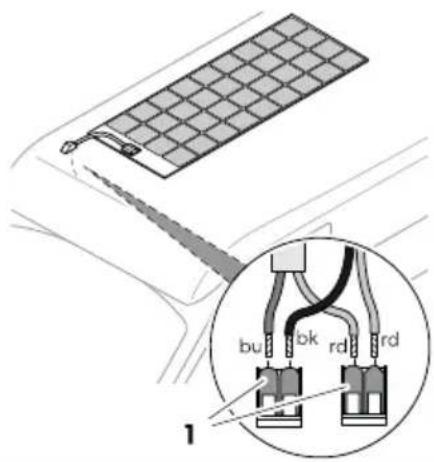
| EN | DE | FR | IT | NL | |
| rd | Red | Rot | Rouge | Rosso | Rood |
| bk | Black | Schwarz | Noir | Nero | Zwart |
| bu | Blue | Blau | Bleu | Blu | Blauw |
1 Important notes....7
2 Explanation of symbols....7
3 Safety instructions....8
4 Scope of delivery....10
5 Accessories....10
6 Intended Use....10
7 Technical description....11
8 Installing the solar system....11
9 Operation....12
10 Cleaning and maintenance....13
11 Troubleshooting....14
12 Disposal....15
13 Warranty....15
14 Technical data....16
1 Important notes
Please read these instructions carefully and follow all instructions, guidelines, and warnings included in this product manual in order to ensure that you install, use, and maintain the product properly at all times. These instructions MUST stay with this product.
By using the product, you hereby confirm that you have read all instructions, guidelines, and warnings carefully and that you understand and agree to abide by the terms and conditions as set forth herein. You agree to use this product only for the intended purpose and application and in accordance with the instructions, guidelines, and warnings as set forth in this product manual as well as in accordance with all applicable laws and regulations. A failure to read and follow the instructions and warnings set forth herein may result in an injury to yourself and others, damage to your product or damage to other property in the vicinity. This product manual, including the instructions, guidelines, and warnings, and related documentation, may be subject to changes and updates. For up-to-date product information, please visit documents.dometic.com.
2 Explanation of symbols
A signal word will identify safety messages and property damage messages, and also will indicate the degree or level of hazard seriousness.

DANGER!
Indicates a hazardous situation that, if not avoided, will result in death or serious injury.

WARNING!
Indicates a hazardous situation that, if not avoided, could result in death or serious injury.

CAUTION!
Indicates a hazardous situation that, if not avoided, could result in minor or moderate injury.

NOTICE!
Indicates a situation that, if not avoided, can result in property damage.

NOTE Supplementary information for operating the product.
3 Safety instructions
Also observe the safety instructions and stipulations issued by the vehicle manufacturer and authorized workshops.
3.1 General safety

WARNING! Electrocution hazard
Solar panels generate direct current and are sources of electricity when exposed to sunlight or other light sources. Do not come into contact with the live parts of the solar panel, such as the terminals, as this can result in burns, sparks and fatal shock whether the module is connected or disconnected.
Do not install the solar system when the solar panels are exposed to sunlight or other light sources. Cover all solar panels with an opaque cloth or material to prevent the production of electricity when installing or working with solar panels or wiring.
Installation and removal of the solar system may only be carried out by qualified personnel.
Do not operate the solar system if any component is visibly damaged.
If this device's power cable is damaged, the power cable must be replaced by the manufacturer, a service agent or a similarly qualified person in order to prevent safety hazards.
The solar system may only be repaired by qualified personnel. Improper repairs can lead to considerable hazards.
If you disassemble the device:
- Detach all connections.
- Ensure that no voltage is present on any of the inputs and outputs.
Only use accessories that are recommended by the manufacturer.
Do not modify or adapt any of the components in any way.

WARNING! Risk of injury
When exposed to direct sunlight, the solar panels can heat up to a temperature of up to 70^ C. Do not come into contact with the surface of the solar panels to avoid burns.

WARNING! Health hazard
This device can be used by children aged from 8 years and above and persons with reduced physical, sensory or mental capabilities or lack of experience and knowledge if they have been given supervision or instruction concerning use of the device in a safe way and understand the hazards involved.
Electrical devices are not toys. Always keep and use the device out of the reach of very young children.
Children must be supervised to ensure that they do not play with the device.
Cleaning and user maintenance shall not be made by children without supervision.

NOTICE! Damage hazard
Ensure that other objects cannot cause a short circuit at the contacts of the device.
Ensure that the negative and positive poles never come into contact.
Do not step or lean on the solar panels.
Do not put excessive load on the glass or back sheet of the solar panels as this may break the cells or cause micro cracks.
Store the solar system in a safe place before mounting or after dismounting. Protect the solar panels from falling over or down.
3.2 Installing the device safely

DANGER! Explosion hazard
Never mount the device in areas where there is a risk of gas or dust explosion.

WARNING! Risk of injury
If you install the solar system on a roof:
- Do not carry out installation and mounting in strong winds.
- Protect yourself and other persons from falling down. Prevent the possible falling of objects.
- Secure the work area so that no other person can be injured.

NOTICE! Damage hazard
Improperly mounted solar panels can get loose and fall down. Do not use silicone or any other adhesive than the one supplied or recommended one to ensure optimum adhesion.
3.3 Safety when connecting the device electrically

WARNING! Electrocution hazard
The electrical installation may only be connected by qualified personnel and only in accordance with the national regulations. Incorrect connection may cause severe hazards.
If you are working on electrical systems, ensure that there is somebody close at hand who can help you in emergencies.
Observe the recommended cable cross-sections.
Lay the cables so that they cannot be damaged by the doors or the hood. Crushed cables can lead to serious injury.

NOTICE! Damage hazard
Do not exceed the current and voltage ratings of the solar charger. Only install solar panels up to the maximum power rating of the used solar charger. If your solar system exceeds these ratings, contact your dealer for a suitable solar charger.
Use ductwork or cable ducts if it is necessary to lay cables through metal panels or other panels with sharp edges.
Do not lay the 230 V mains cable and the 12 V DC cable in the same duct.
Do not lay the cable so that it is loose or heavily kinked.
Fasten the cables securely.
Do not pull on the cables.
3.4 Operate the device safely

DANGER! Electrocution hazard
Do not touch exposed cables with your bare hands.

WARNING! Risk of injury
At the beginning of each trip and at regular intervals during each trip, check that the solar panels are firmly attached to the roof. An incorrectly mounted solar panel can fall off during the journey and injure other road users.
EN

CAUTION! Explosion hazard
Do not operate the device under the following conditions:
• In the vicinity of corrosive fumes
• In the vicinity of combustible materials
• In areas where there is a risk of explosions

NOTICE! Damage hazard
Avoid heavy shocks and vibration while driving.
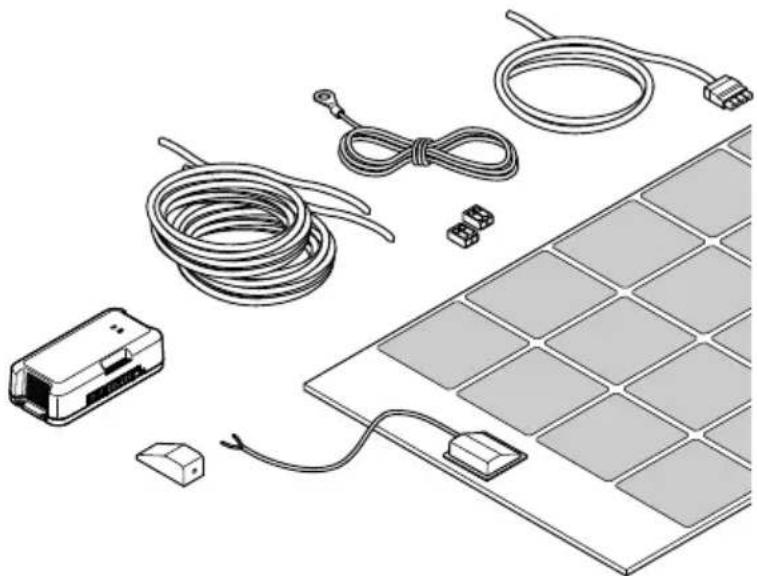
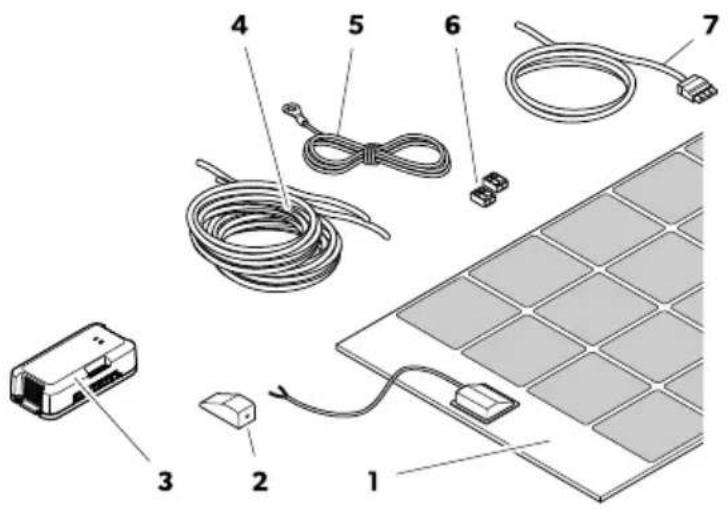
4 Scope of delivery

Fig. 1 on page 3
| Item Quantity Description |
| 1 1 Solar panel (MT 120 FL, MT 150 FL, MT 170 FLQ) |
| 1 2 Solar panel (MT 240-2 FL, MT 300-2 FL, MT 340-2 FLQ) |
| 2 1 Roof duct |
| 3 1 Solar charge controller |
| 4 1 Indoor cable ( 2 × 4 mm^2 ) |
| 5 1 Temperature sensor |
| 6 1 Cable connector |
| 7 2 EBL cable kit |
| – 1 Installation and Operating Manual for the solar charge controller |
5 Accessories
Available as accessories (not included in the scope of delivery):
| Designation Ref. no. | |
| Dometic Touch Display TD283 9620013272 | |
| Glue Set for Flat Solar Panels 9620003978 |
6 Intended Use
The solar system is intended to convert sunlight into direct current (DC) to charge rechargeable 12 V batteries in vehicles or boats while driving or supply them with a float voltage for power generation. The battery power can additionally be used as a stable power supply to operate DC-powered devices connected to the battery.
• Installation in caravans and motor homes
• Stationary or mobile use
- Extreme operating conditions (expedition use)
• Wind speeds up to 225 km/h
- Mains operation
- Portable applications
The voltage output of connected solar panels may not exceed the specified maximum output of the solar charge controller.
This product is only suitable for the intended purpose and application in accordance with these instructions.
This manual provides information that is necessary for proper installation and/or operation of the product. Poor installation and/or improper operation or maintenance will result in unsatisfactory performance and a possible failure.
The manufacturer accepts no liability for any injury or damage to the product resulting from:
- Incorrect installation, assembly or connection, including excess voltage
- Incorrect maintenance or use of spare parts other than original spare parts provided by the manufacturer
• Alterations to the product without express permission from the manufacturer - Use for purposes other than those described in this manual
Dometic reserves the right to change product appearance and product specifications.
7 Technical description
The solar panels are particularly flat and bonded directly to the vehicle roof. The solar panels can be applied to slightly curved roof surfaces and can be walked on.
The solar system can be extended by further solar panels of the same power. The single solar panels can be connected to each other at one junction box.
The solar charge controller is connected between the solar panels and the vehicle batteries to ensure the correct charging current of the batteries and to protect the batteries against over voltage and deep discharge.

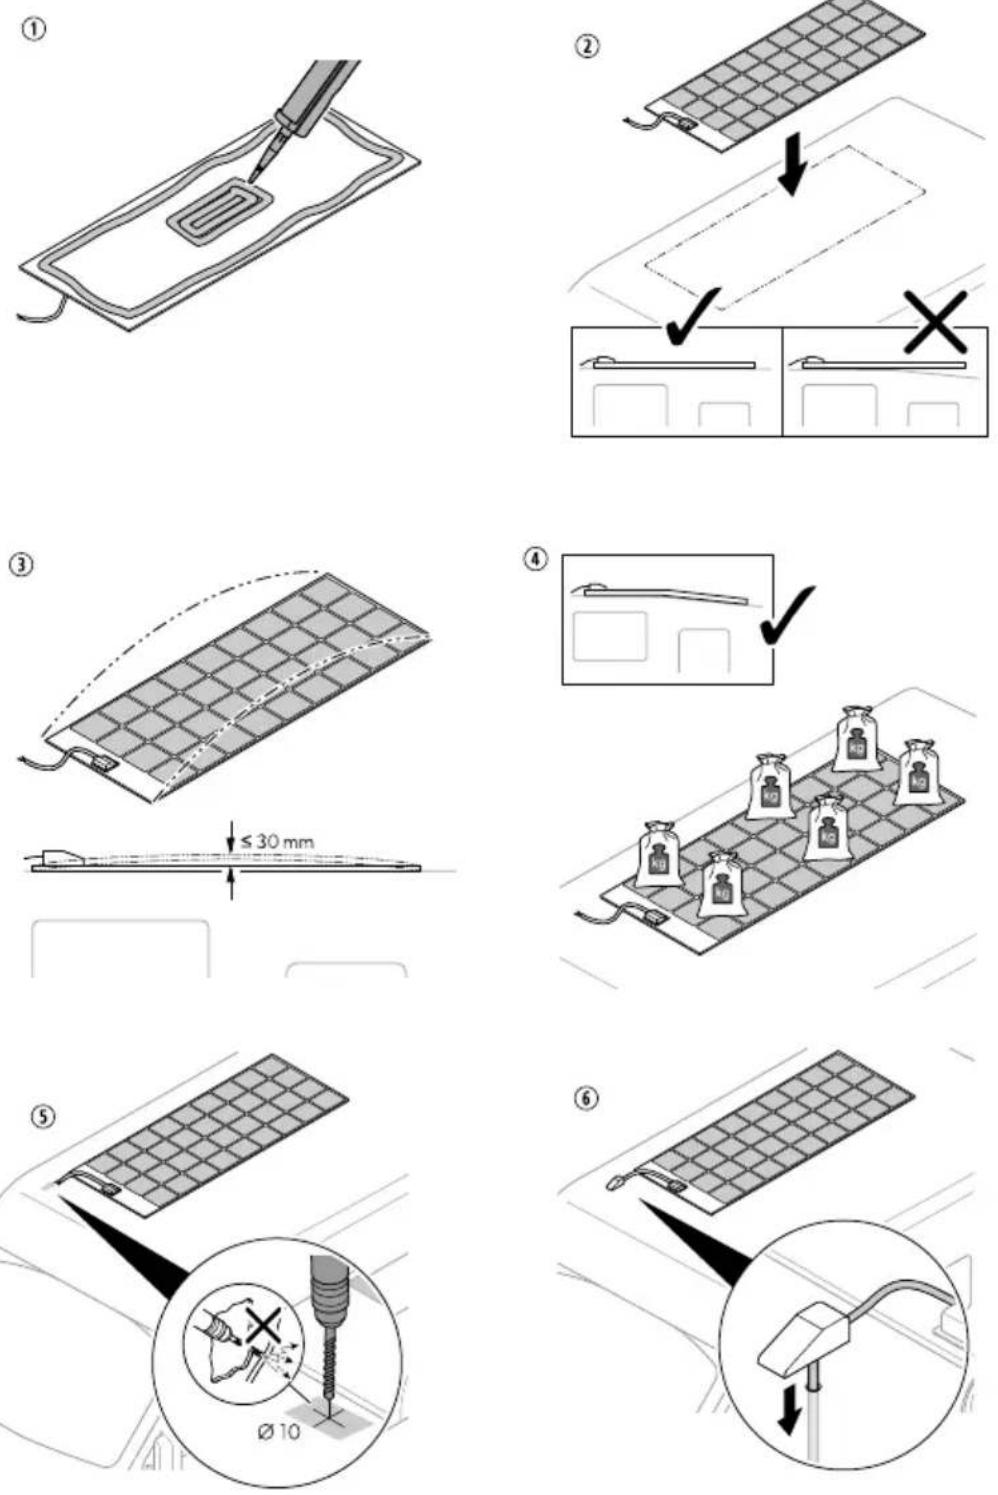
8 Installing the solar system

WARNING! Electrocution hazard
Completely cover all solar panels with an opaque material during installation to prevent electricity from being generated.
8.1 Installation location
When selecting the installation location, consider the following:
- The mounting surface must be even and stable enough to support the solar panel.
- Ensure that the designated mounting surface is sufficiently dimensioned.
- Ensure there is enough room to access the solar panels and other fixed components for future maintenance.
- Ensure that any existing ventilation openings on the vehicle and the rear ventilation of the solar panel are not blocked.
- Shading can reduce the performance of the solar system. Ensure that fixed components, such as air conditioners or opened satellite antennas, do not shade the solar panels.
- Choose a location with direct sunlight for optimal performance.
- Place several solar panels as close to each other as possible.
- Do not glue the solar panels or roof ducts to rubberized surfaces (e.g. exterior planking), as the adhesion of the glue is not guaranteed.
EN
8.2 Preparing the installation
Mark and prepare the bonding surfaces.

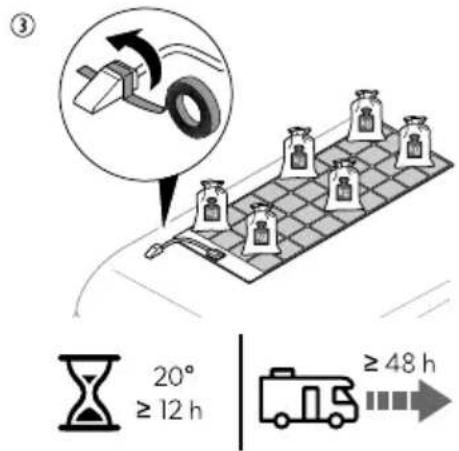
8.3 Mounting the solar system

WARNING! Risk of injury
Use a suitable adhesive, e.g. Sikaflex ^® -554. Do not use silicone.
To mount the solar system, proceed as shown in

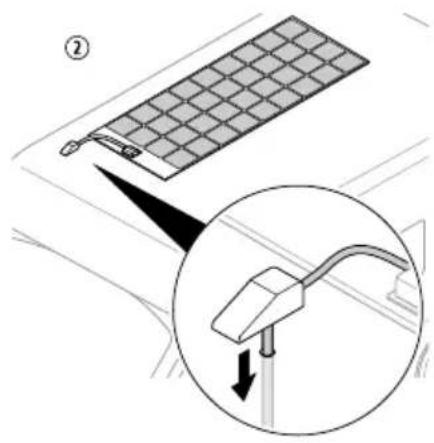
8.4 Connecting outdoor cable and indoor cable

NOTE
The cable length should be as short as possible.
- Strip the cable ends as follows:
a) Outdoor cable 11 mm (2.5 mm²)
b) Indoor cable 11 mm (4 mm ^2 )
- Connect the outdoor cable to the indoor cable at a suitable point using the cable connector.
Fig. 8 on page 6
8.5 Connecting the solar charge controller
1.
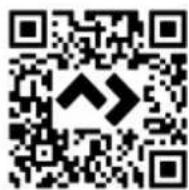
You find the information on installing the solar charge controller in the enclosed installation and operating manual or online at qr.dometic.com/beEcxd
- Also observe the instructions and safety precautions for all other components used in the solar system.
9 Operation
For optimal use of the solar system, note the following:
- Cloudy weather
- Seasonal solar radiation
• Variations in the angle of the sun - Shading or soiling of the solar system
The performance of the solar system decreases the more the solar panels heat up.
Ensure adequate ventilation and avoid excessive solar radiation.
10 Cleaning and maintenance

WARNING! Electrocution hazard
Broken solar panel glass may cause electric shock or fire.
These panels cannot be repaired and should be replaced immediately. Contact an authorized service agent.

CAUTION! Risk of injury
Allow the solar panel to cool down before cleaning to avoid burns or damage to the solar panel as a result of excessive temperature differences.
Clean the solar panels in the early morning or late afternoon hours when the sunlight is low and the solar panels are cooler.

NOTICE! Damage hazard
Do not clean the solar system with a high-pressure cleaner.
Do not use sharp or hard objects, abrasive cleaning agents or bleach during cleaning as these can damage the device.
Regularly check live cables for insulation faults, breaks, rodent damage, weathering and that all connections are tight and corrosion free.
Regularly check the surface of the solar panels for cracks and missing or defective components.
For maximum performance keep the solar panel free of dirt and shading, e.g. dust and leaves. Clean the solar panels with a soft, damp cloth or sponge.
Occasionally check the sealing of the roof duct for any damage.
11 Troubleshooting
| Problem Possible cause Suggested remedy | ||
| The solar system does not work (no power output). | Insulation faults, breaks or loose connections at the live cables. | > Check live cables for insulation faults, breaks or loose connections.> Pull out the fuse on the solar charge controller and check the solar panel voltage (VoC) on the solar charge controller.> If you cannot find an error, contact an authorized service agent. |
| Faulty solar charge controller. | Replace the solar charge controller. | |
| The solar system does not work properly (low power output). | Objects or dirt are blocking out light. Check for obstructions and ensure that the solar panels are not blocked by shadows.> Move the vehicle to a more suitable location.> Remove any dirt. | |
| Overheating of the solar panels. Allow the solar panels to cool down.> Move the vehicle to a more suitable location> Ensure sufficient air circulation around the solar panels. | ||
| One solar panel in the array failed. Pull out the fuse on the solar charge controller and check the solar panel voltage (VoC) on the solar charge controller.> Check the solar panels for micro cracks.> Check the solar panel for delamination.> Replace the solar panel if necessary. | ||
12 Disposal

Recycling packaging material: Place the packaging material in the appropriate recycling waste bins wherever possible.
If you wish to finally dispose of the product, ask your local recycling center or specialist dealer for details about how to do this in accordance with the applicable disposal regulations. The product can be disposed free of charge.

If the product contains any non-replaceable batteries, rechargeable batteries, or light sources, you don't have to remove them before disposal.
13 Warranty
The statutory warranty period applies. If the product is defective, please contact the manufacturer's branch in your country (see dometic.com/dealer) or your retailer.
For repair and warranty processing, please include the following documents when you send in the device:
• A copy of the receipt with purchasing date
- A reason for the claim or description of the fault
Note that self-repair or nonprofessional repair can have safety consequences and might void the warranty.
EN
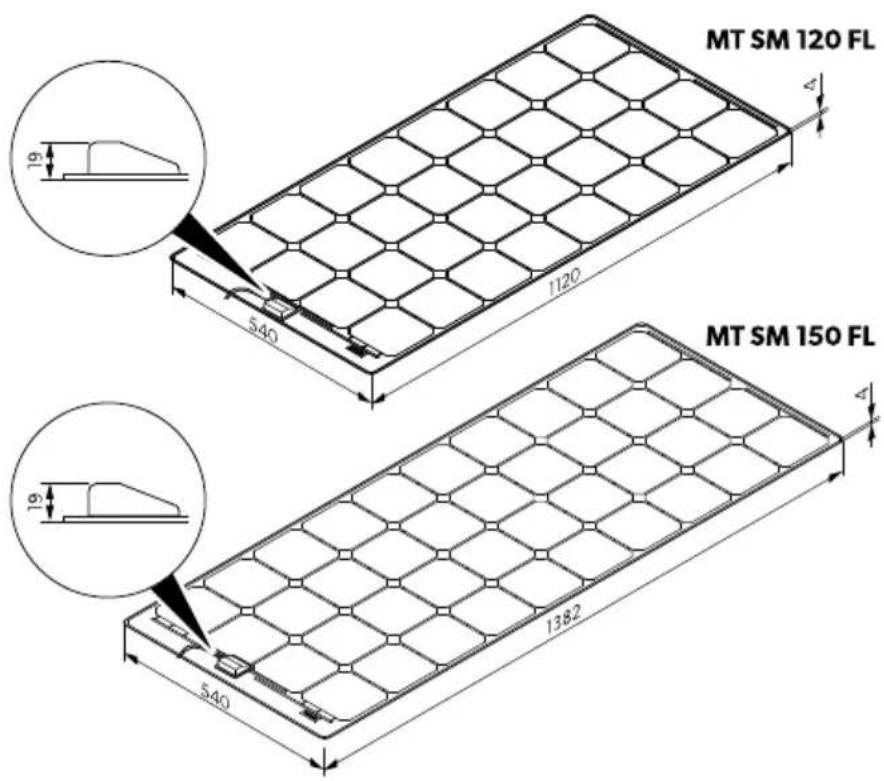
14 Technical data
Solar System
| MT 120 FL | MT 240-2FL | MT 150 FL | MT 300-2 FL | |
| Nominal output | 120 | 240 | 150 | 300 |
| Daily output | 480 | 960 | 660 | 1320 |
| Dimensions (W × D × H) | 1120 mm × 540mm × 19mm | 2xMT120FL | 1380mm × 540mm × 19mm | 2x MT 150 FL |
| Solar panel | MT SM 120FL | 2x MT SM 120FL | MTSM 150FL | 2xMT SM 150FL |
| Solar charge controller | SC330 | SC330 | SC330 | SC480 |
| Weight (without cable) | 3.3kg | 6.3kg | 4.9kg | 9.5kg |
| Inspection/certification |  | |||
| MT 170 RLQ | MT 340-2 RLQ | ||
| Nominal output | 170 | 340 | |
| Daily output | 750 | 1500 | |
| Dimensions (W × D × H) | 980 mm × 980 mm × 19 mm | 2xMT170FL | |
| Solar panel | MTSM170 RLQ | 2xMT SM170RLQ | |
| Solar charge controller | SC330 | SC480 | |
| Weight (without cables) | 5.2 kg | 10.1 kg | |
| Inspection /certification |  | ||
| MT SM 120 FL MT SM 150 FL MT SM 170FLQ | |||
| Dimensions (W × D × H) 1120 mm ×540 mm × 19 mm | 1380 mm ×540 mm × 19 mm | 980 mm ×980 mm × 19 mm | |
| Weight 3 kg 4.6 kg 4.9 kg | |||
| Inspection/certification |  | ||
The specifications are obtained under the standard test conditions of STC (STC: Irradiance 1000 W/m ^2 , panel temperature 25°C AM 1.5).
Solar charge controller
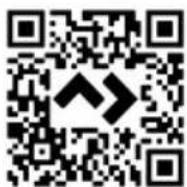
You find detailed information on the technical data of the solar charge controller in the enclosed installation and operating manual or online at qr.dometic.com/beEcxd.
Deutsch
7 Description technique
Laderegulator for solcelleanlegg

dometic.com/sales-offices


