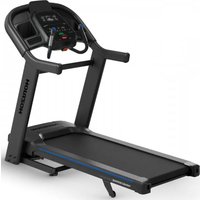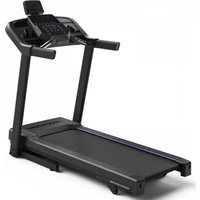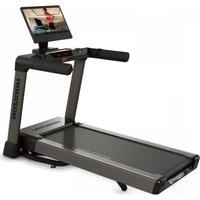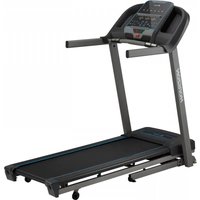
eTR5.0 - Treadmills Horizon - Free user manual and instructions
Find the device manual for free eTR5.0 Horizon in PDF.


User questions about eTR5.0 Horizon
0 question about this device. Answer the ones you know or ask your own.
Ask a new question about this device
Download the instructions for your Treadmills in PDF format for free! Find your manual eTR5.0 - Horizon and take your electronic device back in hand. On this page are published all the documents necessary for the use of your device. eTR5.0 by Horizon.
USER MANUAL eTR5.0 Horizon
SAVE THESE INSTRUCTIONS
When using an electrical product, basic precautions should always be followed, including the following: Read all instructions before using this treadmill. It is the responsibility of the owner to ensure that all users of this treadmill are adequately informed of all warnings and precautions. If you have any questions after reading this guide, contact Customer Tech Support at the number listed on the back panel of the OWNER'S MANUAL.
This treadmill is intended for in-home use only. Do not use this treadmill in any commercial, rental, school or institutional setting. Failure to comply will void the warranty.


DANGER
TO REDUCE THE RISK OF ELECTRICAL SHOCK:
Always unplug the treadmill from the electrical outlet immediately after using, before cleaning, performing maintenance and putting on or taking off parts.

WARNING
TO REDUCE THE RISK OF BURNS, FIRE, ELECTRICAL SHOCK OR INJURY TO PERSONS:
- Never use the treadmill before securing the safety tether clip to your clothing.
- If you experience any kind of pain, including but not limited to chest pains, nausea, dizziness, or shortness of breath, stop exercising immediately and consult your physician before continuing.
- When exercising, always maintain a comfortable pace.
Do not wear clothes that might catch on any part of the treadmill.
•Always wear athletic shoes while using this equipment.
• Do not jump on the treadmill. - At no time should more than one person be on treadmill while in operation.
- This treadmill should not be used by persons weighing more than specified in the OWNER'S MANUAL WARRANTY SECTION. Failure to comply will void the warranty.
- When lowering the treadmill deck, wait until rear feet are firmly on the floor before stepping on the deck.
- Disconnect all power before servicing or moving the equipment. To clean, wipe surfaces down with soap and slightly damp cloth only; never use solvents. (See MAINTENANCE)
- The treadmill should never be left unattended when plugged in. Unplug from outlet when not in use, and before putting on or taking off parts.
- Do not operate under blanket or pillow. Excessive heating can occur and cause fire, electric shock, or injury to persons.
- Connect this exercise product to a properly grounded outlet only.

WARNING
TO REDUCE THE RISK OF BURNS, FIRE, ELECTRICAL SHOCK OR INJURY TO PERSONS:
- At NO time should pets or children under the age of 13 be closer to the treadmill than 10 feet.
- At NO time should children under the age of 13 use the treadmill.
• Children over the age of 13 or disabled persons should not use the treadmill without adult supervision. - Use the treadmill only for its intended use as described in the treadmill guide and owner's manual.
- Do not use other attachments that are not recommended by the manufacturer. Attachments may cause injury.
- Never operate the treadmill if it has a damaged cord or plug, if it is not working properly, if it has been dropped or damaged, or immersed in water. Return the treadmill to a service center for examination and repair.
- Keep power cord away from heated surfaces. Do not carry this unit by its supply cord or use the cord as a handle.
- Never operate the treadmill with the air opening blocked. Keep the air opening clean, free of lint, hair, and the like.
• To prevent electrical shock, never drop or insert any object into any opening. - Do not operate where aerosol (spray) products are being used or when oxygen is being administered.
- To disconnect, turn all controls to the off position, then remove plug from outlet.
- Do not use treadmill in any location that is not temperature controlled, such as but not limited to garages, porches, pool rooms, bathrooms, car ports or outdoors. Failure to comply will void the warranty.
- This treadmill is intended for in-home use only. Do not use this treadmill in any commercial, rental, school or institutional setting. Failure to comply will void the warranty.
- Do not remove the console covers unless instructed by Customer Tech Support. Service should only be done by an authorized service technician.


GROUNDING INSTRUCTIONS
This product must be grounded. If a treadmill should malfunction or breakdown, grounding provides a path of least resistance for electrical current to reduce the risk of electrical shock. This product is equipped with a cord having an equipment-grounding conductor and a grounding plug. The plug must be plugged into an appropriate outlet that is properly installed and grounded in accordance with local codes and ordinances.

DANGER
Improper connection of the equipment-grounding conductor can result in a risk of electric shock. Check with a qualified electrician or service provider if you are in doubt as to whether the product is properly grounded. Do not modify the plug provided with the product. If it will not fit the outlet, have a proper outlet installed by a qualified electrician.
Make sure that the product is connected to an outlet having the same configuration as the plug. No adapter should be used with this product.
This product must be used on a dedicated circuit. To determine if you are on a dedicated circuit, shut off the power to that circuit and observe if any other devices lose power. If so, move devices to a different circuit. Note: There are usually multiple outlets on one circuit.

WARNING
Connect this exercise product to a properly grounded outlet only. Never operate product with a damaged cord or plug even if it is working properly. Never operate any product if it appears damaged, or has been immersed in water. Contact Customer Tech Support for replacement or repair.
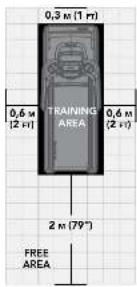
Place the treadmill on a level and stable surface. There should be one foot of clearance in front of the treadmill for the power cord. Please leave a clear zone behind the treadmill that is at least the width of the treadmill and at least 79° (2 meters) long. This zone must be clear of any obstruction and provide the user a clear exit path from the machine. In case of an emergency, place both hands on the side arm rests to hold yourself up and place your feet onto the side rails. For ease of access, there should be an accessible space preferentially on both sides of the treadmill equal to 2 ft (0.6 meters) to allow a user access to the treadmill from other side. Do not place the treadmill in any area that will block any vent or air openings. The treadmill should not be located in a garage, covered patio, near water or outdoors.
text_image
0,3 m (1 ft) 0,6 m (2 ft) TRAINING AREA 0,6 m (2 ft) 2 m (79°) FREE AREA
ASSEMBLY

WARNING
There are several areas during the assembly process that special attention must be paid. It is very important to follow the assembly instructions correctly and to make sure all parts are firmly tightened. If the assembly instructions are not followed correctly, the treadmill could have parts that are not tightened and will seem loose and may cause irritating noises. To prevent damage to the treadmill, the assembly instructions must be reviewed and corrective actions should be taken.
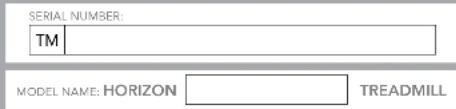
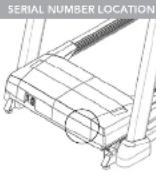
Before proceeding, find your treadmill's serial number located on a white barcode sticker near the on/off power switch and power cord and enter it in the space provided below.
ENTER YOUR SERIAL NUMBER AND MODEL NAME IN THE BOXES BELOW:
text_image
SERIAL NUMBER: TM MODEL NAME: HORIZON TREADMILLa Refer to the SERIAL NUMBER and MODEL NAME when calling for service.

text_image
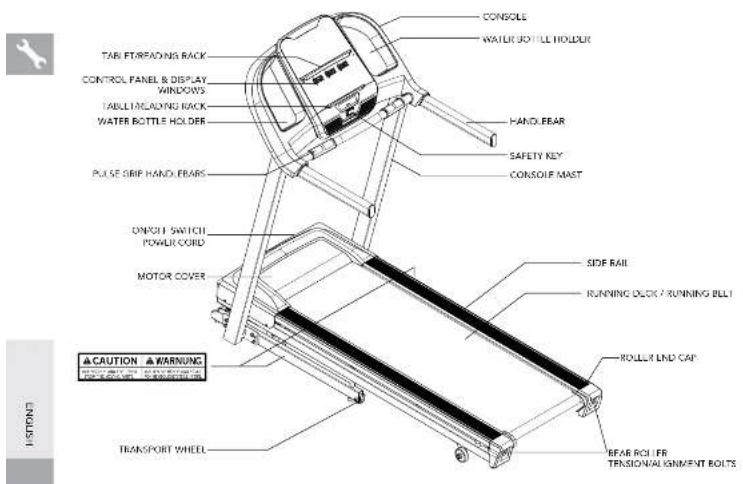
CONSOLE WATER BOTTLE HOLDER TABE FOR READING RACK CONTROL PANEL & DISPLAY WINDOWS TABLE MOUNTING RACK WATER BOTTLE HOLDER PULSE GRIP HAND LEARS ON/OFF SWITCH POWER COLD MOTOR COVER SIDE RAIL RUNNING LOCK / RUNNING BILL ROLLY LND CAP BEAR ROLLER TENSIONAL KINNMENT BOLTS CAUTION ▲WARNING TRANSPORT WHEELTOOLS INCLUDED:
6 mm L-Wrench 6 mm T-Wrench
PARTS INCLUDED:
1 Console Assembly
2 Console Masts
1 Hardware Kit
1 Safety Key
1 Audio Adapter Cable
1 Bottle of Silicone Lubricant
(for 2 applications)
1 Power Cord
2 Handlebars
NEED HELP?
If you have questions or if
there are any missing parts,
contact Customer
Tech Support.
PRE ASSEMBLY
WARNING
DO NOT ATTEMPT TO LIFT THE TREADMILL! Do not move or lift treadmill from packaging until specified to do so in the assembly instructions. You may remove the plastic wrap from console masts.
UNPACKING
Place the treadmill carton on a level flat surface. It is recommended that you place a protective covering on your floor. Take CAUTION when handling and transporting this unit. Never open box when it is on its side. Once the banding straps have been removed, do not lift or transport this unit unless it is fully assembled and in the upright folded position, with the lock latch secure. Unpack and assemble the unit where it will be used. The enclosed treadmill is equipped with high-pressure shocks and may spring open if mishandled. Never grab hold of any portion of the incline frame and attempt to lift or move the treadmill.
WARNING
FAILURE TO FOLLOW THESE INSTRUCTIONS COULD RESULT IN INJURY!
NOTE: During each assembly step, ensure that ALL nuts and bolts are in place and partially threaded in before completely tightening any ONE bolt.
NOTE: A light application of grease may aid in the installation of hardware. Any grease, such as lithium bike grease is recommended.


| HARDWARE FOR STEP 1 | |||
| PART TYPE DESCRIPTION QTY | |||
| A B O I T M X 1.25PX15.4 | |||
| B | SPRING WASHER | 8.0X13.0X1.5T | 4 |
| C | FLAT WASHER | 8.2X13.0X1.4T | 4 |
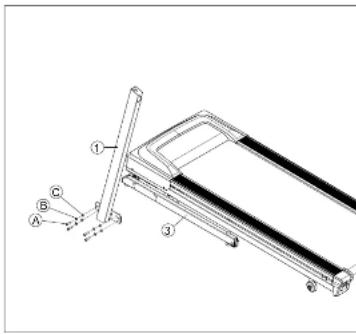
text_image
Technical diagram of a mechanical device with labeled parts A, B, C and numbered components 1, 2, 3A. Open HARDWARE FOR STEP 1.
B Attach the LEFT CONSOLE MAST (1) to the BASE FRAME (3) using 4 BOLTS (A), 4 SPRING WASHERS (B) and 4 FLAT WASHERS (C).
NOTE: Do not fully tighten bolts until STEP 4.

A

B

C
ASSEMBLY STEP 2ASSEMBLY STEP 1
HARDWARE FOR STEP 2
| PART | TYPE DESCRIPTION QTY | ||
| A BOX T | 8/8X1.25FX15L 4 | ||
| B | SPRING WASHER | 8.0X13.0X1.5T | 4 |
| C | FLAT WASHER | 8.2X13.0X1.4T | 4 |
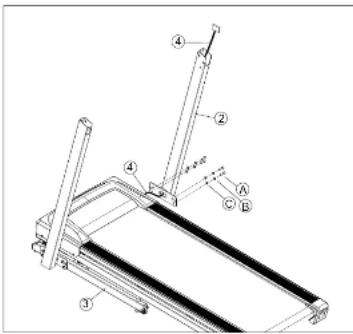
text_image
Technical diagram of a treadmill with labeled parts and motion indicatorsA Open HARDWARE FOR STEP 2.
B Attach LEAD WIRE to bottom end of CONSOLE CABLE (4). Pull LEAD WIRE through RIGHT CONSOLE MAST (2). After pulling the load wire through the mast, the top of the CONSOLE CABLE (4) should be located at the top of the mast.
C Attach the RIGHT CONSOLE MAST (2) to the BASE FRAME (3) using 4 BOLTS (A), 4 SPRING WASHERS (B) and 4 FLAT WASHERS (C).
NOTE: Do not fully tighten bolts until STEP 4.

A

B

c

ASSEMBLY STEP 3 ASSEMBLY STEP 4
| HARDWARE FOR STEP 3 | |||
| PART TYPE DESCRIPTION QTY | |||
| A ROIT M8X1.25PX15.4 | |||
| B SPRING WASHER 8.0X13.0X1.5T 4 | |||
| C | FLAT WASHER | 8.2X13.0X1.4T | 4 |
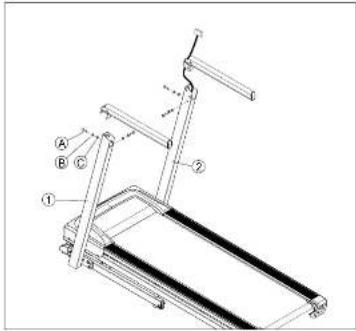
text_image
Technical diagram of a treadmill with labeled parts A, B, and C, showing structural components and motion indicators.NOTE: Be careful not to pinch any wires while assembling the console.
A Pull the LEAD WIRE through the bottom end of the HANDLEBAR.
B Open HARDWARE FOR STEP 3.
C Attach the HANDLEBAR to the LEFT CONSOLE MAST (2) using 2 BOLTS (A), 2 SPRING WASHERS(B) and 2 FLAT WASHERS (C).
D Do the same above for the another HANDLEBAR.
NOTE: Do not fully tighten bolts until STEP 5.

A

B

c
HARDWARE FOR STEP 4
| PART | TYPE DESCRIPTION QTY | ||
| A FO T | M/XX1.25FX15L 6 | ||
| B SPRING WASHER 8.0X13.0X1.5T 6 | |||
| C | FLAT WASHER | 8.2X13.0X1.4T | 6. |
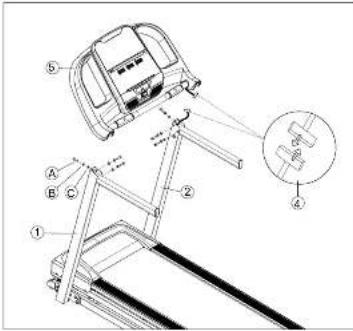
text_image
Technical diagram of a treadmill with labeled parts and an inset close-up view showing component details.A Open HARDWARE FOR STEP 4.
B Gently place the CONSOLE (S) on top of the CONSOLE MASTS (1&2). Attach the LEFT SIDE first using 3 BOLTS (A), 3 SPRING WASHERS (B) and 3 FLAT WASHERS (C).
C The CONSOLE CABLES (4) are tucked into the CONSOLE MAST (2). Using the lead wire carefully pull the CONSOLE CABLE (4) out of the CONSOLE MAST (2). Detach and discard the LEAD WIRE. Connect the CONSOLE CABLES (4) and carefully tuck wires in the mast to avoid damage.
D Attach the RIGHT SIDE of the CONSOLE (5) using 3 BOLTS (A), 3 SPRING WASHERS (B) and 3 FLAT WASHERS (C).

A

B

c

ASSEMBLY STEP 5

ENGLISH
natural_image
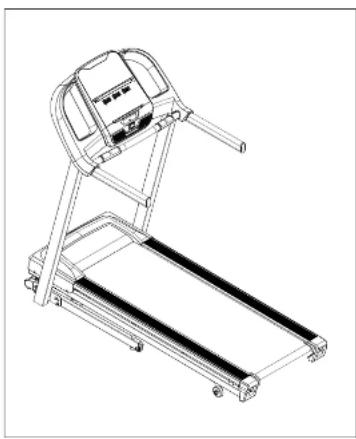
Line drawing of a treadmill with standard tread and control panel (no text or symbols)ASSEMBLY COMPLETE!
TR5.0
User Weight Capacity: 113 kg / 250 lbs.
TREADMILL OPERATION
This section explains how to use your treadmill's console and programming.
The BASIC OPERATION section in the TREADMILL GUIDE has instructions for the following:
• LOCATION OF THE TREADMILL
• USING THE SAFETY KEY
• FOLDING THE TREADMILL
• MOVING THE TREADMILL
• LEVELING THE TREADMILL
• TENSIONING THE RUNNING BELT
• CENTERING THE RUNNING BELT
• USING THE HEART RATE FUNCTION


text_image
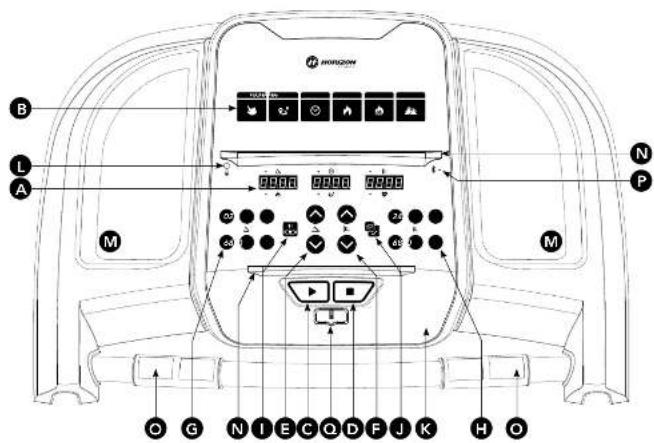
B L A M 9000 9000 9000 N P M O G N I E C Q D F J K H OCONSOLE OPERATION
Note: There is a thin protective sheet of clear plastic on the overlay of the console that should be removed before use.
A) LED DISPLAY: Incline, Calories, Time, Distance, Speed, Heart Rate.
B) WORKOUT PROGRAMS: used to reference program code shown on LED display.
C) START: press to begin exercising, start your workout, or resume exercising after pause.
D) STOP: press to pause/end your workout. Hold for 3 seconds to reset the console
E) INCLINE +/- KEYS: used to adjust incline in small increments (10.5% increments).
F) SPEED +/- KEYS: used to adjust speed in small increments (0.1 mph increments).
G) INCLINE QUICK KEYS: used to reach desired incline more quickly.
H) SPEED QUICK KEYS: used to reach desired speed more quickly.
1) BLUETOOTH HEART RATE: press and hold 3 sec to connect to the Bluetooth heart rate strap. JAPF & BT heart rate
strap could only connect one at a time)
J) ENTER/CHANGE DISPLAY: press to select item/press to change display feedback during workout.
K) SPEAKERS: music plays through speakers when your CD / MP3 player is connected to the console.
L) AUDIO IN JACK: plug your CD / MP3 player into the console using the included audio adaptor cable.
M) WATER BOTTLE POCKETS: holds personal workout equipment.
N) TABLET/READING RACK: holds tablet or reading material
O) HEART RATE PULSE GRIPS: used to measure heart rate.
P) BLUETOOTH: the light will be consistently on once the Bluetooth was connected.
Q) SAFETY KEY: the safety key need to plug in to turn on the treadmill.


text_image
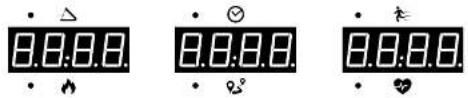
0.0:0.0 • △ 0.0:0.0 • ⏠ 0.0:0.0 • ♡° 0.0:0.0 • ♡DISPLAY WINDOWS
△ INCLINE: Shown as percent. Indicates the incline of your walking or running surface.
CALORIES: Total calories burned or calories remaining left to burn during your workout.
TIME: Set up your workout time and speed. Then start your work out.
9° DISTANCE: Shown as kilometer. Indicates distance traveled or distance remaining during your workout.
SPEED: Shown as KPH. Indicates how fast your walking or running surface is moving.
HEART RATE: Shown as BPM (beats per minute). Used to monitor your heart rate (displayed when contact is made with both pulse grips).
GETTING STARTED
1) Check to make sure no objects are placed on the belt that will hinder the movement of the treadmill.
2) Plug in the power cord and turn the treadmill ON. (The ON/OFF switch is next to the power cord.)
3) Stand on the side rails of the treadmill.
4) Attach the safety key clip to part of your clothing making sure that it is secure and will not become detached during operation.
5) Insert the safety key into the safety keyhole in the console.
6) You have two options to start your workout:
A) QUICK START UP
Simply press the START key to begin working out.
Time, distance, and calories will all count up from zero. OR...
B) SELECT A WORKOUT OR TARGET
1) Select your PROGRAM with the +/- buttons and press ENTER when your desired PROGRAM is displayed.
2) Adjust the SETTING with the +/- buttons and press ENTER when your desired SETTING is displayed.
3) Press START to begin.


WORKOUT PROFILES

P1) MANUAL: Adjust your speed manually during your workout.

P2) DISTANCE: Push yourself and go further during your workout with 13 distance workouts. Choose from L1: 1.6 km, L2: 3.2 km, L3: 5 km, L4: 8 km, L5: 10 km, L6: 12.8 km, L7: 15 km, L8: 16 km, L9: 20 km, L10: half marathon, L11: 24 km, L12: 32 km and L13: marathon goals. User sets starting speed levels.

P3) TIME: Set goals for Time. User could set up the speed and incline to start.

P4) CALORIES: Set goals for burning calories. Calories burned are calculated using distance and speed.

P5) FAT BURN: A workout designed specifically to target fat. Promotes weight loss by increasing and decreasing the speed, while keeping you in your fat burning zone. Includes 10 levels.
| Segment Warn Up 12 14 5 6 ¥8 | |||||||||||
| Time 4:00 Mirs 30 Sec 30 Sec | 30 Sec 30 Sec 30 Sec | 30 Sec 30 Sec 30 Sec | |||||||||
| Level 1 | Iridine | 0 | 0.5 | 1.5 | 1.5 | 1 | 0.5 | 0.5 | 0.5 | 1 | 1.5 |
| Speed(kph) | 0.8 | 2.4 | 3.7 | 4 | 4.8 | 5.6 | 6.4 | 5.6 | 4.8 | 4 | |
| Level 2 | Iridine | 0 | 0.5 | 1.5 | 1.5 | 1 | 0.5 | 1 | 0.5 | 1 | 1.5 |
| Speed(kph) | 0.8 | 3 | 4 | 4.8 | 5.6 | 6.4 | 7.2 | 6.4 | 5.6 | 4.8 | |
| Level 3 | Iridine | 0.5 | 1 | 2 | 2 | 1.5 | 1 | 1 | 1 | 1.5 | 2 |
| Speed(kph) | 0.8 | 3.7 | 4.8 | 5.6 | 6.4 | 7.2 | 8 | 7.2 | 6.4 | 5.6 | |
| Level 4 | Iridine | 0.5 | 1 | 2 | 2 | 1.5 | 1 | 1 | 1 | 1.5 | 2 |
| Speed(kph) | 1.6 | 4.1 | 5.6 | 6.4 | 7.2 | 8 | 8.8 | 8 | 7.2 | 6.4 | |
| Level 5 | Iridine | 1 | 1.5 | 2.5 | 2.5 | 2 | 1.5 | 1.5 | 1.5 | 2 | 2.5 |
| Speed(kph) | 1.6 | 4.8 | 6.4 | 7.2 | 8 | 8.8 | 9.6 | 8.8 | 8 | 7.2 | |
| Level 6 | Iridine | 1 | 1.5 | 2.5 | 2.5 | 2 | 1.5 | 1.5 | 1.5 | 2 | 2.5 |
| Speed(kph) | 1.6 | 5.1 | 7.2 | 8 | 8.8 | 9.6 | 10.4 | 9.6 | 8.8 | 8 | |
| Level 7 | Iridine | 1.5 | 2 | 3 | 2 | 2.5 | 2 | 2 | 2 | 2.5 | 3 |
| Speed(kph) | 2.2 | 6.1 | 8 | 8.8 | 9.6 | 10.4 | 11.2 | 10.4 | 9.6 | 8.8 | |
| Level 8 | Iridine | 1.5 | 2 | 3 | 3 | 2.5 | 2 | 2 | 2 | 2.5 | 3 |
| Speed(kph) | 2.2 | 6.6 | 8.8 | 9.6 | 10.4 | 11.2 | 12 | 11.2 | 10.4 | 9.6 | |
| Level 9 | Iridine | 2 | 2.5 | 3.5 | 3.5 | 3 | 2.5 | 2.5 | 2.5 | 3 | 3.5 |
| Speed(kph) | 2.2 | 7.2 | 9.6 | 10.4 | 11.2 | 12 | 12.8 | 12 | 11.2 | 10.4 | |
| Level 10 | Iridine | 2 | 2.5 | 3.5 | 3.5 | 3 | 2.5 | 2.5 | 2.5 | 3 | 3.5 |
| Speed(kph) | 2.2 | 7.8 | 10.4 | 11.2 | 12 | 12.8 | 13.6 | 12.8 | 12 | 11.2 | |


P6) HILL CLIMB: Simulates a hill ascent and descent. This program helps tone muscle and improve cardiovascular ability.
Speed and Incline changes, segments repeat every 30 seconds.
| Segment Warm Up 1 2 3 4 5 6 7 8 9 10Time 4:00 Minx 30 Sec 30 Sec 30 Sec 30 Sec 30 Sec 30 Sec 30 Sec | |||||||||||||||
| Level 1 0 0 1 1.5 2 2 3 3 3 2.5 2 1.5 1 | |||||||||||||||
| Level 2 0 0 1.5 2 2.3 3 3.5 3.5 2.5 2 1.5 | |||||||||||||||
| Level 3 0 1 2.5 2 3.3 3 4 4.3 3 2.5 2 | |||||||||||||||
| Level 4 0 1.5 2 3 3.5 4 5 4.5 4 5 3 2.5 | |||||||||||||||
| Level 5 0 1 5 3 3.5 4 5 5.5 4 4.3 3 | |||||||||||||||
| Level 6 0 1.5 3 4 4.5 5 5.5 5 4 5 4.3 5 | |||||||||||||||
| Level 7 0 1 5 4 4.5 5 5 6 6.5 5 5 4.5 4 | |||||||||||||||
| Level 8 0 2 4.5 5.5 5 6.5 6.5 5.5 4.5 | |||||||||||||||
| Level 9 0 2 5 5.5 6 6 7.7 6.5 6.5 5 | |||||||||||||||
| Level 10 0 2 5 6.6 5.7 5.7 5.7 4 5 6.5 5 | |||||||||||||||
TO RESET THE CONSOLE
Hold STOP key for 3 seconds.
When your workout is complete, the unit will beep. Your workout information will stay displayed on the console for 30 seconds and then reset.
1) Connect the included AUDIO ADAPTOR CABLE to the AUDIO IN JACK on the top right of the console and the headphone jack on your CD / MP3 player.
2) Use your CD / MP3 player buttons to adjust song settings.
3) Remove the AUDIO ADAPTOR CABLE when not in use.
4) To connect to the Bluetooth speakers open your Bluetooth settings, turn on Bluetooth, scan for new devices, look for "HZ TR5.0 SPEAKERS" and select connect.

□ 6 mm L-Schraubenschlüssel
□ 6 mm T-Schraubenschlüssel
IM LIEFERUMFANG
ENTHALTENE TEILE:
text_image
Technical diagram of a mechanical device with labeled parts A, B, C and numbered components 1, 2, 3text_image
Technical diagram of a treadmill with labeled parts and motion indicatorstext_image
Technical diagram of a treadmill with labeled parts A, B, and numbered components ①, ②, ③text_image
Technical diagram of a treadmill with labeled parts and an inset close-up view showing internal components.natural_image
Line drawing of a treadmill with standard tread and control panel (no text or symbols)text_image
Technical diagram of a mechanical device with labeled parts A, B, C and numbered components 1, 2, 3A Open HARDWARE (MONTAGEMATERIAAL) VOOR STAP 1.
text_image
Technical diagram of a treadmill with labeled parts and motion indicatorsA Open HARDWARE (MONTAGEMATERIAAL) VOOR STAP 2.
text_image
Technical diagram of a treadmill with labeled parts A, B, C and numbered components ①, ②text_image
Technical diagram of a treadmill with labeled parts and an inset close-up view showing component details.A Open HARDWARE VOOR STAP 4.
natural_image
Line drawing of a treadmill with control panel and side-mounted screen (no text or symbols)MONTAGE VOLTOOID!
TR5.0
text_image
Technical diagram of a treadmill with labeled parts A, B, C and numbered components 1, 2, 3text_image
Technical diagram of a treadmill with labeled parts and motion indicatorstext_image
Technical diagram of a treadmill with labeled parts A, B, and numbered components ①, ②, ③text_image
Technical diagram of a treadmill with labeled parts and a magnified inset showing a mechanical component.natural_image
Line drawing of a treadmill with control panel and side-mounted screen (no text or symbols)LE MONTAGE EST TERMINÉ !
TR5.0
VISION Fitness / HORIZON Fitness / TEMPO Fitness / TREO Fitness products are recyclable.
At the end if its useful life please dispose of this article correctly and safely (local refuse sites).