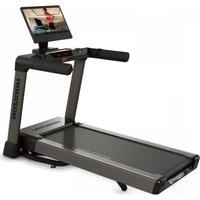
Tread-XP - Treadmills Horizon - Free user manual and instructions
Find the device manual for free Tread-XP Horizon in PDF.


User questions about Tread-XP Horizon
0 question about this device. Answer the ones you know or ask your own.
Ask a new question about this device
Download the instructions for your Treadmills in PDF format for free! Find your manual Tread-XP - Horizon and take your electronic device back in hand. On this page are published all the documents necessary for the use of your device. Tread-XP by Horizon.
USER MANUAL Tread-XP Horizon
natural_image
Line drawing of a treadmill with a laptop on top, showing front and side views (no text or symbols)OWNER'S MANUAL BENUTZERHANDBUCH GEBRUIKERSHANDLEIDING MANUEL DU PROPRIÉTAIRE

Read the TREADMILL GUIDE before using this OWNER'S MANUAL.
There are several steps during the assembly process where special attention must be paid. It is very important to follow the assembly instructions and to ensure the product is assembled correctly to reduce the risk of injury. Make sure all parts are firmly tightened before using the treadmill to ensure that the treadmill is stable and structurally sound.
Before proceeding, find your treadmill's serial number located on a white barcode sticker near the on/off power switch and power cord and enter it in the space provided below.
ENTER YOUR SERIAL NUMBER AND MODEL NAME IN THE BOXES BELOW:
SERIAL NUMBER:
TM
MODEL NAME: HORIZON
TREADMILL
» Refer to the SERIAL NUMBER and MODEL NAME when calling for service.
SERIAL NUMBER LOCATION
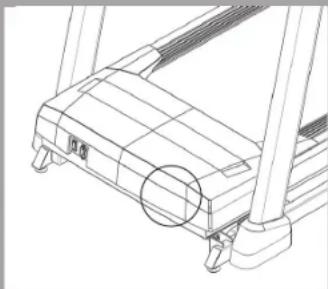
natural_image
Line drawing of a treadmill with a circular highlight on the side panel (no text or symbols)
text_image
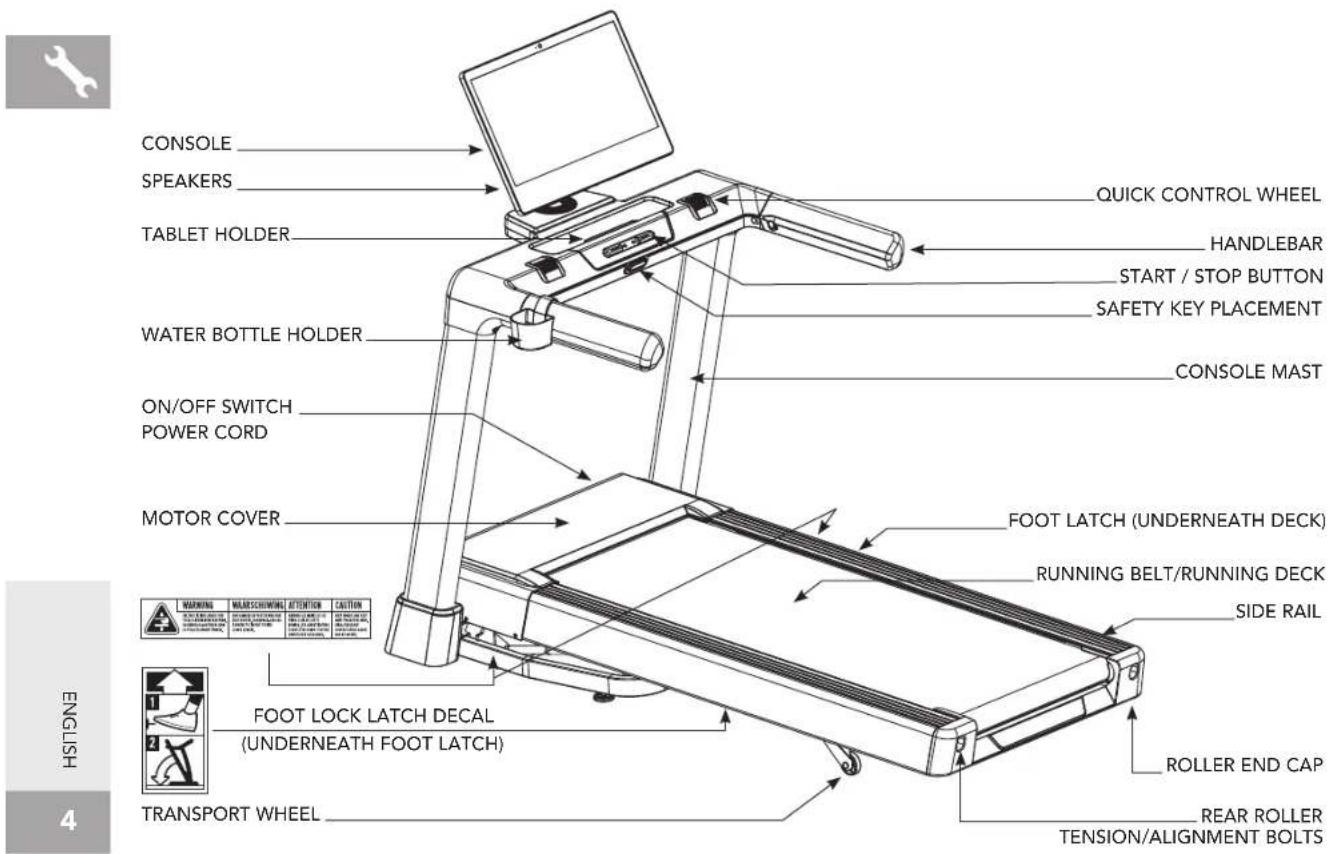
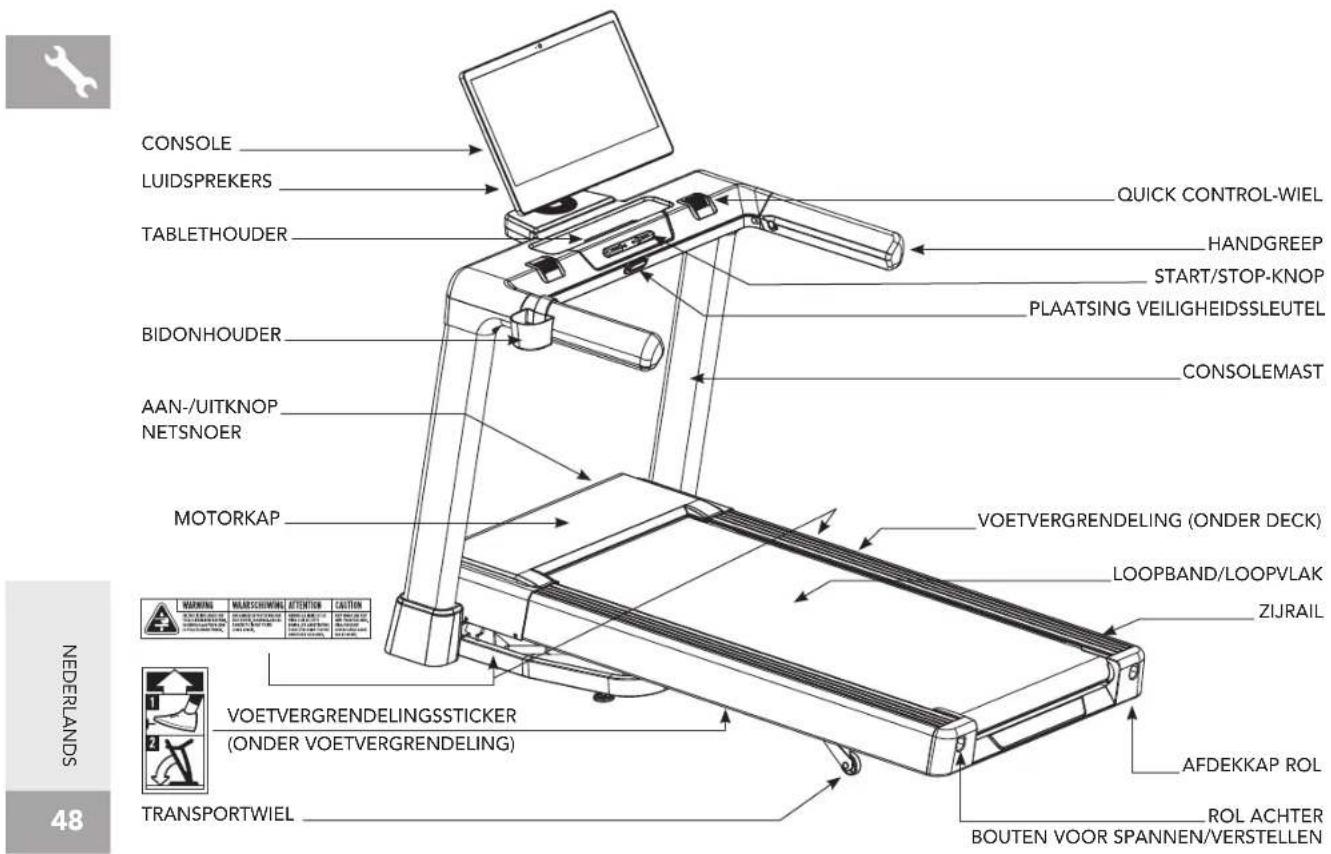
CONSOLE SPEAKERS TABLET HOLDER WATER BOTTLE HOLDER ON/OFF SWITCH POWER CORD MOTOR COVER FOOT LATCH (UNDERNEATH DECK) RUNNING BELT/RUNNING DECK SIDE RAIL WARNING WAARSCHINWELL ATTENTION CAUTION FOOT LOCK LATCH DECAL (UNDERNEATH FOOT LATCH) ROLLER END CAP REAR ROLLER TENSION/ALIGNMENT BOLTS TRANSPORT WHEEL QUICK CONTROL WHEEL HANDLEBAR START / STOP BUTTON SAFETY KEY PLACEMENT CONSOLE MASTTOOLS INCLUDED:
8 mm T-Wrench
6 mm L-Wrench
5 mm L-Wrench
□ Screwdriver
PARTS INCLUDED:
□ 1 Main Frame
□ 1 Console Assembly
2 Console Masts
□ 1 Water Bottle Holder
1 Hardware Kit
□ 1 Safety Key
☐ 1 Bottle of Silicone Lubricant
(for 2 applications)
2 Handlebars
2 Consoel Mast Covers

NEED HELP?
If you have questions or if there
are any missing parts, contact
Customer Tech Support.
PRE ASSEMBLY
UNPACKING
Place the treadmill carton on a level flat surface. It is recommended that you place a protective covering on your floor. Take CAUTION when handling and transporting this unit. Never open box when it is upside down or on its side. Once the red banding straps have been removed, do not lift or transport this unit unless it is fully assembled and in the upright folded position, with the lock latch secure. Unpack and assemble the unit where it will be used. The enclosed treadmill is equipped with high-pressure shocks that may spring open if mishandled. Never grab hold of any portion of the incline frame and attempt to lift or move the treadmill. Transport unit ONLY on the ground, and ONLY after it is fully assembled and in the upright folded position with the lock latch secured.

WARNING
DO NOT ATTEMPT TO LIFT THE TREADMILL! Do not move or lift treadmill from packaging until specified to do so in the assembly instructions. You may remove the plastic wrap from console masts.

WARNING
FAILURE TO FOLLOW THESE INSTRUCTIONS COULD RESULT IN INJURY!
NOTE: During each assembly step, ensure that ALL nuts and bolts are in place and partially threaded in before completely tightening any ONE bolt.
NOTE: A light application of grease may aid in the installation of hardware. Any grease, such as lithium bike grease is recommended.
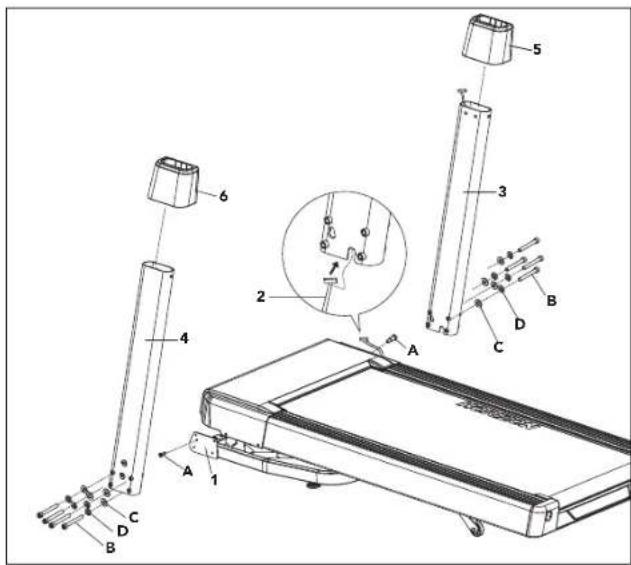
ASSEMBLY STEP 1
| HARDWARE FOR STEP 1 | |||
| PART TYPE DESCRIPTION QTY | |||
| A BOLT M8 2 | |||
| B BOLT M8 8 | |||
| C FLAT WASHER | ∅8 | 8 | |
| D SPRING WASHER | ∅8 | 8 | |
text_image
Technical diagram of a treadmill assembly with labeled parts and a magnified inset showing internal components.A Open HARDWARE FOR STEP 1.
B Insert UPRIGHT GUIDE BOLT (A) into MAIN FRAME BRACKET (1) and fully tighten.
C Attach LEAD WIRE to bottom end of CONSOLE CABLE (2). Pull LEAD WIRE through RIGHT CONSOLE MAST (3). After pulling the wire through the mast.
D Attach RIGHT CONSOLE MAST (3) to MAIN FRAME BRACKET (1) using 4 BOLTS (B), 4 FLAT WASHERS (C) AND 4 SPRING WASHERS (D)
E Repeat STEP D on the LEFT SIDE.
NOTE: Be careful not to pinch any wires while assembling the console.
NOTE: Fully tighten all bolts from STEPS 1 & 2.

text_image
A B C DASSEMBLY STEP 2
| HARDWARE FOR STEP 2 | |||
| PART TYPE DESCRIPTION QTY | |||
| G ARC WASHER | 8 | 2 | |
| F BOLT M8 6 | |||
| C FLAT WASHER | 8 | 4 | |
| D SPRING WASHER | 8 | 6 | |
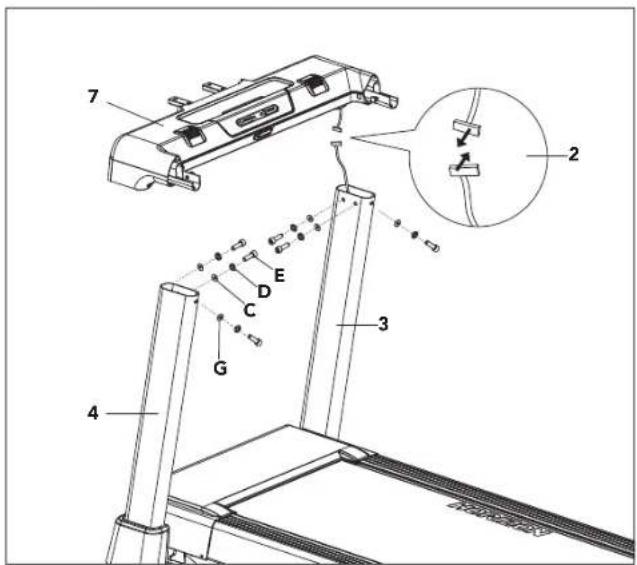
text_image
Technical diagram of a treadmill with labeled parts and an inset showing a cable assembly detail.A Open HARDWARE FOR STEP 2.
B Have someone help hold the CONTROL SET(7) while attaching the CONSOLE CABLE (2). Use the lead wire to carefully pull the CONSOLE CABLE (2) out of the RIGHT CONSOLE MAST (3). Attach the CONSOLE CABLE (2) from the CONTROL SET (7) to the CONSOLE CABLE (2) from the top of the RIGHT UPRIGHT MAST (3). Detach and discard the lead wire.
C Attach CONTROL SET (7) using holes on UPRIGHT MASTS (3) (4) with 4 BOLTS (E).
NOTE: Be careful not to pinch the console cable while attaching the right console mast.
NOTE: Do not fully tighten bolts until end of STEP 2.

ASSEMBLY STEP 3
| HARDWARE FOR STEP 3 | |||
| PART TYPE DESCRIPTION QTY | |||
| E BOLT M8 6 | |||
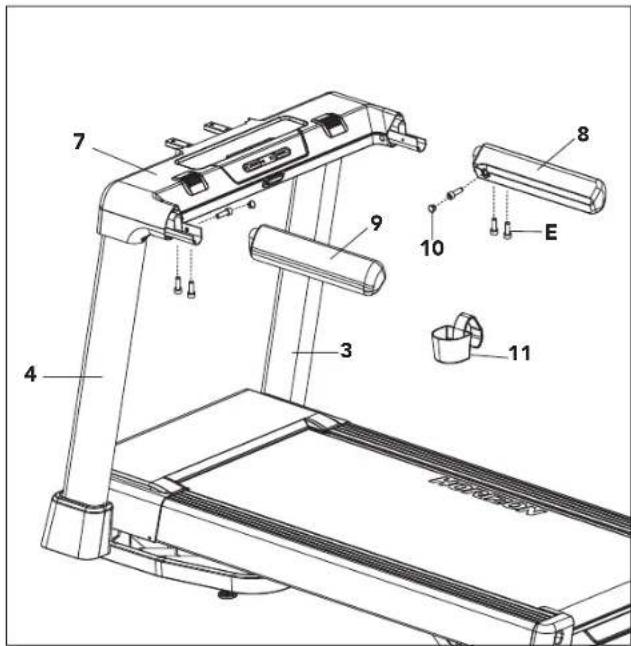
text_image
Technical diagram of a treadmill with numbered parts and labeled parts (E, 10, 11)A Open HARDWARE FOR STEP 3.
B Carefully slide the RIGHT HANDLEBAR (8) to CONTROL SET (7) and attach by using with 3 BOLTS (E), then attach BOLT COVER (10).
C Repeat STEP B on the LEFT SIDE.
D Hook WATER BOTTLE HOLDER (11) on your ideal place on left or right Handlebar.
NOTE: Be careful not to pinch any wires while assembling the console.
NOTE: Fully tighten all bolts from STEPS 1 & 2.

ASSEMBLY STEP 4
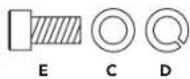
| HARDWARE FOR STEP 4 | |||
| PART TYPE DESCRIPTION QTY | |||
| E BOLT M8 4 | |||
| C FLAT WASHER | ∅8 | 4 | |
| D SPRING WASHER | ∅8 | 4 | |
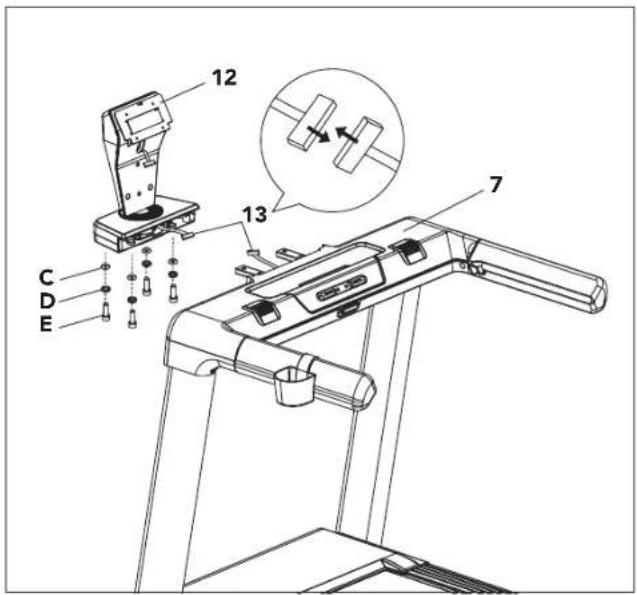
text_image
12 13 7 C D EA Open HARDWARE FOR STEP 4.
B Have someone help hold the CONSOLE ARM SET (12) while attaching the CONSOLE CABLE (13).
C Carefully slide the CONSOLE ARM SET (12) to CONTROL SET (7) and attach by using with 4 BOLTS (E).
ASSEMBLY STEP 5
| HARDWARE FOR STEP 5 | |||
| PART TYPE DESCRIPTION QTY | |||
| F BOLT M4 4 | |||
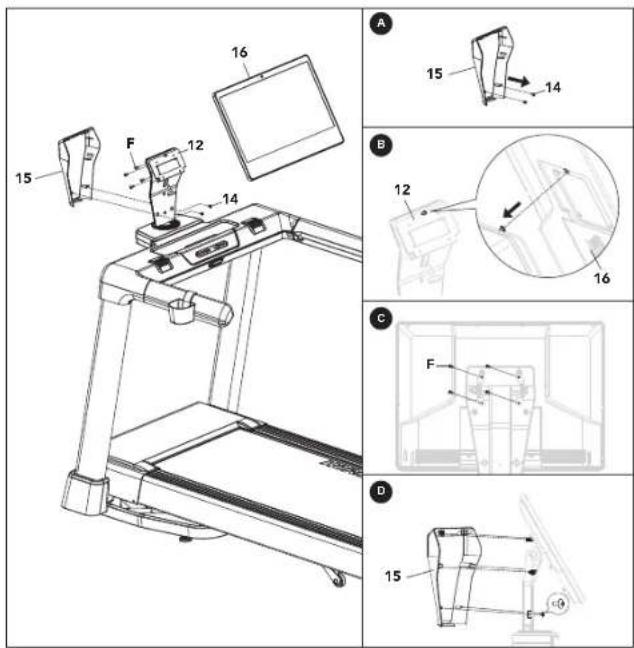
text_image
Technical diagram of a treadmill with labeled parts and corresponding sectional views A, B, C, DA Open HARDWARE FOR STEP 5.
B Gently place the CONSOLE (16) and hook the bolt on top of the CONSOLE ARM (12).
C Attach the CONSOLE (16) using 4 BOLTS (F).
D Attach the CONSOLE ARM BACK COVER (15) using 2 BOLTS (14).
NOTE: Be careful not to pinch any wires while assembling the console.
NOTE: Fully tighten all bolts from STEPS 1 & 2.

ASSEMBLY STEP 6
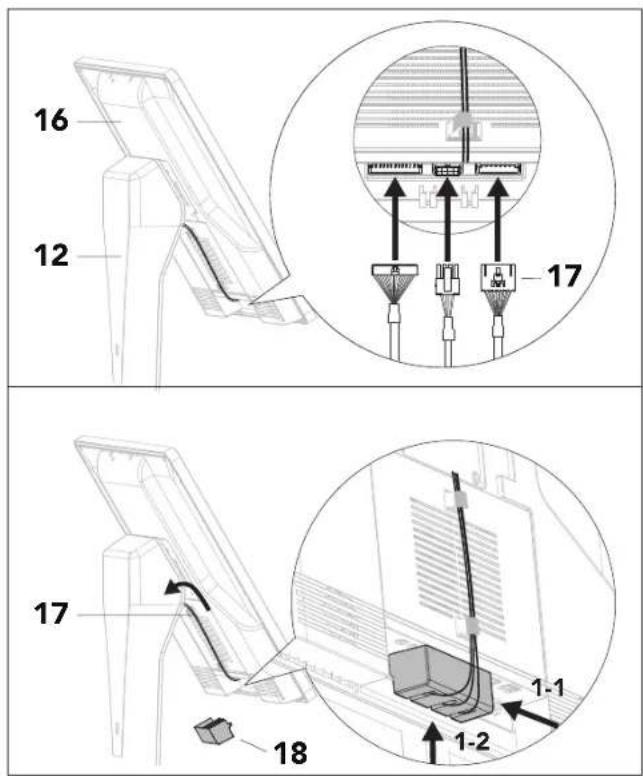
A Take the CONSOLE CONNECTION CORD (17) from the CONSOLE ARM (12) and plug into the CONSOLE (16). (Please follow the picture to plug 3 types of socket).
B Attach CORD COVER (18) at bottom of console. (Fix cords by gaps on cord cover).
C Insert the extra length of CONSOLE CONNECTION CORD (17) back to console arm is necessary.
D Fix the connection cord at fixing hook at back of console.
ASSEMBLY STEP 7
natural_image
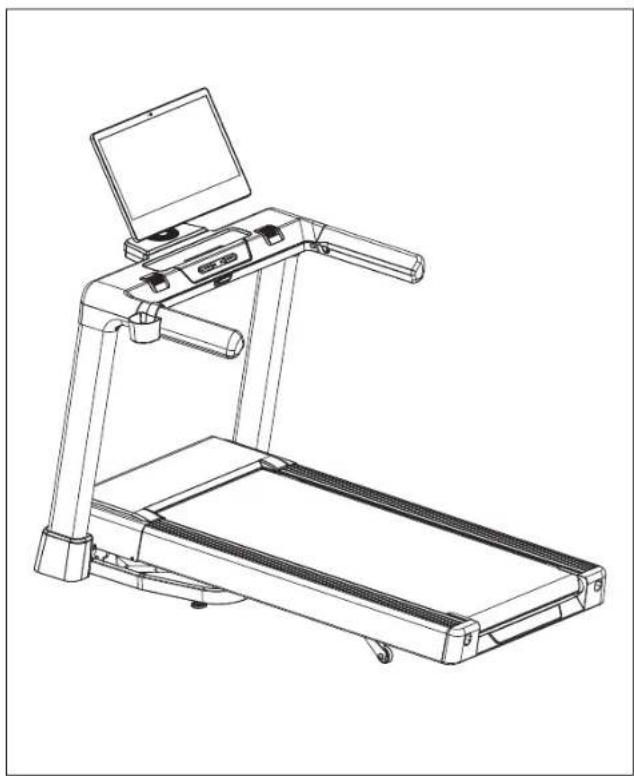
Line drawing of a treadmill with open lid and side-mounted legs (no text or symbols)ASSEMBLY COMPLETE!
Before the first use, lubricate the treadmill deck by following the instructions in the MAINTENANCE section in the TREADMILL GUIDE.
TECH SPECS
| Assembled Dimensions (L x W x H) | 195 x 99 x 161 cm / 77" x 39" x 63" |
| Product Weight 128 kg / 282 lbs. | |
| Max User Weight 159 kg / 350 lbs. | |
TREADMILL OPERATION
This section explains how to use your treadmill's console and programming.
The BASIC OPERATION section in the TREADMILL GUIDE has instructions for the following:
• LOCATION OF THE TREADMILL
• USING THE SAFETY KEY
• FOLDING THE TREADMILL
• MOVING THE TREADMILL
• LEVELING THE TREADMILL
• TENSIONING THE RUNNING BELT
• CENTERING THE RUNNING BELT
• USING THE HEART RATE FUNCTION

text_image
A H D EENGLISH
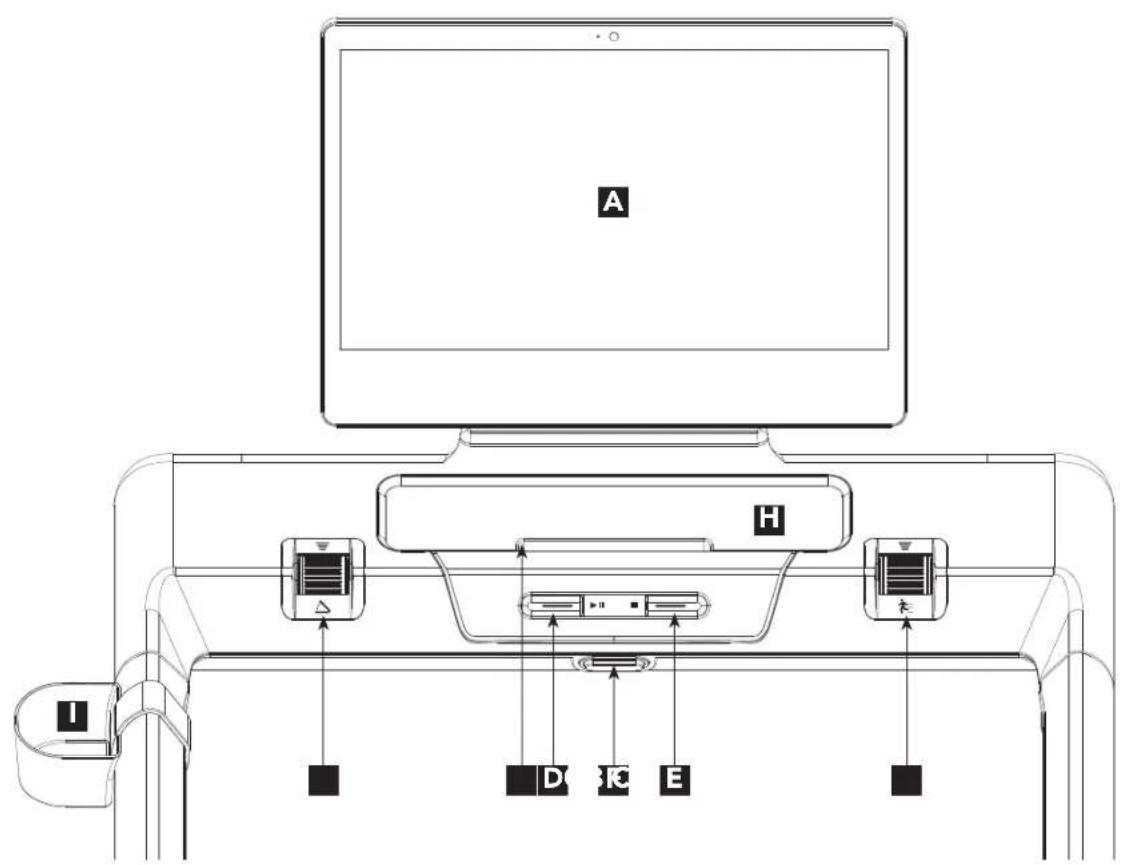
CONSOLE OPERATION
Note: There is a thin protective sheet of clear plastic on the overlay of the console that should be removed before use.
A) TOUCH SCREEN: control UI for functions.
B) LEFT CONTROL WHEEL (INCLINE): adjust incline up & down (0.5%).
C) RIGHT CONTROL WHEEL (SPEED): adjust speed up & down (0.1 km/h).
D) START BUTTON: press to begin exercising, start your workout.
E) STOP BUTTON: press to stop your workout.
F) SAFETY KEY: enable the treadmill when safety key is inserted.
G) TABLET/READING RACK: holds tablet or reading material.
H) STORAGE SPACE: holds personal belongings.
I) WATER BOTTLE HOLDER: movable holder and holds personal water bottle.
CONSOLE ADJUSTMENT
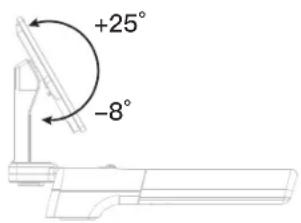
text_image
+25° -8°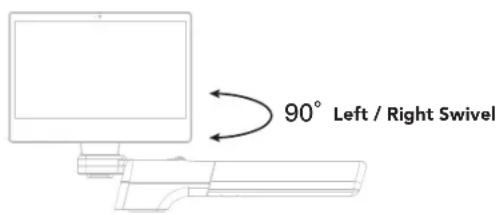
text_image
90° Left / Right Swivel
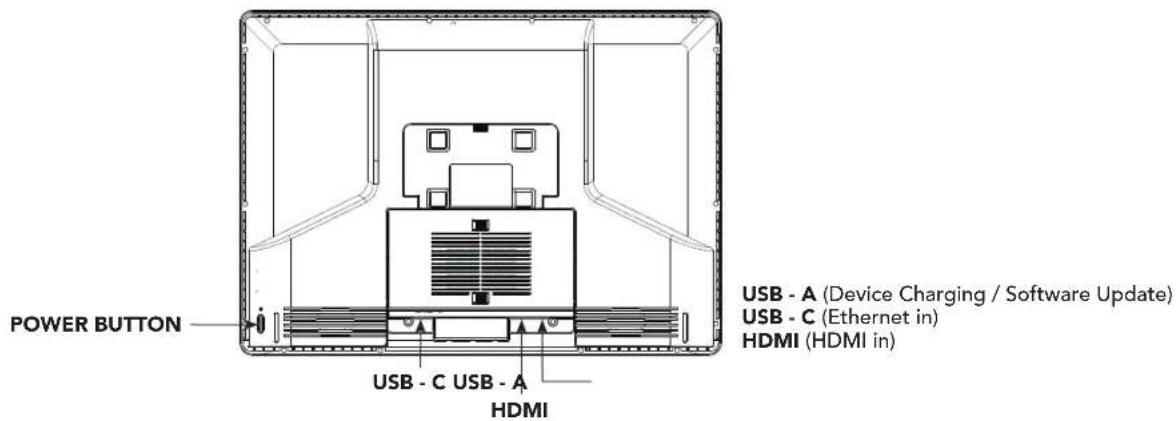
text_image
POWER BUTTON USB - A (Device Charging / Software Update) USB - C (Ethernet in) HDMI (HDMI in) USB - C USB - A HDMIPOWER BUTTON
• To switch to SLEEP MODE, press the power button after power on.
• To wake the bike, press the power button.
- To power off, switch to SLEEP MODE, then unplug the power cord.
WARNING
Heart rate monitoring systems may be inaccurate. Over-exercising may result in serious injury or death. If you feel faint, stop exercising immediately.
MAIN PAGE & PROGRAMS
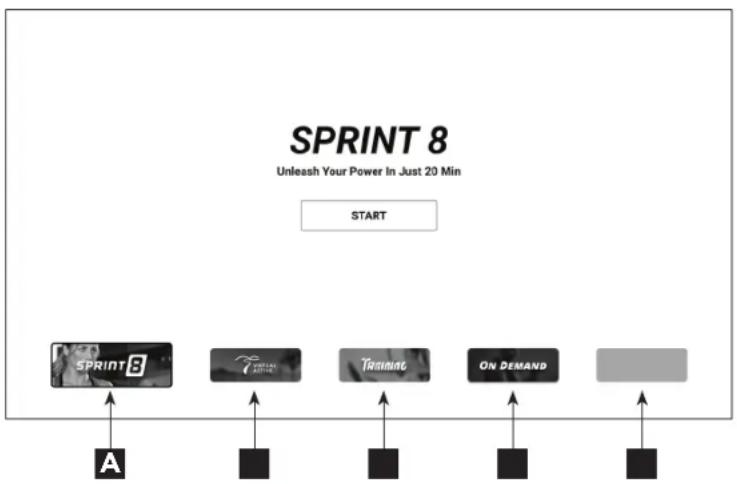
flowchart
graph TD
    A["START"] --> B["SPRINT8"]
    B --> C["Teaming"]
    C --> D["On Demand"]
    D --> E["A"]
A) SPRINT 8: 20-minute high-intensity interval training session.
B) VIRTUAL ACTIVE: transforms ordinary exercise into breathtaking journeys through exotic locales.
C) TRAINING: quick manual start / goal setting mode for training.
D) ON DEMAND: workout classes powered by instructors.
E) EXTENSION PROGRAM: reserved for new program/app
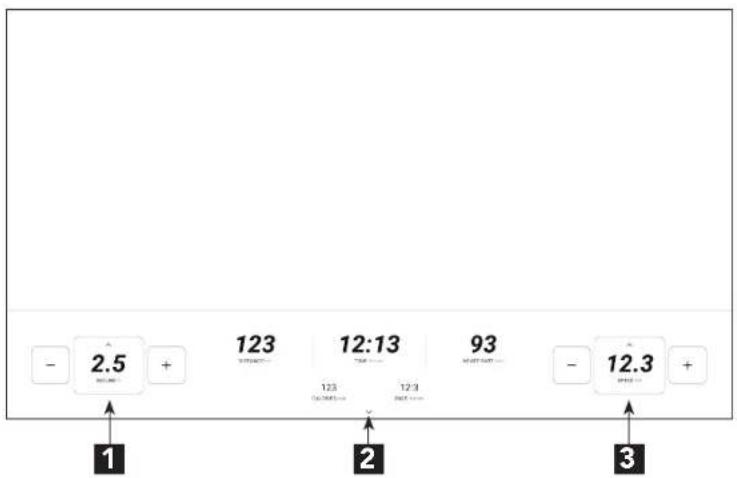
MAIN DASHBOARD
bar
| Value | Label | |---|---| | 2.5 | - | | 123 | Interaction | | 12:13 | Time | | 93 | Interest | | 12.3 | Positive | | 1 | 1 | | 2 | 2 | | 3 | 3 |1) INCLINE ADJUSTMENT
- Left " - " button for decrease incline level
- Right " + " button for increase incline level
- Default: 0% incline
- Minimal: 0%
- Maximal: 15%
• Each level: 0.5% (total 30 levels) - Touch upper small arrow for incline quick control
2) HIDE DASHBOARD
Press the bottom small arrow to hide the Dashboard to mini type dashboard
3) SPEED ADJUSTMENT
- Left " - " button for decrease speed
- Right " + " button for increase speed
- (Limitation: hold the plus button, the max increase speed is 1.2 km)
-
Default: 0.8 km (when running belt is active)
-
Minimal: 0 km (when running belt is stop)
- Maximal: 20 km
• Each level: 0.1 km (total 193 levels) (from 0.8 – 20 km) - Touch upper small arrow for incline quick control
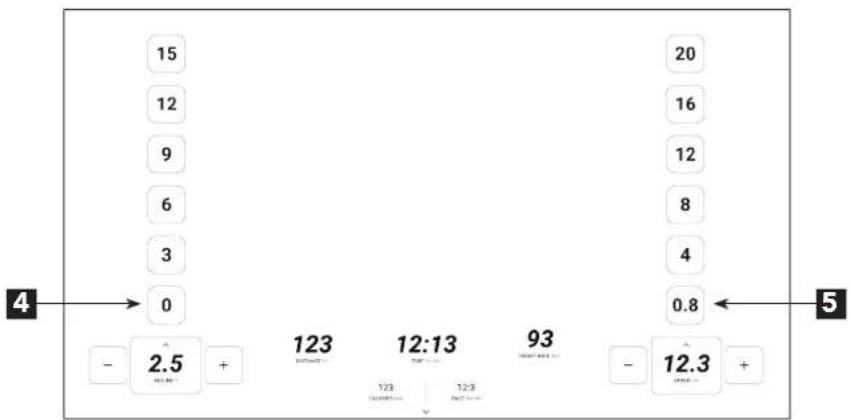
MAIN DASHBOARD - QUICK CONTROL MENU OF INCLINE AND SPEED
other
| Position | Value | |---|---| | 1 | 15 | | 2 | 12 | | 3 | 9 | | 4 | 6 | | 5 | 3 | | - | 0 | | - | 2.5 (###) + | | - | 123 (###) - | | - | 12:13 (###) - | | - | 93 (###) + | | - | 12.3 (###) + | | - | 0.8 (###) - | The chart displays a vertical layout with labeled positions and numerical values.
4) INCLINE ADJUSTMENT QUICK CONTROL
- Select the specified incline level from quick control menu.
- The selected level will display on incline level block.
- Treadmill will adjust the incline according to user's selection.
- Select the specified speed level from quick control menu.
- The selected level will display on speed level block.
- Treadmill will adjust the speed according to user's selection.
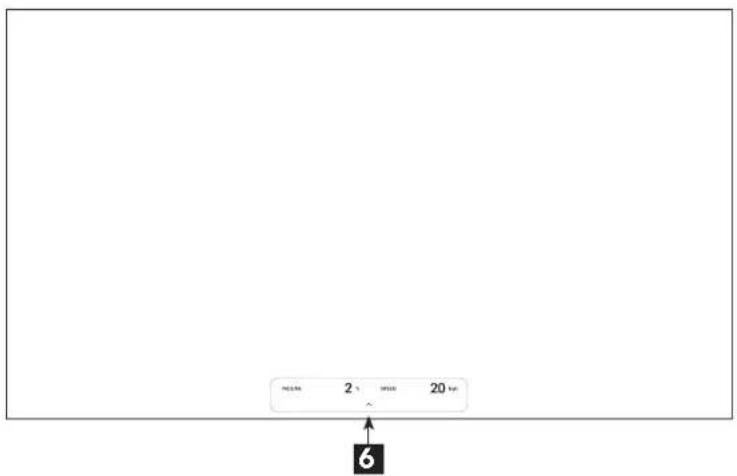
MINI DASHBOARD
text_image
2.1 20 km 66) MINI DASHBOARD
Touch the area of mini dashboard to turn back main dashboard.
HOW TO SET UP THE CONSOLE
- Select the desired language and time zone.
- Connect to your wireless network.
- Set up your Tread Lock. (depend on your equipment type)
- Log into your console service account.
- Check for software updates.
For more details, please see below.
CONNECTING TO THE INTERNET
To login to your account and store your workout history, you must connect the console to a wireless network. Follow the prompts on the screen to connect the console to your wireless network.
- You are able to access the Wi-Fi setting at unboxing process and setting page.
- Select your Wi-Fi network and enter the password. Tap Done button.
- Wi-Fi setting can also be found at setting page. Touch the setting button (the gear icon) on main page to show setting page.
LOG INTO OR CREATE A HORIZON ACCOUNT
Provide your email address, and follow the prompts on the screen to sign up for or log into your Horizon account. You will be able to save each of your workout history and check them in profile page with logging in your Console service account.
CHECK FOR SOFTWARE UPDATES.
For the best results, regularly check for firmware updates. First, touch the setting button (the gear icon), touch the tile of Device Info. The console will check the availability of the software. IMPORTANT: To avoid damaging the console, do not turn off or unplug the equipment while the software is being updated.
The screen will show the progress of the update. When the update is complete, the equipment will turn off and then turn back on. If it does not, use the power switch to turn the equipment off, wait for a few seconds, and then turn it back on again. Note: It may take a few minutes for the console to be ready for use.
TREAD LOCK
Warning: Hide the Tread Lock passcode from person with reduced physical, sensory or mental capabilities that impair the safe use if the equipment.
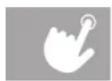
- Tread Lock is an additional safety feature that requires a passcode to unlock the Tread-XP.
- Setting up a 4-digit passcode will be required when using your Tread-XP for the first time. All users will need to enter this passcode after 45 seconds of inactivity, except during a workout or if Tread Lock is turned off.
- To off the Tread Lock, please switch it in setting page.
HOW TO CHANGE CONSOLE SETTING
- Touch the setting button (the gear icon) on main page to show setting page.
- Navigate the setting page and change as desired. To view a setting detail, simply touch the tile. You may be able to view and change settings in the following setting detail:
System Bluetooth
| - Wifi | - Wearable Device |
| - Sleep Mode | - Speaker |
| - Brightness | - FTMS |
| - Language | |
| - Unit | |
| - Volume | |
| - Cast | |
| - Time Zone | |
| - Device Info | |
| - Tread Lock |
- Customize the time from idle to Standby Mode. Touch Sleep Mode to adjust the time.
- View device's information. Touch Device Info to view software version and console serial number. The availability of software update will be check automatically.
- Cast the screen from other devices to the console. Once the video signal be received from HDMI, the casting confirm information will be pop up. Otherwise, touch Cast, then touch HDMI area to activate the casting.
- Executing FTMS. Touch FTMS on setting page, then your equipment is ready to go. Once you connected the equipment, the success information will show up to ask you to turn on casting with your FTMS experience or start workout immediately.
SELECTING A CLASS
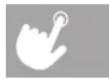
Tap a program on main page then tap start button.
- Select sprint8 and set the level that suits you best to start a HIIT session.
- Select a scenic class from Virtual Active list, the equipment will make adjustments based on the scenery along the route.
- Select an instructed class from On Demand list, your instructor will guide you through your workout.
- Select GO for a session without any class, the equipment will start directly, without any videos or preset programs.
CLASS TYPE
Class types may include the following:
- Treadmill/Studio Cycle(depend on the equipment type)
- Cardio
- Yoga
- Strength
ADDING A PROFILE
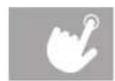
To let another person use your equipment, tap the login button at the upper right of the screen and select "Add a User" icon. The new user can log in with an existing Console service account or tap Create Account to set up a new one.
FOLDING TREADMILLS
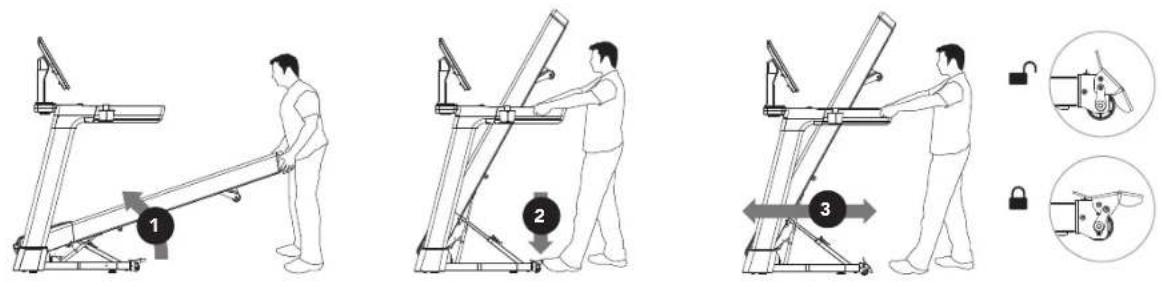
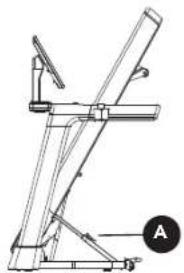
Some treadmills have a deck that can fold for storage and transport. To fold, firmly grasp the back end of the treadmill. Carefully lift the end of the treadmill deck into the upright position until the lock latch engages and securely locks the deck into position. Make sure the deck is securely latched before letting go.
UNFOLDING
Firmly grasp the back end of the treadmill. If your treadmill has a FOOT LOCK
LATCH (A), to unfold, gently press down on the foot lock latch with your foot until the lock latch disengages. Carefully lower the deck to the ground.
natural_image
Technical line drawing of a mechanical device with labeled component A (no text or symbols beyond label)
Waste Disposal
Products are recyclable.
At the end if its useful life please dispose of
this article correctly and safely
(local refuse sites).
AUFBAU
WARNING
natural_image
Technical line drawing of a treadmill with a circular highlight on the side panel (no text or symbols)text_image
Technical diagram of a treadmill assembly with labeled parts and a magnified inset showing internal components.text_image
Technical diagram of a treadmill with labeled parts and an inset showing a close-up view of the component.text_image
Technical diagram of a treadmill with numbered parts and labeled parts (E, 3, 7, 8, 9, 10, 11)text_image
Technical diagram of a treadmill with labeled parts and corresponding sectional views A, B, C, Dnatural_image
Line drawing of a treadmill with open lid and side-mounted legs (no text or symbols)natural_image
Technical line drawing of a mechanical device with labeled component A (no text or symbols beyond label)
Abfallentsorgung
natural_image
Technical line drawing of a treadmill with a circular highlight on the side panel (no text or symbols)
text_image
CONSOLE LUIDSPREKERS TABLETHOUDER BIDONHOUDER AAN-/UITKNOP NETSNOER MOTORKAP QUICK CONTROL-WIEL HANDGREEP START/STOP-KNOP PLAATSING VEILIGHEIDSSLEUTEL CONSOLEMAST VOETVERGRENDELING (ONDER DECK) LOOPBAND/LOOPVLAK ZIJRAIL WARNING MAARTSCHWIEL ATTENTION CAUTION VOETVERGRENDELIINGSSTICKER (ONDER VOETVERGRENDELING) AFDEKKAP ROL ROL ACHTER BOUTEN VOOR SPANNEN/VERSTELLEN NEDERLANDS 48 TRANSPORTWIELMEEGELEVERD GEREEDSCHAP: VOORMONTAGE
text_image
Technical diagram of a treadmill assembly with labeled parts and a magnified inset showing internal components.text_image
Technical diagram of a treadmill with labeled parts and an inset showing a cable assembly detailtext_image
Technical diagram of a treadmill with labeled parts and exploded views, including front, side, and top views.natural_image
Line drawing of a treadmill with a laptop on top, showing front and side views (no text or symbols)MONTAGE VOLTOOID!
3) SNELHEIDSAANPASSING
LOG IN OF MAAK EEN HORIZON-ACCOUNT AAN
INKLAPBARE LOOPBANDEN
natural_image
Technical line drawing of a mechanical device with labeled component A (no text or symbols beyond label)
Afvalverwijdering
natural_image
Technical line drawing of a treadmill frame with no visible text or symbols
text_image
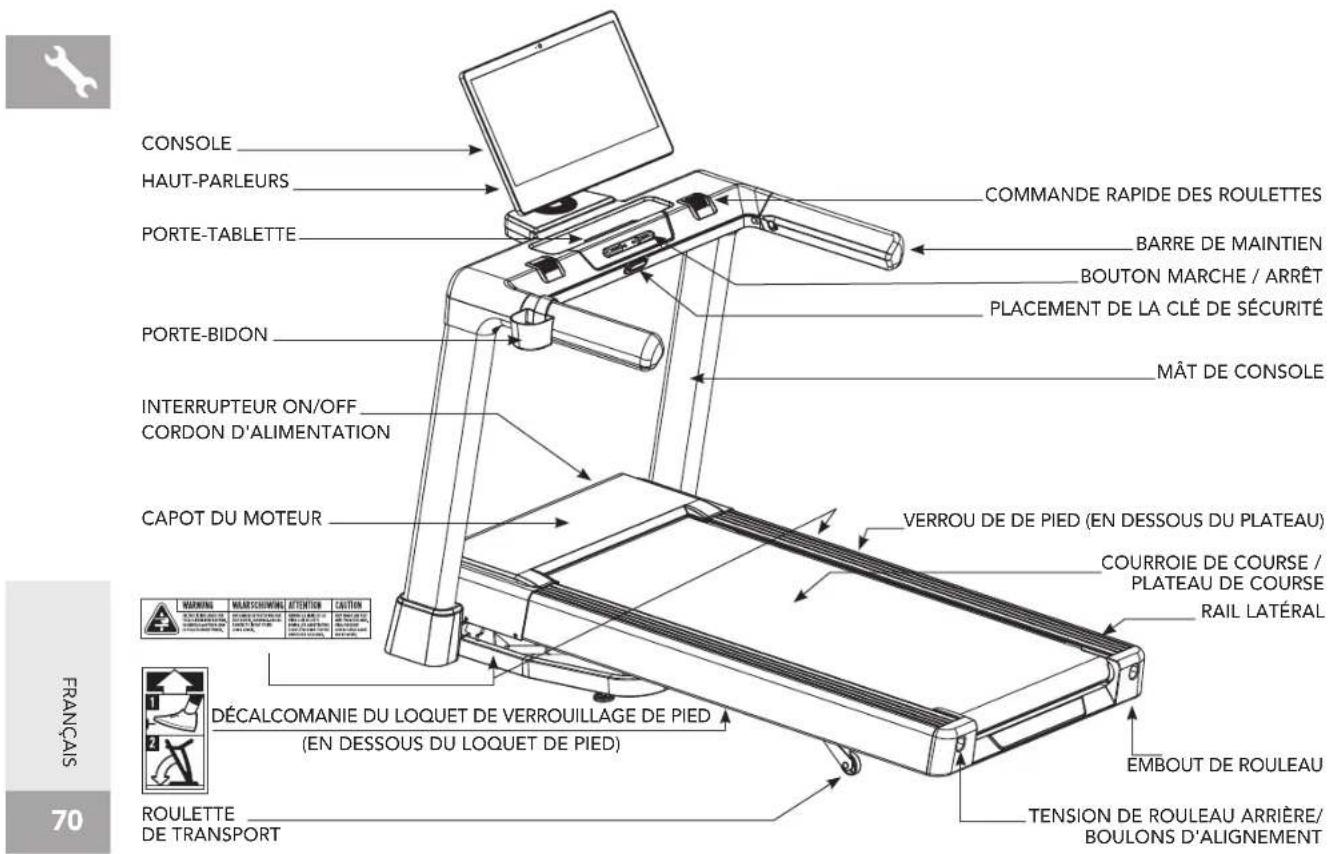
CONSOLE HAUT-PARLEURS PORTE-TABLETTE PORTE-BIDON INTERRUPTEUR ON/OFF CORDON D'ALIMENTATION CAPOT DU MOTEUR COMMANDE RAPIDE DES ROULETTES BARRE DE MAINTIEN BOUTON MARCHE / ARRÊT PLACEMENT DE LA CLÉ DE SÉCURITÉ MÂT DE CONSOLE VERROU DE DE PIED (EN DESSOUS DU PLATEAU) COURROIE DE COURSE / PLATEAU DE COURSE RAIL LATÉRAL DÉCALCOMANIE DU LOQUET DE VERROUILLAGE DE PIED (EN DESSOUS DU LOQUET DE PIED) EMBOUT DE ROULEAU TENSION DE ROULEAU ARRIÈRE/ BOULONS D'ALIGNEMENT ROULETTE DE TRANSPORT WARNING MAIRSCHINWIRE ATTENTION CAUTION 70OUTILS INCLUS :
text_image
Technical diagram of a treadmill assembly with labeled parts and a magnified inset showing internal components.text_image
Technical diagram of a treadmill with labeled parts and an inset showing a cable assembly detailtext_image
Technical diagram of a treadmill with numbered parts and labeled parts (E, 10, 11)text_image
Technical diagram of a treadmill with labeled parts including fuses, wheels, and a screen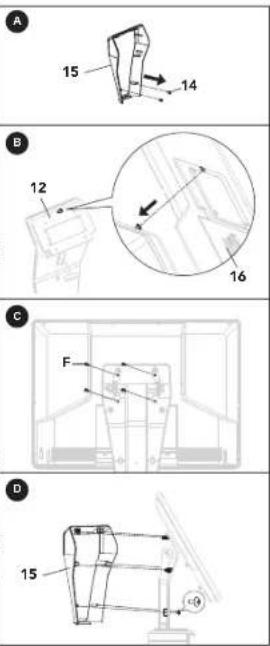
text_image
A 15 14 B 12 16 C F D 15natural_image
Line drawing of a treadmill with a laptop on top, showing front and side views (no text or symbols)LE MONTAGE EST TERMINÉ !
natural_image
Technical line drawing of a mechanical device with labeled component A (no text or symbols beyond label)
natural_image
Blank white image with no visible content, text, or symbols
natural_image
Blank white image with no visible content, text, or symbols
natural_image
Blank white image with no visible content, text, or symbols
natural_image
Blank white image with no visible content, text, or symbols
natural_image
Blank white image with no visible content, text, or symbols
natural_image
Completely blank white image with no visible content, text, or symbols.
natural_image
Blank white image with no visible content, text, or symbols
natural_image
Completely blank white image with no visible content, text, or symbols.
natural_image
Blank white image with no visible content, text, or symbols
natural_image
Blank white image with no visible content, text, or symbols