H-10420 - Vacuum Cleaner Uline - Free user manual and instructions
Find the device manual for free H-10420 Uline in PDF.

User questions about H-10420 Uline
0 question about this device. Answer the ones you know or ask your own.
Ask a new question about this device
Download the instructions for your Vacuum Cleaner in PDF format for free! Find your manual H-10420 - Uline and take your electronic device back in hand. On this page are published all the documents necessary for the use of your device. H-10420 by Uline.
USER MANUAL H-10420 Uline
natural_image
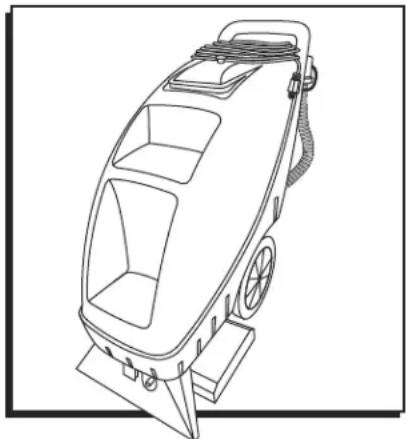
Line drawing of a portable water heater or scrubber device (no text or symbols)SAFETY
BEFORE FIRST USE

IMPORTANT! This appliance must be grounded. See "Grounding" on page 2.

IMPORTANT! Pump and solution lines of this unit contain windshield washer fluid to protect it from freezing temperatures.
Fill the solution tank with at least one gallon of clean water and run the machine to remove the winterizer and clear the pump and solution lines. Dispose of the winterizer in accordance with local regulations.

IMPORTANT! Failure to perform this step will result in the blue winterizer solution being applied to the surface you are working on.
- Use this unit only as described in these instructions.
- This appliance is for use on a nominal 115-volt (three-prong) circuit.
- Misuse of product may result in damage not covered by warranty.
- Do not leave unit when plugged in. Unplug from outlet when not in use and before servicing.
- Use only manufacturer's recommended attachments.
-
Do not pull or carry by cord, use cord as a handle, close door on cord or pull cord around sharp edges or corners. Do not run unit over cord. Keep cord away from heated surfaces.
-
Do not unplug by pulling on cord. To unplug, grasp the plug, not the cord.
- Do not handle plug or appliance with wet hands.
- Do not put any objects into openings. Do not use with any opening blocked: keep free of dust, lint, hair or anything that may reduce airflow.
- Keep hair, loose clothing, fingers and all parts of body away from openings and moving parts.
- Do not pick up anything that is smoking or burning, such as cigarettes, matches or hot ashes.
- Do not use to pick up hazardous chemicals.
• Turn off all controls before unplugging. - Turn unit off immediately if foam or liquid comes from machine exhaust. Empty and clean out recovery (dirty) tank and use defoamer to correct the problem.
- Do not use to pick up flammable or combustible liquids such as gasoline or use in areas where they may be present.
- Do not use where oxygen or anesthetics are used.
- Replace damaged or worn parts immediately with genuine original equipment parts to maintain safety.
- Do not use with damaged cord or plug. If unit is not working properly or damaged in any way, contact Uline Customer Service at 1-800-295-5510.
GROUNDING

IMPORTANT! This appliance must be grounded. The cord features an equipment-grounding conductor and grounding plug to reduce the risk of electric shock.

IMPORTANT! Plug must be inserted into an appropriate outlet that is properly installed and grounded in accordance with all local codes and ordinances.

WARNING! Improper connection of the equipment-grounding conductor can result in a risk of electric shock. Check with a qualified electrician or service person if you are in doubt as to whether the outlet is properly grounded.

WARNING! Do not modify the provided plug. If necessary, have a proper outlet installed by a qualified electrician.
GENERAL INFORMATION
text_image
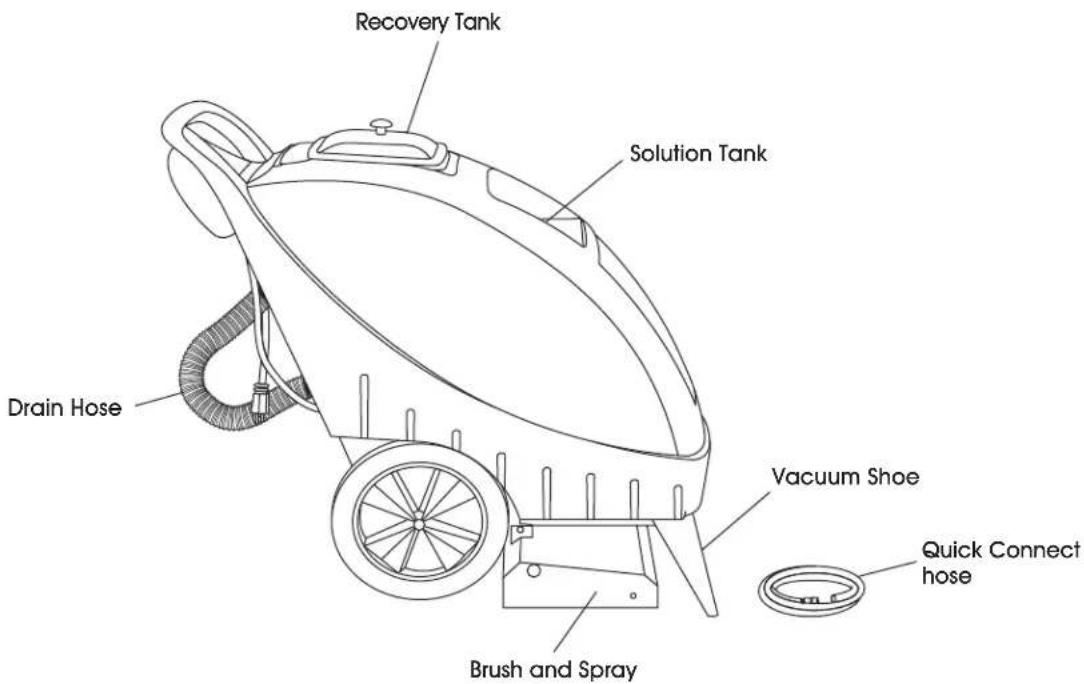
Recovery Tank Solution Tank Drain Hose Vacuum Shoe Brush and Spray Quick Connect hoseOPERATION

IMPORTANT! Before using carpet cleaning chemicals, test on an inconspicuous part of the carpet for color fastness.
BEFORE CLEANING
Place desired solution on a small piece of clean, white material or tissue, then rub the carpet vigorously. Excessive amounts of dye showing on the material would indicate that the colors are not fast and should not be wet cleaned.
- Fill the solution tank with nine gallons of warm water. Do not overfill.

WARNING: Do not exceed water temp of 150^ F.
- Measure carpet cleaning solution at recommended ratio into the clean water tank.

NOTE: Do not use the waste tank to fill the solution tank. Debris can damage pump or block the jet.
OPERATION CONTINUED
- Add defoamer to clean water tank as needed.
- Plug power cable into outlet.

WARNING: Ensure machine is properly grounded.
- Press the VACUUM switch to the on position.
- Press the PUMP and BRUSH switches to the on position.
- Push the brush lowering pedal forward to lower carpet brush. Push down and back to raise brush. (See Figure 1)
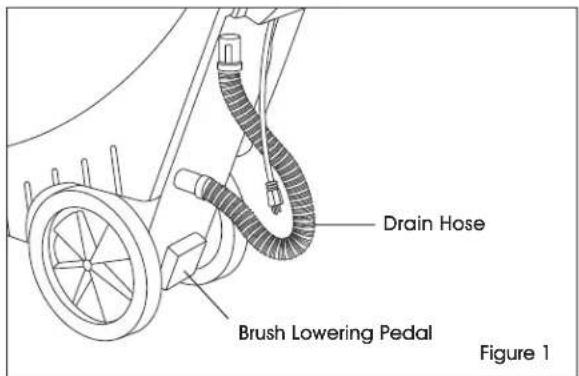
text_image
Drain Hose Brush Lowering Pedal Figure 1- Press and hold solution switch to apply the cleaning solution. Simultaneously pull the machine backward to clean. Release the solution spray button about 12" before the end of run. (See Figure 2)
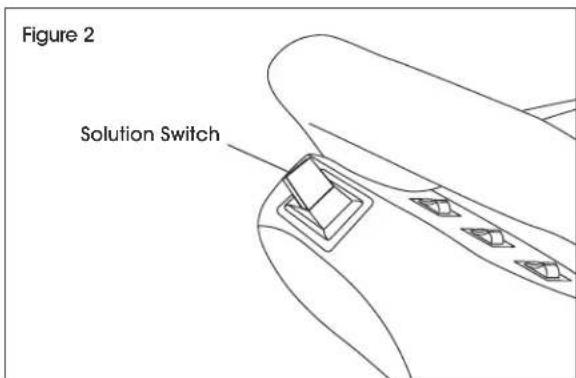
text_image
Figure 2 Solution Switch
NOTE: Slightly overlap the next cleaning pass to prevent streaking.

NOTE: A two wet pass maximum is recommended to avoid overwetting.

IMPORTANT! After a few passes, check the waste tank to see that no foam is present. Add extra defoamer if necessary.
- Empty recovery tank when it is approximately 3/4 full.

IMPORTANT! Do not refill the solution tank without emptying all contents of the recovery tank first.
STORAGE
When cleaning is finished:
- Empty the recovery tank using the drain hose. Rinse recovery tank when empty.
- Attach quick connect hose to solution hose fitting. (See Figure 3)
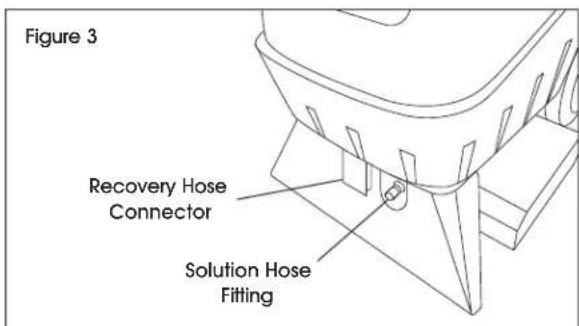
text_image
Figure 3 Recovery Hose Connector Solution Hose Fitting- Turn the PUMP switch on to drain the solution tank.
- To disconnect solution hose, push locking ring and pull hose off fitting. (See Figure 4)
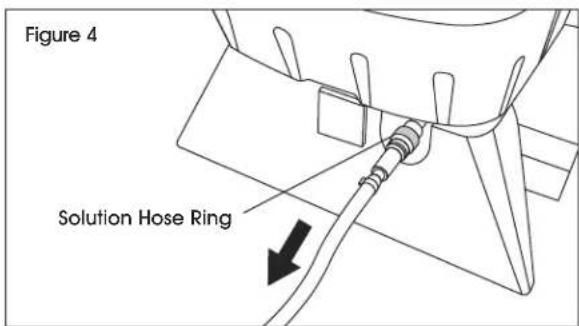
text_image
Figure 4 Solution Hose Ring- Empty and leave recovery tank open when storing.
- Leave brush raised for storage.
OPERATION CONTINUED
ACCESSORIES/TOOLS (OPTIONAL)
Use for upholstery cleaning and hard-to-reach areas.
-
Attach recovery hose to recovery hose connection of vacuum shoe.
-
Connect accessory solution hose to the solution hose connection at the front of the machine.

NOTE: Push back the locking ring to secure hose to machine.
- Turn on vacuum and pump.
MAINTENANCE
DAILY
- Check the spray jet for blockage and uniform spray pattern. Remove jet and blow through to clean. Do not use a pin as this may cause damage to the jet.
- Check and remove any debris or lint buildup from the vacuum head, brush and brush housing.
- Wash tanks with clean water after each use. Pour clean water into solution tank and spray through spray tip to clear chemical residue from the pump, lines and spray tip. Run machine for a few minutes to aid drying and prevent bacteria and odors.
WEEKLY
Inspect hoses, hose cuffs, main cable, plug, switches and rubber seal on the recovery tank lid for damage.

NOTE: Store the unit with the recovery tank lid open or removed.

CAUTION: Protect unit from freezing. Damage from freezing could cause machine to malfunction.
TROUBLESHOOTING
| OPERATING ISSUE CAUSES RECOMMENDATIONS | ||
| Motor is not running Power | er not reaching main switch. | Check power supply, fuses and circuit breaker. |
| Defective power cord. | Replace with 14 gauge cord. | |
| Blown fuse or tripped circuit breaker. | Reset circuit breaker. | |
| Loss of suction Vacuum head | head blocked. | Visually inspect and clear blockage. |
| Hoses blocked. | Visually inspect and clear blockage. | |
| Recovery tank not properly sealed. | Check tank for damage or adjust lid for proper fit. | |
| Brush malfunction Belt broken. | Brush jammed. | Replace belt. |
| Visually inspect and clear blockage. | ||
| Spray jet malfunction Jet | blocked. | Visually inspect and clean according to maintenance instructions. |
| Solution filter blocked. | ||
natural_image
Line drawing of a portable water heater device with wheels and mounting base (no text or symbols)SEGURIDAD
natural_image
Line drawing of a cleaning or cleaning tool with no visible text or symbolsSÉCURITÉ
AVANT LA PREMIÈRE UTILISATION