
H-10166 - Vacuum Cleaner Uline - Free user manual and instructions
Find the device manual for free H-10166 Uline in PDF.

User questions about H-10166 Uline
0 question about this device. Answer the ones you know or ask your own.
Ask a new question about this device
Download the instructions for your Vacuum Cleaner in PDF format for free! Find your manual H-10166 - Uline and take your electronic device back in hand. On this page are published all the documents necessary for the use of your device. H-10166 by Uline.
USER MANUAL H-10166 Uline
natural_image
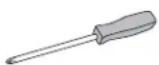
Line drawing of a vacuum cleaner with handle and base (no text or symbols)TOOLS NEEDED
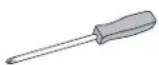
Phillips Screwdriver
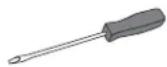
Flathead Screwdriver
SAFETY
GROUNDING
STOP
WARNING! This appliance must be grounded. If it should malfunction or break down, grounding provides a path of least resistance for electric current to reduce the risk of electric shock. This machine is equipped with a cord having an equipment-grounding conductor and grounding plug. The plug must be inserted into an appropriate outlet that is properly installed and grounded in accordance with all local codes and ordinances.
STOP
WARNING! Improper connection of the equipment-grounding conductor can result in a risk of electric shock. Check with a qualified electrician or service person if you are in doubt as to whether the outlet is properly grounded. Do not modify the plug provided with the appliance – if it will not fit the outlet, have a proper outlet installed by a qualified electrician.
- Read and understand all instructions before using this unit.
- This appliance is for use on a nominal 115-volt circuit and has a grounding plug.
- Use this unit only as described in these instructions. Use only manufacturer's recommended attachments. To reduce the risk of personal injury or damage to unit, use only Tornado® recommended accessories.
- This vacuum is intended for commercial use only. It is designed exclusively to pick up dirt, dry debris and dust in an indoor environment and is not constructed for any other use. The pickup of any type of fluid or dangerous/toxic materials is prohibited. Use only recommended accessories.

WARNING! To reduce the risk of fire, electric shock or injury, do not leave appliance unattended when plugged in. Unplug from outlet when not in use and before servicing.

WARNING! Electric shock could occur if used outdoors or on wet surfaces.
- Do not allow to be used as a toy. Close attention is necessary when used by or near children.
- Do not use with damaged cord or plug. If appliance is malfunctioning, has been dropped, damaged, left outdoors or dropped into water, call Uline Customer Service at 1-800-295-5510.
- Do not pull or carry by cord, use cord as handle, close a door on cord, or pull cord around sharp edges or corners. Do not run appliance over cord. Keep cord away from heated surfaces.
- Do not unplug by pulling on cord. To unplug, grasp the plug, not the cord.
- Do not handle plug or appliance with wet hands.
- Turn off all controls before unplugging.
- Do not block or put any object into openings. Keep openings free of dust, lint, hair and anything that may reduce airflow.
SAFETY CONTINUED
- Keep hair, loose clothing and body parts away from openings and moving parts.
- Do not pick up anything that is burning or smoking, such as cigarettes, matches or hot ashes.
- Do not use without vacuum bag and/or filters in place.
- Use extra care when cleaning stairs.
-
Do not use to pick up flammable or combustible liquids such as gasoline or use in areas where they may be present.
-
Connect to a properly grounded outlet only.
- This vacuum is not intended for use by persons (including children) with reduced physical, sensory or mental capabilities, or lack of experience and knowledge, unless they have been given supervision or instruction concerning use of the vacuum by a person responsible for their safety.
- Keep children and unauthorized persons away from the machine when in use.
ASSEMBLY

WARNING! Plastic bags or film can be dangerous. To avoid danger of suffocation, keep away from babies and children.
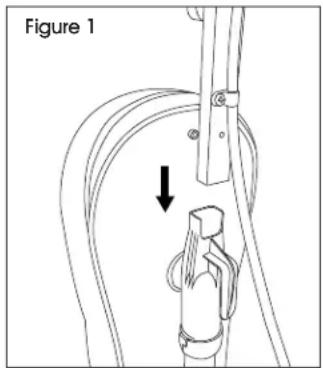
- Slide handle tube into the connector, aligning the hole in the handle tube with hex-shaped cavity at the top of the connector. (See Figure 1)
text_image
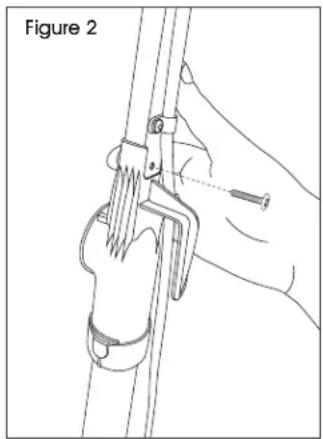
Figure 1- Hold the hex nut in the hex-shaped cavity on back of connector with finger. Insert screw and thread into hex nut. Continue to hold hex nut in place and tighten screw with a Phillips screwdriver. Do not overtighten. (See Figure 2)
natural_image
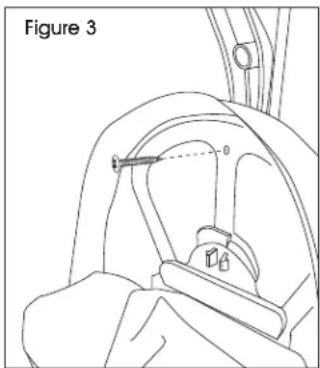
Illustration of a hand using a tool to lift a cable or cable with a spring, labeled 'Figure 2' (no text on diagram itself)- Slide screw through plastic cord hook from inside cloth bag. Align screw with hole in handle tube. Tighten screw. (See Figure 3)
text_image
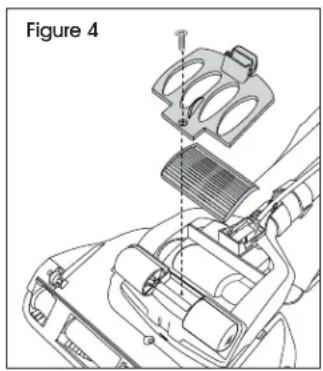
Figure 3- Remove screw from filter cover. Lift filter and cover away from vacuum. (See Figure 4)
- Insert the connector plug into the back of the unit at the rear of the base. (See Figure 5)

IMPORTANT! Ensure the connector plug is fully inserted.
text_image
Figure 4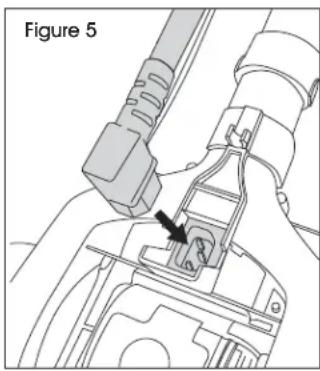
natural_image
Technical line drawing of a mechanical assembly with a labeled component (no text or symbols present)- Replace filter and filter cover. Secure with previously removed screw.
OPERATION
POWER SUPPLY

STOP! Before using, ensure the connector plug is securely attached to the base and that the power plug is plugged into a polarized outlet.

NOTE: Always unplug the vacuum by grasping the power source plug (not the power cord) and disconnecting from the outlet.
The power cord is stored at the back of the vacuum and is looped around the quick release cord hooks. The plug is designed to attach to the power cord during storage.
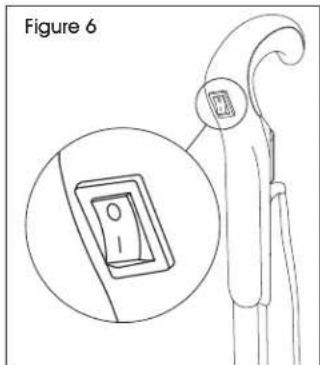
POWER SWITCH
The power switch is located in the handle of the vacuum. (See Figure 6)
- Push down (I) to turn on.
- Push up (O) to turn off.
text_image
Figure 6POWER CORD STORAGE
When finished using vacuum, return it to the upright position. Ensure vacuum is turned off.

NOTE: Always unplug the vacuum by grasping the power source plug (not the power cord) and disconnecting from the outlet.
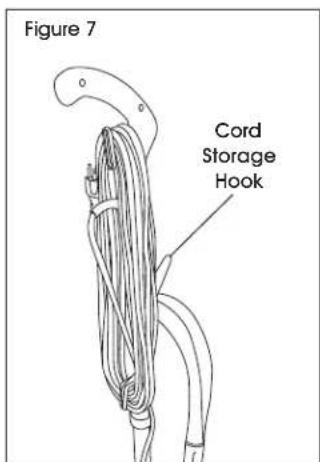
Wind the cord around the quick release cord hooks on the back of the vacuum, or hang on the cord storage hook on the front of the vacuum. Attach the plug end to the power cord. (See Figure 7)
text_image
Figure 7 Cord Storage HookVACUUM USE
This vacuum is designed to effectively and safely clean all types of carpeting, wood, linoleum and vinyl floors.
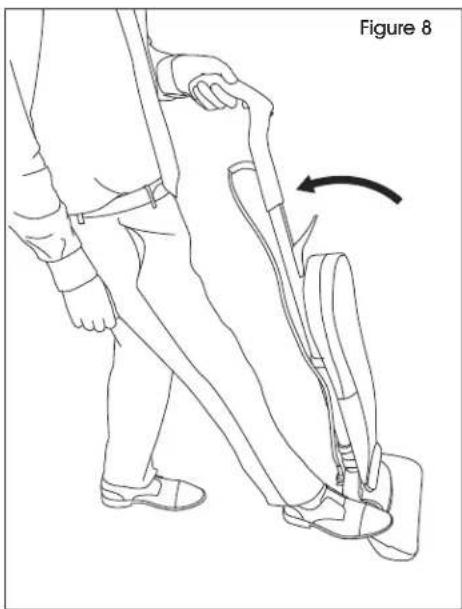
To place vacuum in position for use, lightly press foot on the base and pull the handle backward. (See Figure 8)
natural_image
Line drawing of a person using a walking device with a curved arrow indicating motion (no text or symbols)MAINTENANCE
ROUTINE MAINTENANCE
For maximum performance, check and maintain vacuum parts regularly.

WARNING! To avoid electrical shock or injury from moving parts, always turn off the power switch and unplug the power source plug before performing maintenance or troubleshooting.

IMPORTANT! Always unplug by grasping the power source plug. Never pull on the power cord to unplug.

NOTE: Vacuuming new carpet or vacuuming fine powders may clog the dust bag. Check dust bag often.
REPLACING THE DUST BAG

IMPORTANT! Check dust bag weekly. Replace dust bag when it is near full or when cleaning suction diminishes. Never reuse a dust bag.
- Unplug vacuum by grasping and pulling on the power source plug.
-
Unzip cloth bag. Unlock collar retainer by pressing on the two tabs and pulling the top toward user. Dispose of used dust bag. (See Figure 9)
-
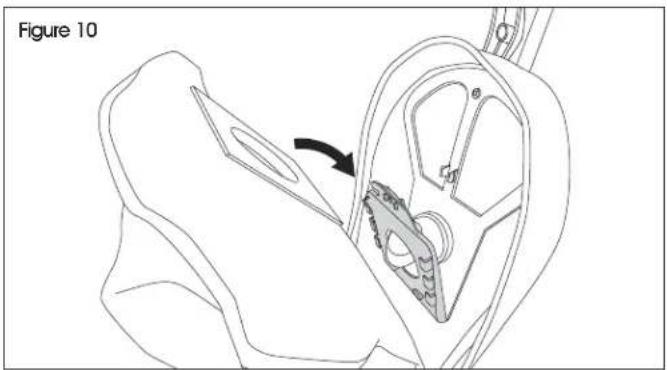
Slide collar of new dust bag completely into collar retainer. (See Figure 10)
natural_image
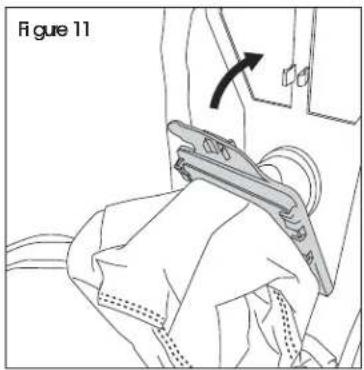
Technical line drawing of a mechanical component with an arrow indicating a process or assembly (no text or symbols present)- Push collar retainer back into position and secure in place. (See Figure 11)
- Tuck the remainder of the dust bag completely inside the cloth bag. Ensure it lays flat, top to bottom, without bunching. Zip cloth bag.
natural_image
Line drawing of a person using a tool to lift a device, labeled 'Figure 11' (no text or symbols on the diagram itself)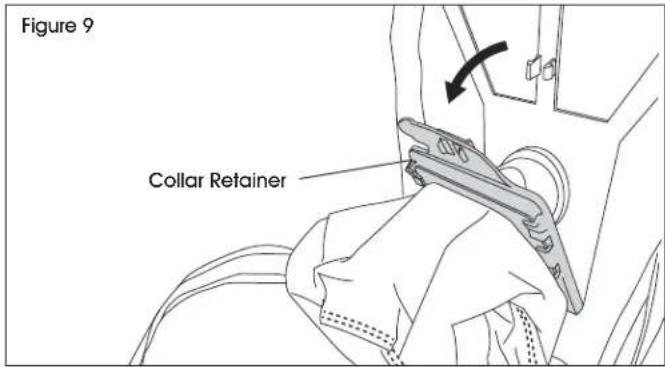
text_image
Figure 9 Collar RetainerMAINTENANCE CONTINUED
CLEANING THE DUST TUBE
The vacuum features a dust tube designed to optimize cleaning power. For best performance, routinely check and clear excess dust and other debris.

WARNING! To avoid electrical shock or injury from moving parts, always turn off the power switch and unplug the power source plug before performing maintenance or troubleshooting. Always unplug by grasping the power source plug. Never pull on the power cord to unplug.

NOTE: Cover floor with newspaper to catch any loose material or dust removed during cleaning.
- Release bag tension spring. (See Figure 12)
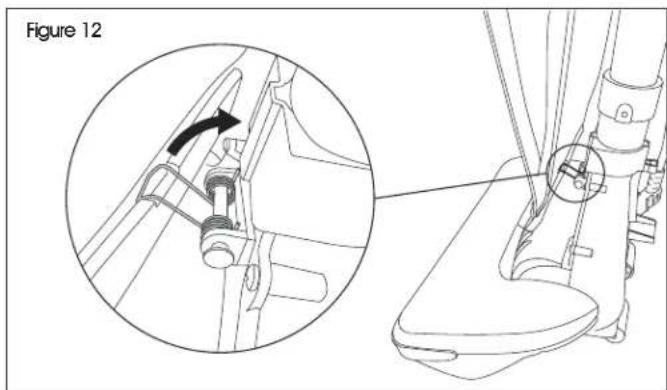
text_image
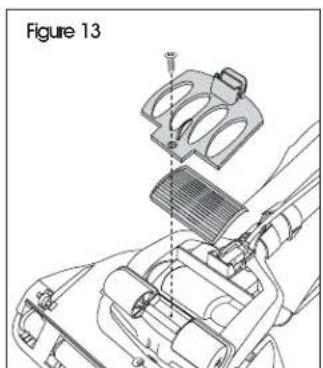
Figure 12- Remove filter cover screw, filter cover and filter. (See Figure 13)
- Unplug connector plug. (See Figure 14)
text_image
Figure 13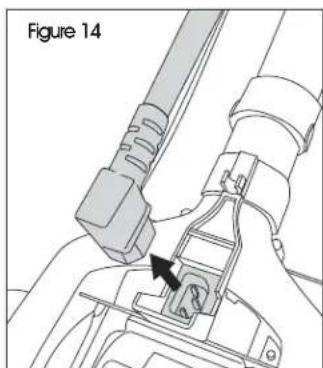
natural_image
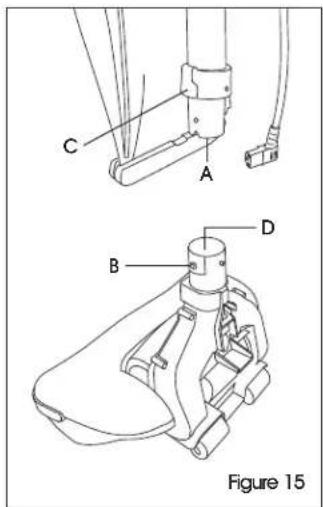
Technical diagram of a mechanical assembly with a labeled component (Figure 14), showing no readable text or symbols.- Lift dust tube (A) while pressing the tube release button (B) located under the rubber collar. Tube release button can be pressed through the rubber collar (C). (See Figure 15)
-
Use a wire brush to clean out the inside of the dust tube (A) and the top section of the base (D). (See Figure 15)
-
Align tube release button on the tube and rubber collar. Reconnect tube with the base. Ensure that tube snaps securely in place.
- Replace connector plug back into base of vacuum.
- Replace filter and filter cover. Secure with previously removed screw.
text_image
C A B D Figure 15MAINTENANCE CONTINUED
CLEANING BRUSH/REPLACING DRIVE BELT
Check rotating cleaning brush and drive belt regularly for wear or damage.

NOTE: Keep rotating cleaning brush ends free of string, hair and carpet fibers.

NOTE: The rotating cleaning brush can most often be cleaned without removal from the vacuum. If there is an excessive amount of hair and/or debris, remove the rotating cleaning brush for proper cleaning.
- Unplug the vacuum and turn face down on a flat surface.
- Remove all three screws from the bottom of the base. (See Figure 16)
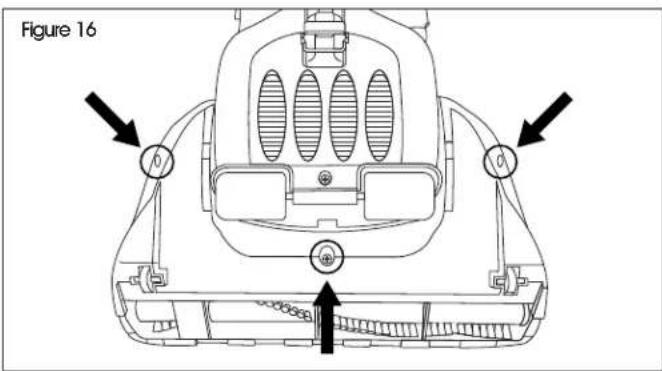
text_image
Figure 16- Grip both the top cover and base while turning unit back over. Lift off top cover.
- Check drive belt. If broken or damaged, remove rotating cleaning brush and replace drive belt. (See Figure 17)

text_image
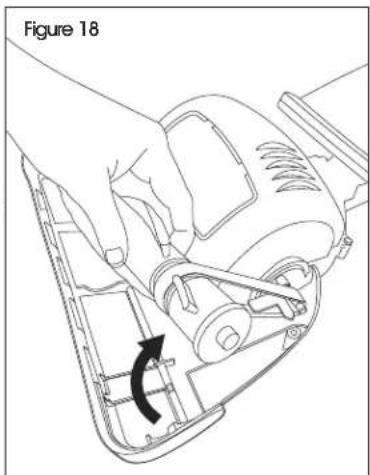
Figure 17 Drive Belt- To remove the rotating cleaning brush, pull the right side of the brush toward the front of the base and lift slowly. (See Figure 18)
-
Remove drive belt from cleaning brush and clean as necessary.
-
Place existing or new drive belt over rotating cleaning brush and motor shaft. Insert the end cap pin on the left end of the rotating cleaning brush into the slot on the base. Slide the end cap pin on the right end of the rotating cleaning brush into the slot in the base and lower until it clicks into place. (See Figure 19)
- Ensure furniture protection guard is in proper place. (See Figure 19)
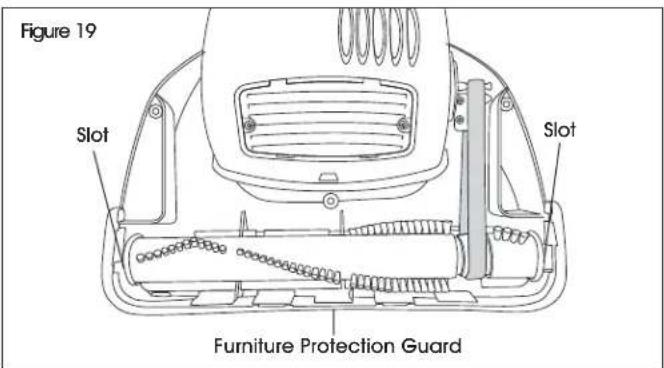
text_image
Figure 19 Slot Slot Furniture Protection Guard- Place top cover onto base. Press into place, ensuring furniture protection guard is on the outside.
- Reinstall previously removed screws beginning with the center screw.
natural_image
Line drawing of a hand operating a cleaning or cleaning machine with a curved arrow indicating rotation (no text or symbols)MAINTENANCE CONTINUED
CLEANING THE FILTER
The post-motor HEPA filter is located in the base of the vacuum.

NOTE: Filter should be checked often and cleaned when it becomes dirty.
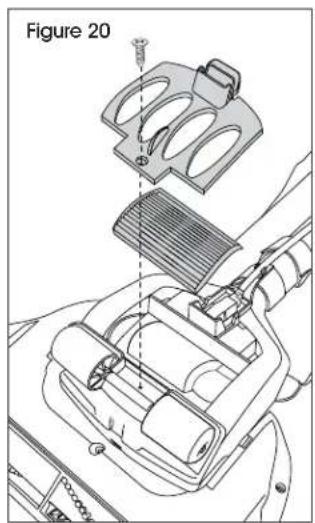
- Remove screw on filter cover with a Phillips head screwdriver. Lift off filter cover. (See Figure 20)
- Remove post-motor HEPA filter. Blow out filter with air and reinstall.
- Replace filter cover. Secure with previously removed screw.
text_image
Figure 20REPLACING LIGHT BULB
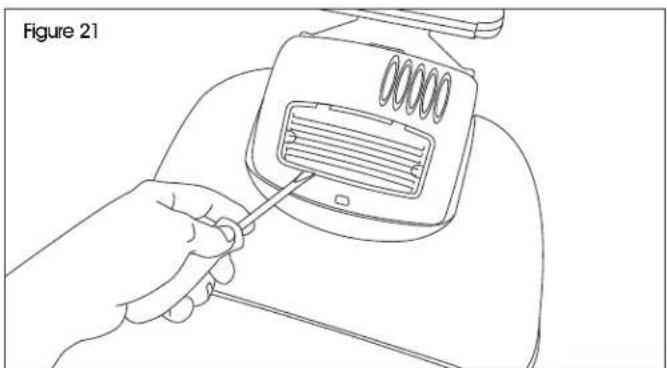
- Unplug the vacuum.
- Insert a flathead screwdriver into slot and remove light lens. (See Figure 21)
natural_image
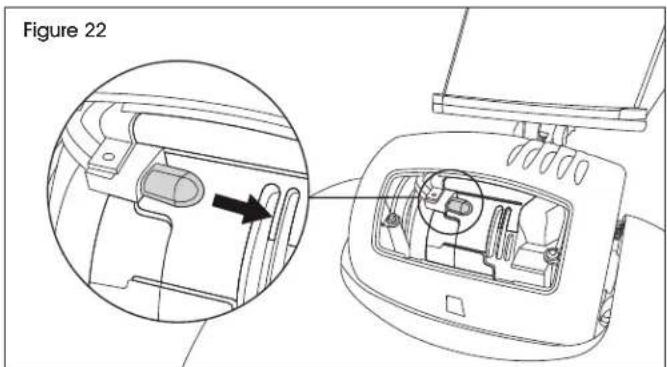
Line drawing of a hand using a screwdriver to adjust or install a device component (no text or symbols present)- Grasp bulb and pull out. Discard old bulb and replace with new one. (See Figure 22)
text_image
Figure 22- Replace light lens.
TROUBLESHOOTING
| OPERATING ISSUE CAUSES | RECOMMENDATIONS | |
| Vacuum won't run. | Vacuum is not plugged in.Household fuse/circuit breaker tripped. | Check power source, plug and connector.Check/replace fuse - reset breaker. |
| Vacuum won't pick up dirt. | Dust bag is full.Drive belt is not functioning.Rotating cleaning brush bristles are worn.Rotating cleaning brush is jammed.Dust tube is clogged. | Replace with new dust bag.Realign or replace drive belt.Replace rotating cleaning brush.Remove rotating cleaning brush and clean debris from brush ends.Clean dust tube. |
| Dust bag is clogged or dirty. | Dust bag is full.Dust bag collar retainer is not secure.Inlet is clogged. | Replace with new dust bag.Secure dust bag collar retainer.Shake dust to bottom of dust bag. |
If the troubleshooting section does not resolve the problem, contact Uline Customer Service at 1-800-295-5510.
natural_image
Line drawing of a vacuum cleaner with handle and base (no text or symbols)natural_image
Technical line drawing of a mechanical assembly with no visible text or symbols
text_image
Diagrama 5Diagrama 4natural_image
Line drawing of a vacuum cleaner with handle and base (no text or symbols)OUTILS REQUIS
Tournevis cruciforme
natural_image
Line drawing of a hand using a tool to lift a cylindrical object, labeled 'Figure 2' (no text or symbols on the diagram itself)
natural_image
Technical line drawing of a mechanical assembly with no visible text or symbols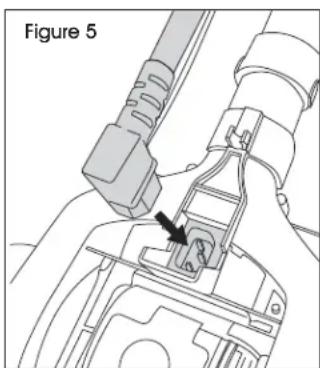
natural_image
Technical line drawing of a mechanical assembly with a labeled component (no text or symbols present)natural_image
Line drawing of a person walking with a backpack, showing foot movement and a curved arrow indicating motion (no text or symbols)RANGEMENT DU CORDON D'ALIMENTATION
natural_image
Technical line drawing of a mechanical component with an arrow indicating direction (no text or symbols)natural_image
Line drawing of a person using a device to lift a seat, with an arrow indicating the motion direction (no text or symbols present)ENTRETIEN SUITE
NETTOYAGE DU TUBE À POUSSIÈRE
text_image
Figure 12text_image
Figure 13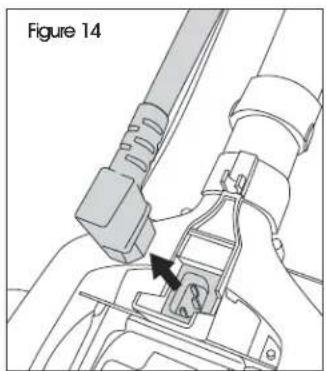
natural_image
Technical line drawing of a mechanical assembly with a labeled component (Figure 14), showing no readable text or symbols.text_image
Figure 16natural_image
Line drawing of a hand operating a power strip device with a black arrow indicating rotation (no text or symbols)text_image
Figure 20REMPLACEMENT DE L'AMPOULE
natural_image
Line drawing of a hand using a screwdriver to adjust or install a device component (no text or symbols present)text_image
Figure 22- Replacez la lentille.


