H-10400 - Vacuum Cleaner Uline - Free user manual and instructions
Find the device manual for free H-10400 Uline in PDF.

User questions about H-10400 Uline
0 question about this device. Answer the ones you know or ask your own.
Ask a new question about this device
Download the instructions for your Vacuum Cleaner in PDF format for free! Find your manual H-10400 - Uline and take your electronic device back in hand. On this page are published all the documents necessary for the use of your device. H-10400 by Uline.
USER MANUAL H-10400 Uline

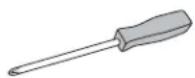
Phillips
Screwdriver
natural_image
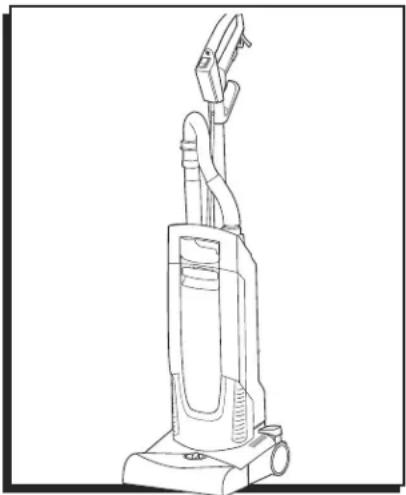
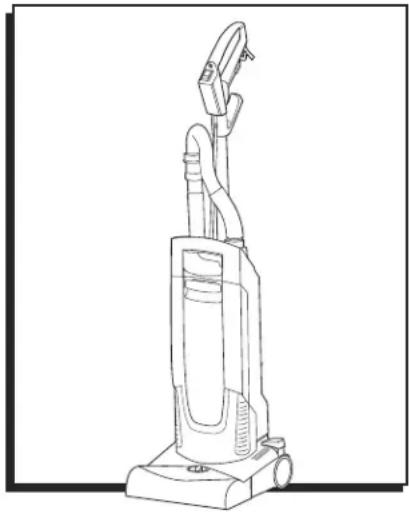
Line drawing of a vacuum cleaner with attached tubing (no text or symbols)SAFETY

NOTE: Read and understand all instructions before using this vacuum.
- Completely remove the accessories from the box.
- The suction unit is not suitable for sucking up hazardous dusts such as asbestos.
- Only operate the vacuum from a grounded outlet.
- Connect vacuum cleaner with properly grounded outlet only. See Grounding Instructions on page 2.
• This vacuum is intended for commercial use.

IMPORTANT! When using an electrical machine, basic precautions should always be followed, including the following:
- Disconnect vacuum cleaner from power circuit before removing the cover, performing maintenance work or when not in use.
- Do not leave the machine unattended when plugged in.
- Always check the power supply cord for damage or signs of any aging before each use.
- Do not pull or carry vacuum cleaner by cord. Do not close door on cord or pull cord around sharp edges.
- Keep cord away from heat and oil.
-
Do not leave cord lying around after job is complete. It can become a tripping hazard.
-
Do not run vacuum over cord.
- Turn switch to OFF before unplugging power supply cord.
- Do not unplug by pulling cord. To unplug, grasp plug, not cord.
- Do not grasp plug with wet hands.
- A damaged cord or plug should only be replaced by an authorized service center representative. Do not attempt to repair power cord.
• To avoid shock, do not expose to rain. Store indoors. - Use only as recommended by these instructions. Use only with recommended attachments.
- Keep hair, clothing, loose jewelry, fingers and all parts of the body away from openings and moving parts.
- Do not block or obstruct openings. Keep openings free of lint, hair, dust and anything that restricts air flow.
- Do not use to vacuum anything that is burning, smoldering or smoking such as matches, cigarettes or hot ashes.
- Do not use to vacuum combustible explosive materials, such as coal, grain and other finely divided combustible material.
- Do not use to vacuum combustible, hazardous, toxic or carcinogenic materials, including gasoline, diesel fuel, acetone, paint thinner, heating oils, undiluted acids and solvents, pesticide and asbestos.
SAFETY CONTINUED
- Use recommended filters when vacuuming drywall materials.
- Do not use without filter and/or dust bag in proper place.
- Connect vacuum cleaner with properly grounded outlet only. See Grounding Instructions.
- Do not allow vacuum cleaner to be used as a toy. Keep children away from vacuum cleaner.
- Do not leave unattended while vacuum cleaner is running.
- Do not use if cord, plug, filter or vacuum cleaner is in poor condition. If the vacuum cleaner has been dropped, damaged, exposed to weather or dropped into water, have it checked by an authorized service.
• Always use eye protection when operating vacuum cleaner. - Use extra caution when operating on stairs.
- Stay alert. Do not use vacuum cleaner when tired or under the influence of drugs, alcohol or medication.
GROUNDING INSTRUCTIONS

CAUTION! Vacuum must be grounded. If it should malfunction or break down, grounding provides a path of least resistance for electric current to reduce the risk of electric shock.
- This vacuum is equipped with a cord having an equipment grounding conductor and ground plug.
- The plug must be inserted into an appropriate outlet that is properly installed and grounded in accordance with all local codes and ordinances.

WARNING! Improper connection of the equipment grounding conductor can result in a risk of electric shock.
- Check with a qualified electrician or service person if you are in doubt as to whether the outlet is properly grounded.
- Do not modify the plug provided with the vacuum.
-
If it will not fit the outlet, have a proper outlet installed by a qualified electrician.
-
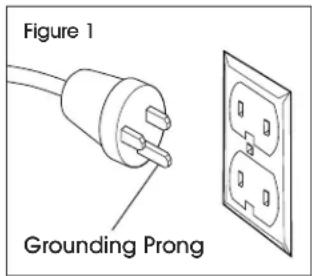
This vacuum is for use on a nominal 120-volt circuit and has a grounded prong. (See Figure 1)
- A temporary adapter may be used to connect this plug to a two-pole receptacle if a properly grounded outlet is not available. (See Figure 2)
text_image
Figure 1 Grounding Prong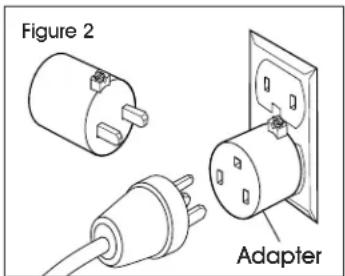
text_image
Figure 2 Adapter
NOTE: In Canada, a temporary adapter should be used only until a properly grounded outlet is installed by a qualified electrician.
- The green-colored rigid ear, lug or the line extending from the adapter must be connected to a permanent ground such as a properly grounded outlet box cover.
- Whenever the adapter is used, it must be held in place by a metal screw.
- Do not attempt to repair power cord. In all cases, ensure the receptacle in question is properly grounded. Never remove grounding prong from power plug.
EXTENSION CORDS
Use only three-wire extension cords that have three-prong grounding-type plugs and three-pole receptacle that accepts the vacuum's plug. Replace damaged or worn cord immediately.

NOTE: In Canada, use of a temporary adapter is not permitted by the Canadian Electrical Code.
SERVICING OF DOUBLE-INSULATED MACHINES
In a double-insulated machine, two systems of insulation are provided instead of grounding. No grounding means are provided on a double-insulated machine, nor should a means for grounding be added to the machine. Servicing a double-insulated machine requires extreme care and knowledge of the system and should be done only by qualified service personnel. Replacement parts for a double-insulated machine must be identical to the parts they replace.
SAFETY CONTINUED

NOTE: Read these operating instructions before using the vacuum for first time and adhere to these. Keep document for future reference or for future owners.

NOTE: If operating instructions and safety instructions are not observed, the vacuum can be damaged and dangers could arise for users and other people.

NOTE: Notify Uline Customer Service at 1-800-295-5510 immediately in the case of shipping damage.

NOTE: Check the package contents when unpacking for missing accessories or for damage.
ENVIRONMENTAL PROTECTION

NOTE: The packing materials can be recycled. Please dispose of packaging in accordance with the environmental regulations.

NOTE: Electrical and electronic vacuums contain valuable, recyclable materials and often components such as batteries, rechargeable batteries or oil, which – if handled or disposed of incorrectly – can pose a potential threat to human health and the environment. However, these components are required for the correct operation of the vacuum. Vacuums marked by this symbol are not allowed to be disposed of together with the household rubbish.
HAZARD LEVELS

DANGER!
Indication of an imminent threat of danger that will lead to severe injuries or even death.

WARNING!
Indication of a potentially dangerous situation that may lead to severe injuries or even death.

CAUTION!
Indication of a potentially dangerous situation that may lead to minor injuries.

ATTENTION!
Indication of a potentially dangerous situation that may lead to damage to property.
INTENDED USE

WARNING! Health risk – Inhalation of dusts that are harmful to health. Do not use vacuum for vacuuming up dusts that are harmful to health.

IMPORTANT! Only use and store vacuum indoors.

NOTE: This vacuum cleaner for carpets is intended for dry cleaning floor and wall surfaces.

NOTE: This vacuum is not suitable for use on hard floors.

NOTE: This vacuum is suitable for commercial use.
SYMBOLS ON VACUUM

Setting for long pile carpets
Setting for short pile carpets
Filter status indicator (See Troubleshooting on page 9)

Identifies access to the roller brush in the side section (See Replacing the Roller Brush on page 8)
HANDLE PARTS
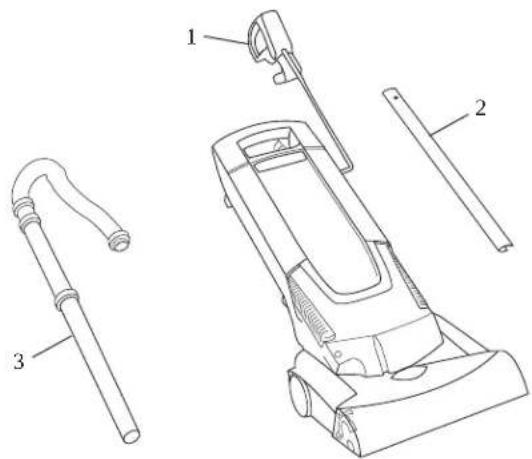
text_image
Technical diagram of a vacuum cleaner with labeled parts including handle, hose, and baseHANDLE PARTS
| # DESCRIPTION QTY. | |
| 1 Handle with Main Power Cable 1 | |
| 2 Handle Metal Tube 1 | |
| 3 Suction Pipe with Suction Hose 1 |
HANDLE ASSEMBLY

NOTE: Install loose parts for handle provided with vacuum before using the vacuum for first time.
- Open the handle adjustment. (See Figure 3)
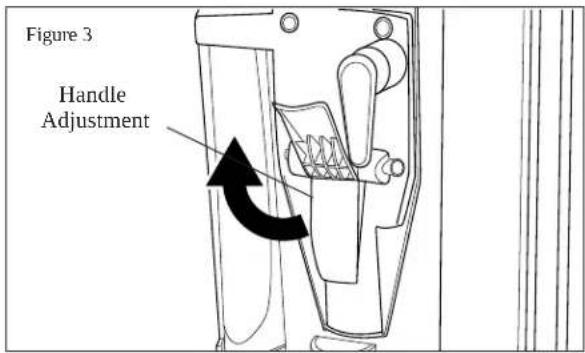
text_image
Figure 3 Handle Adjustment- Push the handle metal tube into the mount all the way to the lowest latching position (latches audibly twice). (See Figure 4)
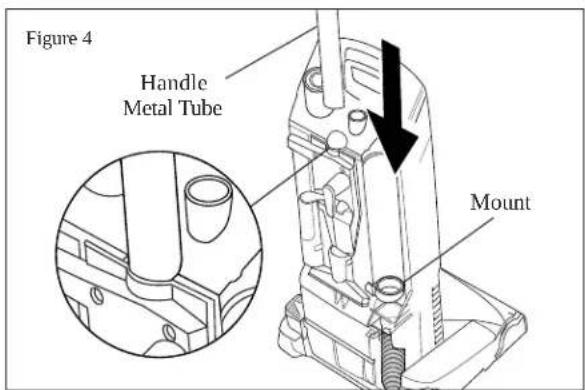
text_image
Figure 4 Handle Metal Tube Mount- Insert the handle into the handle metal tube and latch into place. Ensure that the main cable is not jammed or twisted. (See Figure 5)
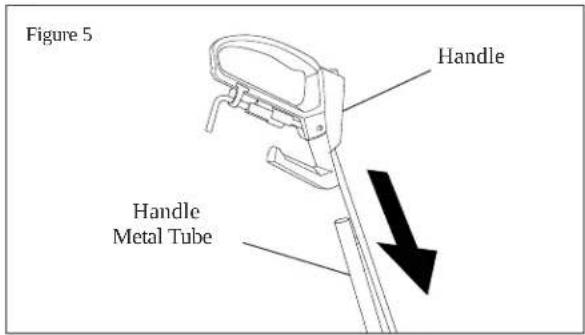
text_image
Figure 5 Handle Handle Metal Tube- Pull the handle to the first (uppermost) latching position. (See Figure 6)
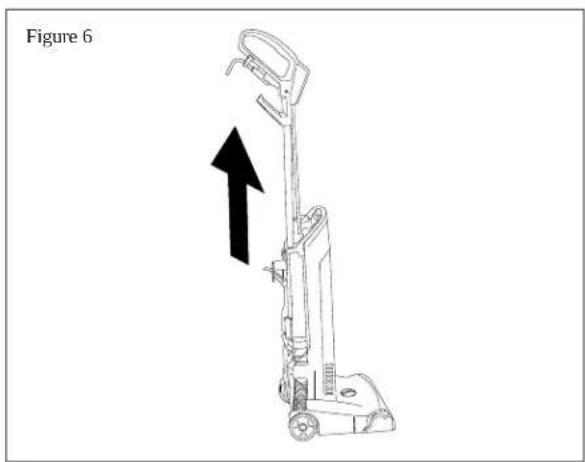
text_image
Figure 6HANDLE ASSEMBLY CONTINUED
- Close the handle adjustment. (See Figure 7)
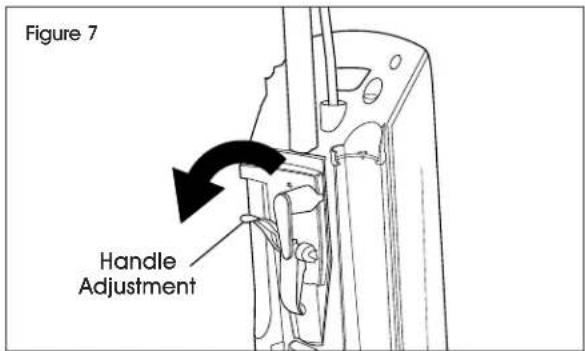
text_image
Figure 7 Handle Adjustment- Insert the suction hose into the connection nozzle. (See Figure 8)
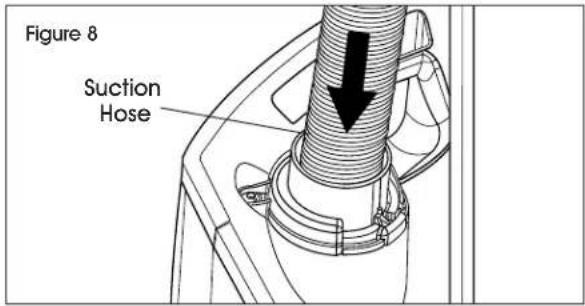
text_image
Figure 8 Suction Hose- Insert the suction wand into the mount on the vacuum. (See Figure 9)
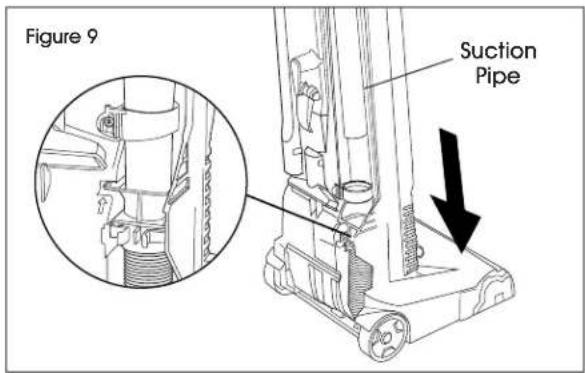
text_image
Figure 9 Suction PipeSETUP
INSTALLING FILTER BAG
- Lift up cover latch release and remove the filter cover.
- Turn the filter bag lock to the right to unlock.
- Insert the filter bag and turn the filter bag lock to the left to lock.
- Fit and lock the filter cover.
CONNECTING MAIN POWER CABLE TO VACUUM
- Open the cable holder at the handle.
- Plug the provided main cable into the socket on the vacuum.
- Secure the plug connection against unintentional unplugging using the cable holder on the handle. (See Figure 10)

NOTE: Use only the main cable provided and only replace it with an equivalent cable in case of damage.
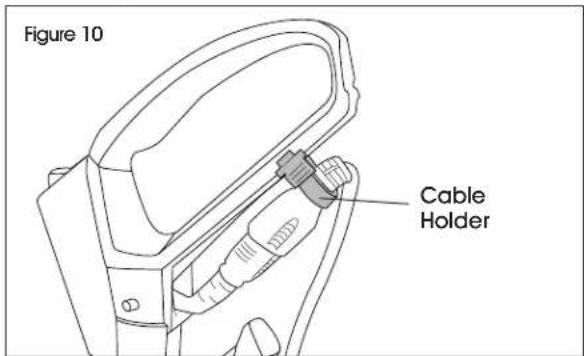
text_image
Figure 10 Cable HolderOPERATION
ADJUSTING HEIGHT OF HANDLE
- Open the handle adjustment.
- Move handle up or down to set desired height.
- Close the handle adjustment.
SWITCHING ON THE VACUUM
- Connect the main plug.
- Switch on the vacuum at the main switch.
- Adjust the carpet height using the carpet height selection knob on the brush head.
- Perform cleaning.
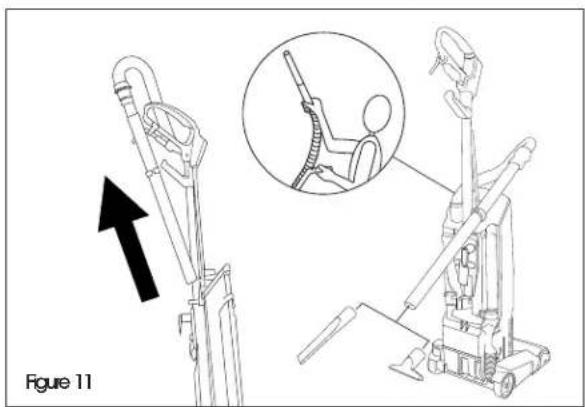
USING ACCESSORIES

NOTE: Vacuum with the crevice nozzle and upholstery nozzle.
- Pull suction wand out of the mount. (See Figure 11)
natural_image
Technical illustration of a mechanical device with an inset showing a person seated on a chair (no text or symbols present)- Remove the desired accessory from the storage compartment and attach it to the suction wand.
- Perform cleaning. (See Figure 12)
Figure 12
text_image
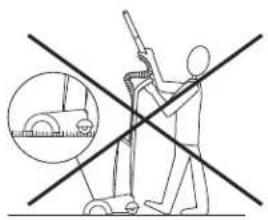
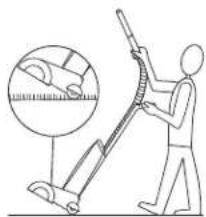
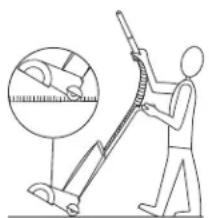
Diagram showing a person using a vacuum cleaner with crossed lines indicating prohibition or prohibition, and an inset image of a car wheel.Incorrect Correct
natural_image
Illustration of a person using a vacuum cleaner to measure a surface, with magnified detail showing the brush (no text or symbols)
ATTENTION! Do not set the brush head with the rotating roller to the deep-pile carpet setting when vacuuming using the suction hose. The carpet could be damaged or destroyed if the rotating brush remains in the same position for a longer period of time.
SWITCHING OFF THE VACUUM
- Switch off the vacuum at the main switch.
- Pull out the main plug.
CABLE STORAGE
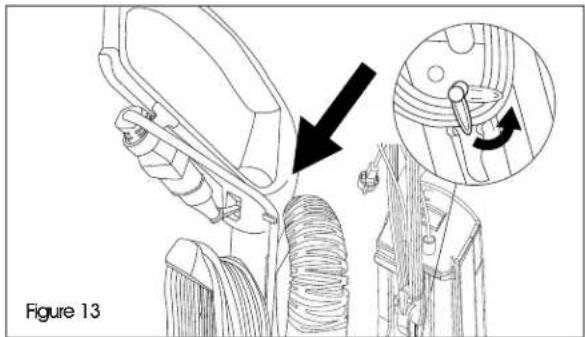
- Wind the main power cable onto the winding aid. (See Figure 13)
natural_image
Technical illustration of a mechanical assembly with a magnified inset showing a pin adjustment (no text or symbols present)- Wind the main cable around the cable hook and handle.
- To remove the cable, open the cable hook and remove the cable from the handle.
TRANSPORT
- Wind the main cable around the cable storage.
- Carry the vacuum by the carrying handle.
- When transporting the vacuum in vehicles, secure it to prevent it from slipping or overturning in accordance with the respective valid guidelines.
MAINTENANCE
DAILY
Clean the roller brush.
WEEKLY
Check the roller brush for wear.

NOTE: The degree of wear can be determined by comparing the differently colored indicator tufts. Replace the roller brush when the black bristles are the same height as the red bristles.
- Remove the brush cover if necessary. Use a coin to turn the rotary lock by 90^ and remove the brush cover.
- Cut off hair and threads wound onto the roller brush using scissors and remove them.
CHANGING THE FILTER BAG
- Unlock and remove the filter cover.
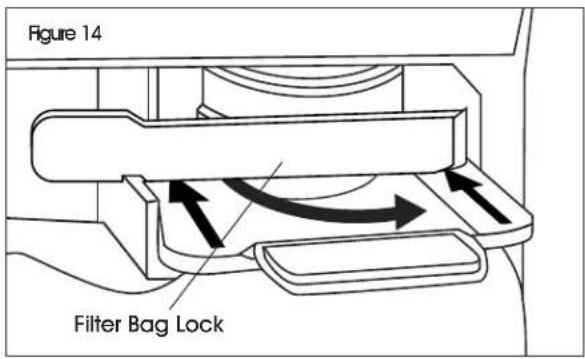
- Turn the filter bag lock to the right to unlock. Close the filter bag, remove and dispose of it. (See Figures 14-16)
text_image
Figure 14 Filter Bag Lock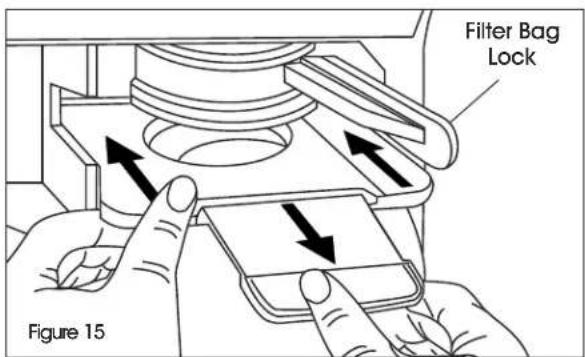
text_image
Filter Bag Lock Figure 15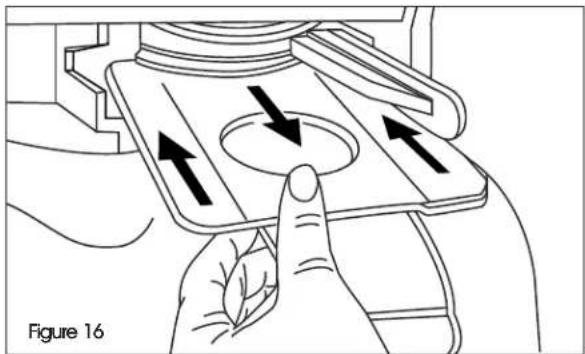
natural_image
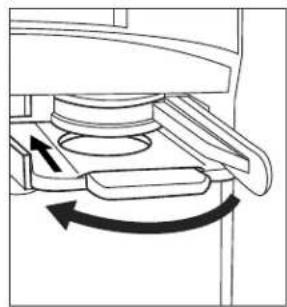
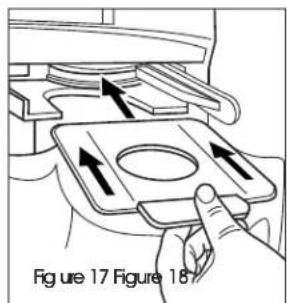
Diagram of a hand pressing a button on a device component, showing directional arrows (no text or symbols)- Insert a new filter bag and turn the filter bag lock to the left to lock. (See Figures 17-18)
text_image
Figure 17 Figure 18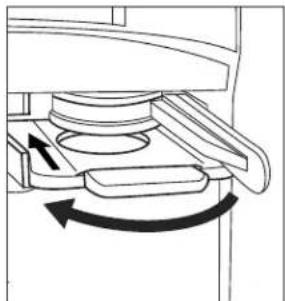
natural_image
Mechanical assembly diagram showing a rotating component with directional arrows (no text or labels)- Fit and lock the filter cover.
REPLACING THE EXHAUST FILTER
- Unlock and remove the filter cover.
- Push the filter casing locking mechanism upward and remove the filter casing.
- Remove the exhaust filter from the filter casing.
- Insert a new exhaust filter in the filter casing.
- Insert the filter casing and latch it into place.
- Fit and lock the filter cover.
REPLACING MOTOR PROTECTION FILTER
- Unlock and remove the filter cover.
- Press the motor protection filter lock upward. Remove old motor protection filter and dispose of it.
- Fit and lock the new motor protection filter.
- Fit and lock the filter cover.
MAINTENANCE CONTINUED
NOTE: Ensure that the bracket is always completely opened during installation.
- Fold the bracket on the side section fully upward and remove the side section. (See Figure 19)
- Pull out the old roller brush and dispose of it.
- Insert a new roller brush in the side section.
- Push the side section together with the roller brush into the vacuum.
- Fold the bracket fully downward to lock the side section.

text_image
Side Section 1 2 3 Roller Brush Figure 19REMOVING BLOCKAGE

NOTE: Remove the brush cover if necessary.
- Insert a rod or dowel to remove blockage from suction pipe. (See Figure 20)
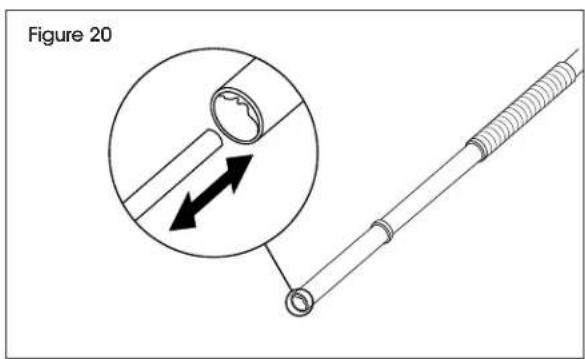
text_image
Figure 20- Squeeze side prongs to release suction hose. (See Figure 21)
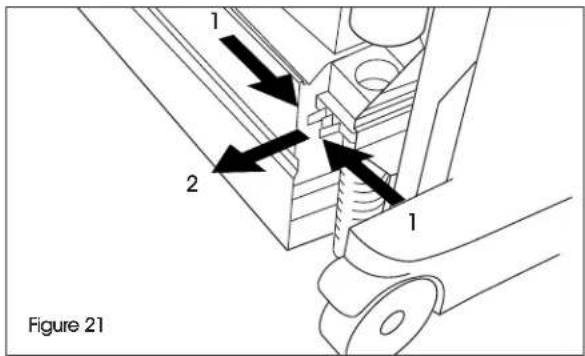
text_image
1 2 1 Figure 21- Insert a rod or dowel to remove blockage from suction hose. (See Figure 22)

NOTE: Debris will exit the vacuum through the brush roll opening.
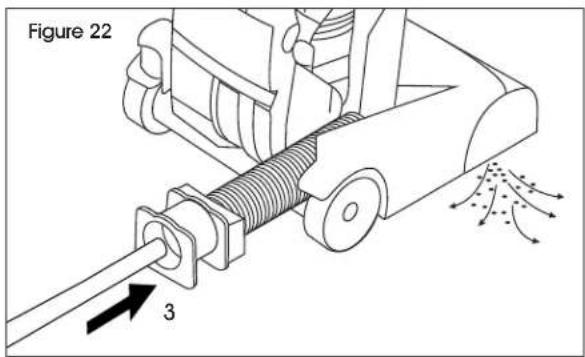
text_image
Figure 22 3- Reinsert hose until an audible click is heard. (See Figure 23)
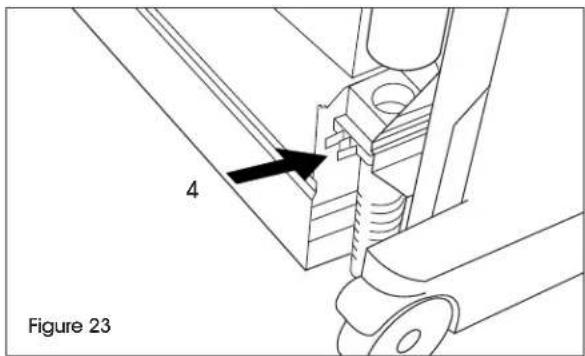
text_image
4 Figure 23TROUBLESHOOTING
| OPERATING ISSUE RECOMMENDATIONS | |
| Motor is not running. If no electrical voltage present:Check the power socket and power supply fuse.Check the main cable and the main plug of vacuum.Check the main cable plug connection at the handle. The thermal protection switch has switched off the motor due to overheating.Check the filter and suction hose. Replace the used filter or remove the blockage from the suction hose.Allow the vacuum to cool down. | |
| Unsatisfactory vacuuming result. | Check the roller brush for blocking objects and remove these if present.Remove blockages from the brush head, suction pipe and suction hose.Replace the filter bag.Replace the exhaust filter or motor protection filter.Set the carpet height selection knob to the correct setting.Replace the roller brush. |
| Filter indicator lamp lights up orange. | Remove blockages from the brush head, suction pipe and suction hose.Replace the filter bag. |
natural_image
Line drawing of a vacuum cleaner with handle and wheels (no text or symbols)text_image
Technical diagram of a vacuum cleaner with labeled parts including handle, hose, and basePARTES DEL ASA
text_image
Diagram showing a person using a vacuum cleaner with crossed lines indicating prohibition or prohibition, and an inset image of a car wheel.Incorrecto Correcto
natural_image
Illustration of a person using a vacuum cleaner to clean or brush, with an inset showing the same tool (no text or symbols present)
natural_image
Mechanical assembly diagram showing a rotating component with directional arrows (no text or labels)natural_image
Line drawing of a vacuum cleaner with handle and wheels (no text or symbols)OUTIL REQUIS
Tournevis
cruciforme
SÉCURITÉ

text_image
Technical diagram of a vacuum cleaner with labeled parts including handle, hose, and basePIÈCES DE LA POIGNÉE
natural_image
Technical line drawing of a mobile vacuum cleaner with an inset showing the seat and arm (no text or symbols)text_image
Diagram showing a person using a tool to cut a surface with a magnified inset highlighting the measurement.Incorrect Correct

natural_image
Illustration of a person using a manual push tool to measure a surface, with an inset showing the same tool (no text or symbols present)
natural_image
Technical illustration of a mechanical device with a close-up inset showing a turning mechanism (no text or symbols present)natural_image
Illustration of a hand pressing a button on a device with directional arrows indicating motion (no text or symbols)text_image
Figure 17 Figure 18