WU9095MX - Basket Atag - Free user manual and instructions
Find the device manual for free WU9095MX Atag in PDF.


User questions about WU9095MX Atag
0 question about this device. Answer the ones you know or ask your own.
Ask a new question about this device
Download the instructions for your Basket in PDF format for free! Find your manual WU9095MX - Atag and take your electronic device back in hand. On this page are published all the documents necessary for the use of your device. WU9095MX by Atag.
USER MANUAL WU9095MX Atag
Informations, consels, astuces, oure commandations

ATTENTION!
Attention-danger

RISQUEDECHOCÉLECTRIQUE!
The following symbols are used throughout themanual, and they havethe following meanings:

INFORMATION!
Information,advice,tip,orrecommendation

WARNING!
Warning-generaldanger

ELECTRICSHOCK!
Warning-dangerofelectricshock

HOTSURFACE!
Warning-dangerofhotsurface

DANGEROFFIRE!
Warning-dangeroffire
Itisimportantthatyoucarefullyreadtheinstructions.
WARNING!
READCAREFULLYANDKEEPITFORFUTUREREFERENCE!
Safeuse
- Themanufacturercannotbeheldliableforanydamageresulting fromfailuretofollowthesafetyinstructionsand warnings.
- Damagecausedbyincorrectconnection,incorrectfitting,or incorrectuseisnotcoveredbythewarranty.
- Childrenshallnotplaywiththeappliance.Cleaninganduser maintenanceshallnotbemadebychildrenwithoutsupervision.
- Thisapplianceisonlydesignedforhouseholduse.
- Alwaysprovideadequateventilation!
- Thereshallbeadequateventilationoftheroomwhentherange hoodisusedatthesametimeasappliancesburninggasorother fuels.
- Whentherangehoodandappliancessuppliedwithenergyother thanelectricityaresimultaneouslyinoperation,thenegative pressureintheroommmustnotexceed4Pa(4×10 -5 bar).
- Localregulationsconcerningthedischargeoffairhavetobefulfilled.
- Neveruseasteamcleanerforcleaningtheappliance.
Onlycleantheappliancewhenswitchedoff. The steamofasteam cleanercouldreachtheconductingpartsandcauseanelectrical short.
WARNING!
-
Thisappliancecanbeusedbychildrenagedfrom8yearsand aboveandpersonswithreducedphysical,sensoryormental capabilitiesorlackofexperienceandknowledgeiftheyhave beengivensupervisionorinstructionconcerninguseofthe applianceinasafewayandunderstandthehazardsinvolved.
-
Thisapplianceandtheaccessiblepartswillbecomehotduring use.Donottouchhotparts.Kepchldrenyoungerthan8away fromtheapplianceunlesstheyareundercontinuous supervision.
ELECTRICSHOCK!
Avoidtheriskoflectricshock;makesuretheapplianceis switchedoffbeforecleaningtheappliance.
- Onlyusetheapplianceinsidethehome.
- Donotusethecookerhoodifthegreasefilterhasnotbeenfitted properly!
- Donotleanagainstthecookerhood.
- Neverusethecookerhoodasaworkingsurfaceunlessthis indicatedexplicitly.
- Greaseandoilareinflammablewhenoverheated.Remaininthe cookingareawhenpreparingmeals.
- Topreventhotfatfromcatchingfire, you should only deep-fry undercontinuousupervision.
- Thecookerhoodshouldbecleanedregularlyboththeoutside aswellastheinside(atleast1xpermonth).Insufficientcleaning oradelayinthereplacementofffilterscancauseafirehazard.
- Cleanthefiltersontime.
- Thegreasefilterscanbecomehotduringuse. Aftercookingwait atleast30minutesbeforecleaning.
- Please note! Intensive use can lead to condensation on the cookerhood. Condensationissimpletoremovewith drycloth.
Safety
- Followtheinstructionsinthemanicalforcleaningorreplacing the greasefiltersand/orcarbonfilters!

DANGEROFFIRE!
- Thereisariskoffireiftheinstructionsforcleaningorreplacing greasefiltersand/orcarbonfiltersarenotfollowed.
- Throughgreasedepositsinthemetalgreasefilter.Neverwork withopenflameundertheappliance(eg.flambéing). Alwaysusetheappliancewiththemetalgreasefilter.Cleanthe greasefilterregularly.
-
Throughoverheatedfatoroil.Neverextinguishafirewithwater; alwaysuseafireblanket,lidorplate.
-
Theappliancemayhavesharpedges;pleasebecarefulduring cleaning.
- ThelightemittedbyLEDlightsisverydazzlingandcandamage theeeyes.DonotlookdirectlyintotheswitchedonLEDlightsfor longerthan100seconds.
- Whenwashinggreasefiltersinthedishwasheritisrecommended touseashort,non-intensiveprogramme.Checkthegreasefilter afterwashinginthedishwasherforwear(loosematerial).Wear canoccurasresultoffrequentwashing.lfloosematerialis visible,replaces filtersinordertopreventthisloosematerial fromendingupinthefoodthatiscooked.
- Donotusetheapplianceintemperaturesbelow 5^ C .
- Keepa20cmseparationdistancetotheappliance.
Dearcustomer!
Please read the operating instructions before use. They include general tips, information about the settings and adjustments you can make, and the best way to take care of your appliance.
TIP!
You can find themostrecentversionoftheinstructionsforuseonourwebsite.
Enjoyyourcooking!
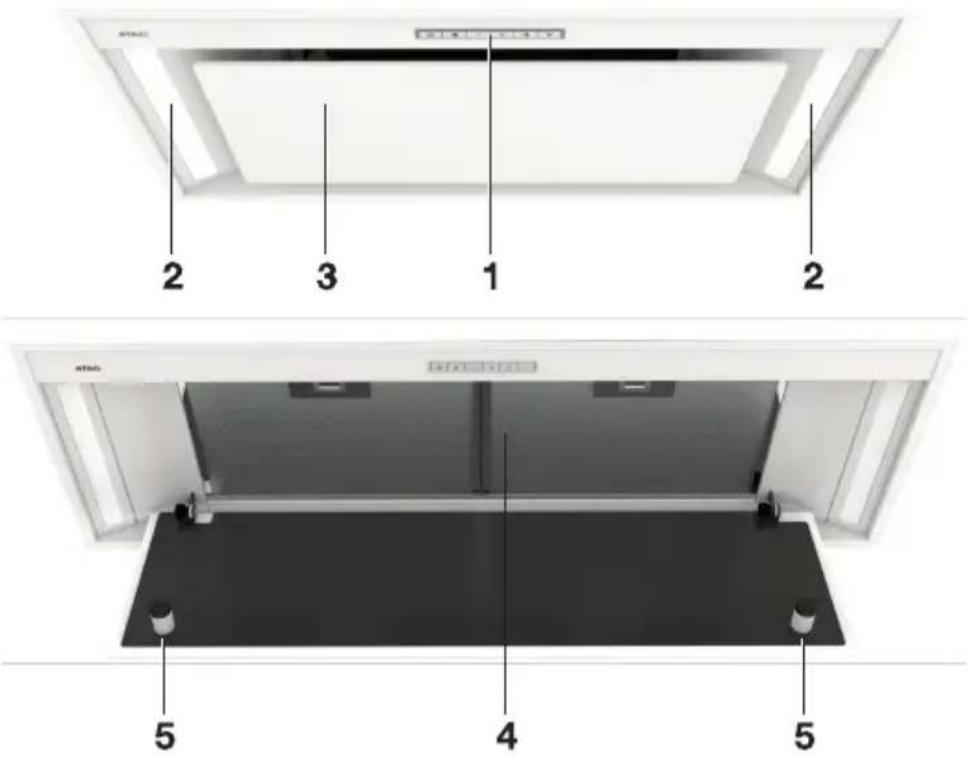
Descriptionhood
1.ButtonControl
2. LEDbar
3.Edgeextraction panel
4.Greasefilter
5.Magnet
Descriptionbuttoncontrol
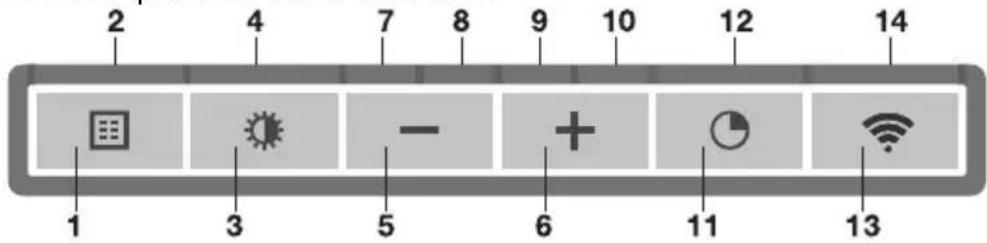
1.Filterresetbutton
2.Filterindicator,signalswhenfiltersrequirecleaning
3.Lightingbutton,switcheson/offanddimsthelighting
4. Lightingindicator
5.-(minus)push-button, reducesairextractioncapacityandswitchesoff
6.+(plus)push-button,switchesonandincreasesairextractioncapacity
7. Speedlevel1indicator
8.Speedlevel2indicator
9.Speedlevel3indicator
10.Speedlevel4/boostindicator
11.Push-buttontimerfunction,turnsoffthehoodaftertime
12.Timerindicatorlight
13.Wi-Fipush-button
14.Wi-Fiindicatorlight
Switchingextractiononandoff
1.Pressthe+(plus)button.

Thecookerhoodwill switch on the lowest setting.
2.Pressthe+(plus)buttonagainforahigherfansetting.Pressandholdthe+(plus)buttonfor 1secondtoselectthehighestsetting(boost).
3.Pressthe-(minus)buttonselectalowersetting.
The extraction setting is indicated in the speed level indicators.
Eachlightarearespresentssaspeedlevel.Speedlevelindicator4alsoservesasaboostindicator whenitblinks.
4.Iftheextractioncapacityissettposition1,switchoffthecookerhoodbybrieflypressingthe
-(minus)button.
5.Toswitchchoftthecookerhood,pressandholdthe-(minus)buttonforatleast1second.
Switchontheboostsetting
- Pressandholdthe + (plus) button for at least 1 second.

Theboostsettingisswitchedonfor 10minutes. Thespeedlevel4indicatorwillflashduringthis period. Theoriginalextractionsettingwillbereactivatedafterthisperiod.
- Pressandreleasethe-(minus)buttonoswitchchofftheboostsetting.
NOTE!
Iftheboostsettinghasbeenselected,therimerfunctioncannotbeactivated.
Switchingonthetimer
1.Pressstimerbutton.

Thetimerindicatorwillstarttoblink.
Thecookerhoodwillswitchoffautomaticallyafter10minutes.
- Switchoffthetimerfunctionbypressingarandombutton(excepttheoneforlighting).
TIP!
Thishoodissetasanextractorhoodondelivery(theairisexhaustedtotheoutside).Thehood canalsobesettotrecirculationuse(theairisblownbacktotheroomafterfiltrationthrough greasefiltersandacombi-filter).
WithanRMSkit(recirculationmodificationset), the air will first be cleaned by the grease filters, and then odours will be filtered by the combi-filter. The cleaned air is recirculated back into the kitchen.
Switchingonrecirculationmode
Simultaneouslypressandholdthetimerbuttonandthelightbuttonuntilthefilterindicatorflashes 3times.
Thecarbonfilterindicatorisactivated.
Switchingoffrecirculationmode
Simultaneouslypressandholdthetimerbuttonandthelightbuttonuntilthefilterindicatorlightsup for3secondsandthenturnsoff.
CleanAirfunction
TheCleanAirfunctionallowsyoufreshentheairinyourkitchenforashortperiodeveryhour,for amaximumof24hoursatlevel1.
- Switchoff the cookerhood.
- Pressandholdthetimerbuttonforapproximately3seconds.

Thecookerhoodwillswitchonautomaticallyfor 10minuteseverhouratthelowestspeed setting.Duringextraction, theindicatorlightsshowafast-runninglight. Whenthehoodswitches offafter 10minutes, theindicatorlightsshowaslowrunninglightuntilthehoodswitcheson againafter50minutes.
3.SwitchofftheCleanAirfunctioninthemeantimebypressingarandombutton(anybuttonother thanhelightbutton).
Switchingthelightandoff
- Shortlypressandreleasethelightbutton.

Thelightswitchesonatmaximumstrength.
- Pressandholdthelightingbuttonosetthelightingstrength. Thelightingchangesfrommaximumtominimumstrengthhandviceversa.
3.Toturnoffthelight,shortlypressthelightbuttonwhilethelightison.
Changing the colour temperature
Youcanadjustthelightingcolortemperature.
- Press and hold the light button. Press the - (minus) button to make the light 'colder' or press the + (plus) button tomakethelight'warmer'.
Making the connection between cookerhood and hob
Tooperatethecookerhoodwiththehob,youmustmakeaconnectionbetweenthehobandthe hood.
Tomaketheconnection, the Connectionsetupmodeof the cookerhood and the hob must be activated.
Seealsothemanualforthehob. Checkourwebsiteforthefullrangeofhobsthatcanbeconnected toyourcookerhood.
- Thehoodandlightsmustbeswitchedoff.
- Pressandholdsimultaneouslythe-(minus)andthe+(plus)buttonfor3seconds.All the indicatorswillblinksimultaneouslyforamaximumof3minutes.
- Onyourhob, activate the pairing mode in the user menu (seethehobmanual). The connection to the hobisestablished.
4.Iftheconnectionissuccessful,thecookerhoodwillreturntostandby.
NOTE!
Whenoperatingisoverruled(bymanuallyoperatingthecookerhood)inconnectionmode,the pairingwillbelostandmustbepairedagain.

ConnectLife-appandWi-Ficonnection
This applianceisequippedwithaWi-Fimodulethatallowstheapplianceconnecttotheinternet via your home network and to use it with the ConnectLife-app, installed on a mobile device like a smartphoneortablet.
TheappisavailableontheAppleAppStoreandGooglePlayStore.Youwillneedtheapptoconnect theappliancetoyournetwork. After your useraccountispairedwiththe appliance, theappcan be usedtomonitorthestatusofthe appliance andenablestoupdateitsfirmware.
You can find direct links for the different storestothe ConnectLife-appunder www.connectlife.io/getstartedandmoreinformationaboutthesystem,support,available functionalities,andadditionalsoptionsunderwww.connectlife.io.
Preparation
Make sure you know the name/SSID of your router's Wi-Fi network and its password ^1)
- Make sure you have the label with the QR code of the appliance unique ID ('AUID') accessible -youneedtoscanitwithyourmobiledevicewhentheApppromptstodoso.
- Yoursmartdevice'sBluetoothisturnedon.

InstalltheConnectLife-apponamobiledevice-scantheQR codetofindit.
- LaunchtheApp. Please register if you don't have an account yet.
- Loginwithyouraccount.
- TheAppwillneedaccesssthemobile'slocationtosearchforWi-Fi networksandtothecameratoscanQRcodes.
Wi-FiConnectionsetup
You will first connect your mobile device directly to the appliance via Wi-Fi, and then use this connection to share data of your Wi-Fi home network. The cookerhood can then connect to the home network.
1.LaunchtheConnectLife-app.
2. IntheConnectLifeapplication, gothe"Adddevice"menuandselecttheappropriatetype of device. ThenscantheQRcode (it can be found on therating plate of the appliance; you can also enter the AUID/SN codemanually).
FollowtheinstructionsintheConnectLife-app.
TheuseraccountssignedinonthemobiledeviceusedfortheConnectionsetupwillautomatically be paired with the cloud. If you'd like to pair another account, e.g. on a second user's mobile device see "Pairingadditionaluser".
Forsafetyreasons,onlypaireduserscancommunicatewiththecookerhood.
1) NOTE:only2,4Ghznetworksaresupported
FirststepstosetuptheWi-Ficonnectivity:
-
Check the "Requirements" as described above.
-
The hood and lights must beswitchedoff.
3.PresstheWi-Fibutionforthreeseconds.TheWi-Fiindicatorwillblink3times.

4.PresstheWi-Fibbuttonfor3secondstopturnonWi-Fi.Speedlevel2and3indicatorswillblink3 times.TheWi-Fiindicatorflashes.

5.After3secondsitwillreturntotheWi-Fi-menu.

- Simultaneously press the + (plus) and timer button for 3 seconds to access 'Connection settings'. Speedlevel2indicatorandtheWi-Fiindicatorflashwhileconnecting. Thismodewillturnoff automaticallyafter5minutes.

7.StarttheConnectLife-appandfollowtheinstructionsintheapp.
8.IftheConnectLife-appdoesn'tconnecttothedevicewait10minutesandrepeatthesteps describedorpressthe'-'(minus)buttonfor3secondstoleavetheWi-Fimenu.

INFORMATION!
TroubleshootingquicklybyturningtheWi-Fimoduleoffandonagain.Youcanfindmorehelpinthe "Wi-Fittroubleshooting"section.
DependingontheWi-Fistate,thereare1to3optionsavailableinthemenu:
- TheConnectionSetupMode
The PairingMode - Remotecontrolmode
Ifmorethan1optionisavailablethenusethe+ (plus)and-(minus)buttonstotogglebetweenthe options.
Wi-Ficonnectivity
ConnectionSetupMode
-
TheappliancemustbeconnectedtotheCloudforthearapplicationmonitorandcontrolthe applianceremotely.
-
Speedlevel2indicatorandWi-Fiindicatorwilllightup.

- Touch the timer key to enable 'Connection Setup Mode'. Speed level 2 indicator will flash.
- Thismodewillbedisabledautomaticallyafter5minutes.
- FollowtheInstructionsoftheConnectLife-app.
PairingMode
When the process was successful and you want to pair another user, you can use the "Pairing mode" of the Wi-Fi menu and the "Pairing" or "Discovery" option of the ConnectLife-app. In the ConnectLife-app, select option 'AddAppliance' and follow the instructions.

- Touch the timer key to enable 'Pairing mode'. The speed level 3 indicator will flash.

-
Thismodewillbedisabledautomaticallyafter3minutes.
-
On the ConnectLife-app, use the 'Pairing' or 'Discovery' option of the ConnectLife app to pair another user.
Remotecontrolmodeswitchonandoff
Tobeabletochangefunctionsettingsremotely, theappliancemustbeswitchedonandthe ConnectLife-appmustbeen Speedlevel4indicatorandWi-Fiindicatorwilllitstatic.

RemotecontrolmodeisonlyavailableiftheWi-Ficonnectivitysetuphasbeenperformed.Touch thetimerkeytoenable'Remotecontrol'.
- Speedlevel4indicatorisblinking:Remotecontrolisenabled.

- Speedlevel4indicatorlitstatic:Remotecontrolisdisabled.

Wi-Fimenu
ToaccesstheWi-Fimenuthehoodmustbeonstandby(thehoodandlightsmustbeswitchedoff) PresstheWi-Fibbuttonfor3seconds.TheWi-Fiindicatorwillflash.

SwitchingonWi-Fi:
- Thehoodandlightsmustbeswitchedoff.
PresstheWi-Fibbuttonforthreeseconds.TheWi-Fiindicatorwillblink3times.

- Press the Wi-Fi button to turn on Wi-Fi. Speed levels 2 and 3 indicators will blink 3 times. The Wi-Fi indicatorwillflash.After3secondsitwillreturntotheWi-Fimenu.

SwitchingoffWi-Fi:
- Thehoodandlightsmustbeswitchedoff.
PresstheWi-Fibutionfor3seconds.TheWi-Fiindicatorison.
Wi-Ficonnectivity

- Press the Wi-Fi button to turn off Wi-Fi. The Wi-Fi indicator will turn off. After 3 seconds it will returntotheWi-Fimenu.
- Pressthe'-'(minus)buttonfor3secondstoexittheWiFimenu.
DisplayingtheWi-Fistatus:
-Wi-Fimoduledisable:Wi-Fiindicatorisoff.
- Configurationinprogress:Wi-Fiindicatorflashes.
- Connectedtohomenetworkrouter:Wi-Fiindicatorflashes.
- Connectedtohomenetworkrouterandcloud:Wi-Fiindicatorcontinuouslylit.
Wi-Fitroubleshooting
| SolutionPossiblecauseSymptom | ||
| Wi-Fiturnedoff.Wi-Fiiconnotsh | SwitchonWi-Fi(see'Switchingon Wi-Fi'). | |
| Homenetworkissues.Wi-Fisetup | phatedhatyourhomenetworksignal isstrongandinternetconnectionis working. | |
| Homenetworkisnot displayeduringconnection setup. | Thehomenetworkisnoton 2.4GHz,thenetworkis hidden,orthesignalstrength istoowear. | Pleasecheckthenetworksettings. Ensurea2.4GHzandvisiblenetwork. Ifthesignalistoowear,trytomovethe networkrouterclosertotheappliance. |
| Applianceisshown disconnectedonthemobile app. | Wi-Fiisabledorhome networkissues. | EnsurethatWi-Fiisenabled,andthe internetconnectionofyourhome networkisworking.Repeatthe connectionsetupnecessary. |
| Differentcauses.OtherWi-Fi | disablertheWi-Fiandenableit again.Checkthattheinternet connectioninyourhomenetworkis working.Repeattheconnectionsetup ifnecessary.Furthertroubleshootingavailableon www.connectlife.ioorcontactthe serviceddepartment. |
NOTE!
Unpair: When the appliance needs to be connected to another network, use the setting 'unpair' intheapp. The appliance will be deleted from the app and will not be linked to the current user account.
Descriptionremotecontrol
NOTE!
Theremotecontrolisavailableasanasaccessoryforthiscookerhoodandisnotincludedwiththis appliance.
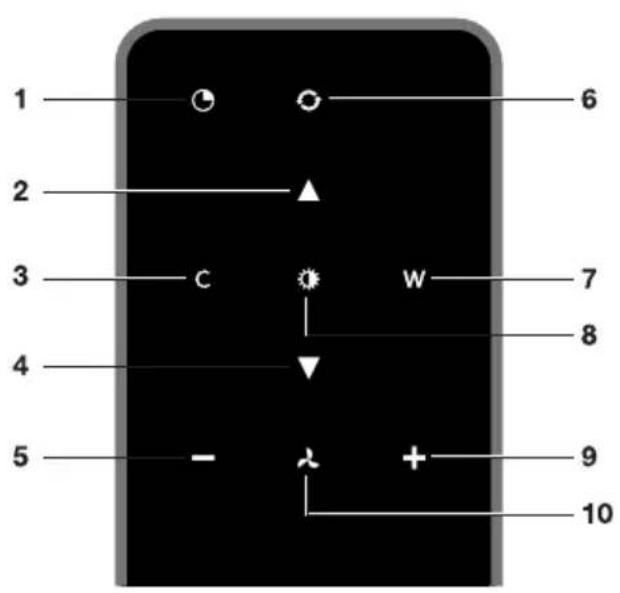
- Timerfunction
2.Increasinglightintensity
3.Colderlighttemperature
4.Decreaselightintensity - Decreaseairextractioncapacity
6.CleanAirfunction - Warmerlighttemperature
8.Switchon/offlighting
9.Increaseairextractioncapacity
10.Fanon/off
Pairingtheremote
Thisremotecontrolmustbepairedtothecookerhoodbeforefirstuse.
- Switch on the appliance. Press and hold the - (minus) button and + (plus) button for 3 seconds. Thehoodwillstart'pairingmode'for5minutes
2.

- Activate the 'Remote pairing mode' by holding 'c' and 'w' for 3 sec.
4.Duringpairingalltheindicatorsonthehoodandremotewillblink.Allindicatorswillturnoffwhen theconnectionistablished.
If the pairing cannot be established, first de-energise the appliance (unplug it f mains), wait a few minutes and then reconnect it. Try the pairing again.

NOTE!
- Remotecontrolwillgointostandbyafter30seconds. Theremotewillwakeupwhenitis pickedupordetectsmovement.
- Avoidtostoretheremotecontrolinadrawer. Themovementofthedrawermayinadvertently activatetheremotecontrollandssignificantlyshortenbatterylife.
Switchingextractiononandoff
- Pressandholdthe'Fan'keyontheremotefor 1second.

Thecookerhoodwillswitchonatthelowestsetting.
- Press the +^ key again for a higher fan setting. Press and hold the +^ key for 1 second to select the highest setting (boost).
3.Pressthe'-keytoselectalowersetting.
The extraction setting is indicated by the speed level indicator on the hood.
- To switch off the cooker hood, press and hold the 'Fan' key for 1 second.
NOTE!
Lighting and motorkey must be pressed for at least 1 second. This stop prevents the functions from being accidentally switched on/off.
Switchontheboostsetting
- Pressandholdthe + 'buttonforatleast1second.

Theboostsettingisswitchedonfor10minutes.thespeedlevel4indicatorwillflashduringthis period. Theoriginalextractionsettingwillbereactivatedafterthisperiod.
- Pressandreleasethe - 'keytoswitchchofftheboostsetting.
NOTE!
Iftheboostsettinghasbeenselected,therimerfunctioncannotbeactivated.
Switchingonthetimer
1.Pressthetimerkey.

Thetimerindicatorwillstarttoblink.
Thecookerhoodwillswitchoffautomaticallyafter10minutes.
- Switchoffthetimerfunctionbypressingarandombutton(excepttheoneforlighting).
TIP!
Thecookerhoodcanbeusedinextractionmodeorrecirculationmode.Theairextractioncapacity isadaptedtotheselectcdmode.Thehoodwillstart-upinthedefaultextractionmode.lthastos beresetforrecirculationmode.
WithanRMSkit(Recirculationmodificationset)theairwillfirstbecleanedbythegreasefilters andthenodourswillbefilteredbythecharcoalfilter. Thecleanedairisrecirculatedbackintothe kitchen.
Switchingonrecirculationmode
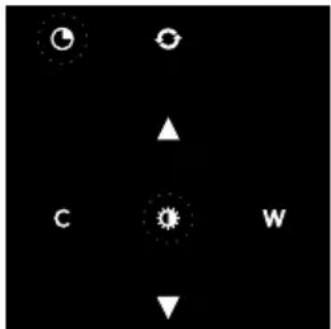
Whenthelightandfanareoff,simultaneouslyholdthetimerkey and thelightkeyuntilthefilterindicatorflashes3times.
Thecarbonfilterindicatorisactivated.
Switchingoffrecirculationmode
Whenthelightandfanareoff,simultaneouslyholdthetimerkeyandthelightkeyuntilthefilter indicatorlightsupfor3secondsandthenturnsoff.
CleanAirfunction
TheCleanAirfunctionalallowsyoufreshentheairinyourkitchenenforamaximumof24hoursat level1.
- Switchoff the cookerhood.
- Pressandholdthe 'CleanAir'keyforapproximately3seconds.

Thecookerhoodwillswitchonautomaticallyfor10minuteseveryhouratthelowestspeed setting. During extraction, the display will show a fast-moving 'snake'. When the hood switches off after 10 minutes, the display will show a slow-moving 'snake' until the hood switches on again after50minutes.
- Switch off the Clean Air function by pressing the timer, clean air, '-' or '+' keys (any key other than helightkey).
Switchingthelightandoff
- Pressandholdthelightkeyfor1second.
Thelightswitchesonatmaximumstrength.
- Press and hold the 'increase light' or 'decrease light' key to set the lighting intensity.
3.Toturnoffthelight,pressandholdthelightkeyfor1second.
NOTE!
Lightingandmotorkeymustbepressedforatleast1second.Thisistopreventthefunctions frombeingaccidentallyswitchedonoroff.
Changing the colourlighting temperature
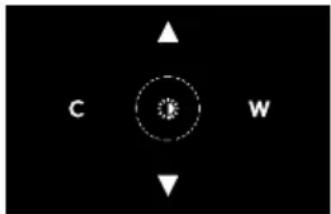
Youcanadjustthelightingcolortemperature.
-
Press and hold the light key for 1 second. Thelight switches at maximum strength.
-
Press the 'C' key to make the light 'colder' or press the 'W' key to makethelight'warmer'.
Cleaning
WARNING!
Important! For all maintenance, first, switch off the mainspowerto the cookerhood by pulling the plugout of the socket by turning off the home's masterswitch. The hood needstobe cleaned regularly, both inside as well as outside (at least as often as the grease filter).
Donotuseabrasivecleaningproducts.Donotusealcohol!
If the instructions regarding cleaning the appliance or replacing the filters are not followed, this can cause a fire. These instructions must be followed! The manufacturer is not liable for damage to the hooded fired damagers resulting from incompetent maintenance or from non-adherenceto the safety instruction above.
Cookerhood
Cleanthecookerhoodwithsoapywaterandasoftcloth.
Thenrinsewithcleanwater.Donotuseaggressivecleaningagentssuchascausticsoda.Thecooker hoodfinishstaysingoodconditionifitisbuffedperiodicallyfollowingtheapplicationofwax.
NOTE!
Stainlesssteelcookerhoods
Donotusescouringpadsortherabrasivecleanersonstainlesssteelcookerhoods.Finishwith anon-abrasive,non-polishingagentandbuffthestainlesssteelinthedirectionofthegrain.
Metalgreasefilters
Metalgreasefilterssshouldbecleanedonceamonth(orwhenindicatedbythefiltercleaningindicator – if present on the model) using a neutral cleaning agent, either by hand or in the dishwasher on a short,low-temperatureprogram.Placethegreasefilterswiththeopeningsfacingdownwardsinthe dishwashersothewatercandrainoutofthefilter.Aluminiumgreasefiltersbecomedallasaresult ofdishwashercleaningagents.Thisisnormalanddoesnoteffecttworking.
Cleaning
The filterscanbecleanedinthedishwasher. Allow the filterstodrainwellbefore replacing.
The filterscanalsobecleanedbyhand.
Cleanthefiltersinsoapywaterwithwashingupliquidandrinse. Allow the filterstodrainwell. The underside of the cookerhood can be cleaned with a mild cleaning agent and damp cloth. Dry off with napertowel.
Replacingcassettefilter
The filters should be placed with the locking mechanism monthfront. Openthefilteraccesslatch. Thenotchesatthefrontofthefilterwillthenslotin.Holdtheaccesslatchinthisispositionwhenplacing the filters.
1.Slotthenotchesatthebackofthefilterinthespeciallydesignedopeningofthecookerhood.
2. Tiltthefilterupwards.
3. Releasethefilteraccesshatch. Thenotchesatthebackofthefilterwillextendoutwardsand slotintothespeciallydesignedopeningsofthecookerhood.
Thefilterisnowinpositionagain.
- Presstheedgeextractionpanelfirmlyinthemagneticsealagain(youwillhearaclick).
TIP!
Theedgeextractionpanelcanberemovedforcleaning.
Activecarbonfilters
Theregenerableactivecarbonfiltermustbewashedbyhandwithneutralcleaningproducts,orinthedishwasheratamaximumtemperatureof 65^ (thewashingshouldbedonewithoutanyplates, dishes,cups,etc.inthemachine).Donotusewashingdetergent.
Removetheexcesswaterwithoutdamagingthefilter,removetheholderandletthefilterdryin the ovenforatleast40minutesatamaximumtemperatureof 70^ .
Tokeeptheregenerablecarbonfilterefficient, this actions shouldberepeatedevery2months or when indicated bythefilterindicator. The filter must replace afternomorethan3years, or if it has been damaged.
CAUTION!
It is important that the grease filters and there are generate reactive carbon filters are thoroughly dry before repositioning.
Replacingthecarbonfilter
Toreplacementecarbonfilter,consultthemanualfortherecirculationkit.
Filterindication
Saturationofgreaseandcarbonfilters
Thefiltersshouldbereplacedorcleanedwhenthefilterindicatorislit.
Greasefilter
Thefilterindicatorwilllightupafter30operatingshours.
- Thegreasefiltersshouldthenbecleaned.
- Reset the memory by pressing and holding -12 (minus) button on the remote control until the filter indicatorgoesoff.
Carbonfilter
Thefilterindicatorwillflashafter120operatinghours.
- Thecarbonfiltersshouldthenbecleanedorreplaced.
- Reset the memory by pressing and holding '-' (minus) button on the remote control until the filter indicatorgoesoff.
Lighting
WARNING!
ThehoodisfittedwithLEDlights.Anaauthorizedtechnicianmustreplacethese.Donotattempt toreplacetheLEDlightsyourself.
Batteryoftheremote
NOTE!
- Whenthebatteriesarereplacedthepairingconnectionwillremain.
- Replace the batteries in time, as the receiving distance will be shortened if the voltage of the batteryistoolow.
- Don't forget to remove the batteries if you don't use the remote for a long time.
- Don'tleavetheremotelyingupsidedownnonaconductivesurface.
- Thewartrydoesn'tcoverthebatteries.
- Thebatterymaydrainmorequicklyinconnectionwiththeliticons.
- Avoidtostoretheremotecontrolinadrawer. Themovementofthedrawermayinadvertently activatetheremotecontrolandsignificantlyshortenbatterylife.
- Batteryspecifications:TwoAAAbatteries.
EUProductSheet
Datadeterminedaccordingo:
StandardEN61591andCommissionRegulations(EU)no.65/2014and(EU)no.66/2014.
| WU9054MGWU9095MXWU | |||
| [ kWh/a] | hood) | 20.720.720.7AnnualEnergyC | |
| 0.60.60.6Timeincreasefactor | |||
| hoods) | 37.637.637.6FluidDynamicEI | ||
| hood) | 33.233.233.2EnergyEfficienc | ||
| point(Q BEP) [m3/h] | 337337337Measuredairflowr | ||
| point(P BEP)[Pa] | 328328328Measuredairpress | ||
| max) [m3/h] | 420420420Maximumairflow( | ||
| efficiencypoint(W BEP)[W] | 81.781.781.7Measuredelect | ||
| [L) [W] | 3.93.93.9Nominalpowerofthe | ||
| onthecookingsurface(E middle)[lux] | 218218218Averageillumination | ||
| mode(P_s)[W] | 0.380.380.38Measuredpower | ||
| Measured power consumption off mode (Po) [W] | - | - | - |
| Soundpowerlevel(L WA)[dB] | 58 | 58 | 58 |
EUProductFiche
| WU9054MGWU9095MXWU | |||
| hood)[lux/W] | 55.955.955.9LightingEfficien | ||
| [‰] hood) | 92.492.492.4GreaseFiltering | ||
| speedinnormaluse[m 3/h] | 290-420290-420290-420Airfl | ||
| [m3/h] | 640640640Airflowatintensive | ||
| poweremissionsatminimummand maximumspeedinnormaluse[dB(A)] | 50-5850-5850-58Airborne | ||
| poweremissionsatintensiveorboost setting[dB(A)] | 676767AirborneacousticalA- |
Compliance information
| Radioequipmenttype | RFmodule |
| Operatingfrequencyrange | 2402-2477MHz(16channels) |
| Maximumoutputpower | -5.2dBmEIRPaverage(calculated) |
| Maximumantennagain | -7dBi |
| Radioequipmenttype | Wi-Fimodule |
| Operatingfrequencyrange | 2412-2472MHz |
| Maximumoutputpower | 16.8dBmEIRPaverage(calculated) |
| Maximumantennagain | 0dBi |
| Radioequipmenttype | BLEmodule |
| Operatingfrequencyrange | 2402-2480MHz |
| Maximumoutputpower | 7.63dBmEIRPaverage(calculated) |
| Maximumantennagain | 0dBi |
Hereby, ATAG declares that the radio equipment type Cookerhood is in compliance with Directive 2014/53/EU.
Safetyregulations
Faultypartsmayonlybereplacedbyoriginalparts. Themanufacturer canonlyguaranteethatoriginalpartsmeetsaftetyrequirements.
Ifthesupplycordisdamaged,itmustbereplacedbythe manufacturer,itserviceagentorsimilarlyqualifiedpersonsinorder toavoidahazard.

WARNING!
This appliances should only be connected by are registered installer.
- Check the appliance for transport damage. Donot connect damaged appliance.
- AlwaysusetheoriginalSupplycordtoconnecttheappliance.
- Theelectricalconnectionmustcomplywithnationalandlocalregulations.
-
Thewallplugsocketandplugshouldalwaysbeaccessible.
-
If a stationary appliance is not fitted with a supply cord and a plug, or with other means for disconnectionfromthesupplymainshavingacontactseparationinallpolesthatprovidefull disconnectionunderovervoltagecategoryllconditions,themeansfordisconnectionmustbe incorporatedinthefixedwiringinaccordancewiththewiringrules. Thisisalsoapplicablefor applianceswithasupplycordandplugwhentheplugisnotaccessibleafterinstallingthe appliance.Usinganomnipolarswitchwithacontactseparationofleast3mmfittedinthe fixedwiringwillfulfilthisrequirement.
- The appliance should not be connected to the mains via a multi-plug adapter or extension cable, asthesafeuseoftheequipmentcannotbeguaranteed.
- Disconnecttheappliancefromthemainssupplybeforestartinganyrepairwork.
- Weadvise you outowear protective gloves when assembling the cookerhood because of the possiblesharpedges.
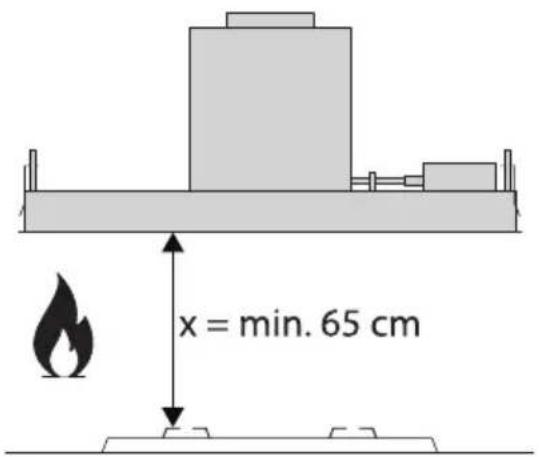
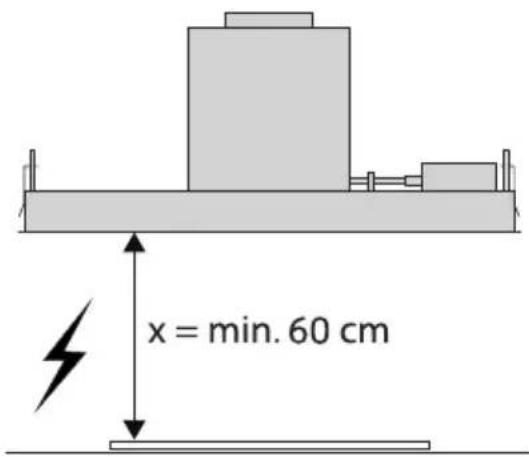
- Thedistancebetweenthelowestpointofthecookerhoodandthesupportingsurfaceforthe cookingvesselsgashobshouldbeatleast65cm.
If the instructions of the gas hob specify a greater distance, this has to be taken into account.

WARNING!
Extractionhoodsandotherappliancesstextractcookingvapourscanaffectthesafeoperation of appliancesthatburngasorotherfuel(includingthoseinotherrooms)bybackflowing combustion gases.These gasescanpotentiallyleadto carbonmonoxidepoisoning.Afterinstalling anextractionhoodorthervapoureextractor, the operationofapplianceswithfluegasextraction mustbetestedbyacompetentpersontoensurethatthecombustiongasesdonotflowback.
Neveropenthecasingoftheappliance.

WARNING!
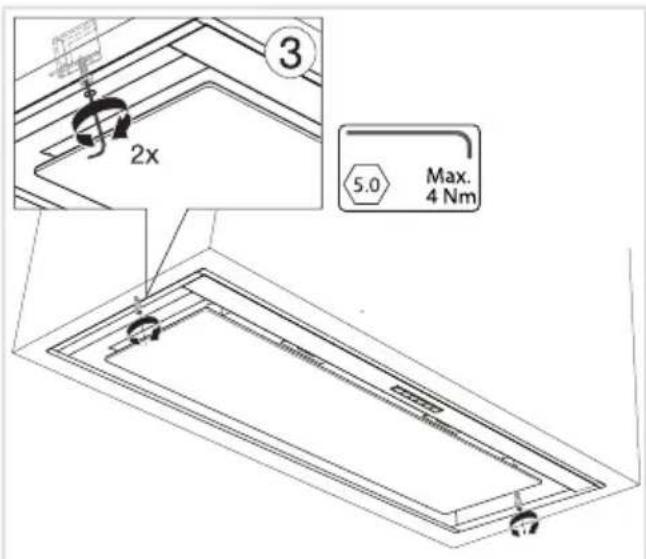
Failuretoinstallscrewssorfixingdevicesinaccordancewiththeseinstructionsmayresultinan electricalhazard.
Ifthesafetyinstructionsand warningsarenotfollowed,themanufacterercannotbeheldresponsible foranyresultingdamage.
If you decide to discontinue using the appliance because of a fault, we recommend you cut off the cable after removing the plug from the plug socket. Take the appliance to your municipality's waste disposalsite.
Placetheapplianceanenvvironmentthatmeetsthefollowingconditions:
Ambienttemperaturerange:+5....+40°C;
Humidity:30....70%RH;
Maximumaltitude:2000metersabovesealevel.
Preparationsforinstallation
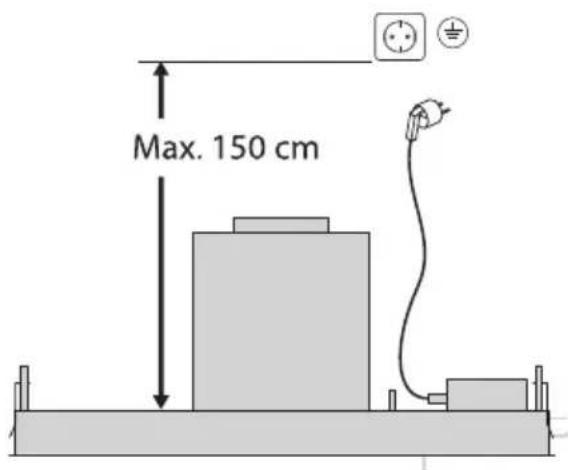
Installation
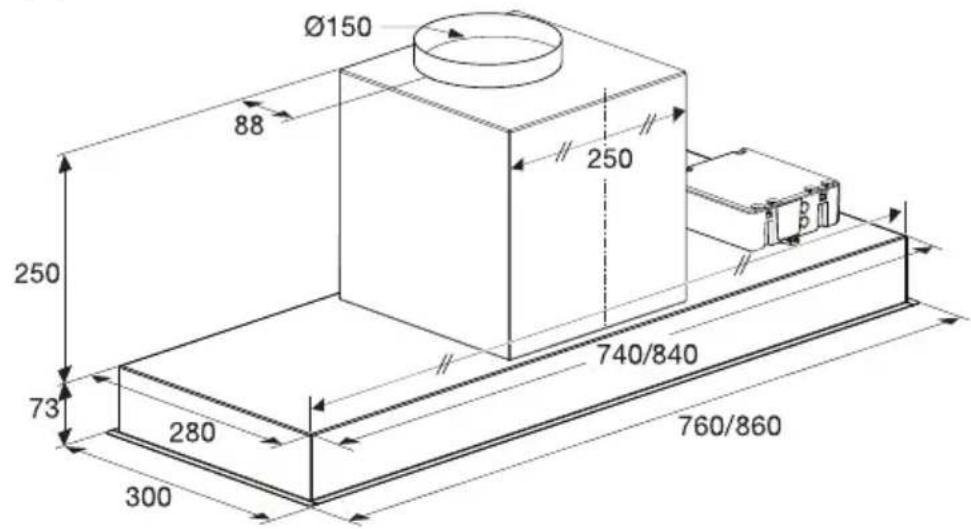
Appliancedimensions
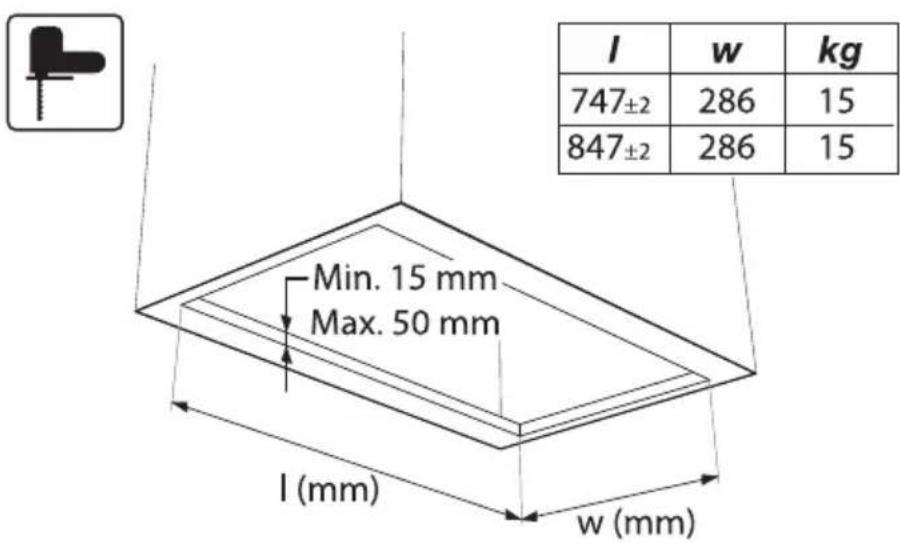
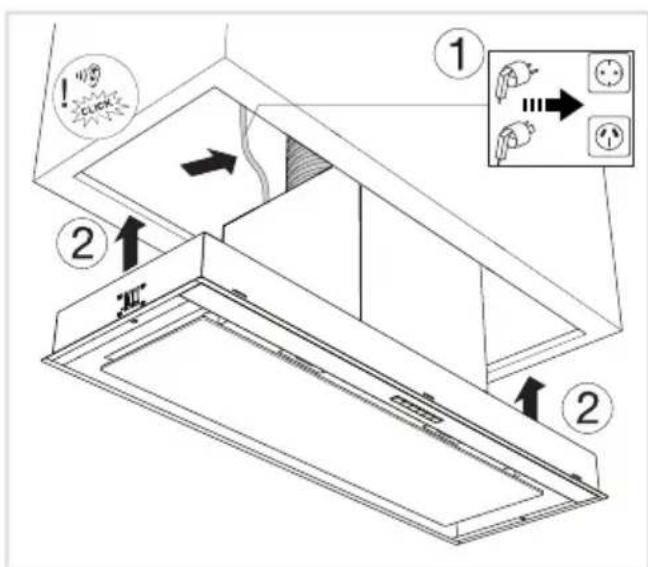
Built-in
Tipsforenergy-efficientcookingwithhoods
- Usealowextractorsettingandusethehighestsetting(boost)onlyifnecessary.
- Awell-ventilatedkitchenmakestherangehoodmoreefficient.
- Clean filters regularly and replace filters when needed to keep the filter efficiency high, as a saturated filter cannot perform leadstolongerusagetimes.
Disposal of the appliance and packaging
Sustainable materialshavebeenusedduringthemanufactuereofthisappliance.Thisappliancemust bedisposedofresponsiblyattheendofitsservicelife.Askyourlocalauthoritiesformoreinformation abouthowtodothis.
Theappliancepackagingisrecyclable. Thefollowingmayhavebeenused:
cardboard;
polyethylenefilm(PE);
CFC-freepolystyrene(PSrigidfoam).
Disseofthesematerialsinaresponsiblemannerandinaccordancewithgovernmentregulations.
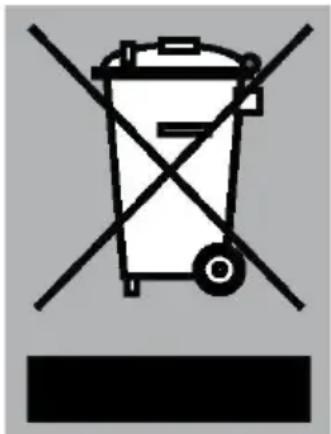
Theproducthasbeenmarkedwithacrossed-outdustbinsymbolto
remindyouoftheobligationtodisposeofelectricalhousehold
appliancesseparately.Thismeansthatheappliancemaynotbe
includedwithnormaldomesticrefuseattheendofitsservicelife.
Theappliancemustbetakentoaspecialmunicipalcentreforseparated
wastecollectionortoadealerprovidingthisservice.
Aseparatecollectionofhouseholdapplianceshelpstopreventany potentialnegativeimpactontheenvironmentandonhumanhealth causedbyimproperdisposal.Itensuressthatthematerialsofwhichthe applianceiscomposedcanberecoveredtoobtainsignificantssavings inenergyandrawmaterials.
C E
Declarationofconformity
Weherebydeclare that our productssatisfytheapplicableEuropean directives,ordersandregulations,aswellastherequirementsstated inthereferencedstandards.
Yournotes
ATAG
www.atag.nl
www.atag.be

926823-a1
C
