
WMA.1 - Basket Atag - Free user manual and instructions
Find the device manual for free WMA.1 Atag in PDF.

User questions about WMA.1 Atag
0 question about this device. Answer the ones you know or ask your own.
Ask a new question about this device
Download the instructions for your Basket in PDF format for free! Find your manual WMA.1 - Atag and take your electronic device back in hand. On this page are published all the documents necessary for the use of your device. WMA.1 by Atag.
USER MANUAL WMA.1 Atag
natural_image
Three people preparing food together, one holding a spoon and serving food (no visible text or symbols)ATAG
ATAG
uw afzuigkap
description of control panel
your extractor hood
foreword
models with motor
text_image
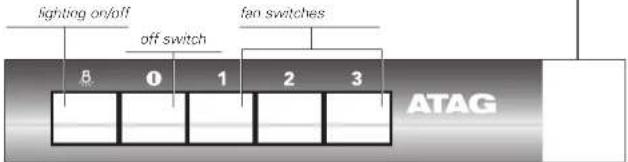
lighting on/off off switch fan switches 8 0 1 2 3 ATAGmodels without motor
text_image
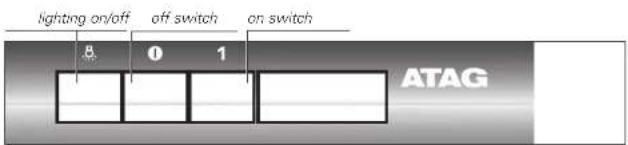
lighting on/off off switch on switch 8 0 1 ATAGThis manual describes how you can make the best possible use of your extractor hood.
You can find information in it about the controls and background information about how the appliance works. You will also find tips about how to look after it.
The safety instructions that are important during the installation are included in the installation guide, which is supplied separately and is meant for the installer.
Please keep this manual carefully, since any subsequent user will also find it very useful.
your extractor hood introduction
your extractor hood contents
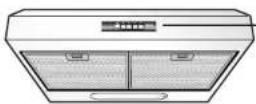
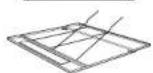
You have selected an under-mounting ATAG extractor hood. Optimum ease of use and simple operation were the most important factors in the development of this product.
The extractor hood operates silently and provides maximum extraction effect. This banishes cocking smells completely. The extractor hood can be adapted for recirculation. The WO60.,AC, WCA.1 and WCA.2 have been specially designed for use on a central extraction system and are fitted with an electric flap.
safety
what you should pay attention to 4 - 5
operation
switching on 6
maintenance
cleaning 7 - 10
faults
what should I do if... 11
installation
general 12 - 14
assembly
building in 15
technical data
general 16
environmental aspects
disposal of packaging and appliance 17
safety
what you should pay attention to
safety
what you should pay attention to
general
This extractor hood is extremely safe. There are, however, a number of things you have to pay attention to, just as for any other product.
For safety tips in relation to the
installation, we refer you to the
instructions in the accompanying
installation guide.
This appliance should only be connected by a registered installer.
Repairs should only be carried out by an authorised service engineer.
Never open the casing and do not alter the mechanical and/or electrical structure of the appliance. This could result in dangerous situations (touching live components) and faults.
Do not use the appliance if it is damaged.
The appliance should be disconnected from the mains before being repaired or cleaned. Remove the plug from the socket or turn the switch in the meter cupboard to zero.
For electrical safety reasons, the appliance must not be cleaned using high-pressure cleaners or steam cleaners.
during use
Flambéing under an extractor hood is not permitted. The high flames could cause a fire, even if the fan is switched off.
Always keep an eye on things when deep-frying.
Switch the extractor hood on before starting to cook. Leave the extractor hood on for about ten minutes after you have finished cooking.
Clean the extractor hood regularly, as specified on page 7, 'maintenance'. In this way, you prevent the risk of fire.
Disconnect the extractor hood from the mains before replacing the light bulbs! Only use the same light bulbs, with the wattage stated.
operation
switching on
maintenance
cleaning
introduction
Set the extraction capacity and lighting on the control panel. Read on this page how to use the facilities.
switching on
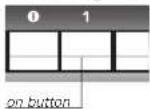
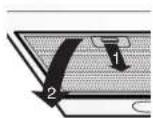
models without motor
Press the on button (1).
The electrically powered flap is opened.
NB: do not leave the flap switched on for more than
12 hours at a time.
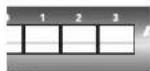
fan buttons
models with motor
Press the fan button for the desired setting (1, 2, 3).
1 is the lowest setting, 3 the highest.
The fan will be switched on at the desired setting.
switch off
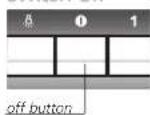
models without motor
Press the off button (①)
The electrically powered flap is closed.
models with motor
Press the off button (①)
The fan is switched off.
switching lighting on
lighting button
Press the lighting button (基
The lighting is switched on.
switching lighting off
Press the light switch (again.
The lighting is switched off.
hood
enamelled extractor hoods
Clean the extractor hood with soap and a soft cloth. Then rinse with clean water. Do not use aggressive cleaning agents, such as soda. The enamel will remain attractive if you polish it with wax from time to time.
stainless steel extractor hoods
For cleaning the stainless steel parts you can best use a mild cleaning agent (washing-up liquid) and a damp cloth. Dry with kitchen paper or a dry cloth.
The stainless steel regains its shine if you occasionally use a stainless-steel care product or polish. The polish applies a dirt-resistant layer to the stainless steel. Always clean the stainless steel in the direction of polishing.
ATAG supplies cleaning and maintenance agents for extractor hoods. For information on availability, please contact the consumer department (see warranty conditions for the phone numbers).
Never use abrasive cleaning agents (such as green scourers or other scouring pads) or polishing cleaning agents (such as liquid abrasives). Never use caustic agents. These can attack the stainless steel.
maintenance cleaning
maintenance cleaning
grease filters
Clean the grease filters at least once a month. During cleaning, the aluminium parts of the filters may become dull as a result of the cleaning agents used, particularly when placed in the dishwasher. This is normal and is not covered by the warranty.
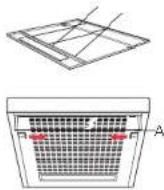
removing aluminium grease filter
1 Switch off the fan and lighting.
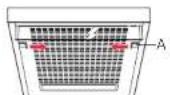
2 Unlock the grille (A) and hinge it downwards.
3 Push the wire brackets aside.
4 Remove the grease filter from the grille.
removing filter cassette
1 Switch off the fan and lighting.
2 Using the recess, press the filter backwards and tip it downwards at the front.
3 Remove the filter from the hood.
cleaning
You can clean the filters in the dishwasher. Allow them to drain fully before reinstalling them in the hood.
The filters may also be cleaned by hand.
Clean the filters in water and washing-up liquid and rinse them. Allow the filters to drain fully. The underside of the extractor hood can be cleaned with a mild cleaning agent and a moist cloth. Then dry it off with kitchen towel or a dry cloth.
reinstalling the aluminium grease filter
1 Place the filter in the grille.
2 Refit the wire brackets
3 Place the grille back in the extractor hood. First press the back into the hood; then the front. The filter will now click into place.
4 Lock the filter in place by pushing the locking projections outwards.
reinstalling filter cassette
The filter has to be installed with the locking mechanism at the front.
Open the locking mechanism. This pulls the projections at the front of the filter inwards. When installing the filters hold the locking mechanism in this position.
1 Push the projections at the back of the filter into the openings provided for this purpose at the rear of the extractor hood.
2 Hinge the filter upwards.
3 Release the locking mechanism. The projections at the front of the filter move outwards into the openings provided for this purpose at the front of the extractor hood.
The filter is now correctly positioned.
maintenance
cleaning
carbon filter
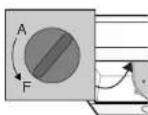
If you plan to use the appliance as a recirculation hood, you must first install the carbon filter. You must then also set the switch located at the back of the appliance to F. In the case of normal use the carbon filter must be replaced twice annually. In the case of intensive use the carbon filter should be replaced more frequently.
installing / replacing
1 Remove the grease filters.
2 Remove the cover from the carbon filter housing.
3 Place the carbon filter in the carbon filter housing.
4 Secure the filter with locking pin A.
5 Reinstall the carbon filter cover.
6 If necessary set the switch in the appliance to position "F" (filter mode) (see also "setting", below).
7 Reinstall the grease filters.
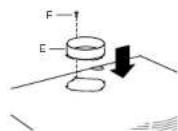
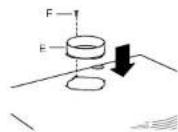
setting
Remove the filters from the extractor hood.
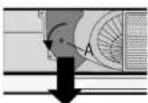
If you are going to use the appliance as a recirculation hood, set the switch located inside the appliance at the back to position F (filter mode) (the flap is closed). You must then also install the carbon filter (see 'carbon filter', above).
If you are connecting the hood to a flue, set the switch located inside the appliance at the back to position A (the flap is open).
faults
what should I do if...
If the appliance does not work properly, this does not always mean that it is defective. Try to deal with the problem yourself first. Phone the service department if the advice given below does not work.
attention:
Disconnect the appliance from the mains before starting the repair, preferably by removing the plug from the socket or setting the main switch to zero.
fault
Lighting is not functioning

cause
Light bulb defective.
Halogen bulb defective.
attention:
Use only the same light bulbs with the wattage stated.
solution
Remove the grease filters. This gives access to the light bulbs. Unscrew the bulb from the fitting and replace it with a new 40 W bulb.

Extractor hood makes a noise.
Discharge too long or too many bends in the duct.
Motor defective.
Pull the inner ring downwards with a screwdriver (see illustration).
Take care: The glass is loose!
Pull the halogen bulb out of the fitting and replace it with a new 20 W halogen bulb. Use a clean cloth to hold the new bulb.
No extraction.
Motor or controls defective.
Connection cable defective.
Change the discharge ducting (see installation guide).
Phone the service department.
Phone the service department.
Phone the service department.
installation general
installation general
the discharge
The discharge may under no circumstances be connected to a duct that is also used for other purposes. Bear in mind the local regulations concerning the ventilation of gas appliances.
The discharge may pass straight through the wall to the outside, provided that the well opening is protected against the entry of rain, leaves and the like by a grating. The passage of the discharge may not be restricted by more than 20% by the wall grating.
We advise the use of as large a discharge duct as possible. A duct with a smaller diameter will have a low extraction capacity and produce higher noise levels.
Bends produce resistance. Make sure that the duct has a smooth run and has as few bends as possible. Draw the flexible pipe out as far as possible. Before starting to drill, check that there are no installation pipes (for gas, water, etc.) present.
The discharge stump has a diameter of 125 mm. It is best if the discharge pipe also has this diameter.
electrical connection
The plug should be accessible after the extractor hood is fitted or it should be possible to disconnect the extractor hood from the mains by means of a bipolar switch with a contact gap of 3 mm.
When making the electrical connections, take care that the voltage and frequency correspond to the values given on the data plate.
If the connection cable becomes damaged, it should be replaced by the manufacturer's service department or by a person with equivalent qualifications, in order to prevent dangerous situations from arising.
safety
Attention: Make sure that there is a sufficient supply of fresh air, if an extractor hood and a heat source (e.g. gas cooker) that both consume air from the same room, are switched on at the same time. The maximum permitted underpressure is 4 Pa.
building-in dimensions
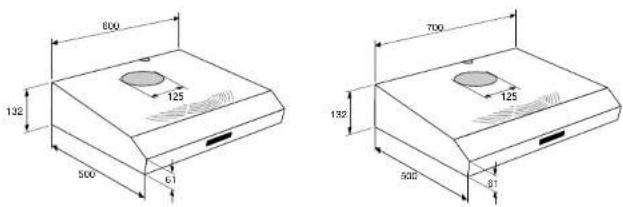
text_image
600 132 125 500 61 700 132 125 500 81WO60.; WCA.; WMA.; WMB.; WO70. WMC.; WMD.
installation general
assembly
building in
clearance required
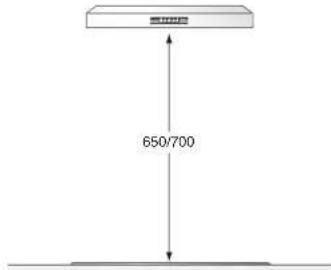
text_image
650/700The distance between the underside of the extractor hood and the hob should be at least 65 cm. For gas hobs, this distance should be a minimum of 70 cm.
fitting possibilities
You can use the extractor hood for recirculation or for extraction. An extractor hood blows the fumes through the discharge to the outside.
In the case of a recirculation hood, a carbon filter removes the fumes. The clean air is blown back into the kitchen.
For instructions on installing the carbon filter see "setting" on page 10.
against the wall
1 Remove the filters from the extractor hood.
2 Hold the hood against the wall.
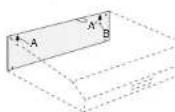
3 Working through the hood or using a fitting template, draw the mounting holes (A) and the hole to secure the hood (B).
4 Drill the holes.
5 Push the wall plugs supplied into the holes.
6 Insert the screws into the 2 mounting holes (A).
NB: screw the screws in until 1 cm is left protruding from the wall.
7 Fit the flue ring (E) to the extractor hood. Tighten the screw (F) with which the flue ring is secured.
8 Hang the hood on the 2 mounting screws.
9 Tighten the mounting screws.
10 Tighten the locking screw.
11 Connect the flue pipe to the flue ring.
below a kitchen cupboard
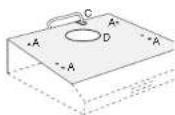
1 Working through the hood or using a fitting template, draw the 4 mounting holes (A), the hole for the power lead (C) and the hole for the flue (D) on the bottom of the kitchen cupboard.
2 Drill the holes.
3 Fit the flue ring (E) to the extractor hood. Tighten the screw (F) used to secure the flue ring.
4 Pull the power lead upwards through the hole provided and push the flue ring through the opening.
5 Hang the hood, through the bottom of the kitchen cupboard, on the 4 mounting screws. Tighten the screws.
6 Connect the flue pipe to the flue ring.
technical data
general
environmental aspects
disposal of packaging and appliance
WO60..AC / BM / CM - WCA.2 / WCA.1 - WMA.2 / WMA.1 WMB.2 / WMB.1 - WMC.1 - WMD.1
Power supply: 230 V AC - 50 Hz
Connected load: see data plate
Dimensions (wxhxd): 600 x 132 x 510 mm
WO70..C
Power supply: 230 V AC - 50 Hz
Connected load: see data plate
Dimensions (wxhxd): 700 x 132 x 510 mm
This appliance conforms to current CE guidelines.
The appliance's packaging is recyclable. The following may be used:
- cardboard;
• polyethylene film (PE);
• CFC-free polystyrene (PS rigid foam).
Dispose of these materials responsibly and in accordance with government regulations.
The government can also provide information about the responsible disposal of discarded domestic appliances.