
CI-20 - Cooker DOMETIC - Free user manual and instructions
Find the device manual for free CI-20 DOMETIC in PDF.

| Product type | Induction cooktop |
| Brand | Dometic |
| Model | CI-20 |
| Supply voltage | 120 V AC, 60 Hz |
| Total rated power | 1440 W |
| Power per zone | 1440 W (left and right) |
| Maximum current | 13.2 A |
| Dimensions (W x D x H) | 620 x 380 x 70 mm |
| Weight | 6.4 kg |
| Number of cooking zones | 2 |
| Surface type | Glass ceramic |
| Control type | Touch |
| Cooking modes | Heat (10 power levels) and Temperature (11 levels) |
| Timer | Yes, from 1 minute to 3 hours |
| Panel lock | Yes, by simultaneous press on + and - |
| Cookware compatibility | Flat ferromagnetic bottom, diameter 127 to 203 mm |
| Safety protections | Overheating, undervoltage, overvoltage, pan detection, automatic shutdown |
| Ventilation | Front and rear, do not obstruct |
| Installation | Built-in, with cutout and permanent fixation |
| Maintenance | Glass cleaner and soft cloth, avoid abrasive products |
| Warranty | 2 years (see Dometic website) |
Frequently Asked Questions - CI-20 DOMETIC
User questions about CI-20 DOMETIC
0 question about this device. Answer the ones you know or ask your own.
Ask a new question about this device
Download the instructions for your Cooker in PDF format for free! Find your manual CI-20 - DOMETIC and take your electronic device back in hand. On this page are published all the documents necessary for the use of your device. CI-20 by DOMETIC.
USER MANUAL CI-20 DOMETIC
EN Induction Cooktop
Installation and Operation Manual.....2
Service Center & Dealer Locations
Visit: www.dometic.com
Please read these instructions carefully and follow all instructions, guidelines, and warnings included in this product manual in order to ensure that you install, use, and maintain the product properly at all times. These instructions MUST stay with this product.
By using the product, you hereby confirm that you have read all instructions, guidelines, and warnings carefully and that you understand and agree to abide by the terms and conditions as set forth herein. You agree to use this product only for the intended purpose and application and in accordance with the instructions, guidelines, and warnings as set forth in this product manual as well as in accordance with all applicable laws and regulations. A failure to read and follow the instructions and warnings set forth herein may result in an injury to yourself and others, damage to your product, or damage to other property in the vicinity. This product manual, including the instructions, guidelines, and warnings, and related documentation, may be subject to changes and updates. For up-to-date product information, please visit www.dometic.com.
Contents
1 Explanation of Symbols and Safety Instructions 2
1.1 Recognize Safety Information....2
1.2 Understand Signal Words....2
1.3 Supplemental Directives....3
1.4 General Safety Messages .... 3
2 Intended Use 4
3 General Information.... 5
3.1 Specifications 5
3.2 Dimensions and Clearances ..... 5
3.3 Components....6
3.4 Control Panel....6
3.5 Compatible Cookware 6
4 Installation....7
5 Operation....8
5.1 Using the Touch Controls....9
5.2 Setting the Power Level....9
5.3 Setting the Cooking Level.....10
5.4 Turning the Cooktop On....10
5.5 Using the Timer....11
5.6 Locking the Control Panel ..... 11
5.7 Turning the Cooktop Off ..... 11
6 Troubleshooting 12
7 Maintenance 13
8 Disposal 13
Limited Two-Year Warranty 13
IMPORTANT SAFEGUARDS
1 Explanation of Symbols and Safety Instructions
This manual has safety information and instructions to help you eliminate or reduce the risk of accidents and injuries.
1.1 Recognize Safety Information
This is the safety alert symbol. It is used to alert you to potential physical injury hazards. Obey all safety messages that follow this symbol to avoid possible injury or death.
1.2 Understand Signal Words
A signal word will identify safety messages and property damage messages, and also will indicate the degree or level of hazard seriousness.
DANGER!
Indicates a hazardous situation that, if not avoided, will result in death or serious injury.
WARNING
Indicates a hazardous situation that, if not avoided, could result in death or serious injury.
CAUTION
Indicates a hazardous situation that, if not avoided, could result in minor or moderate injury.
NOTICE: Used to address practices not related to physical injury.
i Indicates additional information that is not related to physical injury.
1.3 Supplemental Directives
To reduce the risk of accidents and injuries, please observe the following directives before proceeding to install or operate this appliance:
- Read and follow all safety information and instructions.
- Read and understand these instructions before installing or operating this product.
- When using electrical appliances, basic safety precautions should always be followed, including all safety messages in this manual. Ignoring safety warnings may result in injuries.
- The installation must comply with all applicable local or national codes, including the latest edition of the following standards:
U.S.A.
- ANSI/NFPA70, National Electrical Code (NEC)
- ANSI/NFPA 1192, Recreational Vehicles Code
– UL 858 Household Electric Ranges
Canada
– CSA C22.1, Parts I & II, Canadian Electrical Code
– CSA Z240 RV Series, Recreational Vehicles
– CAN/CSA-C22.2 No. 61 Household Cooking Ranges
1.4 General Safety Messages

WARNING: ELECTRICAL SHOCK, FIRE, AND/OR BURN HAZARD. Failure to obey the following warnings could result in death or serious injury:
- Use only Dometic replacement parts and components that are specifically approved for use with the cooktop.
- Avoid improper installation, adjustment, alterations, service, or maintenance of the cooktop. Installation, service, and maintenance must be done by a qualified service person only.
- Do not modify this product in any way. Modification can be extremely hazardous.
EN
- If the cooktop surface or plastic cover is cracked, disconnect it and contact an authorized service center.
- Keep the cooktop out of the reach of children or persons with reduced physical, sensory, or mental capabilities or lack of experience and knowledge, unless they have been given supervision or instruction concerning the use of the cooktop by a person responsible for their safety.
- Children must be closely supervised when using this cooktop. Do not allow children to sit or stand on any part of the cooktop. Do not let the power cord hang over the counter or table top where children can reach it.
- Do not store items of interest to children in cabinets above the cooktop. Children climbing on the cooktop to reach the item could be seriously injured.
- Unplug the power cord by holding the plug, never by pulling the cord.
- Do not handle the plug with wet hands.
- Do not immerse cord, plugs, or the cooktop in water or other liquid. Do not directly rinse this cooktop under water. Do not spill water, soup, or other liquids into the internal parts of the cooktop.
- Do not attempt to modify or lengthen the power cord of this cooktop.
- Do not use an extension cord as a replacement for the provided power cord.
- The marked electrical rating of the detachable power-supply cord or extension cord must be at least as great as the electrical rating of the cooktop.
- If the cooktop is grounded, the extension cord must be a grounded three-wire cord.
- If the power cord is damaged, have it replaced by a qualified service person.
-
This cooktop has a polarized plug (one blade is wider than the other). This plug is intended to fit into a polarized outlet only one way. If the plug does not fit fully into the outlet, reverse the plug. If it still does not fit, contact a qualified electrician. Do not attempt to modify the plug in any way.
-
Never use your cooktop for warming or heating the room.
- Do not cook on or clean a broken cooktop. Cleaning solutions or cooking spills may penetrate the broken cooktop.

WARNING: PACEMAKER HAZARD.
People with heart pacemakers should consult a doctor. Only use the cooktop after confirming that it does not affect the pacemaker. Failure to obey this warning could result in death or serious injury.

WARNING: EXPLOSION HAZARD.
To avoid an explosion caused by heat expansion, never heat foods in sealed containers, such as compressed products, cans, or coffee pots. Failure to obey this warning could result in death or serious injury.

CAUTION: TRIPPING HAZARD. Failure to obey the following warnings could result in death or serious injury:
- A short [less than 4.6 ft (1.4 m)], or detachable, power cord should be used to reduce the risk of becoming entangled in or tripping over the cord.
- A longer detachable power cord or extension cord may be used provided care is exercised in its use.
- Do not use the power cord in walkways where it could be tripped over.
NOTICE: Avoid impacts on the heating plate, and do not overload the cooktop. Overloading the cooktop may damage the plastic cover and cooktop plate.
Federal Communications Commission (FCC) Notice
This equipment generates, uses, and can radiate radio frequency energy and, if not installed and used in accordance with the instructions, may cause harmful interference to radio communications. However, there is no guarantee that interference will not occur in a particular installation. If this equipment does cause harmful interference to radio or television reception, which can be determined by turning the equipment off and on, the user is encouraged to try to correct the interference by one or more of the following measures:
- Reorient or relocate the receiving antenna.
-
Increase the separation between the equipment and receiver.
-
Connect the equipment into an outlet on a circuit different from that to which the receiver is connected.
- Consult the dealer or an experienced radio/ TV technician for help.
Operation is subject to the following conditions:
- This device may not cause harmful interference.
- This device must accept any interference received, including interference that may cause undesired operation.
SAVE THESE INSTRUCTIONS
2 Intended Use
The Induction Cooktop, hereinafter referred to as "cooktop," is intended for indoor household use and listed similar applications only.
- Staff kitchen areas in shops, offices, and other working environments
- By clients in hotels, motels, bed and breakfasts, and other residential-type environments
• Recreational vehicles (RVs)
It is not for commercial use. Do not use the cooktop for other than its intended use.
The manual provides information that is necessary for the installation, operation, and maintenance of the cooktop.
Poor installation and/or improper operating or maintenance will result in unsatisfactory performance and a possible failure. The manufacturer accepts no liability for any injury or damage to the product resulting from:
- Incorrect assembly or connection, including excess voltage
- Incorrect maintenance or use of spare parts other than the original spare parts provided by the manufacturer
• Alterations to the product without express permission from the manufacturer - Use for purposes other than those described in this manual
Dometic reserves the right to modify appearances and specifications without notice.
3 General Information
This section provides general information about the cooktop and its components.
The cooktop uses electromagnetic conduction to heat the cookware. It is thermally efficient, safe and reliable, and easy to clean.
Testing and authentication of this product is based on the use of SUS430 cookware [bottom diameter 6 in. (152 mm)].
The images used in this document are for reference purposes only. Components and component locations may vary according to specific product models. Measurements may vary ±0.38 in. (10 mm).
3.1 Specifications
This section provides the electrical specifications and product weight.
| Model CI-21 | |
| Applied Voltage/Frequency | 120 VAC, 60 Hz |
| Low Voltage Protection | 80 ± 10V |
| Low Voltage Recovery | 90 ± 10V |
| High Voltage Protection | 140 ± 10V |
| High Voltage Recovery | 130 ± 10V |
| Left Rated Power | 1440 W |
| Right Rated Power | 1440 W |
| All Rated Power | 1440 W |
| Current Draw | Up to 13.2 A |
| Dimensions | 24.4 in. × 15.0 in. × 2.8 in.(620 mm × 380 mm ×70 mm) |
| Weight | 14.1 lbs (6.4 kg) |
3.2 Dimensions and Clearances
This section provides the cutout dimensions and the minimum clearance measurements for installation.
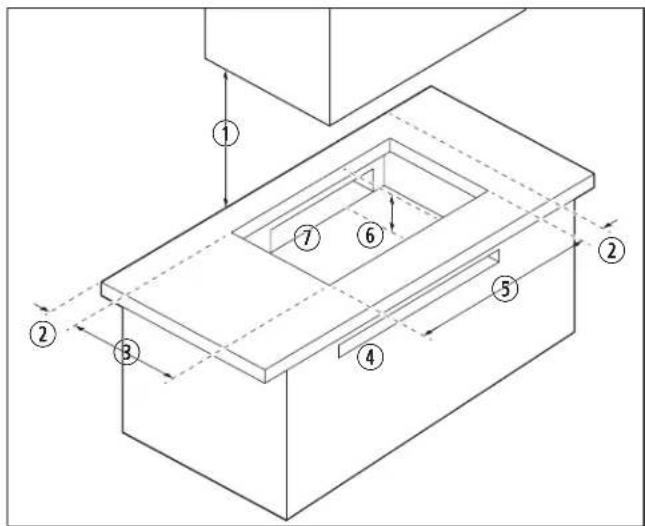
1 Dimensions and Minimum Clearances
| Dimension | Description | |
| 1 | 30.0 in. (762 mm) | Minimum Clearance |
| 2 | 1.0 in. (25 mm) | Minimum Distance from Cooktop to Wall or Cabinet |
| 3 | 14.2 in. (361 mm) | Cutout Width |
| 4 | 8.0 in. (203 mm) x 1.0 in. (25 mm) | Front Ventilation Cutout Dimensions |
| 5 | 23.3 in. (592 mm) Cutout Length | |
| 6 | 6.0 in. (152 mm) | Minimum Distance from Cooktop to a Surface |
| 7 | 1.2 in. (30 mm) x 20.0 in. (508 mm) | Back Ventilation Cutout Dimensions |
3.3 Components
This section identifies the main cooktop components.
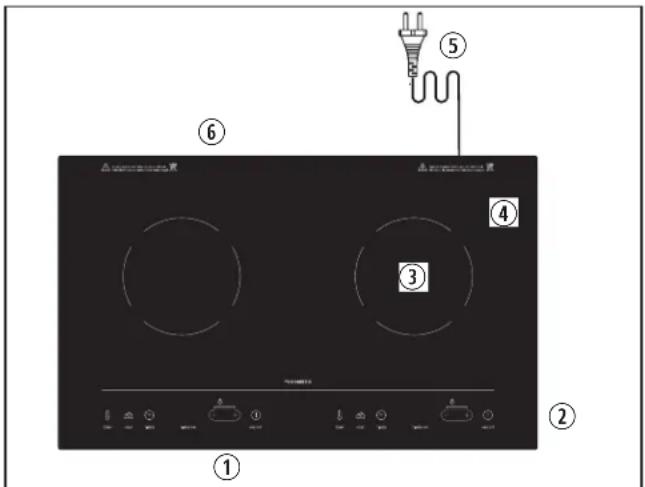
2 Cooktop
① Air Inlet
④ Ceramic Plate
② Control Panel
⑤ Power Cord
③ Cooking Zone
⑥ Air Vent
3.4 Control Panel
This section identifies the cooktop controls.

3 Control Panel
| Name Function | ||
| 1 | TEMP Activates temperature mode | |
| 2 | HEAT Activates heating mode | |
| 3 | TIMER Activates the timer | |
| 4 | TIMER ON LED | Indicates the cooktop is on timed operation |
| Name Function | ||
| 5 | +/- | Increases or decreases the power level, temperature, or time |
| 6 | ON/OFF Turns the cooktop on or off | |
| 7 | ON/OFF LED | Flashes for 1 second to indicate that power has been supplied to the cooktop. Stays lit when the cooktop is turned on |
| 8 | Lock LED | Indicates the cooktop is locked |
| 9 | Display | Displays mode, level, timer countdown, and error codes |
| 10 | HEAT LED | Indicates the cooktop is in heating mode |
| 11 | TEMP LED | Indicates the cooktop is in temperature mode |
3.5 Compatible Cookware
This section describes the type of cookware that is compatible with the cooktop.
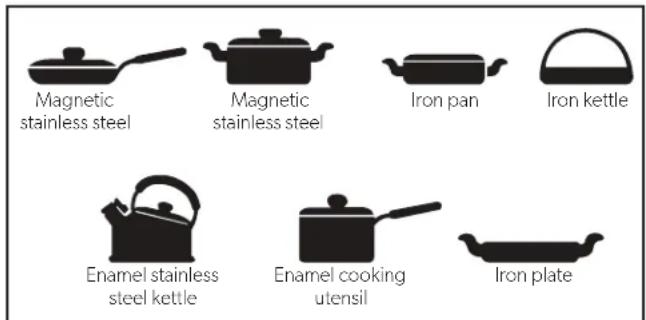
4 Compatible Cookware
Induction-compatible cookware contains ferromagnetic materials. In other words, it contains iron or has a layer with magnetic properties. Aluminum, copper or glass cookware will not work unless they have a layer on the bottom with magnetic properties.
To tell if a pot or pan is induction-compatible, hold a magnet to the bottom. If the magnet clings, the cookware will work on the cooktop.
The cookware must have a flat, smooth bottom with the diameter more than 5 in. (127 mm) and less than 8 in. (203 mm). Using the correct cookware size improves the efficiency of the cooktop.
4 Installation

WARNING: ELECTRICAL SHOCK AND/OR FIRE HAZARD. Failure to obey the following warnings could result in death or serious injury.
- This cooktop is provided with a 120 VAC power cord and must be plugged into a 120 VAC receptacle that is accessible to the user.
- Do not use the cooktop in narrow spaces. When using the cooktop, place it horizontally and allow at least 1 in. (25 mm) of free space between the sides and back of the cooktop and the wall.
- To avoid overheating, do not cover the ventilation openings.
- Use a dedicated and high-quality power outlet with a power rating equal to or above 13.2 A. Do not use poor quality outlets or share the power outlet with electrical appliances with high-power ratings, such as air conditioners, electrical stoves, etc.

WARNING: PROJECTILE HAZARD.
This cooktop must be permanently installed in the counter top and secured with glue, silicone, or another secure mounting method. Failure to secure the cooktop permanently could result in the cooktop becoming airborne in the occupant space of the vehicle in the event of an accident. Failure to obey this warning could result in death or serious injury.
Dometic recommends the installation of a convenience disconnect switch, within 3 ft (0.9 m) of the induction cooker, that disconnects the 120 VAC power to the cooktop when not in use.
This section describes how to position, assemble, and install the cooktop.
- Cut the cooktop and ventilation openings in the counter top. Refer to "Dimensions and Clearances" on page 5.
- Remove any protective film that may still be on the ceramic plate.
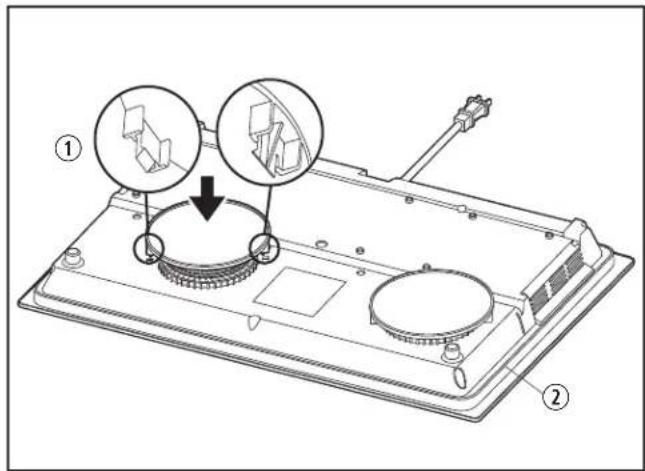
5 Fan Cover Connectors on Cooktop Underside
① Fan Cover Connectors ② Sealing Strip
- Carefully turn the cooktop upside down.
- Push the fan cover connectors into the holes next to the fans until you hear a click.
The connectors are different sizes. If they don't fit in the holes, turn the fan cover 180^ .
natural_image
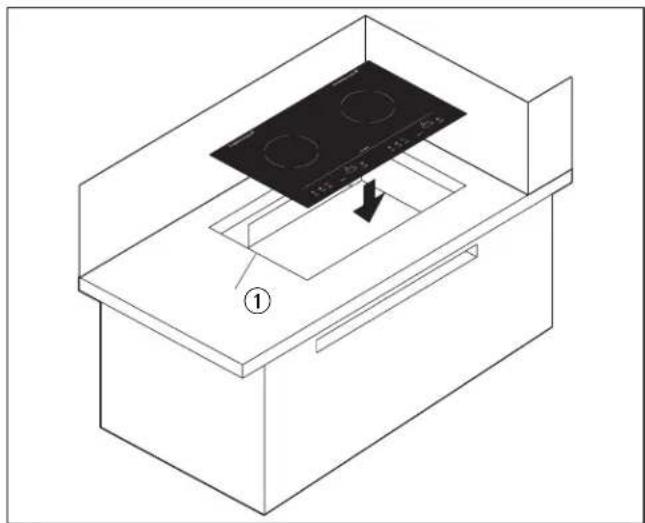
Isometric line drawing of a kitchen appliance with a stove and a tray, labeled with number ① (no text or symbols on the diagram itself)6 Placing the Cooktop
① Cutout
- Apply a continuous bead of glue or silicone to the sealing strip.
- Place the cooktop into the cutout.
- Verify that the air inlet and air vent align with the corresponding ventilation cutouts.
EN
- Plug the power cord into a 120 VAC receptacle accessible to the user.
5 Operation

WARNING: ELECTRICAL SHOCK, FIRE, AND/OR BURN HAZARD. Failure to obey the following warnings could result in death or serious injury:
- Unplug the cooker from the outlet or disconnect power to the outlet when not in use.
- Do not operate the cooktop with a damaged cord or plug, or after the cooktop malfunctions or has been damaged in any manner.
- Do not let the cord hang over the edge of a table or counter or touch hot surfaces.
- Do not use water on grease fires. Smother the fire or flame or use a dry chemical or foam type extinguisher.
- Do not operate this appliance by means of an external timer or separate remote-control system.

WARNING: ELECTRICAL SHOCK HAZARD. Failure to obey the following warnings could result in death or serious injury:
- Shore power is the best option for the cooktop.
- If a generator is used, it must have a pure sine wave output and a minimum power rating of 2000 W.
- The cooktop should not be used with inverting power supplies.

WARNING: FIRE AND/OR BURN HAZARD. Failure to obey the following warnings could result in death or serious injury:
- Flammable materials should not be stored near surface units.
- Never leave surface units unattended at high heat settings. Boil over causes smoking and greasy spillovers that may ignite.
- Wear proper apparel. Loose-fitting or hanging garments should never be worn while using the cooktop.
- Use dry potholders only. Moist or damp potholders on hot surfaces may result in burns from steam. Do
not let potholder touch hot heating elements. Do not use a towel or other bulky cloth.
- To avoid affecting product performance and to prevent injury, do not heat empty pots. When in use, do not leave the cooktop without supervision for extended periods. When leaving the cooktop without supervision, make sure that there is enough liquid in the pot.
- Use the proper cookware size. This cooktop is equipped with one or more surface units of different size. Select cookware with flat bottoms large enough to cover the cooking zone. The use of undersized cookware will expose a portion of the ceramic plate to direct contact and may result in ignition of clothing.
- To reduce the risk of burns, ignition of flammable materials, and spillage due to unintentional contact with the cookware, the cookware handle should be positioned so that it is turned inward and does not extend over adjacent surface units.
- To avoid danger caused by high temperatures, do not heat iron items other than cookware on the cooktop.
- To avoid accidents, do not place the cooktop, when in use, on a gas stove. (The magnetic lines can heat the metal parts of the gas stove.)
- When using the cooktop, do not put it on any metal surface (such as iron, stainless steel, or aluminum).
- Do not place a non-metal pad less than 4.7 in. (12 cm) thick on the ceramic plate.
- To avoid fire, do not place paper, aluminum foil, cloth, or other unsuitable articles onto the cooktop ceramic plate for indirect heating.
- To avoid overheating, do not use the cooktop on carpet, a tablecloth, or thin paper as they may block the air inlet or air vent openings.
- To avoid fire and/or damage to the electrical components, unplug the power cord from the outlet after use.
- Do not use the cooktop near a gas stove, kerosene stove, gas cooker, or other heat source, or in any space with an open fire or an environment with high temperatures.

CAUTION: BURN HAZARD. Failure to obey the following caution could result in minor or moderate injury.
- Do not touch surface units or areas near units. Surface units may be hot even though they are dark in color. Areas near surface units may become hot enough to cause burns. During and after use, do not touch or let clothing or other flammable materials contact surface units or areas near units until they have had sufficient time to cool.
- Extreme caution must be used when moving an appliance containing hot oil or other hot liquids.
- Be cautious when opening any lid while cooking.
- Do not place metallic objects such as knives, forks, spoons and lids on the cooktop since they can get hot.
- Keep utensils away from the immediate area around the ceramic plate.
• To avoid injuries such as scalding, do not let children operate the cooktop alone. Be careful of scalding caused by the high temperature. - When operating the cooktop or after moving the pot, the cooking area will remain hot for a period of time. Do not touch it.
5.1 Using the Touch Controls
Consider the following when using the touch controls.
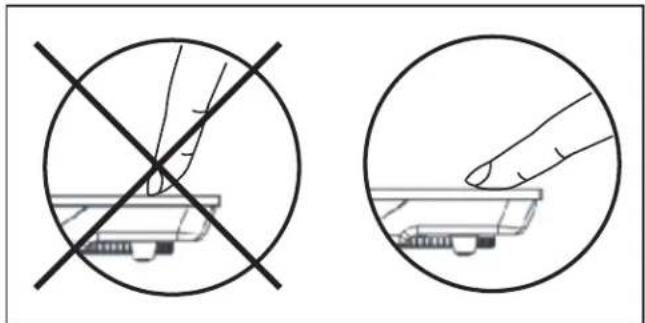
- The controls respond to touch, so you do not need to apply any pressure.
natural_image
Two circular diagrams showing a hand holding a device against a crosshair, with no text or symbols present.7 Touch Controls
- Use the ball of your finger, not the tip of your finger.
- You will hear a beep each time a touch is registered.
EN
- Make sure the controls are always clean, dry, and that there is no object (e.g., a utensil or a cloth) covering them. Even a thin film of water may make the controls difficult to operate.
5.2 Setting the Power Level
This section describes how to use the controls to set the power level prior to turning on the cooktop.
Touch HEAT to enter heating mode, then press (+) or (−) to select the power level.
| Power Level Wattage |
| 1 300 W |
| 2 500 W |
| 3 750 W |
| 4 800 W |
| 5 850 W |
| 6 900 W |
| 7 950 W |
| 8 1100 W |
| 9 1300 W |
| 10 1440 W |
5.3 Setting the Cooking Level
This section describes how to use the controls to set the cooking temperature.
Touch TEMP to enter temperature mode, then press (+) or (−) to select the cooking level.
| Cooking Level Temperature |
| 1 120 °F (49 °C) |
| 2 150 °F (66 °C) |
| 3 180 °F (82 °C) |
| 4 210 °F (99 °C) |
| 5 250 °F (121 °C) |
| 6 300 °F (149 °C) |
| 7 325 °F (163 °C) |
| 8 350 °F (177 °C) |
| 9 375 °F (191 °C) |
| 10 425 °F (218 °C) |
| 11 450 °F (232 °C) |
5.4 Turning the Cooktop On
NOTICE: Always verify that the air vents are not blocked prior to operating the cooktop. Do not block or insert any foreign object into the air opening.
This section describes how to turn on the cooktop and start cooking.
- Plug in the cooktop or operate the disconnect switch (if installed). A beep will sound and the ON/OFF indicator flashes for 1 second.
- Touch ON/OFF. The cooktop will beep once.
- Select the power level or the cooking level. See "Setting the Power Level" on page 9 or "Setting the Cooking Level" on page 10.
- Place the cookware on the ceramic plate.
Make sure the cookware contains food or liquid and is placed in the center of the cooking zone.
- Touch HEAT.
If there is no cookware on the ceramic plate, or the cookware is incompatible, the cooktop will not heat. A beep will sound and the screen will display "U". Ten seconds later, the cooktop will switch off automatically.
5.5 Using the Timer
Use the timer mode with the temperature or heating mode to preset a specific cooking time.
- While in temperature or heating mode, touch TIMER. The TIMER indicator lights up and "0:00" will blink on the display.
- Touch (+) or (−) to adjust the time duration. You can set the timer for a range of time from one minute to three hours.
- Touch the (+) or (−) briefly to change the time by one minute increments.
- Touch and hold to adjust by 10 minute increments.
- When the countdown is done, the cooktop will beep until you touch any key to turn off the timer.
5.6 Locking the Control Panel
To lock the cooktop, touch (+) and (−) at the same time. The lock indicator will light up.
To unlock the cooktop, press (+) and (−) at the same time. The lock indicator will turn off.
While locked, removing the cookware or touching ON/OFF will turn the cooktop off.
5.7 Turning the Cooktop Off
Touch ON/Off to turn off the cooktop.
When using a timer, the cooktop will turn off automatically when the countdown is complete.
6 Troubleshooting
If the recommended solution does not solve the problem, contact an authorized service center.
| Problem Possible Cause Recommended Solution | ||
| The ON/OFF indicator and display do not light up when the cooktop is plugged in and ON/OFF control is touched. | The power cord is disconnected. Confirm the power cord is plugged into the cooktop. | |
| The disconnect switch (if installed) is switched off. | Confirm the disconnect is switched on. | |
| The power receptacle's fuse is blown. Replace the fuse. | ||
| There is no power to the receptacle. Check that the power is on to the receptacle. | ||
| The power cord is damaged. 1. Inspect the power cord for damage.2. If damage is found, contact an authorized service center for replacement. | ||
| The ON/OFF indicator lights up and the display works normally, but the cooktop does not heat up. | The cookware is incompatible. Use compatible cookware. See “Compatible Cookware” on page 6. | |
| The cooktop stops heating during the cooking process. | Heating stops when frying. The oil temperature may be too hot leading to the cooktop overheating. Provide more ventilation around the cooktop or fry at a lower temperature. | |
| The temperature is high in the area surrounding the cooktop. | 1. Verify that the cooktop installation meets the minimum clearances. See “Dimensions and Clearances” on page 5.2. Provide more ventilation around the cooktop. | |
| The air inlet or vent is blocked. | Clear any obstruction blocking the air inlet or vent. | |
| The timer has expired. | Turn the cooktop on and resume the cooking process. | |
| The overheating protection was triggered. | Unplug the cooktop and wait for several minutes, then resume cooking. | |
| Failure Code | E1 The main sensor is an open circuit. | Contact an authorized service center. |
| E2 The main sensor is short circuiting. Contact an authorized service center. | ||
| E3 The main sensor is hot. | If the ceramic plate is hot, wait until it is cool, then try again. | |
| E4 The IGBT sensor has a open circuit. | Contact an authorized service center. | |
| E5 The IGBT sensor has a short circuit. | Contact an authorized service center. | |
| E6 The IGBT sensor is hot. | If the area surrounding the cooktop is hot, wait until the area is cool, then try again. | |
| E7 The voltage is low. | Check the voltage. See “Specifications” on page 5. | |
| E8 The voltage is high. | Check the voltage. See “Specifications” on page 5. | |
| EA The dry burning protection circuit has tripped. | Contact an authorized service center. | |
| EB The main temperature sensor is not working correctly. | Contact an authorized service center. | |
| EC The fan is not working correctly. | Contact an authorized service center. | |
7 Maintenance

WARNING: ELECTRICAL SHOCK HAZARD.
Failure to obey the following warnings could result in death or serious injury:
- Avoid letting anything fall into the interior of the cooktop, which could result in a short circuit of the electrical components.
- Protect the cooktop from rodent and insect infestation, dirt, and humidity.

CAUTION: BURN HAZARD.
Allow the cooktop to cool before putting on or taking off any parts. Failure to obey this warning could result in moderate or minor injury.
This cooktop should be kept clean during and after use. Before cleaning, turn off the cooktop, unplug the power cord, and wait until the ceramic plate is cool.
- Use glass cleaner and a soft cloth to clean the cooktop.
- Do not use harsh chemicals or abrasives.
- Clean the cooktop regularly to prevent dirt from getting into the fan, which could affect the normal operation of the cooktop.
- Periodically use a soft dry cloth, soft brush, or mini vacuum cleaner to remove any dust or debris from the air inlet and air vent.
8 Disposal
Place the packaging material in the appropriate recycling waste bins, whenever possible. Consult a local recycling center or specialist dealer for details about how to dispose of the product in accordance with all applicable national and local regulations.
LIMITED TWO-YEAR WARRANTY
LIMITED TWO-YEAR WARRANTY AVAILABLE AT WWW. DOMETIC.COM/WARRANTY.
IF YOU HAVE QUESTIONS, OR TO OBTAIN A COPY OF THE LIMITED WARRANTY FREE OF CHARGE, CONTACT:
DOMETIC CORPORATION CUSTOMER SUPPORT CENTER 5155 VERDANT DRIVE ELKHART, INDIANA 46516 1-866-544-4881
4 Installation....19
Avis de la Federal Communications Commission (FCC)
2 Plaque de cuisson
natural_image
Isometric line drawing of a kitchen appliance with a stove and tray (no text or symbols)natural_image
Two circular diagrams showing a hand holding a small electronic component and a finger touching it, both without any text or symbols.7 Commandes tactiles
dometic.com/sales-offices


- EN Induction Cooktop
- Service Center & Dealer Locations
- Contents
- Explanation of Symbols and Safety Instructions 2
- Intended Use 4
- General Information.... 5
- Installation....7
- Operation....8
- Troubleshooting 12
- Maintenance 13
- Disposal 13
- Limited Two-Year Warranty 13
- IMPORTANT SAFEGUARDS
- Explanation of Symbols and Safety Instructions
- Recognize Safety Information
- Understand Signal Words
- DANGER!
- WARNING
- CAUTION
- Supplemental Directives
- U.S.A.
- Canada
- General Safety Messages
- WARNING: ELECTRICAL SHOCK, FIRE, AND/OR BURN HAZARD. Failure to obey the following warnings could result in death or serious injury:
- WARNING: PACEMAKER HAZARD.
- WARNING: EXPLOSION HAZARD.
- CAUTION: TRIPPING HAZARD. Failure to obey the following warnings could result in death or serious injury:
- Federal Communications Commission (FCC) Notice
- SAVE THESE INSTRUCTIONS
- Intended Use
- General Information
- Specifications
- Dimensions and Clearances
- Components
- Control Panel
- Compatible Cookware
- Installation
- WARNING: ELECTRICAL SHOCK AND/OR FIRE HAZARD. Failure to obey the following warnings could result in death or serious injury.
- WARNING: PROJECTILE HAZARD.
- Operation
- WARNING: ELECTRICAL SHOCK HAZARD. Failure to obey the following warnings could result in death or serious injury:
- WARNING: FIRE AND/OR BURN HAZARD. Failure to obey the following warnings could result in death or serious injury:
- CAUTION: BURN HAZARD. Failure to obey the following caution could result in minor or moderate injury.
- Using the Touch Controls
- Setting the Power Level
- Setting the Cooking Level
- Turning the Cooktop On
- Using the Timer
- Locking the Control Panel
- Turning the Cooktop Off
- Troubleshooting
- Maintenance
- WARNING: ELECTRICAL SHOCK HAZARD.
- Failure to obey the following warnings could result in death or serious injury:
- CAUTION: BURN HAZARD.
- Disposal
- LIMITED TWO-YEAR WARRANTY
- Installation....19
- Avis de la Federal Communications Commission (FCC)
Brand : DOMETIC
Model : CI-20
Category : Cooker