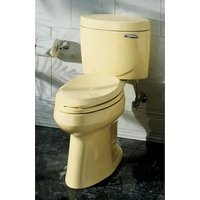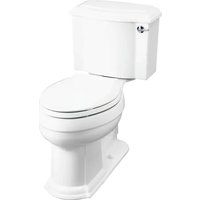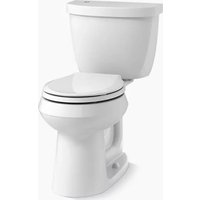
Fleur K-4606 - Toilet KOHLER - Free user manual and instructions
Find the device manual for free Fleur K-4606 KOHLER in PDF.


User questions about Fleur K-4606 KOHLER
0 question about this device. Answer the ones you know or ask your own.
Ask a new question about this device
Download the instructions for your Toilet in PDF format for free! Find your manual Fleur K-4606 - KOHLER and take your electronic device back in hand. On this page are published all the documents necessary for the use of your device. Fleur K-4606 by KOHLER.
USER MANUAL Fleur K-4606 KOHLER
HOW TO USE THESE INSTRUCTIONS
Please read these instructions carefully to familiarize yourself with the required tools, materials, and installation sequences. Follow the sections that pertain to your particular installation. This will help you avoid costly mistakes. In addition to proper installation, read all operating and safety instructions.
All information in these instructions is based upon the latest product information available at the time of publication. Kohler Co. reserves the right to make changes in product characteristics, packaging, or availability at any time without notice.
These instructions contain important care, cleaning, and warranty information – please leave instructions for the consumer.
ORDERING INFORMATION
Fleur ^™ Lite ^™ Toilet K-3447.
Bowl K-4267(M)
Tank K-4606
When specified:
3/8" supply K-7637....
Floor bolts (pair) 21401.
NOTES
- The K-3447 has a 12" (30.5cm) roughing-in dimension. Ensure that the new toilet has the correct roughing-in dimension. See Fig. #1.
- Seat post holes on 5-1/2" (14cm) centers.
•Water depth from rim is 6-7/8" (17.5cm).
-2" (5cm) passageway.
- Be very careful while working with vitreous china products. Vitreous china can break or chip if the bolts and nuts are overtightened, or if carelessly handled.
- Carefully inspect the new fixture for any sign of damage.
- Observe all local plumbing and building codes.
- Shut off the water supply.
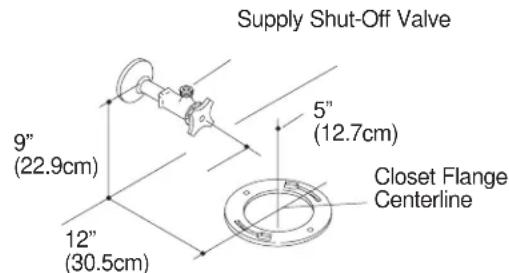
- For new construction, refer to the dimensions in Fig. #1 and Fig. #4 for locating the supply shut-off valve.
•Fixture dimensions are nominal and conform to tolerances established by ANSI Standards (A112.19.2).
- Provide adequate trip lever clearance if shelving or other structures are to be installed above the toilet tank. See Fig. #1.
TOOLS AND MATERIALS REQUIRED
-10" adjustable wrench
- 1/2" open end wrench
- 12" pipe wrench
•Metal file (file cut)
•Tape measure
•Tubing cutter
•Level
•Hacksaw
- Putty knife
- Screwdriver
• Toilet gasket (wax seal)
•Toilet T-bolts (2), 5/16" diameter
• Toilet setting compound (optional)
- Toilet supply shut-off valve, 3/8" recommended
NOTICE: If the existing toilet does not have a supply shut-off valve below the tank, install one before installing the new toilet.
ROUGHING-IN
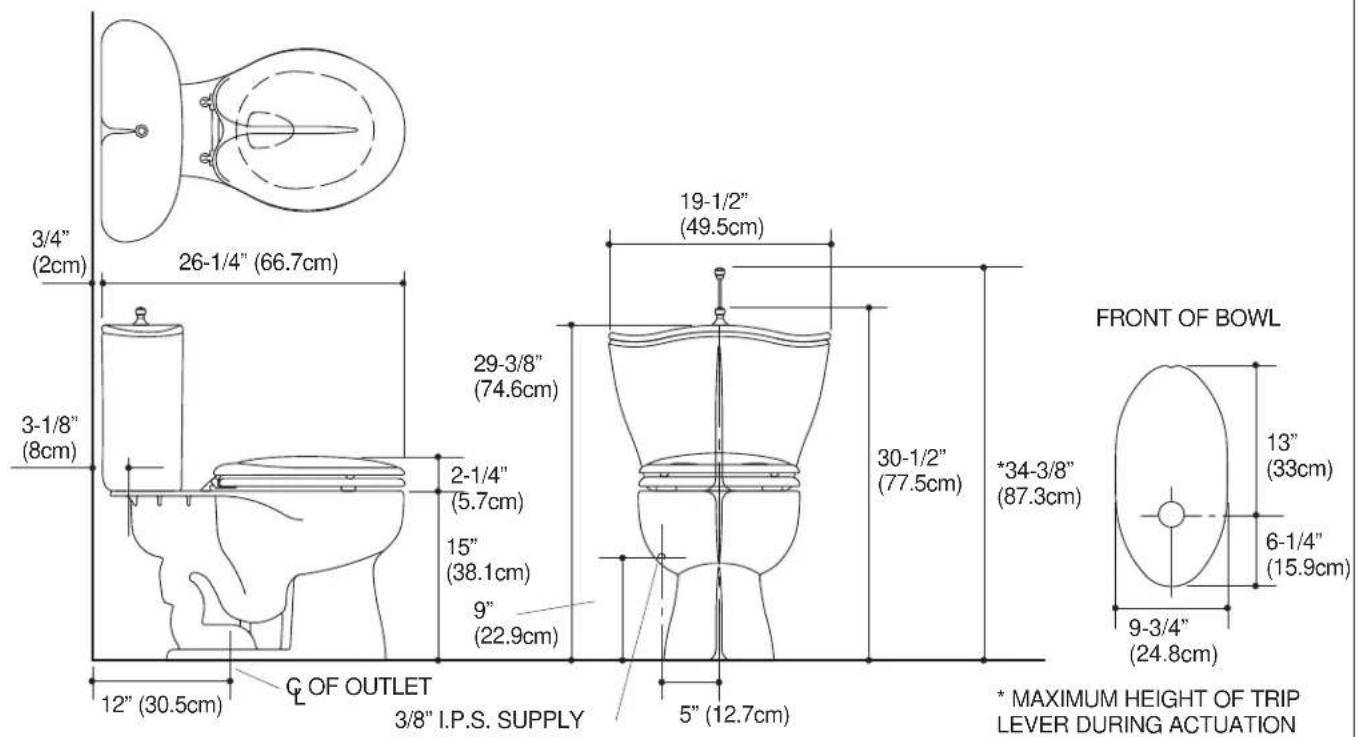
Fig. #1
INSTALLATION
TO REMOVE EXISTING TOILET
Turn off the water supply. Flush the toilet, and use a sponge to remove the remaining water from the tank and bowl. Disconnect the supply shut-off valve (if present), and remove the old tank and bowl.
Remove the old gasket from the floor and the closet flange with a putty knife. Remove the old T-bolts and discard them.
NOTICE: If the new toilet is not installed immediately, temporarily stuff a rag into the closet flange.

natural_image
Simple line drawing of a circular object with textured surface and handle, no text or symbols presentCloset Flange
Fig. #2
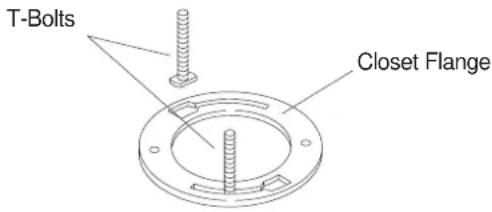
Install two new 5/16" diameter T-bolts into the closet flange.
text_image
T-Bolts Closet FlangeFig. #3
TO INSTALL SUPPLY SHUT-OFF VALVE
Install the supply shut-off valve so it is 9" (22.9cm) above the finished floor line, and 4-1/8" (10.5cm) to the left of the closet flange centerline.
The centerline of the supply shut-off valve outlet should extend 3-5/8" (9.2cm) from the finished wall. Install the supply shut-off valve with the outlet vertical.
text_image
Supply Shut-Off Valve 9" (22.9cm) 12" (30.5cm) 5" (12.7cm) Closet Flange CenterlineFig. #4
TO INSTALL TOILET
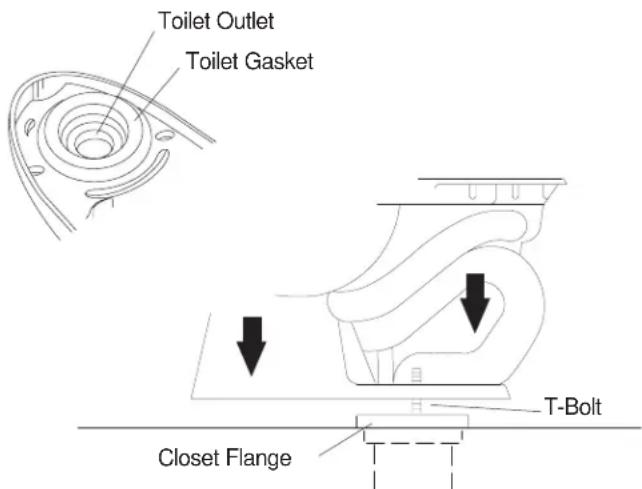
Set the toilet upside down on some padding. Firmly press the toilet gasket onto the toilet outlet.
NOTE: If you are using a toilet gasket with an integral plastic sleeve, make sure the gasket is positioned with the sleeve facing away from the toilet.
If desired, place a 1/4" (6mm) thick bead of toilet setting compound around the toilet base.
If you temporarily plugged the the closet flange with a rag, remove the rag at this time.
Carefully align and lower the toilet over the closet flange and T-bolts. Apply full body weight to the toilet rim to set the seal.

CAUTION: Risk of external leakage: Do not lift or rock the toilet after placement – a new toilet gasket must be installed if you break the watertight seal.
text_image
Toilet Outlet Toilet Gasket T-Bolt Closet FlangeFig. #5
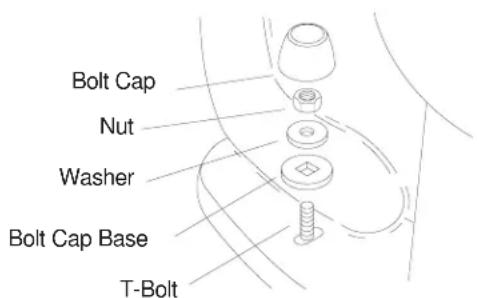
Assemble the bolt cap bases, washers, and nuts on the exposed T-bolts. Hand tighten the nuts, then tighten them an additional 1/2-turn.

CAUTION: Risk of personal injury or product damage: Overtightening may cause breakage or chipping of the vitreous china.
If the T-bolts extend more than 1/4" (6mm) over the top of the nuts, cut off the excess and file the end. Wipe away any residue. Install the bolt caps.
text_image
Bolt Cap Nut Washer Bolt Cap Base T-BoltFig. #6
TO INSTALL TANK
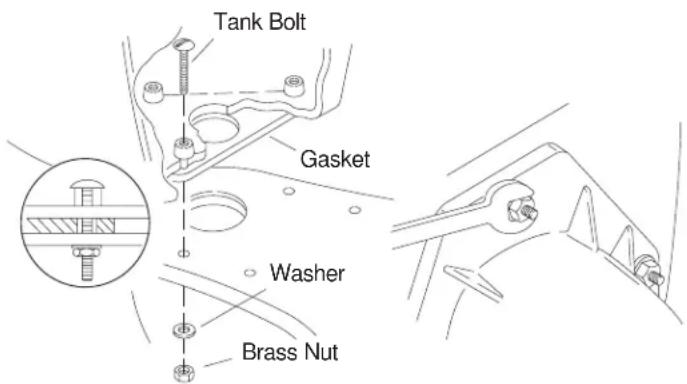
Make sure the three tank bolts extend completely through the holes in the gasket. Set the tank onto the bowl, using the tank bolts as a guide. Center the gasket on the inlet of the bowl. Assemble the washers and brass nuts onto the bolts.
Alternately tighten the three brass nuts so the top of the tank and the top of the bowl are both level. Be sure the brass nuts are tight enough to achieve a watertight seal.

CAUTION: Risk of personal injury or product damage: Overtightening may cause breakage or chipping of the vitreous china.
text_image
Tank Bolt Gasket Washer Brass NutFig. #7
TO CONNECT SUPPLY SHUT-OFF VALVE
NOTICE: Read this section carefully before performing these steps.
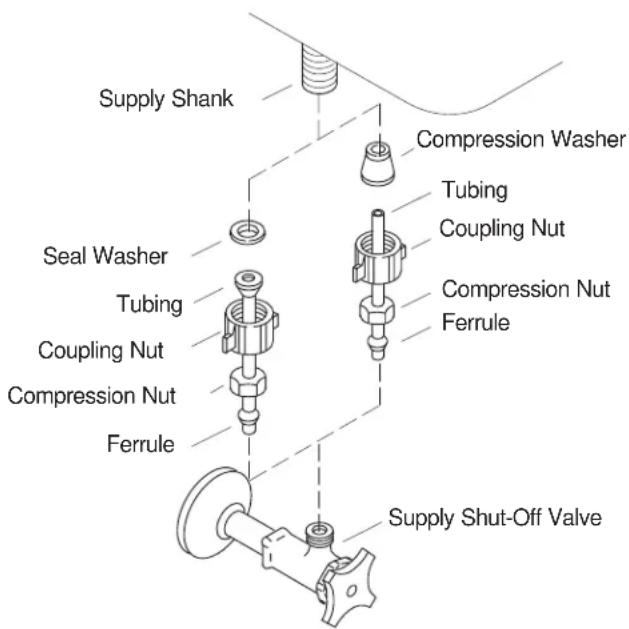
For installation of the supply shut-off valve, refer to the installation instructions packed with the valve. Carefully bend the tubing to fit.
Cut the end of the tubing 1/4" (6mm) longer than the distance between the supply shut-off valve and the supply shank. Remove any burrs from the inside of the tubing.
Slip the coupling nut, compression nut, and ferrule onto the tubing. Insert the tubing into the supply shut-off valve and the supply shank, positioning the seal washer (supplied) or the compression washer (not supplied), as shown. Hand tighten the coupling nut, and then tighten the compression nut.
text_image
Supply Shank Compression Washer Tubing Coupling Nut Compression Nut Ferrule Seal Washer Tubing Coupling Nut Compression Nut Ferrule Supply Shut-Off ValveFig. #8
Open the supply shut-off valve and check all connections for leakage. If the connections have been properly assembled, a slight retightening of the nuts should stop any leakage.
If the toilet is leaking between the tank and the bowl, carefully retighten the three brass nuts evenly. Periodically check all the bowl and tank connections for leakage for several days following installation.

CAUTION: Risk of product damage: The valves and fittings in this toilet require no adjustment. Any attempt to adjust the fittings can damage the product. Such adjustments or any modifications of the product are not considered normal usage, and will void the warranty.
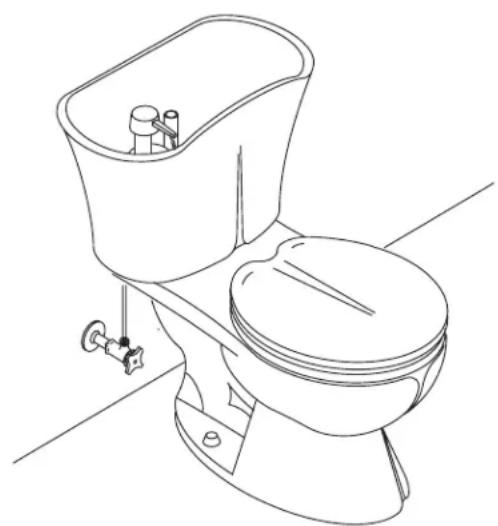
Test flush the toilet by lifting the flapper chain.
Check all connections for leakage for several days.
natural_image
Line drawing of a standard toilet with handle and vent, no text or symbols presentFig. #9
TO INSTALL LIFT ROD AND TANK COVER
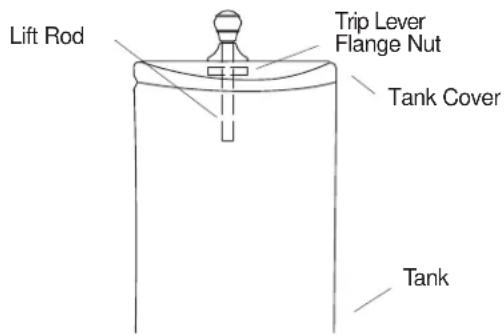
Check the trip lever flange nut for tightness. If the nut is loose, first hand-tighten it. Then tighten it an additional 1/4 turn.
Insert the lift rod into the flange in the center of the tank cover. Set the tank cover on the tank.
text_image
Lift Rod Trip Lever Flange Nut Tank Cover TankFig. #10
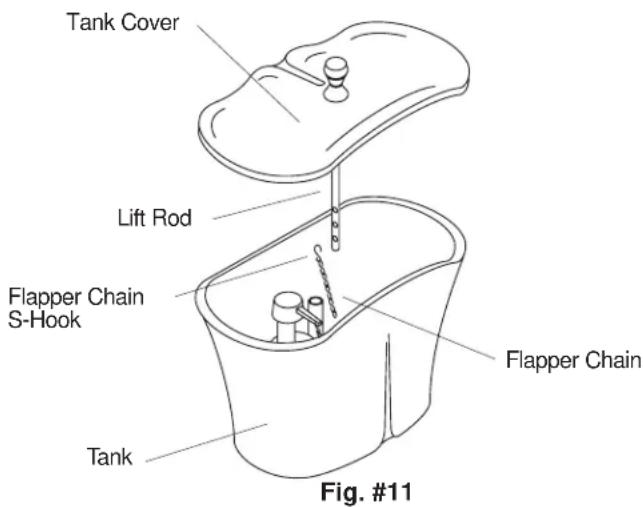
Carefully lift the front of the tank cover just enough to gain access to the flapper chain and lift rod. Insert the flapper chain S-hook into the middle hole in the lift rod. Set the tank cover onto the tank.
Test flush the toilet several times to ensure proper operation. If the flapper ball does not seat properly when the lift rod is raised, provide more flapper chain by:
• relocating the flapper chain S-hook to the bottom hole in the lift rod, or by;
- repositioning the flapper chain S-hook on the flapper chain.
If the toilet does not flush when the lift rod is raised, remove some of the slack in the flapper chain by relocating the flapper chain S-hook to the top hole in the lift rod.
text_image
Tank Cover Lift Rod Flapper Chain S-Hook Flapper Chain Tank Fig. #11| TROUBLESHOOTING CHART | ||
| SYMPTOMS PROBABLE CAUSES CORRECTIVE ACTION | ||
| 1. Float valve turns on/off by itself without toilet being flushed. | A. Refill tube pushed too far down in overflow pipe.B. No slack in flapper chain assembly, holding flapper off seat.C. Flush valve flapper ball worn, dirty or misaligned with flush valve seat; or seat corroded so flapper will not seal. | A. Attach refill tube to overflow pipe above the water line.B. Adjust flapper chain assembly for proper slack.C. Inspect, clean and, if necessary, replace flapper ball and/or seat. |
| 2. Float valve continues to run, allowing water to enter tank. | A. Foreign particles lodged under the float valve seal (located under float valve cap).B. Float valve seal (located under float valve cap) may be cracked or split. | A. Shut off water supply; remove float valve cap assembly by rotating 1/8 turn counterclockwise. Cover uncapped lower valve unit with an inverted cup (holding it to prevent overspray), and turn water on and off a few times. Clean float valve seal surface (located under float valve cap). Replace float valve cap assembly by engaging lugs and rotating 1/8 turn clockwise. Turn water on.Install filter in supply line to prevent recurring problems.B. Replace seal. |
| 3. Long or noisy tank fill cycle. | A. Plugged valve inlet or supply line. A. Perform Corrective Action 2.A. | |
| 4. Poor flush. A. Trapway or rim holes are obstructed.B. Soil pipe or vent is obstructed.C. Low water level in bowl due to refill tube being plugged or out of overflow tube.D. Supply shut-off valve not fully open. | A. Unclog trapway; clean rim holes.B. Clear obstruction from soil pipe or vent.C. Clean or straighten refill tube; attach refill tube to overflow tube.D. Open supply shut-off valve. | |
| 5. Toilet overflows. | A. Toilet trapway is obstructed.B. Soil pipe or vent is obstructed. | A. Use plunger to unclog.B. Clear obstruction from soil pipe or vent pipe. |
| 6. Toilet does not activate. | A. Chain is not connected to lift rod or flush valve. A. Reconnect the chain. | |
| CALL US FOR HELPHere's what you need to do if you require service:First review the installation instructions to ensure correct installation. For additional assistance in the USA, call our Customer Service Department for direct help. You may also contact us at our web site listed below.Call 1-800-4-KOHLER within the U.S.Call 001-877-680-1310 within MexicoCall 1-800-964-5590 within CanadaTHE BOLD LOOKOF KOHLERwww.kohlerco.com | ||
ANTES DE COMENZAR
CÓMO UTILIZAR LAS INSTRUCCIONES
text_image
3/4" (2cm) 26-1/4" (66,7cm) 3-1/8" (8cm) 29-3/8" (74,6cm) 2-1/4" (5,7cm) 15" (38,1cm) 9" (22,9cm) 19-1/2" (49,5cm) 30-1/2" (77,5cm) *34-3/8" (87,3cm) 12" (30,5cm) LÍNEA CENTRAL DE LA SALIDA SUMINISTRO DE 3/8" L.P.S. 5" (12,7cm) * ALTUR PALANO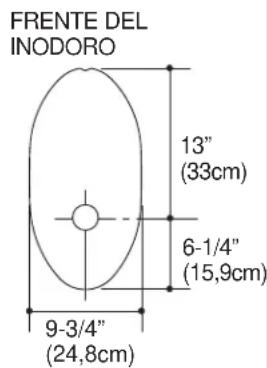
text_image
FRENTE DEL INODORO 13" (33cm) 6-1/4" (15,9cm) 9-3/4" (24,8cm)natural_image
Line drawing of a standard two-tone toilet with handle and vent, no text or symbols presentFig. #9
PARA INSTALAR LA VARILLA DE LEVANTE Y LA CUBIERTA DEL TANQUE
natural_image
Line drawing of a standard two-tone toilet with handle and vent, no text or symbols presentFig. #9
INSTALLER LA TIGE DE LEVAGE ET LE COUVERCLE DU RÉSERVOIR.
Au Canada, composer le 1-800-964-5590
THE BOLD LOOK
OF KOHLER®
www.kohlerco.com