Eir K-77795 - Toilet KOHLER - Free user manual and instructions
Find the device manual for free Eir K-77795 KOHLER in PDF.

| Product type | Smart toilet |
| Brand | KOHLER |
| Model | Eir K-77795 |
| Power supply | 120 V, 60 Hz, 15 A, dedicated circuit with Class A GFCI |
| Voltage | 120 V |
| Frequency | 60 Hz |
| Amperage | 15 A |
| Weight (estimated) | Approximately 60 kg |
| Materials | Ceramic, plastic |
| Main functions | Automated flush, wireless remote, docking station |
| Included accessories | Remote control, docking station, mounting bracket, AA batteries (4), screws, bolts, ceramic ring |
| Remote power supply | 4 AA batteries (included) |
| Maintenance and cleaning | 100% silicone sealant around base; recommended products at kohler.com/clean |
| Safety | Grounding required; unplug before maintenance; do not use extension cord; GFCI protection |
| Installation | Requires two people; power tools; comply with local codes; minimum water pressure 29 psi (200 kPa) in Mexico |
| Minimum temperature | 0 °C (32 °F); do not install below |
| Clearance height | 42 in (1067 mm) minimum for lid |
| Service parts | Available at kohler.com/serviceparts |
| Patents | kohlercompany.com/patents |
Frequently Asked Questions - Eir K-77795 KOHLER
User questions about Eir K-77795 KOHLER
0 question about this device. Answer the ones you know or ask your own.
Ask a new question about this device
Download the instructions for your Toilet in PDF format for free! Find your manual Eir K-77795 - KOHLER and take your electronic device back in hand. On this page are published all the documents necessary for the use of your device. Eir K-77795 by KOHLER.
USER MANUAL Eir K-77795 KOHLER
Installation Instructions
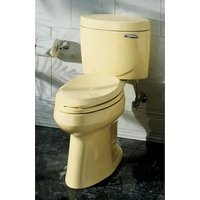
Intelligent Toilet
Record your model number:
Noter le numero de modele:
Anote su numero de modelo:
Français, page 12
Espanol, págin22
Need help? Contact our Customer Care Center.
USA/Canada: 1-800-4KOHLER (1-800-456-4537) Mexico: 001-800-456-4537
Service parts: kohler.com/serviceparts
Care and cleaning: kohler.com/clean
Patents: kohlercompany.com/patents
Important Information

DANGER: Risk of electric shock. Disconnect the electricity to the working area at the main breaker panel before performing installation steps for hardwiring.

WARNING: Risk of electric shock. Disconnect the power before servicing.

WARNING: Risk of electric shock. Connect only to a properly-grounded dedicated circuit protected by a Class A Ground-Fault Circuit-Interrupter (GFCI)*. Use 120V , 60Hz , 15 A service. Do not remove the grounding pin or use a grounding adapter.

WARNING: Risk of electric shock. Grounding is required. A qualified electrician should make all electrical connections.

CAUTION: Risk of personal injury. This product is heavy. Lift the toilet with two people, using proper lifting technique.

CAUTION: Risk of hazardous gases. If the new toilet is not installed immediately, temporarily place a rag in the floor flange.

CAUTION: Risk of property damage. This product is not intended to be installed where temperatures will drop below 32^ (0^) . The design of the toilet makes it difficult to remove all water from the tank. If frozen, the water could damage the tank resulting in leaking.
IMPORTANT! For installation in Mexico, this product requires a minimum static pressure of 29 psi (200 kPa).
Follow all local plumbing and electrical codes.
Installation of a water-hammer arrester is required.
A wiring schematic is located on the inside of the access cover.
*Outside North America, this may be known as a Residual Current Device (RCD).
This product should be grounded. In the event of an electrical short circuit, grounding reduces the risk of electric shock by providing an escape wire for the electric current. This product is equipped with a cord having a grounding wire with a grounding plug. The plug must be plugged into an electrical outlet that is properly installed and grounded.

DANGER: Risk of electric shock. Improper use of the grounding plug can result in a risk of electric shock.
If repair or replacement of the cord or plug is necessary, do not connect the grounding wire to either flat blade terminal. The wire with insulation having an outer surface that is green with or without yellow stripes is the grounding wire.
Check with a qualified electrician or service personnel if the grounding instructions are not completely understood, or if in doubt whether the product is properly grounded.
This product is factory equipped with a specific electric cord and plug to permit connection to a proper electric circuit. Make sure that the product is connected to an outlet having the same configuration as the plug. No adapter should be used with this product. Do not modify the plug provided — if it will not fit the outlet, have the proper outlet installed by a qualified electrician. If the product must be reconnected for use on a different type of electric circuit, the connection should be made by qualified service personnel.
Do not use an extension cord with the product.
Tools and Materials

Plus:
- Assorted Electrical Tools


WARNING: Risk of electric shock. Connect only to a properly-grounded dedicated circuit protected by a Class A Ground-Fault Circuit-Interrupter (GFCI)*. Use 120 V, 60 Hz, 15 A service. Do not remove the grounding pin or use a grounding adapter.

CAUTION: Risk of hazardous gases. If the new toilet is not installed immediately, temporarily place a rag in the floor flange.
IMPORTANT! Do not install items behind the toilet that will interfere with the cover when it is raised. Decorative items should be at least 42^ (1067 mm) high to allow clearance for the cover.
*Outside North America, this may be known as a Residual Current Device (RCD).
For hardwired installations, see the "Prepare the Site - Hardwired" section.
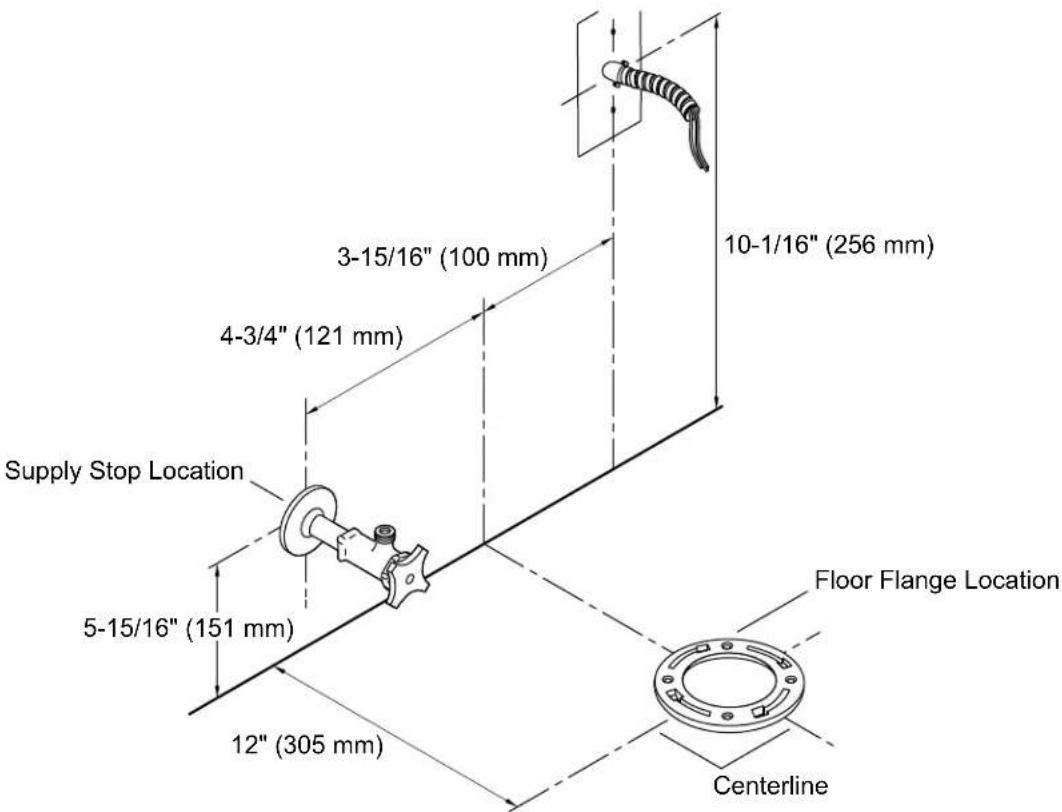
Make sure that the supply stop and electrical outlet are located within the supplied dimensions.
Install the electrical outlet at the location shown.

WARNING: Risk of electric shock. Connect only to a properly-grounded dedicated circuit protected by a Class A Ground-Fault Circuit-Interrupter (GFCI)*. Use 120 V, 60 Hz, 15 A service.

CAUTION: Risk of hazardous gases. If the new toilet is not installed immediately, temporarily place a rag in the floor flange.
IMPORTANT! Do not install items behind the toilet that will interfere with the cover when it is raised. Decorative items should be at least 42^ (1067 mm) high to allow clearance for the cover.
*Outside North America, this may be known as a Residual Current Device (RCD).
Follow the dimensional information exactly when installing a hardwired electrical supply.
- Route the branch circuit supply conductors through UL Listed flexible conduit from the junction box or other approved enclosure to the field wiring compartment at the rear of the toilet as shown and in accordance with local electrical installation codes.

NOTE: Follow this step when hardwiring your toilet. If you are using the plug-in cord, continue to the "Position the Trapway" section.
- Remove the access panels from the toilet.
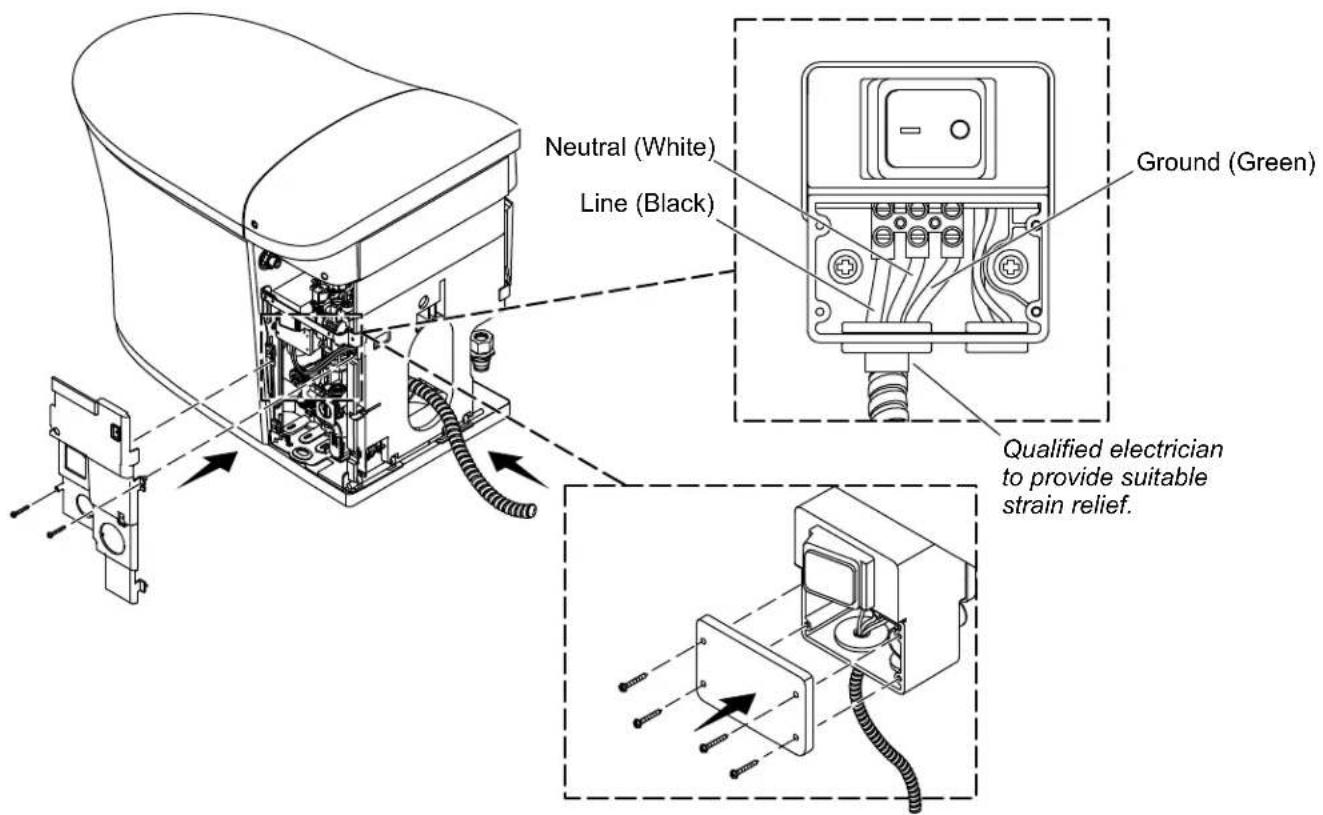
- Remove the two screws and remove the electrical access panel.
Remove the four screws and remove the electrical connections cover. - Disconnect the line (black), neutral (white), and ground (green) wires from the connections.
Remove the two screws and remove the cord retainer.
Remove the cord from the toilet.
Retain all screws and panels for reinstallation.
4. Install the Trapway

CAUTION: Risk of hazardous gases. If the new toilet is not installed immediately, temporarily place a rag in the floor flange.
If an existing toilet was removed, scrap away any remaining wax residue from the flange.
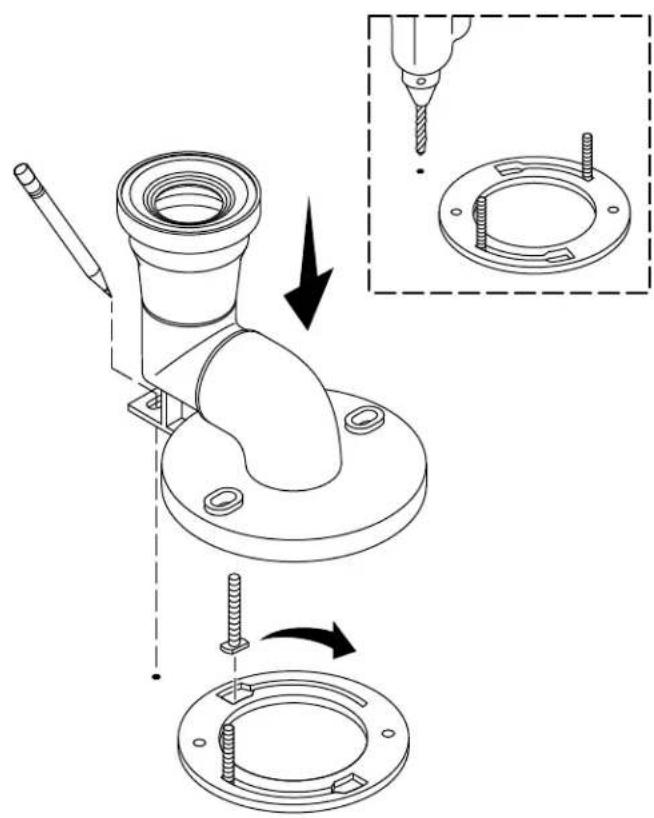
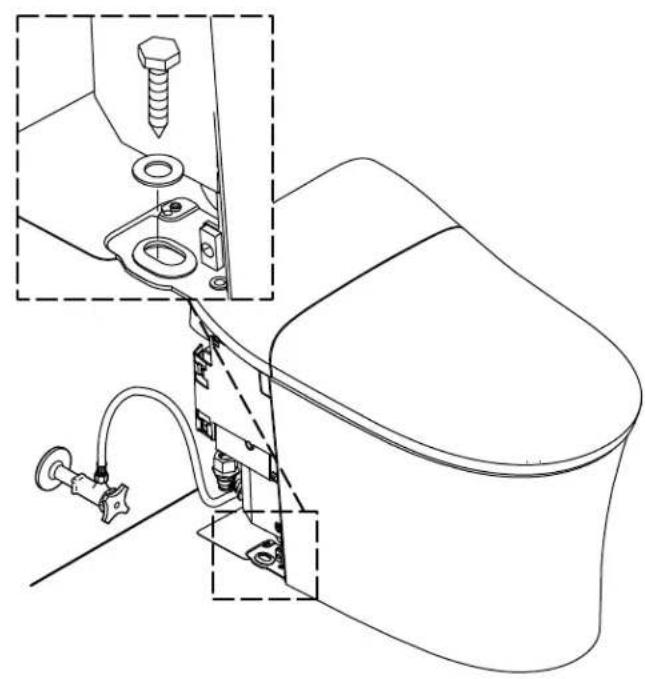
Install two 5/16" diameter x 2-1/4" long T-bolts into the floor flange.
Set the trapway in place over the flange.
Mark the mounting hole at the back of the trapway.
Remove the trapway from the flange and set aside.
At the trapway hole location, drill a 3/16" (5 mm) pilot hole or a 1/2" (13 mm) hole if an anchor will be used.
If an anchor will be used, insert a supplied anchor in the hole.
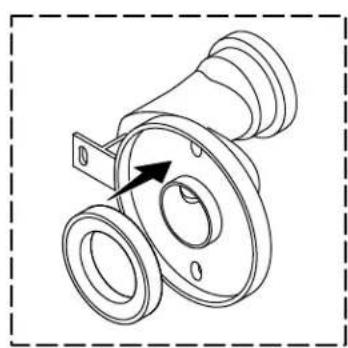
Install the new wax ring to the trapway.
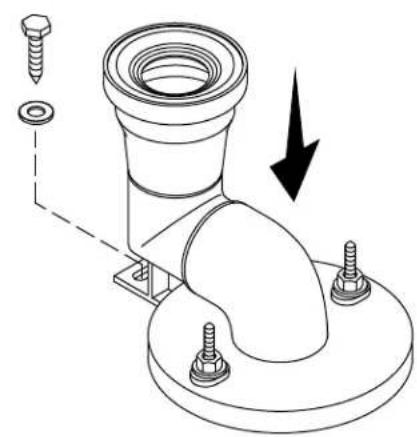
Set the trapway in place over the flange.
Install a washer and nut on each T-bolt.
Secure the back of the trapway with a 1/4 lag bolt and washer.
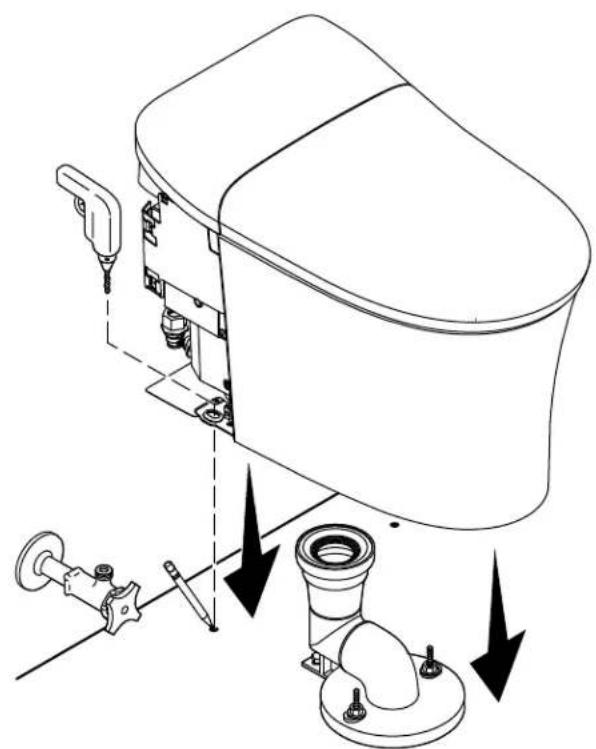

CAUTION: Risk of personal injury. This product is heavy. Lift the toilet with two people, using proper lifting technique.

CAUTION: Risk of product damage. Do not set the shell down hard. Gently lift and move the shell if it is not placed correctly. If handled carelessly, the shell may chip or break.
If not already done, remove the access panels from the toilet.
Carefully lower the toilet onto the trapway.
Mark the two mounting hole locations on the floor.
Remove the toilet.
Drill a 3/16" hole at each marked location.
Carefully lower the toilet onto the trapway.
- Secure the toilet with a 1/4'' lag bolt and washer in each hole.
Connect the water supply.

WARNING: Risk of electric shock. Grounding is required. A qualified electrician should make all electrical connections.
NOTE: Follow this step when hardwiring your toilet. If you are using the plug-in cord, continue to the "Check Operation" section.
- Route the branch circuit supply conductors through UL Listed flexible conduit from the junction box or other approved enclosure to the field wiring compartment at the rear of the toilet as shown and in accordance with local electrical installation codes.
Using a suitable strain relief, connect the Line, Neutral, and Ground wires to the electrical connections as shown.
Install the electrical connection cover with the four screws.
Install the electrical panel cover with the two screws.
7. Complete the Installation
IMPORTANT! Do not install the access covers until the 100% silicone sealant has cured.
Turn ON the water supply.
Check all connections for leaks.
For plug-in installations, plug the power cord into the outlet.
For hardwired installations, turn on the electricity to the circuit.
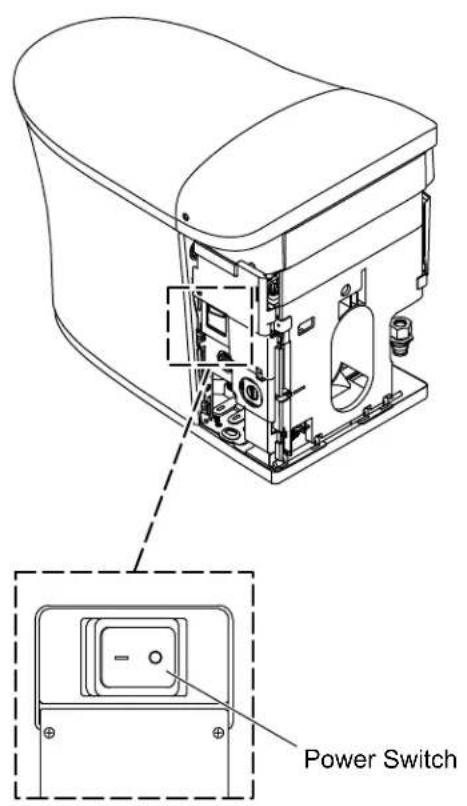
Press the power switch to turn the toilet ON. The toilet will complete a startup cycle.
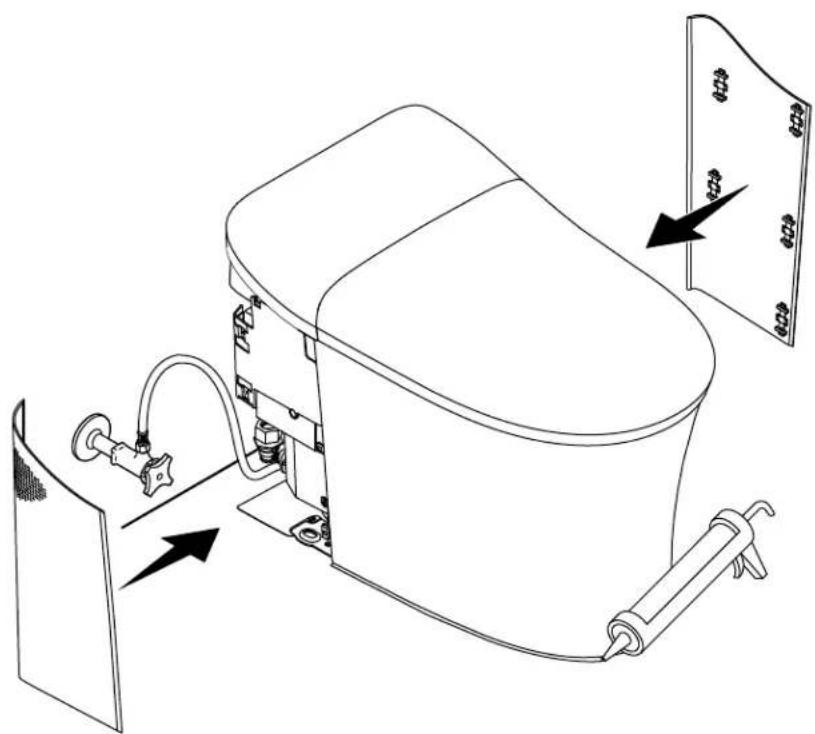
Apply 100% silicone sealant around the base of the toilet as shown. Do not apply sealant where the access covers meet the floor.
□ Attach the access covers.
8. Install the Docking Station
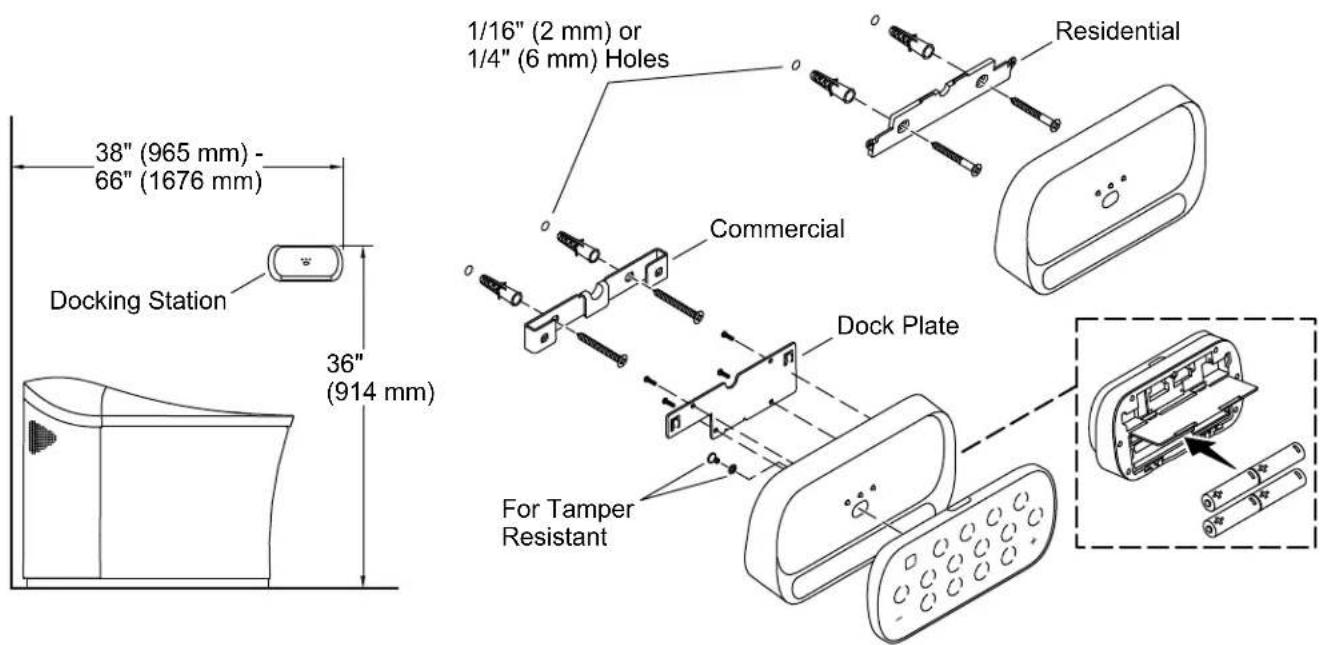
Position the mounting bracket at the desired location.
Confirm that the bracket is level.
Using a pencil, mark the two mounting-hole locations.
For installation into a stud or other wood surface: Drill a 1/16" (2 mm) hole at each of the marked locations.
For installation using wall anchors: Drill a 1/4'' (6 mm) hole at each of the marked locations. Install the provided wall anchors into the holes.
Position the bracket over the anchors or marks. Secure with the provided screws.
Open the back compartment on the docking station by pushing both tabs outward at the same time.
Install the four provided AA batteries in the orientation shown.
Reinstall the cap to the battery compartment.
Residential
Position the docking station on the bracket.
Place the remote control on the docking station.
Commercial
To make the remote control tamper-resistant, secure to the docking station using the supplied washer and screw.
Install the dock plate to the docking station with the four screws.
Position the docking station on the bracket, which will be offset to the left.
Firmly push down on the docking station to fully seat onto the bracket.