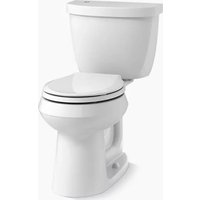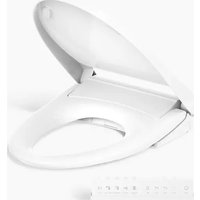
Irvine K-28362 - Toilet KOHLER - Free user manual and instructions
Find the device manual for free Irvine K-28362 KOHLER in PDF.


User questions about Irvine K-28362 KOHLER
0 question about this device. Answer the ones you know or ask your own.
Ask a new question about this device
Download the instructions for your Toilet in PDF format for free! Find your manual Irvine K-28362 - KOHLER and take your electronic device back in hand. On this page are published all the documents necessary for the use of your device. Irvine K-28362 by KOHLER.
USER MANUAL Irvine K-28362 KOHLER
Installation Instructions
Bidet Seat
Record your model number:
Need help? Contact our Customer Care Center.
- USA/Canada: 1-800-4KOHLER (1-800-456-4537) Mexico: 001-800-456-4537
Hours of Operation: Monday-Friday 8:00 AM -5:00 PM (CT)
Languages Spoken: English, Spanish, and translation services are available.
• Service parts: kohler.com/serviceparts
• Care and cleaning: kohler.com/clean
• Patents: kohlercompany.com/patents
Important Information

WARNING: Risk of electric shock. Connect only to a properly grounded dedicated circuit protected by a Class A Ground-Fault Circuit-Interrupter (GFCI)*. Use 120 V, 60 Hz, 15 A service. Do not remove the grounding pin or use a grounding adapter.

WARNING: Risk of electric shock. Do not immerse or flush the product with water.

CAUTION: Risk of product damage. Do not install this product in a location exposed to excessive moisture where condensation might form on the product surface. Provide adequate ventilation when bathing to avoid damage to the electronic components due to high humidity levels.

CAUTION: Risk of product damage. To reduce the risk of product malfunction, do not supply electrical power to the unit until the plumbing installation work has been completed.

CAUTION: Risk of property or product damage. Pushing or pulling on the water connection may cause water leakage.
NOTE: If the supply cord is damaged, the supply cord must be replaced by the manufacturer, its service agent, or similarly qualified agent to avoid a hazard.
NOTE: This product contains thermal protectors that may trip during storage or transportation in warm conditions, causing the unit to not operate. Allow the unit to cool to room temperature before installation or operation.
Follow all local plumbing, building, and electrical codes.
Connect the seat to a cold water supply of drinking quality with a pressure of 20 psi (139 kPa) - 80 psi (551 kPa).
*Outside North America, this may be known as a Residual Current Device (RCD).
This product should be grounded. In the event of an electrical short circuit, grounding reduces the risk of electric shock by providing an escape wire for the electric current. This product is equipped with a cord having a grounding wire with a grounding plug. The plug must be plugged into an electrical outlet that is properly installed and grounded.

DANGER: Risk of electric shock. Improper use of the grounding plug can result in a risk of electric shock.
If repair or replacement of the cord or plug is necessary, do not connect the grounding wire to either flat blade terminal. The wire with insulation having an outer surface that is green with or without yellow stripes is the grounding wire.
Check with a qualified electrician or service personnel if the grounding instructions are not completely understood, or if in doubt whether the product is properly grounded.
This product is factory equipped with a specific electric cord and plug to permit connection to a proper electric circuit. Verify that the product is connected to an outlet having the same configuration as the plug. No adapter should be used with this product. Do not modify the plug provided. If the plug does not fit the outlet, have the proper outlet installed by a qualified electrician. If the product must be reconnected for use on a different type of electric circuit, the connection should be made by qualified service personnel.

CAUTION: Risk of property damage. If use of an extension cord is necessary, a single cord may be used provided that the "Type" begins with "SJ," the cord is a 12 gauge, grounded (12/3), is no longer than 25' (7.6 meters), and is plugged into a GFCI* electrical outlet. Promptly replace an extension cord that exhibits any sign of damage.
*Outside North America, this may be known as a Residual Current Device (RCD).
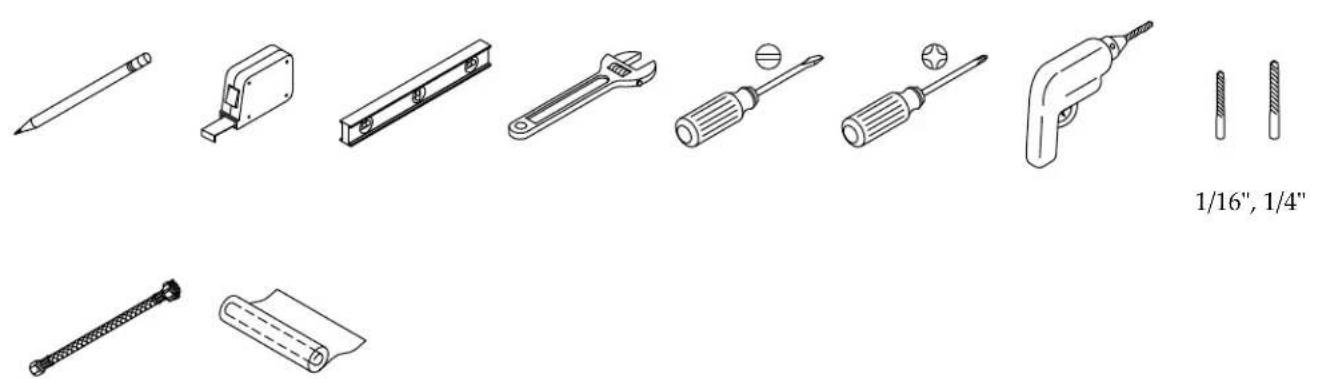
Tools and Materials
text_image
1/16", 1/4"7/8" Supply Hose Plastic Wrap
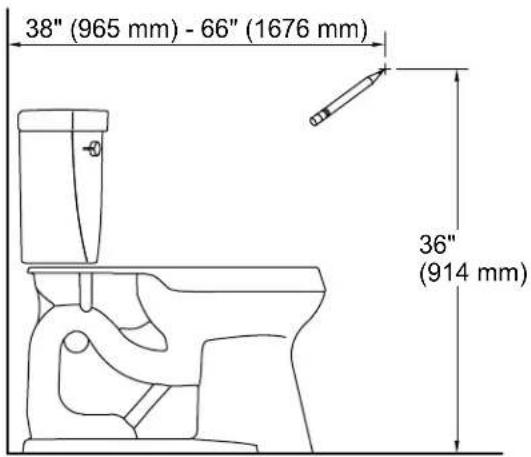
1. Prepare the Site
text_image
38" (965 mm) - 66" (1676 mm) 36" (914 mm)
WARNING: Risk of electric shock. Connect only to a properly grounded dedicated circuit protected by a Class A Ground-Fault Circuit-Interrupter (GFCI)*. Use 120 V, 60 Hz, 15 A service. Do not remove the grounding pin or use a grounding adapter.
*Outside North America, this may be known as a Residual Current Device (RCD).
NOTE: Follow local codes when determining the electrical outlet location.
☐ If applicable, remove the existing toilet seat.
☐ Turn OFF the water supply to the toilet.
☐ Flush the toilet to relieve any pressure from the supply hose.
☐ Disconnect the water supply hose from the toilet fill valve.
□ Determine the installation location for the remote control docking station on the wall.
☐ Install a dedicated 120 V GFCI-protected electrical outlet within 32" (813 mm) of the toilet to accommodate the length of the power cord.
☐ Do not plug the seat into the electrical outlet at this time.
2. Install the Mounting Plate
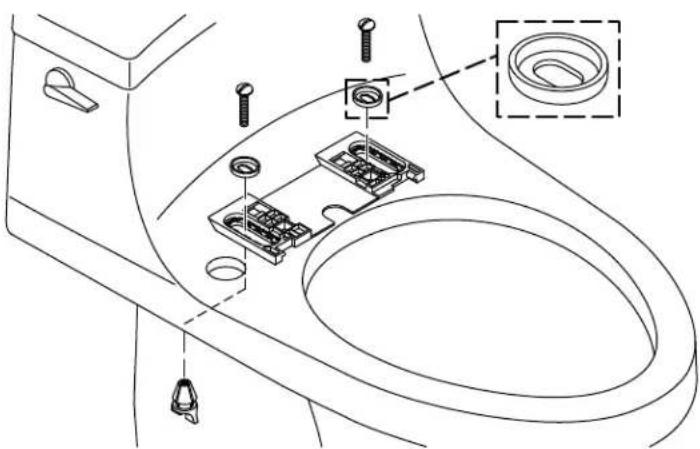
text_image
Technical diagram of a toilet sink with labeled components and a magnified inset showing the washer detail.☐ Position the mounting plate over the mounting holes on the bowl.
☐ Position the inserts in the grooves on the mounting plate as shown.
Toilets with Threaded Mounting Holes
☐ Insert the bolts through the inserts and thread into the mounting holes.
□ Tighten the bolts.
All Other Installations
☐ Insert the bolts through the inserts and into the mounting holes.
☐ Thread a nut onto each bolt.
□ Tighten the bolts.
3. Install the Water Line
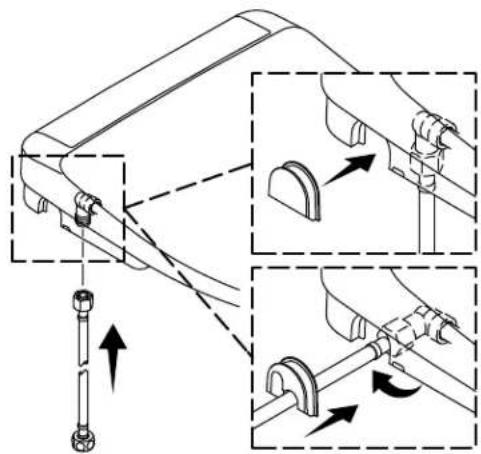
text_image
Technical diagram showing mechanical assembly with labeled parts and directional arrows indicating motion or movement.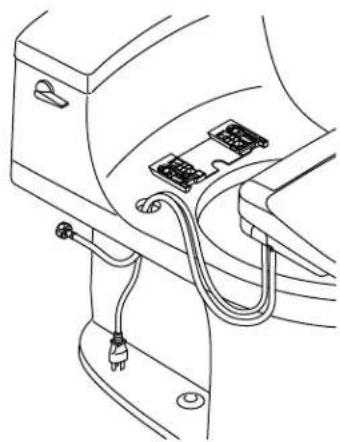
natural_image
Line drawing of a cable connector with attached components (no text or symbols)
CAUTION: Risk of property or product damage. Pushing or pulling on the water connection may cause water leakage.
IMPORTANT! Use only the water supply hose included with the seat. Using a different hose may damage the seat components.
NOTICE: Use care to avoid cross-threading or overtightening the connections. Use an adjustable wrench to tighten one-quarter turn past hand-tight.
NOTE: Verify that the cord routing does not interfere with the fill valve connection.
☐ Install the water supply hose to the white inlet port on the underside of the seat.
□ Toilet with a rim hole: Route the water supply hose and power cord through the hole in the rim of the toilet.
☐ Toilet without a rim hole: Fold the inlet flat so that the water supply hose exits the side of the seat.
☐ Install the appropriate cover over the hole on the side of the seat.
☐ Secure the cover with the provided screw.
4. Install the Seat
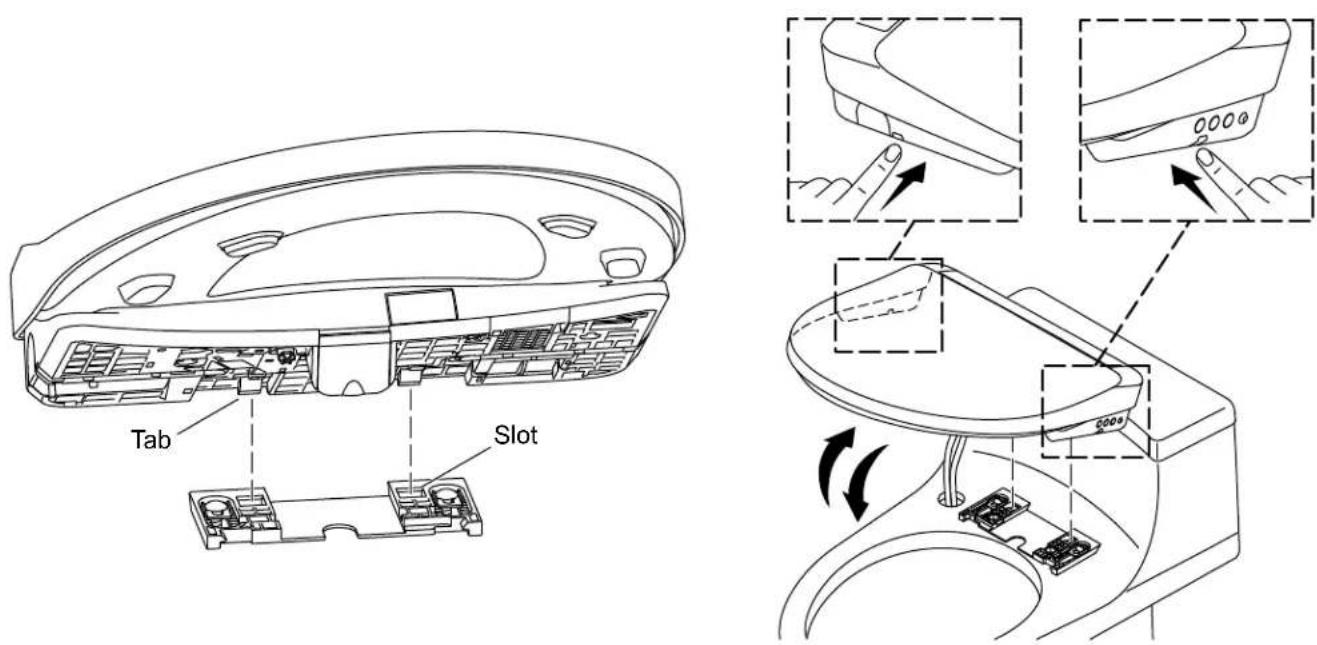
text_image
Tab Slot☐ Insert the tabs on the seat into the slots on the mounting bracket.
☐ Press and hold the release buttons on each side of the seat while tilting the seat down in place.
☐ Once the seat is pressed down fully, release the buttons.
☐ Verify that the seat is securely engaged with the mounting bracket. When the seat is properly engaged, the buttons will be fully depressed.
☐ Check the seat position. Adjust the position if needed.
Adjust the Seat
☐ Press and hold the release buttons on each side of the seat.
☐ Tilt the seat up and lift off of the mounting bracket. Avoid tension on the hose connections.
☐ Loosen the bolts and reposition the mounting plate as needed.
☐ Securely tighten the mounting plate bolts and nuts.
□ Reinstall the seat.
5. Install the Remote Control
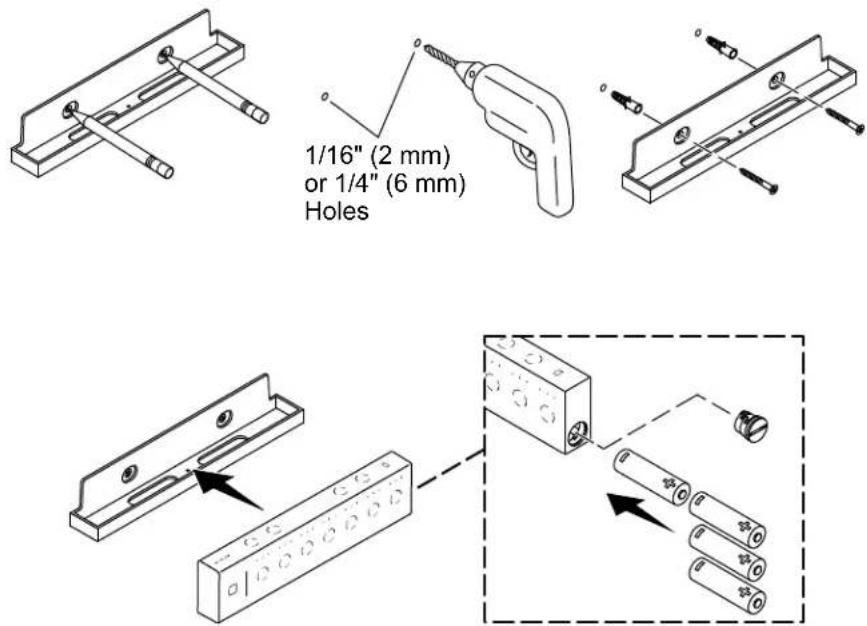
☐ Position the docking station at the desired mounting location.
☐ Confirm that the docking station is level.
☐ Using a pencil, mark the two mounting-hole locations.
☐ For installation into a stud or other wood surface: Drill a 1/16" (2 mm) hole at each of the marked locations.
☐ For installation using wall anchors: Drill a 1/4" (6 mm) hole at each of the marked locations. Install the provided wall anchors into the holes.
☐ Position the docking station over the anchors or marks. Secure with the provided screws.
☐ Remove and retain the cap to the battery compartment.
☐ Install the four provided AA batteries in the orientation shown.
☐ Reinstall the cap to the battery compartment.
☐ Place the remote control on the docking station.
6. Connect the Water Supply
text_image
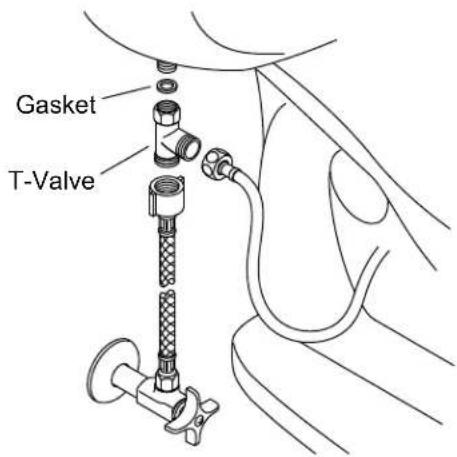
Gasket T-Valve
CAUTION: Risk of property or product damage. Pushing or pulling on the water connection may cause water leakage.
NOTICE: Use care to avoid cross-threading or overtightening the connections. Use an adjustable wrench to tighten one-quarter turn past hand-tight.
□ Verify that the gasket is installed inside the T-valve.
□ Connect the T-valve to the water inlet on the toilet tank.
□ Connect the seat water supply hose to the T-valve.
□ Connect the supply hose (not provided) to the T-valve.
□ Connect the supply hose to the supply stop.
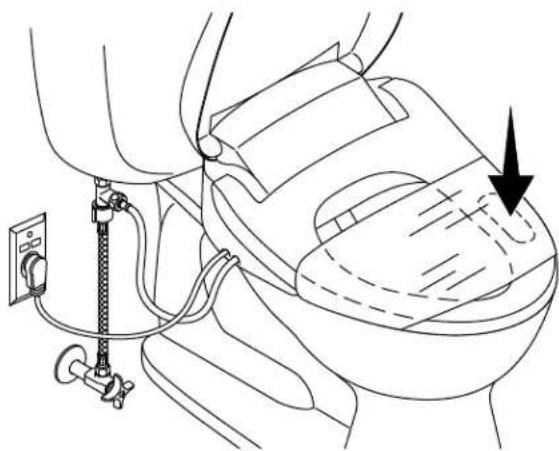
□ Turn ON the water supply.
□ Check all connections for leaks, and make adjustments as needed.
natural_image
Medical illustration of a car seat assembly with a pressure gauge and arrow indicating force (no text or symbols)NOTE: The seat features can be controlled using the panel on the seat or the remote control. For a KOHLER Konnect® product, download the KOHLER Konnect App to control the seat features.
NOTE: The seat cleansing features will not activate unless the sensor detects an occupant. To test cleansing features, place your hand or a wet cloth on the occupancy sensor on the right side of the seat (facing the toilet).
NOTE: Covering the seat with plastic wrap is optional. The features can be tested while sitting on the seat or covering the wand with your hand.
☐ Optional: Wrap the seat with plastic wrap to prevent water from spraying beyond the toilet while testing.
☐ Plug the power cord into the electrical outlet. The seat will go through a power-up sequence. The seat will go silent when the power-up is complete.
☐ Refer to the Homeowners Guide to test the seat features.
text_image
Technical diagram of a toilet sink with labeled components and a magnified inset showing the wheel assembly.text_image
Technical diagram showing mechanical assembly steps with labeled components and directional arrows indicating movement or assembly.
natural_image
Line drawing of a car interior showing seatbelt, dashboard, and valve assembly (no text or symbols)natural_image
Illustration of various types of electrical tools including screwdriver, wrench, and screwdriver (no text or labels)text_image
Technical diagram of a toilet sink with labeled components and a magnified inset showing the washer detail.text_image
Technical diagram showing mechanical assembly steps with labeled components and directional arrows indicating movement or assembly.