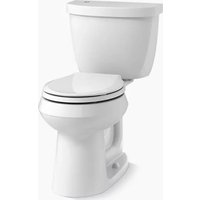
Avoir K-46006 - Toilet KOHLER - Free user manual and instructions
Find the device manual for free Avoir K-46006 KOHLER in PDF.


User questions about Avoir K-46006 KOHLER
0 question about this device. Answer the ones you know or ask your own.
Ask a new question about this device
Download the instructions for your Toilet in PDF format for free! Find your manual Avoir K-46006 - KOHLER and take your electronic device back in hand. On this page are published all the documents necessary for the use of your device. Avoir K-46006 by KOHLER.
USER MANUAL Avoir K-46006 KOHLER
Installation Instructions
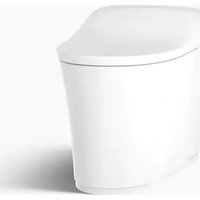
Tankless Toilet
Record your model number:
Noter le numero de modele:
Anote su numero de modelo:
Français, page 17
Espanol, págin33
Need help? Contact our Customer Care Center.
USA/Canada:1-800-4KOHLER (1-800-456-4537)
Mexico:001-800-456-4537
- For service parts, visit kohler.com/serviceparts.
For care and cleaning, visit kohler.com/clean.
Patents: kohlercompany.com/patents
Warranty
This product is covered under the KOHLER® Toilets and Seats Limited Warranty, found at kohler.com/warranty. For a hardcopy of warranty terms, contact the Customer Care Center.
Tools and Materials


Plus:
1/8" T-handle Hex Wrench
WARNING: Risk of electric shock. Disconnect the power before servicing.
WARNING: Risk of product damage. Do not use toilet bowl cleaners containing hydrochloric acid (HCI) in your toilet. Products containing hydrochloric acid (HCI) can cause surface corrosion of stainless steel components.
CAUTION: Risk of hazardous gases. If the new toilet is not installed immediately, temporarily place a rag in the floor flange.
IMPORTANT! Use the supply hose and valve (1/2" NPT) provided with the product. The previously installed hose and valve will not work with this product.
IMPORTANT! This product requires a minimum flow rate of 6.5gal / min (24.6 l/min) when installed for satisfactory rim wash performance. Maximum static pressure is 80 psi (552 kPa).
Follow all local plumbing and building codes.
Carefully inspect the new toilet for any damage.
The inside of the access cover contains a guide to pair the toilet and to operate the manual flush feature.
When unpacking the toilet, set aside the top cardboard packaging piece. This is a template that is needed later in the installation.
Remove the existing supply stop and hose.
Refer to the Quick Reference Guide for user directions and troubleshooting instructions.
Wall Supply Stop Floor Supply Stop
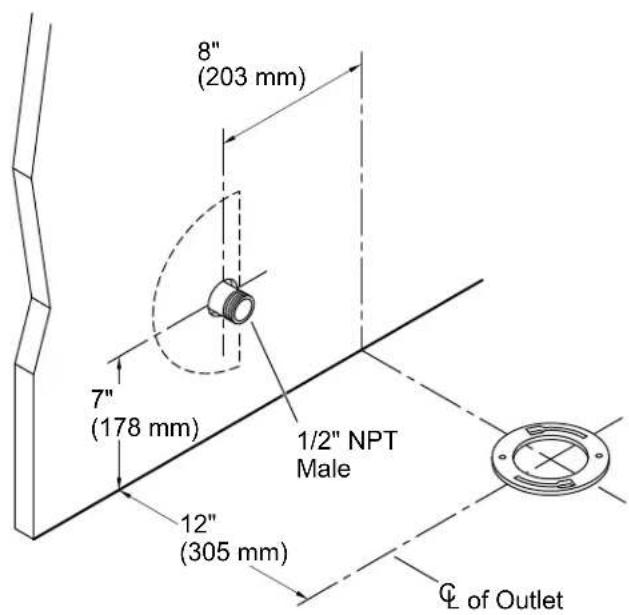
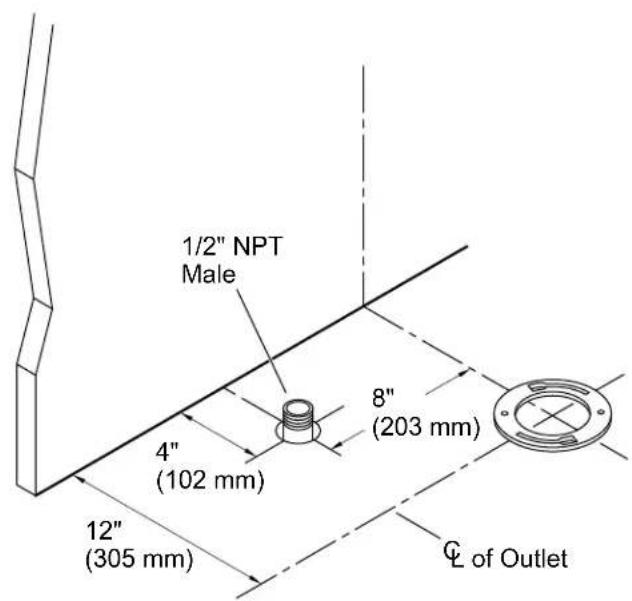

CAUTION: Risk of hazardous gases. If the new toilet is not installed immediately, temporarily place a rag in the floor flange.
NOTE: If the rough-in distance is less than 12" (305 mm) the toilet will not fit in the space. Confirm that the rough-in is 12" (305 mm) before installing the toilet.
NOTE: A 90^ optional accessory is available to make the floor-mount supply hose connection easier.
1. Install the Supply Stop and Confirm the Flow Rate
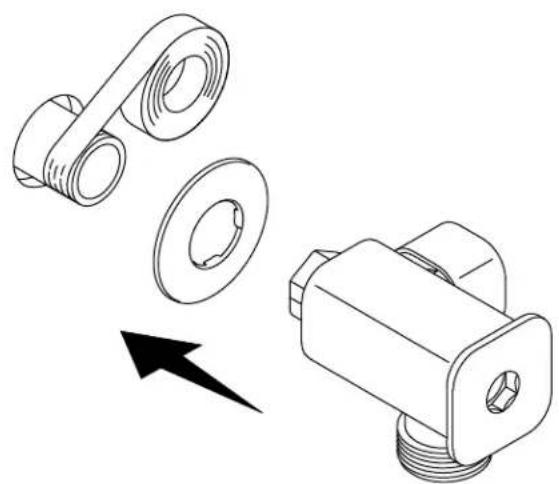
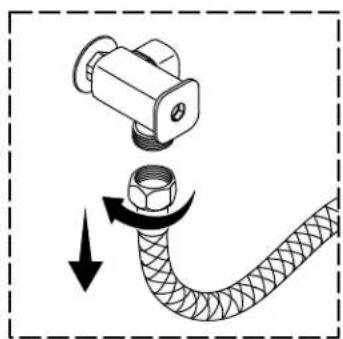
- Slide the cover plate (not provided) onto the supply pipe.
Apply thread sealant onto the end of the supply pipe. - Thread the supply stop onto the supply pipe.
Connect the supply hose to the supply stop.
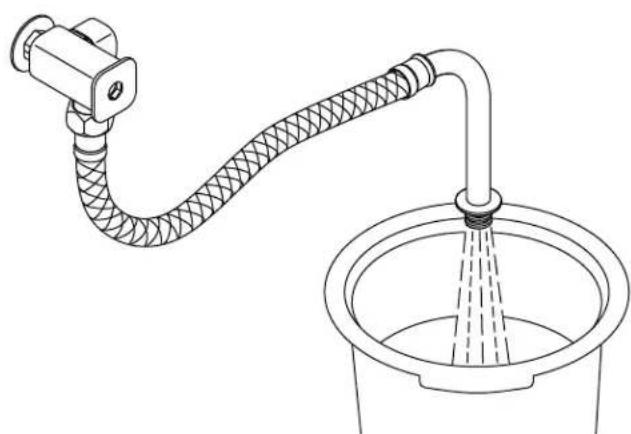
Direct the end of the supply hose into a 3 gal (11.4 l) or larger bucket.
Verify that the supply stop can provide a minimum of 1.1 gal (4.2 l) or more in 10 seconds.
Turn OFF the water supply. - Disconnect the installed supply hose.
2. Position the Trapway

CAUTION: Risk of hazardous gases. If the new toilet is not installed immediately, temporarily place a rag in the floor flange.
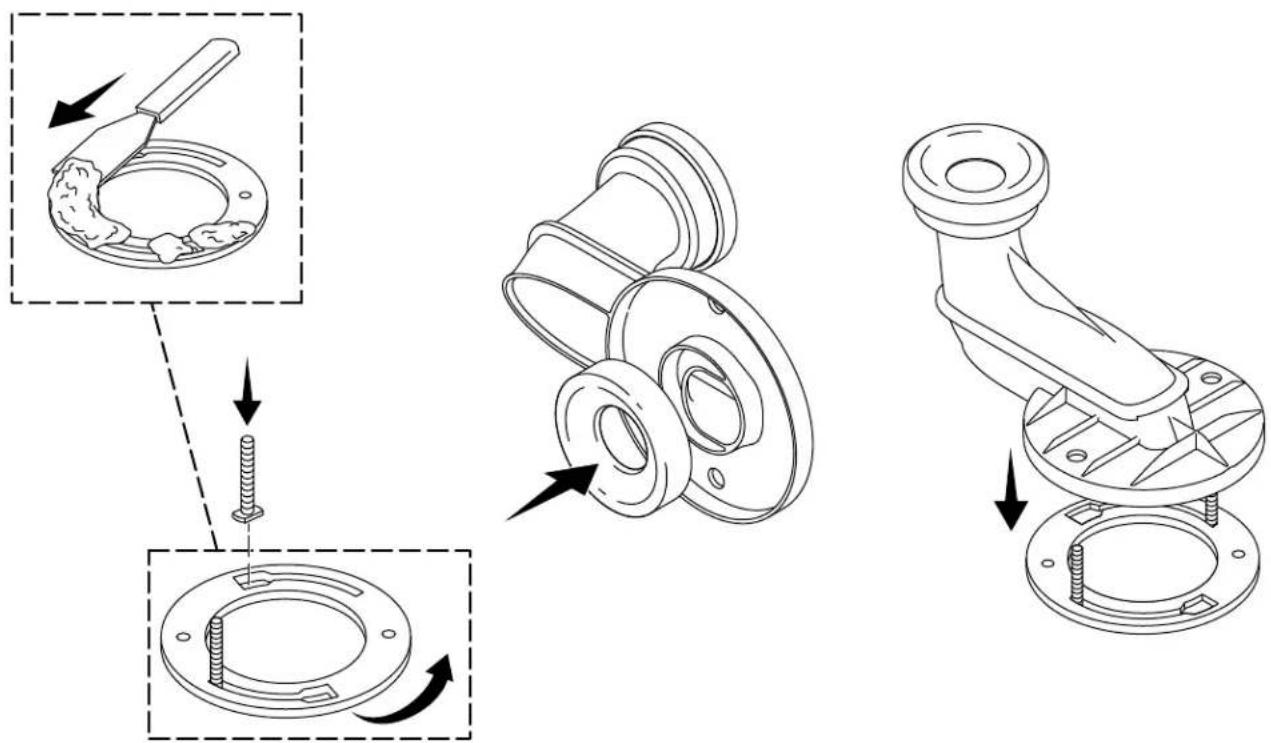
If an existing toilet was removed, scrap away any remaining wax residue from the flange.
Install the new wax ring to the trapway.
Install two 5 / 16'' diameter × 2 - 1 / 4'' long T-bolts into the floor flange.
Set the trapway in place over the flange.
3. Install the Bracket and Cams
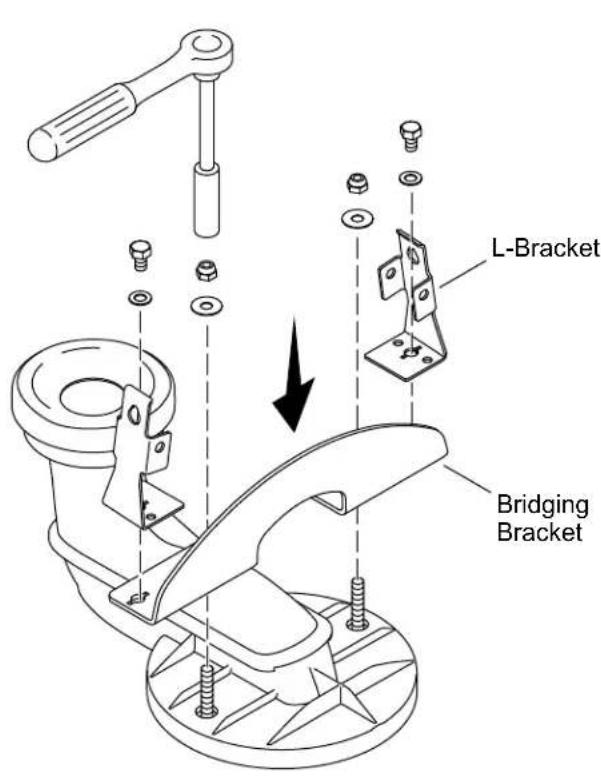
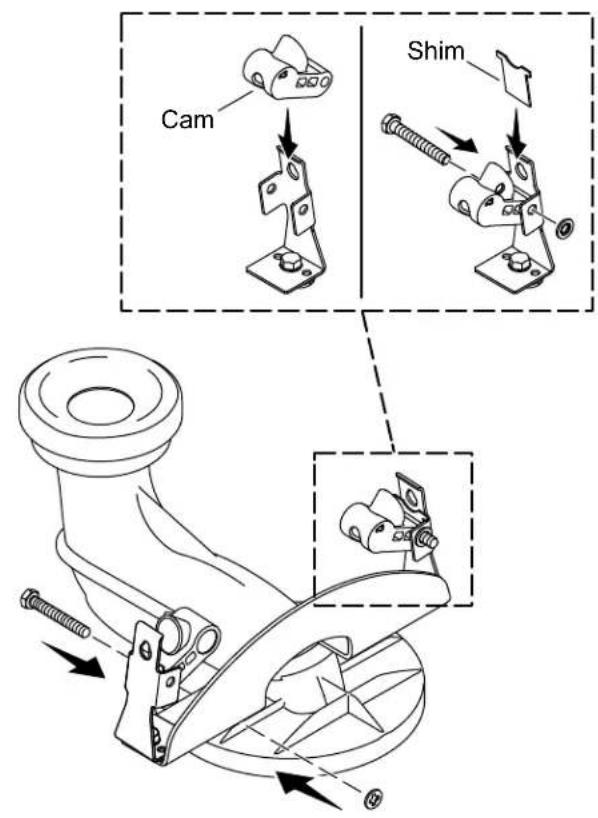
Install the L-brackets onto the outer holes of the bridging bracket using the hardware provided.
Install the bridging bracket to the trapway.
Verify that the bridging bracket is square to the wall.
Install the plastic cam onto the L-brackets using the washers and bolts.
Insert the metal shim between the plastic cam and the L-bracket.
4. Connect the Supply Hose
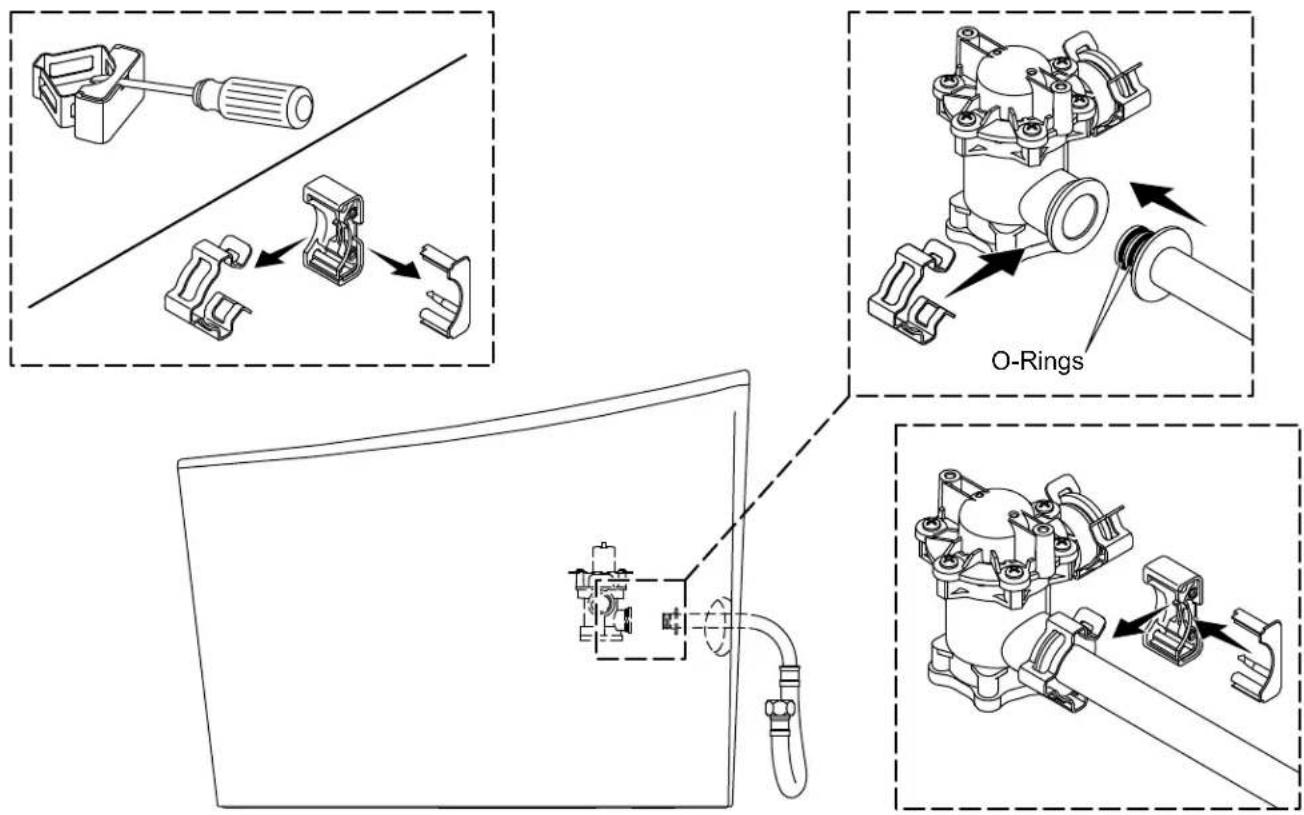
NOTE: Lay the toilet on its side to ease installation (not shown).
Using a screwdriver, pry apart the plastic safety mechanism on the metal clip.
Set the mechanism aside.
Verify that two O-rings are seated on the flanged end of the supply hose.
Insert the supply hose into the hole on the back of the toilet.
Push the supply hose into the inlet on the inside of the toilet.
- Attach the metal clip to the connection point between the toilet and the supply hose.
- Secure the metal clip with the plastic safety mechanism.
5. Install the Toilet
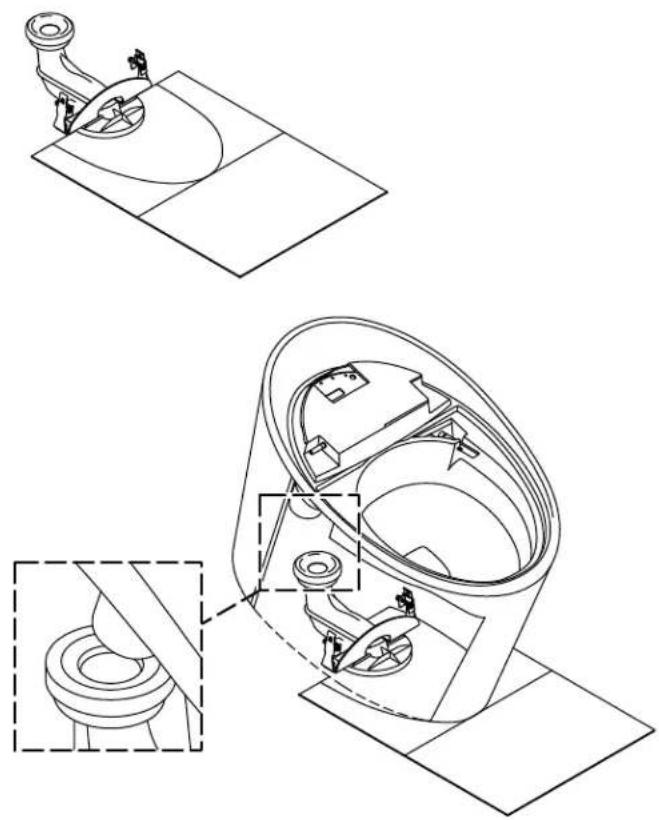
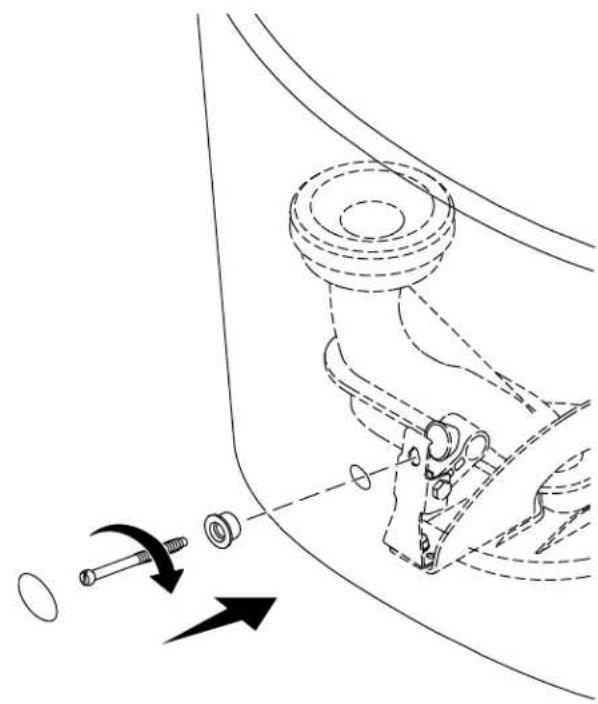

CAUTION: Risk of product damage. Do not overtighten the screws. The vitreous shell may chip or break if the screws are overtightened.
Remove the cardboard template from the toilet packaging.
Place the template in line with the trapway.
Set the front edge of the toilet onto the line on the template.
Carefully lower the toilet onto the trapway.
Remove the template.
Insert a grommet into each of the holes on the side of the toilet.
Insert a screw into each of the holes and tighten securely. Do not overtighten!
Install a cap over each screw. The caps should be flush with the exterior of the toilet.
6. Prepare the Seat

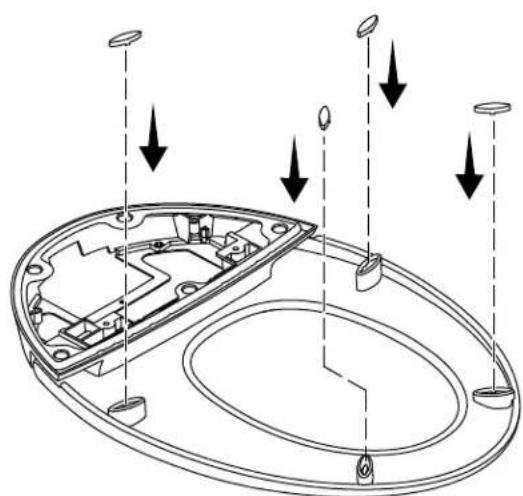
Remove the magnetic cover
Remove the battery tray.
Install the bumpers to the underside of the seat.
7. Position the Seat and Lid
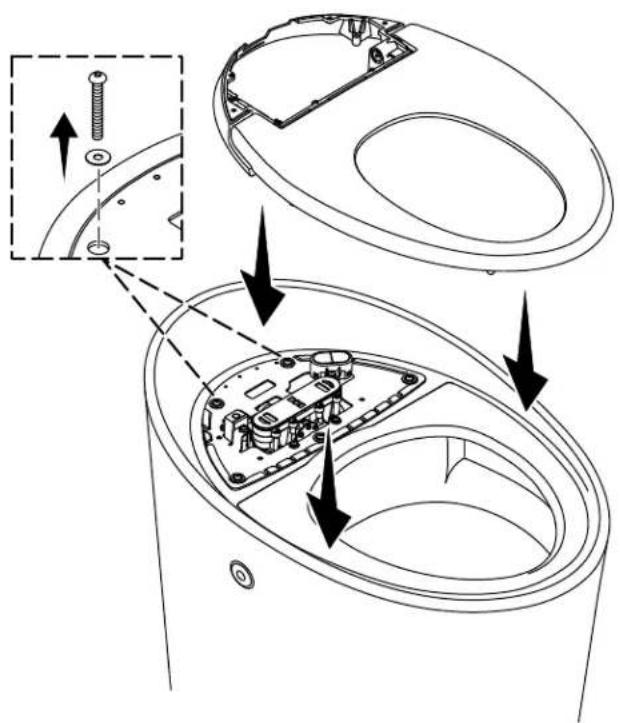
- Remove the two bolts from the back of the toilet. Set the bolts aside for future use.
Position the seat onto the toilet. Do not secure the seat with bolts at this time.
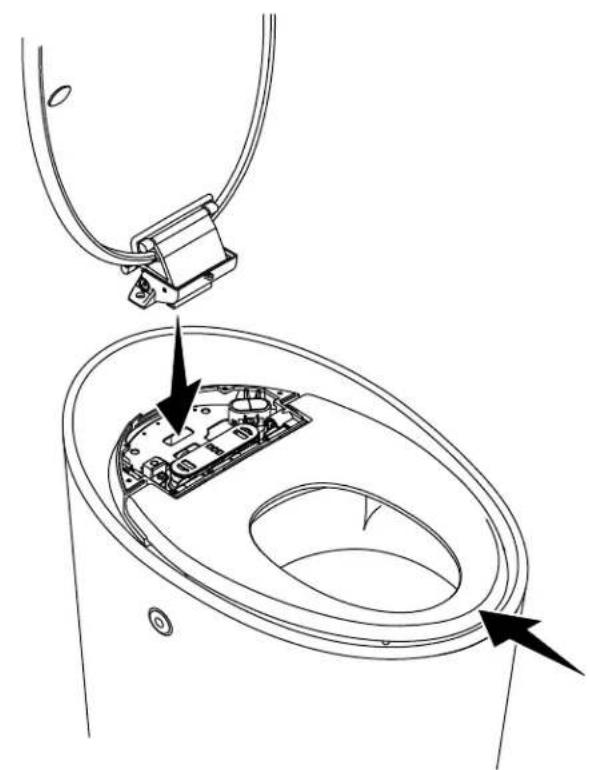
Push the seat toward the back of the toilet to allow room for the lid installation. The seat and toilet holes will not be aligned at this time.
Position the hinge of the lid onto the toilet through the rectangular opening in the metal frame.
8. Secure the Lid
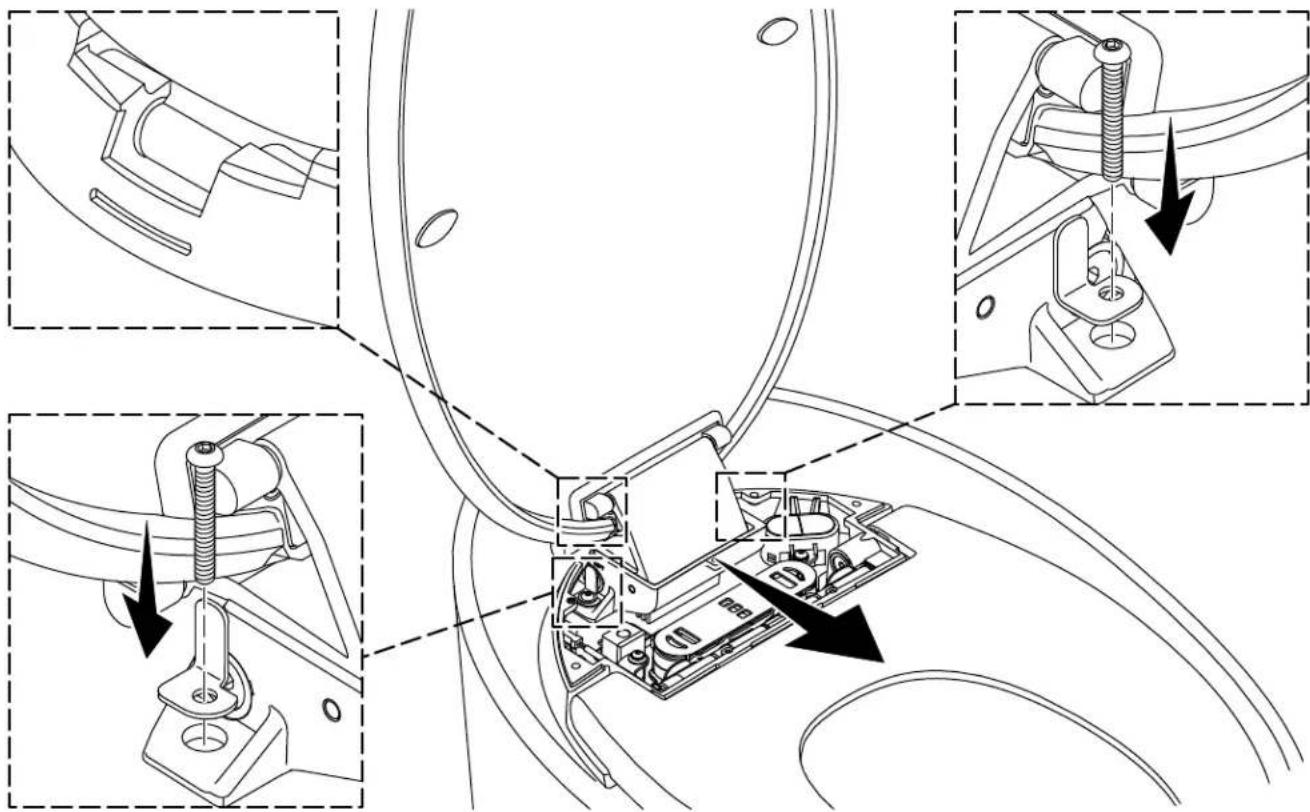
- Slide the lid forward to engage the hook in the slot.
- Slide the seat forward so the back of the lid and back of the seat are flush. There should be no gaps or steps between the back of the seat and the lid.
Verify that the holes on the toilet align with the holes on the seat and lid.
Install the lid using two L-brackets and bolts provided. Do not fully tighten at this time.
Verify that the vertical leg of the L-brackets directly contact the plastic hinge base on the right and left sides of the lid.
9. Secure the Seat
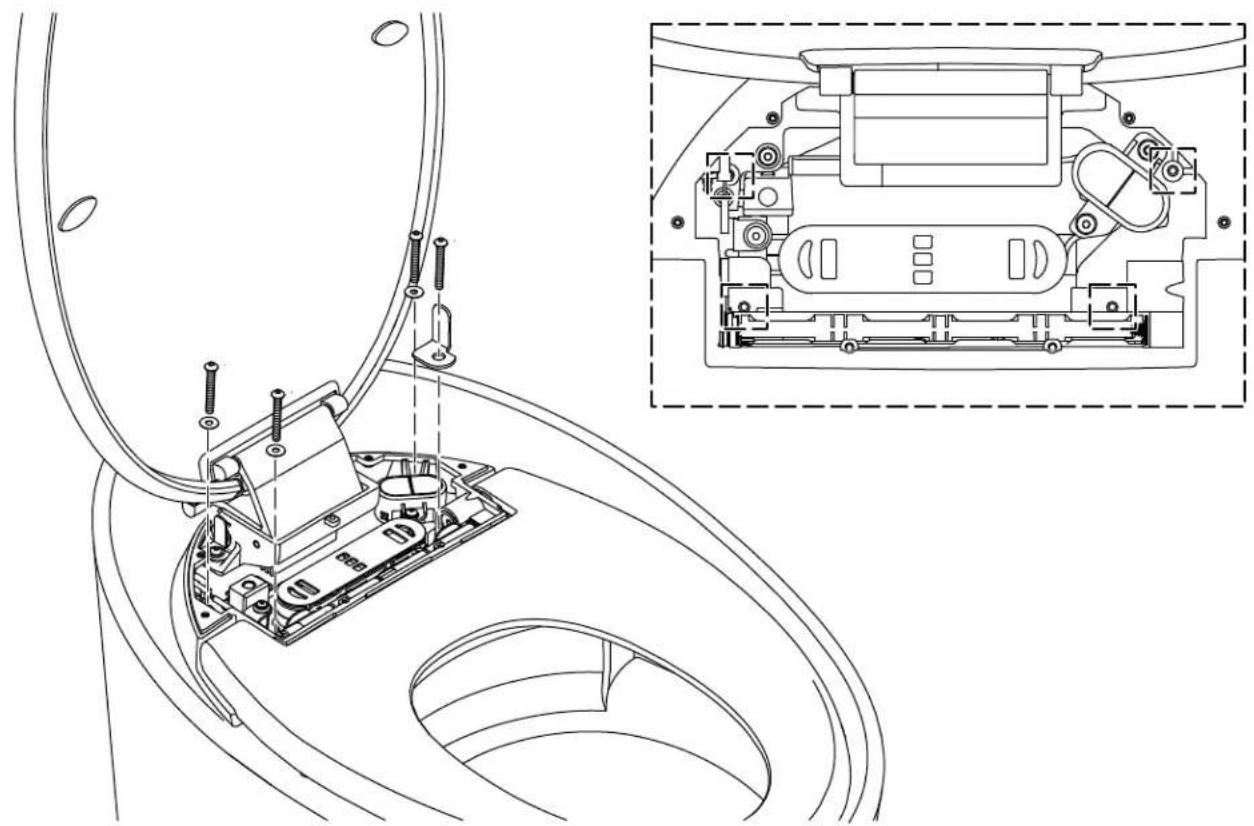
Install the washers and bolts to secure the seat to the toilet. Do not fully tighten at this time.
Verify that an L-bracket is installed in place of a washer in the bottom right corner, as shown.
With the lid raised, verify the centering and alignment of the seat. Adjust as needed.
Close the lid.
Verify the overhang at the front of the toilet, pushing the lid back slightly if less overhang is desired.
Verify the centering and alignment of the lid. Adjust as needed.
Once the seat and lid are aligned as desired, fully tighten the six bolts.
10. Install the Battery Cartridge
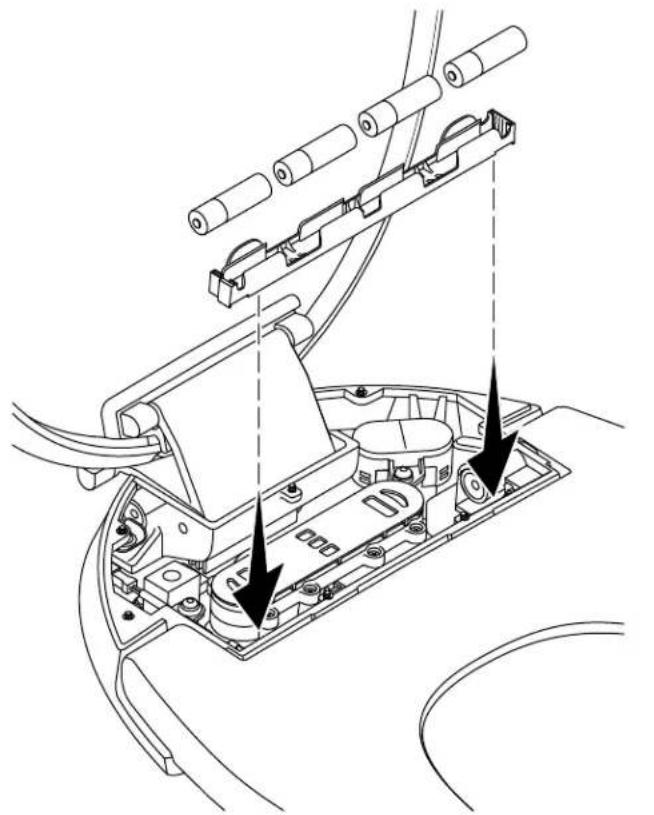
Install the four provided AA batteries into the battery cartridge.
Install the battery cartridge behind the seat.
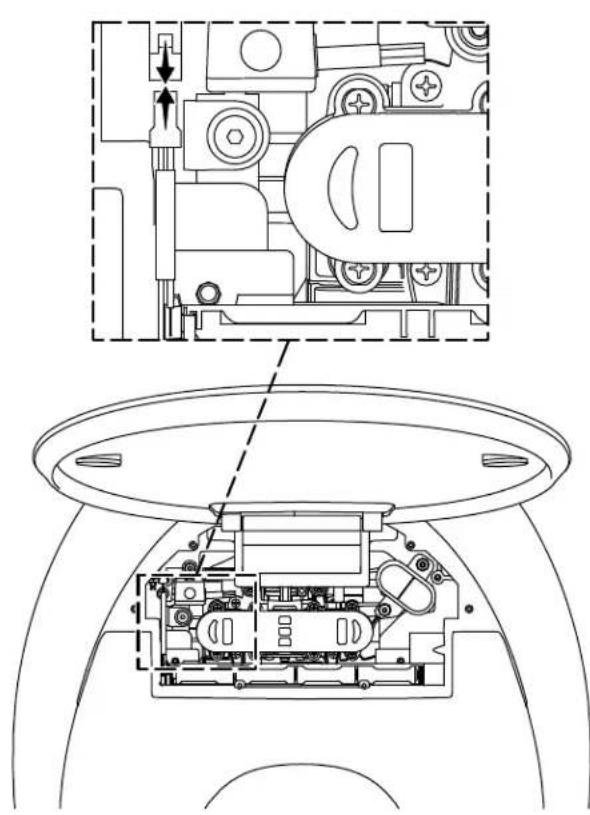
- Connect the wire from the battery cartridge to the wire from the flushing mechanism.
Tuck any excess wire into the opening in the metal mounting frame.
11. Complete the Installation
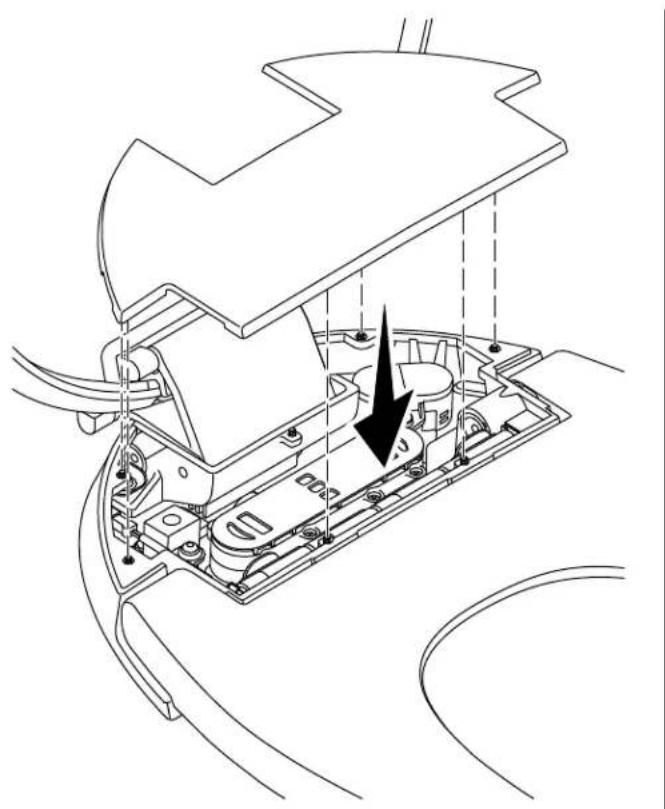
Install the magnetic access cover onto the seat. The cover should snap in place easily.
If the cover does not attach or has excessive gaps, check the alignment of the seat and lid behind the hinge. The lid and seat should form a continuous arc when properly aligned.
If improperly aligned, loosen the six bolts and align, then retighten.
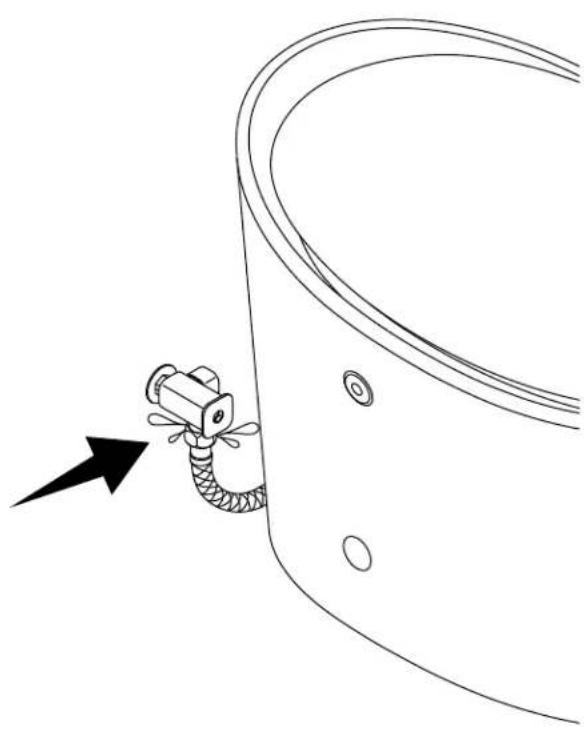
Connect the water supply.
Turn ON the water supply.
Check all connections for leaks.
Contains FCC ID: N82-KOHLER041
This device complies with Part 15 of the FCC Rules. Operation is subject to the following two conditions: (1) this device may not cause harmful interference, and (2) this device must accept any interference received, including interference that may cause undesired operation.
Changes or modifications not expressly approved by the party responsible for compliance could void the user's authority to operate the equipment.
This equipment has been tested and found to comply with the limits for a Class B digital device, pursuant to Part 15 of the FCC Rules. These limits are designed to provide reasonable protection against harmful interference in a residential installation. This equipment generates, uses, and can radiate radio frequency energy and, if not installed and used in accordance with the instructions, may cause harmful interference to radio communications. However, there is no guarantee that interference will not occur in a particular installation. If this equipment does cause harmful interference to radio or television reception, which can be determined by turning the equipment off and on, the user is encouraged to try to correct the interference by one of the following measures:
- Reorient or relocate the receiving antenna.
- Increase the separation between the equipment and receiver.
- Connect the equipment into an outlet on a circuit different from that to which the receiver is connected.
- Consult the dealer or an experienced radio/TV technician for help.
RF Exposure Warning
This transmitter with its antenna complies with FCC's RF exposure limits for general population/uncontrolled exposure. This device must not be co-located or operated in conjunction with any other antenna or transmitter. This device should be operated with a minimum distance of 7 - 7 / 8'' (200 mm) between the radiator and your body.
Contains IC: 4554A-KOHLER041
This device complies with Industry Canada license-exempt RSS standard(s). Operation is subject to the following two conditions: (1) this device may not cause interference, and (2) this device must accept any interference, including interference that may cause undesired operation of the device.
This transmitter with its antenna complies with Industry Canada RF Exposure Limits for General Population/ Uncontrolled Exposure.
This Class B digital apparatus complies with Canadian ICES-003.