
Pausa - Coffee machine Klarstein - Free user manual and instructions
Find the device manual for free Pausa Klarstein in PDF.

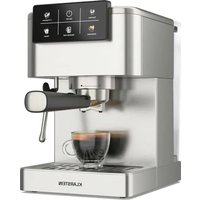
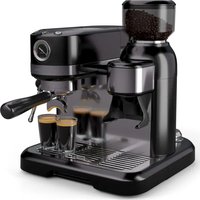
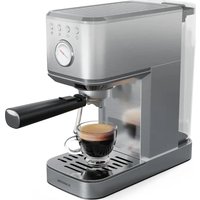
| Product Type | Espresso coffee machine with milk frother |
| Brand | Klarstein |
| Model | Pausa |
| Power Supply | 220-240 V ~ 50/60 Hz |
| Power | 1350 W |
| Water Tank Capacity | 1.4 L |
| Pressure | 20 bar |
| Dimensions (approx.) | 30 x 25 x 30 cm |
| Weight (approx.) | 5 kg |
| Filter Holder Material | Aluminum alloy |
| Filters Included | 1 cup and 2 cups |
| Main Functions | Espresso, cappuccino, latte, hot water |
| Milk Frother Function | Swivel steam nozzle for hot milk and foam |
| Control Panel | Buttons for single cup, double cup, steam, on/off |
| Pressure Gauge | Pressure indicator |
| Memory Function | Programming of espresso volume (up to 60 sec) |
| Cooling Function | Quick cooling after steam |
| Descaling | Recommended every 500 uses |
| Cleaning | Do not immerse, wipe with a damp cloth |
| Safety | Automatic shut-off in case of overheating, dry run protection |
| Spare Parts | Replacement filter holder available (ref. 10038395) |
| Article Numbers | 10038393, 10038394 |
Frequently Asked Questions - Pausa Klarstein
User questions about Pausa Klarstein
0 question about this device. Answer the ones you know or ask your own.
Ask a new question about this device
Download the instructions for your Coffee machine in PDF format for free! Find your manual Pausa - Klarstein and take your electronic device back in hand. On this page are published all the documents necessary for the use of your device. Pausa by Klarstein.
USER MANUAL Pausa Klarstein
INHALTSVERZEICHNIS
natural_image
Line drawing of a handheld device with handle and control panel (no text or symbols)natural_image
Line drawing of a mechanical device with a lever and handle (no text or symbols)natural_image
Technical line drawing of two identical mechanical devices with handles and control knobs (no text or symbols)natural_image
Line drawing of a projector with a circular dial and directional arrows indicating rotation (no text or symbols)natural_image
Symbol of a trash bin crossed with a diagonal line, no text or numbers presentUnit 6 Riverside Business Centre
Brighton Road
Shoreham-by-Sea
BN43 6RE
United Kingdom
Dear Customer,
Congratulations on purchasing this device. Please read the following instructions carefully and follow them to prevent possible damages. We assume no liability for damage caused by disregard of the instructions and improper use. Scan the QR code to get access to the latest user manual and more product information.

CONTENT
Safety Instructions 14
Device overview 15
Control panel 16
Operation 16
Cleaning and Maintenance 20
Troubleshooting 21
Disposal Considerations 22
Manufacturer & Importer (UK) 22
TECHNICAL DATA
| Product code 10038393, 10038394 | |
| Power supply 220-240 V ~ 50/60 Hz | |
| Power 1350 W | |
| Water tank capacity 1,4 L | |
| Pressure 20 Bar | |
| Note: A replacement portafilter is available for this machine under item number 10038395. | |
SAFETY INSTRUCTIONS
- Read this booklet thoroughly before using the device to protect against damage to the device, fire, electric shock and injury to persons or property.
- Save this manual for future reference.
- This device is intended to prepare coffee using high pressure ("Espresso") and to be used in indoors household, only.
- Do not use the device for purposes other than its intended use.
- This device may be only used by children 8 years old or older and persons with limited physical, sensory and mental capabilities and / or lack of experience and knowledge, provided that they have been instructed in use of the device by a responsible person who understands the associated risks.
- Refer all servicing to qualified personnel. Servicing is required when the appliance has been damaged in any way, such as when the power supply cord or plug is damaged, liquid has been spilled over the appliance or objects have fallen into the appliance, or when it has been exposed to rain or humidity, when it does not operate normally, or has been dropped.
- Please, only use accessories recommended by the manufacturer of this device to prevent danger of physical damage, fire or electrical shock to the device or injury to persons.
- Make sure that the water tank of the device is always filled with the amount of water needed for the intended operation to prevent damage to the device.
- Stay away from hot steam escaping from the unit. Only use the handles or levers attached to the unit or its components if you want to move hot components of the unit, such as the frother or the coff ee fi liter.
- Do not immerse the device into water or other liquids to avoid shock damage to the device and harm to you.
- Do not touch the plug of the device with wet hands. Water drops from your hands may drip on the plug and cause an electrical shock when in contact with the power socket.
- Monitor the device during operation, since it needs manual operation.
- Store the device in a dry, clean place out of the reach of unauthorised persons.
- Monitor children while they play near the device to protect them from damage.
- Unplug the unit when not in use.
CAUTION
Risk of injury! To avoid the risk of burns from hot surfaces and scalding by hot liquid leave the device to cool off completely before taking of or attaching components to it, before cleaning or moving the device or its components.
DEVICE OVERVIEW
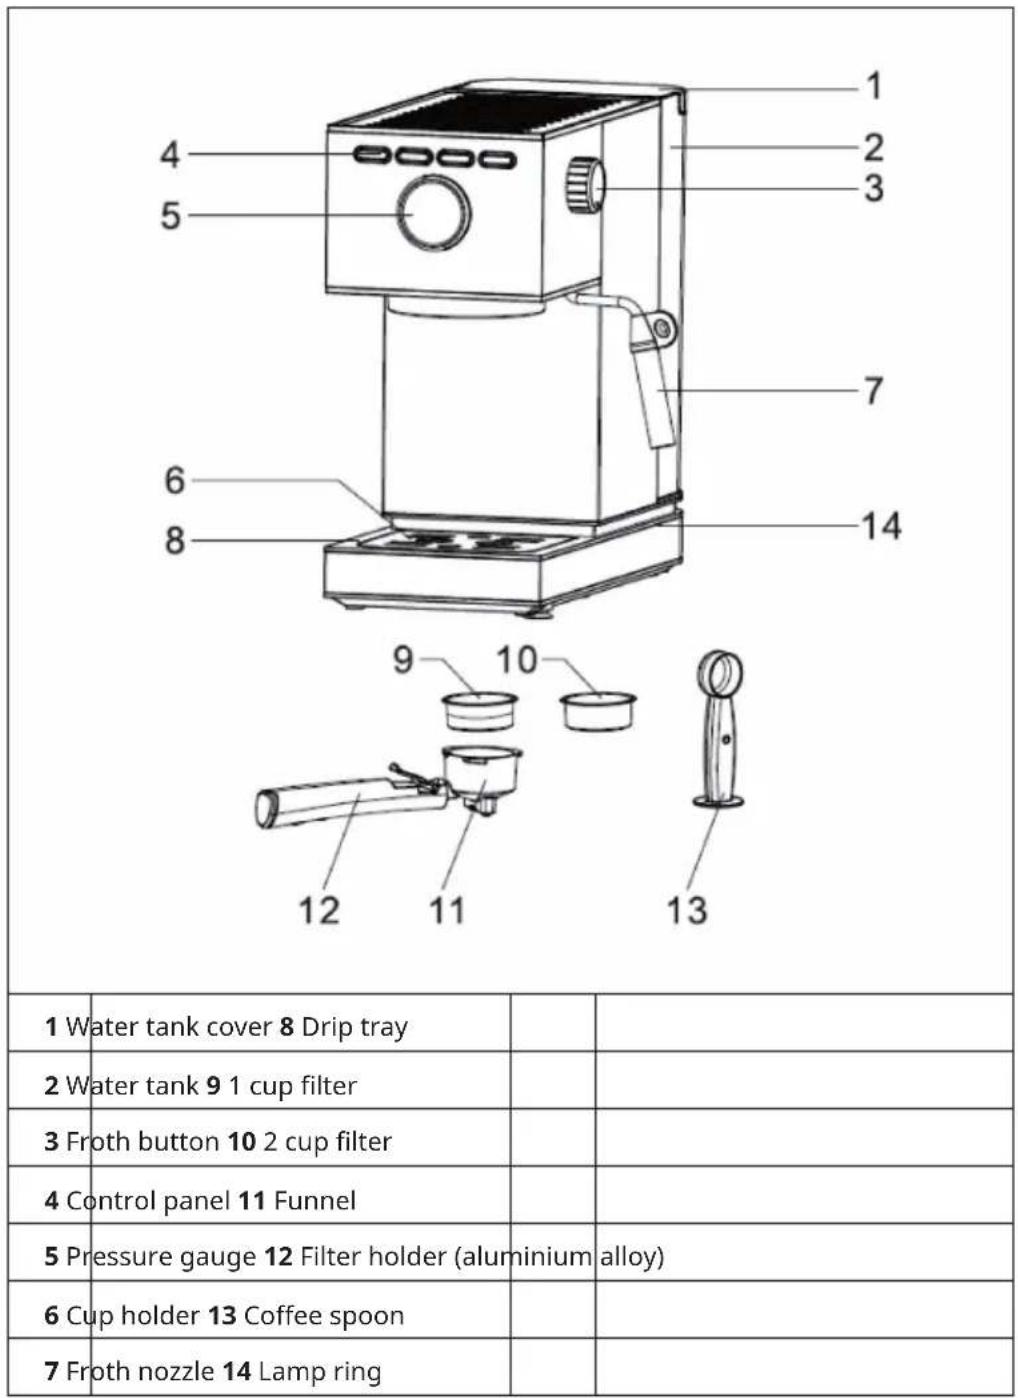
CONTROL PANEL
| D | C | B | A | |
| A Froth button C One cup | ||||
| B Two cups D On / off button |
OPERATION
First use/preparation of the still-cold coffee machine
- Fill the water tank with water, making sure that the water does not exceed the maximum mark in the water tank.
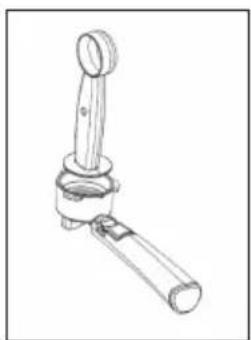
- Remove the funnel from the packaging, insert it into the filter and attach both to the appropriate place in the device. The handle of the funnel must be at the mark.
natural_image
Line drawing of a mechanical device with a handle and lever (no text or symbols)-
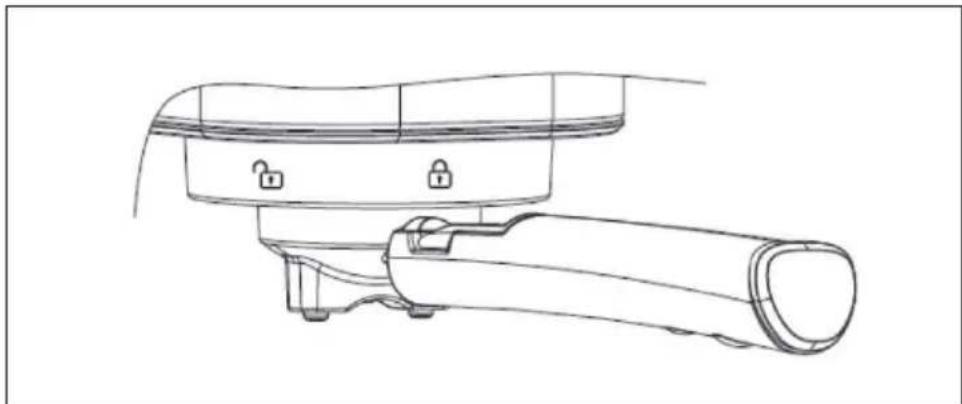
Plug the power plug into the mains socket. Then press the button . The device will beep. The indicator lights and will start flashing and the unit will warm up. Make sure that the steam knob is in the position. When the steam knob is in the position, all four indicator lights will flash at once and the device will not work.
-
When the indicator lights and light up steadily, press the button to rinse the coffee filter or coffee cup with hot water.
Brew an espresso
- While the device is preheating, the coffee powder (the coffee powder should be size 1 powder, not too coarse and not too fine) can be filled into the coffee filter and then compressed with the powder press. In the meantime, remove the coffee powder from the edges of the funnel by hand or with a brush (if one cup is needed, use the filter for one cup; if two cups are needed, use the filter for 2 cups).
natural_image
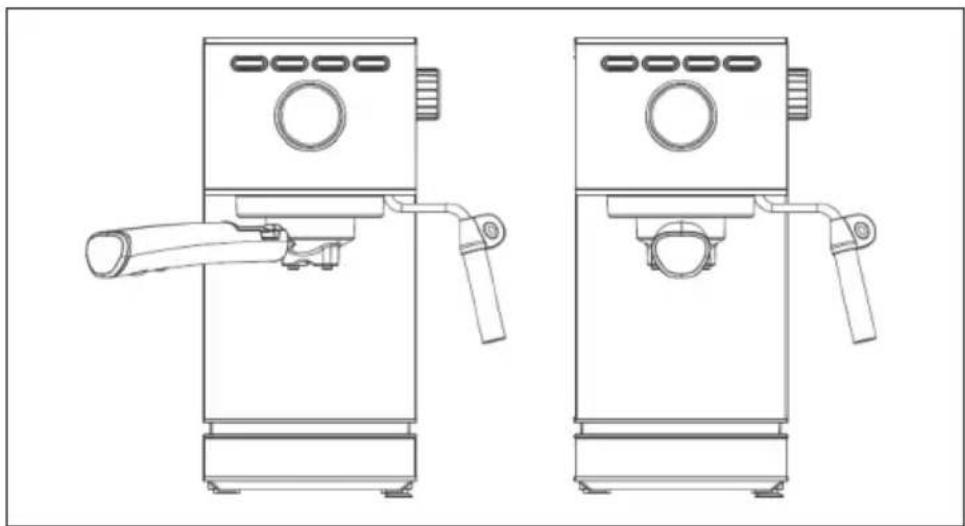
Line drawing of a mechanical lever or lever device (no text or symbols)- Attach the funnel and fix it in the direction of the arrow. Then place the coffee cup under the filter.
natural_image
Technical line drawing of two identical mechanical devices with handles and control knobs (no text or symbols)-
When the indicator lights and are steadily lit, press the button once and the coffee for a cup of coffee will start to flow out. If you want to make two cups of coffee, press the key. Align the coffee cups so that the coffee flows directly along the inner rim of the cup into the coffee cup.
-
Wait until the coffee has flowed in completely. Then the coffee is ready.
Milk foam function
-
First press the ⏻ button and then the ⏻ button. At this time, the indicator light ⏻ will start flashing. As soon as the indicator light is permanently on, the preheating process is finished.
-
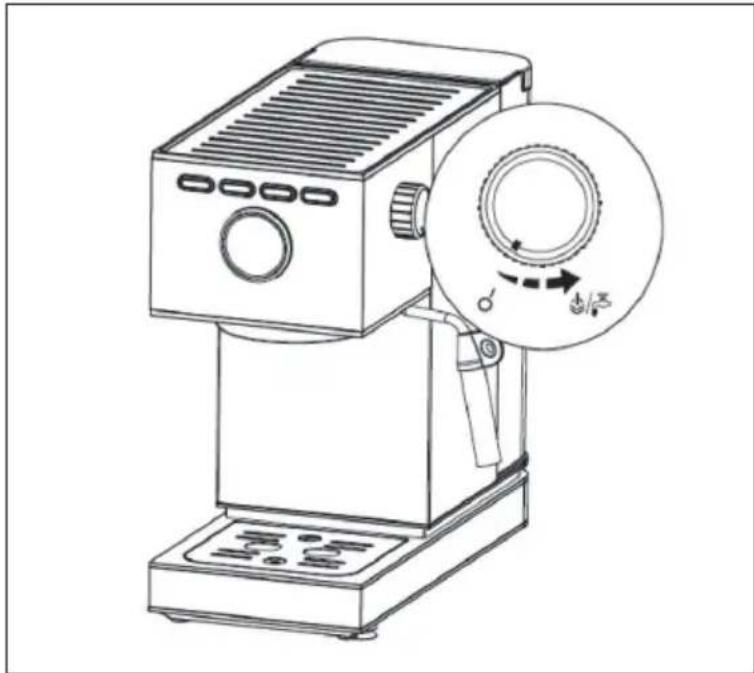
Fill 1/3 of the milk jug with chilled whole milk. Dip the steam nozzle 1 cm deep into the milk surface and then slowly open the steam knob until steam emerges from the front of the nozzle.
Note: Release some water from the steam pipe first before foaming milk.
natural_image
Line drawing of a projector with a circular dial and adjustment knob (no text or symbols)- When the milk temperature reaches approximately 75^ C and the milk foam starts to rise, you can move the steam knob to the position ○ — and press the 🔊 button to stop the function.
Hot water function
Press the ⏻ button and turn the steam knob to the position. Hot water will then continuously emerge from the steam line. Turn the steam knob to the position to end the function.
Additional function - memory function
- After the unit has heated up (once the indicator lights

and are
steadily lit), press and hold the 📋 button. Coffee then flows out of the funnel. Release the button as soon as the desired amount of coffee is reached. The device will emit a sound, which means that the length of time you pressed the button has been saved. The next time you press the 📋 button, the previously stored amount of coffee will come out (the longest time is 60 seconds. If the button was previously pressed for more than 60 seconds, this is invalid and the factory-set time will remain set)
Note: If the time period in which you pressed the button was too short, this time will not be saved. The continuous flow volume should be more than 15 ml.
- The reminder function for the in point 1.

key works in the same way as described
- To reset to factory settings, press and hold the

and buttons
simultaneously for 3 seconds. If the device then beeps once, this means that the device has been reset to factory settings.
Cooling function
If you have previously used the steam function, the indicator lights for ,one cup' and ,two cups' will flash quickly because the temperature of the appliance is too high. Turn the steam knob to the ⏻/hip position. The device will start pumping water through the pipe. Water will continuously flow out of the steam line and the device will cool down. When the indicator lights stop flashing rapidly, the steam knob can be turned to the ○— position and the cooling process is complete. As soon as the indicator lights for ,one cup' and ,two cups' are continuously lit again, the device can again make coffee.
Decalcification
After you have used the coffee or steam function about 500 times, the device must be decalcified manually. Proceed as follows:
- Add some descaler to the water tank (approximately 10 g) and then fill the water tank with fresh water up to the maximum mark.
- After you have switched on the appliance and the preheating process is complete, turn the steam knob to the ⏻/ respiratory position. The water is now pumped through the pipe.
- During descaling, occasionally turn the steam knob to the ○, position to allow a small amount of descaler to flow out of the funnel outlet.
- After about 2 minutes, the device will stop operating.
- Now turn the steam knob to the ○ position and then back to the position. The device will again start pumping water through the pipe. Repeat this step approximately 5 times until the water tank is completely empty.
- Fill the water tank with fresh water up to the maximum mark and switch the steam knob to the ○ position and then back to the position periodically until the pumping process is complete.
CLEANING AND MAINTENANCE
- Switch off the device immediately and pull the power plug out of the socket. Let the device cool down completely.
- Rub the outside of the unit with a damp cloth or clean sponge.
Note: Do not use alcohol or liquid cleaners and do not submerge the unit in water for cleaning.
- Take out the coffee funnel and remove the coffee powder residue from the filter.
TROUBLESHOOTING
| Problem Potential | cause Possible solution | |
| No water/steam. There is no water in the water tank/the water tank is blocked. | Fill the water tank with water, switch on the appliance and press the coffee button. | |
| Not enough water has been added. | ||
| The appliance has not yet preheated. | ||
| The appliance must be preheated before making coffee. The indicator light must be on steadily and must not be flashing anymore. | ||
| The espresso is too thin. | The coffee powder is too coarse/ was not pressed in. | Use a finer coffee powder and press this into the filter. |
| No steam. The steam outlet is blocked. | Use a thin wire and plug this through the steam opening. | |
| The steam button is not on. | ||
| The preheating process is not yet complete. | ||
| The espresso is too strong or too thin. | Too much or too little coffee powder. | Fill the filter with the standard amount of coffee. One coffee spoon for one cup and press the coffee powder firmly in the filter. The coffee powder must be neither too coarse-grained nor too fine-grained. Coffee powder that is too coarse cannot be extracted completely and coffee powder that is too fine can affect the amount of coffee. |
| The milk does not foam properly. | Whole milk was not used. Use whole milk. | |
| The appliance has not yet preheated. | Only use the steam function when the steam indicator is permanently lit and no longer flashing. | |
| No coffee, coffee too weak and steam light flashing rapidly. | Temperature too high after using the steam function. | Use water cooling. |
| The machine does not brew coffee. | The steam switch is not turned off. | Set the steam switch to the 'OFF' position. |
DISPOSAL CONSIDERATIONS
natural_image
Symbol of a trash bin crossed with a diagonal line, no text or numbers presentIf there is a legal regulation for the disposal of electrical and electronic devices in your country, this symbol on the product or on the packaging indicates that this product must not be disposed of with household waste. Instead, it must be taken to a collection point for the recycling of electrical and electronic equipment. By disposing of it in accordance with the rules, you are protecting the environment and the health of your fellow human beings from negative consequences. For information about the recycling and disposal of this product, please contact your local authority or your household waste disposal service.
MANUFACTURER & IMPORTER (UK)
Manufacturer:
Chal-Tec GmbH, Wallstrasse 16, 10179 Berlin, Germany.
Importer for Great Britain:
Chal-Tec UK limited
Unit 6 Riverside Business Centre
Brighton Road
Shoreham-by-Sea
BN43 6RE
United Kingdom
Estimado cliente:
ÍNDICE
natural_image
Line drawing of a mechanical device with handle and lock components (no text or symbols)natural_image
Line drawing of a mechanical lever or lever device with a cylindrical shaft and handle (no text or symbols)natural_image
Technical line drawing of two identical mechanical devices with handles and control knobs (no text or symbols)natural_image
Line drawing of a projector with a circular dial and control panel (no text or symbols)natural_image
Symbol of a trash bin crossed with a diagonal line, no text or numbers presentChal-Tec UK limited.
Unit 6 Riverside Business Centre
Brighton Road
Shoreham-by-Sea
BN43 6RE
Reino Unido
Cher client, chère cliente,
SOMMAIRE
natural_image
Line drawing of a mechanical device with handle and base components (no text or symbols)natural_image
Line drawing of a mechanical lever or lever device (no text or symbols)natural_image
Technical line drawing of two identical mechanical devices with handles and control knobs (no text or symbols)natural_image
Line drawing of a projector with a circular dial and control panel (no text or symbols)natural_image
Symbol of a trash bin crossed with a diagonal line, no text or numbers presentUnit 6 Riverside Business Centre
Brighton Road
Shoreham-by-Sea
BN43 6RE
Royaume Uni
Gentile cliente,
INDICE
natural_image
Line drawing of a mechanical device with handle and base components (no text or symbols)natural_image
Line drawing of a mechanical lever or lever device (no text or symbols)natural_image
Technical line drawing of two identical mechanical devices with handles and control knobs (no text or symbols)natural_image
Line drawing of a projector with a circular dial and control panel (no text or symbols)natural_image
Symbol of a trash bin crossed with a diagonal line, no text or numbers presentPRODUTTORE E IMPORTATORE (UK)
Produttore:
Chal-Tec GmbH, Wallstraße 16, 10179 Berlino, Germania.
Unit 6 Riverside Business Centre
Brighton Road
Shoreham-by-Sea
BN43 6RE
Regno Unito

area
| Category | Value | |---|---| | 1 | 100 | | 2 | 100 | | 3 | 100 | | 4 | 100 | | 5 | 100 | | 6 | 100 | | 7 | 100 | | 8 | 100 | | 9 | 100 | | 10 | 100 | | 11 | 100 | | 12 | 100 | | 13 | 100 | | 14 | 100 | | 15 | 100 | | 16 | 100 | | 17 | 100 | | 18 | 100 | | 19 | 100 | | 20 | 100 | | 21 | 100 | | 22 | 100 | | 23 | 100 | | 24 | 100 | | 25 | 100 | | 26 | 100 | | 27 | 100 | | 28 | 100 | | 29 | 100 | | 30 | 100 | | 31 | 100 | | 32 | 100 | | 33 | 100 | | 34 | 100 | | 35 | 100 | | 36 | 100 | | 37 | 100 | | 38 | 100 | | 39 | 100 | | 40 | 100 | | 41 | 100 | | 42 | 100 | | 43 | 100 | | 44 | 100 | | 45 | 100 | | 46 | 100 | | 47 | 100 | | 48 | 100 | | 49 | 100 | | 50 | 100 | | 51 | 100 | | 52 | 100 | | 53 | 100 | | 54 | 100 | | 55 | 100 | | 56 | 100 | | 57 | 100 | | 58 | 100 | | 59 | 100 | | 60 | 100 | | 61 | 100 | | 62 | 100 | | 63 | 100 | | 64 | 100 | | 65 | 100 | | 66 | 100 | | 67 | 100 | | 68 | 100 | | 69 | 100 | | 70 | 100 | | 71 | 100 | | 72 | 100 | | 73 | 100 | | 74 | 100 | | 75 | 100 | | 76 | 100 | | 77 | 100 | | 78 | 100 | | 79 | 100 | | 80 | 100 | | 81 | 100 | | 82 | 100 | | 83 | 100 | | 84 | 100 | | 85 | 100 | | 86 | 100 | | 87 | 100 | | 88 | 100 | | 89 | 100 | | 90 | 100 | | 91 | 100 | | 92 | 100 | | 93 | 100 | | 94 | 100 | | 95 | 100 | | 96 | 100 | | 97 | 100 | | 98 | 100 | | 99 | 100 | | Note: The actual values in the 'Value' column are not provided in the code. I have used the label 'The Region' to represent the 'Region'. The values are estimated based on the provided code.
KLARSTEIN

- INHALTSVERZEICHNIS
- Dear Customer,
- CONTENT
- SAFETY INSTRUCTIONS
- CAUTION
- DEVICE OVERVIEW
- CONTROL PANEL
- OPERATION
- First use/preparation of the still-cold coffee machine
- Brew an espresso
- Milk foam function
- Hot water function
- Additional function - memory function
- Cooling function
- Decalcification
- CLEANING AND MAINTENANCE
- TROUBLESHOOTING
- DISPOSAL CONSIDERATIONS
- MANUFACTURER & IMPORTER (UK)
- Manufacturer:
- Importer for Great Britain:
- Estimado cliente:
- ÍNDICE
- Cher client, chère cliente,
- SOMMAIRE
- Gentile cliente,
- INDICE
- PRODUTTORE E IMPORTATORE (UK)
- Produttore:
- KLARSTEIN
Brand : Klarstein
Model : Pausa
Category : Coffee machine