
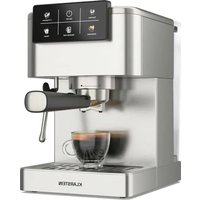
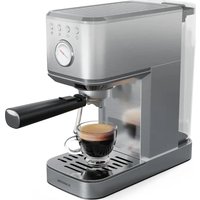
SteelPresso Touch Slim - Coffee machine Klarstein - Free user manual and instructions
Find the device manual for free SteelPresso Touch Slim Klarstein in PDF.

| Product Type | Espresso Coffee Machine |
| Brand | Klarstein |
| Model | SteelPresso Touch Slim |
| Article Number | 10046328, 10046330, 10046331 |
| Power Supply | 220-240 V ~ 50/60 Hz |
| Power | 1350 W |
| Dimensions (W x D x H) | 15,6 x 31 x 31,7 cm |
| Total Weight | 3,6 kg |
| Water Tank | Removable, with MAX level mark |
| Functions | Hot espresso (1 or 2 cups), Cold espresso, Americano, Steam for milk frothing |
| Filters | 2 filters (1 cup and 2 cups) made of stainless steel |
| Steam Wand | Rotating, for milk frothing |
| Control Panel | Touch buttons with indicator lights |
| Drip Tray | Removable, grid included |
| Cleaning | Manual cleaning of parts; do not put in dishwasher |
| Accessories Included | Measuring spoon, tamper, portafilter |
| Safety | Mandatory grounding, splash-proof protection |
| Usage | Flat and stable surface, do not immerse |
Frequently Asked Questions - SteelPresso Touch Slim Klarstein
User questions about SteelPresso Touch Slim Klarstein
0 question about this device. Answer the ones you know or ask your own.
Ask a new question about this device
Download the instructions for your Coffee machine in PDF format for free! Find your manual SteelPresso Touch Slim - Klarstein and take your electronic device back in hand. On this page are published all the documents necessary for the use of your device. SteelPresso Touch Slim by Klarstein.
USER MANUAL SteelPresso Touch Slim Klarstein
Berlin Brands Group UK Limited
PO Box 42
272 Kensington High Street
London, W8 6ND
United Kingdom
Dear Customer,
Congratulations on purchasing this device. Please read the following instructions carefully and follow them to prevent possible damages. We assume no liability for damage caused by disregard of the instructions and improper use. Scan the QR code to get access to the latest user manual and more product information.

CONTENTS
Safety instructions 18
Product Description 20
Operation 22
Cleaning and Maintenance 27
Troubleshooting 29
Disposal Considerations 30
Manufacturer & Importer (UK) 30
TECHNICAL DATA
| Item number | 10046328, 10046330, 10046331 |
| Power supply | 220-240 V ~ 50/60 Hz |
| Power consumption | 1350 W |
| Dimensions (LxWxH) 15.6x31x31.7cm | |
| Total weight 3,6 kg |
SAFETY INSTRUCTIONS
General safety
- Read the manual carefully before use and keep the manual for future reference.
- Only use the appliance and the accessories for their intended purposes and do not use the appliance and the accessories for other purposes than described in the manual.
- Do not use the appliance if any part or any accessory is damaged or defective. If a part or an accessory is damaged or defective, it must be replaced by the manufacturer or an authorised repair agent.
- Children should be supervised to ensure that they do not play with the appliance.
- The use of this appliance by children or persons with a physical, sensory, mental or motorial disability, or lack of experience and knowledge can give cause to hazards. Persons responsible for their safety should give explicit instructions or supervise the use of the appliance.
- Do not use the appliance near bathtubs, showers, basins or other vessels containing water.
- Do not immerse the appliance in water or other liquids.
- If the appliance is immersed in water or other liquids, do not remove the appliance with your hands. Immediately remove the mains plug from the wall socket. If the appliance is immersed in water or other liquids, do not use the appliance again.
- This appliance is intended to be used in domestic and similar applications such as staff kitchen areas in shops, offices and other working environments; farm houses; by clients in hotels, motels and other residential type environments; bed-and-breakfast type environments.
Electrical safety
- Before use, always check that the mains voltage is the same as the voltage on the rating plate of the appliance.
- The appliance is not intended to be operated by means of an external timer or separate remote-control system.
- Connect the appliance to an earthed wall socket. If necessary, use an earthed extension cable of a suitable diameter (at least 3 × 1 ~mm^2 ).
- Make sure that water cannot enter the contact plugs of the mains cable and the extension cable.
- Always fully unwind the mains cable and the extension cable.
- Make sure that the mains cable does not hang over the edge of a worktop and cannot be caught accidentally or tripped over.
- Keep the mains cable away from heat, oil and sharp edges.
-
Do not use the appliance if the mains cable or the mains plug is damaged or defective. If the mains cable or the mains plug is damaged or defective, it must be replaced by the manufacturer, an authorised repair agent or by a qualified person.
-
Do not pull the mains cable to disconnect the mains plug from the mains.
- Disconnect the mains plug from the mains when the appliance is not in use, before assembly or disassembly and before cleaning and maintenance.
Safety instructions for coffee makers
- Do not use the appliance outdoors.
- Do not use the appliance in damp environments.
- Only use the appliance in frost-free environments if the appliance is filled with water.
- Place the appliance on a stable and flat surface.
- Place the appliance on a heat-resistant and splash-proof surface.
- Do not place the appliance on a hob.
- Do not place the appliance on hot surfaces or near open flames.
- Make sure that the appliance does not come into contact with flammable material.
- Keep the appliance away from heat sources.
- Be careful with hot water and steam to avoid burns.
- Store the appliance in a dry place when not in use. Make sure that children do not have access to stored appliances.
Disposal of packaging

WARNING
Danger of suffocation! Dispose of plastic packaging immediately so that children do not injure themselves.
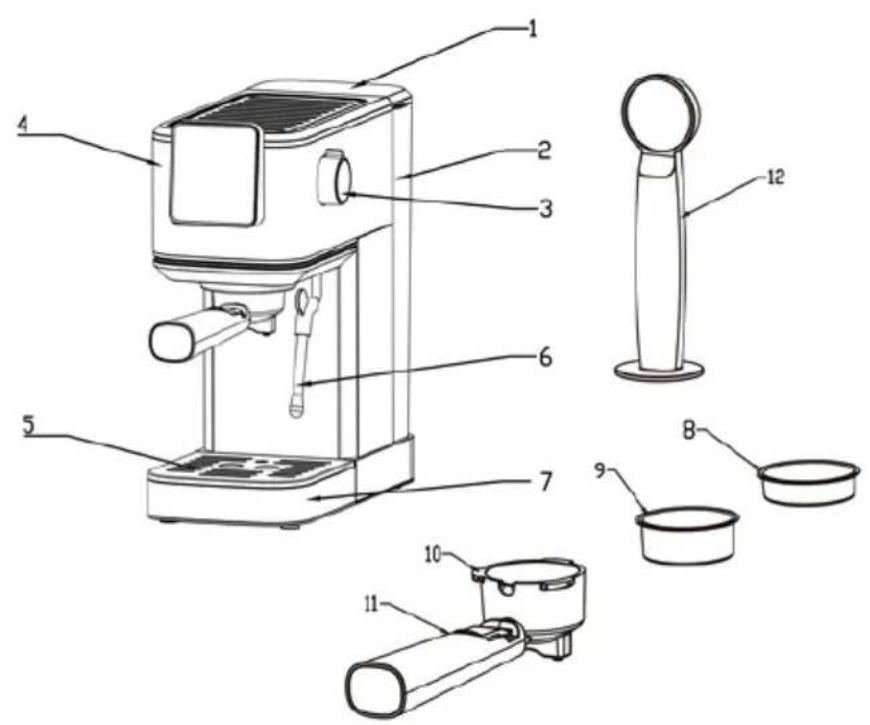
PRODUCT DESCRIPTION
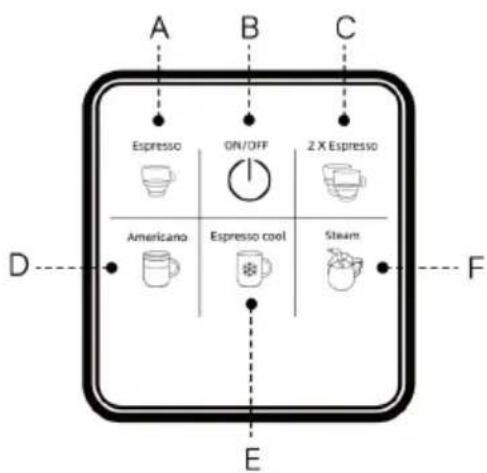
Control panel
1 Tank cover
A 1-shot hot espresso
2 Water tank
B ON/OFF
3 Steam knob
C 2-shot hot espresso
4 Control panel
D Americano
5 Cup plate E Espresso Cool
6 Steam nozzle
F Steam
7 Drip tray
8 1-Cup Filter
9 2-Cup Filter
10 Portafilter
11 Portafilter handle
12 Measure spoon and tamper
OPERATION
- Make sure that the espresso machine is switched off and unplugged from the mains.
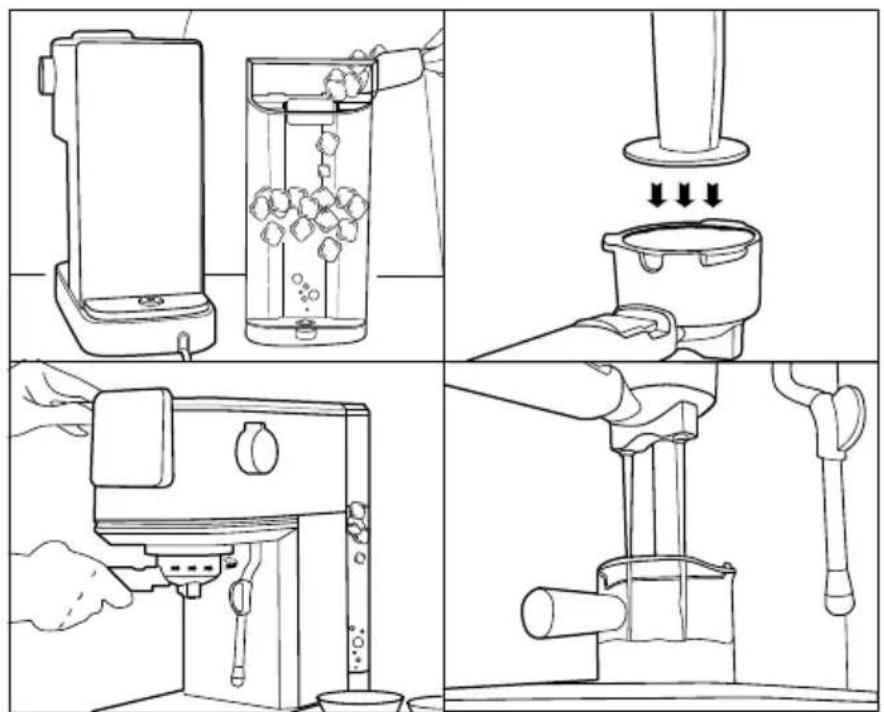
- Hold the water tank handle and remove the water tank.
- Fill the water reservoir with fresh, cold water. DO NOT exceed the maximum fill level marked "MAX".
- Reinsert the water tank to ensure that it is properly seated.
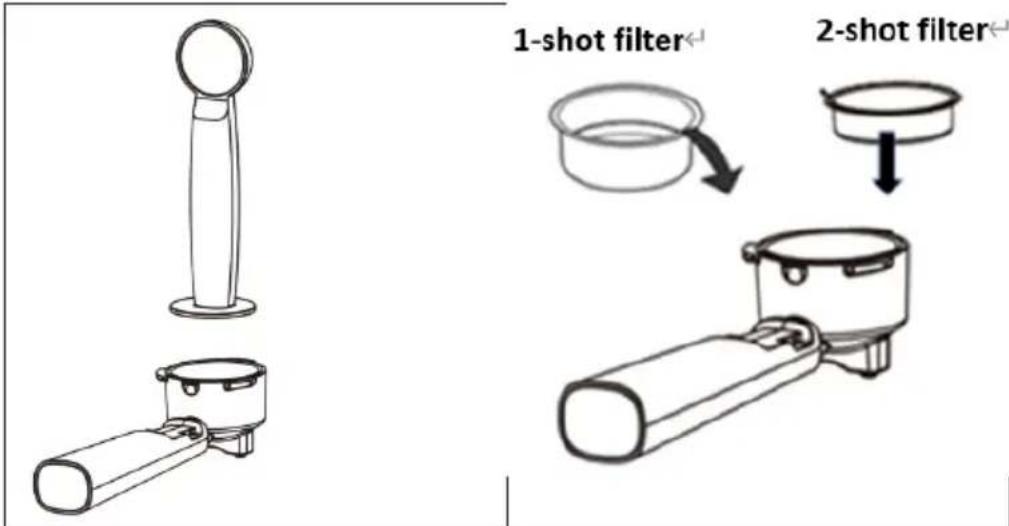
- Insert the filter in the portafilter. Pour the espresso powder into the brewing unit using the measuring spoon provided. The pressure in the filter is as important for a good espresso as the type of coffee and the degree of grinding. Always ensure that the filter is clean and free of ground coffee residue.
- If the grind is too fine, there will be over-extraction and bitterness, with a patchy and uneven cream on top.
- If the grind is too coarse, the water will pass through too quickly and there will not be enough cream on top of the espresso.
- If necessary, add more espresso powder to fill the filter.
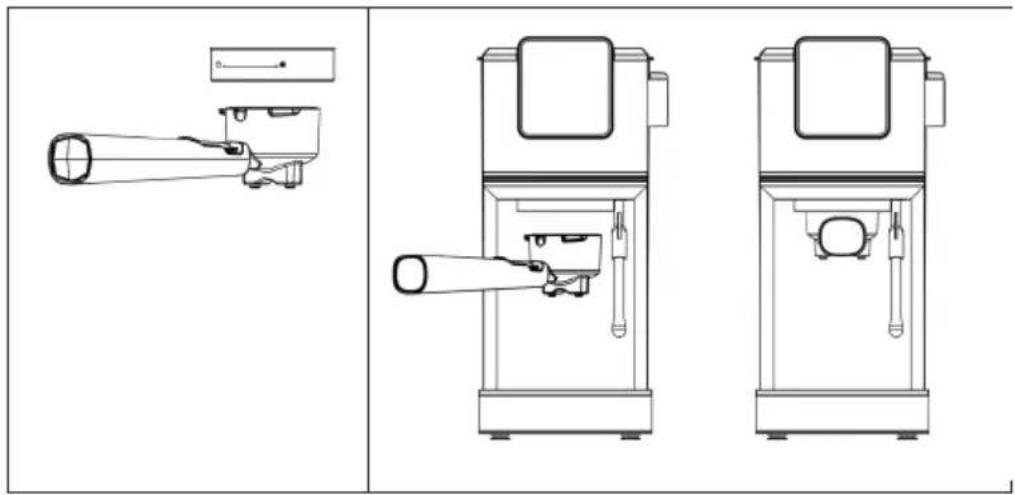
- Compress the espresso powder again with the tamper.
- Wipe off any excess coffee from the rim to ensure a good fit under the brewing head and to avoid leaks.
- Compacting the espresso powder is an important part of the espresso preparation process.
- If the espresso powder is compressed very tightly, the espresso will flow slowly and there will be more cream.
- If the espresso powder is not compressed very tightly, the espresso will flow more quickly and there will be less cream.
- Attach the portafilter to the brew head. Slide the handle to the left, then turn the handle to the right until it clicks into place. Release the handle, the portafilter should sit securely in the brew head and face forward at a 90^ angle.
- Place one or two pre-heated cups under the coffee spout.
- After plugging in, press the ON/OFF button, all indicators will be stable.
Espresso Cool
Drop the ice cubes in the water tank, press the "Espresso Cool" button for cool espresso, the longest time is 19 seconds.
Tip: Always use iced water for the best results.
Single-shot hot espresso
- Press the "Hot espresso" button and the indicator light will start flashing, indicating that the machine is heating up the heating system.
- When the indicator light is steady, the internal components are heated and ready to brew coffee, the longest time is 17 seconds.
Double-shot hot espresso
- Press the "Hot espresso" button and the indicator light will start flashing, indicating that the machine is heating up the heating system.
- When the indicator light is steady, the internal components are heated and ready to brew coffee, the longest time is 25 seconds.
Tips
- The ideal pour is dark and caramel-coloured with reddish reflections.
After brewing hot espresso, allow the machine to cool for 15 minutes before making cold brew espresso. - Turn the steam knob to "ON" to release hot water to cool the machine. After a while turn the steam knob to "OFF". The coffeemaker is ready to use again.
Americano
- Press the button "Americano", the light is flashing which indicates that the machine is preheating.
- When the light stops flashing and remains on steadily, the machine is ready to brew coffee and pour coffee, the longest time is 41 seconds.
Steamfunction
You can do two things with "steam". You can heat the milk or mix the air with the milk to create a frothy texture. But you have to be patient if you want the milk texture to be perfect.
- Determine the amount of milk needed based on the number of cups you will be making.
Note: Remember that the volume of milk will increase during the texturing process.
- Pour cold, chilled milk into the stainless steel frothing pitcher about 1/3 full.
- When you press the steam button, it will flash. It will stabilise when it's ready to use.
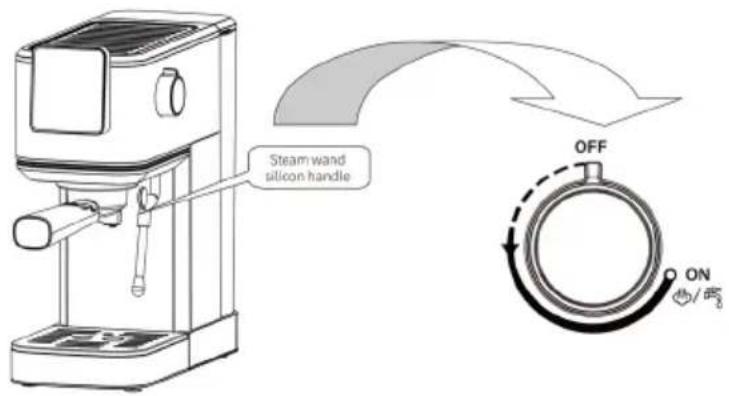
- Clean the water on the steam wand. The steam function is activated by
turning the steam control knob to on. You can turn the control knob to the OFF position when there is no more water.
- Turn the steam wand to the side of the machine.
- Place the steam wand in the milk so that the nozzle is about 1 cm below the surface and activate the steam function by pressing the STEAM button and turning the STEAM control knob to the ON position.
- Turn the cup so that the steam wand is in contact with the nozzle and lower the cup until the tip of the steam wand is just below the surface of the milk. This will start the frothing process in the milk.
Note: Do not allow the steam to spray unevenly, as this will produce aerated foam/bubbles. If this happens, raise the cup to lower the steam nozzle further into the milk.
- As the steam heats and textures the milk, the level of milk in the cup will begin to rise. As this happens, follow the level of the milk by lowering the cup, always keeping the tip of the steam nozzle just below the surface.
- When the froth has formed, raise the cup until the steam spout is in the centre of the milk.
Note: Each drink requires a different amount of froth. For example, a cappuccino needs more foam than a latte.
- You must turn the steam knob to "OFF" to stop the steam immediately.
Note: Do not boil the milk.
- Remove the cup, wipe the steam wand and nozzle with a clean, damp cloth and immediately release a small amount of steam.
Make Cappucino/ Frothed milk
You get a cup of cappuccino when you add foamed milk to a cup of espresso.
- Prepare an espresso using a large enough container as described in the "Hot Espresso" section, making sure that the steam knob is in the OFF position.
- Press the steam warm-up button, the coffee button indicator will go out, wait until the steam warm-up button indicator lights up.
- Fill the milk container with about 200ml of milk for the cappuccino to be prepared, it is recommended to use whole milk at refrigerator temperature (not hot!).
Note: Remember that milk doubles in volume, so make sure that the height of the milk container is sufficient.

Note: The milk container is not included in the scope of delivery and can be purchased separately (article number: 10046331).
- Slowly turn the steam knob anti-clockwise, steam will come out of the frother.
Note: Never turn the steam knob quickly, as steam will build up rapidly in a short time, increasing the risk of explosion.
- Insert the steam nozzle into the rubber tube, froth the milk by moving the container up and down (you could adjust the bubble to adjust the knob of the milk tank).
- When the desired result is achieved, turn the steam control knob to the OFF position.
Note: Clean the steam outlet with a wet sponge immediately after the steam production stops, but be careful not to injure yourself!
- Pour the frothed milk into the prepared espresso, the cappuccino is now ready. Sweeten to taste and sprinkle with cocoa powder if desired.
- Press the power button to switch off the machine. All indicators will go out.
Note: If you wish to make coffee immediately after making steam, the Coffee indicator will flash as an alarm when the Coffee button is touched, at this time you should turn the steam control knob to the ON position to pump hot water to allow the machine to cool down.
Cooling function
You must allow the machine to cool down if you want to make coffee again after frothing milk, or immediately after frothing milk or cleaning the steam pipe.
Otherwise the coffee will be burnt and splashed. You can continue making coffee after the machine has cooled down.
The temperature will be higher after cleaning the steam tube and frothing milk. To stop the steam function, press the special button. Turn the steam knob to "ON" to release hot water to cool the machine. After a while, turn the stream knob to "OFF". The coffeemaker is ready to use again.
CLEANING AND MAINTENANCE
During cleaning, the machine must be switched off and the plug unplugged. We strongly recommend that you do not immerse any part of the machine in water or other liquids. To clean, simply wipe with a clean damp cloth and dry before storing.
Cleaning the filters, filter holder and brew head
The stainless steel filters must be cleaned thoroughly. The filter holder should be rinsed under running water immediately after use to remove any coffee residue.
Periodically run water through the machine with the filter holder in place, but without ground coffee, to rinse out any remaining coffee grounds.
Use a damp, clean cloth to clean and wipe well inside the brew head to remove any coffee residue.
Cleaning the outer housing/cup warming plate
Do not use ordinary or aggressive cleaning agents to clean the outer casing. Use a soft, damp cloth to clean the outer casing and cup warming plate.
Cleaning the drip tray rack
The small rack must be removed, cleaned and emptied frequently, especially when the drip tray is full. The rack can be washed and rinsed thoroughly in warm, soapy water. Use a non-abrasive detergent (do not use abrasive cleaners, pads or cloths that may scratch the surface).
Cleaning the drip tray
The drip tray must be removed when the stand is removed. Then clean it with a soft, damp cloth (do not use abrasive cleaners or scouring agents).
Note: Do not clean any parts or accessories in a dishwasher.
Cleaning the steam wand
You will need to clean the steam wand after steaming milk. Use a damp cloth to wipe the steam wand and then turn the steam wand back into the drip tray, facing back into the drip tray, you must briefly turn the steam control knob to on. This will release any remaining milk from inside the steam wand. Make sure the steam wand knob is in the OFF position. Switch off the machine, unplug the power cord and allow the machine to cool down. If the steam wand remains blocked, use the piercing tool to clean the opening.
TROUBLESHOOTING
| Problem Possible Cause | Use Suggested Solution | |
| No coffee pouring | No water in the water tank fill the tank with water, run through the appliance without a coffee filter to ensure it is fully primed | Empty the filter and rinse under water to clean, Wipe the filter with a cloth. Refill the filter with grinds and tamp |
| The coffee grounds are too fine or tamped down too hard | ||
| No steam from the Steam wand | Steam Nozzle tube is blocked | Check “If the steam outlet becomes blocked” |
| No water in the water tank fill the tank with water, run hot water through the Steam Nozzle to ensure water flows | ||
| Water is leaking from the bottom of the machine | Too much water in the drip tray | Clean out the drip tray |
| Water is leaking from the outer side of the filter | There is some ground coffee on edge of filter | Clean it off |
| Tainted taste to the coffee | Allowing water to sit too long, improper cleaning | Clean and de-scale |
| Low or no steam from the steam wand | Steam Nozzle is clogged up | Clean and de-scale |
| Poor milk frothing Skimmed milk was used It is best to use full fat milk | ||
DISPOSAL CONSIDERATIONS
If there is a legal regulation for the disposal of electrical and electronic devices in your country, this symbol on the product or on the packaging indicates that this product must not be disposed of with household waste. Instead, it must be taken to a collection point for the recycling of electrical and electronic equipment. By disposing of it in accordance with the rules, you are protecting the environment and the health of your fellow human beings from negative consequences. For information about the recycling and disposal of this product, please contact your local authority or your household waste disposal service.
MANUFACTURER & IMPORTER (UK)
Manufacturer:
Chal-Tec GmbH, Wallstrasse 16, 10179 Berlin, Germany.
Importer for Great Britain:
Berlin Brands Group UK Limited
PO Box 42
272 Kensington High Street
London, W8 6ND
United Kingdom
Estimado cliente:
Berlin Brands Group UK Limited
PO Box 42
272 Kensington High Street
London, W8 6ND
United Kingdom
Cher client, chere clientele,
Berlin Brands Group UK Limited
PO Box 42
272 Kensington High Street
London, W8 6ND
United Kingdom
Gentile clientele,
Berlin Brands Group UK Limited
PO Box 42
272 Kensington High Street
London, W8 6ND
United Kingdom


KLARSTEIN


- Dear Customer,
- CONTENTS
- TECHNICAL DATA
- SAFETY INSTRUCTIONS
- General safety
- Electrical safety
- Safety instructions for coffee makers
- Disposal of packaging
- WARNING
- PRODUCT DESCRIPTION
- OPERATION
- Espresso Cool
- Single-shot hot espresso
- Double-shot hot espresso
- Tips
- Americano
- Steamfunction
- Make Cappucino/ Frothed milk
- Cooling function
- CLEANING AND MAINTENANCE
- Cleaning the filters, filter holder and brew head
- Cleaning the outer housing/cup warming plate
- Cleaning the drip tray rack
- Cleaning the drip tray
- Cleaning the steam wand
- TROUBLESHOOTING
- DISPOSAL CONSIDERATIONS
- MANUFACTURER & IMPORTER (UK)
- Estimado cliente:
- Gentile clientele,
Brand : Klarstein
Model : SteelPresso Touch Slim
Category : Coffee machine