
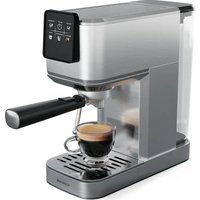
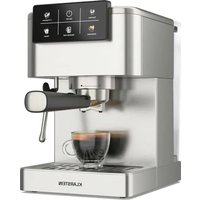
Furore - Coffee machine Klarstein - Free user manual and instructions
Find the device manual for free Furore Klarstein in PDF.

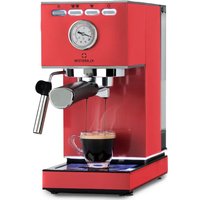
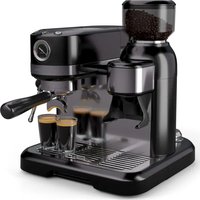
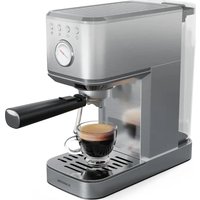
| Product type | Espresso coffee machine |
| Brand | Klarstein |
| Model | Furore |
| Power supply | 220-240 V ~ 50/60 Hz |
| Power | 1150-1360 W |
| Pressure | 20 bar |
| Water tank capacity | 0.9 L |
| Coffee type | Ground coffee |
| Functions | Espresso, cappuccino, hot water, milk frother |
| Milk frother | Integrated steam nozzle |
| Cup warming plate | Yes |
| Drip tray | Removable |
| Included filters | 1 cup and 2 cups |
| Measuring spoon with tamper | Included |
| Recommended descaling | Every 2-3 months |
| Cleaning | Removable parts washable with water |
| Item numbers | 10045525, 10045526 |
Frequently Asked Questions - Furore Klarstein
User questions about Furore Klarstein
0 question about this device. Answer the ones you know or ask your own.
Ask a new question about this device
Download the instructions for your Coffee machine in PDF format for free! Find your manual Furore - Klarstein and take your electronic device back in hand. On this page are published all the documents necessary for the use of your device. Furore by Klarstein.
USER MANUAL Furore Klarstein
INHALTSVERZEICHNIS
natural_image
Line drawing of a coffee machine with lever and control panel (no text or symbols)
natural_image
Simple line drawing of a rectangular box with a label pointing to its side (no text or symbols present)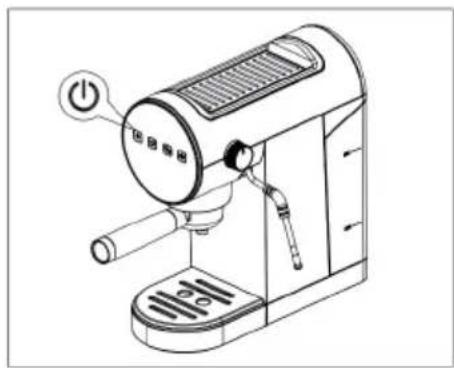
natural_image
Diagram of a mechanical assembly with a cylindrical component and a base component, showing an arrow indicating assembly direction (no text or symbols present)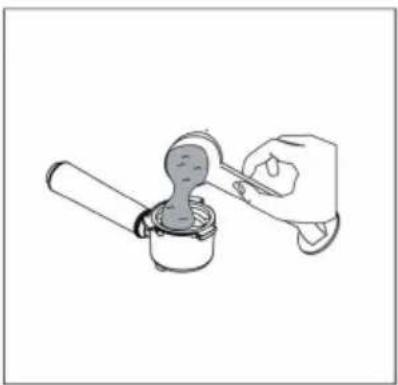
natural_image
Line drawing of a hand using a tool to adjust a small object into a cylindrical container (no text or symbols)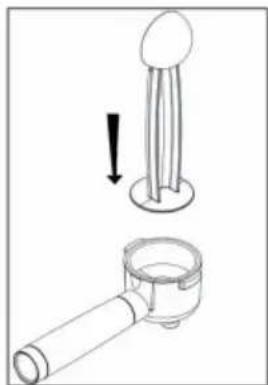
natural_image
Diagram showing a mechanical device with a lever and a pin, both without any text or symbols.natural_image
Line drawing of a coffee machine with a cup and lever (no text or symbols)b) Kaff eemenge pro Tasse einstellen

natural_image
Line drawing of a coffee maker with lever and cup (no text or symbols)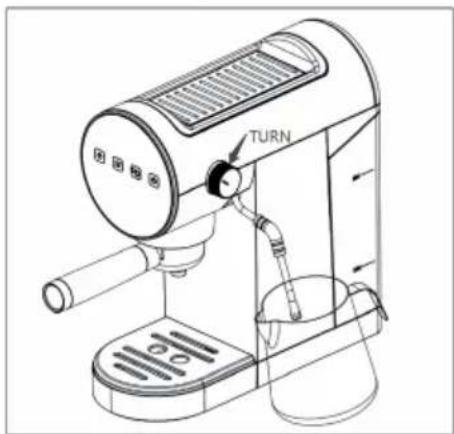
natural_image
Line drawing of a coffee maker with lever and cup (no text or symbols)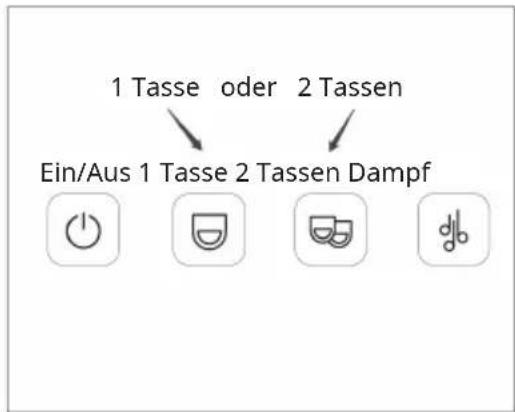
natural_image
Symbol of a trash bin crossed with a diagonal line, no text or numbers presentBerlin Brands Group UK Limited
PO Box 42
272 Kensington High Street
London, W8 6ND
United Kingdom
Congratulations on your purchase. Please read the following instructions carefully and follow them to prevent potential damage. We accept no liability for damage caused by disregarding the instructions and improper use. Please scan the QR code to access the latest operating instructions and further information about the product.

CONTENTS
Safety instructions 24
Device overview 26
Control panel 27
Installation 27
Getting started 28
Operation 30
Cleaning and care 35
Troubleshooting 37
Disposal considerations 40
Manufacturer & importer (UK) 40
TECHNICAL DATA
| Article number 10045525, 10045526 | |
| Power supply 220-240 V ~ 50/60 Hz | |
| Power 1150-1360 watts | |
| Water tank capacity 0.9 litres | |
| Pressure 20 bar |
SAFETY INSTRUCTIONS
- Read these operating instructions carefully to avoid hazards from physical damage, fire, electric shock, injury, and property damage.
- Keep these operating instructions. If the device is passed on to other people, they must also be given these operating instructions.
- This device is intended for the preparation of coffee using a pressure filter ("espresso") or hot water and for heating milk using steam and is intended exclusively for indoor domestic use.
- Never use the hot water/steam spout to froth beverages other than milk. Any other use is considered improper and therefore dangerous.
- Children from the age of 8 years and mentally, sensory and physically impaired persons may only use the device if they have been informed in detail about the functions and safety precautions by a supervisor responsible for them beforehand and understand the associated risks.
- Keep all packaging (plastic bags, styrofoam) out of the reach of children.
• After removing the packaging, ensure that the product is complete, undamaged and that all accessories are present. Do not use the device if it is visibly damaged. - Make sure that the socket you are using is freely accessible at all times so that you can unplug the device from the socket if necessary.
- Only pull the plug directly out of the mains socket. Never pull on the cord, as you may damage it.
- If the device is defective, do not attempt to repair it. Switch it off, pull the plug out of the mains socket and contact the manufacturer, customer service or a qualified specialist company.
- Servicing is required when the device has been damaged in any way, such as when the power supply cord or plug is damaged, liquid has been spilled or objects have fallen into the device, the device has been exposed to rain or moisture, or does not operate normally.
- Please use only the accessories recommended by the manufacturer of this device to ensure proper functioning of the device.
- Before using the device, make sure that the water tank of the appliance is always filled with the required amount of water for the intended application to avoid damage to the appliance.
- Only fill the water tank with drinking water.
- Keep away from the hot steam coming out of the appliance. When moving hot components of the appliance, such as the frother or the filter, only use the handles or levers attached to the appliance or its components.
- Before cleaning the device, switch it off, unplug it from the socket and let it cool down.
- To avoid electrical damage to the device, do not immerse the unit in water for cleaning.
- Do not touch the plug of the device with wet or damp hands. Moisture from your hands can bead up on the plug and cause a dangerous electric shock if it comes in contact with the outlet.
-
Supervise the device during operation.
-
Keep the device and its components dry, clean and out of reach of unauthorised persons.
- Supervise children while they are playing near the appliance to protect them from harm.
- Unplug the appliance from the mains outlet when not in use.
CAUTION
Risk of injury! Allow the appliance to cool completely before cleaning and before moving the appliance or any part of it. This will prevent burning on hot surfaces and injury from hot liquid.
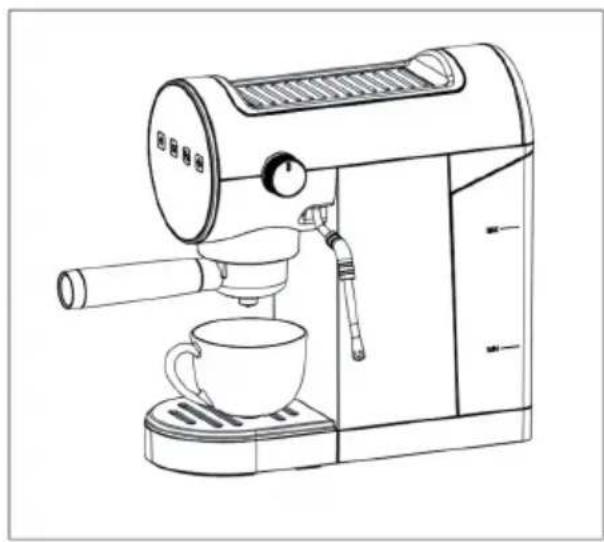
DEVICE OVERVIEW
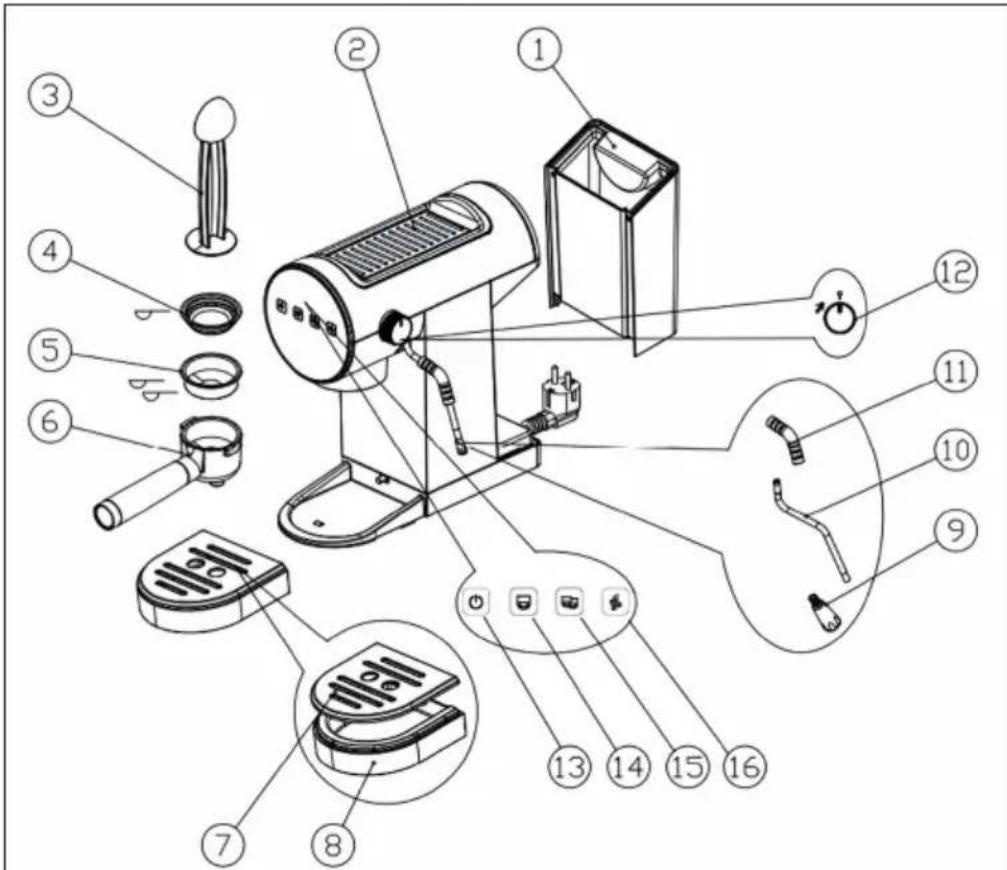
| 1 Removable water tank 9 Steam nozzle | ||
| 2 Hot plate for warming up cups 10 Steam pipe | ||
| 3 Measuring spoon with integrated tamper | 11 Anti-scald tube | |
| 4 Small filter sieve for 1 cup 12 Steam/water dial | ||
| 5 Large filter sieve for 2 cups 13 On / off button | ||
| 6 Portafilter 14 1 cup button | ||
| 7 Drip tray (cup rack) 15 2 cups button | ||
| 8 Drip tray 16 Steam button |
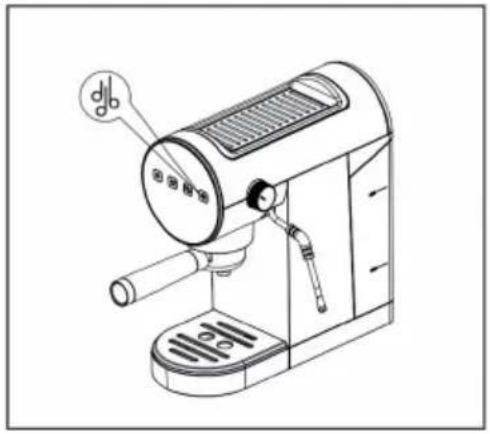
CONTROL PANEL

INSTALLATION
Installation instructions
When installing the device, follow the safety instructions below:
- Do not place the device near water taps or sinks. Water entering the espresso machine can cause damage.
- Do not place the device in a room where the temperature can drop below freezing. The device may be damaged if the water it contains freezes.
- Lay the mains cable in such a way that it cannot be damaged by sharp edges or come into contact with hot surfaces (e.g. electric hotplates).
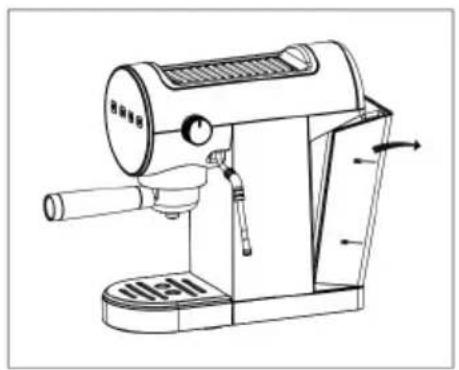
- The device emits heat. After placing the device on the worktop, leave a gap of at least 3 cm between the device surfaces and the side and rear walls and at least 15 cm above the device.
- Clean all detachable parts with clear water.
Connecting the device
- Make sure that the mains voltage corresponds to the voltage specified on the rating plate on the bottom of the device. Plug the device into a properly grounded and properly installed outlet. If the outlet does not match the device plug, have a qualified professional replace the outlet with an appropriate type.
GETTING STARTED
Filling the water tank
Before first use, clean all the accessories and the water tank with warm water.
- Pull the tank out backwards.
- Fill the tank with fresh, clean water, making sure not to exceed the MAX level. Insert the water tank back into the device.
natural_image
Line drawing of a coffee machine with handle and spout (no text or symbols)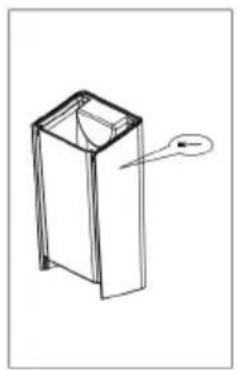
natural_image
Simple line drawing of a rectangular box with a label pointing to its side (no text or symbols present)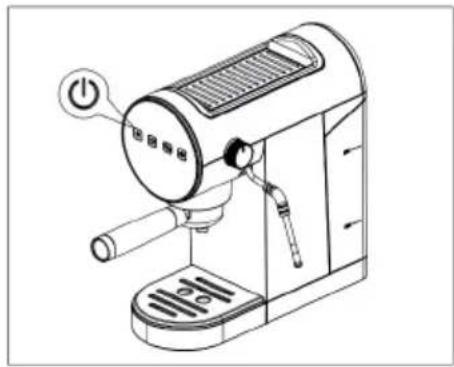
natural_image
Line drawing of a coffee maker with a power button and lever (no text or symbols)Important notes on use
- Never operate the device without water in the tank or without the tank.
- Fill with soft drinking water or filtered water, hard water will shorten the life of the espresso machine. Do not put chemical cleaning agents in the tank.
- It is normal for water to collect in the area under the water tank. This area should therefore be regularly wiped dry with a clean sponge.
Initial start-up
- On first use, when you press the "On/Off" button, all LED lights will flash and beep. Press the "1 cup" button or the "2 cup" button to stop the warning for missing water in the espresso machine. A small amount of water may escape during this process. Place a cup under the spout to avoid splashing water.
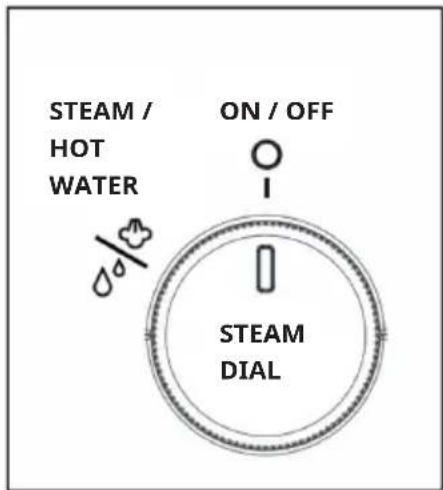
Note: If no water comes out, open the steam knob after preheating the unit.
When using for the first time, flush the internal circuit of the espresso machine as follows:
- Fill the water tank as described.
- After switching on, the device performs a self-diagnostic cycle, indicated by the four buttons flashing for 2 seconds.
-
Press the "On/Off" button, the "1 cup" and "2 cups" lights will flash to indicate that the device is heating up.
-
Press the "Steam" button and turn the steam control to release the remaining air. Keep this process going for at least 30 seconds when you are using the device for the first time or have not used it for a long time.
Note: The residual air inside can cause the device to not work properly!
- Turn off the steam regulator and press the "On/Off" button for the next step.
- Attach the portafilter to the device.
- Press the "On/Off" button, place a container with a capacity of at least 500 ml under the water outlet and press the "2 cups" button when the lights are on steadily. Repeat this process 5 times.
OPERATION
1. Preparation of an espresso coffee
a) Preparation of a hot espresso coffee
- It is recommended to warm up the cups before making coffee by rinsing them with some hot water.
- Attach the portafilter to the machine with the filter sieve inserted, but without the ground coffee. Press the "1 cup" button and pour hot water into the cup to warm it up. Use the same cup that you will later use to make coffee.
- Place the cups you want to use on the cup warmer plate, which will get hot during use.
b) Preparation of an espresso coffee with coffee powder
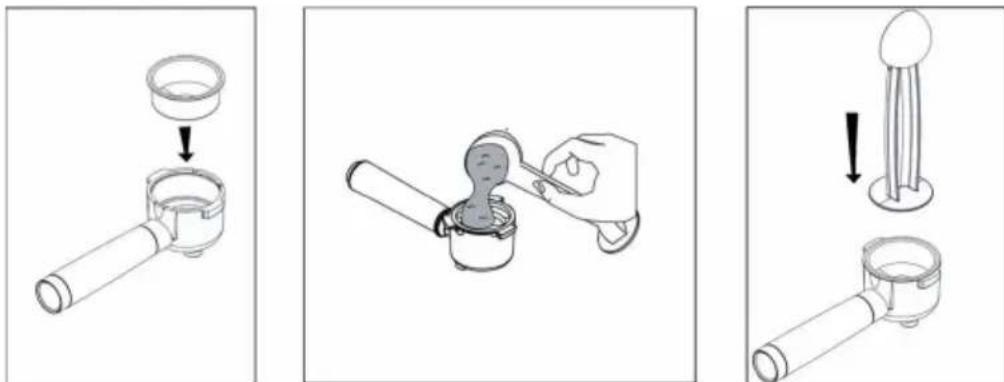
- Place the ground coffee filter in the portafilter.
• To brew a coffee, use the filter sieve with the "1 cup" symbol on the bottom. To prepare two coffees, use the filter with the "2 cups" symbol on the bottom.
Note: The shortest delivery time is 8 seconds (around 20 ml water), the longest delivery time is 60 seconds (around 250 ml water).
• To prepare just one coffee, place a level spoonful of ground coffee in the filter sieve. To prepare two coffees, place two loosely filled spoons of ground coffee in the filter sieve. Fill the filter sieve gradually so that the coffee powder does not trickle over the edge.
Note: For smooth operation, make sure that there are no coffee residues from the last coffee preparation in the filter before filling with ground coffee.
- Distribute the coffee powder evenly and press it lightly into the filter sieve with the tamper.
-
Pressing the pre-ground coffee correctly is crucial for a good espresso. If you press too hard, the coffee will be slow and too strong. If you press too lightly, the coffee will come out quickly and be too weak.
-
Remove excess coff ee from the rim of the portafi lter and insert the portafi lter into the machine. To install correctly, align the portafi lter handle with the "unlocked" symbol, insert the portafi lter and turn the handle to the right until it aligns with the "locked" symbol.
- Place the cup(s) under the portafi Iter spout.
• Make sure the "1 cup" light and "2 cups" light are on, then press the "1 cup" button or the "2 cups" button. The machine starts preparing the coffee and dispensing is automatically interrupted.
• To remove the portafi lter, turn the handle from right (locked) to left (unlocked).

CAUTION
Burn risk! To avoid splashing, never remove the portafi Iter while the machine is brewing coffee. Always wait a few seconds after dispensing.

natural_image
Line drawing of a coffee maker with a cup and side arm (no text or symbols)b) Set the amount of coffee per cup
The machine is factory set to automatically dispense standard amounts. To change these amounts, do the following:
- Prepare the espresso coffee as described in the previous section.
- Place the cup(s) under the portafi Iter spout.
- Press and hold the "1 cup" button or the "2 cups" button, whichever you wish to program. The coff ee maker will start dispensing coff ee.
-
Once the desired amount of coffee has been poured into the cup, release the pressed button. Dispensing will stop and the relevant light will flash to indicate the amount has been correctly stored.
-
When the "1 cup" light and the "2 cups" light are both solid, the machine is ready to use.
Note: The shortest delivery time is 8 seconds (around 20 ml water), the longest delivery time is 60 seconds (around 250 ml water).
c) Resetting the coffee quantity setting
If you want to delete the coffee quantity setting, please proceed as follows:
- Plug the device into the socket but do not press the "Power" button, all buttons will flash for 2 seconds.
- After all button lights are off, press and hold the "Steam" button for 3 seconds, then release the button when the device beeps.
- Immediately press the "2 cups" button. The machine will emit 5 beeps to indicate that the coffee amount has been reset.
- After the reset, all button lights will turn off. Press the "On/Off" button. A warning tone sounds. Press the "1 cup" button or the "2 cups" button to disable the warning sound. The espresso machine will dispense some water and switch back to normal operating mode.
2. Preparation of a cappuccino
- Prepare the espresso coffees as described in the previous sections and use sufficiently large cups.
- Press the "Steam" button, and the indicator light will turn on.
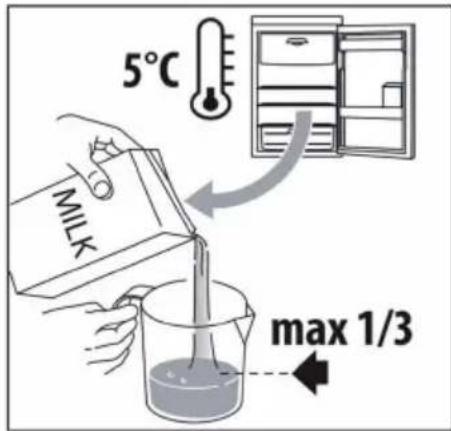
- In the meantime, fill a container with about 100 g of milk for each cappuccino to be prepared. To get a denser and more even foam, you should use whole milk at refrigerator temperature (approx. 5 °C). When choosing the size of the container, it should be noted that the volume of the milk doubles or triples.
- Place an empty container under the steam wand and open the steam dial for a few seconds to release any air remaining in the device. Close the dial again.
- Place the container with the milk under the steam pipe.
- Immerse the steam pipe in the milk container. Be careful never to submerge the black ring. Turn the dial to the ♦ (Steam) position. Steam escapes from the steam tube, making the milk creamy and frothy. For a creamier milk froth, dip the steam wand into the milk and turn the container with slow upward movements.
- When the desired temperature (ideally 60 °C) and the desired milk froth density have been reached, interrupt the steam supply by closing the steam dial again.
- Pour the frothed milk into the cups with the previously prepared espresso. The cappuccino is now ready. Sweeten the cappuccino to taste and sprinkle the milk froth with a little cocoa powder, if desired.
natural_image
Line drawing of a coffee maker with handle and cup (no text or symbols)
Instructions for preparing cappuccino
• To prepare more than one cappuccino, first prepare all the coffees and then the milk froth for all the cappuccinos.
- In order to prepare coffee again immediately after frothing the milk, the espresso machine must first cool down, otherwise the coffee will burn. We therefore recommend pressing the "1 cup" button or the "2 cups" button and draining off some hot water before making another cup of coffee.
- Be careful not to splash the hot water and steam coming out of the steam wand. Catch the water in a vessel.
- Stop the steam supply by pressing the "Steam" button and then turning off the steam regulator. Do not emit steam for more than 60 seconds.
Note: When the steam button is lit, the „1 cup“ or „2 cups“ function cannot be selected. Press the steam button again to exit the steam mode.
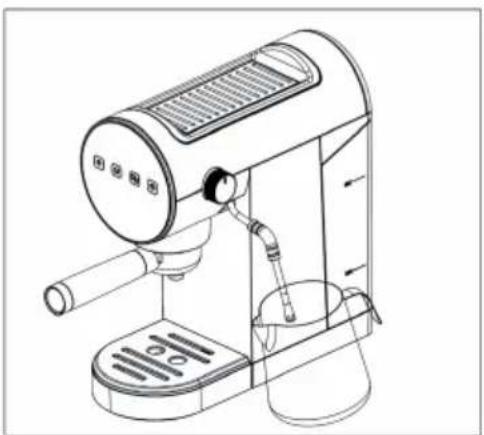
Preparation of hot water
- Switch the unit on by pressing the "On/Off" button.
- Make sure the "1 cup" button and "2 cups" button lights are on and turn the steam/water knob anti-clockwise to open the valve.
- Immediately press the "1 cup" button or the "2 cups" button to dispense water.
- Once the preset amount (1 or 2 cups) of hot water has been dispensed, turn the Steam/Water control dial clockwise to the off position to close the valve.
natural_image
Line drawing of a coffee maker with lever and cup (no text or symbols)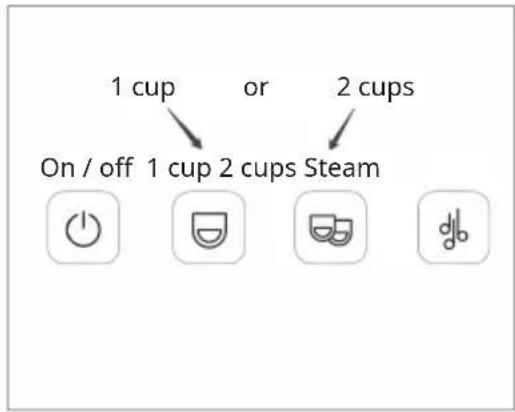
Note: When the steam button is lit, the „1 cup“ or „2 cups“ function cannot be selected. Press the steam button again to exit the steam/water mode.

CAUTION
Risk of burns and scalding! The water running out of the espresso machine is hot. If you are using a metal jug, the jug will also get hot.
- Press the "On/Off" button to switch off the device and unplug the power cord from the outlet when you are no longer using the device.
CLEANING AND CARE
WARNING
Risk of electrical shock! Never immerse the coff ee maker in water during cleaning. It is an electrical device.
- Do not use solvents, abrasives or alcohol to clean the espresso machine. Only clean the device and the accessories with a soft, damp cloth.
- Do not use metal objects to remove encrustations or coffee deposits, as these can scratch metal or plastic surfaces.
- If the device is not going to be used for more than a week, we strongly recommend that you carry out a rinsing cycle (as described in the "Getting started" section) before using it again.
Cleaning the espresso machine
- Fill the water tank to the MAX level.
- Plug the device into the socket but do not press the "Power" button, all buttons will flash for 2 seconds.
- After all lights are off, press and hold the "Steam" button for 3 seconds. Release the button when the espresso machine beeps.
- Immediately press the "1 cup" button, the machine will beep to indicate that the cleaning mode has started (without coffee powder). The temperature is regulated to 70 °C.
- The machine automatically pumps 100 ml of water at a time and stops after 5 minutes for one cycle. There are a total of 6 cycles (600 ml of water) for cleaning the coffee pipe.
- If no cleaning is required, you can turn off the device directly and exit the cleaning mode.
Descaling
Note: To ensure the pure taste of the coff ee, descale the coff ee maker after 2-3 months of use.
- Use a suitable descaler for coffee machines or use citric acid instead (water and citric acid in a ratio of 100:3).
- Fill the descaling solution into the water tank.
- Place a large container on the drip tray. Follow the same descaling procedure as you would for preparing coffee or hot water until the tank is empty.
- Rinse the water tank and fill it with water.
- Proceed again as for the coffee preparation and let the espresso machine pump water through the device to remove any residue of the descaling solution.
- Store the cleaned espresso machine without coff ee powder in the filter and with an empty water tank.
Cleaning the drip tray
Note: Pay attention to the amount of water in the drip tray. Before water overflows from the drip tray, the drip tray must be emptied and cleaned, otherwise the water may run over the rim and contaminate and damage the device, the surface it is standing on and the surrounding area. It is recommended to clean the drip tray every time you use the device.
To clean the drip tray, please proceed as follows:
- Remove the drip pan with the drip tray from the device.
- Remove the drip tray from the drip pan and clean both with a soft, damp cloth.
- Dry the drip tray and the drip pan with a soft cloth, put the drip tray back on the drip pan after cleaning and put both together back into the device.
Cleaning the filter sieves and portafilter
Clean the coffee filters regularly:
- Rinse the filter sieves under running water.
- Make sure the holes are not blocked. If necessary, use a needle to clean.
- Clean the portafilter with a soft damp cloth.
Cleaning the water tank
- Clean the water tank regularly (about once a month) with a damp cloth and a little mild washing-up liquid.
Cleaning the steam pipe (milk frother)
Note: For reasons of hygiene, the milk frother should always be cleaned after use.
Proceed as follows when cleaning:
- Turn up the steam dial to create some steam for a few seconds. This will drain any milk left in the espresso machine.
- Press the „On/Off“ button to switch off the device.
- Make sure the steam nozzle has cooled down before cleaning. Pull the steam nozzle off the steam pipe and rinse under running water to remove any milk residue. Be careful not to burn yourself on the hot steam nozzle.
TROUBLESHOOTING
| Problem Possible cause Solution | ||
| The espresso machine does not brew coffee. | Residual air in the device. | After heating up, open the steam dial as described in the "Getting started" section. |
| No water in the water tank. | Fill the water tank. | |
| The portafilter openings are clogged. | Clean the portafilter openings. | |
| The filter sieve is clogged. | Clean the filter sieves as described in the "Cleaning and care" section. | |
| The water tank has been installed incorrectly and the valves on the bottom are not open. | Press the water tank down slightly to open the valves at the bottom. | |
| Limescale deposits in the water cycle. | Descale the device as described in the "Cleaning and care" section. | |
| The espresso runs over the edges of the fixed portafilter and not out of the holes. | The portafilter has been inserted incorrectly or is dirty. | Insert the portafilter correctly and turn it until it stops. |
| The outlet openings of the portafilter are clogged. | Clean the portafilter outlet openings. | |
| The filter sieve is clogged. | Clean the filter sieves as described in the "Cleaning and care" section. | |
| The portafilter cannot be attached to the device. | Too much ground coffee has been put into the filter sieve. | Use the provided measuring spoon and make sure you use the correct filter sieve for the type of coffee you are brewing. |
| The machine does not make coffee and the button lights flash for a few seconds. | No water in the water tank. | Fill water into the water tank. |
| The water tank has been installed incorrectly and the valves on the bottom are not open. | Press the water tank down slightly to open the valves on the underside. | |
| The outlet of the espresso boiler is clogged. | Clean the espresso machine as described in the "Cleaning and care" section. | |
| The filter sieve is clogged. | Clean the filter sieves as described in the "Cleaning and care" section. | |
| Limescale deposits in the water cycle. | Descale the device as described in the "Cleaning and care" section. | |
| The coffee is too weak (it comes out of the espresso machine too quickly). | The ground coffee was not pressed firmly enough. | Press the ground coffee down harder. |
| Not enough ground coffee was used. | Use more ground coffee. | |
| The ground coffee is too coarse. | Only use ground coffee for espresso machines. | |
| The wrong type of ground coffee is being used. | Use different ground coffee. | |
| The coffee is too dark (it comes out of the espresso machine too slowly). | The ground coffee was pressed too firmly. | Do not press the coffee too firmly. |
| Too much ground coffee was used. | Use less ground coffee. | |
| The outlet of the espresso boiler is clogged. | Clean the device as described in the "Cleaning and care" section. | |
| The filter sieve is clogged. | Clean the device as described in the "Cleaning and care" section. | |
| The ground coffee is too fine. | Only use ground coffee for espresso machines. | |
| The ground coffee is too fine or too wet. | Only use coffee powder for espresso machines and make sure that it is not too moist. | |
| Limescale deposits in the water cycle. | Descale the device as described in the "Cleaning and care" section. | |
| Milk froth cannot be prepared with the device. | The milk is not cold enough. | Always use milk that is refrigerator temperature (5 °C). |
| The steam pipe or the steam nozzle is clogged. | Clean the device as described in the "Cleaning and care" section. | |
| Limescale deposits in the water cycle. | Clean the device as described in the "Cleaning and care" section. | |
| Steam is coming out of the coffee spout. | The steam button is still on. | Interrupt the steam output by first turning off the steam button. Then turn the steam dial to the off position. |
| The device does not work and all function button lights are flashing. | The device is defective Switch off the device immediately and pull the plug out of the socket. Contact customer service or a qualified specialist company. | |
Note: If you cannot find the cause of the malfunction, contact a specialist company and do not attempt to repair or disassemble the device yourself.
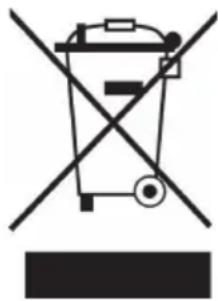
DISPOSAL CONSIDERATIONS
natural_image
Symbol of a trash bin crossed with a diagonal line, no text or labels presentIf there is a legal regulation in your country regarding the disposal of electrical and electronic equipment, this symbol on the product or on the packaging indicates that this product must not be disposed of with household waste. Instead, it must be taken to a collection point for the recycling of electrical and electronic equipment. By disposing of this product in accordance with the regulations, you are protecting the environment and the health of those around you from negative consequences. For information on recycling and disposal of this product, contact your local government or household waste disposal service.
MANUFACTURER & IMPORTER (UK)
Manufacturer:
Chal-Tec GmbH, Wallstrasse 16, 10179 Berlin, Germany.
Importer for Great Britain:
Berlin Brands Group UK Limited
PO Box 42
272 Kensington High Street
London, W8 6ND
United Kingdom
Cher client, chère cliente,
SOMMAIRE
natural_image
Line drawing of a coffee machine with lever and handle (no text or symbols)
natural_image
Simple line drawing of a rectangular box with a label pointing to its side (no text or symbols present)
natural_image
Diagram of a mechanical component with a cylindrical top and a handle, showing a downward arrow indicating assembly (no text or symbols present)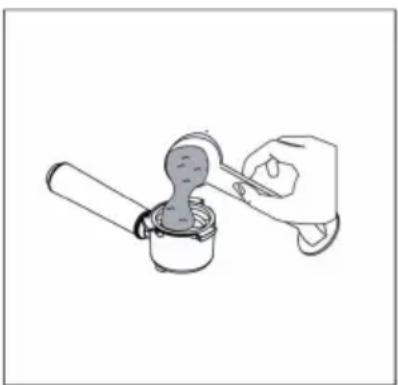
natural_image
Line drawing of a hand using a tool to adjust or install a mechanical component (no text or symbols present)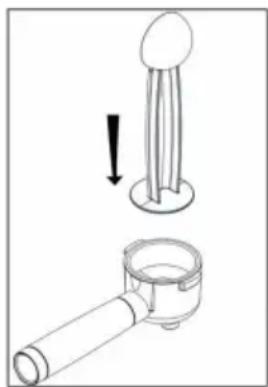
natural_image
Diagram showing a mechanical assembly with a knob and a lever, no text or symbols presentnatural_image
Line drawing of a coffee maker with a cup and lever, no text or symbols present
natural_image
Line drawing of a coffee maker with lever and cup (no text or symbols)
natural_image
Line drawing of a coffee maker with lever and cup (no text or symbols)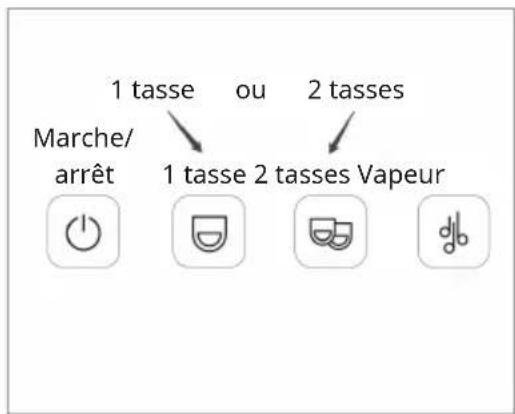
natural_image
Symbol of a trash bin crossed with a diagonal line, no text or numbers presentBerlin Brands Group UK Ltd
PO Box 42
272 Kensington High Street
London, W8 6ND
United Kingdom
Estimado cliente:
ÍNDICE
natural_image
Line drawing of a coffee machine with lever and handle (no text or symbols)
natural_image
Simple line drawing of a rectangular box with a label pointing to its side (no text or symbols present)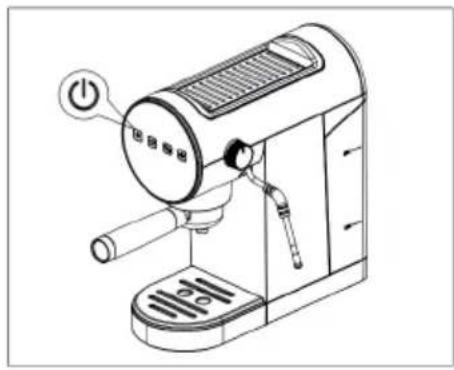
natural_image
Line drawing of a coffee machine with a power button and lever (no text or symbols)natural_image
Diagram of a mechanical assembly with a cylindrical component and a base component, showing an arrow indicating assembly direction (no text or symbols present)
natural_image
Line drawing of a hand using a tool to adjust or install a mechanical component (no text or symbols present)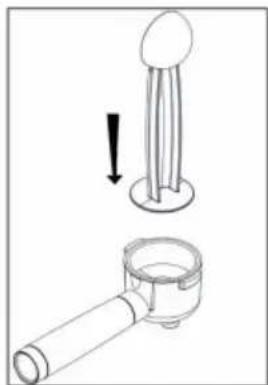
natural_image
Diagram showing a mechanical device with a lever and a separate view of its base (no text or symbols present)natural_image
Line drawing of a coffee machine with a cup and lever (no text or symbols)natural_image
Line drawing of a coffee maker with a brush and screwdriver (no text or symbols)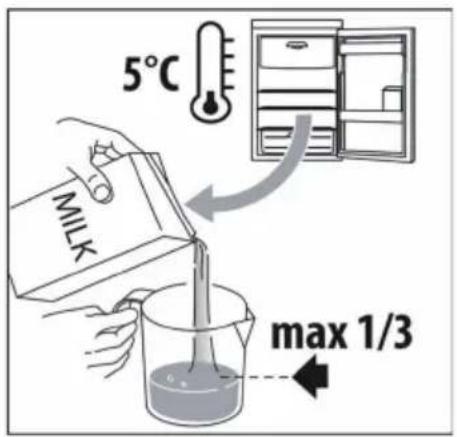

natural_image
Line drawing of a coffee maker with lever and cup (no text or symbols)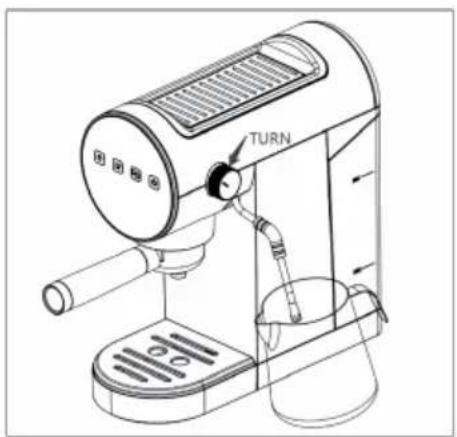
natural_image
Line drawing of a coffee maker with lever and cup (no text or symbols)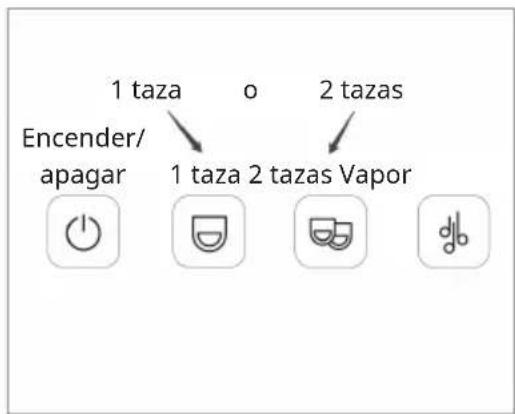
flowchart
graph TD
    A["1 taza"] --> B["Encender/apagar"]
    C["o"] --> D["1 taza"]
    E["2 tazas"] --> F["Vapor"]
    G["Power icon"] --> H["Icon with crescent"]
    I["Circle icon"] --> J["Icon with mask"]
    K["Hand icon"] --> L["Icon with musical note"]
natural_image
Symbol of a trash bin crossed with a diagonal line, no text or numbers presentBerlin Brands Group UK Limited
PO Box 42
272 Kensington High Street
London, W8 6ND
Reino Unido
Gentile cliente,
INDICE
natural_image
Line drawing of a coffee machine with handle and spout (no text or symbols)
natural_image
Simple line drawing of a rectangular box with a label pointing to its side (no text or symbols present)
natural_image
Line drawing of a coffee maker with a power button and lever (no text or symbols)natural_image
Diagram showing a mechanical component with a cylindrical housing and an arrow indicating assembly (no text or symbols)
natural_image
Line drawing of a hand using a tool to adjust or install a mechanical component (no text or symbols present)
natural_image
Diagram showing a mechanical assembly with a knob and a lever, no text or symbols presentnatural_image
Line drawing of a coffee machine with a cup and lever (no text or symbols)
natural_image
Line drawing of a coffee maker with lever and cup (no text or symbols)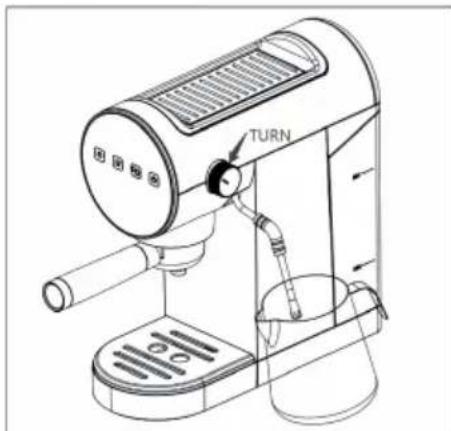
natural_image
Line drawing of a coffee maker with lever and cup (no text or symbols)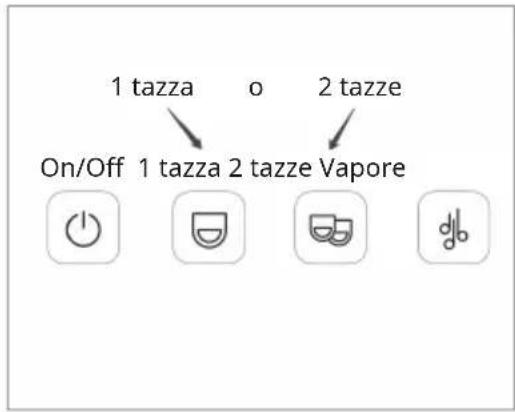
natural_image
Symbol of a trash bin crossed with a diagonal line, no text or numbers presentPRODUTTORE E IMPORTATORE (UK)
Produttore:
Chal-Tec GmbH, Wallstraße 16, 10179 Berlino, Germania.
Berlin Brands Group UK Limited
PO Box 42
272 Kensington High Street
London, W8 6ND
United Kingdom

area
| Category | Value | |---|---| | 1 | 100 | | 2 | 100 | | 3 | 100 | | 4 | 100 | | 5 | 100 | | 6 | 100 | | 7 | 100 | | 8 | 100 | | 9 | 100 | | 10 | 100 | | 11 | 100 | | 12 | 100 | | 13 | 100 | | 14 | 100 | | 15 | 100 | | 16 | 100 | | 17 | 100 | | 18 | 100 | | 19 | 100 | | 20 | 100 | | 21 | 100 | | 22 | 100 | | 23 | 100 | | 24 | 100 | | 25 | 100 | | 26 | 100 | | 27 | 100 | | 28 | 100 | | 29 | 100 | | 30 | 100 | | 31 | 100 | | 32 | 100 | | 33 | 100 | | 34 | 100 | | 35 | 100 | | 36 | 100 | | 37 | 100 | | 38 | 100 | | 39 | 100 | | 40 | 100 | | 41 | 100 | | 42 | 100 | | 43 | 100 | | 44 | 100 | | 45 | 100 | | 46 | 100 | | 47 | 100 | | 48 | 100 | | 49 | 100 | | 50 | 100 | | 51 | 100 | | 52 | 100 | | 53 | 100 | | 54 | 100 | | 55 | 100 | | 56 | 100 | | 57 | 100 | | 58 | 100 | | 59 | 100 | | 60 | 100 | | 61 | 100 | | 62 | 100 | | 63 | 100 | | 64 | 100 | | 65 | 100 | | 66 | 100 | | 67 | 100 | | 68 | 100 | | 69 | 100 | | 70 | 100 | | 71 | 100 | | 72 | 100 | | 73 | 100 | | 74 | 100 | | 75 | 100 | | 76 | 100 | | 77 | 100 | | 78 | 100 | | 79 | 100 | | 80 | 100 | | 81 | 100 | | 82 | 100 | | 83 | 100 | | 84 | 100 | | 85 | 100 | | 86 | 100 | | 87 | 100 | | 88 | 100 | | 89 | 100 | | 90 | 100 | | 91 | 100 | | 92 | 100 | | 93 | 100 | | 94 | 100 | | 95 | 100 | | 96 | 100 | | 97 | 100 | | 98 | 100 | | 99 | 100 | | Note: The actual values in the 'Value' column are not provided in the code. I have used the label 'The Region' to represent the 'Region'. The values are estimated based on the provided code.
KLARSTEIN
- INHALTSVERZEICHNIS
- b) Kaff eemenge pro Tasse einstellen
- CONTENTS
- SAFETY INSTRUCTIONS
- CAUTION
- DEVICE OVERVIEW
- CONTROL PANEL
- INSTALLATION
- Installation instructions
- Connecting the device
- GETTING STARTED
- Filling the water tank
- Important notes on use
- Initial start-up
- OPERATION
- Preparation of an espresso coffee
- a) Preparation of a hot espresso coffee
- b) Preparation of an espresso coffee with coffee powder
- b) Set the amount of coffee per cup
- c) Resetting the coffee quantity setting
- Preparation of a cappuccino
- Instructions for preparing cappuccino
- Preparation of hot water
- CLEANING AND CARE
- WARNING
- Cleaning the espresso machine
- Descaling
- Cleaning the drip tray
- Cleaning the filter sieves and portafilter
- Cleaning the water tank
- Cleaning the steam pipe (milk frother)
- TROUBLESHOOTING
- DISPOSAL CONSIDERATIONS
- MANUFACTURER & IMPORTER (UK)
- Manufacturer:
- Importer for Great Britain:
- SOMMAIRE
- Estimado cliente:
- ÍNDICE
- Gentile cliente,
- INDICE
- PRODUTTORE E IMPORTATORE (UK)
- Produttore:
- KLARSTEIN
Brand : Klarstein
Model : Furore
Category : Coffee machine