
Bella Café - Coffee machine Klarstein - Free user manual and instructions
Find the device manual for free Bella Café Klarstein in PDF.

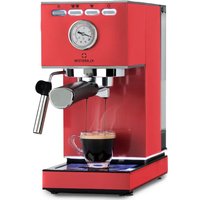
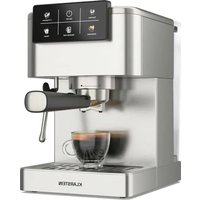
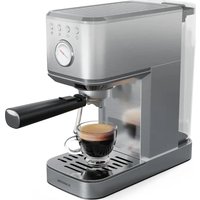
| Brand | Klarstein |
| Model | Bella Café |
| Product Type | Espresso machine with built-in grinder |
| Article Numbers | 10045450, 10045456, 10046424, 10046425, 10046428, 10046429 |
| Power Supply | 220-240 V ~ 50/60 Hz |
| Heating Power | 1230 W - 1465 W |
| Grinder Power | 200 W |
| Maximum Pressure | 19 bar |
| Water Tank Capacity | 1.4 liters |
| Bean Hopper Capacity | 200 g coffee beans |
| Main Functions | Grinding, single/double espresso, steam, hot water, milk frother |
| Included Filters | Single cup filter and double cup filter |
| Steam Wand | Yes, with integrated milk frother |
| Heating Plate | Yes, for keeping warm |
| Cleaning and Maintenance | Descaling recommended every 2-3 months; regular cleaning of removable parts |
| Safety | Automatic shut-off after 15 minutes of inactivity; overheating protection; grounded outlet required |
| Included Accessories | Portafilter, one/two cup filters, tamper, coffee spoon |
| Repairability | Repairs by qualified personnel only; spare parts available through the manufacturer |
| Intended Use | Domestic, for coffee and milk-based drinks (cappuccino, latte macchiato) |
Frequently Asked Questions - Bella Café Klarstein
User questions about Bella Café Klarstein
0 question about this device. Answer the ones you know or ask your own.
Ask a new question about this device
Download the instructions for your Coffee machine in PDF format for free! Find your manual Bella Café - Klarstein and take your electronic device back in hand. On this page are published all the documents necessary for the use of your device. Bella Café by Klarstein.
USER MANUAL Bella Café Klarstein
KLARSTEIN
www.klarstein.com

area
| Category | Value | | -------- | ----- | | 1 | 100 | | 2 | 100 | | 3 | 100 | | 4 | 100 | | 5 | 100 | | 6 | 100 | | 7 | 100 | | 8 | 100 | | 9 | 100 | | 10 | 100 | | 11 | 100 | | 12 | 100 | | 13 | 100 | | 14 | 100 | | 15 | 100 | | 16 | 100 | | 17 | 100 | | 18 | 100 | | 19 | 100 | | 20 | 100 | | 21 | 100 | | 22 | 100 | | 23 | 100 | | 24 | 100 | | 25 | 100 | | 26 | 100 | | 27 | 100 | | 28 | 100 | | 29 | 100 | | 30 | 100 | | 31 | 100 | | 32 | 100 | | 33 | 100 | | 34 | 100 | | 35 | 100 | | 36 | 100 | | 37 | 100 | | 38 | 100 | | 39 | 100 | | 40 | 100 | | 41 | 100 | | 42 | 100 | | 43 | 100 | | 44 | 100 | | 45 | 100 | | 46 | 100 | | 47 | 100 | | 48 | 100 | | 49 | 100 | | 50 | 100 | | 51 | 100 | | 52 | 100 | | 53 | 100 | | 54 | 100 | | 55 | 100 | | 56 | 100 | | 57 | 100 | | 58 | 100 | | 59 | 100 | | 60 | 100 | | 61 | 100 | | 62 | 100 | | 63 | 100 | | 64 | 100 | | 65 | 100 | | 66 | 100 | | 67 | 100 | | 68 | 100 | | 69 | 100 | | 70 | 100 | | 71 | 100 | | 72 | 100 | | 73 | 100 | | 74 | 100 | | 75 | 100 | | 76 | 100 | | 77 | 100 | | 78 | 100 | | 79 | 100 | | 80 | 100 | | Note: The actual values are not provided in the code. I have used the label 'Value' as a placeholder for the value detection. You would need to run the code to get the actual values from the code list. Please note that the actual values would be the result of this example. You would need to run the code to get the actual values from the code list. You would need to run the code to get the actual values from the code list. You would need to run the code to get the actual values from the code list. You would need to run the code to get the actual values from the code list. You would need to run the code to get the actual values from the code list. You would need to run the code to get the actual values from the code list. You would need to run the code to get the actual values from you would need to run the code. You would need to run the code to get the actual values from you would need to run the code.INHALTSVERZEICHNIS
natural_image
Line drawings of a coffee machine and a simple stand mixer (no text or symbols)natural_image
Line drawing of a manual mixer with handle and granular contents (no text or symbols)
natural_image
Line drawing of a manual mixer with a handle and granular top, marked with an 'X' symbol (no text or labels on the diagram itself)natural_image
Diagram showing a container pouring granular material into a bottle and a funnel pouring liquid into a container (no text or symbols)natural_image
Symbol of a trash bin crossed with a diagonal line, no text or labels presentBerlin Brands Group UK Limited
PO Box 42
272 Kensington High Street
London, W8 6ND
United Kingdom
Dear customer,
Congratulations on your purchase. Please read the following instructions carefully and follow them to prevent potential damage. We accept no liability for damage caused by disregarding the instructions and improper use. Please scan the QR code to access the latest operating instructions and further information about the product.

CONTENTS
Safety instructions 30
Device overview 32
Using the coffee grinder 34
Setting up the espresso machine 36
Operating the espresso machine 38
Cleaning and care 45
Overview of the indicator lights 46
Troubleshooting 47
Disposal considerations 49
Manufacturer & importer (UK) 49
TECHNICAL DATA
| Article number | 10045450, 10045456, 10046424, 10046425 | 10046428 10046429 |
| Power supply 220-240 V ~ 50/60 Hz 220-240 V ~ 50/60 Hz | ||
| Heating power 1230 W-1465 W 1230 W-1465 W | ||
| Grinding power 200 W 200 W | ||
| Water tank capacity 1.4 litres 1.4 litres | ||
| Pressure 19 bar 19 bar | ||
SAFETY INSTRUCTIONS
- Read these operating instructions carefully to avoid hazards from physical damage, fire, electric shock, injury, and property damage. Keep the operating instructions for future reference.
- Before use, check that the mains voltage corresponds to the voltage specified on the type plate of the device.
- The espresso machine must be plugged into a grounded outlet.
- To avoid damage to the coffee maker, do not place the espresso machine near a hot surface or open flame.
- This device is intended for making coffee using a pressure filter ("espresso") and for domestic use indoors. Do not use the device outdoors.
- The device is not intended for commercial use, only for household and similar use. These include kitchens in offices, farms, hotels, motels and establishments offering bed & breakfast.
- Do not use the device for any purpose other than its intended use.
- Children from the age of 8 years and mentally, sensory and physically impaired persons may only use the device if they have been informed in detail about the functions and safety precautions by a supervisor responsible for them beforehand and understand the associated risks.
- If a malfunction or defect occurs, or if the device has been dropped and then no longer works properly, pull out the power plug immediately and do not operate the device.
- Servicing is required when the device has been damaged in any way, such as when the power supply cord or plug is damaged, liquid has been spilled or objects have fallen into the device, the device has been exposed to rain or moisture, or does not operate normally.
- If the power cord is damaged, have it replaced by the manufacturer, customer service or a qualified professional to avoid a hazard.
- Please use only the accessories recommended by the manufacturer of this device to ensure proper functioning of the device.
- Place the espresso machine on a table or flat surface and do not let the power cord hang over the edge of the table.
- Make sure that the mains cable does not come into contact with hot parts of the device.
- Do not place the device in an environment where the temperature is below freezing, as there may be residual water in the boiler and water pump, which will damage the espresso machine when it freezes.
- To avoid damage to the device, make sure that the water tank of the device is always filled with the required amount of water for the intended application before use. When you fill the water tank with water, make sure that the level does not exceed the "MAX" mark.
-
When the espresso machine is in operation, some machine components are heated to high temperatures (e.g. the steam tube, the steam wand, the portafilter holder, the portafilter, etc.).
-
Keep away from the hot steam coming out of the device. When moving hot components of the device, such as the frother or the filter, only use the handles or levers attached to the appliance or its components.
- To avoid electrical damage to the device, do not immerse the device or the plug in water or other liquids for cleaning.
- Do not touch the plug of the device with wet or damp hands. Moisture from your hands can bead up on the plug and cause a dangerous electric shock if it comes in contact with the outlet.
- Supervise the device during operation.
- Keep the device and its components dry, clean and out of reach of unauthorised persons.
- Supervise children while they are playing near the device to protect them from harm.
CAUTION
Risk of injury! Unplug the device from the socket and allow it to cool down completely before cleaning, before moving the device or parts of it and when not in use. This will prevent burning on hot surfaces and injury from hot liquid.
DEVICE OVERVIEW
10045450, 10045456, 10046424, 10046425
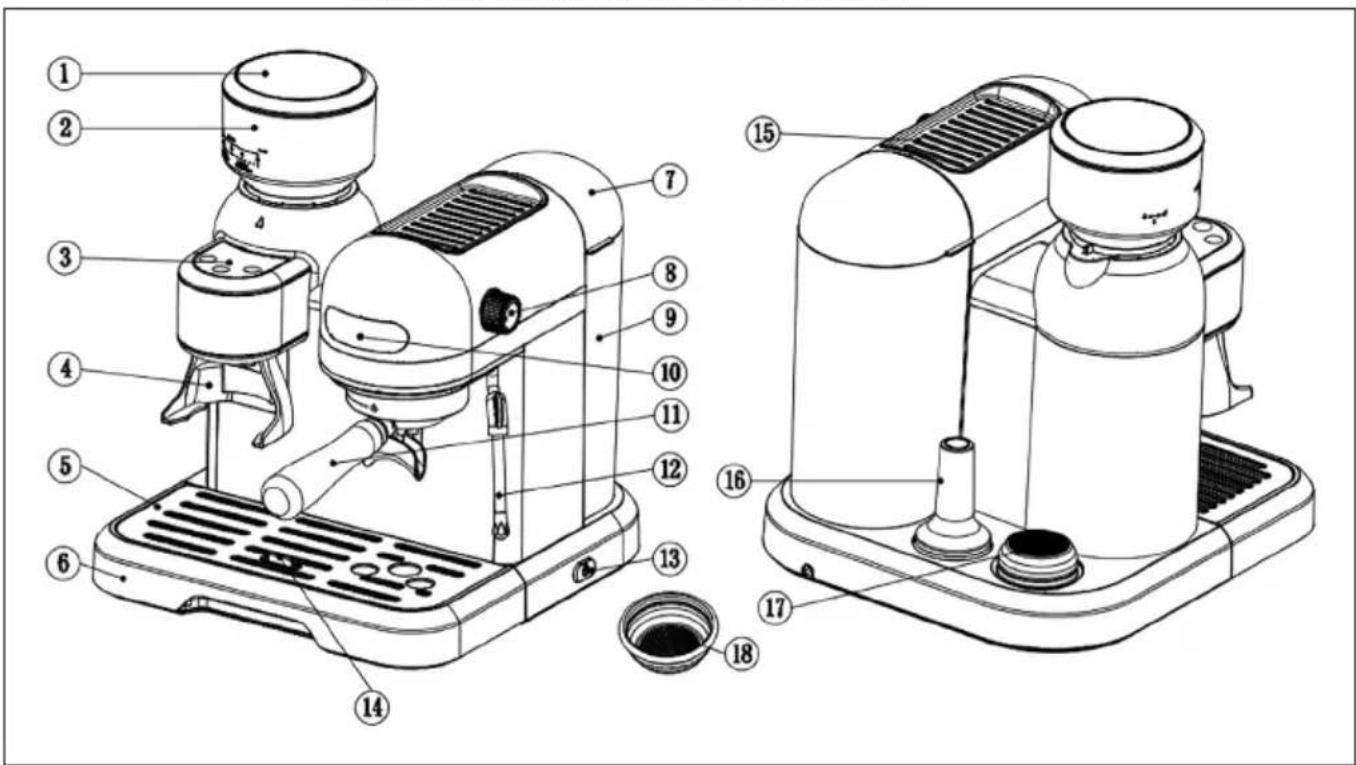
| 1 Coffee bean holder lid 10 Display indications | |||
| 2 Coffee bean holder 11 Handle | |||
| 3 Control panel for the grinder 12 Steam pipe | |||
| 4 Holder for the portafilter 13 On / off button | |||
| 5 | Drip tray cover | 14 Floater | |
| 6 Drip tray 15 Keep-warm plate | |||
| 7 Water tank lid 16 Tamper | |||
| 8 Steam regulator 17 Filter sieve for one cup of coffee | |||
| 9 Water tank 18 | Filter sieve for two cups of coffee | ||
Note: The espresso machine may only be used with ground coffee beans/coffee powder and is only used to prepare coffee and coffee drinks (e.g. cappuccino, latte macchiato, etc.) and to heat milk. Any other use can be dangerous.
10046428 10046429
| 1 Coffee bean holder lid 10 Pressure meter | |||
| 2 Coffee bean holder 11 Handle | |||
| 3 Control panel for the grinder 12 Steam pipe and nozzle | |||
| 4 Holder for the portafilter 13 On / off button | |||
| 5 Drip tray cover 14 Floater | |||
| 6 Drip tray 15 Keep-warm plate | |||
| 7 Water tank lid 16 Tamper | |||
| 8 Steam regulator 17 Filter sieve for one cup of coffee | |||
| 9 Water tank 18 | Filter sieve for two cups of coffee | ||
| 19 Coffe function control buttons | |||
Note: The espresso machine may only be used with ground coffee beans/coffee powder and is only used to prepare coffee and coffee drinks (e.g. cappuccino, latte macchiato, etc.) and to heat milk. Any other use can be dangerous.
USING THE COFFEE GRINDER
Before first use
- Before using the coffee grinder for the first time, wipe the housing and coffee bean holder with a clean, damp cloth.
- Clean the ground coffee container and lid with warm soapy water, rinse and dry.
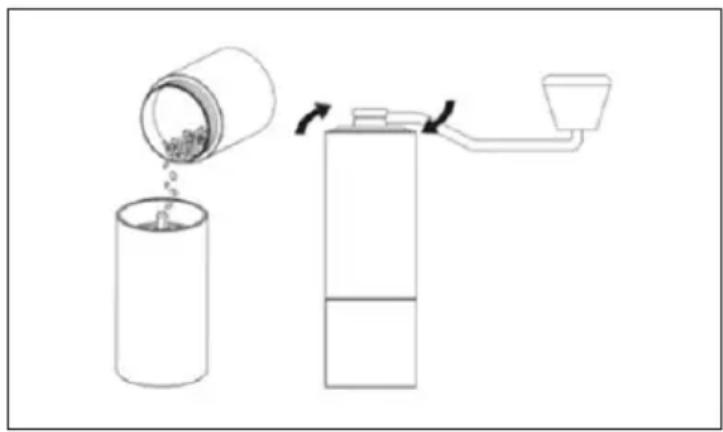
Grinding coffee beans
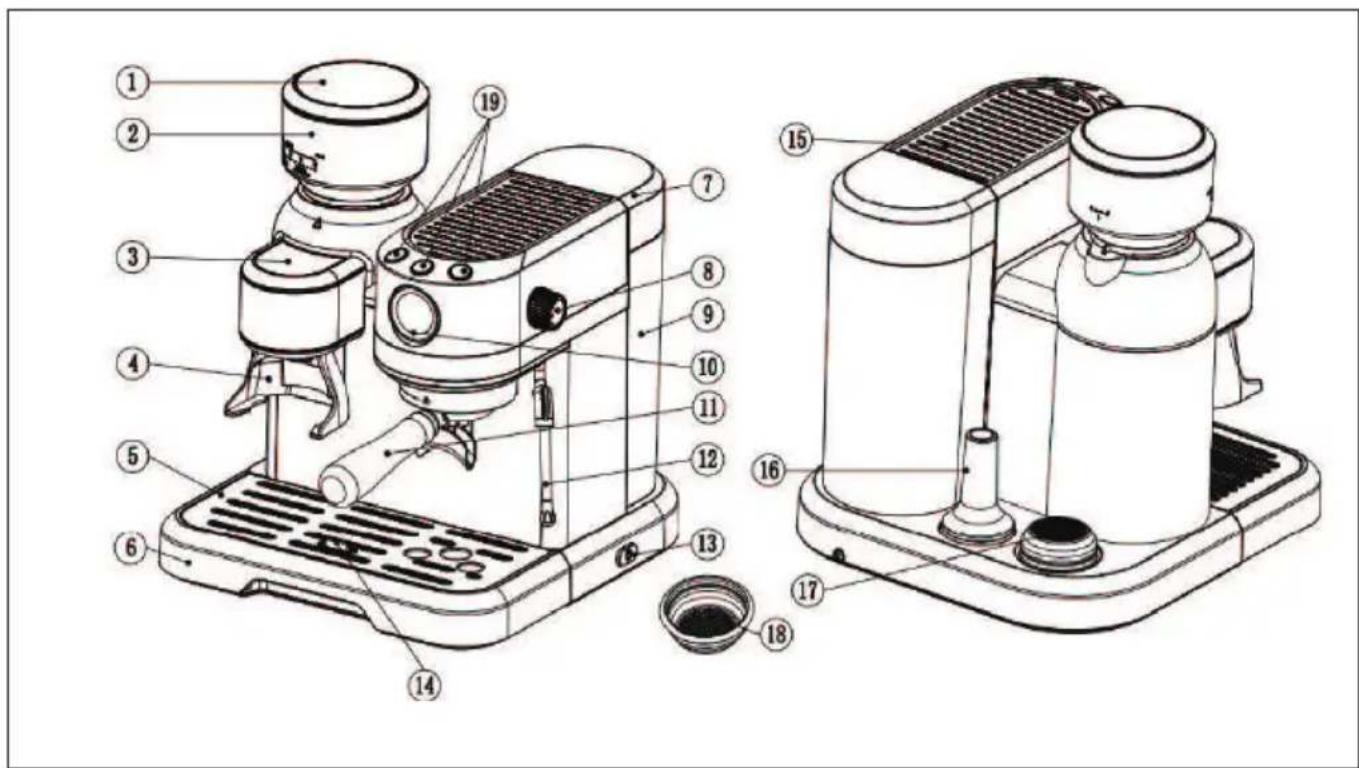
- Align the protruding part of the coffee bean holder with the groove on the espresso machine body, and then turn it clockwise to the corresponding position of the locking arrow. (Note that the device is equipped with a micro switch, so the coffee bean holder must be installed correctly for the device to work).
- Put a sufficient amount of coffee beans in the coffee bean container. The maximum amount of coffee beans must not exceed 200 g. You can run the device continuously for 5 minutes, after which it must pause for 30 minutes).
- Close the coffee bean holder lid
- Place the ground coffee container (the lid must be closed) onto the designated location on the body, making sure it is aligned with the ground coffee outlet.
- Turn the coffee bean container to set the desired coffee strength. Turning to the left increases the coffee strength, turning to the right reduces the coffee strength.
- The amount of coffee is determined by the grinding time. The time can be set on the control panel (+) (-). After confirming your selection, press the Start button to begin the process. By default, the device is set to 14 seconds.
- Level 5 is the most suitable degree of grinding for preparing a cup of espresso with the espresso machine.
Tips for using the grinder
- Coarse ground coffee is typically used for strainers, medium ground coffee is generally suitable for drip coffee pots and steam pressure coffee makers, while fine ground coffee is generally suitable for pump-driven pressure coffee makers.
- If you want to brew the freshest, most delicious coffee, it is recommended to grind enough for each use and to clean the grinding chamber, blades, and grinding mechanism after each grind.
- The grinder is designed for grinding dry and brittle ingredients only and should not be used for wet, over-hard, sticky foods, peanuts, grains or crushing ice.
- Since fresh pepper has a strong taste, it is advisable to purchase a separate grinder for grinding pepper so as not to spoil the taste of the ground coffee.
Cleaning the grinder
- In order to preserve the aroma of the coffee and prevent the coffee powder from spoiling, it is recommended to empty the coffee powder container after each use.
- Always disconnect the power plug from the mains before cleaning.
- Never immerse the grinder, the power cord or the plug in water.
- Do not use harsh detergents or scouring pads to clean device components.
- To disassemble the upper grinding wheel, grasp the upper grinding wheel handle and turn it anti-clockwise. Then lift it up vertically and clean the upper grinding wheel with a cleaning brush.
Note: When using for the first time, the idle range of the grinder is: 20-5. After adding coffee beans, you can set it to 0.
SETTING UP THE ESPRESSO MACHINE
Before first use
- Open the packaging and take out the espresso machine. Check that the accessories are complete and clean any detachable parts.
- Take out the water tank and remove the red silicone cap on the water outlet of the water tank.
Size: 70x45 mm
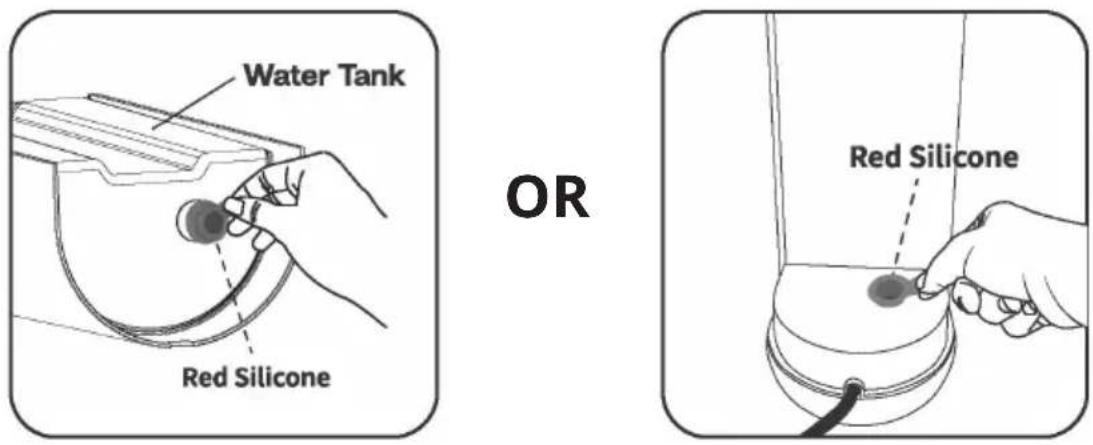
Note: Remove the red silicon before use!
Cleaning the espresso machine
To ensure that the first coffee has the right taste, you need to clean the coffee maker and all detachable parts. Use the following steps to clean:
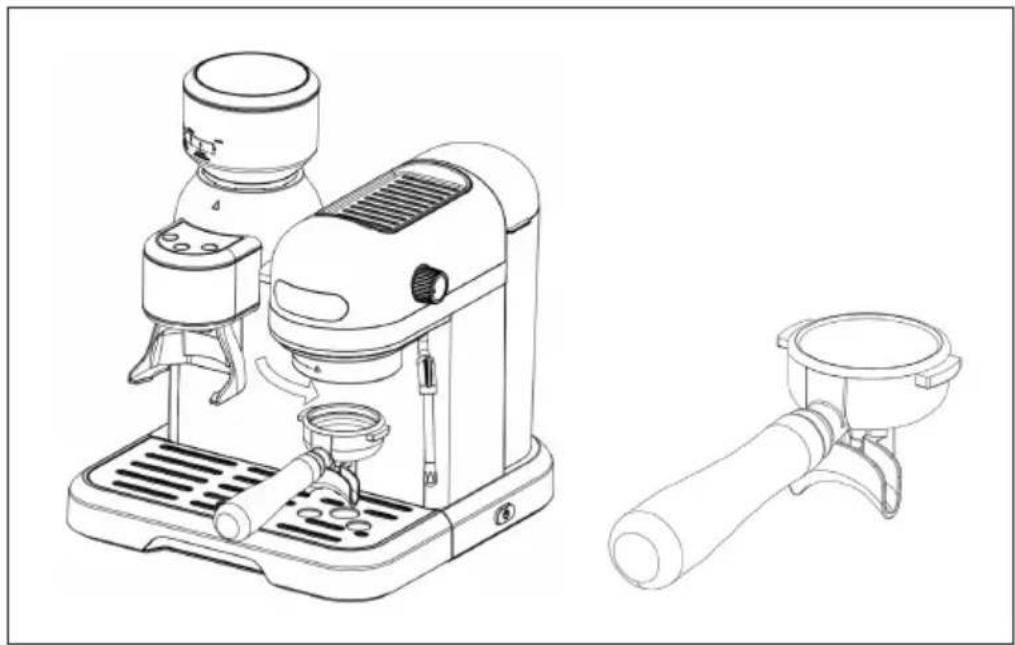
- Fill the water tank with water, making sure not to exceed the maximum water level. Then put the water tank back into the espresso machine and close the water tank lid.
- Hold the upper part of the device with one hand, take the handle of the portafilter in the other hand and turn it anti-clockwise from the unlocked position to the locked position. Do not fill the portafilter with any ground coffee yet. Tighten the portafilter firmly.
natural_image
Line drawings of a coffee machine and a simple stand mixer (no text or symbols)-
Place a coffee cup on the removable drip tray and align it with the coffee spout.
-
Plug the power cord into a grounded mains outlet.
-
Press the On/Off button. All indicator lights will flash and the appliance will start preheating. When the indicator lights are solid, preheating is complete.
-
Once the preheating is complete, turn the steam knob anti-clockwise until it stops. The electric pump will turn on. Wait for the steam wand to produce a steady flow of hot water for at least 30 seconds (this process takes 1-2 minutes). Then turn the steam knob back off.
-
Press the double cup button to dispense hot water to clean the filter screen and cup.
OPERATING THE ESPRESSO MACHINE
Control panel
| Buttons/indicators Steam dial | ||
 |  |  |
| Single cup | Double cup | Steam/preheat |
Operating functions
 | On/off(Note: The power button is located on the bottom right of the device housing.) | Press the on/off button and the display will flash the following indicators for about 1 second: “single cup” > “double cup” “steam/preheat”. All three lights will then flash simultaneously to indicate the start of the preheating process. After about 1 minute, the flashing lights will turn off, indicating the preheating process is complete.If you press the on/off button again during or after the preheating process has finished, the device will switch off.If the "steam" light flashes rapidly after turning on, turn the steam knob clockwise to turn it off. |
 | Single cup | Once preheating is complete, press the single cup button to start brewing coffee. The "single cup" indicator light flashes. The device starts and ends coffee dispensing automatically. If you want to stop the coffee dispensing early, press the single cup button again. The "single cup", "double cup" and "steam/preheat" indicators will illuminate. (The automatic dispensing time is preset and includes the coffee brewing time.) |
 | Double cup | ·Once preheating is complete, press the double cup button to start brewing coffee. The "double cup" indicator light flashes. The device starts and ends coffee dispensing automatically. If you want to stop the coffee dispensing early, press the double cup button again. The "single cup", "double cup" and "steam/preheat" indicators will illuminate. (The automatic dispensing time is preset and includes the coffee brewing time.) |
 | Steam/preheat | ·Press the steam/preheat button, the steam/preheat indicator light will flash and the steam preheating will start. When preheating is complete, the indicator light will be solid and the device will enter steam mode. If you press the steam button again during the process, the machine will switch from steam mode to coffee brewing mode and the "single cup" and "double cup" indicator lights will flash quickly, indicating that the boiler temperature is too high for coffee brewing. Allow the device to cool down or drain hot water from the device. Coffee can only be dispensed when the "single cup", "double cup" and "steam/preheat" indicator lights are on. |
| Steam dial · In the image to the right, the steam knob is shown in the off position. Turn the dial fully anti-clockwise to turn it on. Two different operating modes can be controlled with the control dial: When the device is in coffee dispensing mode, hot water is dispensed via the steam pipe. When the device is in steam mode, the steam wand produces steam. | ||
Preparation of a (double) espresso coffee
- Open the lid, take out the water tank and fill the required amount of water into the water tank. Do not exceed the MAX level.
- Put the water tank back in place and close the lid.
- Plug the power cord into the mains outlet and press the on/off button. The following indicators light up in sequence on the display for about 1 second: "single cup" > "double cup" > "steam/preheat". Then all three lights flash simultaneously and preheating starts. After about 1 minute, the flashing lights will go out and preheating is complete.
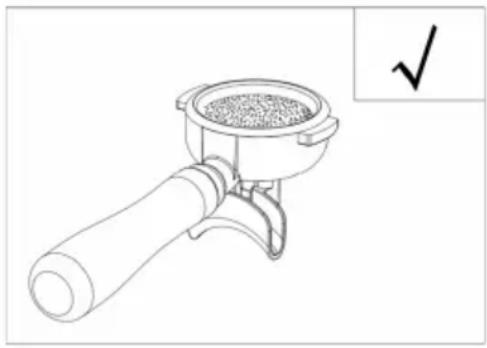
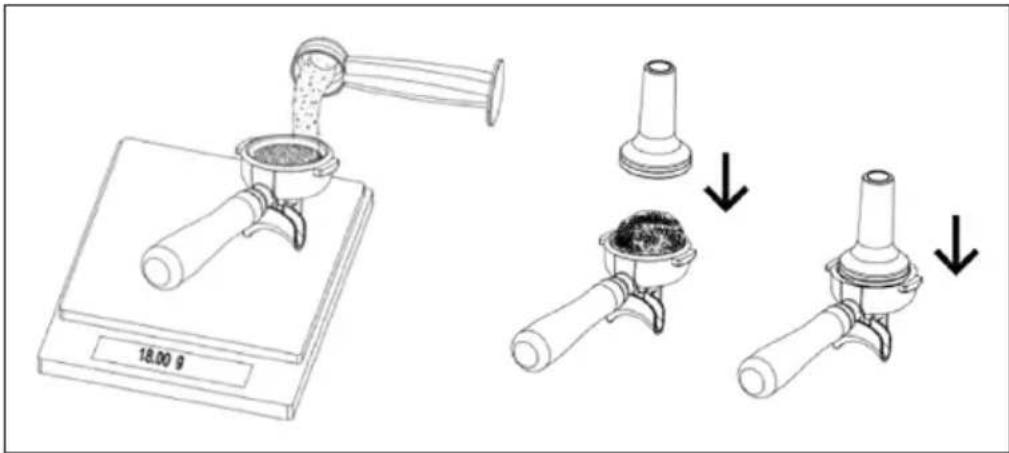
- Take the portafilter out of the device and use the coffee spoon to fill the desired amount of ground coffee into the filter sieve. Use the tamper to press down the ground coffee firmly and clean the rim of the portafilter of excess ground coffee to avoid damaging the brew head sealing ring.
Note: If too much ground coffee remains on the edge of the filter basket, the filter may leak and water may run out of the filter basket.
natural_image
Line drawing of a manual mixer with handle and granular contents (no text or symbols)
natural_image
Line drawing of a manual mixer with a handle and lid, no text or symbols present- Holding the top of the unit with one hand, take the portafilter handle with the other hand and rotate it from the unlocked to the locked position. Tighten the portafilter firmly.
- Place a cup under the coffee spout.
- Press the double cup button. The machine will start pumping water and coffee flows out of the coffee spout.
- The espresso machine stops automatically. The double cup indicator light flashes and stays on when the coffee is being made.
Note: Do not leave the espresso machine unattended while the coffee is being prepared, as it must be operated manually at times.
- After the coffee has been made, remove the portafilter from the machine by turning it clockwise. Clean the filter screen so that there are no coffee grounds left in it and rinse with hot water. Press the single cup button or the double cup button, rinse the coffee outlet with water and reinsert the portafilter with the cleaned filter sieve into the device. The device is now ready for the next coffee preparation.
NOTE: If you want to brew a single cup of espresso coffee, use the single-cup filter. Press the single cup button to make coffee. All other steps are the same as preparing a double espresso coffee.
CAUTION
Risk of scalding! To avoid scalding, do not touch the hot surfaces of the device with your hands, especially the brew outlet and the steam nozzle, when using the device.
Note: When the device pumps water for the first time, it may cause loud noises. This is normal as air in the espresso machine is escaping. After about 20 seconds, the noise disappears.
Tips for making coffee
The quality of the coffee is largely determined by the grinding of the coffee beans and the grinding quality. The ideal grinding time for a cup of coffee should be around 25-30 seconds. If the coffee powder is too coarse, the coffee extraction will be insufficient, resulting in a bland taste, lighter colour, thin crema and pale appearance. If the coffee powder is too fine, the coffee will be extracted too much, resulting in a darker colour and lack of crema. For a good cup of coffee you should use freshly ground coffee beans (preferably with a coffee grinder) and the right amount of coffee beans. The freshness of the coffee beans is important in any preparation of ground coffee, as the oils in the coffee beans can degrade over time.
natural_image
Diagram showing a container pouring granular material into a cylindrical container and a multi-stage bottle with a funnel inserted (no text or symbols)- When using a coffee grinder, first set the desired degree of grinding and then add fresh coffee beans to the grinding chamber for grinding.
Note: Even a slight change in the fineness of the coffee powder can have a significant impact on the extraction pressure and coffee volume. Set the grind size according to the coffee grinder instructions and select a grind size extraction range of 20-40 ml for a single cup and 45-75 ml for a double cup.
- It is recommended to weigh the coffee each time it is brewed to ensure the correct amount of ground coffee is used, and then use a tamper to press the ground coffee.
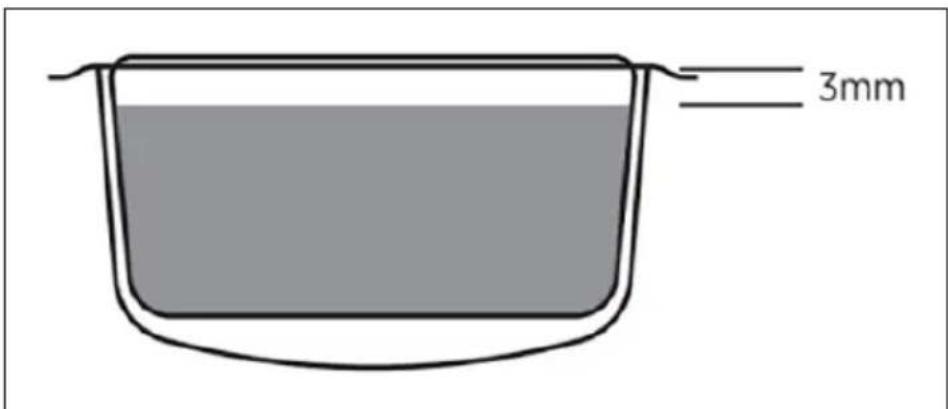
- The level of the pressed coffee powder should be about 3 mm below the edge of the filter sieve (this is an important factor). Too high or too low a level can affect the extraction pressure and the resulting coffee quality. Adjust the amount of ground coffee accordingly, using either less or more ground coffee.
- The amount of coffee brewed should be about 30 ± 10 g for a single cup and 60 ± 15 g for a double cup, which can be fine-tuned by adjusting the coffee powder grind (an important factor).
Frothing milk / preparing a cappuccino
- First prepare the espresso in a sufficiently large cup according to the instructions in the section: "Preparing a (double) espresso coffee".
- Use fresh, chilled whole milk from the refrigerator (8-10 □) and pour 1/3 of the milk into a milk cup.
Note: Use a stainless steel milk cup with a diameter of no less than 70 ± 5 mm, as the volume of the milk will increase due to frothing.
- Press the steam button and the device will start preheating. The "single cup" and "double cup" indicator lights will turn off and the "steam/preheat" indicator light will flash. Wait until the indicator light stops flashing, then preheating is complete.
- Place an empty cup under the steam wand, turn the steam knob anti-clockwise to the stop, drain some water into the steam wand, and after steam has escaped, turn the steam knob clockwise back off.
Note: Do not turn the steam knob too fast, as the steam can build up in a short time, increasing the risk of explosion.
- Place the stainless steel milk cup under the steam nozzle and dip the steam pipe nozzle about 2 cm below the surface of the milk.
- Turn the steam control fully anti-clockwise to froth the milk. The "steam/preheat" indicator light will flash.
- When you have prepared the desired amount of milk froth, turn the steam knob clockwise to stop the steam emission. Remove the milk cup and pour the frothed milk into the prepared espresso. The cappuccino is now ready. Depending on your taste, you can refine it with sugar or cocoa powder.
Note: As soon as no more steam is coming out of the steam pipe, immediately clean it of milk residues with a damp sponge to prevent the milk froth from sticking to the wall of the steam pipe. During operation, the surface of the steam wand becomes very hot. Be careful not to scald yourself.
- Press the on/off button to turn off the device.
Note: Allow the espresso machine to cool down for at least 5 minutes before brewing coffee again. Otherwise, your espresso may have a burnt smell.
Hot water preparation
- With this function you can preheat your coffee cup to ensure that the temperature of the coffee does not drop. This improves the taste of the coffee.
- Cleaning the coffee cup: After drinking coffee, you can also use this function to make hot water to clean the cup. This makes cleaning the cup easier and more convenient.
To prepare hot water:
- Place a cup under the hot water outlet.
-
When the "single cup", "double cup" and "steam/preheat" indicator lights are solid, turn the steam dial anti-clockwise (you do not need to press the "steam/preheat" button). Hot water will run out of the hot water pipe immediately. The "single cup" indicator light flashes while hot water is being prepared.
-
When enough hot water has been prepared, turn the steam control knob clockwise and the hot water dispensing will stop.
Note: The hot water function can also be used to quickly cool down the coffee maker.
CAUTION
Risk of scalding! Be careful of hot device components during use. This applies in particular to the water outlet (portafilter), the hot water nozzle and the steam pipe. Never touch these parts while the device is in operation.
Heating liquid with steam
The steam nozzle (without frothing device) can be used to prepare hot drinks such as hot chocolate, water or tea.
- Use a stainless steel mug and fill it halfway with cold liquid.
Note: The diameter of the cup should be at least 70 ± 5 mm because the liquid is heated by steam. This prevents liquid from overflowing or spilling as a result of the vapour release.
- Press the steam button and the device will start preheating. The "single cup" and "double cup" indicator lights will turn off and the "steam/preheat" indicator light will flash. When the "steam/preheat" indicator light stays on, preheating is complete.
- Place the mug under the steam wand and dip the steam wand into the liquid.
- Turn the steam knob anti-clockwise and release the steam.
- Turn off the steam knob clockwise when the liquid has reached the desired temperature. No more steam will come out of the steam nozzle.
Note: Clean the steam nozzle immediately after use.
CAUTION
Risk of scalding! The steam wand and steam nozzle become very hot during use. Never touch these device Components while the device is in operation.
CLEANING AND CARE
Cleaning the espresso machine
- Turn off the espresso machine and let it cool down.
- Use a clean damp cloth to clean the stainless steel surface.
Note: Do not use scouring pads, alcohol or solvents. Do not immerse the device in water.
- Clean the outlet and the sealing ring under the brewing unit with a professional cleaning brush.
- Loosen the portafilter by turning it anti-clockwise and remove the coffee grounds from the filter screen. You can then clean the portafilter and filter screen with detergent and rinse with clear water.
- Rinse all device attachments in clear water and dry them thoroughly.
- Clean the drip tray and detachable drip tray regularly and then dry them.
- Clean the water tank regularly.
Descaling the espresso machine
- Limescale builds up in the espresso machine over time, so you should descale the device every 2-3 months.
- Pour water and descaler (4:1 ratio) into the water tank up to the MAX level. Follow the descaler's instructions. Use a suitable descaler for coffee machines or, as a substitute for a descaler, use a mixture of water and citric acid (in a ratio of 100:3).
- Insert the portafilter (without ground coffee) into the brewing unit as described in the section "Preparing a (double) espresso coffee".
- When the "single cup" and "double cup" indicator lights are on solid, press the single cup button or the double cup button and drain about 150 ml of descaling solution. Press the single cup button or double cup button again to stop dispensing. Press the steam/preheat button. When the steam indicator light is solid, turn the steam control knob anti-clockwise to release steam for approximately 2 minutes. Then turn the steam knob clockwise again and let the descaler work in the espresso machine for at least 15 minutes to loosen all limescale deposits.
- Repeat step 4 three times.
- Press the single cup button or double cup button to drain the descaler solution until there is no descaler left in the espresso machine.
- Follow the steps of making coffee (without coffee powder) and repeat step 4 three times without waiting 15 minutes until there is no more water in the water tank.
- Repeat step 7 at least 3 times to ensure the espresso machine piping is thoroughly cleaned.
OVERVIEW OF THE INDICATOR LIGHTS
| Single cup Double cup Steam Cause Solution | ||||
| Flashes 1 s Flashes 1 s Flashes 1 s | Device has been switched on. | - | ||
| Flashes | Flashes Flashes | The preheating of coffee and hot water has started. | - | |
| On On On | The preheating of coffee and hot water is finished. | - | ||
| Flashes Off Off | Preparation of a single cup of coffee or water. | - | ||
| Off Flashes Off | Preparation of a double cup of coffee or water. | - | ||
| Off Off Flashes | Steam preheating has started. | - | ||
| Off Off On | Steam preheating is complete. | - | ||
| Off Off Flashes Steam release - | ||||
| Off Off On | Steam release finished | - | ||
| Flashes quickly | Flashes quickly | Flashes quickly | Short circuit or defect of the temperature sensor | Contact a specialist company. |
| After emitting steam, press the steam button (the temperature is too high).Device has been switched off. | Wait for the machine to cool down or press the coffee/steam button to drain hot water.- | |||
| Off Off Off | ||||
| Short circuit in the temperature sensor. | Contact a specialist company. | |||
| Standby longer than 15 minutes | Press a button on the display. | |||
| Off Off | Flashes quickly | Steam knob is not tightly closed when turned on. | Turn the steam control knob clockwise. | |
TROUBLESHOOTING
| Problem Possible cause Solution | |||
| No water comes out of the device. | The water tank is empty. Fill water into the water tank. | ||
| The input voltage or frequency does not match the information on the nameplate of the device. | Make sure that the mains voltage and frequency match the data on the type plate of the device. | ||
| Malfunction of the espresso machine. | Contact a specialist company. | ||
| No steam is generated The steam nozzle is clogged. | Clean the steam nozzle | ||
| The water tank is empty. Fill water into the water tank. | |||
| Malfunction of the espresso machine. | Contact a specialist company. | ||
| Problem Possible cause Solution | ||
| The coffee is running out at the edge of the portafilter. | There is too much coffee powder in the filter sieve | Turn off the device and wait for it to cool down. Clean the filter screen and then fill in the ground coffee. |
| There is coffee powder in the sealing ring under the brewing unit. | ||
| The above operational issues have not been resolved. | Contact a specialist company. | |
| The coffee is coming out of the device too slowly or not at all. | The ground coffee is too fine. | Use coarser coffee powder. |
| The filter sieves are clogged. | Clean the filter sieve with a small brush. | |
| The water tank has not been inserted correctly. | Reinstall the water tank. | |
| Water leaks from the bottom of the unit. | The drip tray is full. Clean the drip tray. | |
| Malfunction of the espresso machine. | Contact a specialist company. | |
| The espresso machine does not work. | The mains plug is not correctly inserted in the socket. | Insert the mains plug properly into the socket. |
| Short circuit in the temperature sensor (NTC). | Contact a specialist company. | |
| Malfunction of the espresso machine. | ||
| The steam does not froth the milk. | The "steam" indicator light does not light up. | Wait for the "steam" indicator light to come on. |
| The milk cup is too big or the shape is not suitable. | Use a tall and narrow milk cup. | |
| Low-fat milk was used. Use whole milk. | ||
Note: If you cannot find the cause of the malfunction, contact a specialist company and do not attempt to repair or disassemble the device yourself.
DISPOSAL CONSIDERATIONS
natural_image
Symbol of a trash bin crossed with a diagonal line, no text or labels presentIf there is a legal regulation in your country regarding the disposal of electrical and electronic equipment, this symbol on the product or on the packaging indicates that this product must not be disposed of with household waste. Instead, it must be taken to a collection point for the recycling of electrical and electronic equipment. By disposing of this product in accordance with the regulations, you are protecting the environment and the health of those around you from negative consequences. For information on recycling and disposal of this product, contact your local government or household waste disposal service.
MANUFACTURER & IMPORTER (UK)
Manufacturer:
Chal-Tec GmbH, Wallstrasse 16, 10179 Berlin, Germany.
Importer for Great Britain:
Berlin Brands Group UK Limited
PO Box 42
272 Kensington High Street
London, W8 6ND
United Kingdom
Cher client, chère cliente,
SOMMAIRE
natural_image
Line drawings of a coffee machine and a simple stand mixer (no text or symbols)natural_image
Line drawing of a manual mixer with handle and granular contents (no text or symbols)
natural_image
Line drawing of a manual mixer with a handle and granular top, marked with an 'X' symbol (no text or labels on the diagram itself)natural_image
Diagram showing a container pouring granular material into a cylindrical container and a multi-stage funnel pouring liquid into a container (no text or symbols)natural_image
Symbol of a trash bin crossed with a diagonal line, no text or labels presentBerlin Brands Group UK Limited
PO Box 42
272 Kensington High Street
London, W8 6ND
United Kingdom
Estimado cliente:
ÍNDICE
natural_image
Line drawings of a coffee machine and a simple stand mixer (no text or symbols)natural_image
Line drawing of a manual mixer with handle and granular contents (no text or symbols)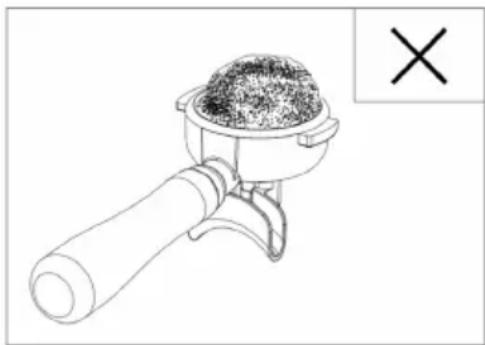
natural_image
Line drawing of a manual mixer with a handle and lid, no text or symbols presentnatural_image
Diagram showing a container pouring granular material into a cylindrical container and a multi-stage bottle with a funnel inserted (no text or symbols)natural_image
Symbol of a trash bin crossed with a diagonal line, no text or labels presentBerlin Brands Group UK Limited
PO Box 42
272 Kensington High Street
London, W8 6ND
Reino Unido
Gentile cliente,
INDICE
natural_image
Line drawings of a coffee machine and a simple stand mixer (no text or symbols)natural_image
Line drawing of a manual mixer with handle and granular contents (no text or symbols)
natural_image
Line drawing of a manual mixer with a handle and lid, no text or symbols presentnatural_image
Diagram showing a container pouring granular material into a cylindrical container and a multi-stage bottle with a funnel inserted (no text or symbols)natural_image
Symbol of a trash bin crossed with a diagonal line, no text or labels presentPRODUTTORE E IMPORTATORE (UK)
Produttore:
Chal-Tec GmbH, Wallstraße 16, 10179 Berlino, Germania.
Berlin Brands Group UK Limited
PO Box 42
272 Kensington High Street
London, W8 6ND
United Kingdom

area
| Category | Value | | -------- | ----- | | 1 | 100 | | 2 | 100 | | 3 | 100 | | 4 | 100 | | 5 | 100 | | 6 | 100 | | 7 | 100 | | 8 | 100 | | 9 | 100 | | 10 | 100 | | 11 | 100 | | 12 | 100 | | 13 | 100 | | 14 | 100 | | 15 | 100 | | 16 | 100 | | 17 | 100 | | 18 | 100 | | 19 | 100 | | 20 | 100 | | 21 | 100 | | 22 | 100 | | 23 | 100 | | 24 | 100 | | 25 | 100 | | 26 | 100 | | 27 | 100 | | 28 | 100 | | 29 | 100 | | 30 | 100 | | 31 | 100 | | 32 | 100 | | 33 | 100 | | 34 | 100 | | 35 | 100 | | 36 | 100 | | 37 | 100 | | 38 | 100 | | 39 | 100 | | 40 | 100 | | 41 | 100 | | 42 | 100 | | 43 | 100 | | 44 | 100 | | 45 | 100 | | 46 | 100 | | 47 | 100 | | 48 | 100 | | 49 | 100 | | 50 | 100 | | 51 | 100 | | 52 | 100 | | 53 | 100 | | 54 | 100 | | 55 | 100 | | 56 | 100 | | 57 | 100 | | 58 | 100 | | 59 | 100 | | 60 | 100 | | 61 | 100 | | 62 | 100 | | 63 | 100 | | 64 | 100 | | 65 | 100 | | 66 | 100 | | 67 | 100 | | 68 | 100 | | 69 | 100 | | 70 | 100 | | 71 | 100 | | 72 | 100 | | 73 | 100 | | 74 | 100 | | 75 | 100 | | 76 | 100 | | 77 | 100 | | 78 | 100 | | 79 | 100 | | 80 | 100 | | Note: The actual values are not provided in the code. I have used the label 'Value' as a placeholder for the value detection. You would need to run the code to get the actual values from the code list. Please note that the actual values would be the result of this example. You would need to run the code to get the actual values from the code list. You would need to run the code to get the actual values from the code list. You would need to run the code to get the actual values from the code list. You would need to run the code to get the actual values from the code list. You would need to run the code to get the actual values from the code list. You would need to run the code to get the actual values from the code list. You would need to run the code to get the actual values from you would need to run the code. You would need to run the code to get the actual values from you would need to run the code.
KLARSTEIN

- INHALTSVERZEICHNIS
- Dear customer,
- CONTENTS
- SAFETY INSTRUCTIONS
- CAUTION
- DEVICE OVERVIEW
- USING THE COFFEE GRINDER
- Before first use
- Grinding coffee beans
- Tips for using the grinder
- Cleaning the grinder
- SETTING UP THE ESPRESSO MACHINE
- Cleaning the espresso machine
- OPERATING THE ESPRESSO MACHINE
- Operating functions
- Preparation of a (double) espresso coffee
- Tips for making coffee
- Frothing milk / preparing a cappuccino
- Hot water preparation
- Heating liquid with steam
- CLEANING AND CARE
- Descaling the espresso machine
- OVERVIEW OF THE INDICATOR LIGHTS
- DISPOSAL CONSIDERATIONS
- MANUFACTURER & IMPORTER (UK)
- Manufacturer:
- Importer for Great Britain:
- SOMMAIRE
- Estimado cliente:
- ÍNDICE
- Gentile cliente,
- INDICE
- PRODUTTORE E IMPORTATORE (UK)
- Produttore:
- KLARSTEIN
Brand : Klarstein
Model : Bella Café
Category : Coffee machine