USER MANUAL Bellagio 2 CHICCO
natural_image
Line drawing of a baby stroller with four wheels and a canopy (no text or symbols)


natural_image
Line drawing of a baby stroller with wheels and a canopy cover (no text or symbols)
natural_image
Line drawing of a baby stroller with wheels and seat, no text or symbols present
natural_image
Illustration of a hand adjusting a camera lens with a red circle highlighting the lens (no text or symbols present)

natural_image
Line drawing of hands using a tool to adjust or install a component, no text or symbols present
natural_image
Line drawing of hands adjusting a seatbelt component (no text or symbols)
natural_image
Line drawing of hands assembling a mechanical component (no text or symbols)
natural_image
Line drawing of hands adjusting a mechanical component (no text or symbols)
natural_image
Line drawing of hands installing or adjusting a vehicle seatbelt (no text or symbols)
natural_image
Line drawing of a hand inserting a small object into a device (no text or symbols)
natural_image
Line drawing of a car seatbelt with two seats and a red circular marker labeled '9' (no text or symbols on the diagram itself)
natural_image
Line drawing of a hand holding a car seatbelt with a red circle highlighting the seat area (no text or symbols)
natural_image
Illustration of a person using a walking stick to adjust a bicycle seatbelt (no text or symbols visible)
natural_image
Line drawing of a hand adjusting a helmet cover on a bicycle (no text or symbols)
natural_image
Line drawing of a hand holding a tool, no text or symbols present
natural_image
Illustration of a hand holding a funnel-shaped object with a red circular badge labeled '12A' (no text or symbols on the diagram itself)

natural_image
Line drawing of a wheeled cart with wheels and a handle, no text or symbols present
natural_image
Medical illustration showing a surgical procedure with a red circle highlighting a specific anatomical area (no text or symbols present)
natural_image
Line drawing of a hand using a tool to cut or adjust a metal bracket (no text or symbols present)
natural_image
Line drawing of a hand pressing down on a car's seatbelt (no text or symbols)
natural_image
Illustration of hands cutting a curved object with a red circular badge showing '181' (no text or symbols on the object itself)
natural_image
Illustration of a baby stroller with decorative frame and wheels, no text or symbols present
natural_image
Top-down line drawing of a bicycle seat with wheels and handle, no text or symbols present

natural_image
Top-down line drawing of a car with red circular annotations highlighting specific parts (no text or symbols)
IT ISTRUZIONI D'USO
IMPORTANTE – LEGGERE ATTENTAMENTE E CONSERVARE PER FUTURO RIFE-RIMENTO.
ATTENZIONE: PRIMA DELL'USO RI-MUOVERE ED ELIMINARE EVENTUALI SACCHETTI DI PLASTICA E TUTTI GLI ELEMENTI FACENTI PARTE DELLA CONFEZIONE DEL PRODOTTO O COMUNQUE TENERLI LONTANI DALLA PORTATA DEI BAMBINI.
AVVERTENZE
EN INSTRUCTIONS FOR USE IMPORTANT – READ CAREFULLY AND KEEP FOR FUTURE REFERENCE.
WARNING: BEFORE USE, REMOVE AND DISPOSE OF ALL PLASTIC BAGS AND PACKAGING MATERIALS AND KEEP THEM OUT OF REACH OF CHILDREN.
WARNINGS
- WARNING: Never leave the child unattended.
- WARNING: Ensure that all the locking devices are engaged before use.
- WARNING: To avoid injury ensure that the child is kept away when unfolding and folding this product.
- WARNING: Do not let the child play with this product.
- WARNING: Always use the restraint system.
- The use of the crotch strap and safety harness is necessary to guarantee the safety of your child. Always use the safety harness together with the crotch strap.
- WARNING: Check that the pram body or seat unit or car seat attachment devices are correctly engaged before use.
- WARNING: This product is not suitable for running or skating.
- WARNING: The seat unit is suitable for children from 0 months of age up to 4 years of age or 22 kg, whichever limit is reached first.
- The stroller is type approved up to 15 kg with the seat in the rear-facing position.
- The stroller is type approved up to 22 kg with the seat in the front-facing position.
- It is recommended that the back-rest should be used in its most reclined position for children from birth to 6 months of age.
- Only CHICCO KORY or CHICCO FIRST-SEAT RECLINE car seats that are fitted with the appropriate fasteners or the CHICCO FLEXI carry cot or CHICCO GRAN COMFORT carry cot can be fitted to the CHICCO BELLAGIO stroller.
- With the child carry cot fitted on the stroller: WARNING: This product in stroller configuration is only suitable for children who cannot sit up unaided or roll over and cannot push up on their hands and knees. Maximum weight of the child: 9 Kg.
- WARNING: Do not add another mattress on top of the mattress supplied or recommended by the manufacturer.
- The parking device shall be engaged when placing and removing the children.
• Always apply the brakes when the stroller is stationary.
- Never leave the stroller on a sloped surface, with a child on board, even when the brakes are on.
- Do not overload the storage basket. Maximum weight 5 kg.
• Maximum load allowed in the backrest pocket 1 kg.
- Any weight attached to the handles and/or backrest and/or on the
sides of the stroller may upset the stability of the stroller.
- Ensure that any bag attached to the handle weighs less than 2 kg.
- Do not transport more than one child at a time.
- Do not use accessories, replacement parts, or any component not supplied or approved by the manufacturer / distributor.
- Do not use this product if any part is broken, torn or missing.
- With the car seat installed on the stroller, this is not a replacement for a crib or bed, if the child needs to sleep he or she should be placed in a carry cot, crib or bed.
- Before assembling, ensure that the product and its components have not been damaged during transportation. In this case, do not use and keep out of reach of children.
- It is only possible to use the CHICCO BELLAGIO stroller seat on the CHICCO LULLAGLIDE/E-LULLA-GLIDE Stand with the backrest in the first 3 positions (starting with the most upright).
- WARNING: When placed on the CHICCO LULLAGLIDE/E-LULLA-GLIDE Stand, DO NOT USE the CHIC-CO BELLAGIO stroller seat with the backrest fully reclined.
- During adjustment operations, ensure that the moving parts of the stroller do not come into contact with your child.
• Make sure that the person using the stroller knows how to operate it in the safest way.
• This product must only be used by an adult.
- The product must only be assembled by an adult.
- To avoid all strangulation hazards, never give children objects with cords or strings attached, or leave them close to such objects.
- Never use the stroller on staircases or escalators: you could suddenly lose control of it.
• Always pay attention when going up and down steps or pavements.
- If the stroller is left exposed to direct sunlight for an extended period of time, allow it to cool down before placing your child inside. Prolonged exposure to direct sunlight may cause the colour of the materials and fabric to fade.
- Prevent the stroller from coming into contact with salt water. It may cause rusting.
- Do not use the stroller on the beach.
- When not in use, the stroller should be kept out of reach of children.
TIPS FOR CLEANING AND MAINTENANCE
This product requires periodical maintenance. Cleaning and maintenance should only be carried out by an adult.
CLEANING
The lining can be removed (please refer to the section "Fitting/removing the seat lining"). Please refer to the care labels for instructions on how to clean the fabric parts. The washing symbols and relative meanings are indicated below:

Hand wash

Do not bleach

Do not tumble dry

Do not iron

Do not dry clean
Routinely wipe clean plastic parts with a soft damp cloth. Never use solvents or abrasive products. To prevent the formation of rust, always dry metal parts if they have come into contact with water.
MAINTENANCE
Regularly check the condition of the wheels and clean off all dust and sand. To avoid friction that may compromise the correct functioning of the stroller, make sure that all plastic parts are clean of dust, dirt and sand. Keep the stroller in a dry place. If necessary, lubricate the moving parts with dry silicone lubricant.
LIST OF COMPONENTS
Check that none of the components of this model are missing before assembling the product. If any part is missing, contact Chicco Customer Service. No tools are needed to assemble this product. The following pieces are needed for product assembly:
- Frame
- Seat with lining
- Canopy
- Bumper bar
• Comfort kit (shoulder straps and crotch straps)
- Storage basket
- Rain cover
- 2 Rear wheels
- 2 front wheels
IMPORTANT NOTE: the pictures and instructions contained in this booklet refer to a specific version of the stroller.
STROLLER FIRST ASSEMBLY
WARNING: When opening or closing the stroller, make sure that your child or other children are at a safe distance. Make sure that during these operations the moving parts of the stroller do not come into contact with your child.
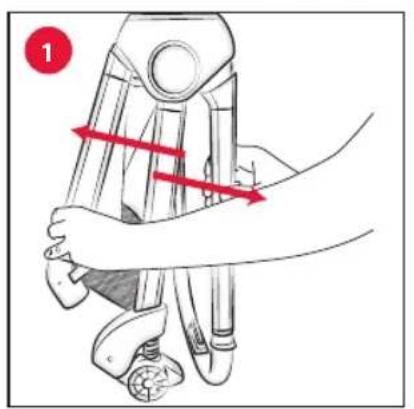
- To open the stroller take hold of the handle and front tube and rotate until a click confirms that the stroller has opened completely (Fig. 1).
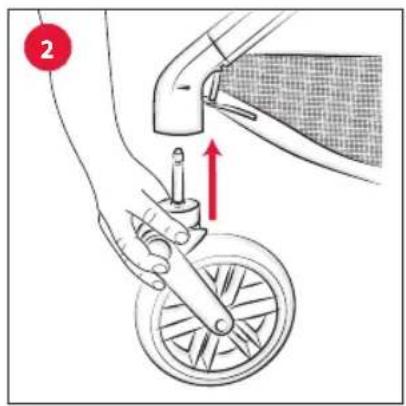
- Insert the front wheel in the dedicated hole on the frame until you hear the locking click (Fig. 2). Repeat the same operation for the other front wheel.
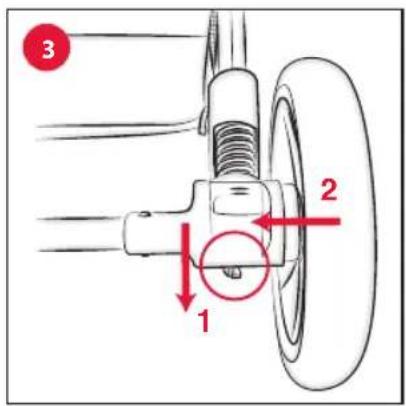
- To assemble the rear wheels, pull down on the indicated lever and insert the wheel pin in the hole on the tube that forms the rear leg.(Fig. 3). Repeat the same operation for the other wheel.
WARNING: Before using the stroller, make sure that the wheels are firmly attached to the structure by gently pulling them outwards.
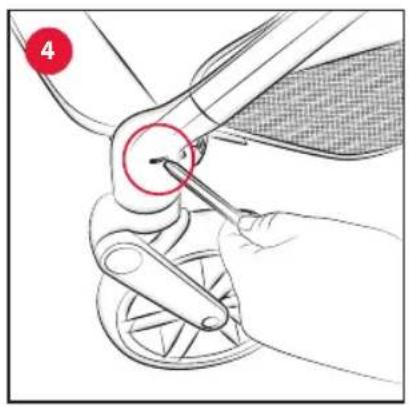
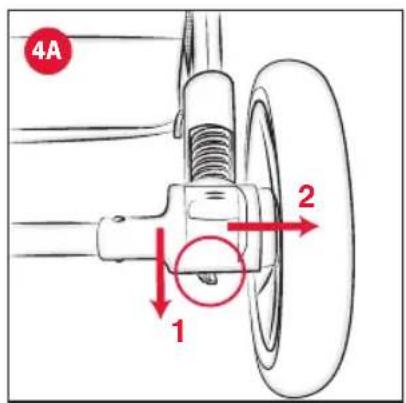
- To remove the front wheels, use a sharp object to exert pressure on the appropriate slot, which is located on the front part of the frame (Fig. 4) and pull the wheel downwards. To remove the rear wheels pull the release lever shown in figure 4A.
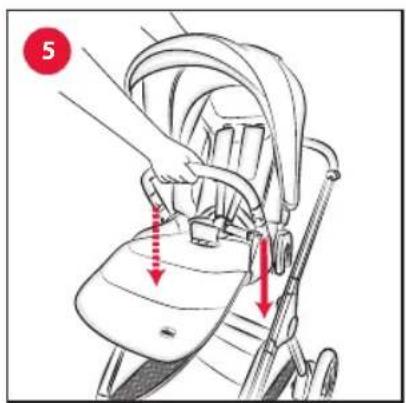
- To attach the stroller seat to the frame, insert the seat into the appropriate plastic connection points until you hear the locking click (Fig. 5).
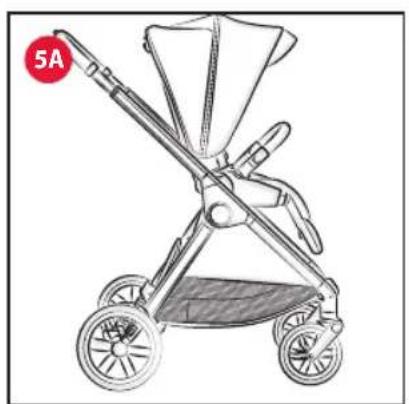
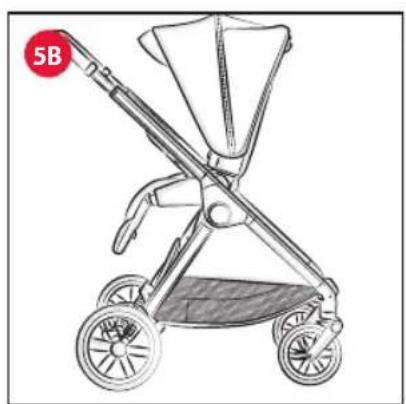
The seat can be assembled either forward facing (Fig. 5A) or rear facing (Fig. 5B).
WARNING: Before using, make sure that the seat is properly locked on by pulling it upwards.
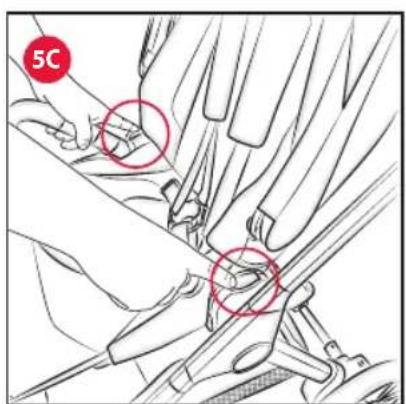
To release the seat press the buttons located on the seat joints simultaneously and pull up (Fig. 5C).
WARNING: The child must never be sitting in the seat when fastening/unfastening it.
BUMPER BAR
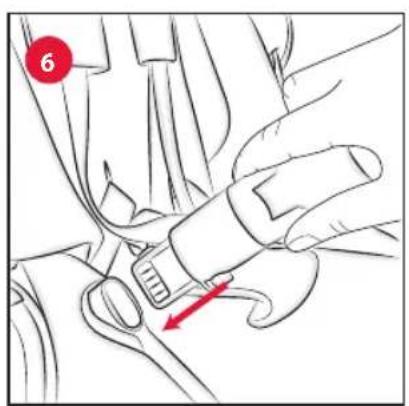
- The seat features a bumper bar. To fasten the bumper bar insert it in the housing located next to the joint (Fig. 6) and make sure that the bumper bar is properly fastened by pulling it towards you.
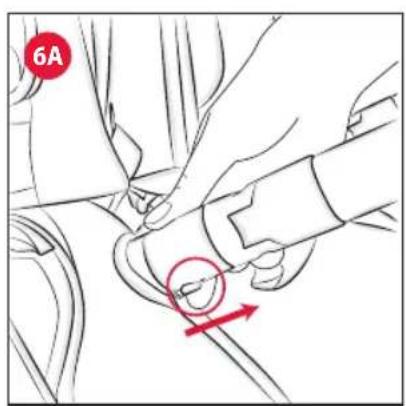
To remove the bumper bar press on the two external side buttons (Fig. 6A) and extract the bumper bar from the housing. You can release one side of the bumper bar to easily seat your child. The bumper bar can be used both forward facing and parent facing.
WARNING: Always fasten your child with the safety harnesses. The bumper bar IS NOT a device for containing your child.
WARNING: Never use the bumper bar to lift the product with your child sitting in it.
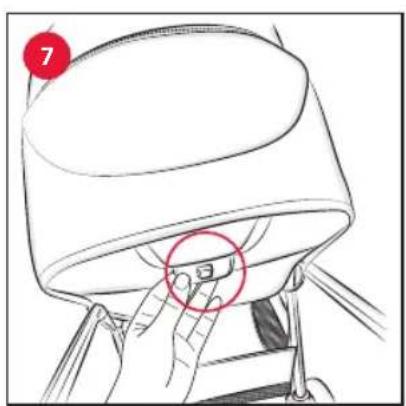
- The backrest can be reclined in four different positions; to adjust the inclination use the lever located on the rear of the stroller backrest (Fig. 7). The inclination can be adjusted until the desired position is reached. By releasing the lever, the backrest will lock in the nearest position.
WARNING: The child's weight can make these operations more difficult.
HOW TO USE THE SAFETY HARNESS
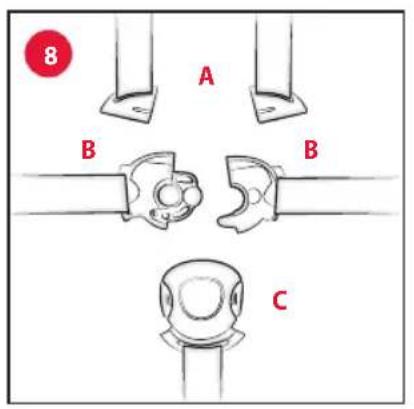
- The stroller comes with a five-point safety harness which consists in two shoulder straps, a waist strap and a crotch strap with a buckle. The buckle included has a magnetic closure (Fig. 8).
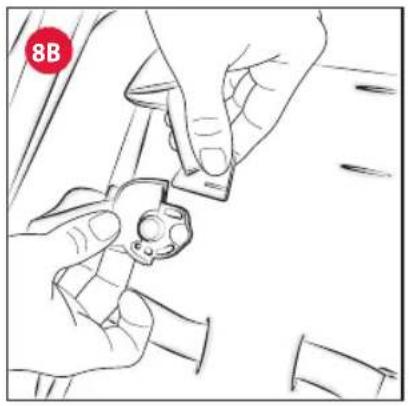
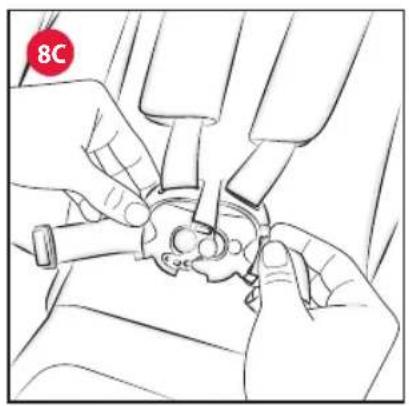
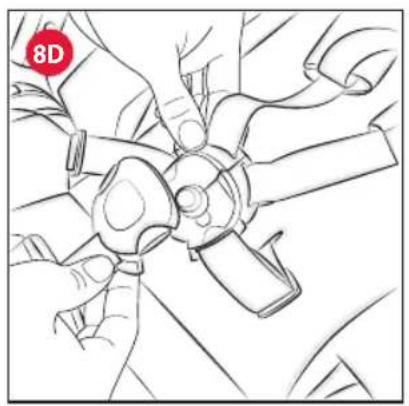
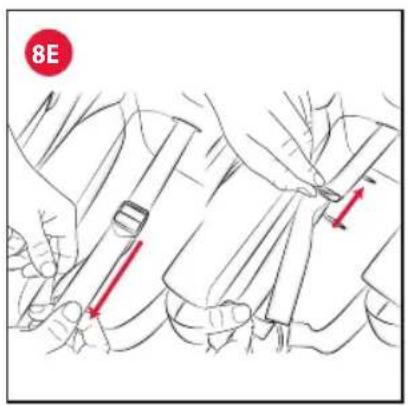
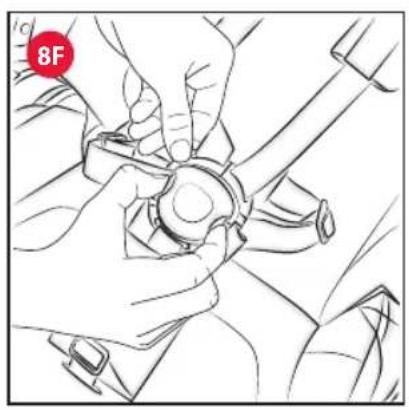
On the backrest there are three pairs of slots for adapting the height of the shoulder straps to the size of the child (Fig. 8A). After placing the baby in the stroller, fasten the safety belts by inserting the shoulder strap component (A) into the appropriate housing on the component (B) of the waist strap (Fig. 8B). This operation must be carried out for both safety belts. Then join the two components together until they engage correctly (Fig. 8C) and complete the belt fastening with the belt buckle (C) by joining it to the two previously assembled components (Fig. 8D). The belts have a magnetic buckle that clicks once it has been secured. Finally, adjust the shoulder straps so that they fit snugly against the child's shoulders (Fig. 8E). To unfasten the safety belts, press the two side buttons on the crotch strap and remove it from the connector (Fig. 8F).
WARNING: For use with children from birth to about 6 months the shoulder straps must be inserted in the lowest slots (Fig. 8A - no. 1); the length of the straps may need to be reduced so that they fit the size of the child.
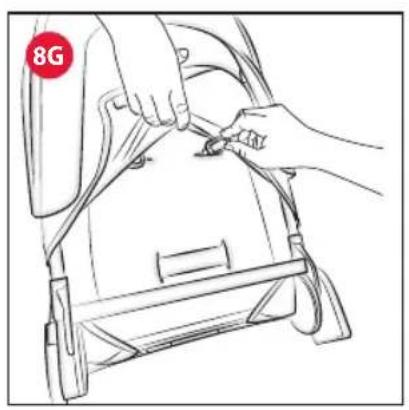
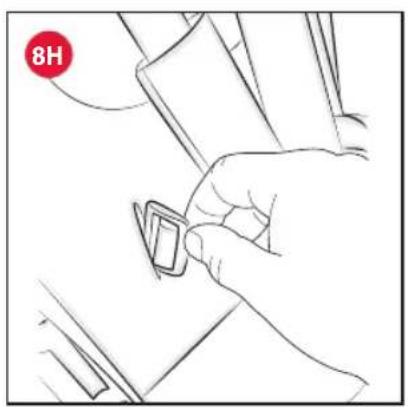
To change the position of the belts on the backrest, after opening the cover using the zip at the base of the backrest, access the back and pass the buckle through the backrest to release the belts. (Fig. 8G). Complete the operation by inserting the retaining buckle into the chosen slot, passing it through the backrest. After this, pull firmly to check the correct positioning of the belts. If the lap belts are removed, they can be reassembled by passing the plastic buckles through the slots on the backrest (diag. 6B) until fully engaged at the back. Pull firmly to check correct installation. The padded shoulder straps can also be adjusted (point 9).
WARNING: Always make sure that the straps are fastened correctly.
WARNING: To guarantee the safety of your child, the safety harness must be fastened at all times. To make sure the har-
ness straps are fitted correctly, place your child inside the stroller and pull the ends of the straps firmly.
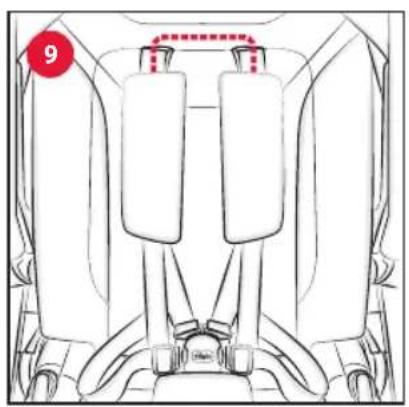
KIT COMFORT
- The Comfort Kit comprises 2 padded shoulder straps and a padded crotch strap (Fig. 9). The shoulder straps are tied together by a ribbon with a snap fastener.
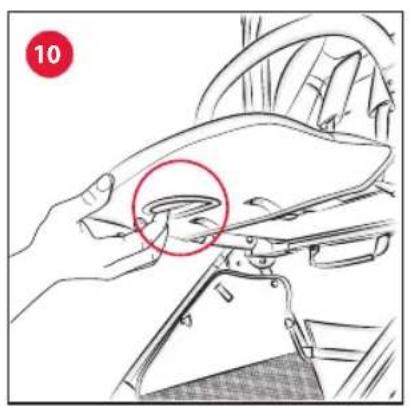
HOW TO ADJUST THE LEGREST
- The legrest has two positions. To adjust it, use the central lever located under the legrest (Fig. 10).
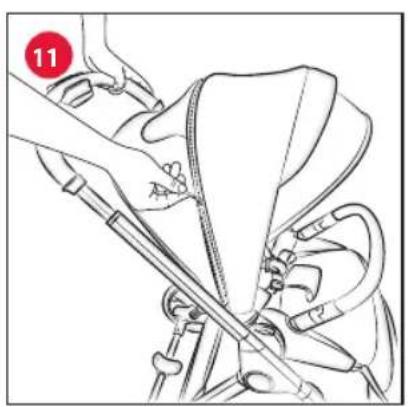
CANOPY
- The stroller is equipped with a sun canopy and wind-shield that can be adjusted to various positions.
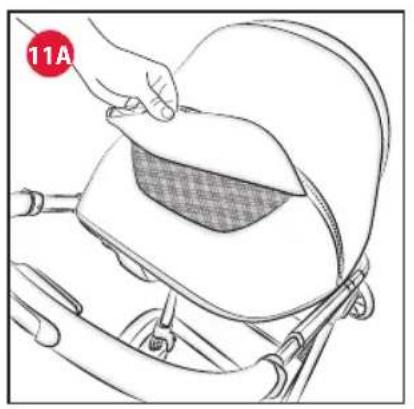
To adjust the hood, pull and/or push it centrally. For more extensive protection, open the zipper on the hood and open the remaining fabric section (Fig. 11). Raising the fabric flap present on the top section of the hood (Fig. 11A) reveals a mesh section that can be used to observe the child.
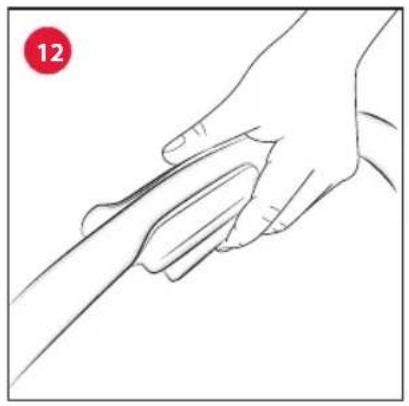
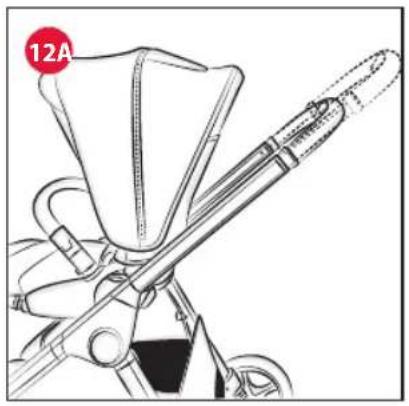
HANDLE ADJUSTMENT
The stroller features a handle that can be adjusted in height, according to the user's needs.
- Press the button in the centre of the handle (Fig. 12) and pull the handle towards you to the desired position. Starting from the lowest or closed position, the handle can be adjusted to different positions (Fig. 12A).
After switching from one position to the other, make sure the automatic locking mechanism is properly engaged.
PARKING BRAKE
- The parking brake acts on both stroller's rear wheels at the same time. To activate the brake push the lever down (Fig. 13). To deactivate the brake, operate the lever in the other direction.
WARNING: Always apply the brakes whenever the stroller is stopped. Never leave the stroller on a sloped surface, with a child inside, even with the parking brakes engaged.
WARNING: After operating the brake lever, ensure that the brakes are correctly engaged in both of the rear wheel units.
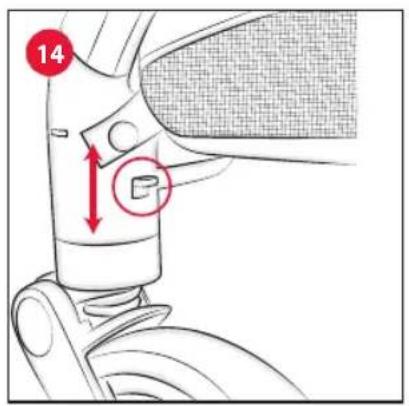
SWIVEL WHEELS
The stroller has front swivel/fixed wheels. It is recommended to use the wheels in the fixed mode on particularly changeable surfaces. The use of the wheels in the swivel mode is recommended in order to increase the control of the stroller on a normal road surface.
- To lock the front wheels in swivel mode, push down on the lever located on the rear part of the wheels; to unlock them, push the lever upwards (Fig. 14).
Ensure that both front wheels are fixed or in swivel mode.
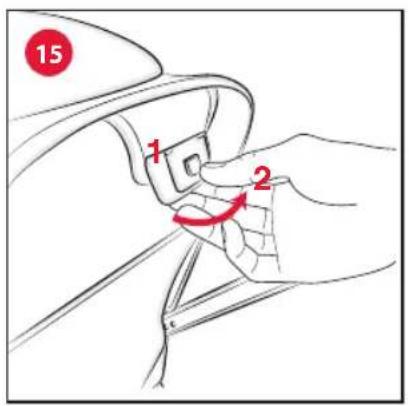
WARNING: When opening or closing the stroller, make sure that your child or other children are at a safe distance. Make sure that during these operations the moving parts of the stroller do not come into contact with your child.
WARNING: You must remove all contents from the basket before closing the stroller.
- The stroller can be folded either without the seat or with the seat (in either configuration: forward facing or rear-
ward facing).
To close the stroller, adjust the height of the handle to the lowest, closed position.
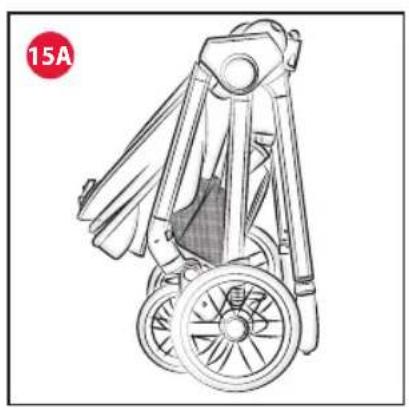
Press the button and, at the same time, raise the backrest adjustment lever by pushing the backrest forward (Fig. 15). The stroller will close itself automatically (Fig. 15A).
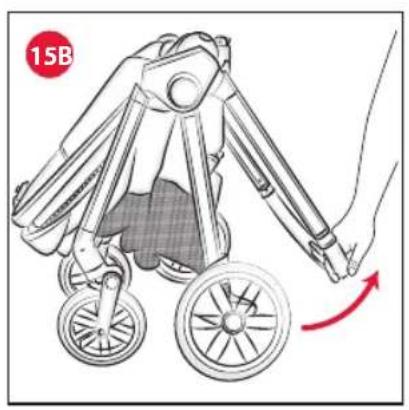
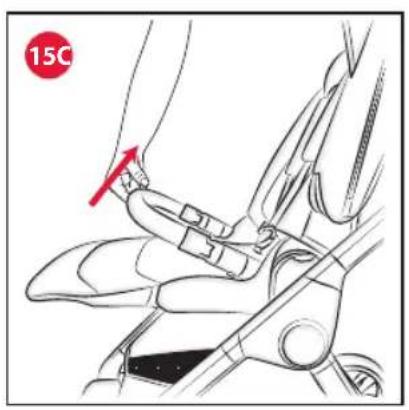
To reopen the stroller, lift the handle until a click confirms that it has opened (Fig. 15B), install the seat as indicated in step 5 if previously removed, taking care to lift the bumper bar as shown in figure 15C.
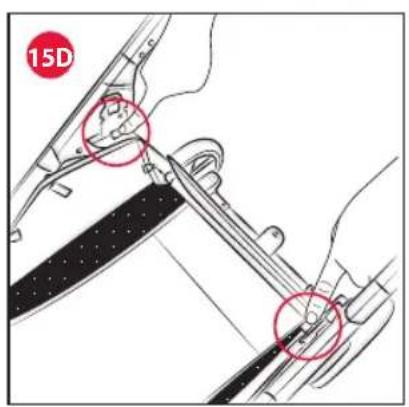
In case of closing the frame without the seat, it is necessary to push down the levers on the joints (Fig. 15D), the stroller will fold at this point.
CARRY-ALL BASKET
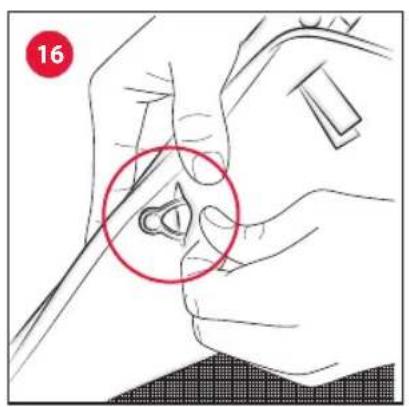
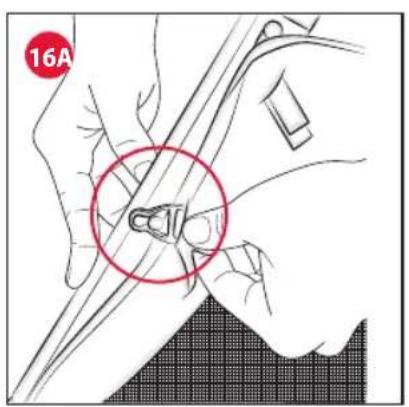
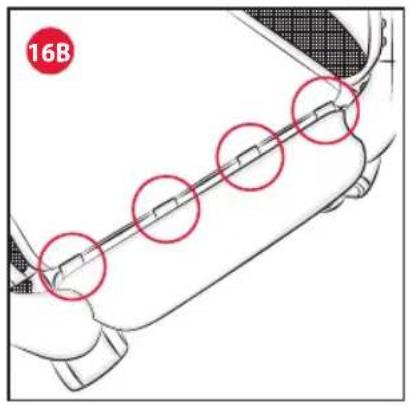
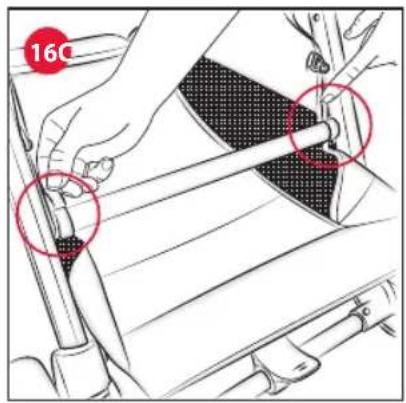
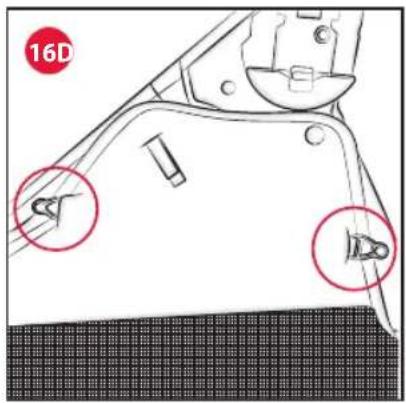
- To remove the basket from the frame of the stroller, unlock the 3 plastic hooks on each side (Fig. 16 and 16A) and the snap fasteners. To act on the plastic hooks sewn to the side elastic of the basket, it is suggested to perform the operation with the frame semi-closed. Detach the Velcro straps under the footplate (Fig. 16B), and those on both sides of the rear tube (Fig. 16C).
To assemble the basket, carry out the operations in reverse order, taking care to fasten the hooks of the side elastic bands onto the metal pins (Fig. 16D).
REMOVING THE LINING OF THE HOOD
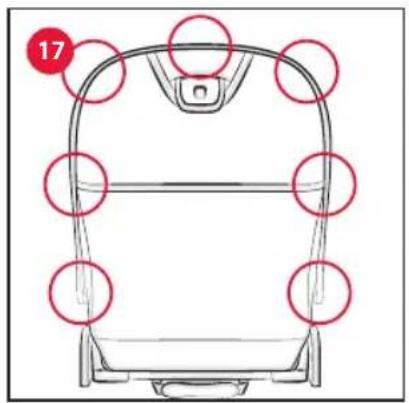
- If the fabric needs to be removed from the hood for cleaning, follow these steps: Open the snap fasteners on the joints of the hood and then all those on the perimeter of the backrest (Fig.17).
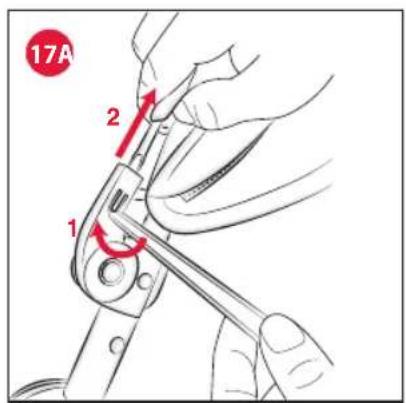
Use a pointed object to slightly lift the plastic retainers of the joints (Fig. 17A) and pull the metal rod of the hood upwards; Pull the rod out of the fabric.
To reassemble the fabric and the hood carry out the operations in reverse order.
WARNING: The hood must be fixed on both sides of the stroller. Ensure that the canopy is correctly fastened.
REMOVING SEAT LINING
- To easily remove the fabric from the seat, detach the seat from the frame (paragraph 5) and remove the bumper bar (paragraph 6).
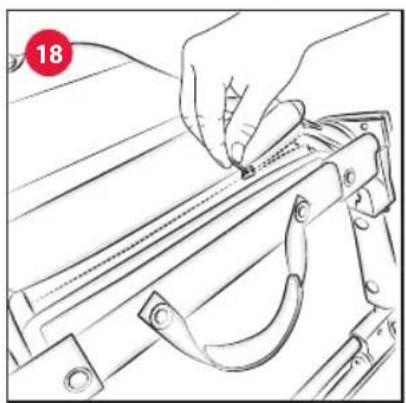
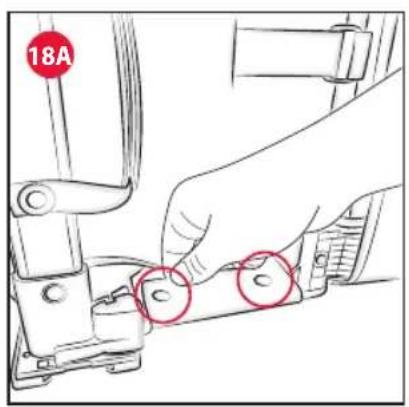
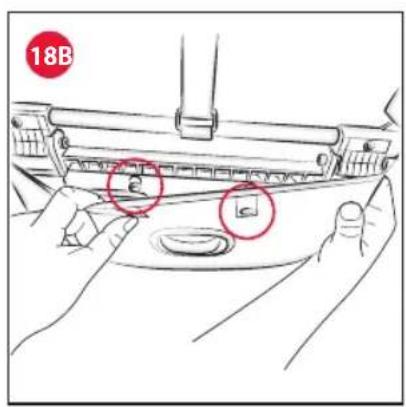
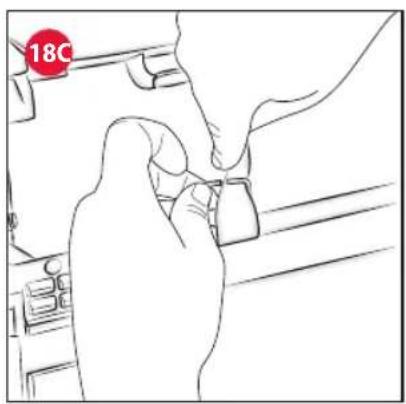
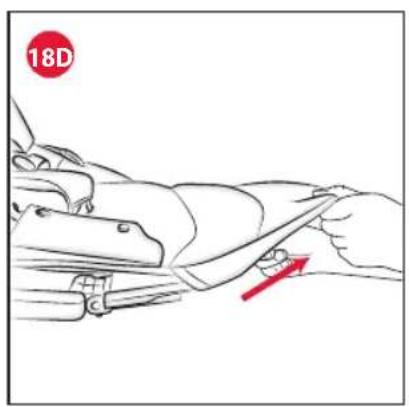
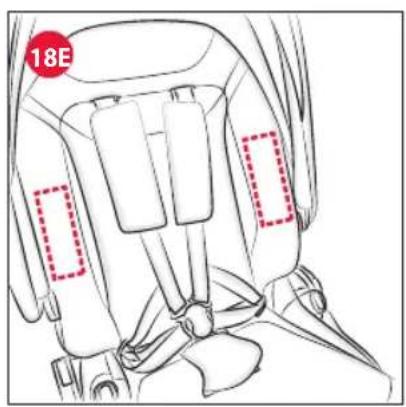
After unfastening the hood (paragraph 17), open the zip at the bottom of the backrest (Fig. 18), release the snap fasteners located under both sides of the seat (Fig. 18A) and under the legrest (Fig. 18B); remove the crotch strap with buckle from the frame by passing the ribbon through the slot in the metal ring (Fig. 18C) and remove the fabric from the legrest (Fig. 18D).
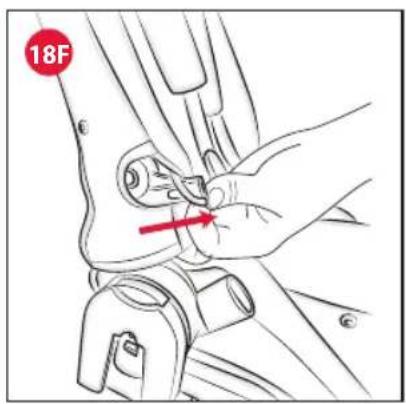
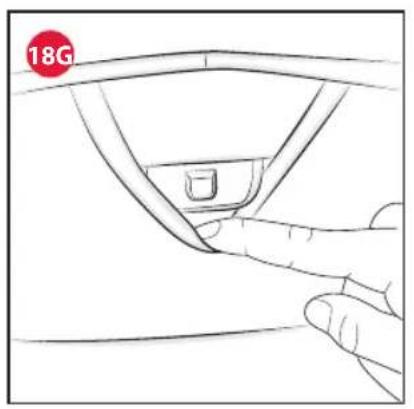
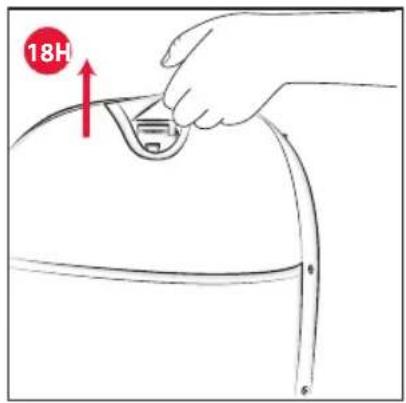
Detach the Velcro straps located on the inside of the joints of the hood (Fig. 18E) and remove the fabric from the joints (fig. 18F) complete the operation by releasing the fabric from the backrest adjustment lever (Fig. 18G) and pull it upwards (Fig. 18H).
After removing the fabric from the frame, the four belts can be pulled out by passing them through the slots, as described in point 8.
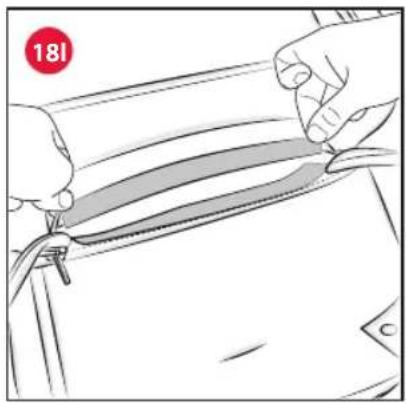
The fabric is now released, the panel must be removed from the backrest by opening the Velcro at the bottom of the panel (Fig. 18l)
To fit the lining on the seat, follow these same steps in the reverse order; During this operation it is necessary to re-at-
tach the legstrap to the tube (Fig.18C), the waist straps at the bottom of the backrest (Fig. 8A - no.4) and the shoulder straps in the top part of the backrest (Fig. 8A - no.1/2/3).
WARNING: Pull the seat belts tight to check that they are assembled correctly.
WARNING: Once the seat lining fitting is complete, reposition the comfort kit as indicated in point 9.
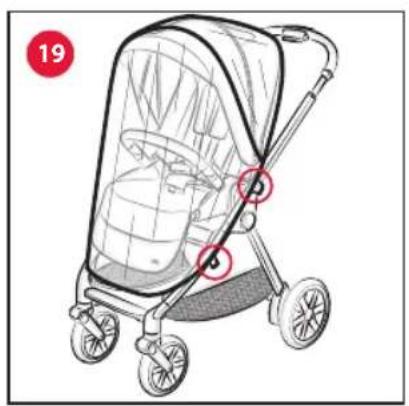
RAIN COVER
- The stroller is equipped with a rain cover.
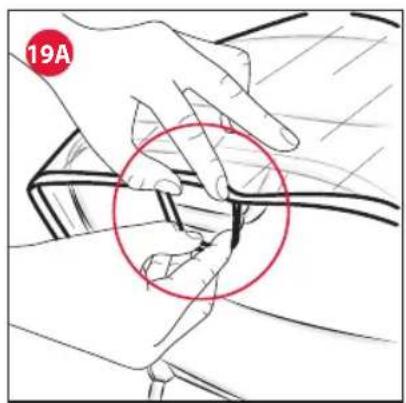
To install, place the rain cover on the hood and attach it to the tubes of the stroller with the appropriate straps (Fig. 19). Complete the operation by fastening the elasticated strap near the backrest adjustment button (Fig. 19A).
After use, if wet, let the rain cover dry off before folding and storing it. The rain cover can be used both forward facing and parent facing.
WARNING: The rain cover cannot be used on the stroller without the hood being extended, as it may cause suffocation. When the rain cover is fitted on the stroller, never leave it exposed to direct sunlight with the child inside, as the temperature will rise considerably.
USING THE CAR SEAT AND CHILD CARRY COT
The following products can be attached to the CHICCO BELLAGIO stroller:
- CHICCO KORY / CHICCO FIRST-SEAT RECLINE car seat by using special adapters on the frame.
• CHICCO FLEXI carry cot.
• CHICCO GRAN COMFORT carry cot.
For instructions on assembling and disassembling the car seats refer to the manual for the CHICCO BELLAGIO ADAPTORS.
For assembly and disassembly of the child carry cots, please refer to the child carry cot manual.
WARNING: Before using the stroller with a carry cot or car seat, always check that the attachment devices are correctly engaged by pulling up.
WARNING: Both car seats and the carry cot may only be attached to the chassis in the parent-facing position.
CHICCO BELLAGIO SEAT ATTACHMENT ON THE CHICCO LULLAGLIDE/E-LULLAGLIDE STAND
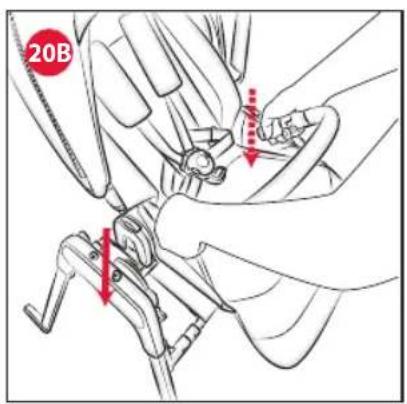
WARNING: Do not attach/remove the seat when your child is sitting in it.
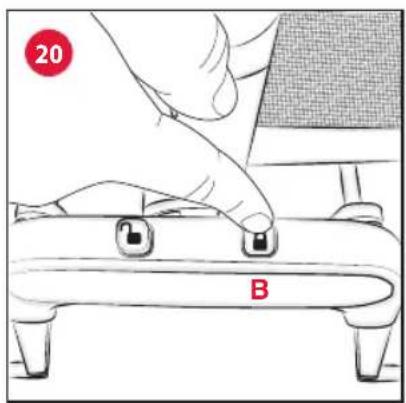
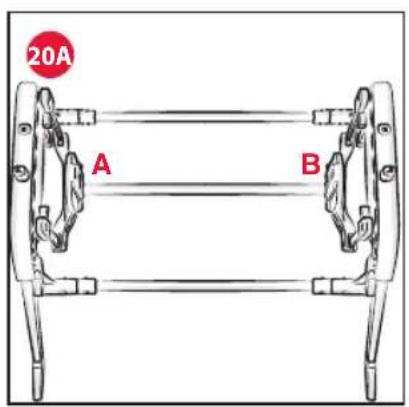
- To connect the seat, make sure that the stand is in a fixed mode. (Fig. 20)
In order to mount the stroller seat on the Lullaglide/E-Lullaglide stand, the seat must be hooked onto the side plastic clips (fig. 20A components A-B) until hearing the click (fig. 20B). The seat can be assembled in either direction.
WARNING: Before using, make sure that the seat is properly locked on by pulling it upwards.
WARNING: Always use the restraint system.
The use of the crotch strap and safety harness is necessary to guarantee the safety of your child.
Always use the safety harness together with the crotch strap.
CHICCO BELLAGIO SEAT RELEASE FROM CHICCO LULLAGLIDE/E-LULLAGLIDE STAND
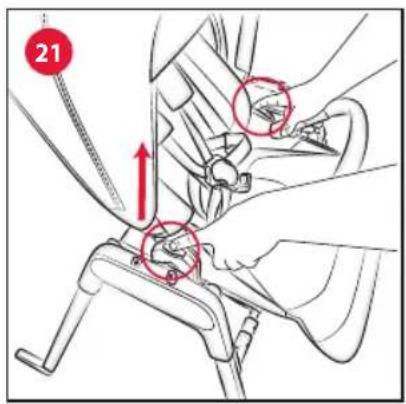
WARNING: The child must never be sitting in the seat when fastening/unfastening it
- To release the seat press the buttons located on the seat joints simultaneously and pull up (Fig. 21).
LEG COVER
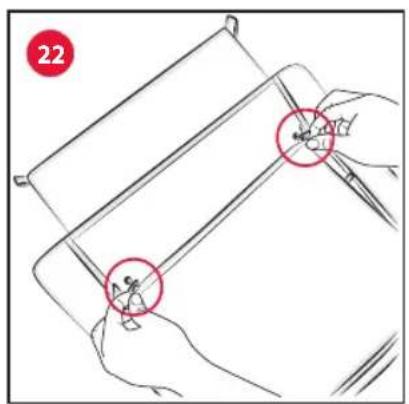
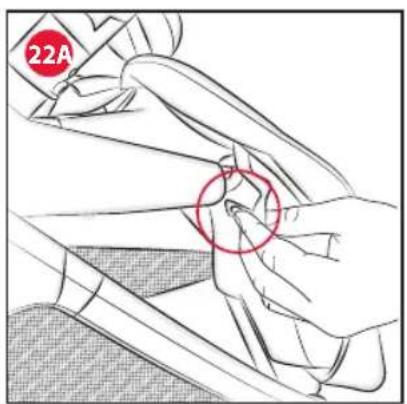
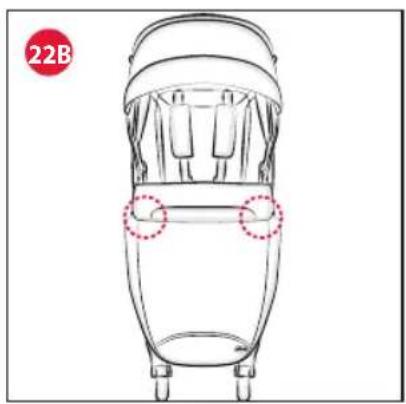
- The cover of the CHICCO FLEXI/CHICCO GRAN COMFORT Carry cot also acts as a leg cover for the stroller. Unfasten the two snap buttons found inside the cover (Fig. 22) and fasten them at the sides of the stroller's footrest (Fig. 22A). Secure the upper flap to the bumper bar by fastening the two snap buttons (Fig. 22B), or, for greater protection, fasten it to the two snap buttons found at the sides of the canopy (Fig. 22C).
WARRANTY
The product is guaranteed against any lack of conformity under normal use as specified in the instructions. The warranty shall not therefore apply in the case of damage caused by improper use, wear or accidental events. For the duration of warranty on conformity defects, please refer to the specific provisions of national laws applicable in the country of purchase, where provided.
FR NOTICE D'UTILISATION IMPORTANT - A LIRE ATTENTIVEMENT ET À CONSERVER POUR RÉFÉRENCE ULTÉ- RIEURE.
AVERTISSEMENT : AVANT L'EMPLOI, ENLEVER ET ÉLIMINER TOUS LES SACS EN PLASTIQUE ET ÉLÉMENTS QUI FONT PARTIE DE L'EMBALLAGE DU PRODUIT ET LES TENIR HORS DE PORTÉE DES ENFANTS.
AVERTISSEMENTS
Handwas in koud water

Niet bleken

Niet in de droogtrommel drogen

Niet strijken