
KA-5092 - Heating TRISTAR - Free user manual and instructions
Find the device manual for free KA-5092 TRISTAR in PDF.

| Product type | Electric heater |
| Brand | TriStar |
| Model | KA-5092 |
| Power supply | 220-240V~, 50/60Hz |
| Power | 400W |
| Adjustable temperature range | 5°C to 55°C |
| Timer | 0 to 24 hours |
| Operating modes | Normal mode, ECO mode |
| Controls | Touch panel + remote control |
| Display | LED |
| Child lock | Yes |
| Installation | Wall-mounted (brackets included) or on feet (supplied) |
| Recommended installation height | 20 to 100 cm from floor |
| Safety distance | 1 m minimum from flammable materials |
| Overheat protection | Yes |
| Automatic shut-off | Yes (ECO mode, open window detection) |
| Automatic screen off | After 1 minute of inactivity |
| Cleaning | Damp cloth, no abrasive products |
| Spare parts | Available at www.tristar.eu |
| Customer service | www.tristar.eu/fr-fr/service-client%C3%A8le |
Frequently Asked Questions - KA-5092 TRISTAR
User questions about KA-5092 TRISTAR
0 question about this device. Answer the ones you know or ask your own.
Ask a new question about this device
Download the instructions for your Heating in PDF format for free! Find your manual KA-5092 - TRISTAR and take your electronic device back in hand. On this page are published all the documents necessary for the use of your device. KA-5092 by TRISTAR.
USER MANUAL KA-5092 TRISTAR
natural_image
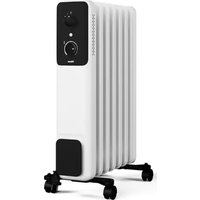
White rectangular electronic device with a digital display and 'TRISTAR' branding (no visible text or symbols on the device body)EN - This product is only suitable for well insulated spaces or occasional use. NL - Dit product is uitsluitend geschikt voor goed geïsoleerde plaatsen of voor incidenteel gebruik. FR - Ce produit ne peut être utilisé que dans des locaux bien isolés ou de manière occasionnelle. DE - Dieses Produkt ist nur für gut isolierte Räume oder für den gelegentlichen Gebrauch geeignet. ES - Este producto está indicado únicamente en lugares abrigados o para una utilización puntual. IT - II presente prodotto è adatto solo a ambienti correttamente isolati o ad un uso occasionale. PT - Este produto é adequado apenas para espaços bem isolados espaços ou utilização ocasional. SV - Denna produkt är endast lämpad för välisolerade utrymmen eller sporadisk användning. PL - Ten produkt jest odpowiedni tylko do sporadycznego użytku lub do stosowania w dobrze izolowanych pomieszczeniach. CZ - Tento výrobek je vhodný pouze pro dobne izolované prostory nebo obÃasné používání. SK - Tento výrobok je určený iba do dobre izolovaných priestorov alebo na príležitostné použitie. DA - Dette produkt er kun egnet til godt isolerede rum eller lejlighedsvis brug. NO - Dette produktet er bare egnet for godt isolerte steder eller tilfeldig bruk. FI - Tämä tuote soveltuu ainoastaan hyvin eristettyihin tiloihin tai saturnnaiseen käyttöön.
Infrared Panel Heater KA-5092
| EN | User manual 3 | SV | Bruksanvisning | 36 | |
| NL | Gebruikshandleiding | 7 | PL | Instrukcja obsługi | 41 |
| FR | Mode d'emploi | 12 | CS | Uživatelská příručka | 46 |
| DE | Benutzerhandbuch 17 | SK | Používateľská príručka | 51 | |
| ES | Manual del usuario | 22 | FI | Käyttöopas | 56 |
| PT | Manual do utilizador | 27 | DA | Brugervejledning | 61 |
| IT | Manuale d'uso | 32 | NO | Brukerhåndbok | 66 |
EN User manual 3 SV Bruksanvisning 36
NL Gebruikshandleiding 7 PL Instrukcja obsługi 41
FR Mode d'emploi 12 CS Uživatelská příručka 46
DE Benutzerhandbuch 17 SK Používatel'ská príručka 51
ES Manual del usuario 22 FI Käyttöopas 56
PT Manual do utilizador 27 DA Brugervejledning 61
IT Manuale d'uso 32 NO Brukerhåndbok 66

Infrared Panel Heater
FOREWORD
About this document
This user manual contains all the information for correct, safe, and efficient use of the appliance.
Ensure you have fully read and understood the instructions in this user manual before you use the appliance.
Always store this user manual in a safe place near the appliance for future reference.
Original instructions
This manual is originally written in English. All other languages are translated documents.
Support
For spare parts and more information about the appliance, please visit www.tristar.eu/en-gb/customerservice
General symbols
| Symbol Description | |
 | This product complies with conformity requirements of the applicable European regulations or directives. |
 | The Green Dot is the registered trademark of Der Grüne Punkt – Duales System Deutschland GmbH and is protected as a trademark worldwide. The logo may only be used by customers of DSD GmbH holding a valid trademark usage contract or by engaged waste management companies within the Federal Republic of Germany. This also applies to reproduction of the logo by third parties in a dictionary, an encyclopaedia or an electronic database containing a reference manual. |
 | The universal recycling symbol, logo, or icon is an internationally recognized symbol used to designate recyclable materials. The recycling symbol is in the public domain and is not a trademark. |
 | Applicable in France:The product or packaging can be recycled and components must be disposed of separately.Follow the local regulations. |
 | Applicable in Italy:The product or packaging can be recycled and components must be disposed of separately.Follow the local regulations. |
 | Waste electrical products should not be disposed of with household waste. Please recycle where facilities exist. Check with your local authority or local store for recycling advice. |
APPLIANCE DESCRIPTION
Main parts (see image A)
1 Main body
2 Feet
3 Control panel
4 Wall mount brackets
5 Power box
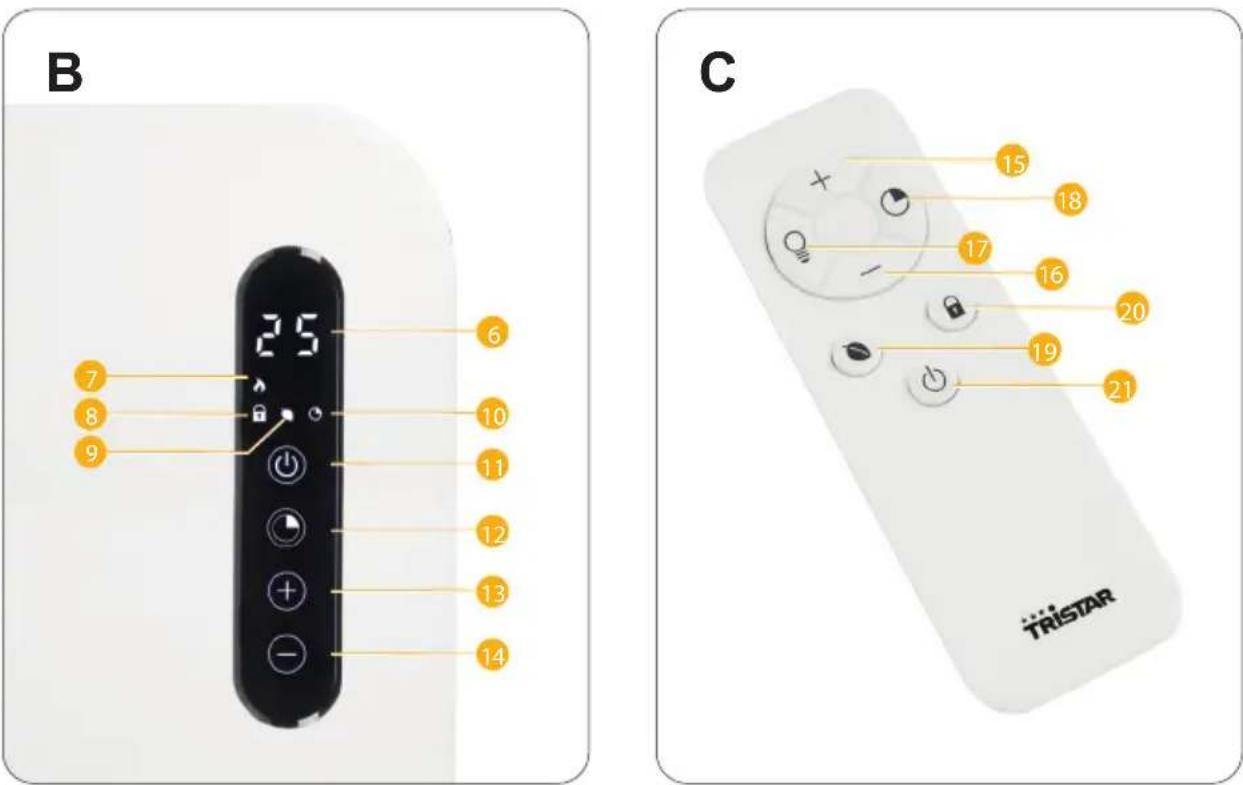
Control panel (see image B)
6 LED Display
7 Heating indicator light
8 Child lock indicator light
9 ECO indicator light
10 Timer indicator light
11 Power button
12 Timer button
13 Plus - button
14 Minus - button
Remote control (see image C)
15 Plus - button
16 Minus - button
17 Screen off button
18 Timer button
19 ECO mode button
20 Child lock button
21 Power button
SAFETY
Safety Instructions
In order to avoid overheating, do not cover the heater
- By ignoring the safety instructions the manufacturer cannot be held responsible for the damage.
- If the supply cord is damaged, it must be replaced by the manufacturer, its service agent or similarly qualified persons in order to avoid a hazard.
- Never move the appliance by pulling the cord and make sure the cord cannot become entangled.
- The appliance must be placed on a stable, level surface.
- The user must not leave the appliance unattended while it is connected to the supply.
- This appliance is only to be used for household purposes and only for the purpose it is made for.
- This appliance can be used by children aged from 8 years and above and persons with reduced physical, sensory or mental capabilities or lack of experience and knowledge if they have been given supervision or instructions concerning use of the appliance in a safe way and understand the hazards involved.
• Children shall not play with the appliance. - Cleaning and user maintenance shall not be made by children without supervision.
- Children of less than 3 years should be kept away unless continuously supervised.
- Children aged from 3 years and less than 8 years shall only switch on/off the appliance provided that it has been placed or installed in its intended normal operating position and they have been given supervision or instruction concerning use of the appliance in a safe way and understand the hazards
involved.
- Children aged from 3 years and less than 8 years shall not plug in, regulate and clean the appliance or perform user maintenance.
- To protect yourself against an electric shock, do not immerse the cord, plug or appliance in the water or any other liquid.
- WARNING: Some parts of this product can become very hot and cause burns. Particular attention has to be given where children and vulnerable people are present.
- Do not use this heater in the immediate surroundings of a bath, a shower or a swimming pool.
- Joists, beams and rafters shall not be cut or notched to install the appliance.
- Please do not install the appliance close to curtains and other combustible materials. This could cause a fire.
- The appliance shall, under no circumstances, be covered with insulating material or similar material.
- The heater must not be located immediately below a socket-outlet.
- Do not use this heater if it has been dropped.
- Use this heater on a horizontal and stable surface, or fix it to the wall, as applicable.
- WARNING: Do not use this heater in small rooms when they are occupied by persons not capable of leaving the room on their own, unless constant supervision is provided.
- WARNING: To reduce the risk of fire, keep textiles, curtain, or any other flammable material a minimum distance of 1m from the air outlet.
- The heater needs to be installed so that the switches and other controls cannot be touched by a person in the bath or shower.
BEFORE FIRST USE
- When the device is turned on for the first time, a slight odour will occur. This is normal, ensure adequate ventilation. This smell is only temporary and will soon fade.
- During heating up and cooling down there may be some noises caused by the heater casing expanding and contracting, this is normal and does not indicate any fault.
- Connect the power cable to the socket.
Note: Make sure the indicated voltage on the device matches the local voltage before connecting the device. Voltage 220V-240V \~ 50/60Hz
USE
Installation
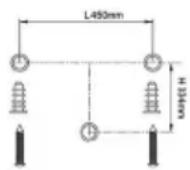
Wall mounting
- Mark the positions of the three holes to be drilled on the wall. (Better install the heater 20cm to 100cm height from the floor toget best performance.)
- Drill the holes with the drill bit.
- Insert the plastic rails fitting into the holes.
- Insert the three metal screws for wall mounting into the plastic rails.
- Lift the heater and aim the three round holes on the brackets at back of the heater to the 3 screws on the wall, and slide the screw from Position A to Position B by moving the heater slightly.
- Make sure the distance between the bottom of the heater and the floor is no less than 20cm.

Foot assembly
- If the heater is not mounted on the wall, the supplied feet must be fitted to the unit.
- Place the feet and secure them by putting the screws into the housing.
• Take care to ensure that the feet are located correctly on the bottom end of the heater.
TOUCH BUTTON/DISPLAY FUNCTIONS
- Check the heater to be sure it is not damaged before using.
- Insert the plug in the socket, you will hear "beep", the full screen will be light on for 1.5 seconds, then display "--", and the heater is in standby mode.
- PressB 11 switch on the control panel or remote, the display will show defaulted setting temperature 25^ . Heater will start working when room temperature is 1 degree lower than setting temperature, or stop working when room temperature reaches setting temperature.
- PressB 13 or B 14 key on the control panel or remote to adjust the temperature setting, it will flash 5 seconds on the display to confirm the setting temperature. With each press, the temperature will be increased(B 13) or decreased(B 14) by one degree. The temperature setting range is 05-55°C.
- PressB 12 key once on the control panel or remote control, LED screen flashes, press B 13 or B 14 to set 0-24 hours timer. The countdown timer is set after 5 seconds blinking.
- To enable the child lock, press and hold the “plus” key on the display or the “child lock button” on the remote. To disable the child lock, press and hold the “minus” or press the “child lock” on the remote again. When the Child Lock is active, all buttons on the control panel will be disabled, and the heater can only be operated using the remote control.
- When powered on, the display will switch off if you change nothing in the settings for more than 1 minute. You can reactivate it by pressing once on any button at random.
- ECO Mode: When you turn this on, the B⑨ ECO indicator light will light up on the display. When opening the window and the room temperature drops more than 5 degrees in 10 minutes, the product automatically stops heating to save energy.
CLEANING AND MAINTENANCE
- Before cleaning, unplug the appliance and wait for the appliance to cool down.
- Clean the appliance with a damp cloth. Never use harsh and abrasive cleaners, scouring pad or steel wool, which damages the device.
STORAGE
Always disconnect the appliance, let it completely cool and clean it before storing. If you do not use the device for a long period, put back the unit and the instruction manual to the original carton and store in a dry and ventilated place. Do not place any heavy items on top of carton during storing as this may damage the appliance.
TECHNICAL SPECIFICATIONS
Art. nr. KA-5092
Voltage 220-240V\~
Frequency 50-60Hz
Power 400W
DISPOSAL

The crossed out wheelie bin symbol means that this product shall not be disposed of with normal household waste. Electronic and Electrical Equipment not included in the selective sorting process are potentially dangerous for the environment and human health due to the presence of hazardous substances. Please dispose of responsibly at an approved waste or recycling facility.
SUPPORT
You can find all available information and spare parts at www.tristar.eu!

Gebruikshandleiding
Infrarood paneelverwarming
VOORWOORD
Over dit document
BESCHRIJVING APPARAAT
4 Supports de fixation murale
19 ECO-tilan painike
20 Lapsilukituspainike
21 Virtapainike
Turvallisuusohjeet

- Infrared Panel Heater KA-5092
- Infrared Panel Heater
- FOREWORD
- About this document
- Original instructions
- Support
- APPLIANCE DESCRIPTION
- Main parts (see image A)
- Control panel (see image B)
- Remote control (see image C)
- SAFETY
- Safety Instructions
- In order to avoid overheating, do not cover the heater
- BEFORE FIRST USE
- USE
- Installation
- Wall mounting
- Foot assembly
- TOUCH BUTTON/DISPLAY FUNCTIONS
- CLEANING AND MAINTENANCE
- STORAGE
- TECHNICAL SPECIFICATIONS
- DISPOSAL
- Gebruikshandleiding
- Infrarood paneelverwarming
- VOORWOORD
- Over dit document
- BESCHRIJVING APPARAAT
- Turvallisuusohjeet
Brand : TRISTAR
Model : KA-5092
Category : Heating