Kult X 61.3022.2140 - Cooker WMF - Free user manual and instructions
Find the device manual for free Kult X 61.3022.2140 WMF in PDF.

| Brand | WMF |
| Model | Kult X 61.3022.2140 |
| Product Type | Induction hob (cooktop) |
| Number of cooking zones | 2 |
| Control Type | Touch control panel |
| Supply Voltage | 220-240 V ~, 50-60 Hz |
| Total Power | 3500 W |
| Protection Class | 1 |
| Power Levels | 8 (100 W to 2100 W per zone) |
| Power-Sharing Function | Equitable power distribution between the two zones |
| Direct Cooking Programs | Keep Warm, Melt, Simmer, Steam, Sauté, Turbo |
| Timer | 0:01 to 9:59 hours, adjustable in 1 min or 10 min increments |
| Compatible Utensil Diameter | 180 to 280 mm |
| Maximum Weight per Utensil | 6 kg |
| Required Utensil Type | Ferromagnetic base (stainless steel with iron core, cast iron, magnetic enamel) |
| Child Safety | Not specifically mentioned, but instructions for children |
| Automatic Shut-off | Yes (standby after 10 min pause, shut-off after timer ends) |
| Overheating Protection | Yes (triggers error messages E03/E04/E0) |
| Overvoltage/Undervoltage Protection | Yes (messages E01/E02) |
| Cleaning | Ceramic glass surface: damp cloth or mild soapy solution; housing and controls: soft cloth |
| Spare Parts (power cord) | Must be replaced by the manufacturer, its service department, or a qualified person |
| Energy Consumption (entire hob) | 183.8 Wh/kg (according to standard EN 60350-2) |
| Ventilation | Minimum distance of 10 cm from other objects/walls; air intake from underneath |
| Residual Heat Indicator | Display of letter H on the screen while the surface is hot |
| Electromagnetic Compatibility | Medical device (pacemaker): consult a doctor |
Frequently Asked Questions - Kult X 61.3022.2140 WMF
User questions about Kult X 61.3022.2140 WMF
0 question about this device. Answer the ones you know or ask your own.
Ask a new question about this device
Download the instructions for your Cooker in PDF format for free! Find your manual Kult X 61.3022.2140 - WMF and take your electronic device back in hand. On this page are published all the documents necessary for the use of your device. Kult X 61.3022.2140 by WMF.
USER MANUAL Kult X 61.3022.2140 WMF
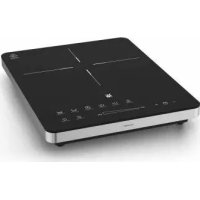
natural_image
Black rectangular electronic device with control buttons and a triangular logo on the top (no visible text or symbols)EN Operating Manual 14 Double Induction Hob
Operating Manual
Double Induction Hob
Touch-Bedienfeld (3)

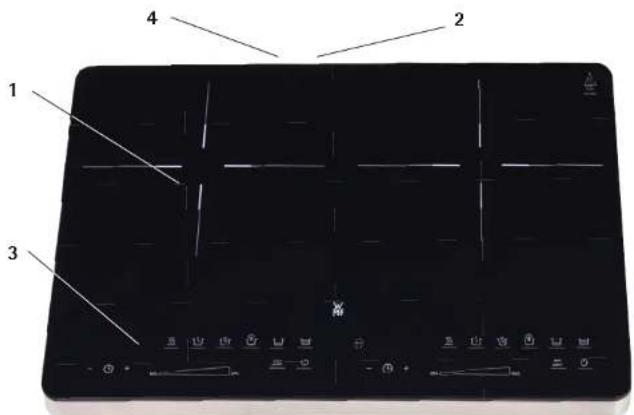
Layout
- Induction hob
- Fan
- Touch control panel
- Plug
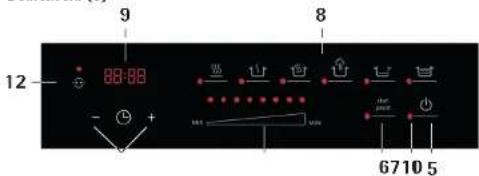
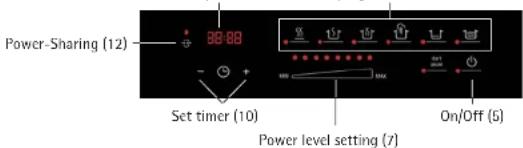
Touch control panel
- On/Off button
- Start/Pause button
- Power level controller
- Direct select programmes
- Display
- Timer button
- LED
- Power-Sharing

Important safety information
- The appliance can be used by children older than 8 years of age as well as by people with limited physical, sensory or mental capabilities and persons lacking experience and/or lacking knowledge, if they are supervised or have received instructions on how to use the appliance safely and have understood the resulting risks.
- Children should be supervised in order to ensure that they do not play with the device.
■ Children must not clean or maintain the appliance unless they are older than 8 years of age and are supervised. - Keep the appliance and its connection cable out of reach of children under 8 years of age.
- The appliance must not be operated via an external timer or remote control.
- The appliance is designed for indoor household use only.
- Caution! Risk of burns! The temperature of accessible surfaces can become very hot. They also remain hot for some time after the appliance has been switched off.
- If the appliance's power cord is damaged, it must be replaced by the manufacturer, its after-sales service or a similarly qualified person if hazards are to be avoided.
- If the surface is cracked, switch off the appliance and unplug the power cord to avoid the risk of electric shock.
■ Always disconnect the appliance from the mains supply if it is to be left unattended, as well as before assembling, disassembling or cleaning it. - The supply cord should be regularly examined for signs of damage, and if the cord is damaged, the appliance must not be used.
- Do not place any cooking utensils, saucepan lids, knives or other metal objects on the hob. Such objects can heat up significantly if the appliance is switched on.
- Do not touch the hot surface of the ceramic hotplates. The induction hob itself does not generate any heat during the cooking process. The temperature of the cookware however, heats up the hotplate.
- This appliance is designed for use in households and similar envi-
ronments, such as:
- Staff kitchen areas in shops, offices and other commercial environments;
- Farmhouses;
- By guests at hotels, motels and other residential facilities;
- At bed-and-breakfast establishments.
- The appliance is not intended for purely commercial use.
Before use
Read the instruction manual carefully. It contains important information about the use, safety and maintenance of the appliance. It should be kept in a safe place and passed on to any subsequent users. The appliance may be used only for the intended purpose in accordance with these instructions for use. The safety precautions must be observed during use.
Technical data
Mains voltage: 220 - 240 V\~, 50 - 60 Hz
Power consumption: 3500 Watt
Protection class:
Additional safety information
- Persons with heightened electro-sensitivity shouldn't be in the immediate area of the appliance any longer than is necessary.
- Persons fitted with cardiac pacemakers or medication pumps who are uncertain whether using the appliance is harmless for them, should speak with their doctor.
- The appliance must not be operated on a metal base, as this can heat up considerably.
- To ensure proper ventilation of the appliance, make sure that the appliance is at least 10 cm away from other objects or walls.
- The cool air is drawn in by the underside of the appliance. Do not cover or block any of the appliances openings.
- Position the cookware centrally on the hob. In this way, the base of the pan largely screens the electro-magnetic field.
- Do no remove any covers from the appliance.
- Do not place any empty piece of cookware on the hob when it is switched on. Heating up an empty cooking pot causes the overheating protection to be triggered.
- Do not heat up any sealed cans. There is a risk of explosion!
- The appliance should be connected only to carthed wall sockets that have been installed in accordance with the regulations. The power cable and plug must be dry.
- The connection cable must not come into contact with hot appliance parts.
- Stop using the appliance and/or pull the mains plug out of the socket immediately if:
- The appliance or the mains cable is damaged;
- You suspect that the device may be defective following a fall or similar incident. In such cases, arrange for the appliance to be repaired.
- Do not touch the surface of the ceramic hotplates while they are still hot (H is shown in the display).
- Do not leave the appliance unattended.
■ Pull out the mains plug
- If the appliance malfunctions during use;
- Before cleaning and care;
- After use.
- Do not immerse the appliance in water to clean it.
- We accept no liability for any damage caused as a result of misuse, incorrect operation or improper repairs. Warranty claims are likewise excluded in such cases.
Use
The induction cooker is intended for the warming, cooking and frying of foodstuffs and may only be used indoors. It is only intended for domestic use. The cookware used must be suitable for induction cookers. Induction hobs require special cookware.
Suitable cookware
- Cookware with a ferromagnetic base
- Stainless steel (with iron core in the base), cast iron
- Enamel frying pans with a magnetic base
- Recommended cookware diameter: 180 mm to 280 mm
- Max. weight 6 kg (pot and content)
Unsuitable cookware
- Ceramic pots, heat-resistant glass
■ Copper, aluminium or other non-metallic cookware - Cookware with feet
- Containers with a curved base
- Containers made from stainless steel without a magnetic steel core
- Containers without a flat base
Carry out your own test!
You can easily test the suitability of the cookware yourself:
Hold a magnet next to the base of the pan. If there is a strong magnetic attraction, the cookware is suitable. The induction hob only works with appropriate cookware. The appliance recognises if the cookware is not suitable and behaves as if no cookware is on the hotplate: The hob doesn't switch on.
Functions
Touch control panel (3)
The double induction hob has two hotplates. You can use the two touch control panels (3) to set the two hotplates independently.
The functions of the induction hob are activated by tapping the corresponding symbol buttons. The control panel reacts to being tapped lightly without needing to apply pressure. To work correctly, the control panel has to be clean and dry. The corresponding LED lights up red when a function is activated, e.g. after switching the appliance on.
Display (9) Direct select programmes (8)

88:88


Setting power levels (7)
The appliance has eight power levels that are set and changed directly through the power level controller and displayed correspondingly through the red LEDs. If you touch a position on the power level controller, the corresponding level is selected. All LEDs from the lowest level (left) to the selected level are then lit. You can also change the selected power level by sliding your finger from left to right, or from right to left along the power level controller.
Display (9)
To show the timer. The timer can be reset any time by using the + and - (10) buttons.
Set timer (10)
The timer is set through the + and - (10) buttons. If you tap on one of the buttons, the time is changed by 1 minute. If you tap and press one of the buttons for a longer time, the time is changed progressively in 10 minute steps. The timer can be set to a value between 0:01 and 9:59 by directly using the 8 power levels (7), without selecting a programme. The timer can be changed at any time using the programme functions and the 8 power levels (7).
Power-Sharing (12)
The Power-Sharing function ensures optimum usage of the total power available. If both hotplates are operated at the same time, they share the power settings via the Power-Sharing function. As soon as the Power-Sharing function is active, it is indicated with the red LED.
Note: If one hotplate is working at power level 7–8, the maximum power level for the other is power level 5.
Direct select programmes (8)
A programme can be selected by tapping the appropriate symbol button. If you wish to change the programme while the hob is in operation, simply tap and hold the appropriate symbol button for a whole second.
| Button Function | Approx. Temp. ^a C*) | Power level Preset | Performance Adjustable | Timer Adjustable | |
| Keep warmKeep food at serving temperature | Approx. 60 2 | 1-3 10-120 mins. | |||
| Heating up milk, melting e.g. chocolate | Approx. 50 2 | 1-2 1-30 mins. | |||
| SimmerCook in hot water below boiling point | Approx. 85 3 | 1-4 10-120 mins. | |||
| Cooking/Steaming | Approx. 95 6 | 2-8 1-120 mins. | |||
| FryQuick frying of meat or fish | Approx. 200 | 7 4-8 1-30 mins. | |||
| Boost= Rapid heating of larger quantities to maximum temperature, for example | Approx. 230 | 8 No 1-5 mins. | |||
Note: By selecting the direct select programmes (8) (with the exception of Booster), the power levels (7) can be raised or lowered to achieve quicker or slower warming.
Depending on which programme has been selected, the timer settings that are predefined for the programme functions can be changed by using the + and - (10) buttons.
Caution: It must be ensured that oils and fats that are suitable for use at high temperatures are used for the Fry and Booster programmes.
*) The temperatures of the heated foodstuffs may deviate from those shown here as the temperatures are dependent on the cookware used, amongst other factors.
Operating procedure
The induction hob offers 3 different functions:
- Use of the power levels 1-8 without timer function
- Use of the power levels 1-8 with timer function
■ Using direct select programmes (8)
Use of the power levels (7) without timer function
| Action Touch button Display | ||
| Plug the appliance in. Appliance is in standby mode. | : | |
| Tap the On/Off button; appliance is in operational readiness mode | --:-- | |
| Position the pan on the hob. | --:-- | |
| Set the desired power level 1-8. | ********** | |
| Tap the Start/Pause button. Cooking process starts. The "Appliance in use" symbol is shown in the display | start pause | |
| Adjust the power level as required, e.g. when the boiling point is reached. | ********** | |
| If necessary, tap the Start/Pause button again:- Cooking process is paused- The "Appliance in use" symbol disappears- Start/Pause LED fl ashes- Tap on the Start/Pause button to resume the cooking process | start pausestart pause | start pause |
| Switching off the hob by pushing the On/Off button twice. Note: The fan runs on for a few seconds. | : | |
| Pull out plug. |
Note: If the induction hob is in pause mode it switches itself to standby automatically after 10 minutes if the control panel is not operated.
Use of the power levels (7) with timer function
| Action Touch button Display | ||
| Plug the appliance in. Appliance is in standby mode. | : | |
| Tap the On/Off button, appliance is in operational readiness mode. | --:-- | |
| Position the pan on the hotplate. | --:-- | |
| Set the desired power level 1-8. | ********** | |
| Set the timer with +/- buttons. | - + | 0:59 |
| Tap the Start/Pause button. Cooking process and Timer starts. The "Appliance in use" symbol is shown in the display | start pause | ≡ 0:59 |
| Change the power level if required | ********** | |
| If necessary, tap the Start/Pause button again:- Cooking process and Timer is paused- The "Appliance in use" symbol disappears- Start/Pause LED fl ashes- Tap on the Start/Pause button to resume the Cooking process and Timer | start pause | 0:59start pause |
| start pause | ≡ 0:59 | |
| Once the defi ned timer time has elapsed, the appliance switches automatically to operational readiness mode. | --:-- | |
| After one minute, the appliance switches automatically to standby mode.Alternatively, press the On/Off button.Note: The fan runs on for a few seconds. | : | |
| Pull out plug. |
Note: If the induction hob is in pause mode it switches itself to standby automatically after 10 minutes if the control panel is not operated.
Using direct select programmes (8)
| Action Touch button Display | ||
| Plug the appliance in. Appliance is in standby mode. | : | |
| Tap the On/Off button; appliance is in operational readiness mode | ---:--- | |
| Position the pan on the hotplate. | ---:--- | |
| Select programme. For example "Cooking/Steaming". | 0:30··· | |
| Adjust the power level if required. | ······ | |
| Adjust the timer with + / - if required. | - 0 + | 0:59 |
| Tap the Start/Pause button. Cooking process and Timer starts. The "Appliance in use" symbol is shown in the display | start pause | ≡ 0:59 |
| If necessary, tap the Start/Pause button again:- Cooking process and Timer is paused- The "Appliance in use" symbol disappears- Start/Pause LED fl ashes- Tap on the Start/Pause button to resume the Cooking process and Timer | start pausestart pause | 0:59start pause≡ 0:59 |
| Once the defi ned timer time has elapsed, the appliance switches automatically to operational readiness mode. | ---:--- | |
| After one minute, the appliance switches automatically to standby mode.Alternatively, press the On/Off button.Note: The fan runs on for a few seconds. | : | |
| Pull out plug. |
Note: If the induction hob is in pause mode it switches itself to standby automatically after 10 minutes if the control panel is not operated.
Additional instructions for use
You can change the cooking parameters at any time while cooking:
- Change the power level using the power level controller (within the range of the predefined programme (B). See Programme table).
- Adjust the timer with the + and - (10) buttons.
- Change the programme by selecting another programme. In this case, the corresponding symbol button must be tapped and held for 1 second. This prevents an accidental change of programme from occurring.
Cleaning and care
- Pull out the mains plug before cleaning the appliance.
- Ensure that no water gets into the appliance.
- Never submerge the appliance, cable or plug in water or any other liquids.
- Do not use any cleaning agents that are abrasive or that contain benzine.
- Do not bring any fl ammable (infl ammable), acidic or alkaline material or substances close to the appliance as this could shorten the appliance's working life and a burst of flame can occur when switching the appliance on.
- Wipe down the ceramic area with a damp cloth or you can use a mild, non-abrasive soap solution.
- Wipe down the casing and control panel with a damp cloth or you can use a mild cleaning agent.
- Dry the whole appliance completely before next use.
Information for domestic electric hobs
| Symbol Value Unit | |||
| Model identifi cation 04 1532 XXXX | |||
| Type of hob —— | Domestic electric hobs | — — | |
| Number of cooking zones and/or areas —— ? — — | |||
| Heating technology (induction cooking zones and cooking areas, radiant cooking zones, solid plates) | — — | Induction cooking zones | — — |
| For non-circular cooking zones or areas: length and width of useful surface area per electric heated cooking zone or area, rounded to the nearest 5 mm | L 26 cm | ||
| W 21 cm | |||
| Energy consumption per cooking zone or area calculated per kg | Left Hob EC electric cooking | 184,3 Wh/kg | |
| Right Hob EC electric cooking | 183,3 Wh/kg | ||
| Energy consumption for the hob calcula- ted per kg | EC electric hob | 183,8 Wh/kg | |
| Reference test method | (EU) 66/2014 EN 60350-2 | ||
Errors
| Problem: Cause: Solution: | ||
| The appliance is not working. The | mains plug is not connected to a socket. | Plug the mains plug into a socket. |
| The appliance cannot be started, is beeping and the display is showing error message "E0". | There is no or unsuitable cookware on the hob. | Never use the appliance without cookware. Only use cookware that is suitable for use with inductions hobs. Follow the safety instructions for your cookware. |
| The appliance switched itself off during operation. | The appliance gets too hot. | Unplug the mains plug and clean the ventilation slots if necessary. Allow the appliance to cool down. |
| The set time has elapsed and the appliance has ended the heating process. | If the food you are cooking is not hot enough, extend the cooking time. | |
| Display shows error message "E01/E02". | The over-/undervoltage protection feature was triggered. | Ensure appropriale power supply to the appliance. |
| Display shows error message "E03/E04/E05". | The overheating protection mechanism has been triggered. | Switch off the appliance and cool it down, unplug it from the mains and switch it back on. |
| The indicator light of the on/off button is on, but the appliance isn't heating up. | The appliance is on standby, the heating function is not activated. | Select the type of operation, e.g. operation by power level or by direct select programmes. |
| The appliance was on standby and switched itself off. | The automatic shut-off feature was triggered as the appliance was not in use. | Switch the appliance back on when you want to use it. |
For UK use only
This product is supplied with a 13 A plug conforming to BS 1363 fitted to the mains lead. If the plug is unsuitable for your socket outlets or needs to be replaced, please note the following. If the plug is a non-rewireable one, cut it from the mains lead and immediately dispose of it. Never insert it into a socket outlet as there is a very great risk of an electric shock.
- The replacement of the plug at the mains lead has to be done according to the following instructions:
Warning - This appliance must be earthed
Important: The wires in this mains lead are coloured in accordance with the following code: green/yellow Earth
blue Neutral
brown Live
As the colours of the wires in the mains lead of this appliance may not correspond with the
coloured markings identifying the terminals in your plug, proceed as follows:
- the wire which is coloured green and yellow must be connected to the terminal which is
marked with the letter E or by the earth symbol ⊕, or coloured green or green and yellow. - the wire which is coloured blue must be connected to the terminal which is marked the letter N or coloured black,
- the wire which is coloured brown must be connected to the terminal which is marked with the letter L or coloured red.
- If a 13 A (BS 1363) plug is used it must be fitted with a 13 A fuse conforming to BS 1362 and be ASTA approved. If any other type of plug is used, the appliance must be protected by a 15 A fuse either in the plug or adapter or at the distribution board.
If in doubt - consult a qualified electrician.
- Never use the plug without closing the fuse cover.

The appliance complies with European directives 2014/35/EU, 2014/30/EU and 2009/125/EU.
At the end of its life, this product may not be disposed of in normal household waste, but must instead be taken to a collection point for recycling electrical and electronic appliances.
The materials are recyclable in accordance with their labelling. Reuse, recycling and other ways of reutilising old appliances make an important contribution to protecting our environment.
Please ask your local authorities for information about the appropriate disposal point.
End users are personally responsible for deleting any personal data that may be stored on appliances they are disposing of.
Subject to change.