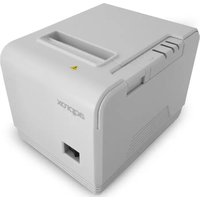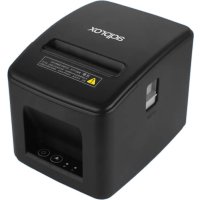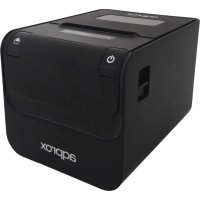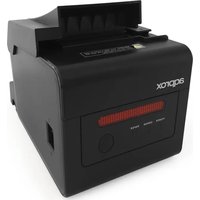
appPOS80WIFI+ - Printer Aqprox - Free user manual and instructions
Find the device manual for free appPOS80WIFI+ Aqprox in PDF.


| Product Type | Direct Thermal Printer |
| Brand | Aqprox |
| Model | appPOS80WIFI+ |
| Print Speed | 230 mm/s |
| Interface | USB + Wi-Fi (IEEE 802.11b/g/n) |
| Paper Width | 79.5 ± 0.5 mm |
| Max Roll Diameter | 83 mm |
| Paper Thickness | 0.06 to 0.08 mm |
| Auto Cutter | Partial |
| Head Life | 100 km |
| Print Density | 576 or 512 dots/line |
| Command Set | ESC/POS compatible |
| Black Mark Detection | Yes |
| Network Monitoring | Yes |
| Barcodes | UPC-A/E, JAN13/8, CODE39, ITF, CODABAR, CODE93, CODE128 |
| 2D Code | QR Code, PDF417 |
| Input Power | AC 110-220V, 50-60 Hz |
| Printer Power | DC 24V, 2.5 A |
| Compatible Drivers | Windows 2000 to 10, Linux |
| Operating Temperature | 0 to 45 °C |
| Operating Humidity | 10 to 80% |
| Head Maintenance | Clean with ethyl alcohol after heavy use |
| Recycling | WEEE compliant – Do not dispose with household waste |
Frequently Asked Questions - appPOS80WIFI+ Aqprox
User questions about appPOS80WIFI+ Aqprox
0 question about this device. Answer the ones you know or ask your own.
Ask a new question about this device
Download the instructions for your Printer in PDF format for free! Find your manual appPOS80WIFI+ - Aqprox and take your electronic device back in hand. On this page are published all the documents necessary for the use of your device. appPOS80WIFI+ by Aqprox.
USER MANUAL appPOS80WIFI+ Aqprox
natural_image
Abstract composition of red geometric shapes (arrow, circle, and dot) on white background, no text or symbols presentUser Guide
Notas
text_image
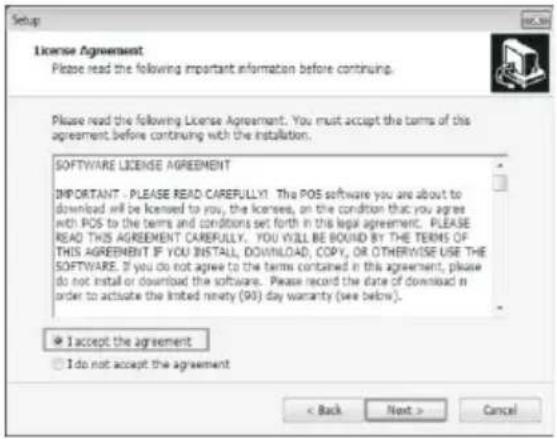
Setup Welcome to the POS P80 Driver VT.01 Setup Wizard This will install POS P80 Driver VT.01 version 7.01 on your computer. It is recommended that you close all other applications before continuing. Click Next to continue, or Cancel to exit Setup. Next > Cancelb) Marque "I agree" y puse Next:
text_image
Setup License Agreement Please read the following important information before continuing. Please read the following License Agreement. You must accept the terms of this agreement before continuing with the installation. SOFTWARE LICENSE AGREEMENT IMPORTANT - PLEASE READ CAREFULLY! The POS software you are about to download will be licensed to you, the licenses, on the condition that you agree with POS to the terms and conditions set forth in this legal agreement. PLEASE READ THIS AGREEMENT CAREFULLY. YOU WILL BE BOUND BY THE TERMS OF THIS AGREEMENT IF YOU INSTALL, DOWNLOAD, COPY, OR OTHERWISE USE THE SOFTWARE. If you do not agree to the terms contained in this agreement, please do not install or download the software. Please record the date of download in order to actuate the limited ninety (93) day warranty (see below). I accept the agreement I do not accept the agreement < Back Next > Canceltext_image
Setup Select Destination Location Where should POS P80 Driver V7.01 be installed? Setup will install POS P80 Driver V7.01 into the following folder. To continue, click Next. If you would like to select a different folder, click Browse. At least: 7.6 MB of free disk space is required.text_image
Setup Select Additional Tasks Which additional tasks should be performed? Select the additional tasks you would like Setup to perform while installing POS PS8 Driver V7.01, then click Next. Additional icons: ✓ Create a desktop icon < Back Next > Canceltext_image
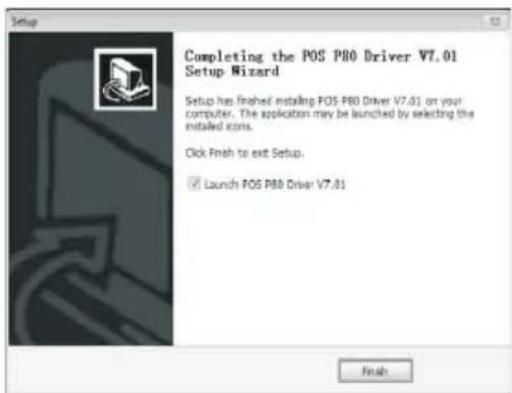
Setup Ready to Install Setup is now ready to begin installing PDS P90 Driver V7.81 on your computer. Click Install to continue with the installation, or click Back if you want to review or change any settings. Destination location: C:\PDS P90 Driver V7.81 Additional tasks: Additional icons: Create a desktop icon < Back Install Cancelf) Haga clic en Finish:
text_image
Setup Completing the POS P80 Driver V7.01 Setup Wizard Setup has finished installing POS P80 Driver V7.01 on your computer. The application may be launched by selecting the installed icons. Click Finish to exit Setup. ✓ Launch POS P80 Driver V7.01 Finishnatural_image
Illustration of a laptop, wireless router, and printer with signal waves (no text or symbols)- Put printer on a stable place, to avoid vibration and impaction.
- Do not use and store the printer in the place with high temperature and humidity as well as heavy pollution.
- The adapter of the printer shall be connected to a suitable grounded socket. It shall be avoided to share the same socket with large motor or other devices that may cause power fluctuation.
- It shall be avoided water or conductive materials (for example metals) getting into the inside of the printer. Once happened, turn off the power immediately.
- The printer shall not run the printing without paper feeding; otherwise it will damage the printing rubber roll and the thermal printing head seriously.
- If the printer is not used for long time, please cut off the power adapter.
- Do not arbitrarily disassemble the printer for repair modification.
- The adapter only specially equipped with the printer.
- In order to ensure the printing quality and the printer life, it is recommended to use good quality printing paper.
- Please turn off the power when inserting or pulling cables.
- The plug of the adapter is the power disconnecting device. The socket connected which shall be placed nearby and easy to touch.
- This product is applicable for the tropical conditions with the altitude of 5000m or below this height.
Packing
- User manual
- Printer
- USB cable
- Adapter (incl. power cord)
- Paper roll
- Driver (CD-ROM)
Main features
• High printing speed of 230mm/s
• Support kitchen printing and network printing
• Support cash drawer drive
• Support black mark detection function
• Support overtype function
• Small size and light with attractive shape
• Rational structure, and convenient maintenance
• Built-in information buffer (printing information can be received while printing)
- Characters can be enlarged, over striking, and underlining. The line spacing, the left and right spacing are adjustable
• Support the printings for bitmap with different density and downloaded graphic
• Small power consumption and low running cost
• Compatible with ESC/POS
• Support network printing status monitoring, multi computers connection printing and
hight level OPOS drive
- Support printer authentication, computer software binding and drive high speed printing mode
• Support multi international languages character fonts
Technical parameters
| Printing method Direct thermal | |
| Printing speed | 230mm/s |
| Black mark detection Support | |
| Networking monitoring Support | |
| Roll paper Width: 79,5+0,5mm Max. outside diam: 83mm | |
| Printing density 576 o 512 dots/line | |
| Printing command Compatible with ESC/POS commands | |
| Interface | USB+Wi-Fi |
| Auto cutter | Partial |
| Reliability Printing head life: 100 km | |
| 2D Code QR Code, PDF417 | |
| Barcode | UPC-A/UPC-E/JAN13(EAN13)/JAN8(EAN8)/CODE39/ITF/CODABAR/CODE93/CODE128 |
| Transmission distance Max. 100 m. | |
| Communication parameters | IEEE 802.11b/g/n |
| NV flash | 256 kbytes |
| Input buffer 2048 kbytes | |
| Paper thickness | 0.06-0.08mm |
| Adaptor input voltage AC 110V/220V, 50-60Hz | |
| Printer input voltage DC 24V=2.5A | |
| Cash drawer control DC 24V=1A | |
| Working environment Temperature 0-45°C, humidity 10-80% | |
| Storage environment Temperature -10-60°C, humidity 10-90% | |
| Drivers | Win 2000/Win 2003/Win XP/Win 7/Win 8/Win 8.1/Windows 10/Linux |
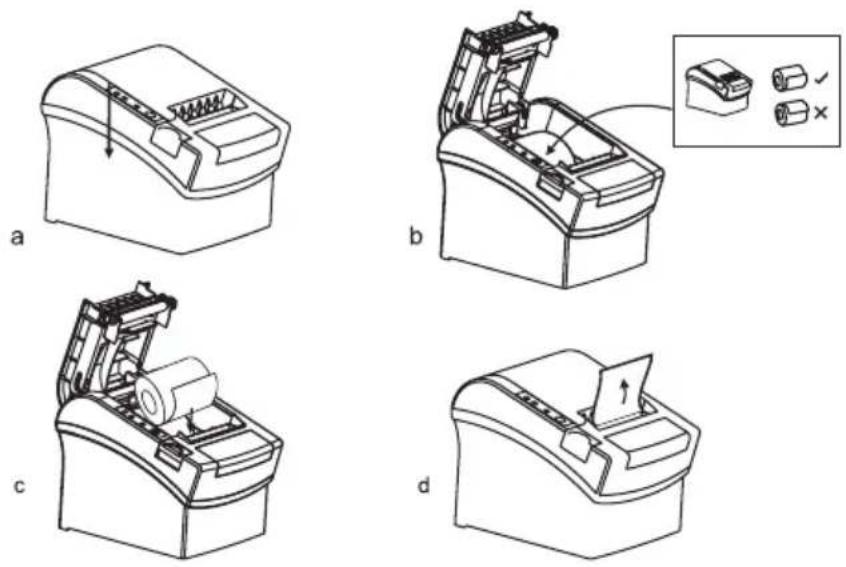
Paper roll loading
Wireless printer uses the thermal paper roll with 80mm, with easy loading structure. Installation method of thermal paper as below:
a. Open the top cover of the printer.
b. Place the thermal paper roll in the compartment shown as the icon below.
c. Pull out a length of paper to the outside of the cover, then close the cover.
Name of keys and indicator functions
- FEED: Press this key to feed the paper, and hold it to feed papers continuously.
- PAPER: When it lights on together with the Error indicator, it shows that the printer is lack of paper, and when both indicators of (paper out) and the Error indicator light off, it shows that there are papers in the printer.
- POWER: If the indicator lights on, it shows that the printer is powered on, and if it is off, the printer is powered off.
- ERROR: It will flash when paper out, error cutting, printing head overheat and so on occur.
Self Test
Method of self-test: After the printer is connected, turn off the power, press and hold Feed key and turn on the power of the printer simultaneously for about 2 seconds, then release the key, the printer will print the current state and the setting.
Method of entering hexadecimal
After the printer is connected, press and hold Feed key and turn on the power of the printer for about 10 seconds, then release the Feed key to enter hexadecimal dump mode. The printer will print out "Hexadecimal Dump" receipt.
Printer initialization
When the printer is connected, press and hold Feed key and turn on the power of the printer simultaneously for about 20 seconds, the printer will beeper, it has been initialized to recover to factory settings.
Maintenance for cutter stuck
Method 1: Press down the power switch key to turn off the power and then turn it on again to initialize the printer and recovery the cutter.
Method 2: Turn the gear on the cutter of the printer to make the cutter return its initial position, the open the front cover and put the paper roll again, the printer will operate normally.
Caution! Do not pry the cover with force to avoid damaging the printing head and the auto cutter.
The driver of the printer
The wireless receipt printer provides two modes of driver, one is directly installing the driver program under Windows to print, and the other is printing by commands.
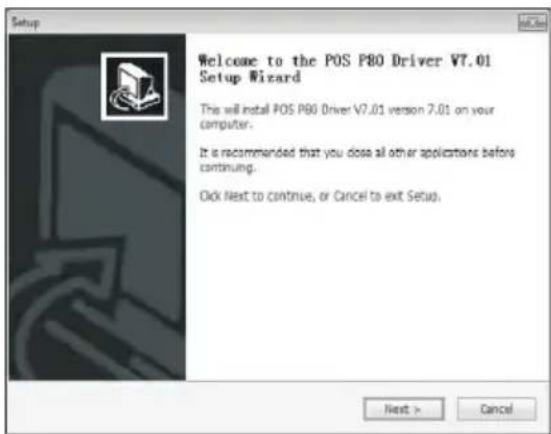
- Windows driver installation graphical presentation
a) Open the position for storing the CD-ROM, doble click icon the next step:

to install, choose
text_image
Setup Welcome to the POS P80 Driver V7.01 Setup Wizard This will install POS P80 Driver V7.01 version 7.01 on your computer. It is recommended that you close all other applications before continuing. Click Next to continue, or Cancel to exit Setup. Next > Cancelb) Choose "I agree", next:
text_image
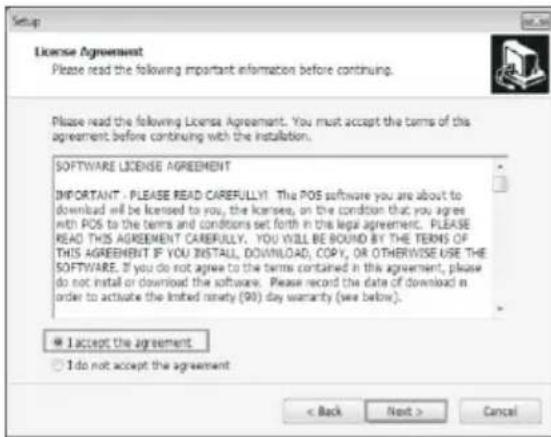
License Agreement Please read the following important information before continuing. Please read the following License Agreement. You must accept the terms of the agreement before continuing with the installation. SOFTWARE LICENSE AGREEMENT IMPORTANT . PLEASE READ CAREFULLY! This POS software you are about to download will be licensed to you, the licenses, on the condition that you agree with POS to the terms and conditions set forth in this legal agreement. PLEASE READ THIS AGREEMENT CAREFULLY. YOU WILL BE BOUND BY THE TERMS OF THIS AGREEMENT IF YOU INSTALL, DOWNLOAD, COPY, OR OTHERWISE USE THE SOFTWARE. If you do not agree to the terms contained in this agreement, please do not install or download the software. Please record the date of download in order to activate the limited royalty (90) day warranty (we below). I accept the agreement. I do not accept the agreement < Back Next > Cancelc) Choose default installation, next:
text_image
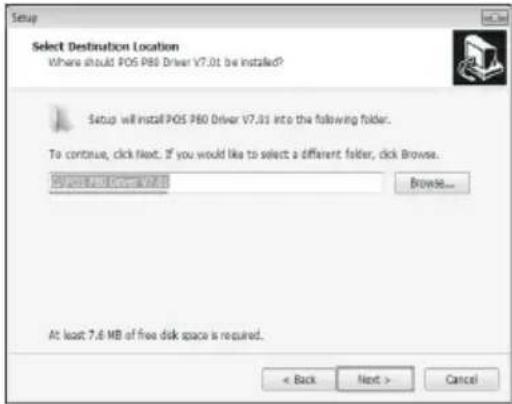
Setup Select Destination Location Where should POS P60 Driver V7.01 be installed? Setup will install POS P60 Driver V7.01 into the following folder. To continue, click Next. If you would like to select a different folder, click Browse... V7.01 is required to access Browse... At least 7.6 MB of free disk space is required. < Back Next > Canceld) Create a shortcut on the desktop, so as to install in the next time:
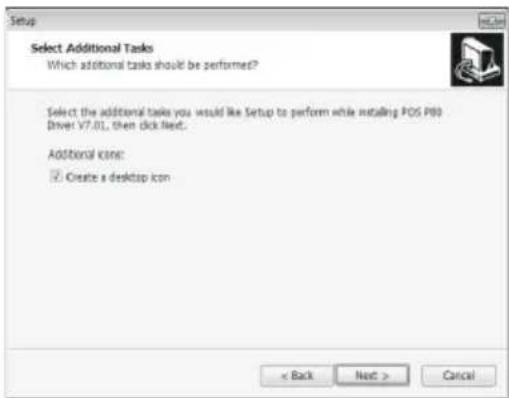
text_image
Setup Select Additional Tasks Which additional tasks should be performed? Select the additional tasks you would like Setup to perform while installing PDS P80 Driver V7.01, then click Next. Additional icon: ✓ Create a desktop icon < Back Next > Cancele) Choose installation, shown as the picture:
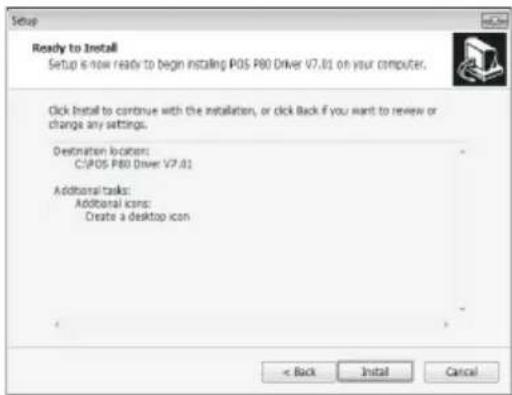
text_image
Setup Ready to Install Setup is now ready to begin installing PDS P80 Driver V7.01 on your computer. Click Install to continue with the installation, or click Back if you want to review or change any settings. Destination location: C:\POS P80 Driver V7.01 Additional tasks: Additional icons: Create a desktop icon < Back Install Cancelf) Click finish:
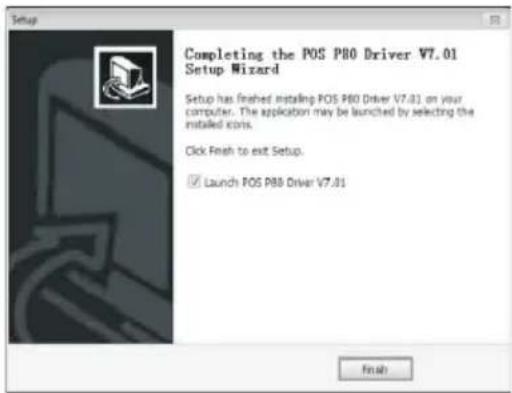
text_image
Setup Completing the POS P80 Driver V7.01 Setup Wizard Setup has finished installing POS P80 Driver V7.01 on your computer. The application may be launched by selecting the installed icons. Click Finish to exit Setup. ✓ Launch POS P80 Driver V7.01 Finish- Direct driver by the port: In this mode, no need to install driver, it is only needed to output the characters directly to the port, and to achieve the conversion of printing by the hard character library in the printer. This mode makes the printing more convenient. When using the mode of direct driver by the port, printing command sets shall be required to control the printing, while appPOS80WIFI has been integrated ESC/POS command sets.
Wi-Fi printer
The wireless printer is connected and the signal is transferred by radio wave. It provides advantages such as moving freely, unrestricted by line, quickly and easily installing as well as easy expansion and so on.
Wi-Fi printer has a transmission distance of 50m-100m.
Wireless infrastructure mode: All data transmission and network flow are processed by way of wireless router (Wi-Fi_802,11b/g/n protocol) or the access point. The mode provides the advantages as follows:
The signal is stable, safe and can be expanded flexibly.
The Wi-Fi module used in the printer is low power consumption embedded Wi-Fi module, it adopts static IP (IP shall not have any conflict with other devices that are connected with the router). Turn on printer, users could set up Wi-Fi module by tools, in the option of network setting.
The working mode of Wi-Fi module is to use: STA + Server (TCP Protocol), e.g. the server mode. The server mode supports text printing and driver printing. Once the setting is made, the printer will connect with server automatically.
Wi-Fi printer setting
It is to achieve the Wi-Fi working parameters setting, the connection between printer with the wireless router.
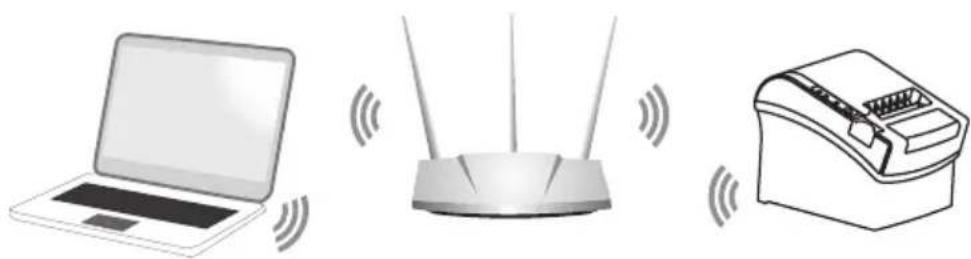
natural_image
Illustration of a laptop, wireless router, and printer with signal waves (no text or symbols)- Please make sure the computer is connected with the wireless router. Connect the printer with USB line, turn on the printer. In CD, open the "tools" for printer, find the printer setting mode, choose the right usb port, print a test page, if print successfully, turn to "Advance" setting, see the picture bellow:
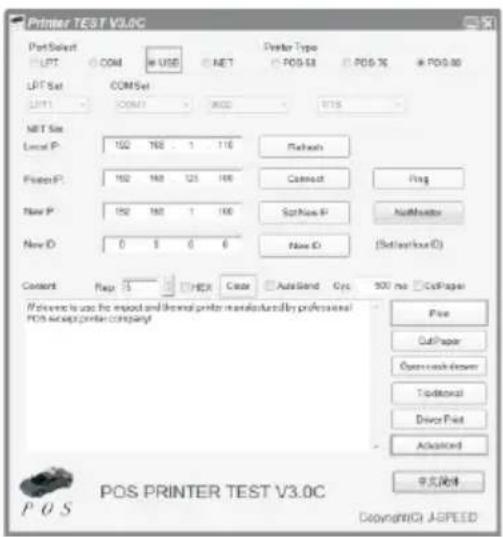
text_image
Primer TEST V3.0C PortSelect LPT COMUSB
NET Docker Type POS-53 POS-76POS-80
LPT Set COM Set LPT1 COM1 2000 NTS NET Size Local P: 102 168 1 116 Refresh Print P: 162 168 125 166 Connect Flag New P: 192 168 1 166 Soft Now P Audio Player New ID: 0 0 0 0 New ID (Setters/Host C) Content Page 5 HES Color Auto Blend Cys 500 ms Cell Page Preferences to use the impact and thermal printer manufacturer by professional POS accept printer company? Free Cut Paper Open each screen Topset Device Post Advanced 中文版本 POS PRINTER TEST V3.0C Copyright© JASPEED- Click “network setting”, set up the printer IP address, subnet mask, gateway address as well as the related information to wireless router, click “set up above contents”, the printer will beep a sound. Then restart the printer, wait around 30 seconds, the printer will print a receipt automatically, it means the Wi-Fi setting successfully.
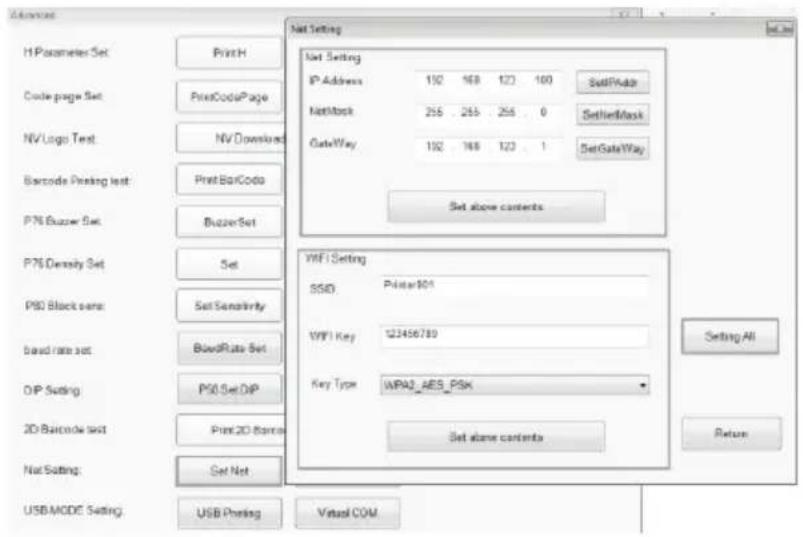
text_image
H Parameter Set Code page Set NV Logo Test Barcode Printing test: P7E Buzzer Set P7E Density Set P90 Block sense: band rate set: DIP Setting 2D Barcode test Net Setting: USB MODE Setting Print H PrintCodePage PrintBarCode BuzzerSet Set Set above contents Net Setting IP Address 150 168 173 180 Network 255 255 255 0 GateWay 182 168 173 1 Set/Path Set/PathMask Set/PathMask Set/PathWay Set above contents WiFi Setting SSD: Printer101 WiFi Key 123456780 Key Type WPA2_AES_PSK Set above contents Setting All Return Virtual COM- Set up driver port for Wi-Fi printer. Click "Start" once, open "Control panel", double click "Printer and Fax", find the installed printer driver, see the picture as below:
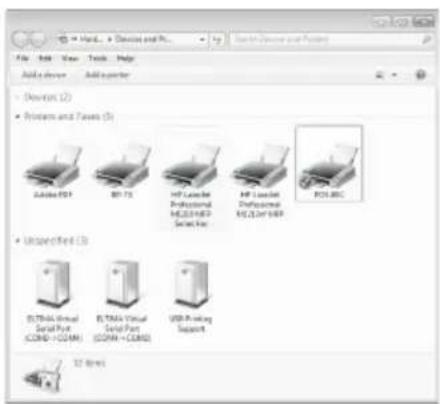
text_image
File Edit View Tools Help Add a device Add folder • Download (2) • Process and Pass (5) Adobe PDT BPTX HPT Loadset Professional HD/CD/WRP Serial Port HPT Loadset Professional HD/CD/WRP • Unspecified (3) BPTX Visual Serial Port (CDRD + CDAM) BPTX Visual Serial Port (CDRA + CDRA) USB Parking Support 12 Bytes- Click the right button of POS-80C / Printer properties / Port / Add port / Select Standard TCP/IP port:
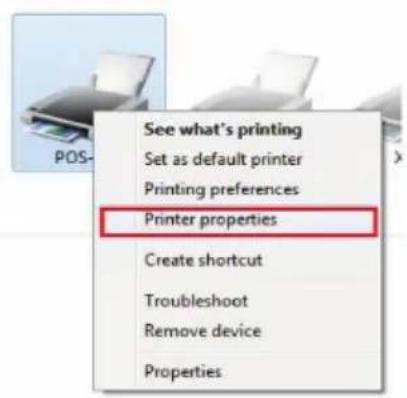
text_image
See what's printing Set as default printer Printing preferences Printer properties Create shortcut Troubleshoot Remove device Properties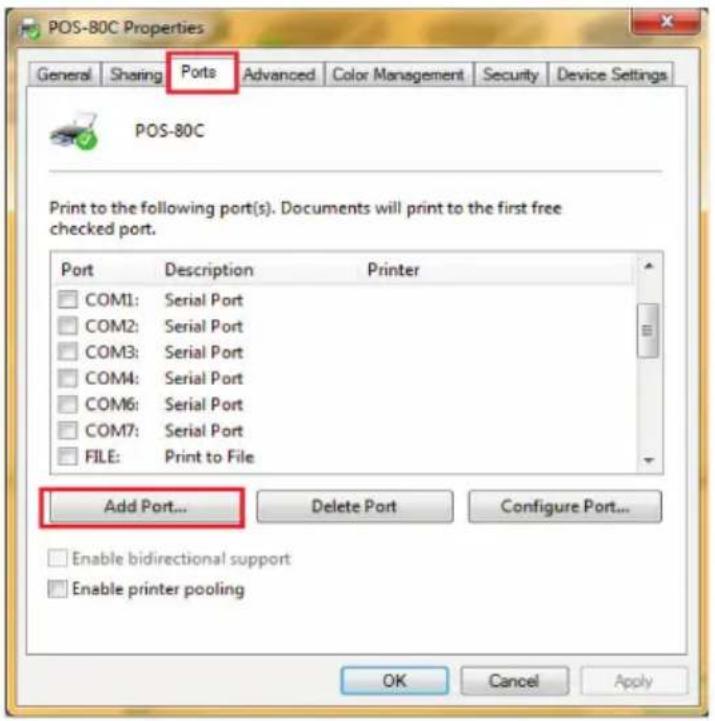
text_image
POS-80C Properties General Sharing Ports Advanced Color Management Security Device Settings POS-80C Print to the following port(s). Documents will print to the first free checked port. Port Description Printer COM1: Serial Port COM2: Serial Port COM3: Serial Port COM4: Serial Port COM6: Serial Port COM7: Serial Port FILE: Print to File Add Port... Delete Port Configure Port... Enable bidirectional support Enable printer pooling OK Cancel Apply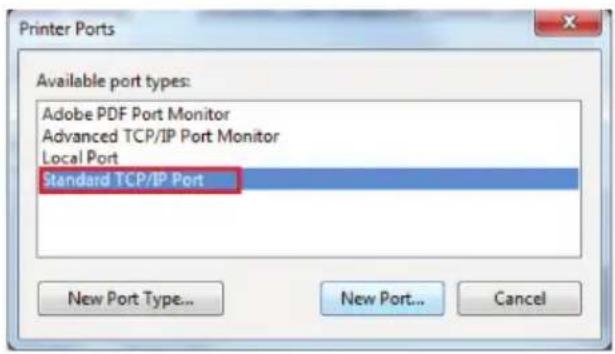
text_image
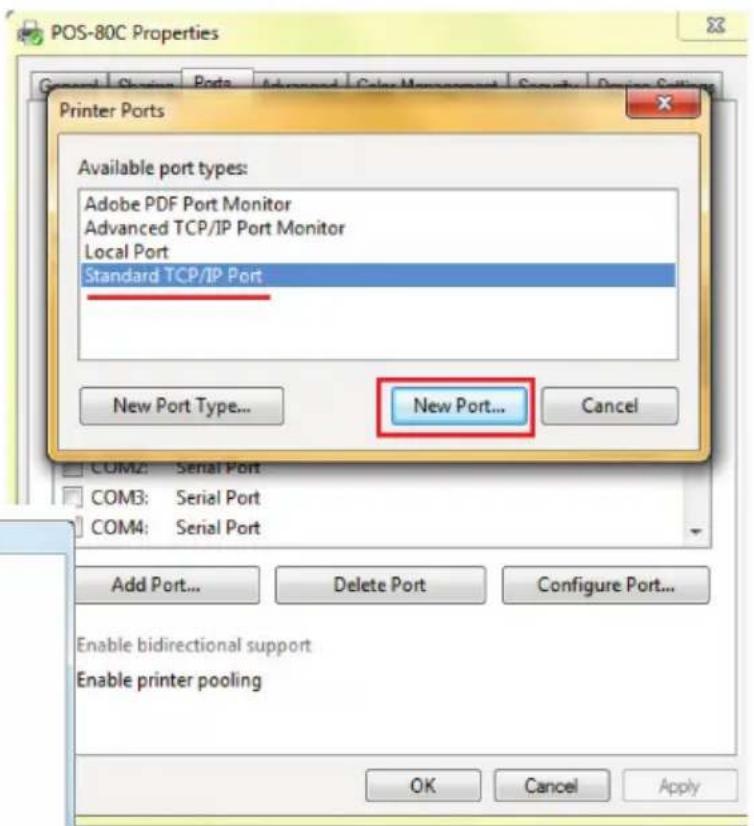
Printer Ports Available port types: Adobe PDF Port Monitor Advanced TCP/IP Port Monitor Local Port Standard TCP/IP Port New Port Type... New Port... Cancel- Select New Port, then next:
text_image
POS-80C Properties General Sharing Ports Advanced Color Management Security Design Settings Printer Ports Available port types: Adobe PDF Port Monitor Advanced TCP/IP Port Monitor Local Port Standard TCP/IP Port New Port Type... New Port... Cancel COM2: Serial Port COM3: Serial Port COM4: Serial Port Add Port... Delete Port Configure Port... Enable bidirectional support Enable printer pooling OK Cancel Apply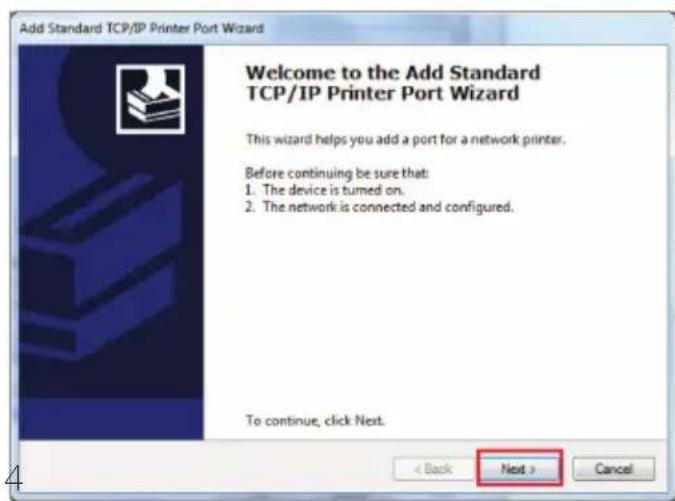
text_image
Add Standard TCP/IP Printer Port Wizard Welcome to the Add Standard TCP/IP Printer Port Wizard This wizard helps you add a port for a network printer. Before continuing be sure that: 1. The device is turned on. 2. The network is connected and configured. To continue, click Next. < Back Next > Cancel- Input Printer IP address, then click next:
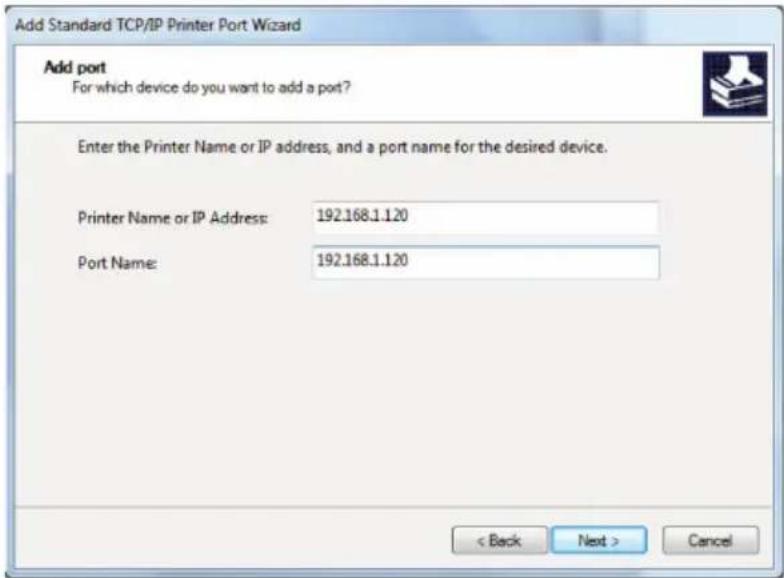
text_image
Add Standard TCP/IP Printer Port Wizard Add port For which device do you want to add a port? Enter the Printer Name or IP address, and a port name for the desired device. Printer Name or IP Address: 192.168.1.120 Port Name: 192.168.1.120 < Back Next > Cancel- A port is creating, need to wait about 5-10 seconds, as below picture:
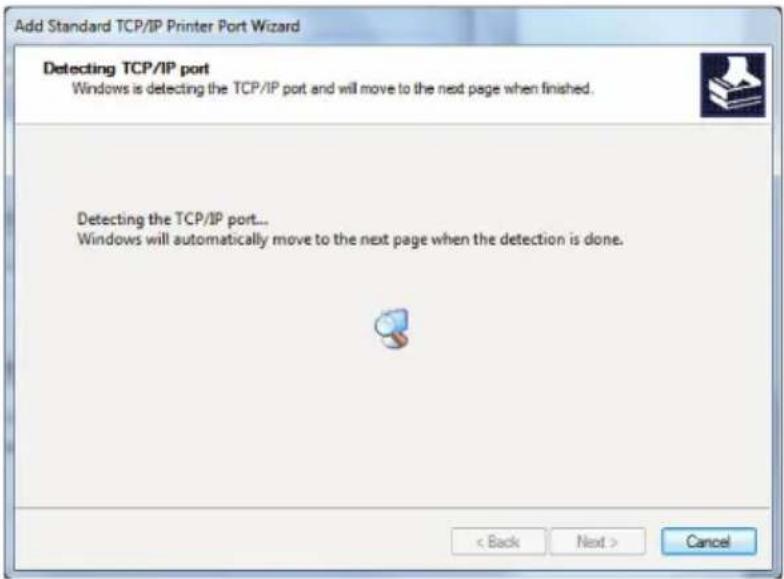
text_image
Add Standard TCP/IP Printer Port Wizard Detecting TCP/IP port Windows is detecting the TCP/IP port and will move to the next page when finished. Detecting the TCP/IP port... Windows will automatically move to the next page when the detection is done. < Back Next > Cancel- Click Custom / Settings / Protocol Raw / Raw setting: 9100 / OK, as below picture:
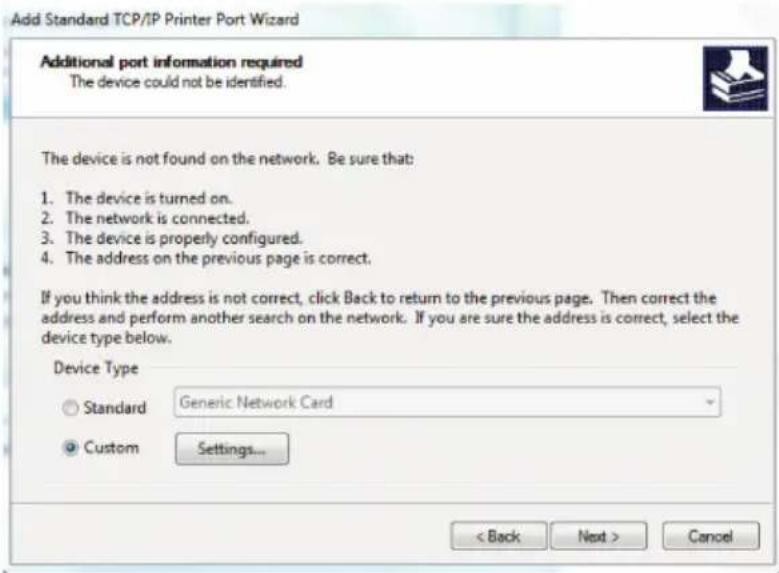
text_image
Add Standard TCP/IP Printer Port Wizard Additional port information required The device could not be identified. The device is not found on the network. Be sure that: 1. The device is turned on. 2. The network is connected. 3. The device is properly configured. 4. The address on the previous page is correct. If you think the address is not correct, click Back to return to the previous page. Then correct the address and perform another search on the network. If you are sure the address is correct, select the device type below. Device Type Standard Generic Network Card Custom Settings... < Back Next > Cancel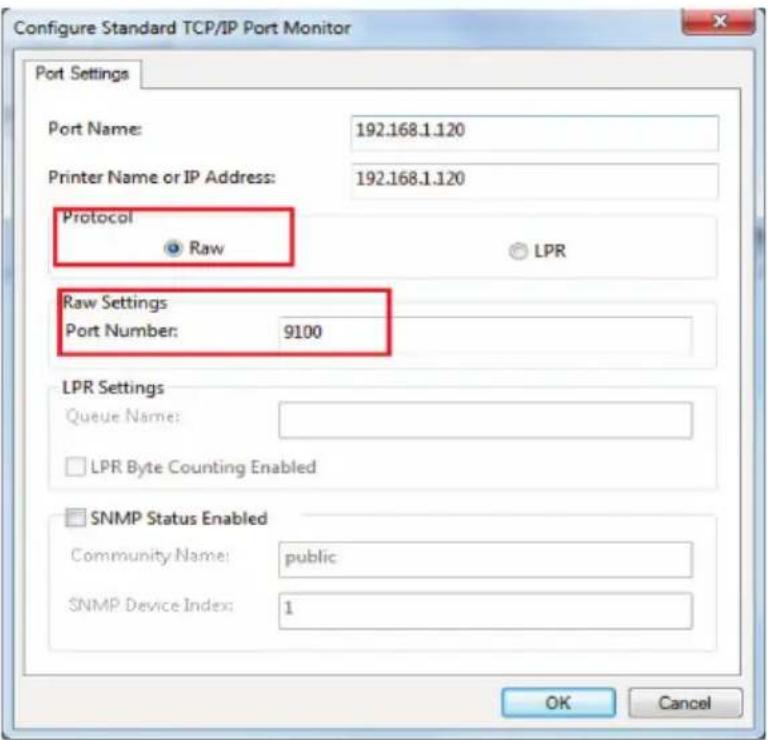
text_image
Configure Standard TCP/IP Port Monitor Port Settings Port Name: 192.168.1.120 Printer Name or IP Address: 192.168.1.120 Protocol Raw LPR Raw Settings Port Number: 9100 LPR Settings Queue Name: LPR Byte Counting Enabled SNMP Status Enabled Community Name: public SNMP Device Index: 1 OK Cancel- Click "next" button when custom setting is confirmed.
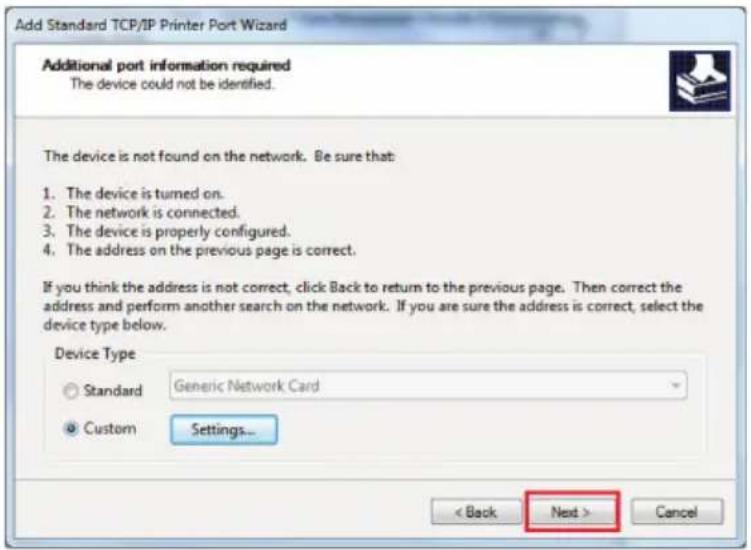
text_image
Add Standard TCP/IP Printer Port Wizard Additional port information required The device could not be identified. The device is not found on the network. Be sure that: 1. The device is turned on. 2. The network is connected. 3. The device is properly configured. 4. The address on the previous page is correct. If you think the address is not correct, click Back to return to the previous page. Then correct the address and perform another search on the network. If you are sure the address is correct, select the device type below. Device Type Standard Generic Network Card Custom Settings... < Back Next > Cancel- Click Finish, then click close:
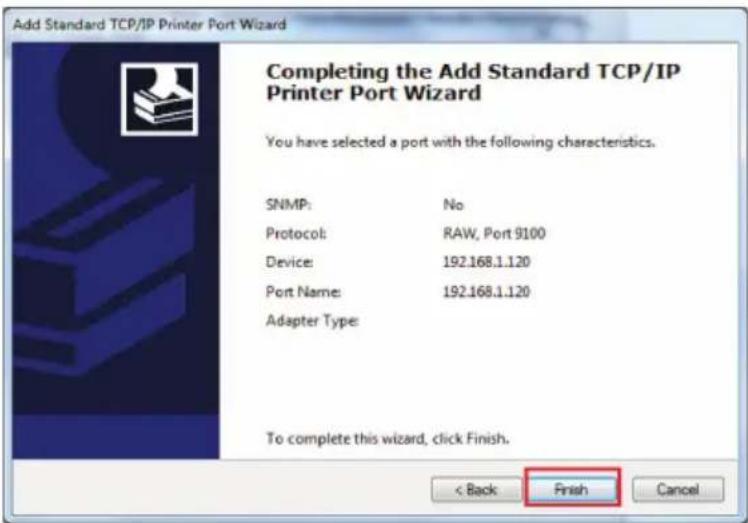
text_image
Add Standard TCP/IP Printer Port Wizard Completing the Add Standard TCP/IP Printer Port Wizard You have selected a port with the following characteristics. SNMP: No Protocol: RAW, Port 9100 Device: 192.168.1.120 Port Name: 192.168.1.120 Adapter Type: To complete this wizard, click Finish. < Back Finish Cancel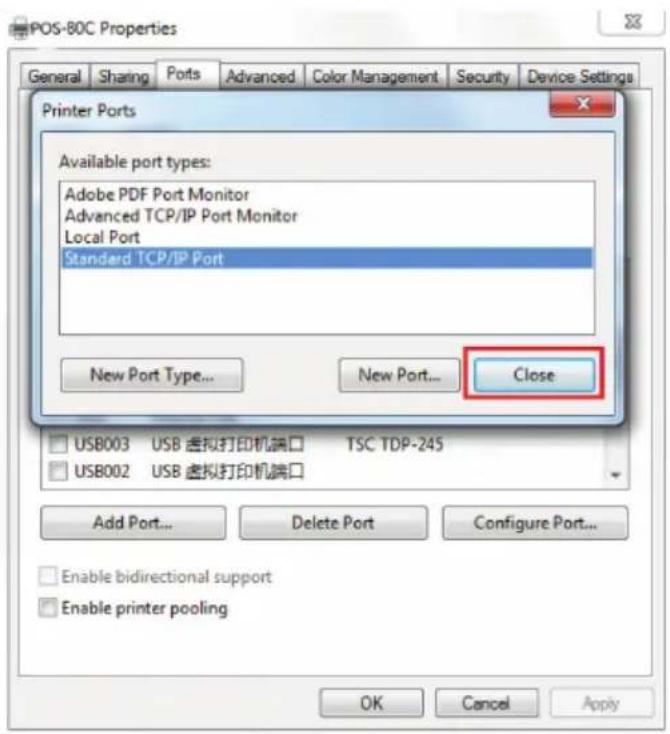
text_image
POS-80C Properties General Sharing Ports Advanced Color Management Security Device Settings Printer Ports Available port types: Adobe PDF Port Monitor Advanced TCP/IP Port Monitor Local Port Standard TCP/IP Port New Port Type... New Port... Close USB003 USB 虚拟打印机端口 TSC TDP-245 USB002 USB 虚拟打印机端口 Add Port... Delete Port Configure Port... Enable bidirectional support Enable printer pooling OK Cancel Apply- After completing, A new IP port has generated, Click "Apply" button, as below showed.
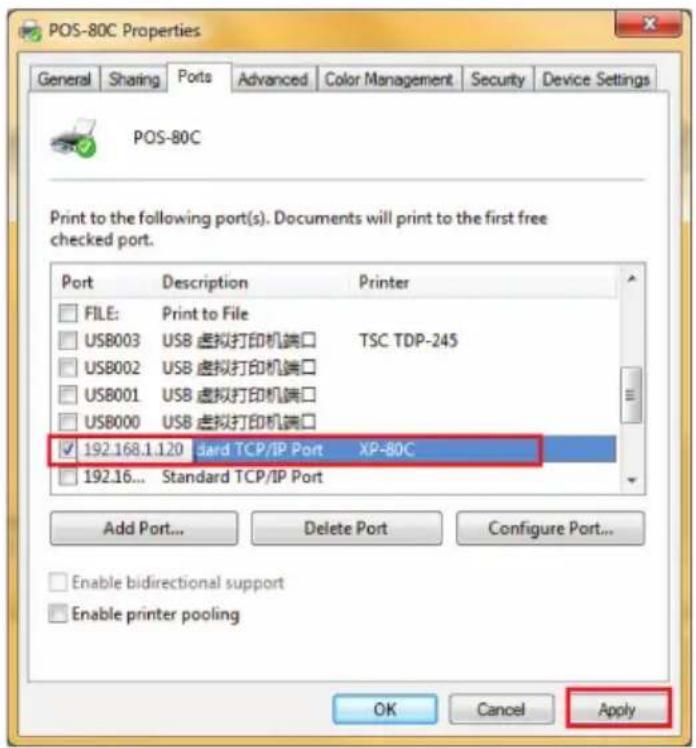
text_image
POS-80C Properties General Sharing Ports Advanced Color Management Security Device Settings POS-80C Print to the following port(s). Documents will print to the first free checked port. Port Description Printer FILE: Print to File USB003 USB 虚拟打印机端口 TSC TDP-245 USB002 USB 虚拟打印机端口 USB001 USB 虚拟打印机端口 USB000 USB 虚拟打印机端口 ✓ 192.168.1.120 standard TCP/IP Port XP-80C 192.16... Standard TCP/IP Port Add Port... Delete Port Configure Port... Enable bidirectional support Enable printer pooling OK Cancel Apply- Printing test: Click "Test printing" in "Normal" option, if the page is printed out, it means that the port configuration is correct.

text_image
POS-80C Properties General Sharing Paths Advanced Color Management Security Device Settings POS-80C Locations: Comments: Model: POS-80C Features Color No Paper available Double-sided: No 80(72.1) x 297 mm Staple: No Speed: Unknown Maximum resolution: 203 dpi Preferences... Print Text Page OK Cancel ApplyAfter completing the above mentioned procedures, the printer setting has been finished, it can be used for printing.
Printer cleaning
When any of the following occurs, the printing head shall be cleaned:
- Printing is not clear
• Certain column on the printed page is not clear
• Paper feeding makes louder noise
Printing head cleaning procedures:
• Turn off the power of the printer, open the upper cover, remove the paper if any
• If just printing, wait till the printing head becomes cool completely
- Take the absolute ethyl alcohol with cotton cloth (shall wring up) to erase the dust and dirt on the surface of the printing head
- When the absolute ethyl alcohol is evaporated completely, close the upper cover, and print the test page again.
Notice!
- It shall make sure the power is off for daily maintenance.
- Do not touch the surface of the printing head with hands or metal parts, and do not use tools like tweezers to scratch the printing head, printing rubber roll and the surface of the sensor.
- Do not use the organic solutions such as gasoline and acetone and so on.
- Printing can be continued only after the absolute ethyl alcohol evaporates completely.
Safety and Maintenance Instructions
- Do not use this product in a location with volatile substances such as alcohol or paint thinner, or near a fire. Doing so may cause an electric shock or fire.
- Turn off your equipment immediately if it produces smoke, a strange smell or unusual noise.
- Improper use can cause a fire. Unplug the equipment immediately and contact your
dealer or Approx technical service for advice.
- Never try to repair this product yourself. Improper repair work can be dangerous and void the warranty.
- Never disassemble or modify this product. The handling of this product may cause injury or fire.
- Be sure to use the supplied power adapter and connect the power connector correctly, an incorrect connection may cause a short circuit.
- Do not allow foreign objects to enter the equipment. Penetration of foreign objects can cause a short circuit in the device.
- If water or other liquid is poured into this equipment, do not continue to use it. Continued use can lead to fire or electric shock. Disconnect the equipment immediately and contact your dealer or the Approx technical service for advice.
- Do not use this product in an environment where flammable gas or explosive gas may be present. Do not use aerosols containing flammable gas in or around this product. Doing so can cause fire.
- Do not connect cables in ways other than those mentioned in this manual. Different connections can cause equipment damage and burns.
- Do not touch the areas inside the product other than those mentioned in this manual. Doing so can cause an electric shock or burns.
- Be careful not to drop this product. This may cause the product to break.
- Do not use it in places subject to high levels of humidity or dust. Excessive moisture and dust can cause damage to the equipment.
- Do not place heavy objects on top of this product. Never stand or lean on this product. Equipment may fall or collapse, causing breakage and possible injury.
- To ensure safety, unplug this product before leaving it unused for an extended period.
- Before moving the product, unplug it and unplug all cables connected to it.
- Do not use this product in places with high temperatures 60 °C or more. Also, do not leave or store this product in places that are 60 °C or more. Doing so could cause heat, smoke, ruptures, fire or leakage. Be sure to use within the limits of the environment and respect its temperature conditions for use.
Recycled
AEEREI-RAE 558 - In this manual, the container (bien) symbol indicates that the product is subject to the European directive 2002/96/EC, electrical and electronic products, batteries, and other accessories must necessarily be subject to a selective collection.
At the end of the life of the devise, make use of the recycling bins. This gesture will help reduce the health risks and preserve the environment.
Municipalities and distributor, will provide essential details on recycling your old device. If this device carries an internal battery, it must be removed and deposited separately for proper management.

Notes
text_image
Setup Welcome to the POS P80 Driver V7.01 Setup Wizard This will install POS P80 Driver V7.01 version 7.01 on your computer. It is recommended that you close all other applications before continuing. Click Next to continue, or Cancel to exit Setup. Next > Cancel
text_image
Setup License Agreement Please read the following important information before continuing. Please read the following License Agreement. You must accept the terms of this agreement before continuing with the installation. SOFTWARE LICENSE AGREEMENT IMPORTANT - PLEASE READ CAREFULLY! The POS software you are about to download will be licensed to you, the licenses, on the condition that you agree with POS to the terms and conditions set forth in the legal agreement. PLEASE READ THIS AGREEMENT CAREFULLY. YOU WILL BE SOUND BY THE TERMS OF THIS AGREEMENT IF YOU INSTALL, DOWNLOAD, COPY, OR OTHERWISE USE THE SOFTWARE. If you do not agree to the terms contained in this agreement, please do not install or download the software. Please record the date of download in order to actuate the limited ninety (90) day warranty (see below). I accept the agreement I do not accept the agreement < Back Next > Canceltext_image
Setup Select Destination Location Where should POS P80 Driver V7.01 be installed? Setup will install POS P80 Driver V7.01 into the following folder. To continue, click Next. If you would like to select a different folder, click Browse... Browse... At least 7.6 MB of free disk space is required. < Back Next > Canceltext_image
Setup Select Additional Tasks Which additional tasks should be performed? Select the additional tasks you would like Setup to perform while installing POS PS0 Driver V7.01, then click Next. Additional icon: ✓ Create a desktop icon < Back Next > Canceltext_image
Setup Ready to Install Setup is now ready to begin installing PDS P90 Driver V7.81 on your computer. Click Install to continue with the installation, or click Back if you want to review or change any settings. Destination location: C:\PDS P90 Driver V7.81 Additional tasks: Additional icons: Create a desktop icon < Back Install Canceltext_image
Setup Completing the POS P80 Driver V7.01 Setup Wizard Setup has finished installing POS P80 Driver V7.01 on your computer. The application may be launched by selecting the installed icons. Click Finish to exit Setup. ✓ Launch POS P80 Driver V7.01 Finishnatural_image
Illustration of a laptop, wireless router, and printer with signal waves (no text or symbols)text_image
Printer TEST V3.0C Post Select LPT COM USB NET PDS-03 POS-76 POS-80 LPT Set COM Set NET LPT1 COM1 100% NET Set Local P: 102 156 1 110 Refresh Present: 182 166 123 120 Connect Ping New P: 157 166 1 120 Set New SP MultiMonitor New ID: 0 0 0 0 New C (Default line C) Content Flag: 5 HEX Clear AutoScan Cyc SET ms Cut Paper Preference to use the impact and thermal printer manufactured by professional POS access printer company. Prior Cut Paper Open cash boxes Trademarks Driver Post Advanced 中文简体 POS PRINTER TEST V3.0C Copyright(C) ASPEEDtext_image
Setup Welcome to the POS P80 Driver V7.01 Setup Wizard This will install POS P80 Driver V7.01 version 7.01 on your computer. It is recommended that you close all other applications before continuing. Click Next to continue, or Cancel to exit Setup. Next > Canceltext_image
License Agreement: Please read the following important information before continuing. Please read the following License Agreement. You must accept the terms of the agreement before continuing with the installation. SOFTWARE LICENSE AGREEMENT IMPORTANT: PLEASE READ CAREFULLY! The POS software you are about to download will be licensed to you, the licensere, on the condition that you agree with POS to the terms and conditions set forth in this legal agreement. PLEASE READ THIS AGREEMENT CAREFULLY! YOU WILL BE BOUND BY THE TERMS OF THIS AGREEMENT IF YOU INSTALL, DOWNLOAD, COPY, OR OTHERWISE USE THE SOFTWARE. If you do not agree to the terms contained in this agreement, please do not install or download the software. Please record the date of download in order to activate the listed ninety (90) day warranty (see below). ● I accept the agreement ○ I do not accept the agreement: < Back Next > Canceltext_image
Setup Select Destination Location Where should POS P80 Driver V7.01 be installed? Setup will install POS P80 Driver V7.01 into the following folder. To continue, click Next. If you would like to select a different folder, click Browse. At least 7.6 MB of free disk space is required.text_image
Setup Select Additional Tasks Which additional tasks should be performed? Select the additional tasks you would like Setup to perform while installing POS PS0 Driver V7.01, then click Next. Additional icon: ✓ Create a desktop icon < Back Next > Canceltext_image
Setup Ready to Install Setup is now ready to begin installing PDS P90 Driver V7.81 on your computer. Click Install to continue with the installation, or click Back if you want to review or change any settings. Destination location: C:\PDS P90 Driver V7.81 Additional tasks: Additional icons: Create a desktop icon < Back Install Canceltext_image
Setup Completing the POS P80 Driver V7.01 Setup Wizard Setup has finished installing POS P80 Driver V7.01 on your computer. The application may be launched by selecting the installed icons. Click Finish to exit Setup. ✓ Launch POS P80 Driver V7.01 Finishnatural_image
Illustration of a laptop, wireless router, and printer with signal waves (no text or symbols)text_image
Printer TEST V3.0C PostSelect LPT COM USB NET Printer Type POS-03 POS-76 POS-80 LPT Set COM Set NET Local P: 102 156 1 110 Refresh Printer(P): 192 196 123 100 Connect Ping New P: 197 198 1 100 SetNote(P) AutoMyristor New D: 0 0 0 0 Save C (Offed line C) Content Plug: 5 HEX Clear AutoGnd Opt 500 ms CutPaper Preference to use the impact and thermal printer manufactured by professional POS setup printer company. Press Cut Paper Open cash sheets Trademarks Driver Post Acquired 中文媒体 POS PRINTER TEST V3.0C Copyright(C) J-SPEEDEU Declaration of conformity simplified
Hereby, APPROX IBERIA S.L. declares that the radio equipment type APPPOS80WIFI is in compliance with Directives 2014/53/EU, 2014/30/EU, 2014/35/EU, 2011/65/EU.
The full text of the EU declaration of conformity is available at the following internet address: http://www.approx.es/CE/APPPOS80WIFI_DECLARATION.pdf
http://www.approx.es/CE/APPPOS80WIFI_DECLARATION.pdf
APPROX IBERIA S.L.: C/ Tecnología 5, 412120 Gelves, Sevilla (Spain)
Importado por / Imported by:
APPROX IBERIA S. L.
CIF: B-91202499
APPROX TPV
Tlf.: 954 323 886
Email: soporte@approxpv.es
MADE IN PRC
El contenido de esta guía está sujeto a errores tipográficos The content of this guide is subject to typographical errors
aqprox
www.approxtpv.es