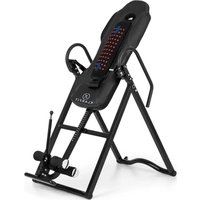
Ease Delux - Fitness Equipment Klarfit - Free user manual and instructions
Find the device manual for free Ease Delux Klarfit in PDF.


| Product Type | Inversion table with heating massage cushion |
| Brand | Klarfit |
| Model | Ease Delux |
| Available Colors | Blue (10031831), Beige (10031832) |
| Maximum User Weight | 136 kg |
| Height Adjustment Range | 1.54 m to 1.98 m |
| Inversion Angles | 20°, 40°, 60° |
| Massage Types | 2 automatic modes (A1, A2) |
| Massage Intensity Levels | 3 levels |
| Massage Session Duration | 5 or 10 minutes |
| Heating Function | Yes, integrated heating cushion |
| Power Supply | Electric (mains) |
| Main Materials | Steel, foam, plastic |
| Safety | Safety pin, foot locking system |
| Assembly Required | Yes, instructions included |
| Cleaning | Damp cloth, no abrasive products |
| Recycling | Follow local WEEE recycling rules |
| Medical Contraindications | Pregnancy, heart problems, eye problems, etc. (see instructions) |
Frequently Asked Questions - Ease Delux Klarfit
User questions about Ease Delux Klarfit
0 question about this device. Answer the ones you know or ask your own.
Ask a new question about this device
Download the instructions for your Fitness Equipment in PDF format for free! Find your manual Ease Delux - Klarfit and take your electronic device back in hand. On this page are published all the documents necessary for the use of your device. Ease Delux by Klarfit.
USER MANUAL Ease Delux Klarfit
INHALTSVERZEICHNIS
natural_image
Technical line drawing of a mechanical device with articulated arms and a base plate (no text or symbols)natural_image
Close-up of a mechanical lever mechanism with numbered components (no readable text or symbols)Member of Berlin Brands Group
Handwerkerstr. 11
15366 Dahlwitz-Hoppegarten
Deutschland
natural_image
Symbol of a trash bin crossed with a diagonal line, no text or numbers presentBerlin Brands Group UK Limited PO Box 42 272 Kensington High Street London, W8 6ND United Kingdom
Dear customer,
Congratulations on the purchase of your device. Please read the following instructions carefully and follow them to prevent potential damage. We accept no liability for damage caused by disregarding the instructions and improper use. Please scan the QR code to access the latest operating instructions and further information about the product.

CONTENTS
Safety Instructions 20
Assembly 21
Operating the control unit 28
Settings 29
Using the device 30
Disposal Considerations 32
Manufacturer & importer (UK) 32
TECHNICAL DATA
| Article number Colour | |
| 10031831 Blue | |
| 10031832 beige |
SAFETY INSTRUCTIONS
Note: The maximum weight load is 136 kg.
General instructions
- Do not allow children to use the inversion bench unsupervised.
- Some people are not allowed to do inversion exercises as a matter of principle. If you think you belong to this small group, talk to your doctor before using the inversion bench.
- Ensure that all nuts, bolts and nuts are tight before using the unit.
- Hook your ankles firmly before the exercises and insert the holding pins securely.
Important health tips
Only use the inversion bench with the approval of your doctor. Do not use the inversion bench in the following health circumstances:
• In case of pregnancy.
- With hiatal hernia, glaucoma, retinal detachment or conjunctivitis.
- With high blood pressure, recent stroke or temporary circulatory problems.
- With heart conditions that are under treatment.
- With injuries to the spine.
- With cerebral sclerosis or acutely swollen joints.
- With osteoporosis, recent fractures that have not healed, intramedullary nails or surgically implanted support implants.
- When taking anticoagulants, including high doses of aspirin.
- With middle ear infections.
- With extreme obesity.
ASSEMBLY
Step 1: Unfold the frame
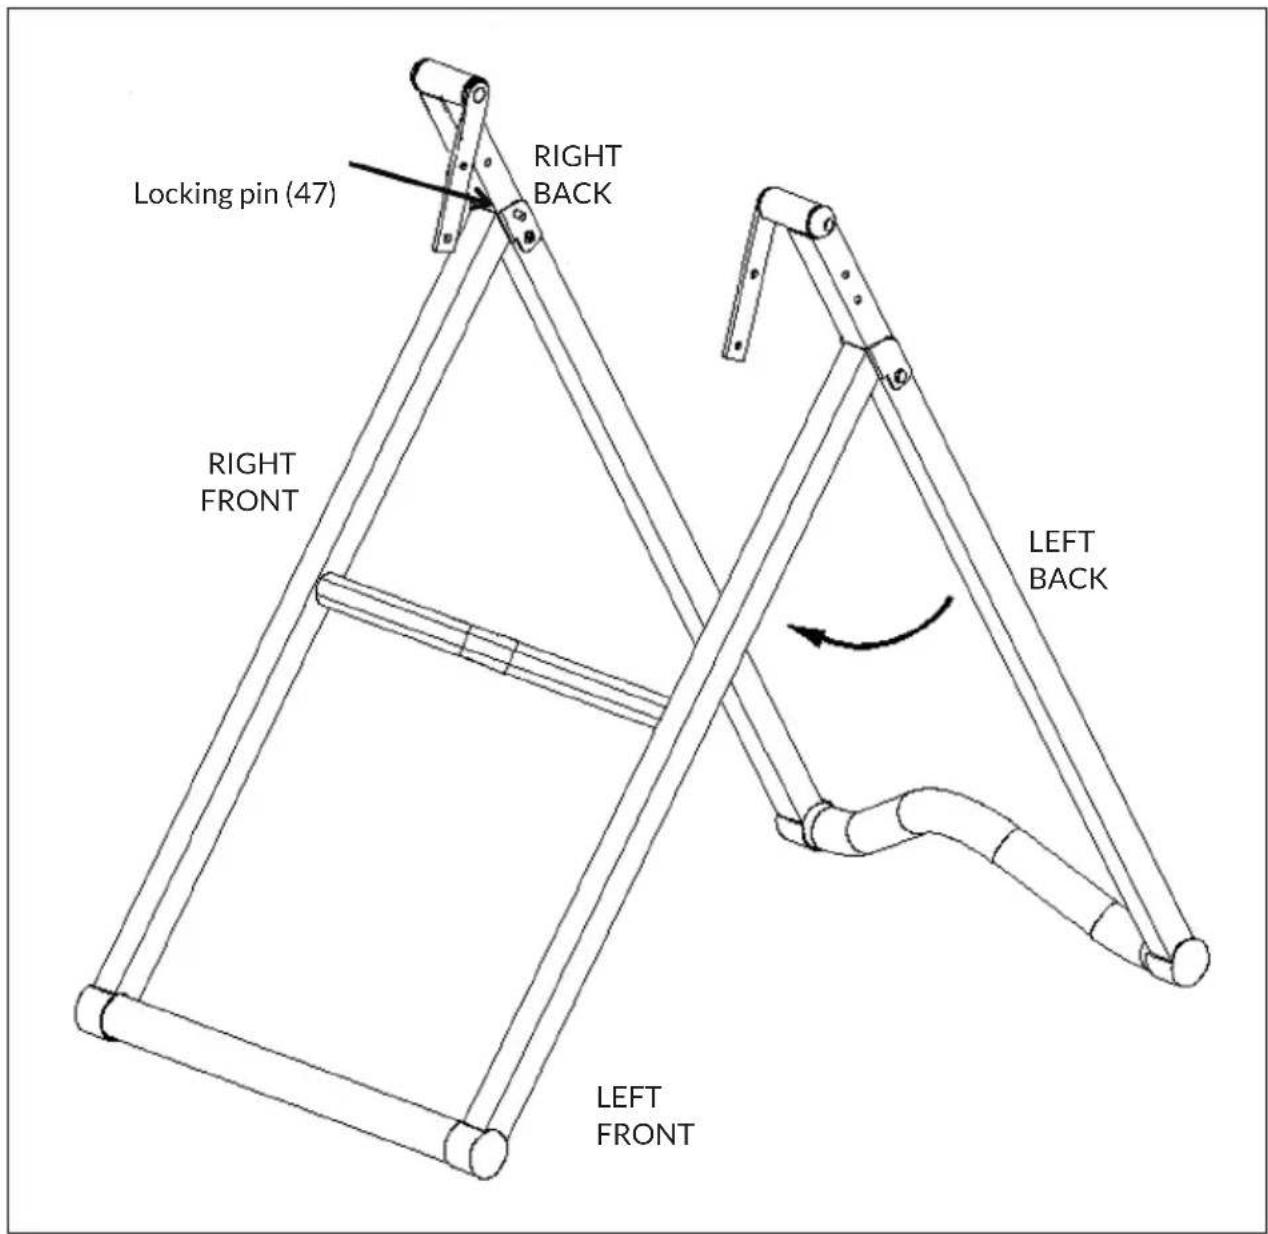
Carefully remove the frame from the box. Unfold it. Insert the locking pin (47) into the right side of the frame. Note the front, rear, right and left sides for the further assembly steps.
Step 2: Screw the handrail together
Attach the right handrail (13) to the right side of the base frame. Use 2 screws (21), 2 washers (8) and 2 nuts (7). Use the screws (20) and washers (8) to reinforce the angle bracket on the base frame.
Attach the left handrail (14) to the left side of the base. Use 2 screws (21), 2 washers (8) and 2 nuts (7). Now place the pin for adjusting the angle in the hole.
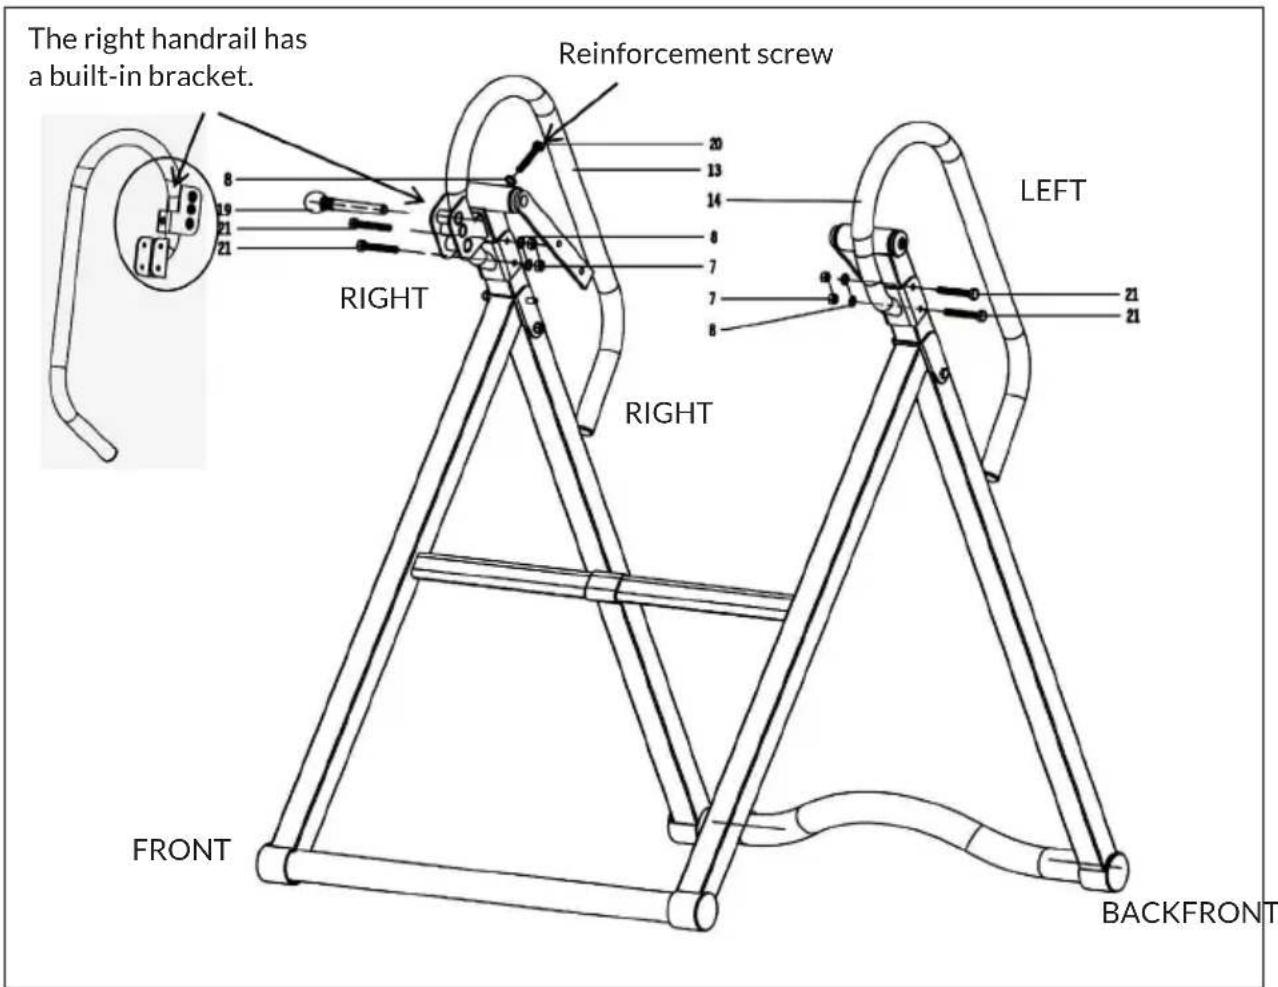
Now tighten all screws well.
Step 3: Mounting the backrest on the base frame
Attach the assembled part of the backrest to the base frame. Use the screws (6), washers (8) and lock nuts (7).
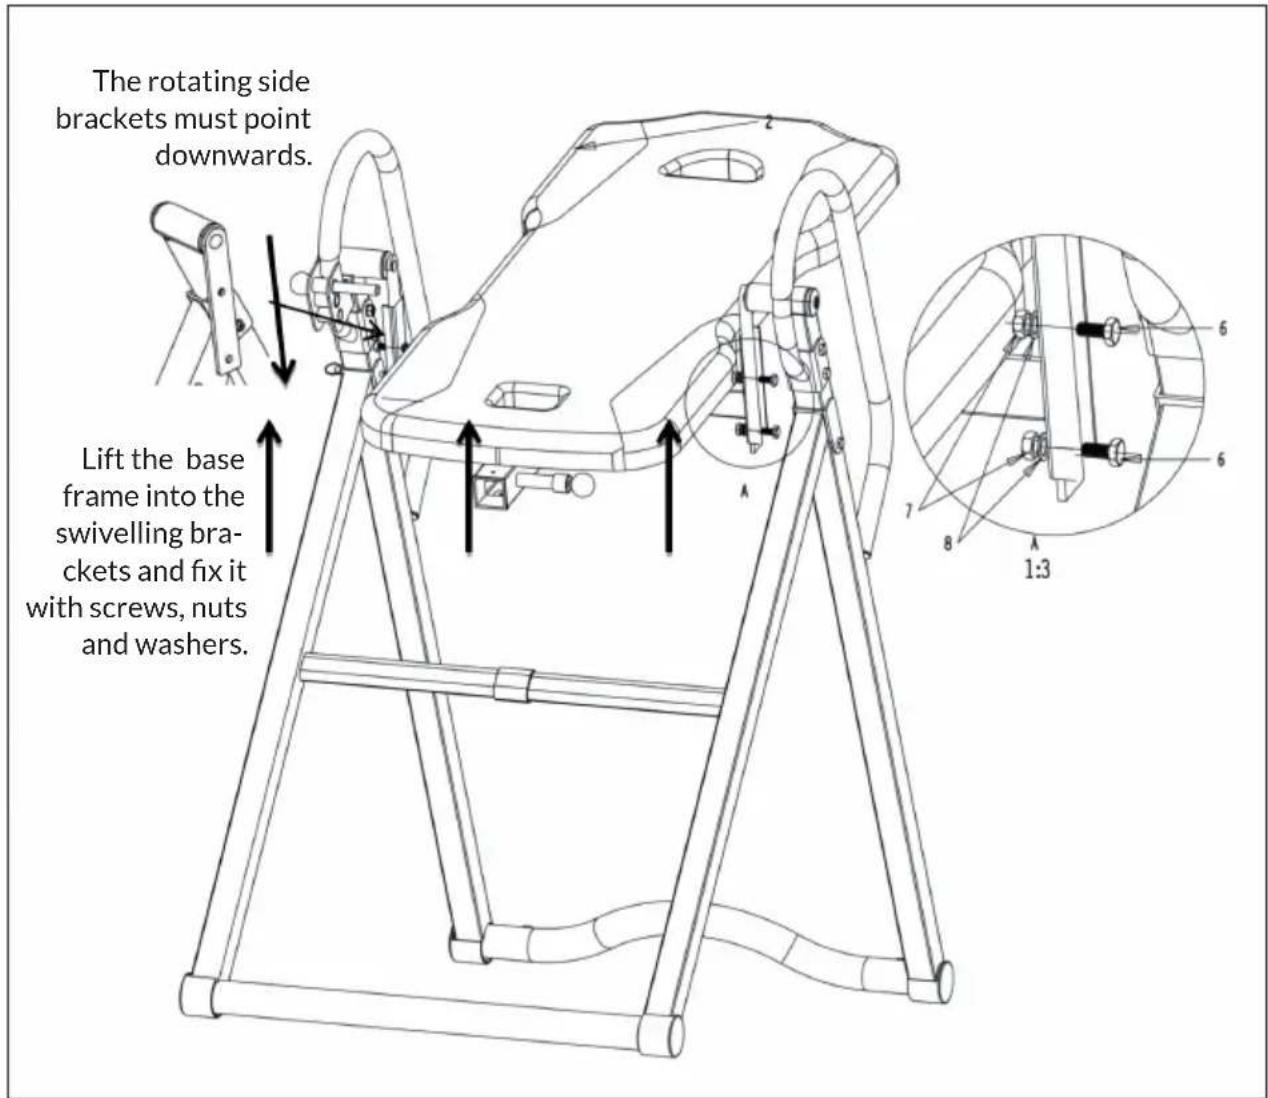
Now tighten all screws well.
Step 4: Body length adjustment tube and foam rollers

| (B) (C) | |
| B Insert the foot support tube (42) into the body length adjustment tube (33) and tighten with the bolts (49), washers (36) and nuts (35). Put the foam rollers (43) on top and put the plastic cap on. | |
| C Put the foam rollers (43) on the body length adjustment tube (33) and secure it with the screws (39), washers (36) and nuts (43). Put the plastic caps (41) on the ends. Ensure that the knob is screwed tightly to the body length adjustment tube (33). |
Now tighten all screws well.
Step 5: Final assembly
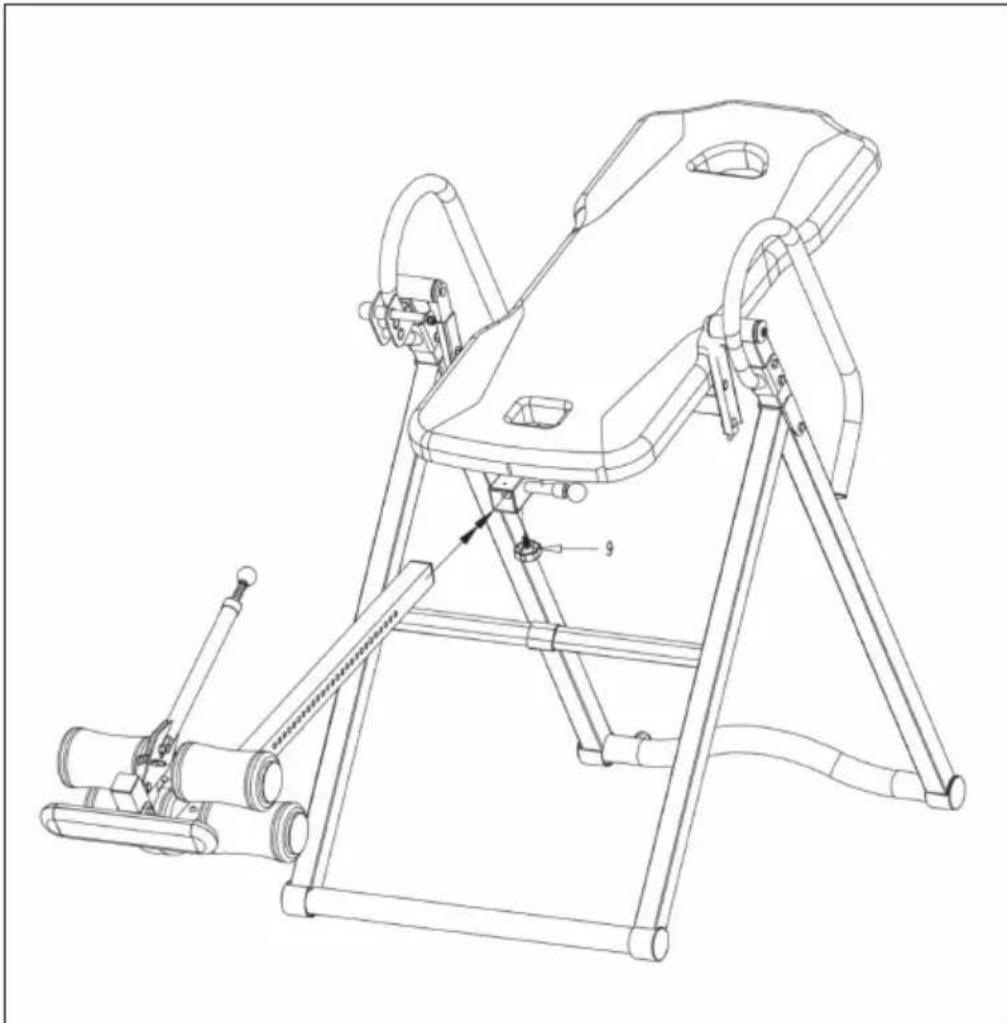
Insert the ready-assembled body length adjustment tube (33) and the foot support into the back support tube and fasten the tubes with the body length adjustment knob.
Use the height adjustment knob (9) to secure the body length adjustment tube (33) when the desired body length adjustment has been made.
Note: With this unit, it is possible to adjust the body height from 1.54 m to 1.98 m. The maximum body weight is 136 kg.
natural_image
Technical line drawing of a mechanical device with articulated arms and a base plate (no text or symbols)Now tighten all screws well.
Step 6: Putting on the heat massage pad
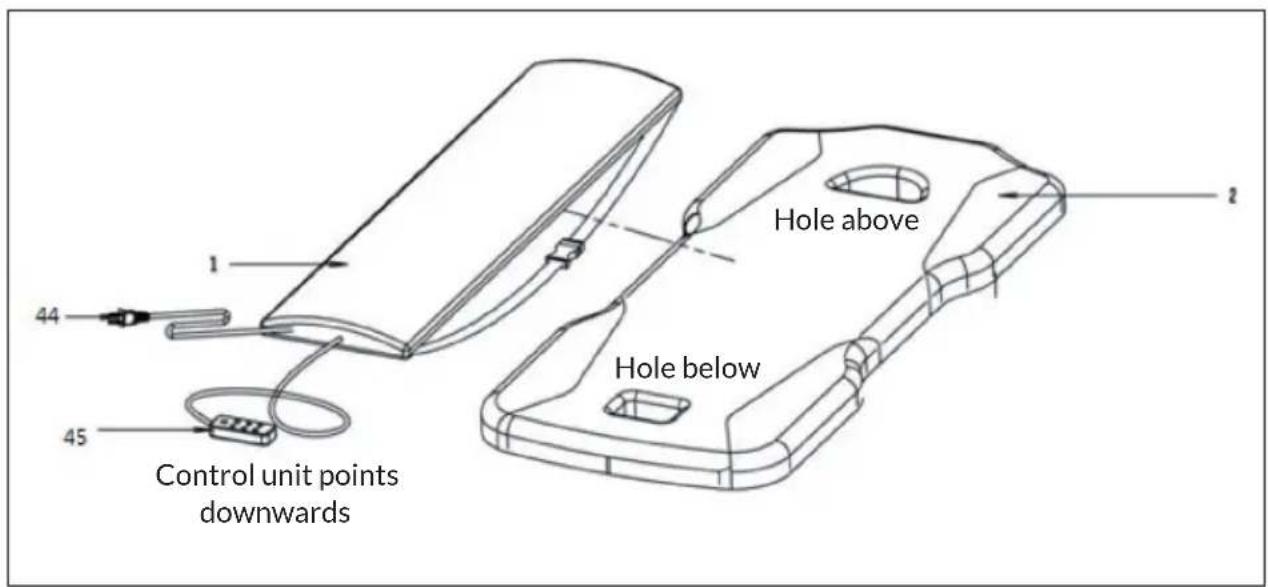
Place the heat massage pad (1) on the back cushion (2). To do this, pull 2 straps through the upper hole and 2 straps through the lower hole.
The control element (45) can be stored within easy reach in the Velcro pocket on the back pad.
Note: Make sure that the mains cable is not pushed through the inversion bench. Make sure that all nuts, bolts and screws are fully tightened before use.
Press the switch-on button to activate the heat massage pad. Now the automatic mode starts, which lasts for 10 minutes. The device then switches off automatically. In this mode, massage level 1 and intensity level 1 are active. To deactivate the lumbar pad again, press and hold the power button for 2 seconds.
Mode
Press the MODE button to select one of two available massage modes. Each time you press the MODE button, the display shows "A1" and "A2" in succession.
Intensity
Press the INTENSITY button to set 3 available intensity levels. Each time the INTENSITY button is pressed, the numbers "1-3" appear in the display.
Time setting
Each massage session lasts a maximum of 10 minutes. Press the TIME button to set the massage time (5 or 10 minutes).

WARNING
Danger of electrocution! Do not use near water. Do not allow the unit to get wet. Do not use if the wires are exposed. Make sure that children do not play with the unit.
SETTINGS
Quick adjuster for setting the tilt angle
natural_image
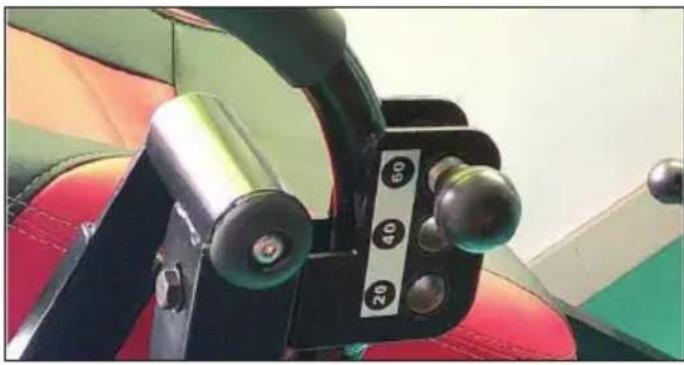
Close-up of a mechanical lever mechanism with numbered components (20, 30, 40) against a colorful abstract background (no text or symbols visible)Familiarise yourself with the quick adjuster on the right-hand side. The position of the locking pin determines the inversion angle you are comfortable with. The 3 settings are:
- 20^ Slight inversion angle
- 40^ Moderate inversion angle
- 60^ Elevated inversion angle
Note: It is strongly recommended that someone accompanies you during the inversion exercises. Although the inversion bench is easy to use, it means extra safety and help with inversion exercises.
Adjusting the body size
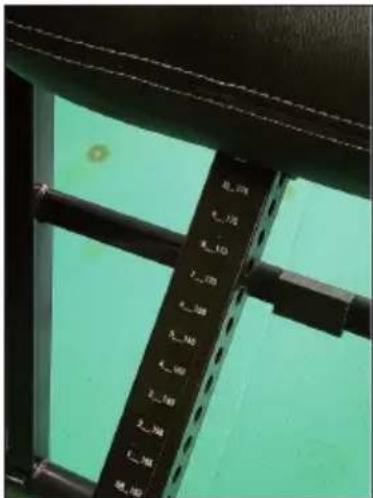
Before you start an exercise, make sure that the inversion bench is properly adjusted to your height. The body height is displayed on the body length adjustment tube in centimetres and inches.
As every body is different, you need to find the right balance setting for your body type. Do this with the quick adjuster.
USING THE DEVICE

CAUTION
Risk of injury! Always wear training shoes with tightly tied laces to hook the feet well and protect the feet during exercise.
| 1 | 2 |
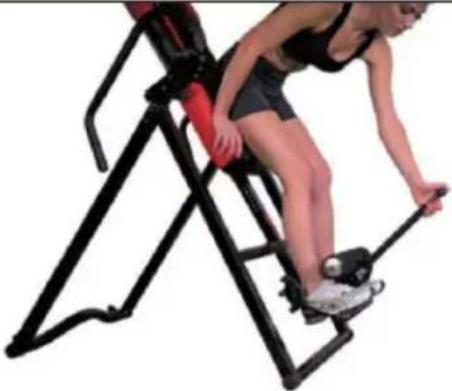 | 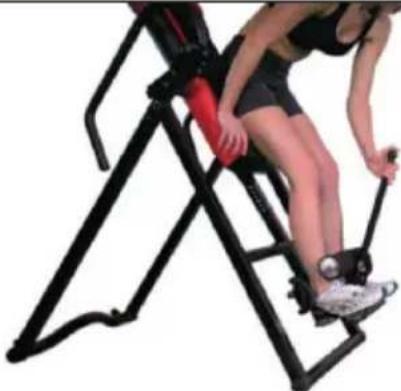 |
| Extend the front rollers by pushing the foot extension down and releasing it forward. Carefully step onto the footrest. | Slide your feet under the foam rollers and support your heel in the rear heel support. Slowly release the top button and let the foam rollers slowly sink down onto the feet. |
| 3 | ||
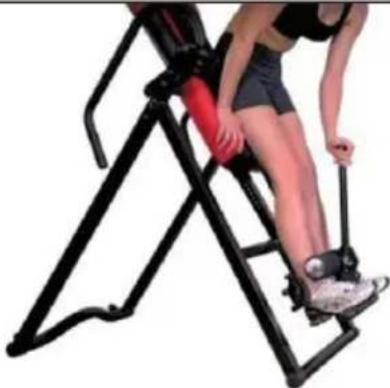 | Snap the foam rollers firmly against your feet and hook the legs and ankles securely until it is locked in place.NOTE: The legs and feet must be securely hooked before tipping back. Do not start an inversion exercise if this mechanism is not working properly. | |
Finding the right height and balance
| 4 | |
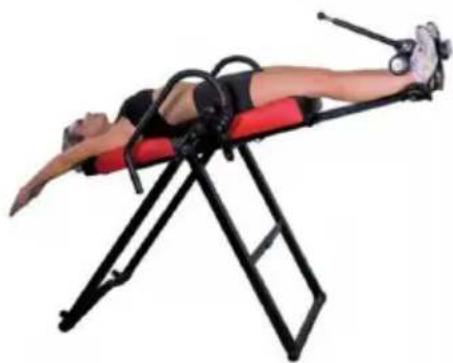 | Lay your head flat on the back cushion. Slowly raise one arm towards the ceiling. If the bench slowly tilts backwards, the body length setting is correct. |
| 5 | |
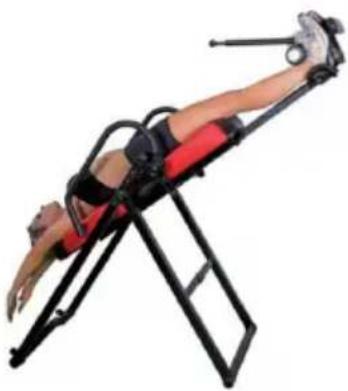 | If the bench does not tilt backwards, adjust the height setting one hole at a time until the bench tilts backwards. Make sure you only slowly move your arm. If you move both arms above your head, the inversion bench should now continue to tilt. Assuming you are comfortable with the angle, set the quick adjuster to 20° or more. |
| 6 | |
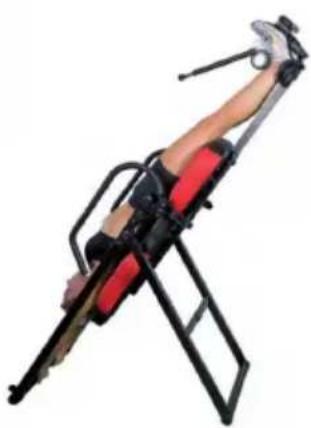 | With the right assistance and provided you are comfortable with the settings at 40° or 60°, you can tilt the inversion bench further. |
NOTE: When you move your hands back to the start position, the inversion bench should move back to the start position. If this is not the case, use the handrails to move yourself back and adjust the slider again to suit your body weight and body type.
DISPOSAL CONSIDERATIONS
natural_image
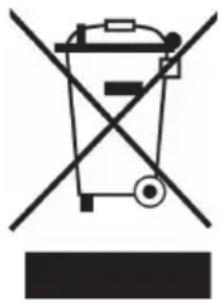
Symbol of a trash bin crossed with a diagonal line, no text or numbers presentIf there is a legal regulation in your country regarding the disposal of electrical and electronic equipment, this symbol on the product or on the packaging indicates that this product must not be disposed of with household waste. Instead, it must be taken to a collection point for the recycling of electrical and electronic equipment. By disposing of this product in accordance with the regulations, you protect the environment and the health of those around you from negative consequences. For information on recycling and disposal of this product, contact your local government or household waste disposal service.
MANUFACTURER & IMPORTER (UK)
Manufacturer:
Chal-Tec GmbH, Wallstrasse 16, 10179 Berlin, Germany.
Importer for Great Britain:
Berlin Brands Group UK Limited
PO Box 42
272 Kensington High Street
London, W8 6ND
United Kingdom
Estimado cliente:
ÍNDICE
natural_image
Technical line drawing of a balance exercise machine with adjustable arms and legs (no text or symbols)natural_image
Close-up of a mechanical lever mechanism with numbered components (no readable text or symbols)natural_image
Symbol of a trash bin crossed with a diagonal line, no text or numbers presentBerlin Brands Group UK Limited
PO Box 42
272 Kensington High Street
London, W8 6ND
United Kingdom
Cher client, chère cliente,
SOMMAIRE
natural_image
Technical line drawing of a mechanical device with articulated arms and a base plate (no text or symbols)natural_image
Close-up of a mechanical lever mechanism with numbered components (no readable text or symbols)natural_image
Person performing a high jump exercise using a balance scale (no text or symbols visible)natural_image
Person performing a high jump exercise using a balance scale (no text or symbols visible)natural_image
Symbol of a trash bin crossed with a diagonal line, no text or numbers presentBerlin Brands Group UK Limited
PO Box 42
272 Kensington High Street
London, W8 6ND
United Kingdom
Gentile cliente,
INDICE
natural_image
Technical line drawing of a mechanical device with articulated arms and a base plate (no text or symbols)natural_image
Close-up of a mechanical lever mechanism with numbered components (no readable text or symbols)natural_image
Person performing a high jump exercise using a balance scale (no text or symbols visible)natural_image
Symbol of a trash bin crossed with a diagonal line, no text or numbers presentPRODUTTORE E IMPORTATORE (UK)
Produttore:
Chal-Tec GmbH, Wallstraße 16, 10179 Berlino, Germania.
Berlin Brands Group UK Limited
PO Box 42
272 Kensington High Street
London, W8 6ND
United Kingdom

bar
| Category | Value | |---|---| | Category 1 | 100 | | Category 2 | 100 | | Category 3 | 100 | | Category 4 | 100 | | Category 5 | 100 | | Category 6 | 100 | | Category 7 | 100 | | Category 8 | 100 | | Category 9 | 100 | | Category 10 | 100 | | Category 11 | 100 | | Category 12 | 100 | | Category 13 | 100 | | Category 14 | 100 | | Category 15 | 100 | | Category 16 | 100 | | Category 17 | 100 | | Category 18 | 100 | | Category 19 | 100 | | Category 20 | 100 | | Category 21 | 100 | | Category 22 | 100 | | Category 23 | 100 | | Category 24 | 100 | | Category 25 | 100 | | Category 26 | 100 | | Category 27 | 100 | | Category 28 | 100 | | Category 29 | 100 | | Category 30 | 100 | | Category 31 | 100 | | Category 32 | 100 | | Category 33 | 100 | | Category 34 | 100 | | Category 35 | 100 | | Category 36 | 100 | | Category 37 | 100 | | Category 38 | 100 | | Category 39 | 100 | | Category 40 | 100 | | Category 41 | 100 | | Category 42 | 100 | | Category 43 | 100 | | Category 44 | 100 | | Category 45 | 100 | | Category 46 | 100 | | Category 47 | 100 | | Category 48 | 100 | | Category 49 | 100 | | Category 50 | 100 | | Category 51 | 100 | | Category 52 | 100 | | Category 53 | 100 | | Category 54 | 100 | | Category 55 | 100 | | Category 56 | 100 | | Category 57 | 100 | | Category 58 | 100 | | Category 59 | 100 | | Category 60 | 100 | | Category 61 | 100 | | Category 62 | 100 | | Category 63 | 100 | | Category 64 | 100 | | Category 65 | 100 | | Category 66 | 100 | | Category 67 | 100 | | Category 68 | 100 | | Category 69 | 100 | | Category 70 | 100 | | Category 71 | 100 | | Category 72 | 100 | | Category 73 | 100 | | Category 74 | 100 | | Category 75 | 100 | | Category 76 | 100 | | Category 77 | 100 | | Category 78 | 100 | | Category 79 | 100 | | Category 80 | 100 | | Category 81 | 100 | | Category 82 | 100 | | Category 83 | 100 | | Category 84 | 100 | | Category 85 | 100 | | Category 86 | 100 | | Category 87 | 100 | | Category 88 | 100 | | Category 89 | 100 | | Category 90 | 100 | | Category 91 | 100 | | Category 92 | 100 | | Category 93 | 100 | | Category 94 | 100 | | Category 95 | 100 | | Category 96 | 100 | | Category 97 | 100 | | Category 98 | 100 | | Category 99 | 100 | | Total (Total) |

- INHALTSVERZEICHNIS
- Member of Berlin Brands Group
- Handwerkerstr. 11
- Dahlwitz-Hoppegarten
- Deutschland
- Dear customer,
- CONTENTS
- SAFETY INSTRUCTIONS
- General instructions
- Important health tips
- ASSEMBLY
- Step 1: Unfold the frame
- Step 2: Screw the handrail together
- Step 3: Mounting the backrest on the base frame
- Step 5: Final assembly
- Step 6: Putting on the heat massage pad
- Mode
- Intensity
- Time setting
- WARNING
- SETTINGS
- Quick adjuster for setting the tilt angle
- Adjusting the body size
- USING THE DEVICE
- CAUTION
- Finding the right height and balance
- DISPOSAL CONSIDERATIONS
- MANUFACTURER & IMPORTER (UK)
- Manufacturer:
- Importer for Great Britain:
- Estimado cliente:
- ÍNDICE
- Cher client, chère cliente,
- SOMMAIRE
- Gentile cliente,
- INDICE
- PRODUTTORE E IMPORTATORE (UK)
- Produttore:
Brand : Klarfit
Model : Ease Delux
Category : Fitness Equipment