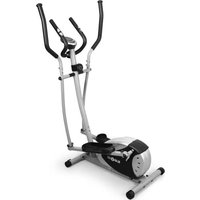
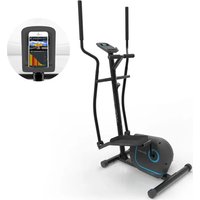
Ellifit Basic 20 - Elliptical bike Klarfit - Free user manual and instructions
Find the device manual for free Ellifit Basic 20 Klarfit in PDF.


| Product Type | Elliptical bike |
| Dimensions (L x W x H) | 120 x 60 x 160 cm |
| Product Weight | 35 kg |
| Max User Weight | 120 kg |
| Power Supply | 2 AA batteries |
| Resistance Levels | 8 levels, manually adjustable |
| Display Functions | Time, speed, distance, calories, pulse |
| Maintenance | Clean with damp cloth; lubricate moving parts every 3 months |
| Safety Features | Stabilizing base, non-slip pedals, emergency stop |
| Spare Parts | Replacement pedals, handles, and resistance bands available |
| Warranty | 2 years |
Frequently Asked Questions - Ellifit Basic 20 Klarfit
User questions about Ellifit Basic 20 Klarfit
0 question about this device. Answer the ones you know or ask your own.
Ask a new question about this device
Download the instructions for your Elliptical bike in PDF format for free! Find your manual Ellifit Basic 20 - Klarfit and take your electronic device back in hand. On this page are published all the documents necessary for the use of your device. Ellifit Basic 20 by Klarfit.
USER MANUAL Ellifit Basic 20 Klarfit
natural_image
Line drawing of an exercise machine with rotating body and support poles (no text or symbols)
electronic.star
www.elektronik-star.de
Teileliste
Schritt 2:
Schritt 3:
Ziel-Pulsschlag
| TRAININGSBEREICH | |
| ALTER | MIN-MAX (BPM) |
| 20 | 133-167 |
| 25 | 132-166 |
| 30 | 130-164 |
| 35 | 129-162 |
| 40 | 127-161 |
| 45 | 125-159 |
| 50 | 124-156 |
| 55 | 122-155 |
| 60 | 121-153 |
| 65 | 119-151 |
| 70 | 118-150 |
| 75 | 117-147 |
| 80 | 115-146 |
| 85 | 114-144 |
natural_image
Line drawing of a person in a stretching pose (no text or symbols)Kniesehne dehnen
natural_image
Line drawing of a person sitting on a yoga mat, no text or symbols presentQuadrizeps dehnen
natural_image
Line drawing of a woman performing a stretching exercise (no text or symbols)natural_image
Line drawing of a person sitting on a yoga mat (no text or symbols)Kopf-bis-Fuß dehnen
natural_image
Line drawing of a person in a forward bend yoga pose (no text or symbols)Gesäß dehnen
natural_image
Line drawing of a person sitting on a yoga mat, arms crossed (no text or symbols)natural_image
Line drawing of a person lying on a rectangular platform (no text or symbols)
natural_image
Line drawing of a person performing a prone exercise on a mat (no text or symbols)
natural_image
Line drawing of a person performing a yoga pose on a mat (no text or symbols)
natural_image
Line drawing of a woman in profile view wearing a tank top and skirt (no text or symbols)Schulter dehnen
natural_image
Line drawings of a person performing a stretching exercise (no text or symbols)WARNING: To reduce the risk of serious injury read the following important precautions before using the exercise bike.
- Read all instructions in this instruction book before using the exercise bike Use the exercise bike only in the way described in this instruction book.
- It is the responsibility of the owner to ensure that all users are adequately informed of all precautions,
- Use the exercise bike indoors on a level surface. Keep the exercise bike away form excessive moisture and dust,
- The safety level of the exercise bike can be maintained only if it is examined regularly for damage and wear. Replace defective components immediately. If there are any defective components, do not use the exercise bike.
- Keep unsupervised children away from the exercise bike at all times.
- The exercise bike should not be used by persons weighing more than 100 kg.
- Wear appropriate clothing and athletic shoes when exercising; do not wear loose clothing or jeweler that may get caught in moving parts.
- Do not arch your back when using the exercise bike always try to keep your back straight.
- If you feel pain or dizziness while exercising, stop immediately and cool down.
- The exercise bike is intended for home use down.
- The exercise bike is not intended for therapeutic purposes.
WARNING: Before beginning this or and exercise program, consult your doctor. This is especially important for people over the age of 35 or those with health problems. Read all instructions before using the exercise bike
EXPLODE-VIEW

| Parts | Description | Qty | Parts | Description | Qty |
| 1 | Main Frame | 1 | 28 | Hex Bolt | 4 |
| 2 | Front Stabilizer | 1 | 29 | Flat Washer | 6 |
| 3 | Rear Stabilizer | 1 | 30 | Nylon Nut | 6 |
| 4 | Roller Cap | 2 | 31 | Armrest | 1 |
| 5 | Leveler Cap | 2 | 32L/R | Handlebar (L/R) | 1pr. |
| 6 | Carriage Bolt | 4 | 33 | Acorn Nut | 4 |
| 7 | Arc Washer | 4 | 34 | Spring Washer | 2 |
| 8 | Acorn Nut | 4 | 35 | Allen Bolt | 2 |
| 9 | Handlebar Post | 1 | 36 | Handlebar Clamp Cover | 1 |
| 10 | Tension Controller | 1 | 37 | Carriage Bolt | 4 |
| 11 | Cross Pan Head Screw | 1 | 38 | Meter | 1 |
| 12 | Flat Washer | 1 | 39 | Spring Washer | 2 |
| 13 | Inner Hexagon Bolt | 4 | 40L/R | Nylon Nut (L/R) | 1pr. |
| 14 | Arc Washer | 8 | 41 | Nut Cap (S19) | 2 |
| 15 | Extension Sensor Wire | 1 | 42 | Square End Cap | 4 |
| 16 | Sensor Wire | 1 | 43 | Foam Grip | 2 |
| 17 | Tension Control Cable | 1 | 44 | Foam Grip | 2 |
| 18L/R | Pedal Support Tube (L/R) | 1pr. | 45 | Meter Bracket | 1 |
| 19L/R | Locking Bolt(L/R) | 1pr. | 46 | Pulse Sensor Wire | 2 |
| 20a | Nut Cap (S13) | 2 | 47 | Spherical Cap | 2 |
| 20b | Nut Cap (S14) | 4 | 48 | Mushroom Cap | 2 |
| 21 | Hex Bolt | 2 | 49 | Crank | 1 |
| 22 | Flat Washer | 2 | 50 | Tension Controller Cover | 1 |
| 23 | Nylon Nut | 2 | 51 | Alloy bushing | 4 |
| 24L/R | Swing Bar (L/R) | 1pr. | 52 | Bolt | 2 |
| 25 | Hex Bolt | 2 | 53 | Pedal tube joint | 2 |
| 26 | Flat Washer | 2 | 54 | Sleeve | 4 |
| 27L/R | Pedal (L/R) | 1pr. | 55 | Nut Cap(S17) | 4 |
| 56 | Wave washer | 2 |
Step 1:
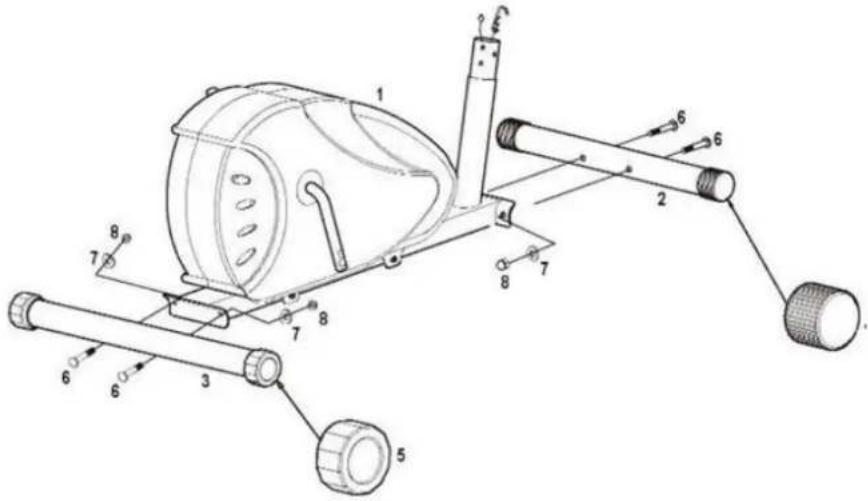
Attach the Front Stabilizer (2) and Rear Stabilizer (3) onto the Main Frame (1), secure with the Carriage Bolts (6), Arc Washers (7) and Acorn Nuts (8) which are pre-attached to the stabilizer
Note: Ensure that all bolts and washers are in place arid partially threaded in before completely tightening the bolt.
Step 2:
a: Connect Tension Control Cable (17) with the wire of Tension Controller (10), and then connect the Sensor wire (16) to the Extension Sensor Wire (15).
Note: With the tension controller (10) turned to its lowest setting.
b: Fasten the Handlebar Post (9) to the Main Frame(1), secure in place with Inner Hexagon Bolt (13) and Arc Washers (14) which are pre-attached to the Main frame (1).
Note: Ensure that all bolts and washers are in place and partially threaded in before completely tightening the bolt.

Step 3:
a:Attach Swing Bar (24L/R) to Pedal support Tube (13L/R) using Hex Bolt (21), Flat Washer (22) and Nylon Nut (23).
b: Fix the Swing Bar (24L/R) to the long axle of the Handlebar Post (9) with Hex Bolt (25) and Flat Washer (26), and then fix to Pedal Support Tube (18L/R) on the Crank (49) with Locking Bolt (19L/R), wave washer (56), Spring Washer (39) and Nylon Nut (40L/R). Then cover the Nut Cap (20a), (20b), (41).
Note: Ensure that all bolts and washers are in place an partially threaded in before completely tightening the bolt.

Step 4:
Secure the Pedals (27L/R) to the Pedal Support Tube (18L/R) respectively using Hex Bolt (28), Flat Washer (29) and Nylon Nut (30), viewed from the rider's travel direction.
Note:. Both pedals are labeled I for left and r for right. to tighten turn the left pedal counterclockwise and the right pedal clockwise.

Step 5:
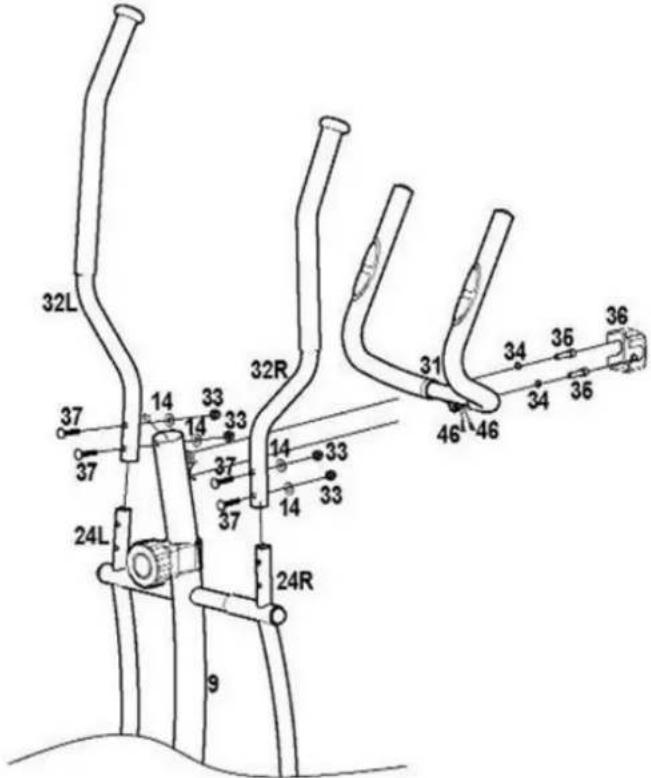
a: Fit the Armrest (31) to the Handlebar Post (9), secure in place with the Spring Washers (34) and Allen Bolts (35) which are pre-attached to the Handlebar Post (9), and then pull the Pulse Sensor Wire (46) out of the Handlebar Post (9), finally clip the Handlebar Clamp Cover (36).
b: Fix the Handlebar (32L/R) to the Swing Bar (24L/R) with Carriage Bolt (37), Arc Washer (14) and Acorn Nut (33) respectively.
Note: Foam Grip may be easy broken, using it carefully!
Step 6:
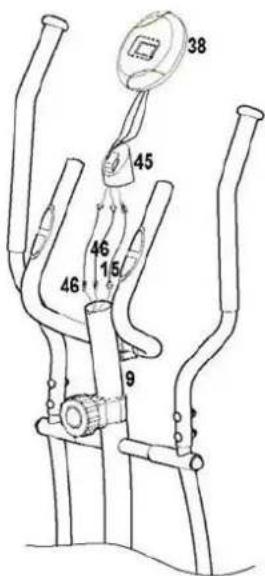
a: Feed the wires of meter (38) through hole of the meter Bracket (45) fix the meter (38) onto the Bracket (45). And then connect the Wires (46), (16) to the wires of Meter (38) respectively. Insert the Bracket onto the Handlebar Post (9). b: Remove the battery cover from the back of the meter (38) and insert two AA batteries. See bottom of battery compartment for correct orientation.
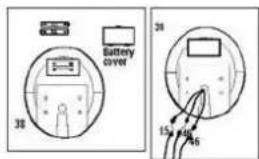

The following guidelines will help you to plan your exercise program. Remember that proper nutrition and adequate rest are essential of successful results.
WARNING: Before beginning this or and exercise program, consult your doctor. This is especially important for people over the age of 35 or those with health problems.
WHY EXERCISE?
Exercise has been proven essential for good health and general wellbeing. Regular exercise will:
Relieve tension and stress
Provide enjoyment and fun
Stimulate the mind
Help maintain stable weight
Control appetite
Boost self-image
Improve muscle tone and strength
Improve flexibility
Lower blood pressure
Believe insomnia
TARGET HEART RATE
| TRAINING ZONE | |
| AGE | MIN-MAX (BPM) |
| 20 | 133-167 |
| 25 | 132-166 |
| 30 | 130-164 |
| 35 | 129-162 |
| 40 | 127-161 |
| 45 | 125-159 |
| 50 | 124-156 |
| 55 | 122-155 |
| 60 | 121-153 |
| 65 | 119-151 |
| 70 | 118-150 |
| 75 | 117-147 |
| 80 | 115-146 |
| 85 | 114-144 |
Note: This is a guide only and performance will depend on the fitness and condition (health) of the person using the exercise bike.
BEGINNERS GUIDE
If you're beginning an exercise program, you should check with your doctor if:
• You have been diagnosed with heart problems, high blood pressure or other medical conditions.
- You have not exercised for over a year.
- If you are over 35 and no not currently exercise,
- You are pregnant.
- You have diabetes.
- You have chest pain, or experience dizziness or fainting spells.
- You are recovering from an injury or illness.
• Always perform stretching exercises both before and after your work-out see page 9.
- Start slowly; doing too much too soon can lead to injuries.
• If you are sore or tired, give yourself a few extra days to recover.
HOW TO BEGIN
- Start with two or three 15 minute sessions per week with a rest day between work-outs.
- Warm-up for 5 to 10 minutes with gentle movements like walking or swinging your arms in a circle and then stretch the muscles you'll use during your work-out. Seated cycling works mainly the quadriceps (thing) and hamstrings.
- Increase the pace and resistance to slightly harder than comfortable and exercise for as long as you can. You may only be able to exercise for a few minutes at a time, but that will change quickly if you exercise regularly.
- End each work –out with a 5-minute cool down with the resistance set to a low level. You should then stretch the muscles you've just worked to prevent injury and cramp.
- Increase your work-out time by a few minutes each week until you can work continuously for 30 minutes per session,
- Don't worry about distance or pace. For the first few weeks, focus on endurance and conditioning.
HOW HARD SHOULD YOU WORK?
When exercising, you should try to stay within your target heart rate (THR) zone. The table on the previous page will tell you the THR for your age. This is only a guide and will depend on the fitness and condition (health) of the person using the exercise bike. Always be aware of how you feel when you exercise. If you feel dizzy or light-headed, stop immediately and rest. If you're not breaking a sweat, speed it up!
STRETCHING GUIDE
- Begin with gradual mobility exercises of all the joints, i.e. simply rotate the wrists, bend the arm and roll your shoulders. This will allow the body's natural lubrication (synovial fluid) to protect the surface of your bones at these joints.
- Always warm up the body before stretching, as this increases blood flow around the body, which in turn makes the muscles more supple.
- Start with your legs, and work up the body.
- Each stretch should be held for at least 10 seconds (working up to 20 to 30 seconds) and usually repeated about 2 or 3 times.
- Do not stretch until it hurts. If there's any pain, ease off.
- Don't bounce. Stretching should be gradual and relaxed.
- Don't hold your breath during a stretch.
- Stretch after exercising to prevent muscles from tightening up.
- Stretch at least three times a week to maintain flexibility.
CALF STRETCH
- Stand with one leg in front of the other, both feet facing forwards and the front leg bent (the knee should be above the ankle).
- Press the heel of the back leg into the floor until you begin to feel the calf muscle in the back of the rear leg starting to stretch.
Note:
Side the rear leg backwards to increase this stretch if required.

natural_image
Line drawing of a person in a squatting pose, wearing athletic wear (no text or symbols)HAMSTRING STRETCH
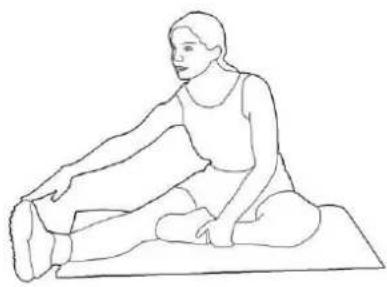
- Sit with one leg extended. Bring the other leg towards you and rest the sole of that foot onto the inner thigh of the extended leg.
- Keeping your shoulders square, reach forward towards your toes as far as possible, hold for the required count and then relax.
Note:
Keep your back and rear leg straight when performing this stretch.
natural_image
Line drawing of a woman sitting on a yoga mat, no text or symbols presentQUADRICEPS STRETCH
- With one hand against a wall for balance, reach back and grasp one foot with your other hand. Bring your heel as close to your buttocks as possible. Hold for the required count and then relax.

natural_image
Line drawing of a woman performing a stretching exercise (no text or symbols)INNER THIGH STRETCH
- Sit with the soles of your feet together and your knees outward. Pull your feet toward your groin area as far as possible. Hold for the required count and then relax.

natural_image
Line drawing of a person sitting on a yoga mat (no text or symbols)TOE TOUTH STRETCH
- Stand with your knees bent slightly and slowly bend forward from your hips.
- Allow your back and shoulders to relax as you reach down toward your toes, stretch as far as possible. Hold for the required count, the slowly return to the upright position and relax.

natural_image
Line drawing of a person in a forward bend yoga pose (no text or symbols)GLUTS (BUTTOCKS) STRETCH
- Sit up with your right leg stretched outwards; place your left foot over your right leg at the knee joint, placing your foot flat on the floor.
- Use your right arm to pull the bent knee across your body until you begin to feel a stretch in the left buttock. Hold for the requited count and then relax.
- Repeat using the opposite arms and legs.

natural_image
Line drawing of a person sitting on a yoga mat, arms crossed (no text or symbols)LOWER BACK
- Lie on your back with your knees bent.
- Keeping your upper back firmly on the floor, allow your knees to fall to one side, your lower back will rotate naturally. Hold for the required count and relax.
- Repeat on the other side.

natural_image
Line drawing of a person lying on a cushioned platform (no text or symbols)Note:
If any pain is felt avoid this stretch.
UPPER ABDOMINALS STRETH
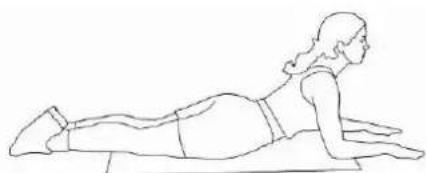
- Lie on your stomach with your forearms flat on the floor palms facing down.
- Try to lift your head upwards while looking forwards at all times, taking the weight onto your forearms and allowing your hips to relax into the floor. Hold for the required count and then relax.
natural_image
Line drawing of a person performing a prone exercise on a mat (no text or symbols)UPPER BACK
- Start off on all fours looking down towards the floor.
- Push your shoulders as high as possible; imagine a wire placed between your shoulder blades lifting you. Hold for the required count, and then relax.

natural_image
Line drawing of a person performing a yoga or stretching pose on a mat (no text or symbols)CHEST STRETCH
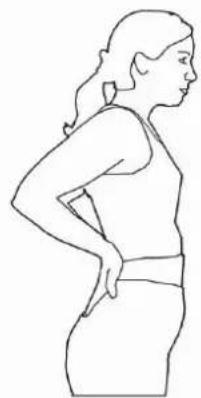
- Stand up and place both hand on the small of your back (just above your backside).
- Keeping your hands where they are, slowly push your elbows together, and push your chest outwards. Brust dehnen
- Hold for the required count, and then relax.
natural_image
Line drawing of a woman in profile view wearing a tank top (no text or symbols)- Stand up and place one arm across the front of the body.
- Use the other arm to push the outstretched arm into your chest.

natural_image
Line drawing of a person in a relaxed pose with one arm extended (no text or symbols)Note:
Push at the point just above the elbow.
- Try to keep the arm straight and breathe normally. Hold for the required count and then relax.
ALL OVER STRETH
- Stand with your feet shoulder width apart and your knees slightly bent.
- Place your hands above your head with your thumbs touching. Reach up evenly as high as possible, and hold for the required count and then relax.

natural_image
Line drawing of a person performing a stretching or exercise pose (no text or symbols)SPECIFICATIONS
Dimensions (L x W x H) 1000 x 600 x 1580mm
Batteries 2 x „AA“ size
Class Rating HC
Maximum User Weight 100kg
Please note that the specifications are subject to change without notice.

- Schritt 2:
- Schritt 3:
- Kniesehne dehnen
- Quadrizeps dehnen
- Kopf-bis-Fuß dehnen
- Gesäß dehnen
- Schulter dehnen
- WARNING: To reduce the risk of serious injury read the following important precautions before using the exercise bike.
- Step 1:
- Step 2:
- Step 3:
- Step 4:
- Step 5:
- Step 6:
- WARNING: Before beginning this or and exercise program, consult your doctor. This is especially important for people over the age of 35 or those with health problems.
- WHY EXERCISE?
- BEGINNERS GUIDE
- HOW TO BEGIN
- HOW HARD SHOULD YOU WORK?
- STRETCHING GUIDE
- CALF STRETCH
- Note:
- HAMSTRING STRETCH
- QUADRICEPS STRETCH
- INNER THIGH STRETCH
- TOE TOUTH STRETCH
- GLUTS (BUTTOCKS) STRETCH
- LOWER BACK
- UPPER ABDOMINALS STRETH
- UPPER BACK
- CHEST STRETCH
- Push at the point just above the elbow.
- ALL OVER STRETH
- SPECIFICATIONS
Brand : Klarfit
Model : Ellifit Basic 20
Category : Elliptical bike