
MC-860 - Turntable LENCO - Free user manual and instructions
Find the device manual for free MC-860 LENCO in PDF.

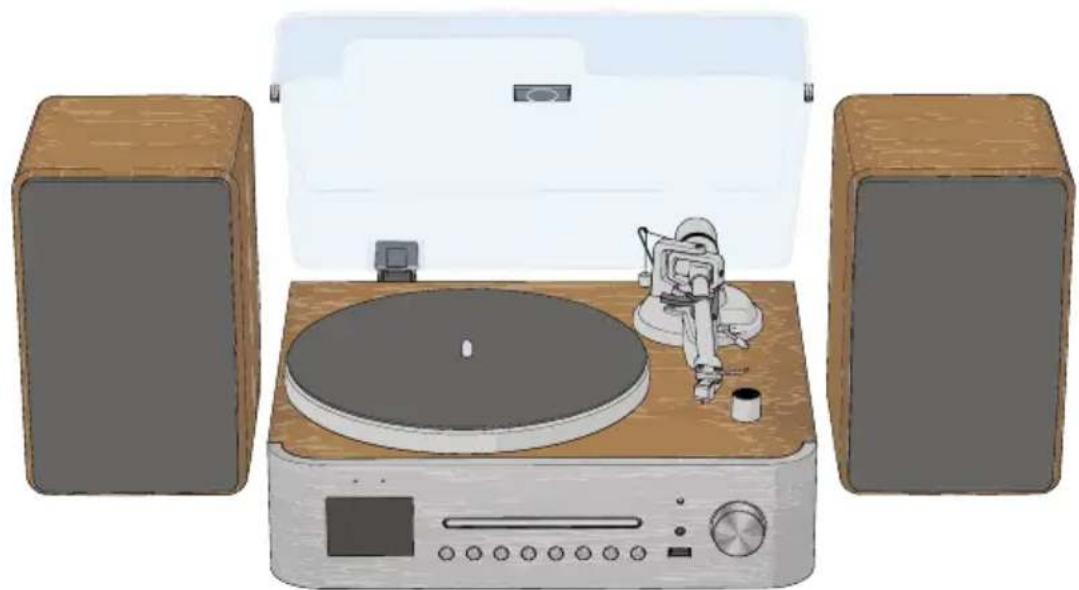
| Product Type | Turntable with built-in speakers, CD/MP3 player, Internet radio, DAB+, FM, Bluetooth |
| Brand | Lenco |
| Model | MC-860 |
| Power Supply | 230 V AC, 50 Hz via power adapter (EU and UK cables included) |
| Turntable Speeds | 33 1/3 and 45 RPM, fine adjustment possible |
| Main Functions | Vinyl playback, CD/MP3, Internet radio, DAB+, FM, Bluetooth, auxiliary input (3.5 mm), USB recording, alarm, sleep timer |
| Connectivity | Wi-Fi (Internet radio, Spotify Connect), Bluetooth, AUX input (3.5 mm), USB port (recording), line output |
| Speakers | 2 passive stereo speakers included, wired connection with press connectors |
| Display | LED |
| CD Player | Compatible with CD and MP3, tray loading |
| Internet Radio | Access to thousands of stations and podcasts via Wi-Fi |
| DAB+ Radio | Digital reception with auto scan and 40 presets |
| FM Radio | FM reception with RDS, 20 presets |
| Bluetooth | Wireless audio streaming from smartphones/tablets |
| USB Recording | Recording from CD, DAB, FM to USB flash drive (FAT32, max 32 GB) |
| Equalizer | 8 presets + manual EQ (bass/treble) |
| Alarm | 2 independent alarms with snooze, source selection (tone, radio, CD) |
| Maintenance | Clean the exterior with a soft damp cloth once a month; do not use abrasives |
| Safety | Do not expose to water, do not open (no user-serviceable parts), use only the provided adapter |
| Operating Temperature | 0 °C to 35 °C |
| Included Accessories | Power cable (EU and UK), speaker cables (×2), lens cloth, anti-skating weight, remote control |
Frequently Asked Questions - MC-860 LENCO
User questions about MC-860 LENCO
0 question about this device. Answer the ones you know or ask your own.
Ask a new question about this device
Download the instructions for your Turntable in PDF format for free! Find your manual MC-860 - LENCO and take your electronic device back in hand. On this page are published all the documents necessary for the use of your device. MC-860 by LENCO.
USER MANUAL MC-860 LENCO
HiFi set with Internet, DAB+, FM Radio, CD/MP3 Player and Turntable
QUICK START GUIDE
natural_image
Illustration of a vintage gramophone with two speakers and a digital display (no text or symbols)EN Quick start guide 7
DE Kurzanleitung 13
FR Guide d'utilisation rapide 20
NL Snelstartgids 27
IT Guida rapida all'avvio 34
ES Guía de inicio rápido 41
PT Guia de iniciação rápida 48
SV Snabbstartsguide 55
FI Pika-aloitusopas 62
NO Hurtigguide 68
DA Vejledning til hurtig start 75
HU Gyors beüzemelési útmutató 81
PL Przewodnik Szybki start 88
EL Οδηγός γρήγορης εκκίνησης 95
SK Rýchly návod 102
cs Rychlý návod 109
RO Ghid rapid de inițiere 115
Lühijuhend 122
LV Ātrās palaišanas celvedis 128
LT Greitasis pradžios vadovas 135
TR Hızlı başlangıç kılavuzu 142
A
B
C
D
natural_image
Illustration of a vintage CD or DVD disc with a rotating screen and mechanical components (no text or symbols)E
natural_image
Diagram of a mechanical device with a rotating component and a curved arrow indicating rotation (no text or symbols present)F
natural_image
Technical illustration of a mechanical device with an inset showing a close-up of its internal components (no text or symbols present)G
H
natural_image
Illustration of a vintage CD or DVD machine with a disc and control panel, showing mechanical components and a paper lid (no text or symbols present)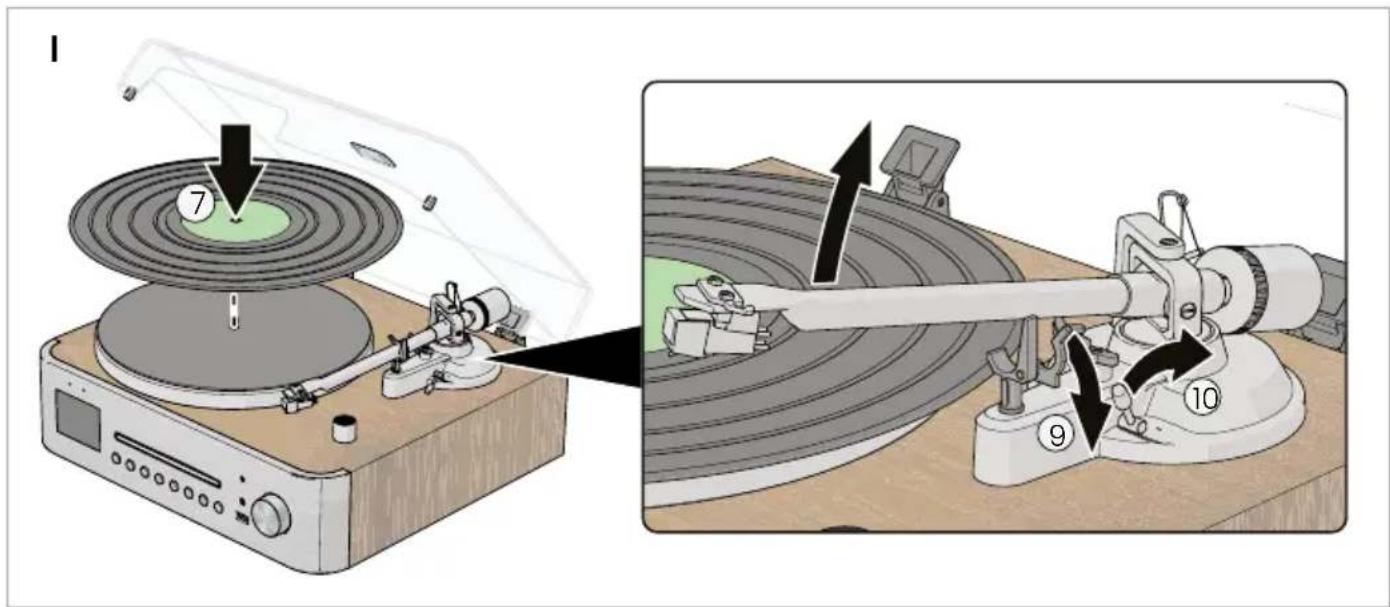
Specifications
| Specifications Value / Description | |
| Productname MC-760 / MC-860 | |
| Powersupply AC: 100 - 240 V ; 50/60 Hz | |
| Powerconsumption Max. 80 W | |
| Protectionclass Protection class II specified (double or reinforced insulated) | |
| Remote control battery type 2× AAA Batteries (not included) | |
| Max. sound output 2× 30W RMS | |
| BluetoothVersion5.2 | |
| BluetoothFrequency2.4GHz | |
| Bluetooth Transmission Power Max. 4 dBm | |
| WiFiVersion802.11b/g/n/a | |
| WiFiFrequency 2.4 - 5 GHz | |
| WiFi Transmission Power Max. 13 dBm | |
| CDformatsAudio-CD,MP3-CD | |
| DABfrequency | 174 - 240 MHz |
| FMfrequency | 87.5 - 108 MHz |
| Colourdisplay | 2.8 inch / 7.1 cm |
| Function modes | Internet radio, podcasts, music player, DAB, FM, CD, Bluetooth, AUX-IN, record player |
| USBformatsMP3 | |
| Memory slots DAB+ radio | 20 |
| Memory slots FM radio | 20 |
| Memory slots Internet radio | 40 |
| Sleeptimer Off / 15 / 30 / 45 / 60 minutes | |
| Connections | 1× headphone output (3.5mm), 1× USB, 1× line-out (3.5mm), 1× Aux-In (3.5mm), 1× AC power, 2× speaker connections |
| Dimensions main unit (W × D × H) | 372 × 330 × 158 mm |
| Dimensions speaker (W × D × H) | 160 × 165 × 240 mm |
| Weight main unit | 4kg |
| Weightspeaker | 3.5kg |
| Weightcomplete | 10 kg |
HiFi set with Internet, DAB+, FM Radio, CD/MP3 Player and Turntable
MC-760
MC-860

For more information, scan the QR code on the front page to see the extended manual.
Aboutthisdocument
This document is the user manual and contains all the information for correct, efficient, and safe use of the product.
Ensure you have fully read and understood the instructions in this document before you install or use the product. Keep the packaging and this document for future reference.
Symbols used
WARNING!
Signal word used to indicate a potentially hazardous situation which, if not avoided, could result in death or serious injury.
CAUTION!
Signal word used to indicate a potentially hazardous situation which, if not avoided, could result in minor or moderate injury.
NOTICE
Signal word used to address practices not related to physical injury.

Indicates important information that is not directly related to safety.
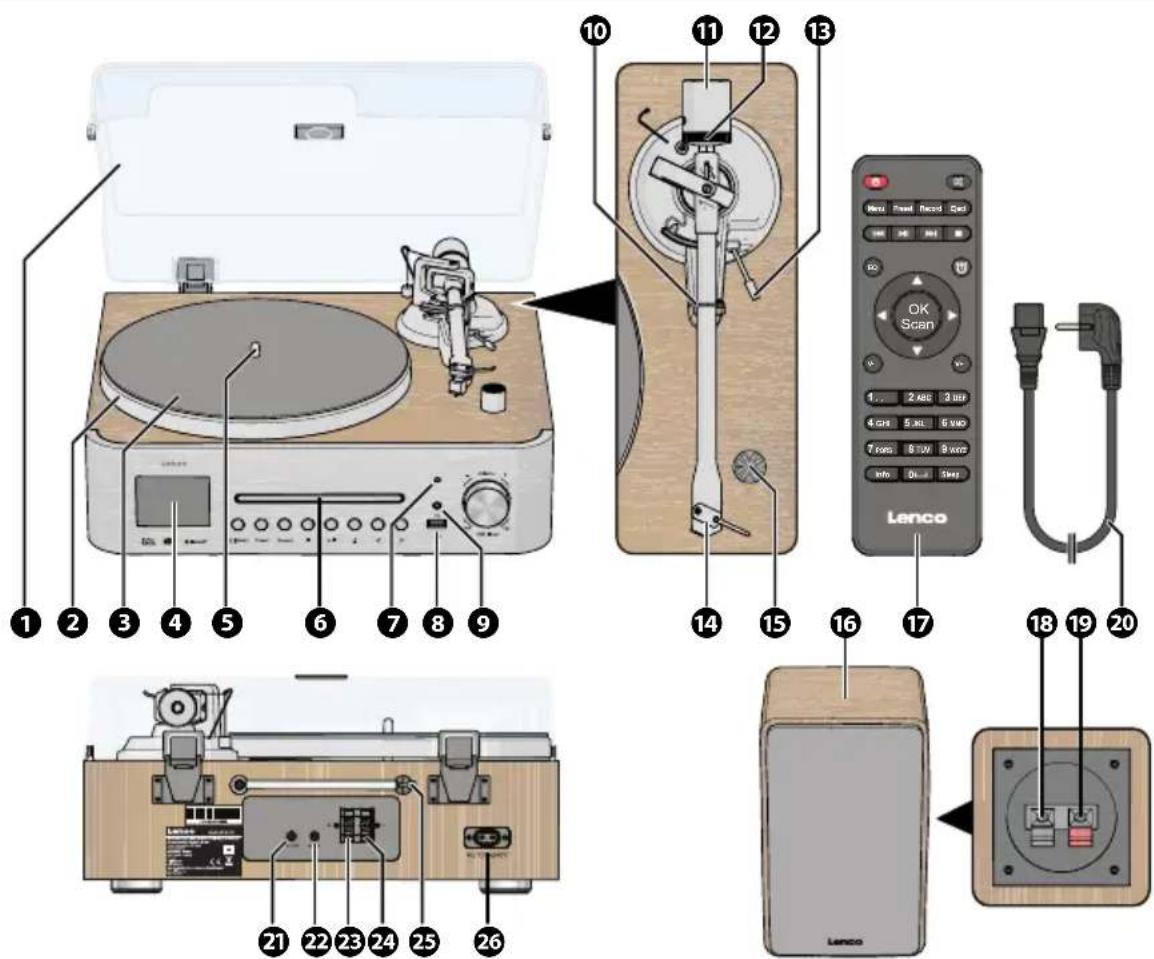
Product description (image A)
① Dust cover
②Turntableplatter
③Turntablemat
4LEDdisplay
⑤Turntablespindle
6CDdrive
⑦Infraredreceiver
⑧USBinput
9AUXheadphoneoutput
10 Tonearmrest(andlock)
11Counterweight
12Trackingforcedial
13Cuelever
14 Tonearm(withcartridge)
1533/45rpmspeedselector
16Speakers(2×)
17 Remotecontrol
18 Negativespeakerconnector
19 Positivespeakerconnector
20Powercable(EU)
21Lineoutput
22AUXinput
Lenco | Quick start guide
23 Rightspeakerconnectors
24 Leftspeakerconnectors
25FMradioantenna
26 Powerinput
Additional included parts
• Power cable (EU)
- Speaker cables (2×)
- Lenscloth
- Anti-skateweight
Display and buttons
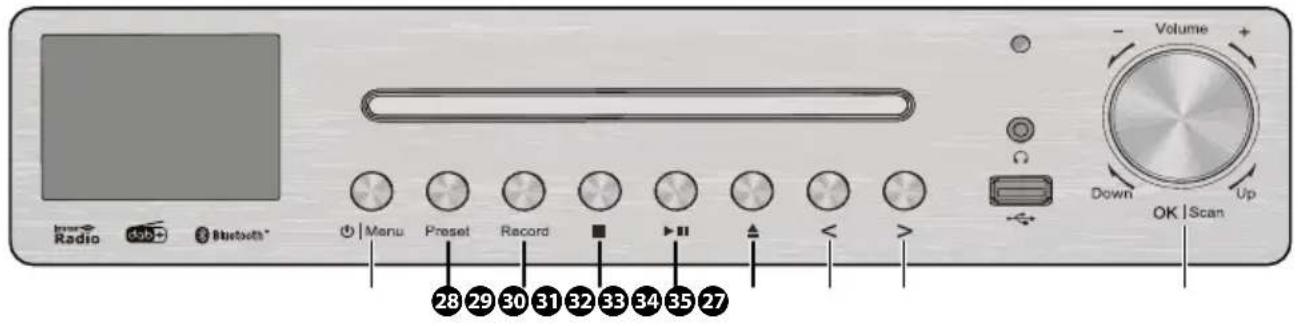
Buttons on the main unit (image B)
27 Power/menubutton
28 Presetselectionbutton
29Recordbutton
30 Stopbutton
31 Play/pausebutton
32 CDejectbutton
33 Previousbutton
34 Nextbutton
35 Press:OK/ScanScroll:Volume/menunavigation
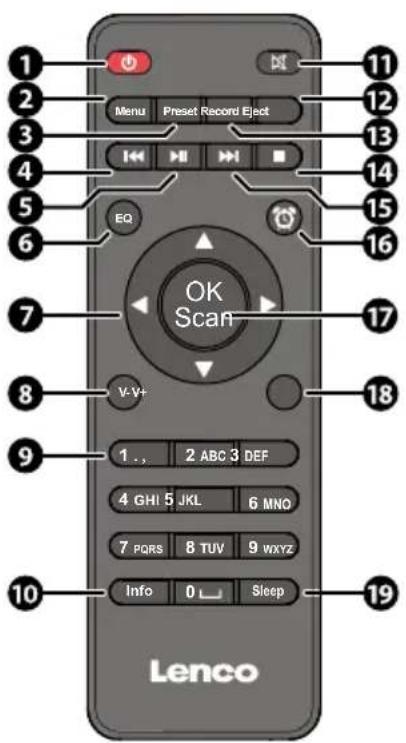
Buttons on the remote controller (image C)
① On-/off button
② Menubutton
③ Presetbutton
4 Previousbutton
⑤ Play/pausebutton
⑥ EQsettingsbutton
⑦Navigationbuttons
⑧ Volumedownbutton
9 Numericalbuttons
10 Infobutton
⑪ Mutebutton
⑫Ejectbutton
13 Recordbutton
14 Stopbutton
15 Nextbutton
16 Alarmbutton
17 Confirmbutton
18 Volumeupbutton
19 Sleepbutton
Intended use
This product is intended as a fully manual turntable with Internet, DAB+radio, FM Radio, CD Player, MP3 player, Bluetooth® functionality, and stereo speakers.
This product is intended for indoor use only. Only use the product as described in this user manual.
This product is not intended for commercial use.
This device is not intended for use by persons (including children) with reduced physical, sensory
or mental capabilities, or lack of experience and knowledge, unless they have been given supervision or instruction concerning use of the device by a person responsible for their safety, regarding the use of the device.
Safety instructions
Ensure you have fully read and understood the instructions in this document before you install or use the product. Keep the packaging and this document for future reference.
WARNING!
Chokinghazard:
- Do not let children play with packaging material. Packaging materials can lead to choking and suffocation. Always keep the packaging material out of reach of children.
- If the battery compartment does not close securely, stop using the product and keep it away from children.
Electricalhazard:
- Do not expose the product to water, rain, moisture, or high humidity.
- Do not use the product in damp environments, such as a bathroom or kitchen.
- Never insert any object into the ventilation opening of the product. The product contains electrical components.
- Only use the provided power cable.
- Only plug the power cable into a power outlet that is easily accessible.
- Keep the product away from pets and other animals. Animals can bite through the power cable and suffer electrical shock.
- Do not open the product, there are no user serviceable parts inside.
- This product may only be serviced by a qualified technician for maintenance.
Firehazard:
- Do not use the product if a part is damaged or defective. Always replace a damaged or defective product immediately.
- Unplug the product from the power source and other equipment if problems occur.
- Do not cover the ventilation openings. Always leave at least 5 cm of space around the product.
- Do not place the product on top of other electrical equipment.
- Never use the product with a damaged power cable.
CAUTION!
Risk of hearing loss:
- Extended exposure to high volumes can cause hearing loss.
Risk of eye damage:
- Class I laser product. Do not look directly into the infrared light to avoid damage to your eyesight.
NOTICE
Risk of damaging the product:
- Keep the product away from heat sources, such as radiators, heaters, stoves, and naked flames.
- Keep the product away from strong magnetic objects.
- Always keep the power cable and the product away from usual walkways.
- Only use a power source as specified on the specification label. If you are not sure of the type of power supply used in your home, consult your dealer or local power company.
- Do not disconnect the product by pulling on the cable. Always grasp the connector and pull.
- Avoid electrostatic discharge when handling the product. Electrostatic discharge can disturb the normal functioning of the product.
- Use the product only in moderate climates. Avoid extremely cold or hot environments. The recommended operating temperature is between 0°C and 35°C.
- Only use accessories provided by the manufacturer.
- Disconnect the product from the power outlet during lightning storms or before prolonged periods of disuse.
- Only use the product as described in this document.
- Do not touch the lens of the tonearm.
- Do not drop the product and avoid bumping.
- Clean the outside of the product every month with a soft, damp cloth. Avoid abrasives that can damage the surface.
Check the contents of the package
Check that all parts are present and that no damage is visible on the parts. If parts are missing or damaged, contact the Lenco B.V. service desk via the website: www.lenco.com.
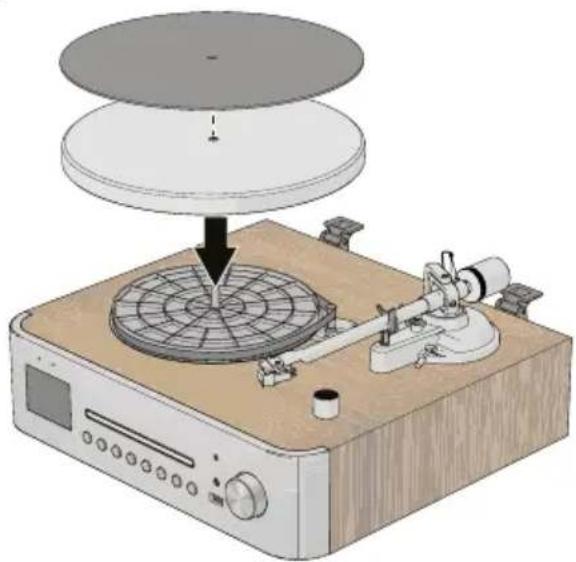
Installing the turntable platter and mat (image D)
- Remove the protective packaging.
- Place the product on a flat, stable, and low resonance surface, close to a power outlet.
- Remove all transport locks and stickers from the product.
- Place the platter onto the spindle in the centre of the turntable.
- Place the turntable mat on top of the platter. When removing the platter, lift the mat first,
then gently lift the platter straight up. This prevents damage during shipping or moving.
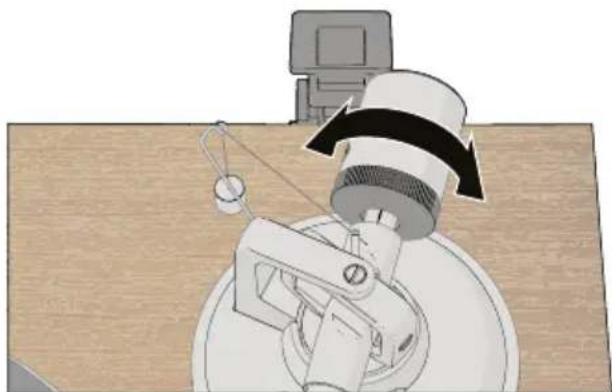
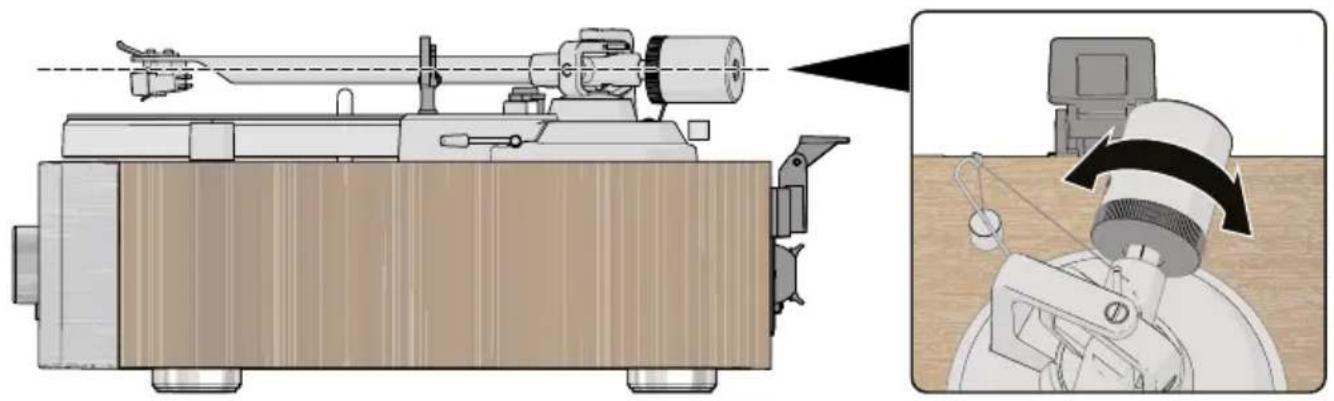
Attaching and adjusting the counterweight (image E & F)
- Hold the counterweight with the number ring facing you and slide it onto the tonearm end.
- Set the tracking force dial to 0.
- Pull the tonearm lock up and out of the way to unlock the tonearm.
- Push the cue lever backwards to lift the tonearm.
- Carefully move the tonearm between the tonearm rest and the turntable platter.
- Push the cue lever forwards to lower the tonearm.
The tonearm will be out of balance.
- Adjust the counterweight until the tonearm is horizontal.
Carefully push the tonearm up/down to test the alignment. The tonearm should automatically return to a steady horizontal position after pushing up/down. - Move the tonearm over to the rest position.
- Hold the counterweight steady and rotate the tracking force dial until the "0" lines up with the mark on the tonearm.
- Hold both the counterweight and the tracking force dial together and rotate them counterclockwise until the recommended tracking force (3 grams) is set.
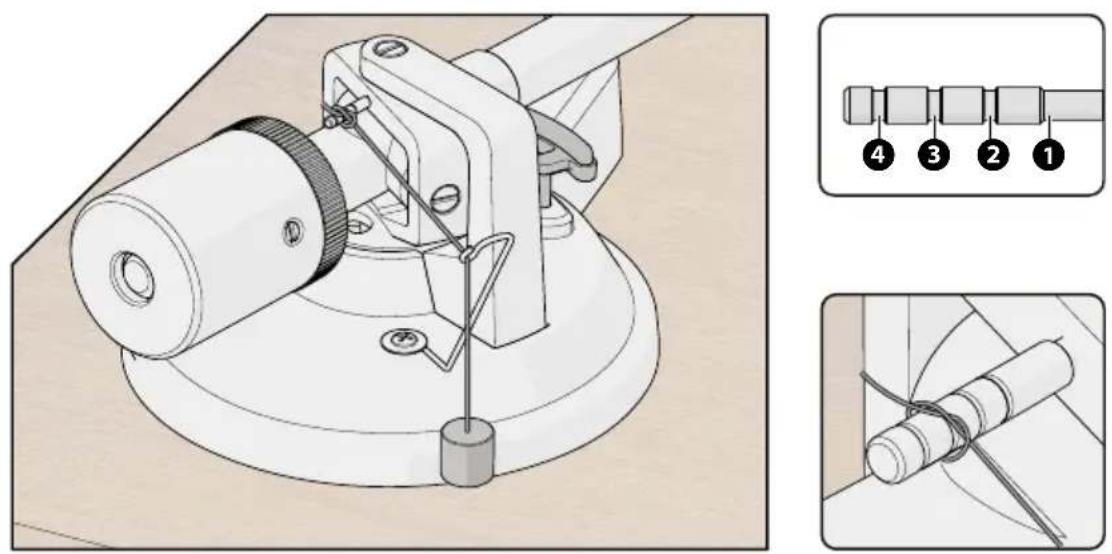
Adjusting the anti-skating force (image G) NOTICE
Risk of damaging the product:
- Do not adjust the tonearm or counterweight while changing anti-skating. This prevents damage to the stylus needle.
When a record plays, a small force pulls the tone arm toward the centre of the record. This is called skating. You can adjust this force with the anti-skating weight.
- Slip the loop of the anti-skating weight wire over the anti-skating adjustment stub.
- Place the loop into groove 3 to set the correct anti skating force for the factory-fitted cartridge.
- Pull the wire to tighten the loop and secure the wire in the groove.
- Feed the anti-skating weight thread through the wire support. The weight should hang freely from the support.
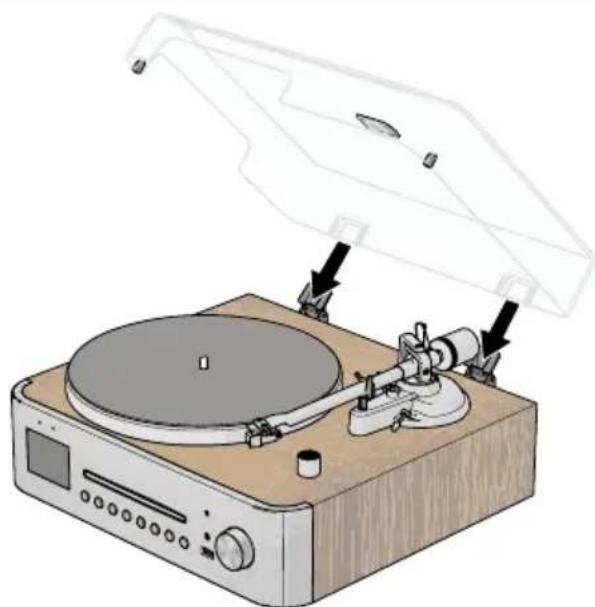
Installing the dust cover (image H)
- Insert the dust cover hinges into the hinge slots on the back panel of the turntable.
- Hold the dust cover and insert it into the hinges.
Lenco | Quick start guide
Connecting the included speakers
- Connect the included speaker wires to the speakers:
a. Press and hold the left and/or right speaker connector of a speaker in and insert the exposed metal wire into the speaker connector.
b. Release the left and/or right speaker connector to secure the speaker wire.
Make sure to connect positive (red) to positive (red) and negative (black) to negative (black).
- Connect the other end of the speaker wires to the turntable in the same manner:
a. Press and hold the left and/or right speaker connector of the turntable in and insert the exposed metal wire into the speaker connector.
b. Release the left and/or right speaker connector to secure the speaker wire.
Make sure you connect one set of wires to the left speaker connectors and one set of wires to the right speaker connectors.
- Position the speakers to the left and right side corresponding to the connected wires.
Powering the product
- Plug the power connector into the power input on the product.
- Plug the other end of the power adapter into a power outlet.
Initial setup
- Press the Power/menu button to switch on the product.
- Follow the setup wizard on the display the first time you switch on the product, to set the language time, date, and establish a connection to your wireless network.
Selecting a playback mode
- Press the Menu button during playback.
- Select "Main menu" and press OK.
- Choose your desired playback mode.
Phono in (vinyl record) (image I & J)
- Press the power button to switch on the turntable.
- Press the Menu button.
- Select 'Main menu' and press OK.
- Select 'PHONO IN' and press OK.
- Open the dust cover.
- Set the speed dial to the applicable speed of the vinyl record (33 1/3 or 45 RPM).
- Carefully place a vinyl record on the turntable platter.
- Carefully remove the stylus guard.
-
Pull the tonearm lock out of the way to unlock the tonearm.
-
Push the cue lever backwards to lift the tonearm.
- Carefully move the tonearm over the vinyl record.
- Push the cue lever forward to lower the tonearm and start playing the vinyl record.
- Adjust the volume with the volume dial.
The turntable automatically stops spinning at the end of the record.
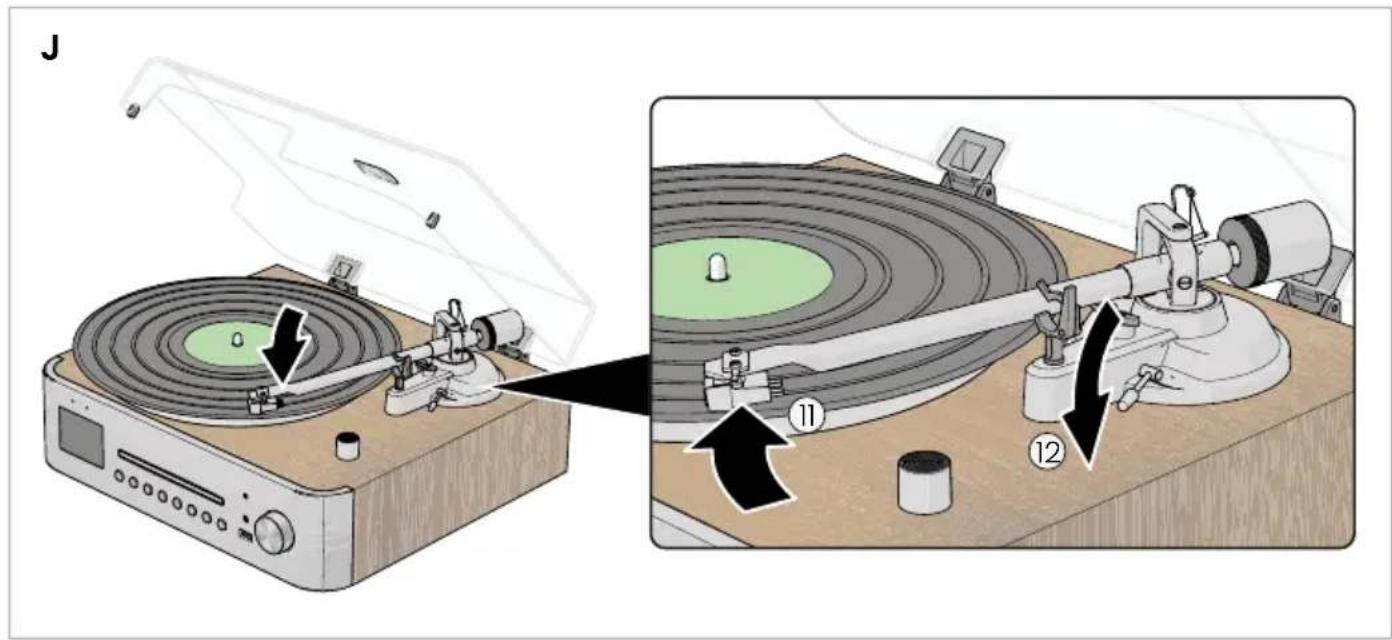
Stop playing a vinyl record
- Press the stop button to stop playing the vinyl record.
- Push the cue lever backwards to lift the tonearm.
- Move the tonearm over to the rest position.
- Push the cue lever forward to rest the tonearm.
- Lock the tone arm in place with the tone arm lock.
- Press the power button to switch off the turntable.
Carefully place the stylus guard back onto the stylus when not using the product for a longer period of time.
Adjusting turntable speed
To manually set a turntable speed:
- Press and hold the start/stop/set button for 3 seconds to enter speeds adjustment mode.
The speed on the LED display start blinking. - Use the RPM dial to decrease or increase the turntable speed by 0.1 RPM increments.
The turntable needs 3 - 5 rotations to store the set speed.
- Press the start/stop/set button to confirm the set turntable speed.
The speed on the LED display stops blinking and displays the set value.
The product automatically recalls the set speed after powering off and on (within 3 - 5 rotations).
Internet Radio and Podcasts
- Press the Menu button.
- Select "Internet radio" or "Podcasts" and press OK.
- Choose from "Last listened, Station/Podcast list, Search, Location, Popular, or Discover".
- Select a station or podcast and press OK to start playback.
Adding Internet radio stations to favorites
- Select a station or podcast and start playback.
- Press and hold Preset for approx. 3 seconds. "Preset Save" appears on the display.
- Select a memory slot and press OK. Up to 40 memory slots are available. Internet radio and podcasts share memory locations.
Existing presets can be overwritten.
Playing favorite Internet radio stations
- Press Preset.
- Select a preset station.
- Press OK.
DAB Radio
- Press the Menu button.
- Select "DAB" and press OK.
When DAB mode is selected for the first time, the product immediately starts scanning for available DAB stations. The stations are automatically saved and the station list is displayed when the search has finished.
- Select a station from the list.
- Press OK to start playback.
Press the previous or next button to switch stations.
Press the up or down button to select a station from the station list.
Adding DAB radio stations to favorites
- Select a station and start playback.
- Press and hold the Preset button for 3 seconds.
"Preset Save" appears on the display.
- Select a memory slot and press OK.
Up to 40 memory slots are available. Memory locations that have already been used are labelled with a radio frequency and can be overwritten
Playing favorite DAB radio stations
- Press Preset.
- Select a preset station.
- Press OK.
DAB radio menu
Press the menu button to access the DAB radio menu.
Inside the DAB radio menu, you can select the following options:
Stationlist Show a list of all available DAB stations
Scan Search for available DAB stations
Manualtune Search for a DAB station on a specific frequency.
Pruneinvalid Delete inactive channels
DRC Set the DRC to High, Low, or Off
Systemsettings Go to system settings
Mainmenu Return to the main menu
FM Radio
- Press the Menu button.
- Select "FM" and press OK.
When FM mode is selected for the first time, you need to search for available radio stations.
- Press the Menu button.
- Select "FM Auto Scan" and press OK.
- Select "Yes" and press OK to start scanning for FM stations.
All stations are automatically saved and the first found station list starts playing when the search has finished.
Press the previous or next button to switch stations.
Press the up or down button to select a station from the station list.
Adding FM radio stations to favorites
-
Search for an FM radio station.
-
Press the > button to increase the frequency with + 0.05MHz.
- Press the > button to increase the frequency with + 0.05MHz.
- Press and half the < or > button to search for next / previous available station.
- Press the OK button to stop searching.
- Press and hold the Preset button for 3 seconds. "Preset Save" appears on the display.
- Select a memory slot and press OK.
Up to 20 memory slots are available. Memory locations that have already been used are labelled with a radio frequency and can be overwritten.
Playing favorite FM radio stations
- Press Preset.
- Select a preset station.
- Press OK.
FM radio menu
Press the menu button to access the FM radio menu.
Inside the FM radio menu, you can select the following options:
Scansetting Enable to only scan for FM stations with a strong reception
Audiosetting Enable for weak reception or listening in mono sound.
Autopresetting Search for FM stations.
Systemsettings Go to system settings
Mainmenu Return to the main menu
Spotify
- Connect your phone, tablet, or computer to the same network.
- Open the Spotify app and select your device from Spotify Connect.
Visit spotify.com/connect for details.
The Spotify Software is subject to third party licenses found here: https://www.spotify.com/connect/third-partylicenses
CD Player
- Press the Eject button.
- Insert a CD with the label facing up
- Close the tray.
Playback starts automatically.
Creating a queue
- Press Stop.
- Press Preset.
- Select a track and press Preset to confirm.
- Repeat for up to 20 tracks.
- Press Play/Pause to start playback.
Press Stop twice to clear the queue.
AUX in
The connected speakers can be used to play audio from an external audio source:
- Plug a 3.5 mm audio cable cable (not included) into the Line input of the turntable.
- Plug the other end of the cable into your external audio source.
- Press the Line mode button.
Use the volume dial to adjust the volume, use your external audio source for all other controls.
Bluetooth®
The product can wirelessly stream music from a Bluetooth ^® connected device.
- Press the power button to switch on the turntable.
- Activate Bluetooth® pairing mode on your smartphone or tablet.
Make sure your smartphone or tablet is within one metre from the turntable.
Make sure no other devices are in pairing mode.
3. Press the Bluetooth® mode button.
The Bluetooth® mode LED blinks.
- On your smartphone or tablet, Search for and select "MC-760" or "MC-860".
The Bluetooth® LED indicator lights up when the connection is successful.
- Control the music on your smartphone or tablet.
Alarm
- Press the Menu button and select Alarm, or press the Alarm button directly.
- Select Alarm 1 or Alarm 2 and confirm with OK.
-
Set the alarm parameters:
-
Enable: Off, Daily, Once, Weekends, or Weekdays.
• Time: Adjust hours and minutes. -
Mode: Choose Buzzer, Internet radio, DAB, FM, or CD.
-
Preset: Select Last listened or a saved station.
• Duration: Choose 15–120 minutes.
• Volume: Set the alarm volume. -
Press Save to confirm.
-
Check for the clock icon to confirm activation. When the alarm rings, press Power or OK to snooze for 5 minutes, or press Alarm to stop.
Recording (USB)
- Insert a USB stick (up to 32 GB, FAT formatted).
- Start playback from CD, DAB, FM, or another source.
- Press the Record button to start recording to the USB stick.
- Check that "REC" appears on the display.
- Press Record again to stop recording.
i Recording can only be stopped manually.
Track names and information are not stored.
Sleep Function
- Press the Sleep button.
- Select a timer duration using the Sleep button or navigation keys.
- Wait a few seconds for the setting to confirm.
- Check the crescent moon icon on the display. The product switches off automatically when the timer ends.
Switching off the product
Always make sure the tonearm is positioned on the tonearm rest.
1. Press the power button to switch off the turntable.
The turntable remembers the last set mode and settings.
If the power cable is unplugged from the outlet or turntable the settings will be reset.
The product automatically switches to standby mode after 20 minutes without playing music.
Systemsettings
- Press the Menu button.
- Select System settings and press OK.
- Choose from the following options:
Equaliser
Select an equaliser preset: Normal, Flat, Jazz, Rock, Movie, Classic, Pop, News, or select My EQ to manually adjust Bass and Treble.
i Press the EQ button to change the equaliser mode at any time.
Streaming Audio Quality
Select Low, Normal, or High quality.
Network
| NetworkWizard | Search for and display available networks. |
| PBC WLAN setup | Connect to your wireless network by pressing the WPS button on your router, and then press the OK button. |
| Manualsettings | Manually search for and enter your network details. |
| Viewsetting | Display information on the network connection. |
| Networkprofile | Show the current connected network. |
| Clearnetwork settings | Disconnect from the network. |
| Keepnetwork connected | Choose if the network settings are saved or forgotten when switching off. Saving the network enables faster startup of internet radio playback, but with higher standby consumption. |
Time/Date
| SetTime/Date Set the time and date manually. |
| Autoupdate Select from which source the time and date information is to be loaded. |
| Setformat Choose 12-hour or 24-hour format. |
| Settimezone Select the time zone based on the location of the device. |
| Daylightsavings Enable or disable daylight saving time (+1 hour). |
Language
Select the preferred menu language.
Factory reset
Select Factory reset and confirm to delete all settings.
Setup Wizard
Start guided configuration.
Info
View software version.
Backlight
Adjust the backlight brightness during use and standby.
Select Timeout to set the dimming delay for the displayor keep dimming off.
Disclaimer
Due to the constant development of our products in terms of function and design, we reserve the right to make changes to the product without notice. All logos, brands and product names are trademarks or registered trademarks of their respective holders and are hereby recognized as such.
Disposal

This symbol indicates that the relevant electrical product or battery should not be disposed of as general household waste in Europe. To ensure the correct waste treatment of the product and battery, please dispose them in accordance to any applicable local laws of requirement for disposal of electrical equipment or batteries. In doing so, you will help to conserve natural resources and improve standards of environmental protection in treatment and disposal of electrical waste (Waste Electrical and Electronic Equipment Directive).
DeclarationofConformity
Hereby, Commaxx B.V. declares that the radio equipment type MC-760 / MC-860 is in compliance with Directive 2014/53/EU. The full text of the EU declaration of conformity is available at the following internet address: doc.nedis.com/en-us/MC760BK doc.nedis.com/en-us/MC860WDSI
Service
For more information and helpdesk support, please visit www.lenco.com
Commaxx B.V. Wiebachstraat 37, 6466 NG, Kerkrade, The Netherlands.

Kurzanleitung
Phono inn (vinylplate) (bilde I & J)
Veiviser for oppsett
- Cablu electric (UE)