
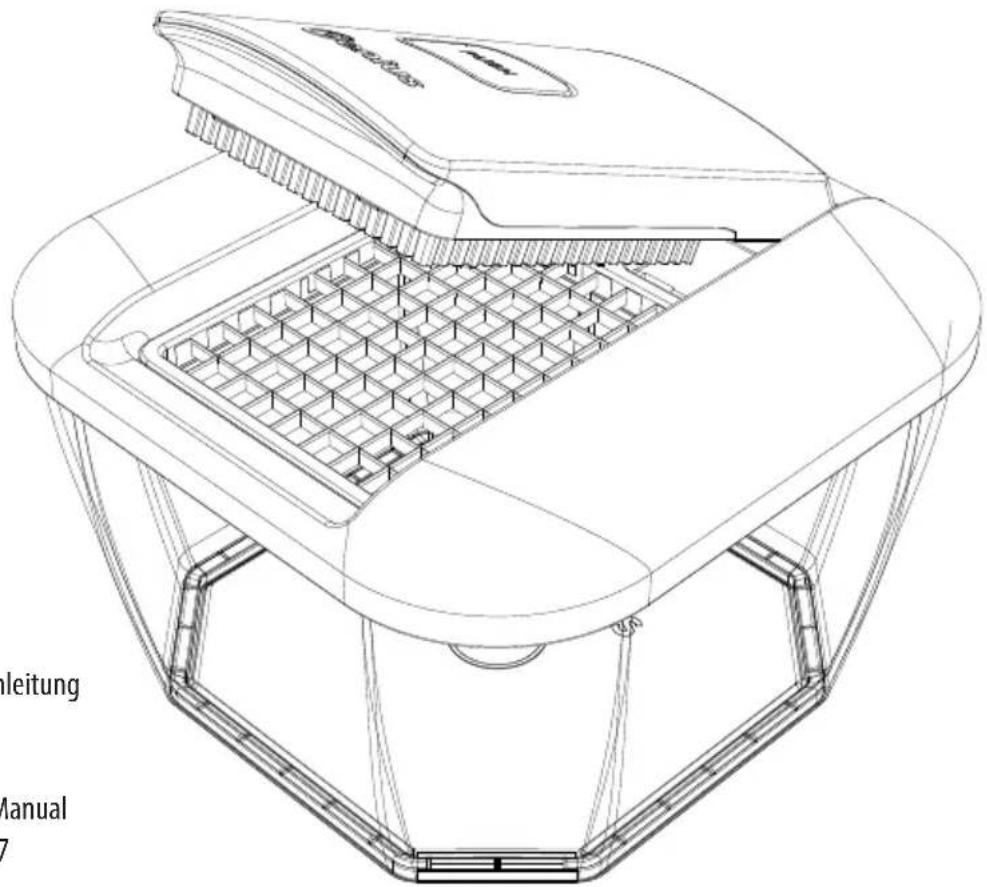
Nicer Dicer Chef Professional - Slicer GENIUS - Free user manual and instructions
Find the device manual for free Nicer Dicer Chef Professional GENIUS in PDF.

| Product type | Multi-function slicer with cutting grids, planers, graters and Julietti accessory |
| Brand | Genius |
| Model | Nicer Dicer Chef Professional |
| Container capacity | 5 200 ml |
| Glass bowl capacity | 2 800 ml |
| Bowl material | Heat-resistant glass up to 250 °C |
| Number of cutting grids included | 5 grids: 12x12 mm, 6x6/6x30 mm, 12x48 mm, 24x24 mm, eight segments |
| Additional accessories | Vegetable and tomato cutter, graters (fine, coarse, julienne), adjustable planer, fixed planer, multi-grater mandoline, Nicer Julietti XL, pusher, Handy Hopper, storage bin |
| Intended use | Domestic: chopping, slicing, grating, mincing food |
| Power source | Manual (no electrical power) |
| Cleaning | Hand washing recommended; some parts are dishwasher safe (except blades) |
| Self-cleaning function | Push button to clean the cutter |
| Safety instructions | Very sharp blades - handle by plastic parts; use pusher; do not cut frozen or hard foods |
| Storage | Protective covers for grids; storage bin for accessories |
| Spare parts | Accessories available separately from retailer |
| Approximate dimensions (L x W x H) | 40 x 25 x 20 cm (estimated) |
| Approximate weight | 2.5 kg (estimated) |
Frequently Asked Questions - Nicer Dicer Chef Professional GENIUS
User questions about Nicer Dicer Chef Professional GENIUS
0 question about this device. Answer the ones you know or ask your own.
Ask a new question about this device
Download the instructions for your Slicer in PDF format for free! Find your manual Nicer Dicer Chef Professional - GENIUS and take your electronic device back in hand. On this page are published all the documents necessary for the use of your device. Nicer Dicer Chef Professional by GENIUS.
USER MANUAL Nicer Dicer Chef Professional GENIUS
Nicer Dicer Chef Professional
natural_image
Technical line drawing of a mechanical device with internal grid structure and mounting brackets (no text or symbols)Schneid-Oberteil
Schneid-Unterteil
natural_image
Technical line drawing of a rectangular mechanical component with cutouts and mounting brackets (no text or symbols)natural_image
Line drawing of a rectangular device with a central square and two side brackets (no text or symbols)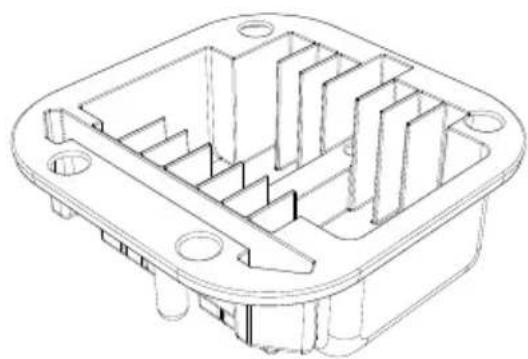
natural_image
Technical line drawing of a mechanical housing or enclosure with internal compartments and mounting holes (no text or symbols)natural_image
Technical line drawing of a rectangular container with internal compartments and a curved arrow indicating rotation (no text or symbols)natural_image
Diagram of car interior components with arrows indicating movement or assembly (no text or symbols present)natural_image
Line drawing of a hand inserting a grid into a device (no text or symbols)natural_image
Line drawing of a hand using a grating tool to press or install a grid-patterned device (no text or symbols present)natural_image
Three technical line drawings of a device component: a rounded rectangular frame, a curved lid with a button, and a grid-patterned base (no text or symbols)natural_image
Four technical line drawings of electronic components: a rectangular box, a curved cover, a heat sink with internal channels, and a multi-layered heat sink (no text or symbols)natural_image
Technical line drawings of a mechanical component assembly (no text or symbols)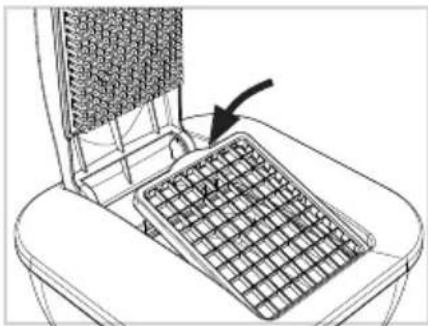
natural_image
Line drawing of a mechanical device with a grid-patterned panel and an arrow pointing to it (no text or symbols)natural_image
Technical illustration of a heat exchanger with cooling fins and fan blades, showing structural components (no text or symbols)natural_image
Line drawing of hands using a computer to press a device on a keyboard (no text or symbols)natural_image
Line drawing of a bathtub with a keyboard inserted, showing the interior and exterior views (no text or symbols)natural_image
Technical line drawings of a mechanical component assembly (no text or symbols)natural_image
Diagram showing a mechanical component with an arrow pointing to a circular component (no text or symbols present)natural_image
Illustration of a hand using a tool to press or adjust a component on a gridded base (no text or symbols visible)natural_image
Technical line drawings of five different electronic components or housing parts, including a plastic housing and a dome-shaped container (no text or symbols present)
natural_image
Technical line drawing of a heat exchanger or cooling unit with internal components and wiring (no text or symbols)natural_image
Line drawing of a hand using a tool to press or adjust a component in a container (no text or symbols)natural_image
Line drawing of a carrot and a bowl with leafy top (no text or symbols)natural_image
Diagram of a hand using a tool to press or adjust a component on a container (no text or symbols visible)natural_image
Hand holding a circular object with concentric rings and a downward arrow, no text or symbols presentnatural_image
Technical line drawing of a mechanical component with arrows indicating features (no text or symbols)natural_image
Technical line drawing of a mechanical component with no visible text or symbolsnatural_image
Technical line drawing of a mechanical component with arrows indicating features (no text or symbols)natural_image
Diagram of a hand pressing down on a mechanical component with directional arrows indicating movement (no text or symbols)natural_image
Three technical line drawings of a plastic housing component, showing front, side, and top views with no text or symbols.
natural_image
Line drawing of a mechanical component with a gridded top and side plate (no text or symbols)natural_image
Illustration of a hand pouring liquid into a container with arrows indicating flow direction (no text or symbols)natural_image
Technical line drawings of a mechanical component assembly (no text or symbols)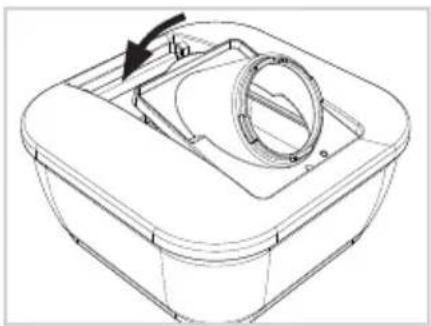
natural_image
Technical line drawing of a mechanical component with a circular housing and arrow indicating rotation (no text or symbols)natural_image
Hand holding a circular component with an arrow indicating rotation (no text or symbols)natural_image
Technical line drawing of a mechanical component with a threaded fastener and housing (no text or symbols)natural_image
Technical line drawings of a mechanical component with grid layout and internal components (no text or symbols)natural_image
Technical line drawing of a mechanical component with internal ribs and mounting holes (no text or symbols)natural_image
Isometric line drawing of a rectangular grid-like structure with no text or symbolsnatural_image
Line drawing of a hand inserting a small object into a laptop keyboard (no text or symbols)natural_image
Technical line drawing of a mechanical component with vertical grooves and mounting brackets (no text or symbols)Content
1 SAFETY INSTRUCTIONS AND WARNINGS....17
1.1 Proper use .... 18
1.2 Safety instructions.... 18
2 Before first use 19
3 Product components 20
4 Nicer Dicer Chef Professional – blade inserts, slicers and grating inserts....22
4.1 Assembly....22
4.2 Using the blade inserts....23
4.3 Tips and tricks – blade inserts ....25
4.4 Using the slicers....25
4.5 Tips and tricks – slicers 27
4.6 Using the grating inserts 28
4.7 Tips and Tricks – grating inserts ...... 29
5 Nicer Julietti XL....29
5.1 Assembly/Using 29
6 Safety and storage 30
7 Care and cleaning....30
8 Disposal....31
Please take the time to read through these instruction manual carefully.
For your own protection and that of others, please pay particular attention to the safety instructions chapter and the warnings contained in the document.
Keep these instruction manual for future reference. Always be sure to include the instruction manual if giving the product to a third party.
The illustrations in this instruction manual are intended as a schematic representation of correct use. They may have details that differ from the original product.
1 SAFETY INSTRUCTIONS AND WARNINGS
Guide to the symbols used

CAUTION!
Failure to follow these instructions may lead to injury.

ATTENTION!
Damage to property may occur.
1.1 Proper use
The product is intended to be used to cut food.
The product is intended for home use only. It is not suitable for commercial or industrial use.
The product is not suitable for:
- Chopping frozen food
- Grinding pits, cores, etc.
- Chopping bones or other non-edible food elements
The accessories (except the glass bowl) are not suitable for use in microwave or conventional ovens.
The product is not intended for use by adults or children with limited physical, sensory or intellectual abilities or little experience with household equipment, unless they are supervised by a competent person who is responsible for their safety or they receive clear instructions from such a person about how the product is to be used.
Only use the product as described in the instruction manual. Any other use is considered improper.
1.2 Safety instructions
RISK OF INJURY FROM SHARP BLADES
The blades are extremely sharp! Always hold accessories by the plastic and do not touch the blades with your hands or other body parts under any circumstances. Handle the product with care.
Never allow hands, hair, loose clothing or other items to come into contact with the blade.
Only cut food by pressing down on the top. Do not use your fingers to push food through the blade inserts under any circumstances.
Use a washing-up brush or similar tool to remove food residue from the blades or blade inserts.
HANDLING THE PRODUCT CORRECTLY
Always place the product on a dry, clean, level and stable surface.
Keep a sufficient distance from heat sources (e.g. hobs or ovens) and open flames to avoid damage to the product.
Check the product for damage before each use. Do not use a damaged product or damaged accessories.
Do not make any unauthorised modifications, repairs or changes to the product.
Only use the product with original accessories, otherwise you will damage it and increase the risk of injury.
Please note that the blade inserts cannot be used to cut very hard food such as carrots, unpeeled squashes or similar. Cores and pits must be removed before processing and the food may need to be peeled.
USING THE GLASS BOWL IN THE OVEN
The glass bowl can be used in the oven up to a maximum temperature of 250^ C.
Always place the glass bowl on a grate. Never put it directly on the oven floor.
Use oven gloves or cloths to remove the glass bowl from the oven – burn risk!
Don't put cold water into a hot glass bowl, you may damage it. Also, never put boiling liquids into a cold glass bowl. Always heat up the bowl with the content inside it.
2 Before first use

CAUTION!
Risk of suffocation from plastic sheeting and bags!
Keep children and animals away from packaging material.
Check the set to ensure that it is complete and no damage has occurred in transit. Details of what is supplied with the set that you purchased can be found on the packaging or the separate insert sheet. The production process used to make the glass bowls can result in the formation of small bubbles and streaks. This does not impair the bowl's function and does not constitute grounds for complaint.
Remove the packaging material and any stickers attached to the product for protection during transit or for advertising purposes.
Clean all parts before the first use to remove any production residue (see also "Care and cleaning").
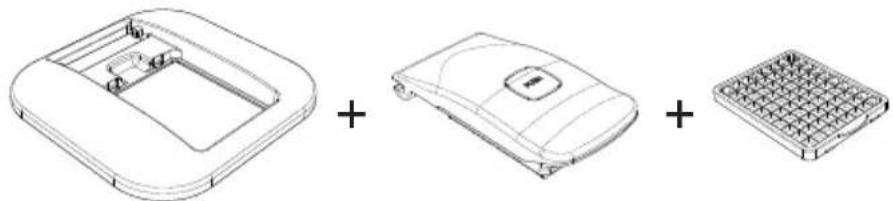
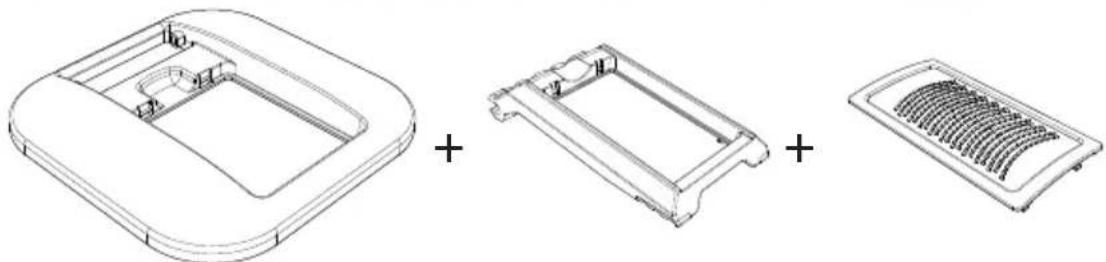
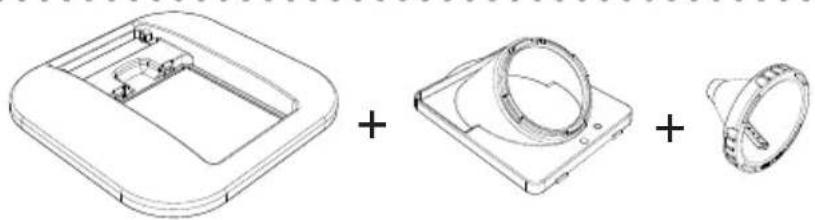
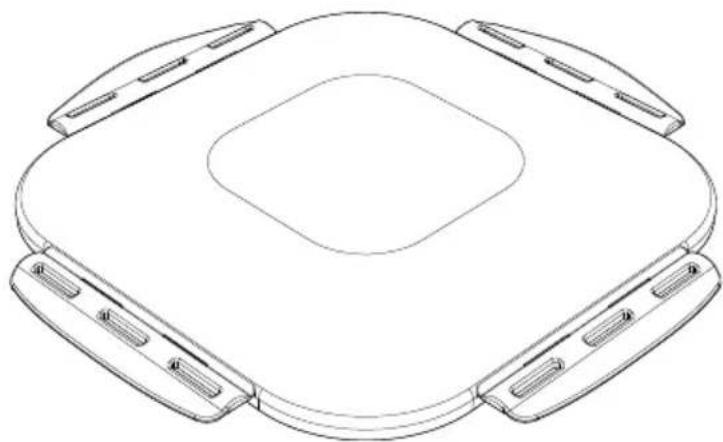
3 Product components
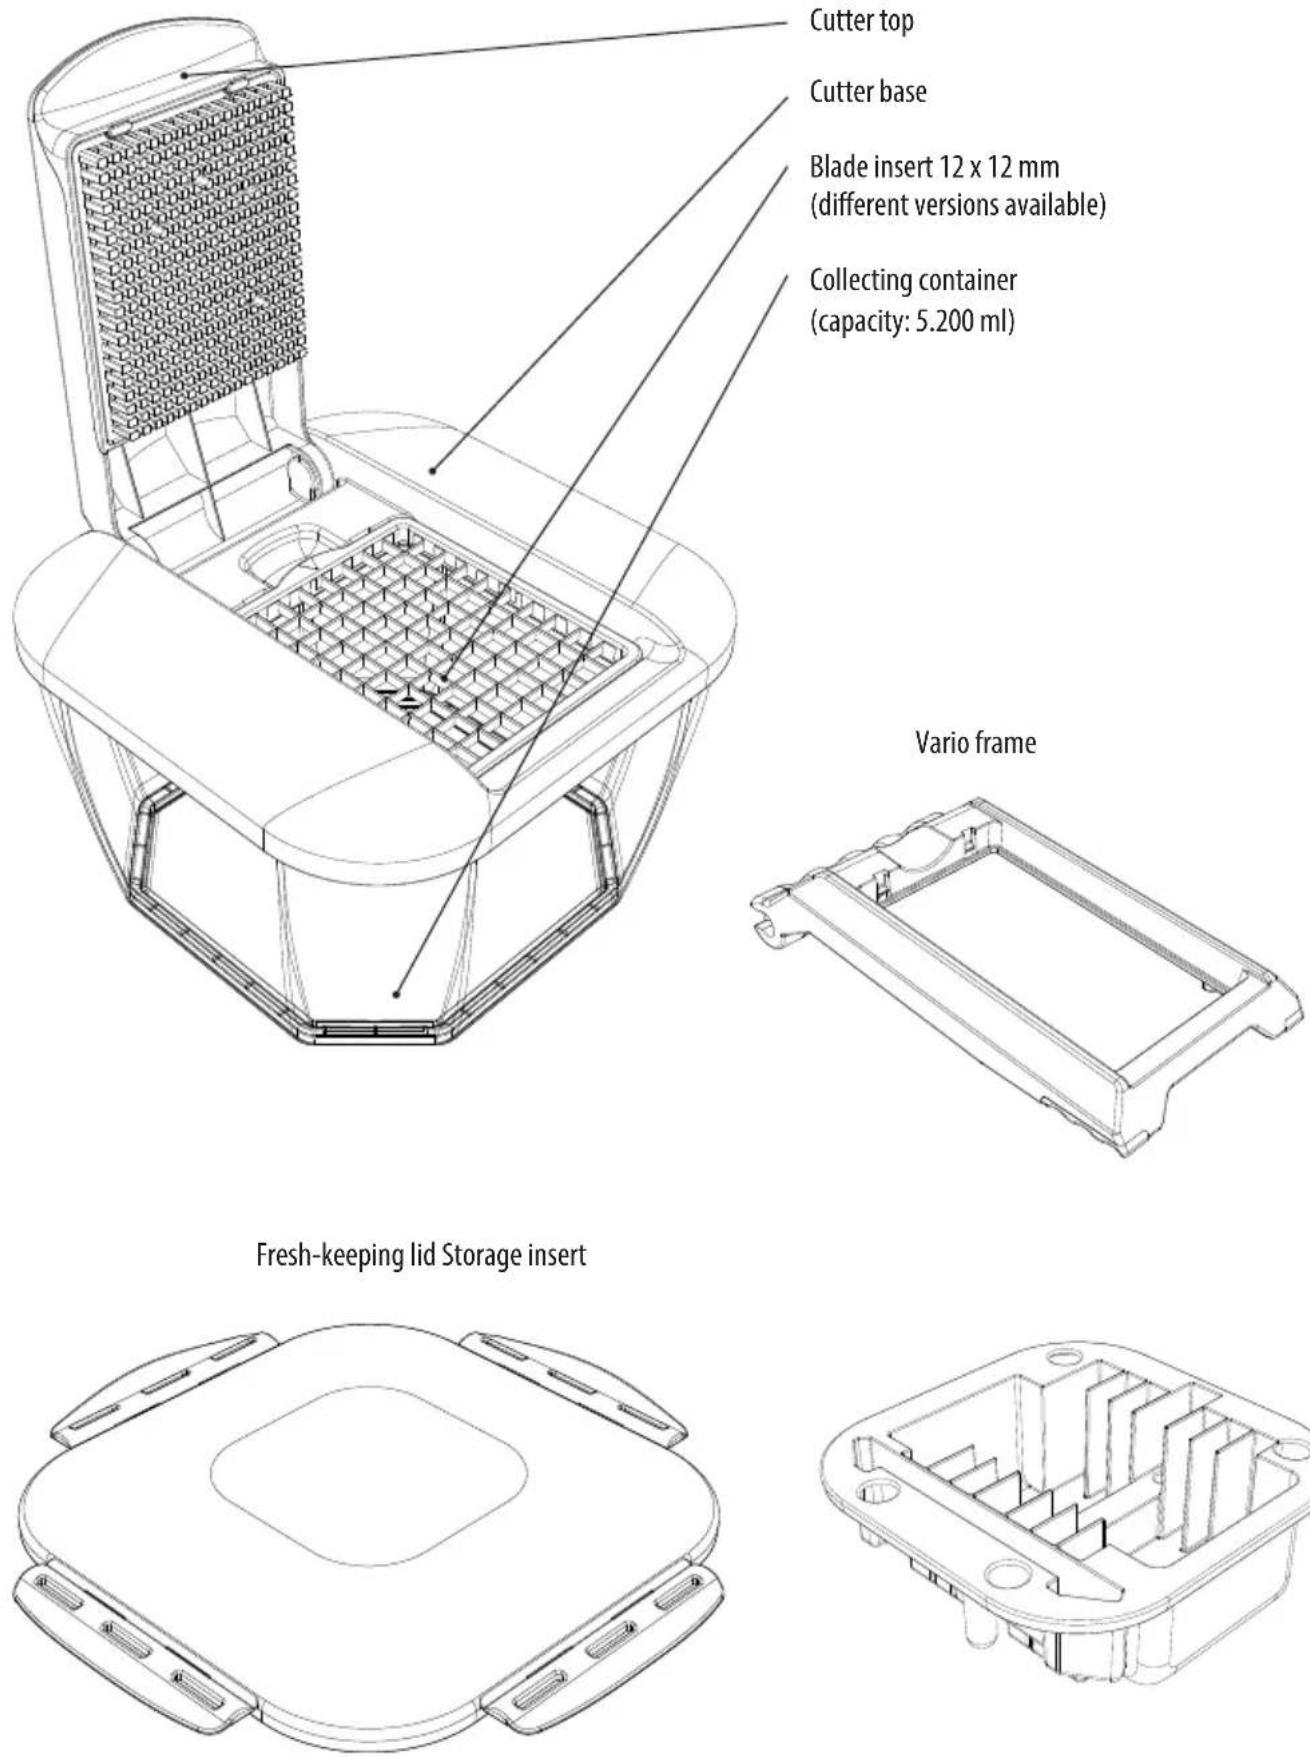
Cutter top
Cutter base
Blade insert 12 x 12 mm
(different versions available)
Collecting container
(capacity: 5.200 ml)
(Continued on the next page)
| Blade inserts | 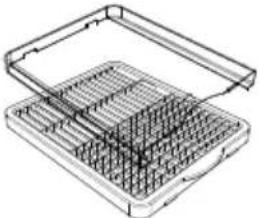 6 x 6/6 x 30 mm 6 x 6/6 x 30 mm 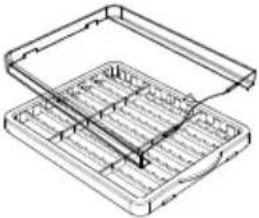 12 x 48 mm 24 x 24 mm 12 x 48 mm 24 x 24 mm | |||
| Blade inserts | 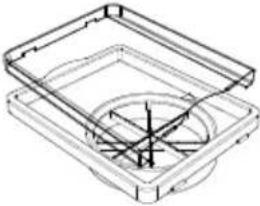 Blade insert for eighths + stamp Tomato and vegetable cutter + stamp (9 mm) Blade insert for eighths + stamp Tomato and vegetable cutter + stamp (9 mm) | |||
| Grating inserts(for Vario frame) |  coarsefine Julienne coarsefine Julienne | |||
| Slicers | 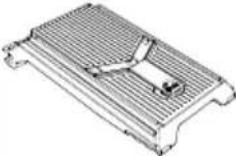 adjustable adjustable 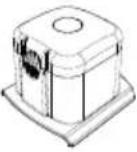 Handy Hopper Handy Hopper  Slicer, not adjustable (for Vario frame) Slicer, not adjustable (for Vario frame) 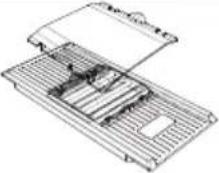 Multi-slicer (for Vario frame) Multi-slicer (for Vario frame)  Food holderSlic Food holderSlic | |||
| Nicer Julietti XL | 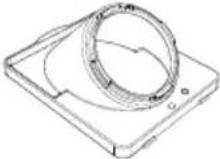 XL-Frame insert (for the cutter base) XL-Frame insert (for the cutter base) 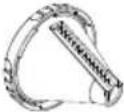 XL-Spiral insert with Julietti blade XL-Spiral insert with Julietti blade 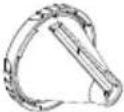 XL-Spiral insert with smooth blade XL-Spiral insert with smooth blade | |||
| Glass bowl | 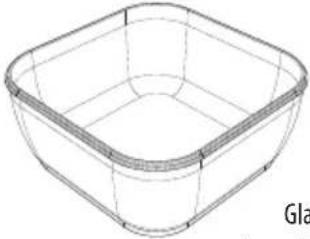 iss bowl(capacity: 2.800 ml) iss bowl(capacity: 2.800 ml) 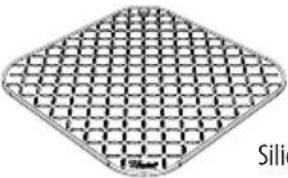 cone mat cone mat | |||
This instruction manual covers all the accessories available for the device/product. Details of what is supplied with the set that you purchased can be found on the packaging or the separate insert sheet.
Parts that are not included in your set can of course be bought at a later date.
4 Nicer Dicer Chef Professional – blade inserts, slicers and grating inserts
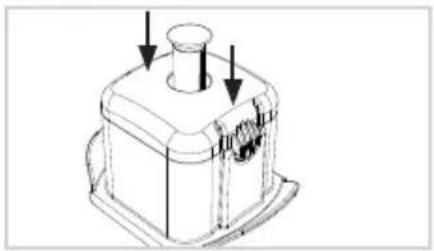
4.1 Assembly

CAUTION!
Risk of cutting injuries!
The blades are extremely sharp. Always hold parts by the plastic and do not touch the blades with your hands or other body parts under any circumstances.
Store the product out of the reach of children and animals.

natural_image
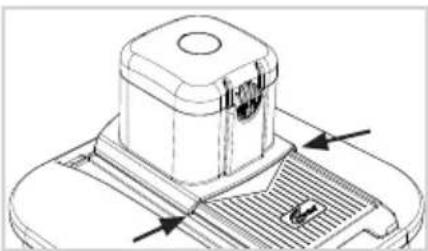
Technical line drawing of a rectangular container with internal compartments and a curved arrow indicating rotation (no text or symbols)Place the cutter base on the collecting container and lock it into place with an audible click.

natural_image
Diagram of a car seat assembly showing internal components and directional arrows (no text or symbols)Depending on your requirements, hold the cutter top, the adjustable slicer or the Vario frame at a 90° angle (vertical) and insert it into the side brackets. The adjustable slicer and the variable frame have recesses on the side of the handle. Always lift up the cutter top, Vario frame and/or slicer to a vertical position (90°) to remove: Fold up the accessory and lift it out from the cutter base.
natural_image
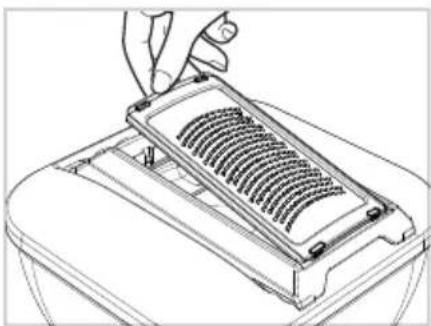
Line drawing of a hand inserting a grid into a device (no text or symbols)Remove accessories from the cutter base with the assistance of the grip indent: Hold the accessory underneath the semi-circular tab and lift it out of the cutter base.
natural_image
Line drawing of a hand using a tool to press or install a grid-like object on a tray (no text or symbols)Remove accessories from the Vario frame with the assistance of the grip indent: Grip the indent and remove the accessory from the Vario frame.
4.2 Using the blade inserts

CAUTION!
Risk of cutting injuries.
The blades are extremely sharp. Always hold parts by the plastic and do not touch the blades with your hands or other body parts under any circumstances.
Only cut food by pressing down on the cutter top. Do not use your fingers to push food through the blade inserts under any circumstances.

ATTENTION!
If the cutter top does NOT descend fully in one stroke, then DO NOT apply any further force — this may damage the product. If the food has lodged in the blades, remove it by turning over the blade insert (to the blunt side) and carefully pushing out the cuttings.
The blade inserts may not be used to cut very hard food such as carrots, unpeeled squashes or similar. Cores and pits must be removed before processing and the food may need to be peeled.
ATTENTION! Make sure that you always use each insert with the correct stamp.
Preparing food
Wash the food and remove stems, cores or pits, and peel if necessary. The food must be cut into small enough pieces to fit the cutting area so that there is sufficient space between the food and the blade insert frame on all four sides.
Place the food with the cut side on the desired cutting surface.
A – Cutting sticks/cubes
natural_image
Three technical line drawings of a device component: a rounded rectangular frame, a curved lid with a button, and a grid-patterned base (no text or symbols)B – Tomato and vegetable cutter

natural_image
Four technical line drawings of electronic components: a rectangular box, a curved device, a coiled spring, and a heat sink (no text or symbols)C - Cutting eighths

natural_image
Technical line drawings of a mechanical component assembly (no text or symbols)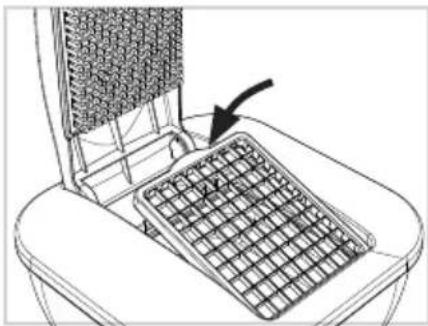
natural_image
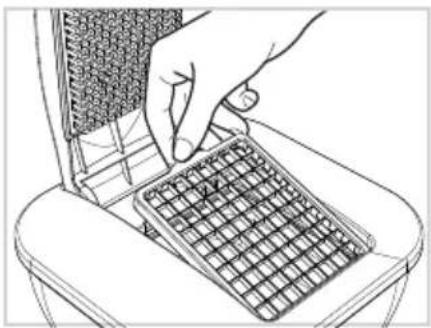
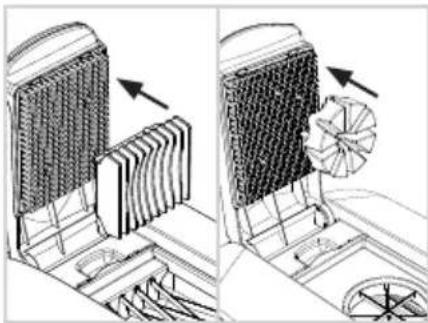
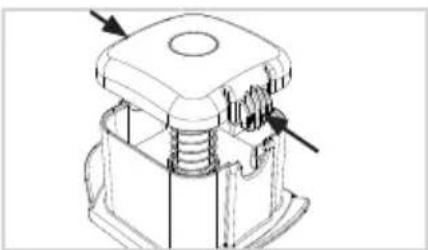
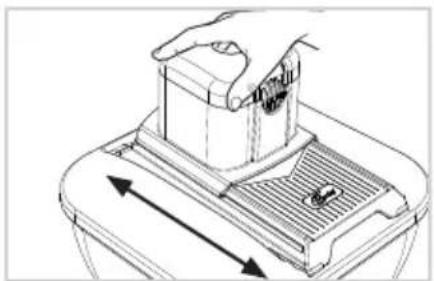
Line drawing of a mechanical device with a grid-patterned panel and an arrow pointing to it (no text or symbols)Place the required blade insert into the cutter base by putting the 2 small nibs into the recesses and push the semi-circular tab into the grip indent until you hear it click into place. Please ensure that you do not touch the blades during use.
When using the tomato and vegetable cutter or the blade insert for eighths insert
natural_image
Technical illustration of a mechanical device with heat dissipation and fan assembly (no text or symbols)the corresponding stamp into the pin block of the cutter top so that the round lugs on the back of the stamp fit into the corresponding recesses in the pin block. Press firmly.
natural_image
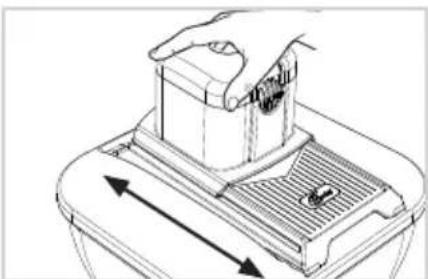
Line drawing of hands using a smartphone to clean or store items on a keyboard (no text or symbols)Place the item of food onto the cutter and push down the cutter top firmly using both hands. The food is pushed through the blades and automatically collected in the collecting container.
natural_image
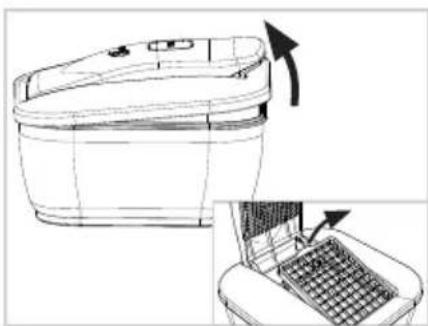
Line drawing of a toilet with a side panel and a laptop on top (no text or symbols)Place the correct stamp into the pin block on the cutter top so that the round nibs on the back of the stamp fit into the holes on the pin block. Press together firmly. To empty the collecting container, simply lift the entire cutter lid (cutter top and base) and remove.
To remove the blade insert, open the cutter top and remove the blade insert carefully, using the grip recesses.
NOTE: You can also cut cooked potatoes, eggs, mushrooms, mozzarella cheese and other soft foods with the tomato and vegetable blade insert. It is not suitable for cutting hard foods such as raw potatoes, apples, courgettes or carrots.
NOTE: For large pieces or those to be cut in an upright position, hold the food in place with your hand and press lightly on the cutter top to keep the food from slipping. If it is not easy to apply pressure to an ingredient, then it is NOT suitable for this method of cutting.
4.3 Tips and tricks – blade inserts
NOTE: The plastic bowls are not suitable as containers for citrus fruits. This may result in alterations to the container's surface. However, this will not affect its ability to function.
For storage, you can seal the collecting container with the practical fresh-keeping lid. The collecting container can therefore also be used to keep food fresh.
To dice food, lay the food flat on the cutting surface. For potato soup, for example, first cut the potatoes into slices. To dice, place several slices on top of one another on the blade. You can use the same method for cucumbers, courgettes, etc.
To cut into batons, for example when making chips, place the potatoes upright on the blade one after another. Press down using the cutter top to keep them from moving around. You can cut delicious batons of cucumbers, apples etc. for dips in this way. If it is not easy to apply pressure to an ingredient, then it is NOT suitable for this method of cutting.
Place the food with the cut side on the desired cutting surface.
Cutting made easy with the right technique: Place your stronger hand (left hand if you are left-handed, right hand if you are right-handed) on the outside of the cutter top. Place your weaker hand in the centre of the cutter top. Then press down firmly in a single stroke.
Before starting, dip the blade inserts in water. Wet blades cut more easily and require less force. During cutting, the blades are kept moist by the moisture in the food that is being cut.
The cutter lid can also be used with the glass bowl so that all the ingredients for a casserole can be cut directly into the bowl and put straight into the oven without the need to transfer them to another dish.
The silicone mat can be placed on the working surface under the glass bowl to keep it stable while you are cutting.
4.4 Using the slicers

CAUTION!
Risk of cutting injuries!
The blades are extremely sharp. Always hold accessories by the plastic and do not touch the blades with your hands or other body parts under any circumstances.
When not using, ALWAYS attach the blade protector to the V-blade.
When not in use, always set the adjustable slicer to the "lock" position on the cutting thickness scale. In this position, the feed plate is lifted above the height of the blades and therefore protects against injury.
Adjustable slicer

natural_image
Technical line drawings of a mechanical component assembly (no text or symbols)Setting the cutting thickness
With the help of the cutting thickness regulator on the underside of the adjustable slicer the height-adjustable feed plate can be individually adjusted to any cutting thickness.
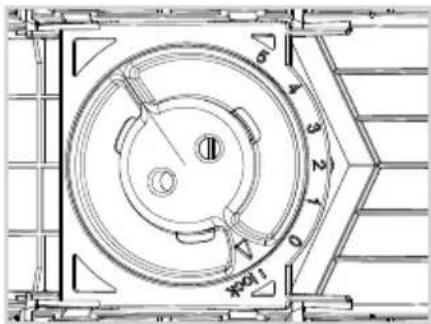
Clockwise: Lifting the feed plate for thinner slices
Counter clockwise: Lowering the feed plate for thicker slices
„lock“: the feed plate is higher than the blades for safe stowing and storage
natural_image
Diagram showing a mechanical component with an arrow pointing to a circular component (no text or symbols present)Place the adjustable slicer in the cutter base, set the cutting thickness and remove the blade protector.
natural_image
Line drawing of a hand pressing down on a mechanical component with directional arrows (no text or symbols)Feed the food in quick movements over the V-blade. To prevent injuries from contact with the sharp blades, always use the food holder or the Handy Hopper.
Fixed slicer/Multi-slicer

natural_image
Technical line drawings of five different electronic components or housing assemblies (no text or symbols present)
natural_image
Technical line drawing of a heat exchanger or cooling unit with internal components and wiring (no text or symbols)Insert the Vario frame into the cutter base, engage the fixed slicer or multi-slicer and remove the protective cover.
natural_image
Line drawing of a hand using a tool to press or adjust a component in a container (no text or symbols)Feed the food in quick movements over the blade. To prevent injuries from contact with the sharp blades, always use the food holder.
4.5 Tips and tricks – slicers
All slicers (multi-slicer and fixed slicer only in combination with the Vario frame) can also be used on a hands-free basis, so you can slice foods straight on to finished dishes or the worktop. With its non-slip feet, 'freehand' slicing is simple and safe. For easy cutting, feed the food or food holder using your dominant hand and hold down the slicer at its grip with the other hand.
Using the food holder

CAUTION!
The metal needles are pointy and sharp. Do not touch the needles with your fingers.

ATTENTION!
Always move the food holder in the direction of the arrow printed on it, otherwise material damages may occur.

natural_image
Simple line drawing of a carrot and a leaf (no text or symbols)Anchor the food with the 3 metal needles. The stamp on the top is pushed out as you do so. The two cut-outs provide stability for longer vegetables (carrots, cucumbers, etc.).

natural_image
Line drawing of a hand using a tool to lift a lid with arrows indicating direction (no text or symbols)Lay the food holder flat against the frame and feed it in quick movements over the blade.
natural_image
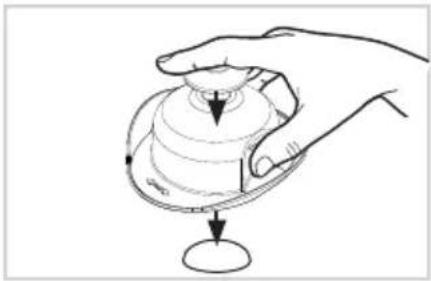
Hand holding a circular object with concentric rings and a downward arrow, no text or symbols presentBy applying equal pressure on the stamp, the food to be cut will automatically be pushed forward.
Any residue can simply be dropped by pressing on the stamp.
Using the Handy Hopper
natural_image
Technical line drawing of a mechanical component with arrows indicating features (no text or symbols)Place the Handy Hopper on top of the adjustable slicer so that the runners slide into the side guides.
natural_image
Technical line drawing of a mechanical component with no visible text or symbolsPress the side clips together and remove the lid. Fill with food.

natural_image
Technical line drawing of a mechanical component with arrows indicating features (no text or symbols)Place the stamp in the middle and press down on the lid until the side clips lock into place with an audible click.
natural_image
Line drawing of a hand pressing down on a mechanical component with directional arrows indicating movement (no text or symbols)Feed the Handy Hopper in quick movements over the V-blade.
4.6 Using the grating inserts
natural_image
Technical line drawings of three views of a mechanical component: top, front, and side (no text or symbols)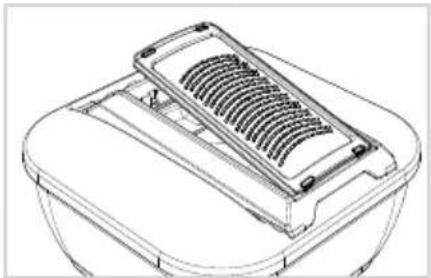
natural_image
Line drawing of a mechanical component with a gridded top and side plate (no text or symbols)Place the Vario frame in the cutter base, click the grater of your choice into place and remove the blade protector.
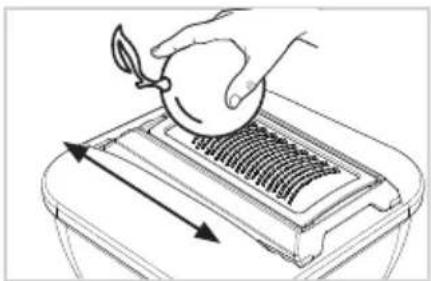
natural_image
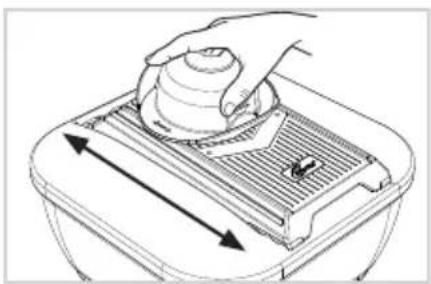
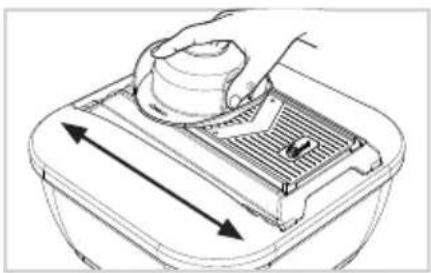
Illustration of a hand pouring liquid into a container with arrows indicating flow direction (no text or symbols)Move the foods across the grater swiftly.
4.7 Tips and Tricks – grating inserts
All grating inserts (only in combination with the Vario frame) can also be used hands-free, so that ingredients can be grated directly over finished dishes or onto the worktop. With the anti-slip feet, "one-handed" grating is easy and safe.
5 Nicer Julietti XL
5.1 Assembly/Using

CAUTION!
Risk of cutting injuries!
The blades are extremely sharp. Always hold accessories by the plastic and do not touch the blades with your hands or other body parts under any circumstances.
natural_image
Technical line drawings of a mechanical component with three views: top, front, and side (no text or symbols)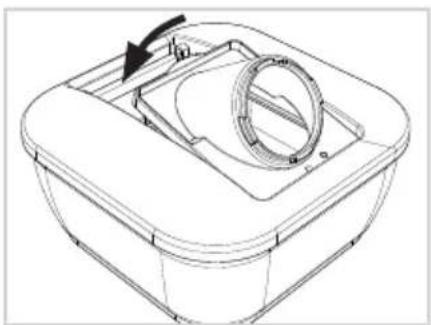
natural_image
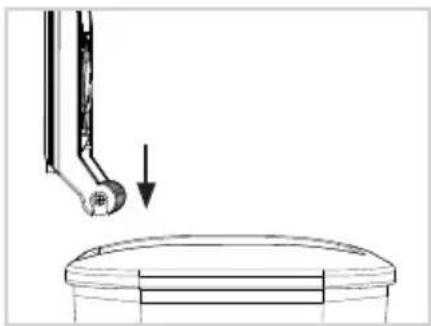
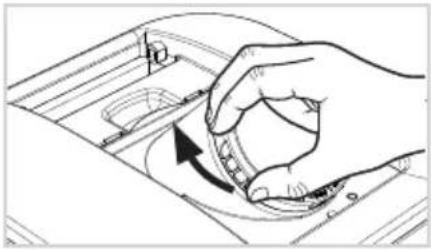
Technical line drawing of a mechanical component with a circular housing and arrow indicating rotation (no text or symbols)Place the Julietti frame into the cutter base by putting the 2 small nibs into the recesses and push the semi-circular tab into the grip indent until you hear it click into place.
natural_image
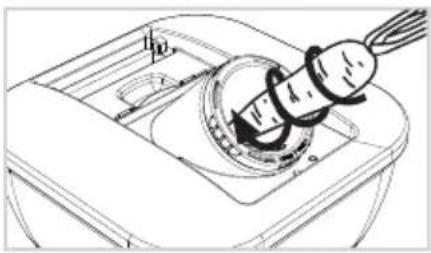
Hand holding a circular component with an arrow indicating rotation (no text or symbols)Insert the desired spiral insert into the frame and turn clockwise until it locks into place. Make sure that the blade is pointing towards the collecting container after insertion (note the marks on the frame and spiral insert).
natural_image
Technical line drawing of a mechanical component with a threaded fastener and housing (no text or symbols)Feed the vegetables into the spiral insert and rotate clockwise, applying slight pressure.
6 Safety and storage
natural_image
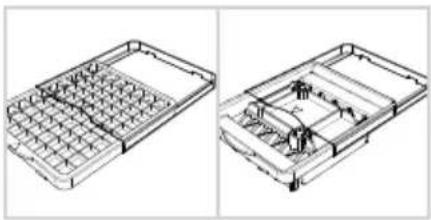
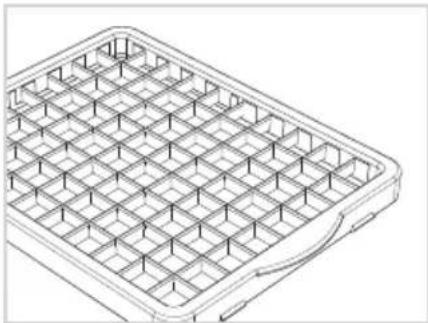
Technical line drawings of a mechanical component with grid and housing (no text or symbols)With the protective covers, the blade inserts can be stowed safely.
natural_image
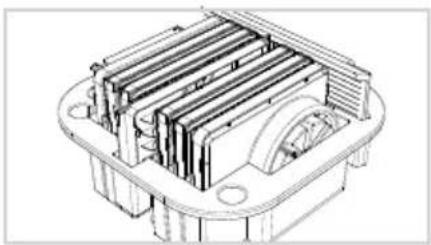
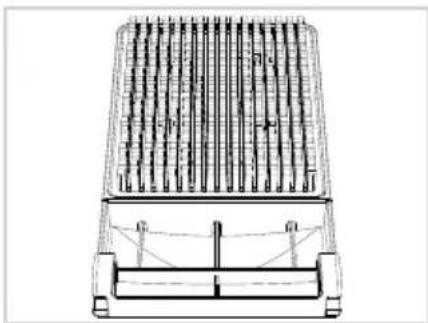
Technical line drawing of a mechanical component with internal channels and mounting holes (no text or symbols)The majority of the accessories can be stored in the storage insert.
7 Care and cleaning

CAUTION!
Risk of cutting injuries due to sharp blades!
Do not touch the blades with your hands. Always hold the inserts by the plastic.

ATTENTION!
Clean the product immediately after use to avoid the build-up of germs or mould.
Dismantle the product before cleaning.
Do not use sharp or abrasive cleaning agents or cleaning pads.
Allow all parts to dry thoroughly before putting them away.
We recommend hand-washing any parts that contain blades (e.g. blade inserts, slicers, grating inserts) to preserve quality and sharpness over the long term.
Note: Some types of fruit and vegetables can stain the plastic parts (e.g. beets). Frequent cleaning of the collecting container in a dishwasher can affect the material's transparency. This is normal and not a cause for concern; it does not limit the functionality.
Cleaning the blade inserts
natural_image
Isometric line drawing of a rectangular grid structure with no text or symbolsWhen you're cleaning the product, never touch the side with the sharp blades. If food remains get caught between the blades, turn the blade insert with the sharp side down and carefully remove the food remains.
Self-cleaning function

natural_image
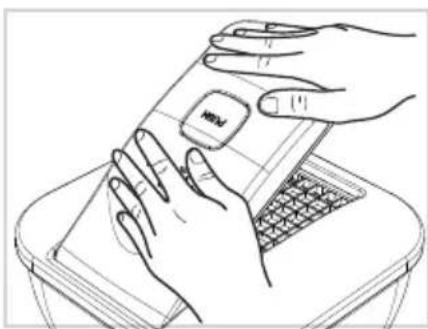
Line drawing of a hand inserting a small object into a laptop keyboard (no text or symbols)To clean the built-in pin block, press the 'Push' button on the top of the cutter top. The built-in cleaning sieve is automatically pushed downwards and removes even small pieces of food residue from the pin block.
The lid should remain open during this process. If the self-cleaning process is launched when the cutter top is closed, there must not be any blade inserts in the frame.
natural_image
Technical line drawing of a mechanical component with vertical rods and mounting brackets (no text or symbols)When you clean the appliance in the dish washer, water can get into the cutter top. It can be removed again via the drain holes. To drain the water, hold cutter top vertically with the drain holes facing down and shake gently. Stand it up vertically (holes facing down) to drain it completely.
8 Disposal
In the event that the product and/or accessories can no longer be used, they should be disposed of with the household rubbish. It can be disposed of by the municipal waste management services.
The packaging material can be recycled. Dispose of the packaging in an environmentally friendly way and take it to your recycling site.
If you have any questions about the device or spare parts/accessories, please contact your local retailer.
CONTENU
1 CONSIGNES DE SÉCURITÉ ET AVERTISSEMENTS....32
UTILISATION CORRECTE DU PRODUIT
natural_image
Technical line drawing of a mechanical device with internal grid structure and mounting points (no text or symbols)natural_image
Technical line drawing of a rectangular mechanical housing or frame (no text or symbols)natural_image
Line drawing of a rectangular device with a central diamond-shaped opening and two side brackets (no text or symbols)
natural_image
Technical line drawing of a mechanical housing or enclosure with internal compartments and mounting holes (no text or symbols)natural_image
Technical line drawing of a rectangular container with internal compartments and a curved arrow indicating rotation (no text or symbols)natural_image
Diagram of car seat assembly showing internal components and directional arrows (no text or symbols)natural_image
Line drawing of a hand inserting a grid into a device (no text or symbols)natural_image
Line drawing of a hand using a tool to press or install a gridded rack (no text or symbols visible)natural_image
Three technical line drawings of electronic components: a rectangular casing, a curved cover with a lid, and a grid-patterned base (no text or symbols)natural_image
Four technical line drawings of electronic components: a rectangular box, a curved device, a heat sink with internal channels, and a grid-like base (no text or symbols)natural_image
Technical line drawings of a car body panel and its three views (front, side, top), showing different mounting configurations without any text or symbols.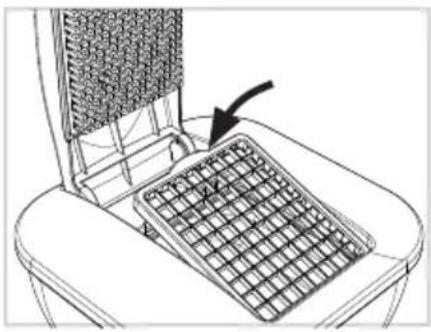
natural_image
Line drawing of a computer keyboard with an arrow pointing to the screen (no text or symbols)natural_image
Technical illustration of a mechanical device with internal components and directional arrows (no text or symbols)natural_image
Line drawing of hands using a laptop to press a card into a trash bin (no text or symbols)natural_image
Line drawing of a toilet with a side panel showing the keyboard and lid (no text or symbols)natural_image
Technical line drawings of a mechanical component assembly (no text or symbols)natural_image
Diagram showing a mechanical component with an arrow pointing to a circular component (no text or symbols present)natural_image
Line drawing of a hand pressing down on a mechanical component with arrows indicating motion (no text or symbols)natural_image
Technical line drawings of five different electronic components or housing assemblies (no text or symbols present)
natural_image
Technical line drawing of a heat exchanger or cooling unit with internal cooling fins and heat exchangers (no text or symbols)natural_image
Line drawing of a hand using a tool to press or adjust a component in a container (no text or symbols)natural_image
Line drawing of a carrot and a bowl with a leaf (no text or symbols)natural_image
Line drawing of a hand using a tool to press or adjust a mechanical component, with no visible text or symbols.natural_image
Hand holding a circular object with a pointer, no text or symbols visiblenatural_image
Technical line drawing of a mechanical component with arrows indicating features (no text or symbols)natural_image
Technical line drawing of a mechanical component with no visible text or symbolsnatural_image
Technical line drawing of a mechanical component with arrows indicating features (no text or symbols)natural_image
Diagram of a hand pressing down on a mechanical component with directional arrows indicating motion (no text or symbols)natural_image
Technical line drawings of three views of a device housing: front, side, and top (no text or symbols)
natural_image
Line drawing of a mechanical component with a gridded top and side plate (no text or symbols)natural_image
Illustration of a hand using a tool to press or brush on a container with arrows indicating motion (no text or symbols)natural_image
Technical line drawings of a mechanical component, showing front, top, and side views (no text or symbols)
natural_image
Technical line drawing of a mechanical component with a circular housing and arrow indicating rotation (no text or symbols)natural_image
Hand holding a knob on a mechanical component, with an arrow indicating rotation (no text or symbols present)natural_image
Technical line drawing of a mechanical component with a threaded fastener and housing (no text or symbols)natural_image
Technical line drawings of a mechanical component with grid layouts and internal compartments (no text or symbols)natural_image
Technical line drawing of a mechanical component with internal ribs and mounting holes (no text or symbols)natural_image
Isometric line drawing of a rectangular grid structure with no text or symbolsnatural_image
Line drawing of a hand pressing down on a laptop keyboard (no text or symbols)natural_image
Technical line drawing of a mechanical component with vertical rods and mounting brackets (no text or symbols)natural_image
Technical line drawing of a rectangular container with internal compartments and a curved top, showing no text or symbols.natural_image
Diagram of a car seat assembly showing internal components and directional arrows (no text or symbols)natural_image
Line drawing of a hand inserting a grid into a device (no text or symbols)natural_image
Line drawing of a hand using a tool to press or install a grid-like object on a base (no text or symbols)natural_image
Three technical line drawings of electronic components: a square enclosure, a curved device with a labeled pad, and a grid-patterned tray (no text or symbols)natural_image
Four technical line drawings of electronic components or modules, including a top-down view and heat sink (no text or symbols)natural_image
Technical line drawings of a device housing and fan components (no text or symbols)
natural_image
Line drawing of a computer keyboard with an arrow pointing to the screen (no text or symbols present)natural_image
Technical illustration of a heat exchanger with cooling fans and fan blades, showing structural components (no text or symbols)natural_image
Line drawing of hands typing on a keyboard with a mouse (no text or symbols)natural_image
Line drawing of a toilet with a side panel and a close-up of the keyboard (no text or symbols)natural_image
Technical line drawings of a mechanical component assembly (no text or symbols)natural_image
Diagram showing a mechanical component with an arrow pointing to a circular component (no text or symbols present)natural_image
Line drawing of a hand pressing down on a mechanical component with directional arrows (no text or symbols)natural_image
Technical line drawings of five different electronic components or housing assemblies, including a front panel, internal compartments, and a dome-shaped base (no text or symbols present)
natural_image
Technical line drawing of a heat exchanger or cooling unit with internal cooling fins and ductwork (no text or symbols)natural_image
Line drawing of a hand using a tool to press or adjust a component in a container (no text or symbols)natural_image
Line drawing of a carrot and a bowl with leafy ends (no text or symbols)natural_image
Diagram of a hand using a tool to lift a lid onto a container with arrows indicating direction (no text or symbols)natural_image
Line drawing of a hand holding a circular object with a pointer, no text or symbols presentnatural_image
Technical diagram of a mechanical component with arrows indicating direction (no text or symbols)natural_image
Technical line drawing of a mechanical component with no visible text or symbolsnatural_image
Technical line drawing of a mechanical component with arrows indicating features (no text or symbols)natural_image
Diagram of a hand pressing down on a mechanical device with directional arrows indicating motion (no text or symbols)natural_image
Three technical line drawings of a plastic housing component, showing front, top, and side views (no text or symbols)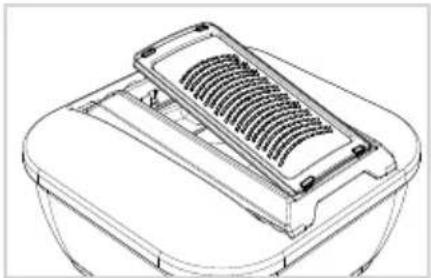
natural_image
Line drawing of a mechanical component with a gridded top and side plate (no text or symbols)natural_image
Illustration of a hand pouring liquid into a container with arrows indicating direction (no text or symbols)natural_image
Technical line drawings of a mechanical component with three views: top, front, and side (no text or symbols)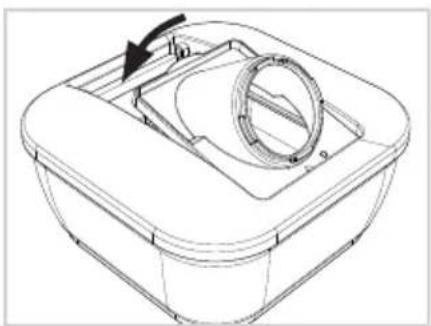
natural_image
Technical line drawing of a mechanical housing or basin with a circular component and an arrow indicating direction (no text or symbols)natural_image
Hand holding a knob with an arrow indicating rotation (no text or symbols)natural_image
Technical line drawing of a mechanical component with a threaded fastener and housing (no text or symbols)natural_image
Technical line drawings of a mechanical assembly with grid layouts and internal components (no text or symbols)natural_image
Technical line drawing of a mechanical component with internal ribs and mounting holes (no text or symbols)natural_image
Isometric line drawing of a rectangular grid structure with no text or symbolsnatural_image
Line drawing of a hand inserting a small object into a laptop keyboard (no text or symbols)natural_image
Technical line drawing of a mechanical component with vertical grooves and mounting brackets (no text or symbols)natural_image
Line drawing of a rectangular device with a central square and two side brackets (no text or symbols)
natural_image
Technical line drawing of a mechanical housing or enclosure component (no text or symbols)natural_image
Line drawing of a rectangular container with internal compartments and a curved lid, marked with an arrow (no text or symbols)natural_image
Diagram of a car seatbelt mechanism with arrows indicating force or movement (no text or symbols present)natural_image
Line drawing of a hand inserting a grid into a device (no text or symbols)natural_image
Line drawing of a hand using a grater to press or install a rack (no text or symbols visible)natural_image
Three technical line drawings of electronic components: a rectangular housing, a curved cover with a lid, and a grid-patterned tray (no text or symbols)natural_image
Line drawings of four different electronic components: a rectangular housing, a curved device, a coiled heat sink, and a multi-tiered heat sink (no text or symbols)natural_image
Technical line drawings of a mechanical component with four views: front, top, side, and cross-section (no text or symbols)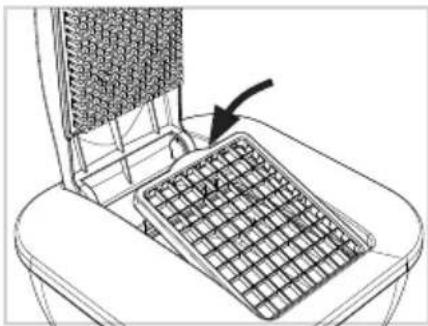
natural_image
Line drawing of a mechanical device with a grid-patterned panel and an arrow pointing to it (no text or symbols)natural_image
Technical illustration of a heat exchanger with cooling fans and fan blades, showing airflow direction (no text or symbols)natural_image
Line drawing of hands using a computer on a keyboard (no text or symbols)natural_image
Line drawing of a container with an arrow indicating upward motion, alongside a magnified view of the interior portion of a laptop (no text or symbols)natural_image
Technical line drawings of four electronic components: a plastic housing, a heat exchanger, a dome-shaped device, and a base case (no text or symbols)natural_image
Diagram showing a mechanical component with an arrow pointing to a circular component, no text or symbols present.natural_image
Line drawing of a hand pressing down on a mechanical component with directional arrows (no text or symbols)natural_image
Technical line drawings of five different electronic components or housing parts, including a plastic housing and a dome-shaped cover (no text or symbols present)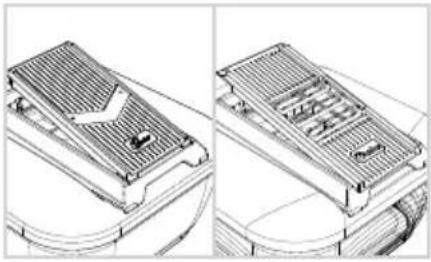
natural_image
Technical line drawing of a heat exchanger or cooling unit with internal components and wiring (no text or symbols)natural_image
Line drawing of a hand using a tool to press or adjust a component in a container (no text or symbols)natural_image
Line drawing of a carrot and a bowl with a leaf (no text or symbols)natural_image
Diagram of a hand using a tool to press or adjust a component on a container (no text or symbols visible)natural_image
Hand holding a circular object with concentric rings and a downward arrow, no text or symbols presentnatural_image
Technical line drawing of a mechanical component with arrows indicating features (no text or symbols)natural_image
Technical line drawing of a mechanical component with no visible text or symbolsnatural_image
Technical line drawing of a mechanical component with arrows indicating features (no text or symbols)natural_image
Diagram of a hand pressing down on a mechanical component with directional arrows indicating movement (no text or symbols)Passare l'Handy Hopper con movimenti veloci sopra la lama V.
natural_image
Technical line drawings of three views of a plastic housing or enclosure, showing front, side, and top views with no text or symbols.
natural_image
Line drawing of a mechanical component with a gridded top and side plate (no text or symbols)natural_image
Illustration of a hand using a tool to clean or brush a circular object on a tray (no text or symbols)natural_image
Technical line drawings of a mechanical component assembly (no text or symbols)
natural_image
Technical line drawing of a mechanical component with a circular housing and arrow indicating rotation (no text or symbols)natural_image
Hand holding a knob on a mechanical component, with an arrow indicating rotation (no text or symbols)natural_image
Technical line drawing of a mechanical component with a threaded fastener and housing (no text or symbols)natural_image
Technical line drawings of a mechanical assembly with grid-like components (no text or symbols)natural_image
Technical line drawing of a mechanical housing or enclosure with internal structural components (no text or symbols)natural_image
Isometric line drawing of a rectangular grid structure with no text or symbolsnatural_image
Line drawing of a hand pressing down on a laptop keyboard (no text or symbols)natural_image
Technical line drawing of a mechanical component with vertical rods and mounting brackets (no text or symbols)natural_image
Technical line drawing of a mechanical device with internal grid structure and mounting brackets (no text or symbols)natural_image
Technical line drawing of a rectangular mechanical housing or frame (no text or symbols)natural_image
Line drawing of a mechanical component with four flanges and a central square recess (no text or symbols)
natural_image
Technical line drawing of an electronic component housing (no text or symbols)natural_image
Line drawing of a rectangular container with internal compartments and a curved arrow indicating rotation (no text or symbols)natural_image
Diagram of a car seat assembly showing internal components and directional arrows (no text or symbols)natural_image
Line drawing of a hand inserting a grid into a device (no text or symbols)natural_image
Line drawing of a hand using a tool to press or install a grid-like object on a base (no text or symbols)natural_image
Three technical line drawings of a device component: a rounded rectangular casing, a curved lid with a button, and a grid-patterned base (no text or symbols)natural_image
Line drawings of four different electronic components or modules, including a rectangular housing and three heat sinks (no text or symbols)natural_image
Technical line drawings of a mechanical component with multiple views and mounting features (no text or symbols)
natural_image
Line drawing of a mechanical device with a grid-patterned panel and an arrow pointing to it (no text or symbols)natural_image
Technical illustration of a heat exchanger with cooling fins and fan assembly (no text or symbols)natural_image
Line drawing of hands using a smartphone to press a laptop on a keyboard (no text or symbols)natural_image
Line drawing of a toilet with a side panel and a laptop keyboard inserted (no text or symbols)natural_image
Technical line drawings of a mechanical component assembly (no text or symbols)natural_image
Diagram showing a mechanical component with an arrow pointing to a circular component (no text or symbols present)natural_image
Line drawing of a hand pressing down on a mechanical component with directional arrows (no text or symbols)natural_image
Technical line drawings of five different electronic components or housing parts, including a plastic housing and a dome-shaped container (no text or symbols present)
natural_image
Technical line drawing of a heat exchanger or cooling unit with internal cooling fins and heat exchangers (no text or symbols)natural_image
Illustration of a hand using a tool to press or adjust a container with arrows indicating direction (no text or symbols)natural_image
Simple line drawing of a carrot and a bowl with leafy tops (no text or symbols)natural_image
Diagram of a hand using a tool to press or adjust a component on a container (no text or symbols visible)natural_image
Hand holding a circular object with a pointer, no text or symbols visiblenatural_image
Technical line drawing of a mechanical component with arrows indicating features (no text or symbols)natural_image
Technical line drawing of a mechanical component with no visible text or symbolsnatural_image
Technical line drawing of a mechanical component with arrows indicating force or movement (no text or symbols)natural_image
Diagram of a hand pressing down on a mechanical component with directional arrows indicating movement (no text or symbols)natural_image
Three technical line drawings of a plastic housing component, showing front, side, and top views with no text or symbols.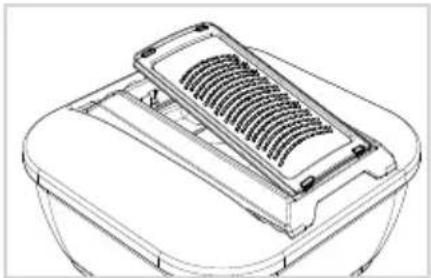
natural_image
Line drawing of a mechanical component with a gridded top and base (no text or symbols)natural_image
Illustration of a hand using a tool to press or brush on a container with arrows indicating motion (no text or symbols)natural_image
Technical line drawings of a mechanical component assembly (no text or symbols)
natural_image
Technical line drawing of a mechanical component with a circular housing and arrow indicating rotation (no text or symbols)natural_image
Hand holding a knob with an arrow indicating rotation (no text or symbols)natural_image
Technical line drawing of a mechanical component with a threaded fastener and housing (no text or symbols)natural_image
Technical line drawings of a mechanical assembly with grid layouts and internal components (no text or symbols)natural_image
Technical line drawing of a mechanical component with internal ribs and mounting holes (no text or symbols)natural_image
Isometric line drawing of a rectangular grid structure with no text or symbolsnatural_image
Line drawing of a hand inserting a coin into a laptop keyboard (no text or symbols)natural_image
Technical line drawing of a mechanical component with internal channels and support structures (no text or symbols)natural_image
Technical line drawing of a mechanical device with internal grid structure and mounting brackets (no text or symbols)natural_image
Technical line drawing of a rectangular mechanical housing or frame (no text or symbols)Veko Keep-fresh Násadka na skladovanie
natural_image
Line drawing of a rectangular device with a central diamond-shaped opening and two side brackets (no text or symbols)
natural_image
Technical line drawing of a mechanical housing or enclosure with internal compartments and mounting holes (no text or symbols)natural_image
Technical line drawing of a rectangular container with internal compartments and a curved top, showing no text or symbols.natural_image
Diagram of a car seat assembly showing internal components and directional arrows (no text or symbols)natural_image
Line drawing of a hand inserting a grid into a device (no text or symbols)natural_image
Line drawing of a hand using a tool to press or install a grid-like device on a base (no text or symbols)natural_image
Three technical line drawings of a device component: a rounded rectangular casing, a closed lid with a curved handle, and a grid-patterned base (no text or symbols)natural_image
Four technical line drawings of electronic components: a rectangular box, a curved panel, a coiled spring, and a heat sink (no text or symbols)natural_image
Technical line drawings of a mechanical component with four views: top, front, side, and cross-section (no text or symbols)
natural_image
Line drawing of a mechanical device with a grid-patterned panel and an arrow pointing to it (no text or symbols)natural_image
Technical illustration of a heat exchanger or fan structure with directional arrows indicating flow or movement (no text or symbols present)natural_image
Line drawing of hands using a computer to clean or store items on a keyboard (no text or symbols)natural_image
Line drawing of a bathtub with an arrow indicating rotation, alongside a laptop keyboard (no text or symbols)natural_image
Four technical line drawings of mechanical components: a 3D part, a heat exchanger, a dome-shaped housing, and a final container (no text or symbols)natural_image
Diagram showing a mechanical component with an arrow pointing to a circular component (no text or symbols present)natural_image
Illustration of a hand using a tool to press or adjust a component on a tray (no text or symbols visible)natural_image
Technical line drawings of five different electronic components or housing assemblies (no text or symbols present)
natural_image
Technical line drawing of a heat exchanger or cooling unit with internal components and wiring (no text or symbols)natural_image
Line drawing of a hand using a tool to press or adjust a component in a container (no text or symbols)natural_image
Line drawing of a carrot and a leaf with a stem, no text or symbols presentnatural_image
Line drawing of a hand using a tool to press down a trash bin with arrows indicating motion (no text or symbols)natural_image
Hand holding a circular object with concentric rings and a downward arrow, no text or symbols presentnatural_image
Technical line drawing of a mechanical component with arrows indicating features (no text or symbols)natural_image
Technical diagram of a mechanical assembly with arrows indicating force or movement (no text or symbols present)Stlačte bočné svorky k sebe a odstráňte veko. Naplňte ho potravinami.
natural_image
Technical line drawing of a mechanical component with arrows indicating features (no text or symbols)Umiestnite pečat’ do stredu a zatlačte kryt nadol, kým spony po stranách nezacvaknú na svoje miesto.
natural_image
Diagram of a hand pressing down on a mechanical component with directional arrows indicating movement (no text or symbols)Rýchlymi pohybmi ved'te Handy Hopper cez V-čepel'.
natural_image
Three technical line drawings of a plastic housing component, showing front, side, and top views with internal cutouts (no text or symbols)
natural_image
Line drawing of a mechanical component with a gridded top and rectangular base (no text or symbols)natural_image
Illustration of a hand pouring liquid into a container with arrows indicating flow direction (no text or symbols)natural_image
Technical line drawings of a mechanical component assembly (no text or symbols)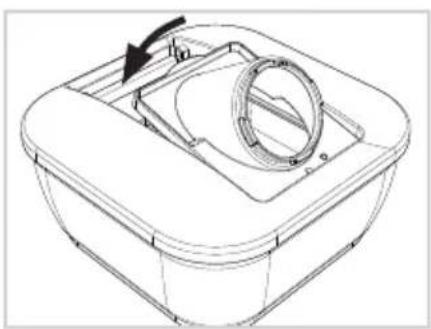
natural_image
Technical line drawing of a mechanical component with a circular housing and arrow indicating rotation (no text or symbols)natural_image
Hand holding a knob on a mechanical component, with an arrow indicating rotation (no text or symbols present)natural_image
Technical line drawing of a mechanical component with a threaded fastener and housing (no text or symbols)natural_image
Technical line drawings of a mechanical assembly with grid-like components (no text or symbols)natural_image
Technical line drawing of a mechanical component with heat dissipation fins and mounting holes (no text or symbols)natural_image
Line drawing of a rectangular grid-patterned tray or container (no text or symbols)natural_image
Line drawing of a hand inserting a small object into a laptop keyboard (no text or symbols)natural_image
Technical line drawing of a mechanical component with vertical rods and base supports (no text or symbols)
- Nicer Dicer Chef Professional
- Content
- SAFETY INSTRUCTIONS AND WARNINGS
- Guide to the symbols used
- CAUTION!
- ATTENTION!
- Proper use
- Safety instructions
- RISK OF INJURY FROM SHARP BLADES
- HANDLING THE PRODUCT CORRECTLY
- USING THE GLASS BOWL IN THE OVEN
- Before first use
- Product components
- Nicer Dicer Chef Professional – blade inserts, slicers and grating inserts
- Assembly
- Using the blade inserts
- Preparing food
- A – Cutting sticks/cubes
- B – Tomato and vegetable cutter
- C - Cutting eighths
- Tips and tricks – blade inserts
- Using the slicers
- Risk of cutting injuries!
- Adjustable slicer
- Setting the cutting thickness
- Fixed slicer/Multi-slicer
- Tips and tricks – slicers
- Using the food holder
- Tips and Tricks – grating inserts
- Nicer Julietti XL
- Assembly/Using
- Safety and storage
- Care and cleaning
- Cleaning the blade inserts
- Self-cleaning function
- Disposal
- CONTENU
- UTILISATION CORRECTE DU PRODUIT
Brand : GENIUS
Model : Nicer Dicer Chef Professional
Category : Slicer