BM6000 - Lawn mower SCHEPPACH - Free user manual and instructions
Find the device manual for free BM6000 SCHEPPACH in PDF.

User questions about BM6000 SCHEPPACH
0 question about this device. Answer the ones you know or ask your own.
Ask a new question about this device
Download the instructions for your Lawn mower in PDF format for free! Find your manual BM6000 - SCHEPPACH and take your electronic device back in hand. On this page are published all the documents necessary for the use of your device. BM6000 by SCHEPPACH.
USER MANUAL BM6000 SCHEPPACH
Translation from the original instruction manual
FR
Tracteur Pousse
- After unpacking, check all parts for possible transportation damages. In the event of complaints, inform the supplier immediately. Any complaints made after this time will not be accepted.
The shipment is to be checked for completeness upon receipt. - Read through the manual carefully in order to make yourself familiar in dealing with the device before using it for the first time.
- Only use original equipment regarding accessories, as well as consumable items and spare parts. Spare parts can be obtained from your specialized dealer. When ordering, please specify our part numbers, as well as type and construction year of the device.
NOTE:
According to the applicable product liability laws, the manufacturer of the device does not assume liability for damages to the product or damages caused by the product that occurs due to:
- Improper handling,
Non-compliance of the operating instructions, - Repairs by third parties, not by authorized service technicians,
- Installation and replacement of non-original spare parts,
Application other than specified, - A breakdown of the electrical system that occurs due to the non-compliance of the electric regulations and VDE regulations 0100, DIN 57113 /
VDE0113.
We recommend:
Read through the complete text in the operating instructions before installing and commissioning the device. The operating instructions are intended to help the user to become familiar with the machine and take advantage of its application possibilities in accordance with the recommendations. The operating instructions contain important information on how to operate the machine safely, professionally and economically, how to avoid danger, costly repairs, reduce downtimes and how to increase reliability and service life of the machine.
In addition to the safety regulations in the operating instructions, you have to meet the applicable regulations that apply for the operation of the machine in your country. Keep the operating instructions package with the machine at all times and store it in a plastic cover to protect it from dirt and moisture.
Read the instruction manual each time before operating the machine and carefully follow its information. The machine can only be operated by persons who were instructed concerning the operation of the machine and who are informed about the associated dangers. The minimum age requirement must be complied with.
We have marked the points in this manual that concern your safety with this sign:
Scope of delivery
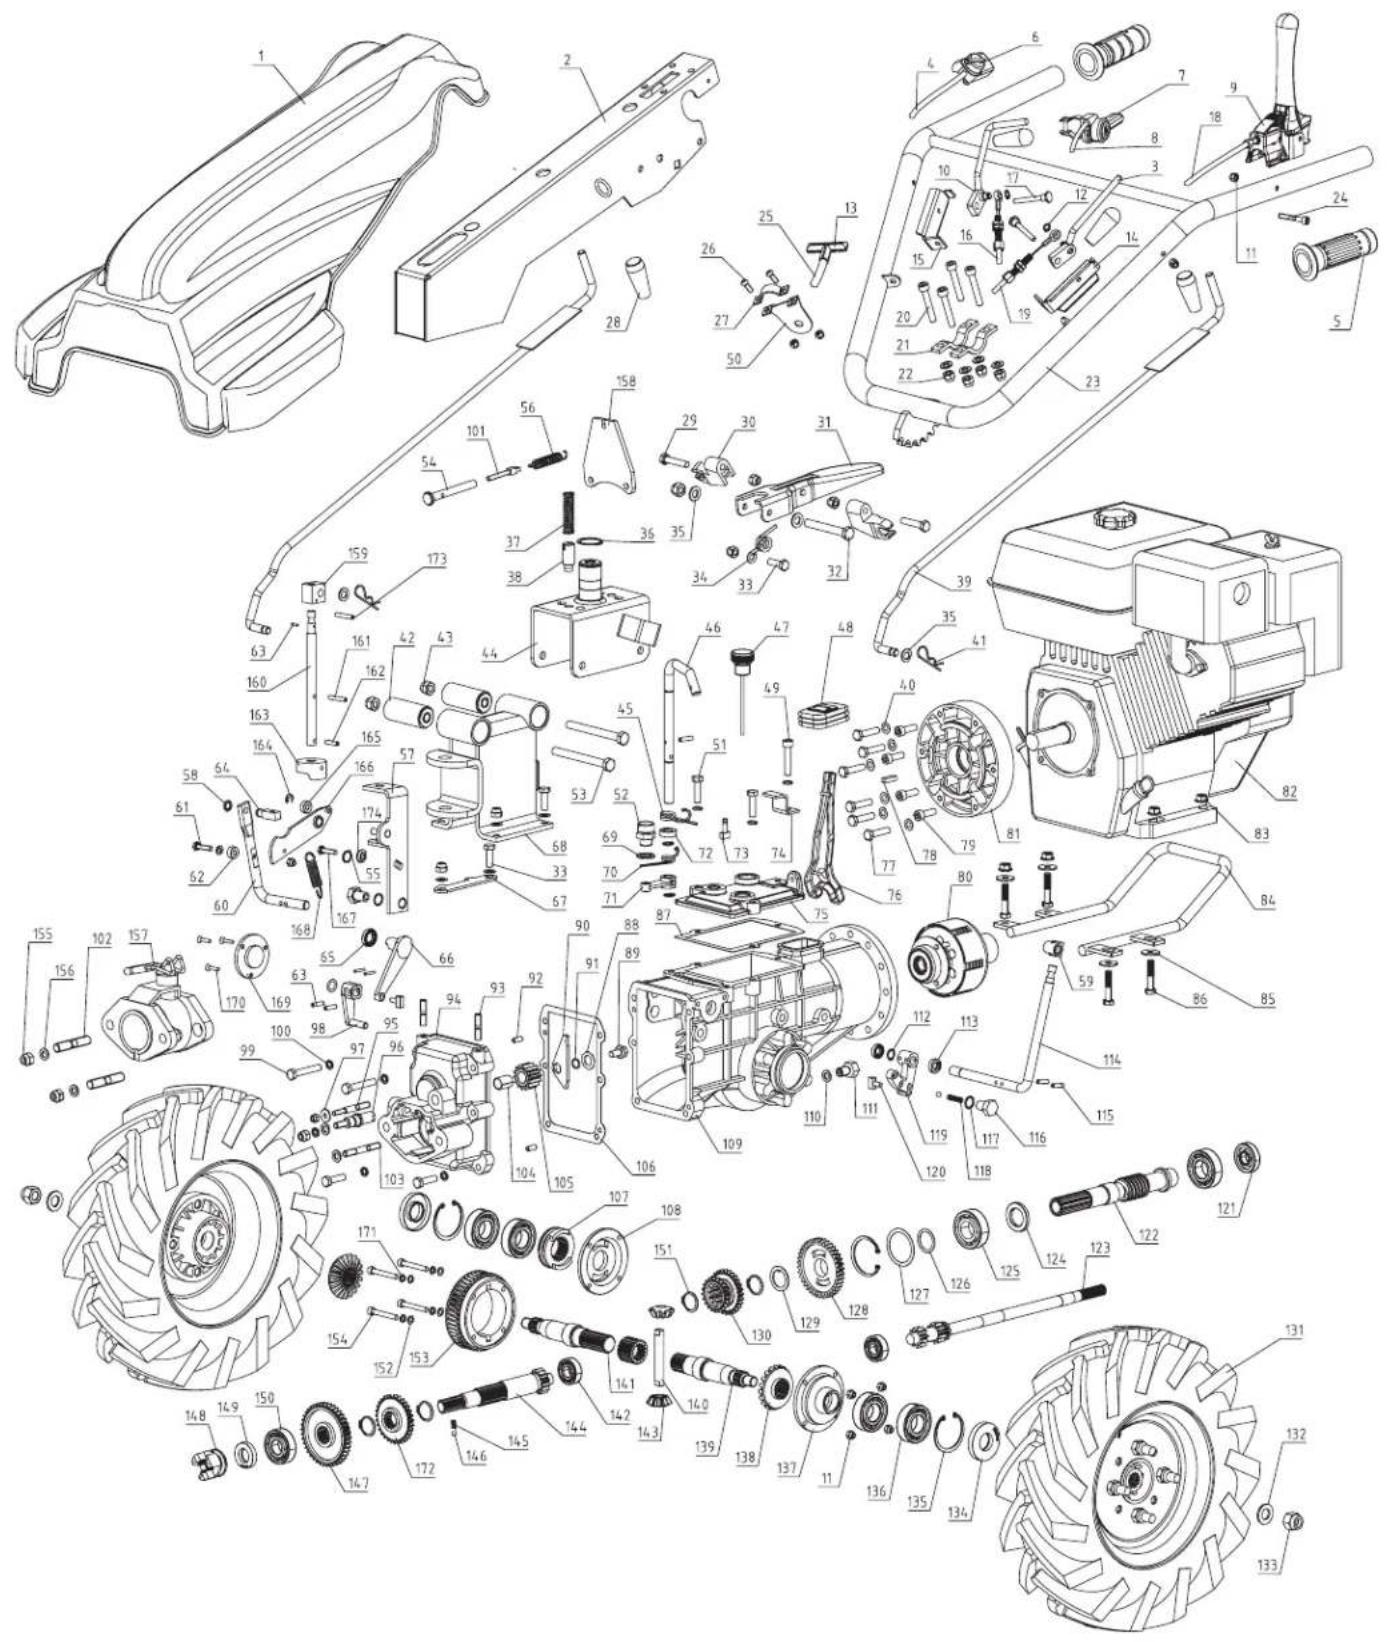
Walk-behind tractor with Engine Fig.2
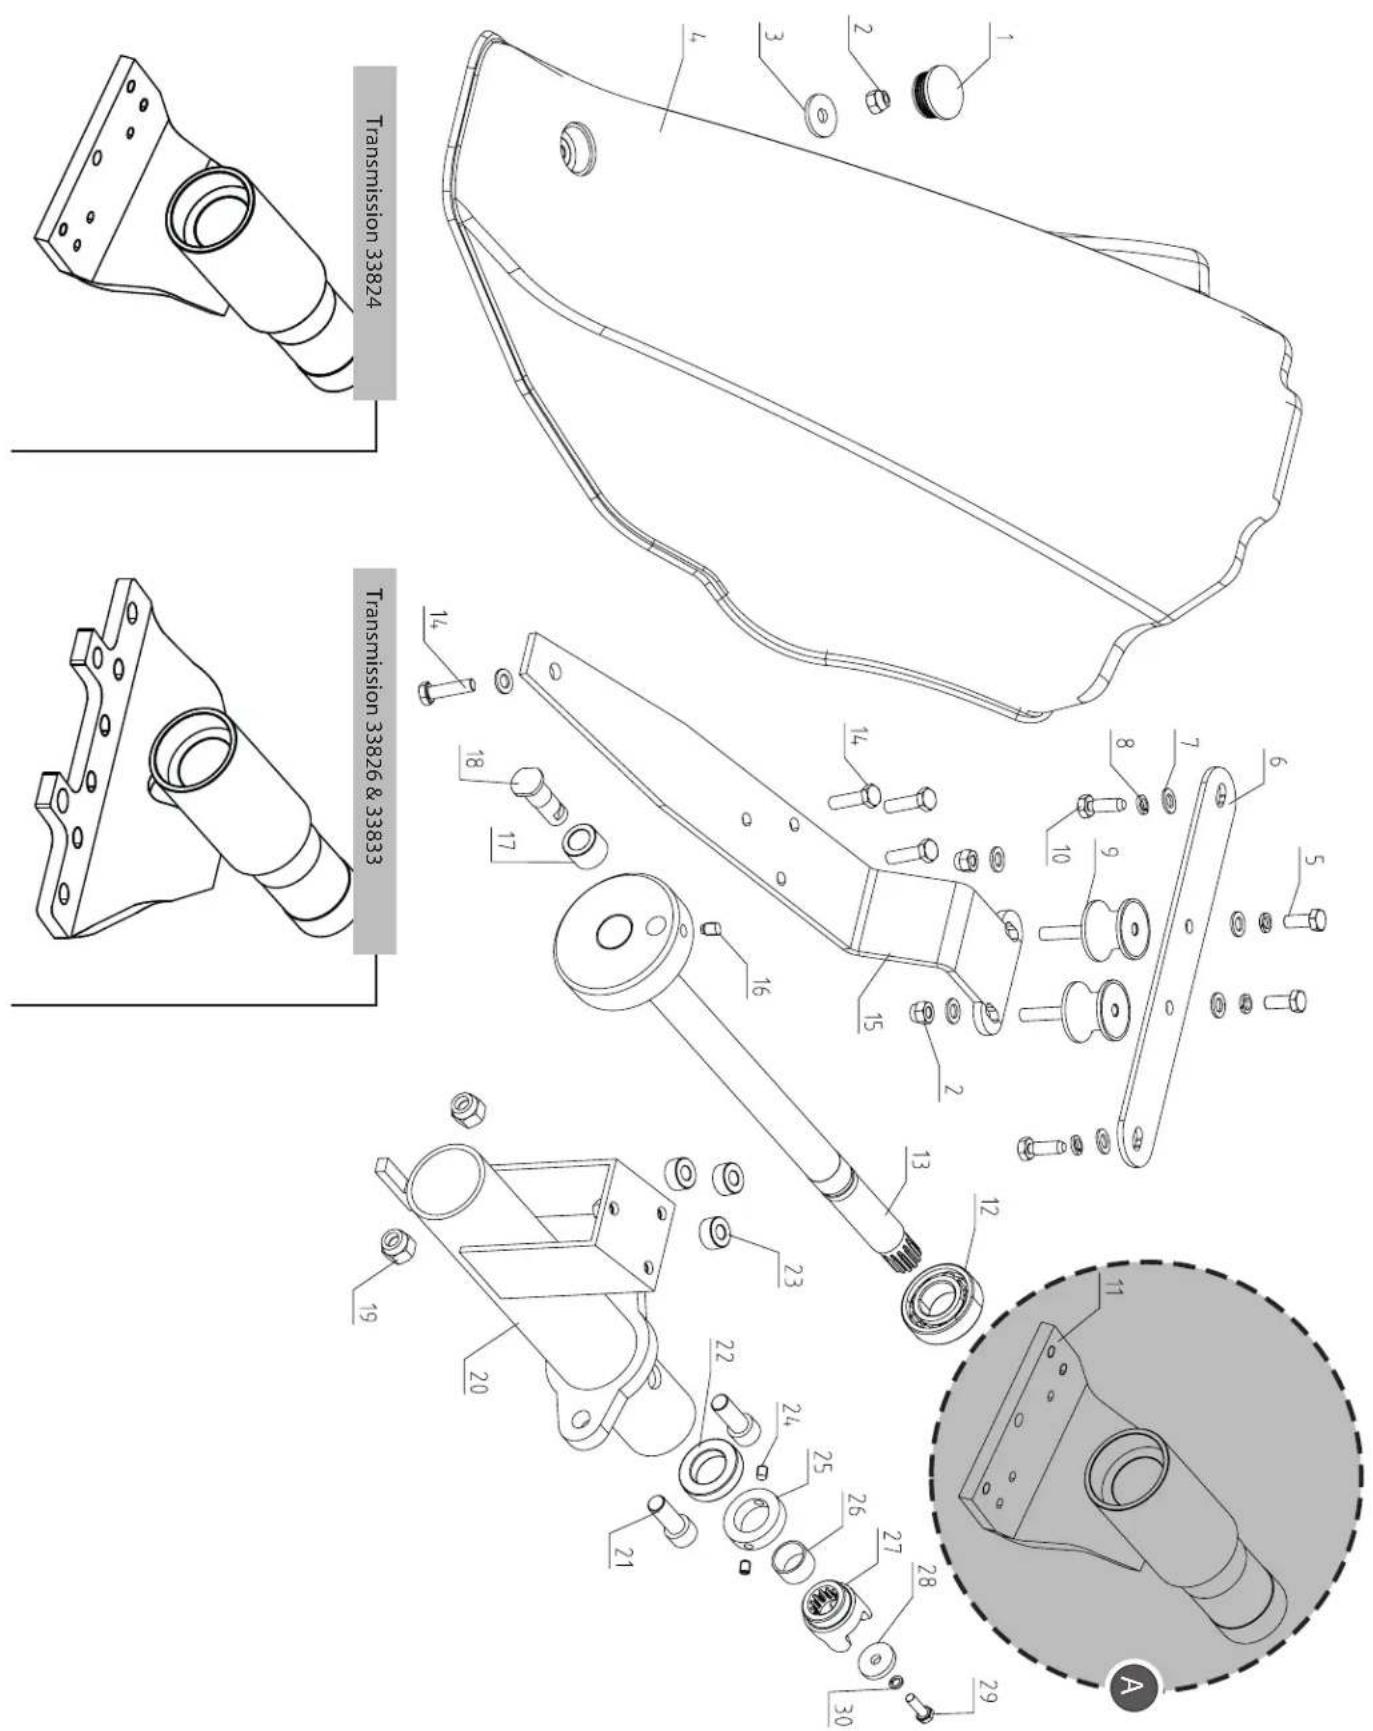
Transmission Assembly Fig.3
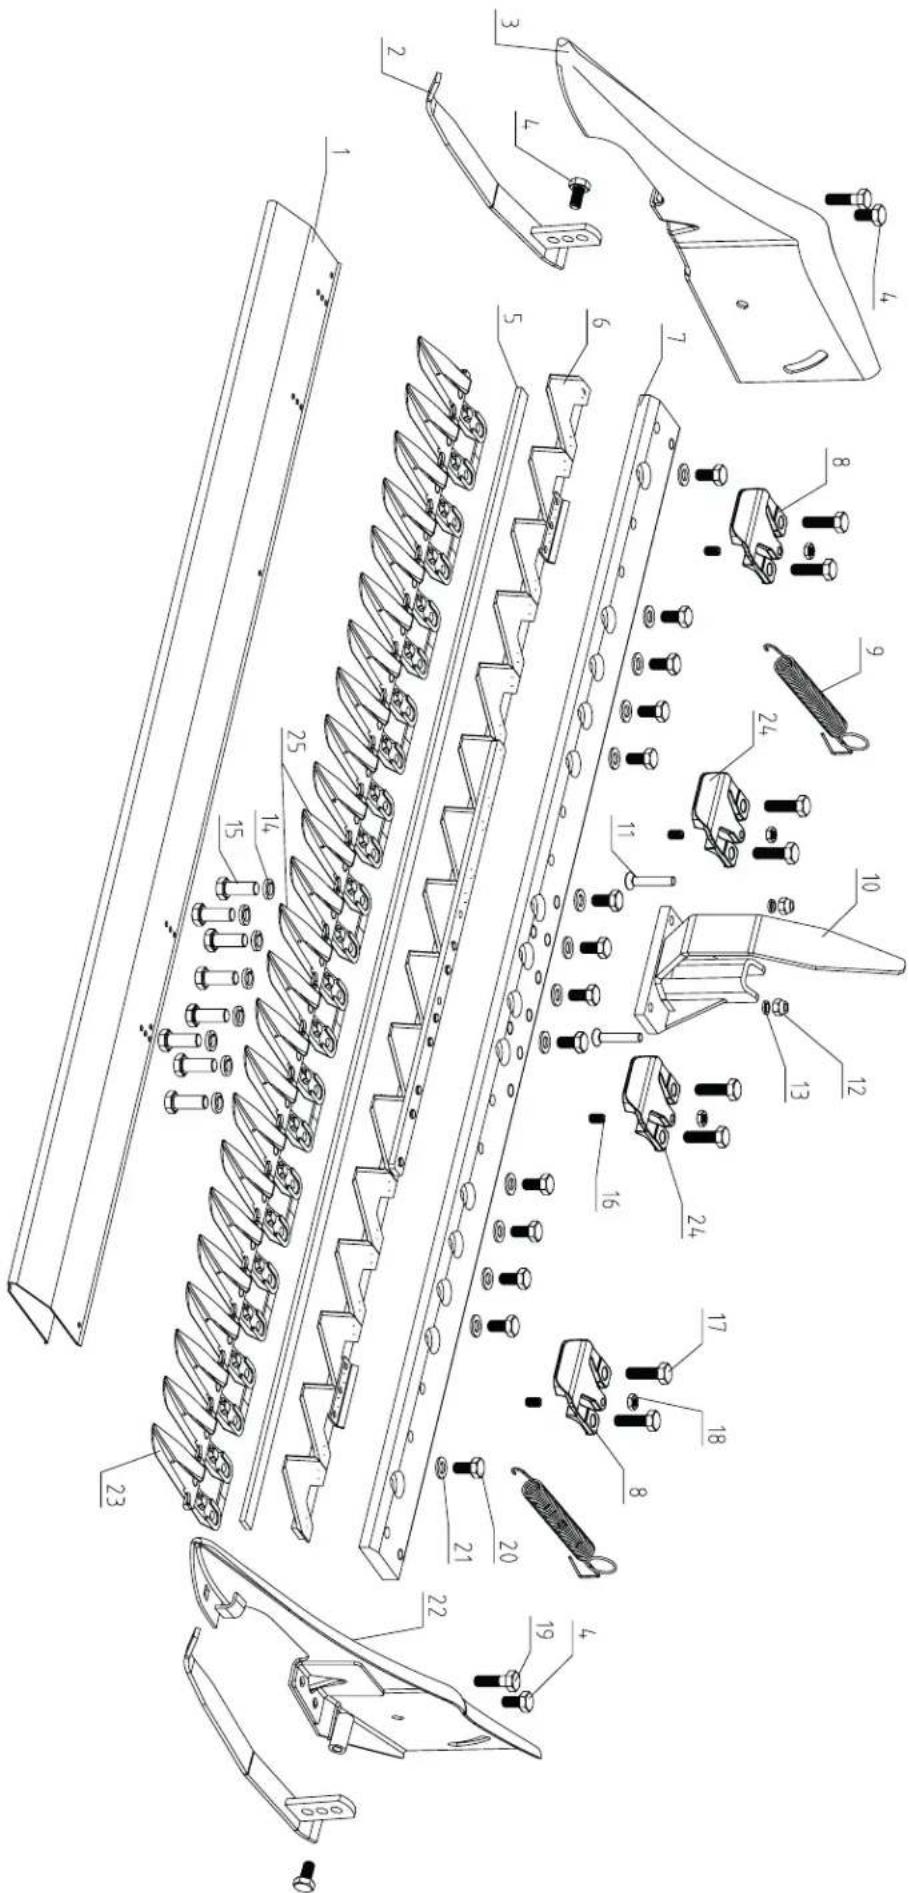
Sickle Bar Fig.4
Operator's Manual
Hardware Bag, including
Machine parts Fig.1
Clutch lever, Fig.1.1
It permits to engage and disengage clutch, PTO, reversing gear
180^ Steering Lever, Fig.1.2
This lever to unlock the handlebars so that it can be rotated 180^ .
Speed Shift Lever, Fig.1.3
It controls different speeds as shown on the selector.
Reversing gear lever, Fig.1.4
It permits the reversal of the machine movement and of the PTO.
Differential lock lever, Fig.1.5
Locks or unlocks the differential lock to increase the adhesion of the wheels on bad ground. In this case, you have the clutch disengaged, turned the lock, and the clutch released slowly.
Engine Stop lever, Fig.1.6
Turns off the engine.
Throttle lever, Fig.1.7
The throttle lever controls engine speed. Moving the throttle lever in the directions shown makes the engine run faster or slower.
Handlebar, Fig.1.8
Driving position is comfortable with the controls positioned ergonomically. The handlebars are adjustable in height, sideways and are reversible by 180^ . Special silent-blocks absorb the vibrations produced by the machine when in operation.
Gearbox, Fig.1.9
Power takeoff, Fig.1.10
It is a front locking 3-teeth implement. It rotates clockwise, independently from
the gearbox, and depending on the engine speed.
NOTE: Always use the clutch lever when wanting to engage or disengage the PTO.
Technical data
| Length x width x height mm 1880 x 1530 x 1000 | ||
| Cutting bar mm 1530 | ||
| Number of scissors pcs 20 | ||
| Cutting speed m/s 1980 | ||
| Cutting height mm 30-40 | ||
| Forward speed of 4 courses km/h 1,1 / 2,6 / 4,5 / 11,2 | ||
| Reverse speed 3-course | km/h | 1,1 / 2,6 / 4,5 |
| Wheel diameter | mm | 410 |
| Handle height mm 1000 | ||
| Weight | kg 128 |
| Drive: | ||
| Engine Type | 4-stroke engine | |
| Capacity | ccm³ 270 | |
| Idle | 1/min | 3000 |
| Maximum Speed | 1/min | 3600 |
| Motor Starters | Recoil starter (pull starter) | |
| Power | kW | 6,7 |
| Fuel | Unleaded gasoline octane number from 90 to a maximum ethanol content of 5% | |
| Maximum fuel tank capacity | 1 | 5,5 |
| Required motor oil | SAE 10W-30 | |
| Oil tank capacity maximum l | 1,1 | |
Subject to technical changes!
Noise and vibration values
| Sound pressure level Lp(A) | db(A) | 98,6 |
| Sound power level Lw(A) | db(A) | 113,8 |
| Uncertainty K | db(A) | 3 |
| Vibration left | m/s2 | 3,08 |
| Vibration right | m/s2 | 4,91 |
| Uncertainty K | m/s2 | 1,5 |
The noise emission values were determined according to EN ISO 3744 for the sound power or EN ISO 11201 for the sound pressure.
The given hand-arm vibration levels have been determined according to DIN EN 1033.
Symbols
| Read these instructions for use carefully. | |
| Use safety equipment. Always wear eye and hearing protection, safety footwear, gloves while operating. | |
| It is forbidden to remove or tamper with the protection devices and safety devices. | |
| Do not smoke or have open flames. Use extreme caution when storing, handling and using fuels, as they are highly volatile and explosive in vapor state. |
General Safety Rules
- Understand your machine
- Read and understand the operator's manual and labels affixed to the machine. Learn its application and limitations as well as the specific potential hazards peculiar to it.
- Be thoroughly familiar with the controls and their proper operation. Know how to stop the machine and disengage the controls quickly.
- Make sure to read and understand all the instructions and safety precautions as outlined in the Engine Manufacturer's Manual, packed separately with your unit. Do not attempt to operate the machine until you fully understand how to properly operate and maintain the Engine and how to avoid accidental injuries and/or property damage.
Work area
- Never start or run the unit inside a closed area.
- The exhaust fumes are dangerous, containing carbon monoxide, an odorless and deadly gas. Operate this unit only in a well ventilated outdoor area.
- Never operate the machine without good visibility or light.
- Never operate the machine on a steep slope - Danger of tipping.
Always work across to the slope, not up and down.
Personal safety
- Do not operate the machine while under the influence of drugs, alcohol, or any medication that could affect your ability to use it properly.
- Dress properly. Wear heavy long pants, boots and gloves. Do not wear loose clothing, short pants, and jewelry of any kind. Secure long hair so it is above shoulder level. Keep your hair, clothing and gloves away from moving parts. Loose clothes, jewelry or long hair can be caught in moving parts.
- Check your machine before starting it. Keep guards in place and in working order. Make sure all nuts, bolts, etc. are securely tightened, in particular those fixing the implement to the machine.
- Never operate the machine when it is in need of repair or is in poor mechanical condition. Replace damaged, missing or failed parts before using it. Check for fuel leaks. Keep the machine in safe working condition.
- Do not use the machine if the engine's switch does not turn it on or off. Any gasoline powered machine that can not be controlled with the engine switch is dangerous and must be replaced.
- Form a habit of checking to see that keys and adjusting wrenches are removed from machine area before starting it. A wrench or a key that is left attached to a rotating part of the machine may result in personal injury.
- Stay alert, watch what you are doing and use common sense when operating the machine.
- Do not overreach. Do not operate the machine while barefoot or when wearing sandals or similar lightweight footwear. Wear protective footwear that will protect your feet and improve your footing on slippery surfaces. Keep proper footing and balance at all times. This enables better control of the machine in unexpected situations.
- Avoid accidental starting. Be sure the engine is off before transporting the machine or performing any maintenance or adjustment on the unit.
Fuel safety
- Fuel is highly flammable, and its vapors can explode if ignited. Take precautions when using to reduce the chance of serious personal injury.
- When refilling or draining the fuel tank, use an approved fuel storage container while in a clean, well-ventilated outdoor. Do not smoke, or allow sparks, open flames or other sources of ignition near the area while adding fuel or operating the unit.
- Keep grounded conductive objects, such as tools, away from exposed, live electrical parts and connections to avoid sparking or arcing. These events could ignite fumes or vapors.
- Always stop the engine and allow it to cool before filling the fuel tank. Never remove the cap of the fuel tank or add fuel while the engine is running or when the engine is hot. Do not operate the machine with known leaks in the fuel system.
- Loose the fuel tank cap slowly to relieve any pressure in the tank.
- Never overfill fuel tank (there should be no fuel above the upper limit mark)
- Replace all fuel tank and container caps securely and wipe up spilled fuel. Never operate the unit without the fuel cap securely in place.
- Avoid creating a source of ignition for spilled fuel. If fuel is spilled, do not attempt to start the engine but move the machine away from the area of spillage and avoid creating any source of ignition until fuel vapors have dissipated.
- Never store fuel or machine with fuel in the tank inside a building where fumes may reach a spark, open flame, or other sources of ignition, such as a water heater, furnace, clothes dryer and the like. Allow the engine to
cool before storing in any enclosure.
Machine use and care
- Never pick up or carry a machine while the engine is running.
- Do not force the machine. Use the correct machine for your application. The correct machine will do the job better and safer at the rate for which it was designed.
- Do not change the engine governor settings or over-speed the engine. The governor controls the maximum safe operating speed of the engine.
- Do not run the engine at a high speed when not in use.
- Do not put hands or feet near rotating parts.
- Avoid contact with hot fuel, oil, exhaust fumes and hot surfaces. Do not touch the engine or muffler. These parts get extremely hot from operation. They remain hot for a short time after you turn off the unit. Allow the engine to cool before doing maintenance or making adjustments.
- If the machine should start to make an unusual noise or vibration, immediately shut off the engine, disconnect the spark plug wire, and check for the cause. Unusual noise or vibration is generally warning of trouble.
- Use only attachments and accessories approved by the manufacturer. Failure to do so can result in personal injury.
- Maintain the machine. Check for misalignment or binding of moving parts, breakage of parts and any other condition that may affect the machine's operation. If damaged, have the machine repaired before use. Many accidents are caused by poorly maintained equipment.
- Keep the engine and muffler free of grass, leaves, excessive grease or carbon build up to reduce the chance of a fire hazard.
- Keep cutting tools sharp and clean. Properly maintained cutting tools with sharp cutting edges are less likely to bind and are easier to control.
- Never douse or squirt the unit with water or any other liquid. Keep handles dry, clean and free from debris. Clean after each use.
- Observe proper disposal laws and regulations for gas, oil, etc. to protect the environment.
- Store idle machine out of the reach of children and do not allow children or persons unfamiliar with the machine or these instructions to operate it. Machine is dangerous in the hands of untrained users.
Service
- Before cleaning, repair, inspecting, or adjusting, shut off the engine and make certain all moving parts have stopped. Always make sure the engine switch is in its "OFF" position. Disconnect the spark plug wire, and keep the wire away from the plug to prevent accidental starting.
- Have your machine serviced by qualified repair personnel using only identical replacement parts. This will ensure that the safety of the machine maintained.
Specific Safety Rules
- Before starting work, remove all foreign matter (stones, metal wires, rods etc.) from the area where the equipment is to be used.
- This machine has been designed and manufactured for being used by one operator only.
- Keep all bystanders, children, and pets at least 23m (75 feet) away. If you are approached, stop the unit immediately.
- Walk, never run with the machine.
- Always operate the machine from behind, never pass or stand in front of the machine when the engine is running.
- Disengage all command levers before starting the engine.
- This unit has a clutch. Squeeze the clutch control lever and check that it returns automatically to the neutral position. If it does not, have unit adjusted by a qualified repair personnel.
- Engage the clutch gradually. Sudden engagement could cause the machine to rear-up.
- Always hold the unit with both hands when operating. Keep a firm grip on the handlebars. Be aware that the machine may unexpectedly bounce upward or jump forward.
- If the unit strikes a foreign object, stop the engine, disconnect the spark plug, thoroughly inspect the machine for any damage, and repair the damage before restarting and operating the machine.
- Use extreme caution when in reverse or pulling the machine towards you.
- Do not overload the machine's capacity
- Never operate the unit at high transport speeds on hard or slippery surfaces.
- Exercise extreme caution when operating on or crossing gravel drives, walks, or roads. Stay alert for hidden hazards or traffic. Do not carry passengers or objects.
- Never leave the operating position and leave the tractor unattended when the engine is running.
-
Always stop the engine and disengage the Power Takeoff during movement to and from the area of work.
-
Pay attention when reversing the machine not to trip over anything. If you loose your balance, release the handlebars immediately, the disengagement will immediately stop the machine.
- Do not travel down hill with the clutch disengaged or the gears in idle.
-
Always park the unit on a firm and level surface and shut the tool off.
-
To reduce exposure to vibration, limit the hours of operation and take periodic breaks to minimize repetition and rest your hand. Reduce the speed and force in which you do the repetitive movement. Try to fill each day with jobs where operating hand-held power equipment is not required.
Intended Use
- The machine conforms to the current EU Machinery Directive.
- The machine has a job that is located behind the machine.
- The working area of the machine and the surrounding area must be free from unwanted foreign bodies to prevent accidents
- The device may only be used for their intended purpose.
- For improper use of the manufacturer assumes no liability!
- The machine is intended for use in the private sector.
- The machine may only be operated with the original accessories.
-
The machine is to be used for the maintenance of grass or lawns.
-
Compliance with the instructions provided by the manufacturer is a prerequisite for the proper use of the mower.
- Caution! To prevent injury, the
- Do not use the machine for the following work:
- For cutting and pruning of climbers or grass on roofs or in window boxes
- For chopping of tree and hedge clippings.
- Furthermore, the machine must not be used as a tiller of the ground for leveling surveys, such as Molehill.
Residual risks
The machine is constructed according to the prior art and the recognized safety rules. Nevertheless, some residual risks can occur at work.
- Risk of injury to fingers and hands by the tool.
- Injury from hot surfaces on the machine
-
Injuries caused by the catapulting objects.
-
Improper use of the machine.
- Health hazards of noise. When working, the allowable noise level is exceeded. Essential personal protective equipment such as hearing protection.
- Residual risks can be minimized if the „SafetyWarnings“ and „Intended Use“ and generally Handling instructions be observed.
Mounting
With the following installation instructions to install the unit in a few minutes.
Unit carrier assembly
Fig.A
- Raise the handlebar and install the PTO shaft.
Fig.B
Install the shift rod.
Cutter bar unit
Fig.C
- Align the holes of the cutterbar and gearbox unit, install the washers, followed by screws M12x30, and then drag it to.
Fig. D
Install the fork on the cutter bar.
Fig. E
- Position the three spacer bushings with the holes on Mahbalkenhalter, then position the frame on the sleeves and secure with M8x30 screws with spring washers.
Fig. F
Install the trim on the gear unit as shown.
Fig.G
- Align the holes of Swath and cutter bar and secure it with screws M10x45 and M10x30 and nuts.
Work unit assembly
Quick coupling Fig. H
- The walking tractor is equipped with a quick coupling to switch the attachments on the machine quickly.
- Mount before attaching the implement the quick coupling and make sure that the PTO lever is in the neutral position.
- When connecting the implement, with the engine stopped and the machine level, the pin has to be pulled up, the power tool connected to the connecting sleeve and the pin is returned to its original position.
- Make sure that the pin is in the locked position and the nuts that fasten the device to work the machine are well dressed.
- To prevent the attachments eating the quick coupling of daily lubrication.
Engine Oil
THE OIL WAS DRAINED FOR TRANSPORT.
- If the oil tank is not filled before starting the engine with oil, this leads to permanent damage and void any engine warranty.
Fill out before start of oil into the container:
-Oil Type:SAW 10W-30
- Quantity: 1.1 L
Motor startup
Engine components Figure I + J
- Throttle
- Exhaust
- Spark
- Air Filter
- Petcock
- Choke lever
- Reversiestarter
- Recoil
- Ignition switch
- Gas cap
- Fuel tank
- Oil drain plug
-
Oil filler / dipstick
-
When you restart a warm engine, leave the choke lever in the OPEN position.
- Turn the ignition switch to "ON".
- Pull the cable grip lightly until you feel resistance, then pull firmly and run the cable grip then back again. Let the engine after the engine for a few minutes at idle, allowing the oil to lubricate all moving parts.
Starting the engine
- Make sure the PTO lever (if present) is disengaged and the gear shift lever in neutral position.
- Move the throttle lever on the handle to half-open position.
- Open the fuel cock.
- Operate the engine is cold, move the choke lever to the CLOSE position.
Machine commissioning
Working with the machine
With the engine on:
- Bring the engine to idle speed rotary and push the clutch lever to engage the gear and drive the working tool. Let, if the intervention is not immediate, the clutch lever easily go and let out the clutch lever several times easily.
- Engage the PTO and turn the gear shift lever to the desired position.
- Let the clutch lever slowly and completely off to begin work.
Stopping the machine
- Reduce your speed, you get the PTO shaft and the gear lever into neutral and release the engine stop lever completely.
Height adjustable cutter bar Fig. K
When working in rough terrain, the average height of the cutter bar must be set in the following manner.
Loosen the hex screw 1
- Attach the skid 2 in the desired position.
- Tighten the hex screw 1 again.
- Repeat the process on the second side.
Setting mower bar holder, Fig.L
Loosen the screw 1
- Turn the adjuster 2 in the knife holder.
- Tighten the mounting screw.
NOTE: To ensure proper function, excessive friction between the blade holder and the blade must be avoided.
Replacement blades, fig.M
Loosen the screws 1
- Remove the knife attack.
Pull the knife.
Run for re-assembly of the knife the same steps but in reverse order, and make sure that the knife in the same way are assembled.
Storing the machine
Note the following steps to store your machine when the walking tractor is not used for a period of longer than 30 days.
- Drain the fuel tank completely. Stored fuel containing ethanol or MTBE can start to go stale in 30 days. Stale fuel has high gum content and can clog the carburetor and restrict fuel flow.
- Start the engine and allow it to run until it stops. This ensures no fuel is left in the carburetor. Run the engine until it stops. This helps prevent deposits from forming inside the carburetor and possible engine damage.
-
Lubricate the cylinder introducing few drops of the same kind of oil used for the engine through the spark plug hole and letting the engine tick over for a short time.
-
Use clean cloths to clean off the outside of the machine and to keep the air vents free of obstructions.
- Do not use strong detergents or petroleum based cleaners when cleaning plastic parts. Chemicals can damage plastics.
- Protect the teeth of the sickle bar with the front protection and ensure that the blade does not escape from the side of the bar.
- Store your unit in upright position in a clean, dry building that has good ventilation.
- Do not store the unit with fuel in a non-ventilated area where fuel fumes may reach flame, sparks, pilot lights or any ignition sources.
MAINTENANCE
A proper maintenance and lubrication will help the machine in a perfect working condition.
Turn off engine and disengage all command levers. Engine must be cool.
Inspect the general condition of the unit Check for loose screws, misalignment or binding of moving parts, cracked or broken parts, and any other condition that may affect its safe operation.
Remove all debris from the unit with a soft brush, vacuum, or compressed air. Then use a premium quality lightweight machine oil to lubricate all moving parts.
Clutch: as clutch wears out, the same lever could have a wider opening, being so uneasy to use. This means that it is necessary to adjust the cable, setting clutch lever on its original position acting on the adjustment device and on counter-nut.
Engine: you should check the oil every 4 hours of work and replace it every 50 hours of work. Always use good quality oil. For the intervals between maintenance follow the instructions give in the engine's manual. Please use SAW 10W-30 or SAE 10W-40.
Gearbox: check oil level every 50 hours of working removing the plug and check that, with horizontal machine, oil reaches the two notches. If necessary, add the oil.
Gearbox oil replacement: oil must be replaced when hot by unscrewing filler cap and plug equipped with an oil dipstick. When oil is completely drained, replace filler cap and fill up with new oil. Please use SAE 80-W90/GL4.
Sickle bar: grease the blade movement block using the greaser every 4 working hours. Adjust the blade and blade holder if necessary (Fig. L + M) so that you always get a perfect cutting results. Adjust the blade, so that the distance between the knife and the other knife is not too large. But Tighten the mounting screws not so strong that the blades are still free to move and do not jam. If the blades are worn or damaged, it must be replaced. Let's Swap the knife by a qualified specialist workshop and use only original spare parts. Always keep blades sharp. After every working day, clean the sickle bar and remove any remaining piece of grass or mud. Check occasionally that all screws are lightened. Each time the bar is transferred or exposed to the public or left in a deposit, it is compulsory to apply the front protection.
Tiller: clean the tiller underside of the tine shield after each use. The dirt washes off tines easier if rinsed off immediately instead of after it dries. Always towel dry the tiller afterwards and apply na light coat of oil to prevent rusting or water damage.
Never use a "pressure washer" to clean your unit. Water can penetrate tight areas of the unit and cause damage to spindles, gears, bearings, or the engine. The use of pressure washers will result in shortened life and reduce serviceability.
Engine maintenance
Refer to the Engine Manual included in your walkbehind tractor for the information on engine maintenance. Your engine manual provides detailed information for performing the tasks.
Important hint in case of sending the equipment to a service station:
Due to security reasons please see to it that the equipment is sent back free of oil and gas!
Troubleshooting
| Error Possible Cause Solution | ||
| Engine will not start | The fuel tank is less than half full Filling the fuel tank | |
| Not open fuel tap Open petcock | ||
| Not choke on „OPEN“ (Cold engine) Put choke to the „OPEN" | ||
| Strainer not clean the intake of the carburetor Clean mesh filter | ||
| Dirty carburetor jets Clean the carburetor jets with compressed air. | ||
| Transitions can not be load | Clutch set incorrectly Setting the clutch in that it has a game of 5-6mm. | |
180^ levier de direction, Fig.1.2
Annex IV Notified Body: Notified Body No.:
X 2000/14/EC 2005/88/EC
Annex V
Annex VI
x Noise:measured Lw = 91.99 dB(A);guaranteed LwA = 95 dB(A) Notified Body:TUV Rheinland LGA Products GmbH Notified BodyNo.:0197
X 2004/26/EC
Emission. No: e1197/68SA2010/26141501
Standard references: EN ISO 12100; EN ISO 14982; EN 12733
Subject to change without notice
Documents registrar: Christian Droßler
Günzburger Str. 69, D-89335 Ichenhausen
X

X 20

X 0
Garantie D.
Apparent defects must be notified within 8 days from the receipt of the goods. Otherwise, the buyer's rights of claim due to such defects are invalidated. We guarantee for our machines in case of proper treatment for the time of the statutory warranty period from delivery in such a way that we replace any machine part free of charge which provably becomes unusable due to faulty material or defects of fabrica
tion within such period of time. With respect to parts not manufactured by us we only warrant insofar as we are entitled to warranty claims against the upstream suppliers. The costs for the installation of the new parts shall be borne by the buyer. The cancellation of sale or the reduction of purchase price as well as any other claims for damages shall be excluded.