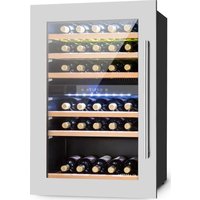
Vinsider 35D - Wine cellar Klarstein - Free user manual and instructions
Find the device manual for free Vinsider 35D Klarstein in PDF.


User questions about Vinsider 35D Klarstein
0 question about this device. Answer the ones you know or ask your own.
Ask a new question about this device
Download the instructions for your Wine cellar in PDF format for free! Find your manual Vinsider 35D - Klarstein and take your electronic device back in hand. On this page are published all the documents necessary for the use of your device. Vinsider 35D by Klarstein.
USER MANUAL Vinsider 35D Klarstein
text_image
QR code image containing encoded data, no visible human-readable textINHALTSVERZEICHNIS
natural_image
Pure architectural or mechanical line drawing with no text, numbers, or symbols| 7 | Tür | 11 | Regal |
| 8 | Griff | 12 | Kondensator |
| 9 | Bedienfeld | 13 | Gehäuse |
| 10 | Regal |
INSTALLATION
Vor dem Einbau
text_image
Technical diagram showing assembly steps of a mechanical component with numbered parts and directional arrows indicating motion.natural_image
Symbol of a trash bin crossed with a diagonal line, no text or numbers presentBerlin Brands Group UK Limited
PO Box 42
272 Kensington High Street
London, W8 6ND
United Kingdom
Dear Customer,
Congratulations on purchasing this device. Please read the following instructions carefully and follow them to prevent possible damages. We assume no liability for damage caused by disregard of the instructions and improper use. Scan the QR code to get access to the latest user manual and more product information.

text_image
QR code image containing encoded data, no visible human-readable textCONTENTS
Safety Instructions 24
Product Description 26
Installation 27
Reversing the Door Swing of Your Appliance 30
Use and Operation 32
Cleaning and Care 35
Troubleshooting 37
Product Data Sheet 38
Disposal Considerations 40
Manufacturer & Importer (UK) 40
TECHNICAL DATA
| Item number 10045812, 10045817, 10045820 | |
| Power supply 220-240 V ~ 50/60 Hz | |
SAFETY INSTRUCTIONS
- Check that the voltage of the power supply in your home is the same as the voltage shown on the rating label of this product.
- This appliance can be used by children aged from 8 years and above and persons with reduced physical, sensory or mental capabilities or lack of experience and knowledge if they have been given supervision or instruction concerning use of the appliance in a safe way and understand the hazards involved. Children shall not play with the appliance. Cleaning and user maintenance shall not be made by children without supervision.
- Keep ventilation opening, in the appliance enclosure or in the built-in structure, clear of obstruction.
- Do not use mechanical devices or other means to accelerate the defrosting process, other than those recommended by the manufacturer.
- Do not use electrical appliances inside the food storage compartments of the appliance, unless they are of the type recommended by the manufacturer.
- Do not damage the refrigerant circuit.
- If the supply cord is damaged, it must be replaced by the manufacturer or its service agent or a similarly qualified person in order to avoid a hazard.
- It is recommended to check regularly the supply cord for any sign of possible deterioration, and the appliance should not be used if the cable is damaged.
- To avoid injury or death from electrical shock, do not operate the appliance with wet hands, while standing on a wet surface.
- It is not recommended to use this refrigerator with an extension cord or power board. Please ensure that the appliance is plugged directly into the electrical outlet.
- When positioning the appliance, ensure that there is at least a 5 cm clearance at the sides and a 10 cm clearance at the back as this is the main outlet for heat. This will allow for adequate ventilation.
- Do not place hot food or drink into the refrigerator before it cools down to room temperature.
- Close the door immediately after putting in any items so the inside temperature will not rise dramatically.
- Keep appliance away from any heat source or direct sunlight.
- To fix stably, the appliance must be placed on a flat and solid surface. It should not be laid on any soft material.
- Do not place any other appliance on top of the refrigerator, and do not wet it.
- Do not store something like ether, methanol, gasoline, which is easy to evaporate burn or explode.
- Do not use outdoors or in wet conditions.
- Never pull the cord to disconnect it from the outlet. Grasp the plug and pull it from the outlet.
- Keep the cord away from heated surfaces.
- This appliance has been incorporated with a grounded plug. Please ensure the wall outlet in your house is well earthed.
- Connect your refrigerator to an independent electrical socket and use a safe ground wire.
- Defrost the freezer at least once a month because too much frost may affect refrigeration.
- Turn on electricity only 5 minutes later after electricity goes off. Otherwise, the compressor may be damaged.
This appliance contains the coolant isobutane (R600a), a natural gas which is environmentally friendly. Although it is fl ammable, it does not damage the ozone layer and does not increase the greenhouse effect. The use of this coolant has, however, led to a slight increase in the noise level of the appliance. In addition to the noise of the compressor, you might be able to hear the coolant flowing around the system. This is unavoidable, and does not have any adverse effect on the performance of the appliance. Care must be taken during the transportation and setting up of the appliance that no parts of the cooling system are damaged. Leaking coolant can damage the eyes.
Special notes
- Children between the ages of 3 and 8 are allowed to fill refrigerators with food and remove food.
- When positioning the unit, make sure that the power cord is not pinched or damaged.
• Make sure that there are no multiple sockets or power supplies on the back of the unit.
To avoid contamination of food, please follow the instructions below:
- A prolonged opening of the door can lead to a significant rise in temperature in the compartments of the appliance.
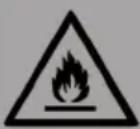
WARNING
When using, servicing and disposing of the unit, pay attention to the left symbol on the rear of the unit or on the compressor. This symbol warns of possible fires. There are flammable substances in the refrigerant lines and in the compressor. Keep the appliance away from sources of fire during use, maintenance and disposal.
Notes on correct use
- This device is intended exclusively for the storage of wine.
- This appliance is not intended for use as a built-in appliance unless explicitly mentioned in the instructions.
• This appliance is not suitable for freezing food. - The shelves have been installed in advance to allow the most efficient use of energy.
Note: It is recommended to set the temperature to 12 °C. If the temperature is set too high, the wine may spoil; if the temperature is set too low, a lot of electricity is consumed.
PRODUCT DESCRIPTION
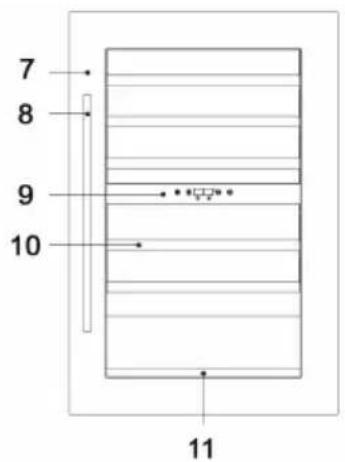
text_image
7 8 9 10 11
natural_image
Pure architectural or mechanical line drawing with no text, numbers, or symbols| 7 | Door | 11 | Shelf |
| 8 | Grip | 12 | Condenser |
| 9 | Control panel | 13 | Case |
| 10 | Shelf |
INSTALLATION
Befor Installation (Built-in)
- Remove all exterior and interior packing.
- Before connecting the Wine Cooler to the power source, let it stand upright for approximately 2 hours. This will reduce the possibility of a malfunction in the cooling system caused by handling during transportation.
- Clean the interior surface with lukewarm water using a soft cloth.
- The door on this appliance can be opened from either the left or the right side. The unit is delivered with the door opening on the left side.
Installation
- The appliance is designed to be built-in the kitchen cabinets.
- The appliance should be positioned in a well-ventilated, dry room.
- Place your Wine Cooler on a position that is strong enough to support it when it is fully loaded. To level your Wine Cooler, adjust the front leveling legs at the bottom of the Wine Cooler.
- Locate the Wine Cooler away from direct sunlight and sources of heat (stove, heater, radiator, etc.). Direct sunlight may affect the acrylic coating and heat sources may increase electrical consumption. Extreme cold ambient temperatures may also cause the unit not to perform properly.
- Plug the Wine Cooler into an exclusive, easily accessible plug socket. Any questions concerning power and/or earthing should be directed towards a qualified electrician or an authorized products service centre.
- To prevent the appliance from heating up, ensure that an adequate ventilation gap is retained and install a suitable thermal insulation panel. An adequate flow of air to and from the cooling system must be ensured.
- The appliance must be installed to all electrical, plumbing, water and drain connections in
Built-in Cabinet Instructions
The wine cooler door seals the installed unit almost completely, so an air vent must be provided in the base of the housing. Warmed air must be conducted via the ventilation shaft to the rear wall of the housing and then expelled upwards. The ventilation channels should measure at least 200 square centimeters in cross-section.
- Remove the door gasket on the side you wish to install the handle - you can see two designated holes for handle installation.
- Install the handle tightly as shown above with two screws, lock washers and flat washers provided. WARN-ING: To ensure the proper functioning of the appliance, air vents should never be blocked or covered.
Note: To ensure proper functioning of the unit, never block or cover the vent holes.
• Store only sealed bottles in the refrigerator.
- Do not overload the refrigerator.
- Open the door as rarely as possible.
- Do not cover the shelves with aluminium foil or similar so that the air can circulate.
- If the refrigerator is left empty for a long time, remove the plug from the socket, clean it and leave the door a gap open to prevent condensation and mould.
- Replace the door seal if necessary.
Installation Instructions
- The refrigerator is designed for installation in kitchen cabinets and is equipped with adjustable feet so that you can adjust its height. The wine cooler fits 600 mm deep kitchen cabinets.
• The ventilation opening at the front must not be covered. - Do not place the appliance in damp places.
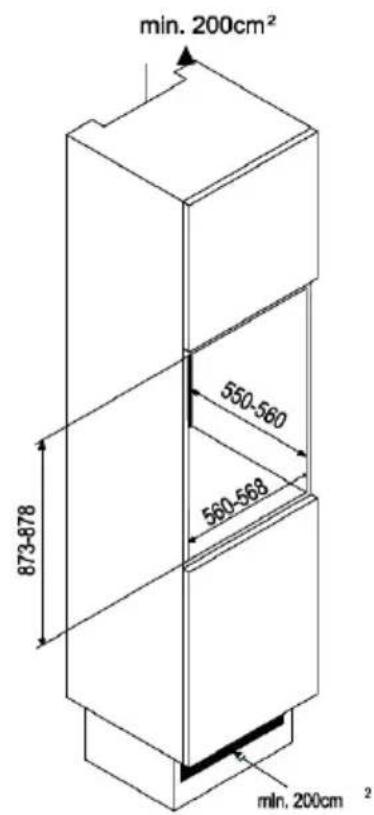
text_image
min. 200cm² 550-560 560-568 873-878 min. 200cm²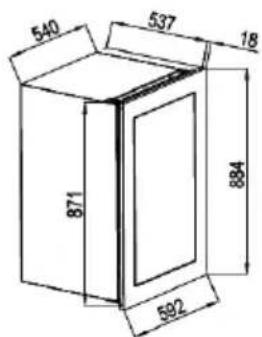
text_image
540 537 18 871 884 592Notes on the power connection
- Before use, check the voltage on the device label and connect the device only to sockets which correspond to the voltage of the device.
- The device can be connected to sockets with a voltage of 220-240 V \~ 50 Hz. If you are not sure whether your connections meet the requirements, consult an electrician or your power supplier.
- The cable should run safely behind the unit. Only connect the appliance to sockets to which no other electrical appliances are connected. Do not pull the plug out of the socket by the cable, but hold it by hand when pulling it off.
- If the power cord is damaged, it must be replaced by the manufacturer or an authorized service center or a similarly qualified person.
- Do not connect the equipment to extension cords that have not been specifically tested and recommended by a technician.
REVERSING THE DOOR SWING OF YOUR APPLIANCE
text_image
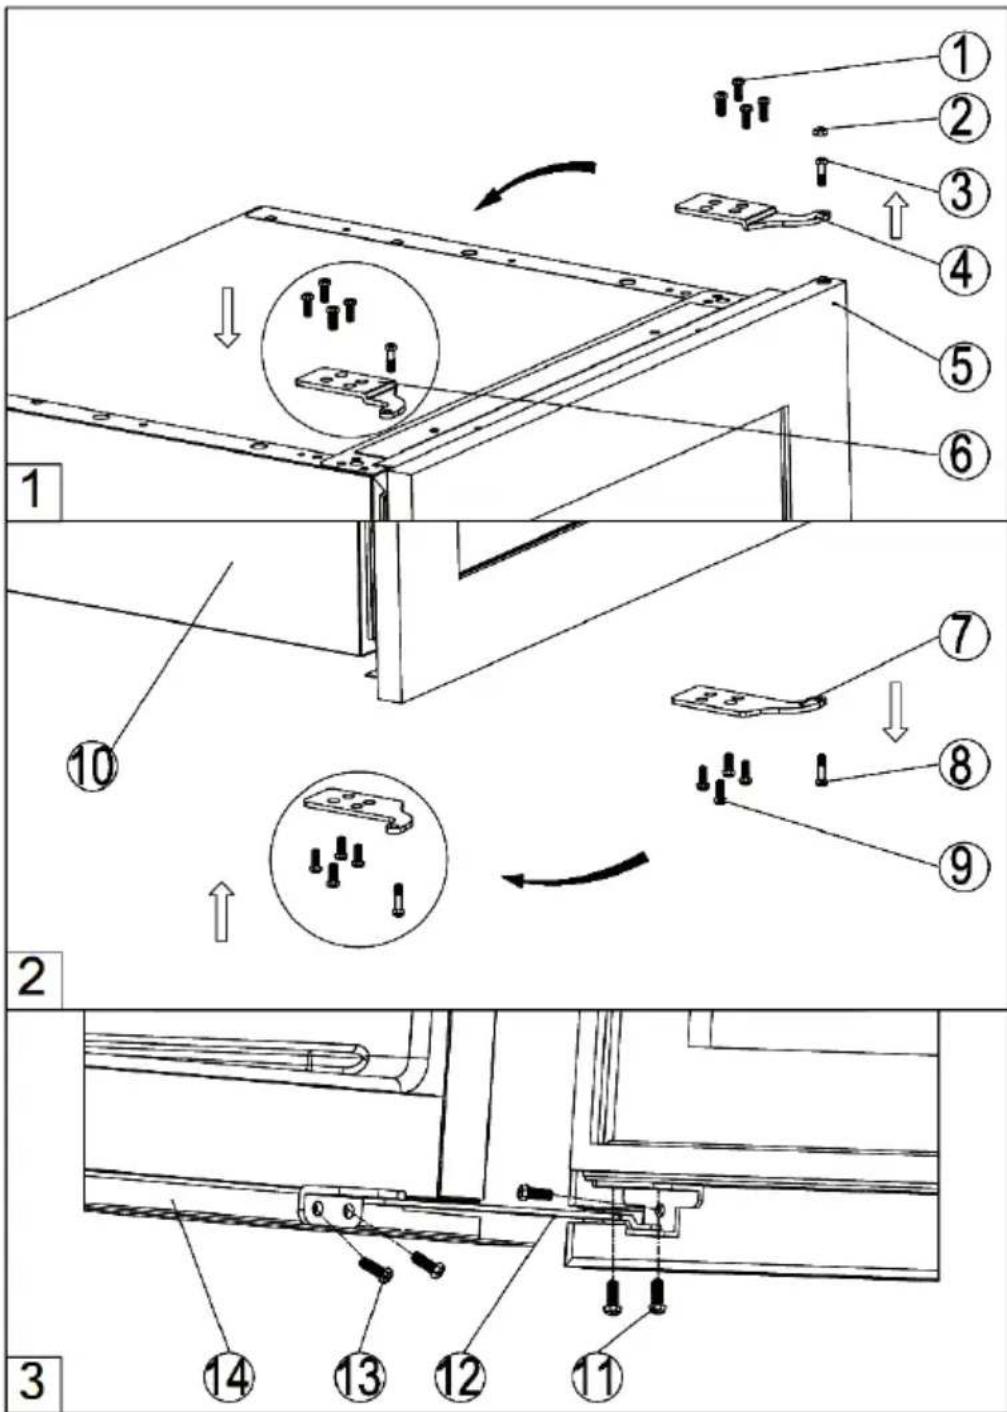
Technical diagram showing assembly steps of a mechanical component with numbered parts and directional arrows indicating motion.- Close the glass door, and remove the deco- ration plug 2. Unscrew the top hinge pin 3 and lower hinge pin 8. Be careful to support the glass door with hands to prevent it drop- ping after removing the pins. (Figure 1&2).
- Pull down to remove the glass door and place it on a padded surface to prevent scratching it.
- Remove the right top hinge plate 4 by un-screwing the four screws 1 and get the left top hinge plate 6 from the plastic bag that includes the instruction manual then install it at the designated position on the opposite side. (Figure 1)
- Remove the lower hinge plate 7 by unscrewing the four screws 9. Then turn it around and refit it on the opposite side. (Figure 2)
- Turn around the glass door 180° and refit the hinge pin 3&8 through the top hinge plate 6 and lower hinge plate 7 into the door. Make sure that the spacers which the hinge pins sit on are correctly positioned.
- Leveling the door by adjusting the screws that are used to fix the top hinge plate and lower hinge plate.
USE AND OPERATION
The Wine Cooler should be placed in a position where the ambient temperature is between 16-35 °C/60\~95 °F. If the ambient temperature is above or below this range, the performance of the unit may be affected. For example, placing your unit in extreme cold or hot conditions may cause interior temperatures to fluctuate. The range of 5-22 °C/40\~72 °F may not be reached.
Note: When you use the Wine Cooler for the first time or restart the Wine Cooler, there could be a few degrees variance between the temperature you select and the one indicated on the LED readout. This is normal and it is due to the length of the activation time. Once the Wine Cooler is running for a few hours everything will be back to normal.
If the unit is unplugged, power lost, or turned off, you must wait 3 to 5 minutes before restarting the unit. If you attempt to restart before this time delay, the Wine Cooler will not start.
Control Panel and Functions
      | |
 | SET: To set or view the internal temperature setting for each zone. |
 | LIGHT: To control the inner light turn on/off. |
 | UP: Used to increase (warm) the set temperature by 1 °C/1°F. |
 | DOWN: Used to lower (cool) the set temperature by 1 °C/1°F. |
| °C/°F | Select the temperature display setting in Fahrenheit or Celsius degree.To change the temperature from Fahrenheit to Celsius or from Celsius to Fahrenheit, press the LIGHT button for 5 seconds |
The wine cooler has two temperature zones. The temperature settings of LOWER ZONE and UPPER ZONE are adjustable with the range 5^ - 22^ / 40^ - 72^ . It is recommended to set the LOWER ZONE to 13 - 22^ / 55 - 72^ which is ideal for storing white and red wines and the UPPER ZONE to 5 - 13^ / 40 - 55^ which is ideal for storing sparkling and white wines.
Note: The temperature set for the LOWER ZONE must always be the same or higher than that in the UPPER ZONE. For optimal performance, the set temperature of the two zones should differ by at least 4 °C.
- You can touch SET mark to set the internal temperature for each zone. The degrees indicators will appear in the display window marked for UPPER ZONE and for LOWER ZONE.
- When you touch the SET mark for the first time the LED readouts will show the original temperature sets previously (the preset temperature at the factory for UPPER ZONE is 10°C / 50°F and for LOWER ZONE is 16°C / 60°F).
- Touch the SET mark once. The left LED indicator for UPPER ZONE will flash. Then touch the UP or DOWN marks to set the desired temperature.
- When you touch the SET mark again, the right LED indicator for LOWER ZONE will flash. Then proceed to touch the UP or DOWN marks to set the desired temperature for the LOWER ZONE.
- The temperature will increase 1 °C or 1°F if you touch the UP mark once, or the temperature will decrease 1 °C or 1°F if you touch the DOWN mark once.
- The appliance is designed to display the set temperature. To display the current temperature, press the UP button for 5 seconds. After another 5 seconds, the set temperature is displayed again.
Temperature Display
During normal operation, the temperature display on the control panel shows the temperature inside the appliance. The temperature display will flash if:
• A different temperature is being set.
- The temperature in the zone deviates by more than 5 °C from the set temperature. The temperature display flashing ensures that the temperature can not rise or fall un-noticed and impair the wine.
Recommended Storage Temperatures
| Vintage Bordeaux - Reds 16-17 °C | |
| Vintage Burgundy - Reds 15-16 °C | |
| Vintage dry white wines 14-16 °C | |
| Light, fruity, young reds 11-12 °C | |
| Rosés de Provence, early wines 10-12 °C | |
| Dry whites and regional red wines 10-12 °C | |
| Regional white wines 8-10 °C | |
| Champagnes 7-8 °C | |
| Sweet wines 6 °C |
CLEANING AND CARE
Before cleaning the cabinet (this must be done regularly), disconnect it either by unplugging it or by removing the fuse. It is suggested that before first use and then regularly, the cabinet be cleaned both inside and out (front, sides and on top) with a mixture of warm water and gentle cleaning fluid. Rinse with water and let dry completely before reconnecting. Do not use solvents or abrasive products. Clean the shelves with a gentle detergent then dry with a soft dry cloth. At the moment of the first use, some odours can persist. In this case, make functioning the appliance at the coldest temperatures, empty, during a few hours. The cold will cancel all these possible odours.
Defrosting
• The unit defrosts automatically.
- The evaporator behind the rear wall of the unit defrosts automatically. The condensate collects in the drain-age channel behind the rear wall of the unit, and flows through the drainage hole into the drip tray by the compressor where it evaporates.
Removing Shelves
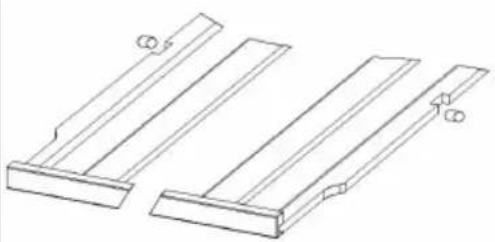
To remove any of the shelves from the rail compartment, move the shelf to the position where the notch on the shelf is exactly under the plastic post then lift the shelf to release it. When replacing the shelves, always ensure they are correctly located.
natural_image
Technical line drawing of two mechanical components with mounting holes and a bracket (no text or symbols)Humidity Control (Optional)
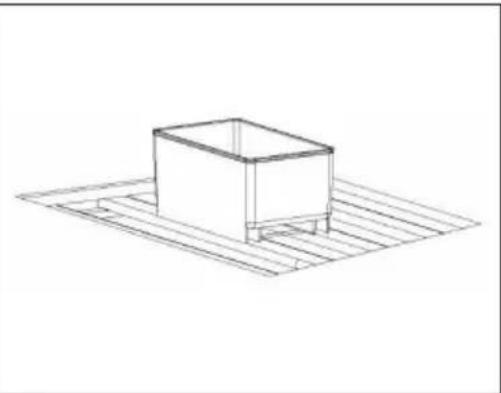
The wine cooler is equipped with a system for maintaining the correct level of humidity. Fill the small plastic reservoir (humidity box) 34 full with water, and fit onto the runners found on the top shelf of the wine cooler. Check the water level regularly and refill as necessary. Please ensure the reservoir is positioned correctly on the runners on the top shelf to avoid the possibility of water spillage.
natural_image
Simple line drawing of a rectangular box placed on a grid base (no text or symbols)Cleaning Your Wine Cooler
- Turn off the power, unplug the appliance, and remove all items including shelves and rack.
- Wash the inside surfaces with a warm water and baking soda solution. The solution should be about 2 table- spoons of baking soda to a pint of water.
- Wash the shelves with a mild detergent solution.
- Wring excess water out of the sponge or cloth when cleaning any area of the controls.
- Wash the outside cabinet with warm water and mild liquid detergent.
- Rinse well and wipe dry with a clean soft cloth.
Vacation Time
- Short holidays: Leave the Wine Cooler in operation for holidays of less than three weeks.
- Long absences: If the appliance will not be used for several months, remove all items, turn off the appliance and unplug. Clean and dry the interior thoroughly. To prevent odour and mold growth, leave the door open slightly: blocking it open if necessary.
TROUBLESHOOTING
| Problem Possible Cause and Suggested Solution | |
| Wine cellar does not operate. | Not plugged in. |
| The appliance is turned off. | |
| The circuit breaker tripped or the fuse is broken. | |
| Wine cellar is not cold enough. | Check the temperature control setting. |
| External environment may require a higher setting. | |
| The door is opened too often. | |
| The door is not closed completely. | |
| The door gasket does not seal properly. | |
| The light does not work. | Not plugged in. |
| The circuit breaker tripped or a blown fuse. | |
| The bulb is out of order. | |
| The light button is "OFF". | |
| Turns on and off frequently. | The room temperature is hotter than normal. |
| A large amount of contents has been added to the Wine cellar. | |
| The door is opened too often. | |
| The door is not closed completely. | |
| The temperature control is not set correctly. | |
| The door gasket does not seal properly. | |
| Vibrations. Check to assure that the Wine cellar is level. | |
| The Wine cellar seems to make too much noise. | The rattling noise may come from the flow of the refrigerant, which is normal. |
| As each cycle ends, you may hear gurgling sounds caused by the flow of refrigerant in your Wine cellar. | |
| Contraction and expansion of the inside walls may cause popping and crackling noises. | |
| The Wine cellar is not level. | |
| The door will not close properly. | The Wine cellar is not level. |
| The door was reversed and not properly installed. | |
| The gasket is faulty (magnet or rubber is spoiled). | |
| The shelves are out of position. | |
PRODUCT DATA SHEET
Information according to Regulation (EU) No. 2019/2016
| Supplier's name or trademark: Klarstein | ||||
| Supplier's address: Wallstraße 16, 10179 Berlin, DE | ||||
| Model identifier: 10045812, 10045817, 10045820 | ||||
| Type of refrigerating appliance: | ||||
| Low-noise appliance: No Design type: freestanding | ||||
| Wine storage appliance: Yes Other refrigerating appliance: | No | |||
| General product parameters: | ||||
| Parameter Value Parameter Value | ||||
| Overall dimensions (mm) | Height 884 | Total volume (dm3 or L) | 132 | |
| Width | 592 | |||
| Depth | 557 | |||
| EEI | 171 | Energy efficiency class | G | |
| Airborne acoustical noise emissions (dB(A) re 1 pW) | 41 | Airborne acoustical noise emission class | C | |
| Annual energy consumption (kWh/a) | 147 Climate class: | extended temperate, temperate | ||
| Minimum ambient temperature (°C), for which the refrigerating appliance is suitable | 10 | Maximum ambient temperature (°C), for which the refrigerating appliance is suitable | 32 | |
| Winter setting | No | |||
| Compartment Parameters: | |||||
| Compartment type | Compartment parameters and values | ||||
| Compartment volume (dm3 or L) | Recommended temperature setting for optimised food storage (°C) These settings shall not contradict the storage conditions set out in Annex IV, Table 3 | Freezing capacity (kg/24h) | Defrosting type (auto-defrost=A, manual defrost=M) | ||
| Pantry No - - - - | |||||
| Wine storage | Yes | 132.0 | 12 | - | A |
| Cellar No - - - - | |||||
| Fresh food No - - - - | |||||
| Chill No - - - - | |||||
| 0-star or icemaking No - - - - | |||||
| 1-star | No - - - - | ||||
| 2-star | No - - - - | ||||
| 3-star | No - - - - | ||||
| 4-star | No - - - - | ||||
| 2-star section | No - - - - | ||||
| Variable temperature compartment | - | - - - - | |||
| For wine storage appliances | |||||
| Number of standard wine bottles | 41 | ||||
| Light source parameters: | |||||
| Type of light source | - | ||||
| Energy efficiency class | - | ||||
| Minimum duration of the guarantee offered by the manufacturer: 24 months | |||||
| Additional information: | |||||
| Weblink to the manufacturer's website, where the information in point4(a) Annex of Commission Regulation (EU) 2019/2019 is found: www.klarstein.co.uk | |||||
DISPOSAL CONSIDERATIONS
natural_image
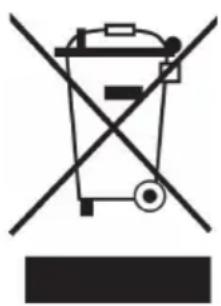
Symbol of a trash bin crossed with a diagonal line, no text or numbers presentIf there is a legal regulation for the disposal of electrical and electronic devices in your country, this symbol on the product or on the packaging indicates that this product must not be disposed of with household waste. Instead, it must be taken to a collection point for the recycling of electrical and electronic equipment. By disposing of it in accordance with the rules, you are protecting the environment and the health of your fellow human beings from negative consequences. For information about the recycling and disposal of this product, please contact your local authority or your household waste disposal service.
MANUFACTURER & IMPORTER (UK)
Manufacturer:
Chal-Tec GmbH, Wallstrasse 16, 10179 Berlin, Germany.
Importer for Great Britain:
Berlin Brands Group UK Limited
PO Box 42
272 Kensington High Street
London, W8 6ND
United Kingdom
Estimado cliente:
text_image
QR code image containing encoded data, no visible human-readable textÍNDICE
natural_image
Pure architectural or mechanical diagram showing a rectangular frame with side markers and dimension lines (no text or symbols)text_image
Technical diagram showing assembly steps of a mechanical component with numbered parts and directional arrows indicating motion.natural_image
Technical line drawing of two mechanical components with mounting holes and fasteners (no text or symbols)natural_image
Line drawing of a rectangular box placed on a wooden platform (no text or symbols)natural_image
Symbol of a trash bin crossed with a diagonal line, no text or numbers presentBerlin Brands Group UK Limited
PO Box 42
272 Kensington High Street
London, W8 6ND
United Kingdom
Chère cliente, cher client,
text_image
QR code image containing encoded data, no visible human-readable textSOMMAIRE
natural_image
Pure technical line drawing of a rectangular frame with dimension annotations (12 and 13) but no readable text or symbols.text_image
Technical diagram showing assembly steps of a mechanical component with numbered parts and directional arrows indicating motion.natural_image
Technical line drawing of two mechanical components with mounting holes (no text or symbols)natural_image
Simple line drawing of a rectangular box placed on a wooden platform (no text or symbols)FICHE DE DONNÉES PRODUIT
natural_image
Symbol of a trash bin crossed with a diagonal line, no text or numbers presentBerlin Brands Group UK Limited
PO Box 42
272 Kensington High Street
London, W8 6ND
United Kingdom
Gentile cliente,
text_image
QR code image containing encoded data, no visible human-readable textINDICE
natural_image
Pure architectural or mechanical line drawing with no text, numbers, or symbolstext_image
Technical diagram showing assembly steps of a mechanical component with numbered parts and directional arrows indicating motion.natural_image
Technical line drawing of two mechanical components with mounting holes and a bracket (no text or symbols)natural_image
Line drawing of a rectangular box placed on a grid base (no text or symbols)natural_image
Symbol of a trash bin crossed out by a diagonal line, with no text or labels present.PRODUTTORE E IMPORTATORE (UK)
Produttore:
Chal-Tec GmbH, Wallstraße 16, 10179 Berlino, Germania.
Berlin Brands Group UK Limited
PO Box 42
272 Kensington High Street
London, W8 6ND
United Kingdom

area
| Category | Value | | -------- | ----- | | A | 100 | | B | 100 | | C | 100 | | D | 100 | | E | 100 | | F | 100 | | G | 100 | | H | 100 | | I | 100 | | J | 100 | | K | 100 | | L | 100 | | M | 100 | | N | 100 | | O | 100 | | P | 100 | | Q | 100 | | R | 100 | | S | 100 | | T | 100 | | U | 100 | | V | 100 | | W | 100 | | X | 100 | | Y | 100 | | Z | 100 |