
Vinamour 45D - Wine cellar Klarstein - Free user manual and instructions
Find the device manual for free Vinamour 45D Klarstein in PDF.


| Product type | Wine cooler |
| Brand | Klarstein |
| Model | Vinamour 45D |
| Article number | 10045908 |
| Dimensions (H x W x D) | 850 x 480 x 565 mm |
| Total volume | 118 L |
| Standard wine bottle capacity | 54 bottles |
| Upper zone temperature range | 5 – 12 °C |
| Lower zone temperature range | 12 – 18 °C |
| Power supply | 220-240 V ~ 50 Hz |
| Annual energy consumption | 143 kWh/year |
| Energy efficiency class | G |
| Noise level | 37 dB(A) – class C |
| Refrigerant | R600a (Isobutane) |
| Defrost type | Automatic |
| Climate class | SN, N, ST, T (10-38 °C) |
| Recommended ambient temperature | 23-25 °C |
| Recommended temperature setting | 12 °C |
| Construction type | Freestanding |
| Special features | LED lighting, digital display, zone temperature control, reversible door hinge |
| Manufacturer warranty | 24 months |
| Maintenance and cleaning | Clean interior with a damp cloth and mild detergent; vacuum ventilation openings |
| Safety | Child lock (not mentioned), do not use mechanical device to defrost, observe ventilation clearances |
| Manufacturer | Chal-Tec GmbH, Wallstraße 16, 10179 Berlin, Germany |
Frequently Asked Questions - Vinamour 45D Klarstein
User questions about Vinamour 45D Klarstein
0 question about this device. Answer the ones you know or ask your own.
Ask a new question about this device
Download the instructions for your Wine cellar in PDF format for free! Find your manual Vinamour 45D - Klarstein and take your electronic device back in hand. On this page are published all the documents necessary for the use of your device. Vinamour 45D by Klarstein.
USER MANUAL Vinamour 45D Klarstein
KLARSTEIN
www.klarstein.com

area
| Category | Value | | -------- | ----- | | 1 | 100 | | 2 | 100 | | 3 | 100 | | 4 | 100 | | 5 | 100 | | 6 | 100 | | 7 | 100 | | 8 | 100 | | 9 | 100 | | 10 | 100 | | 11 | 100 | | 12 | 100 | | 13 | 100 | | 14 | 100 | | 15 | 100 | | 16 | 100 | | 17 | 100 | | 18 | 100 | | 19 | 100 | | 20 | 100 | | 21 | 100 | | 22 | 100 | | 23 | 100 | | 24 | 100 | | 25 | 100 | | 26 | 100 | | 27 | 100 | | 28 | 100 | | 29 | 100 | | 30 | 100 | | 31 | 100 | | 32 | 100 | | 33 | 100 | | 34 | 100 | | 35 | 100 | | 36 | 100 | | 37 | 100 | | 38 | 100 | | 39 | 100 | | 40 | 100 | | 41 | 100 | | 42 | 100 | | 43 | 100 | | 44 | 100 | | 45 | 100 | | 46 | 100 | | 47 | 100 | | 48 | 100 | | 49 | 100 | | 50 | 100 | | 51 | 100 | | 52 | 100 | | 53 | 100 | | 54 | 100 | | 55 | 100 | | 56 | 100 | | 57 | 100 | | 58 | 100 | | 59 | 100 | | 60 | 100 | | 61 | 100 | | 62 | 100 | | 63 | 100 | | 64 | 100 | | 65 | 100 | | 66 | 100 | | 67 | 100 | | 68 | 100 | | 69 | 100 | | 70 | 100 | | 71 | 100 | | 72 | 100 | | 73 | 100 | | 74 | 100 | | 75 | 100 | | 76 | 100 | | 77 | 100 | | 78 | 100 | | 79 | 100 | | 80 | 100 | | Note: The actual values are not provided in the code. I have used the label 'Value' as a placeholder for the value detection. You would need to run the code to get the actual values from the code list. Please note that the actual values would be the result of this example. You would need to run the code to get the actual values from the code list. You would need to run the code to get the actual values from the code list. You would need to run the code to get the actual values from the code list. You would need to run the code to get the actual values from the code list. You would need to run the code to get the actual values from the code list. You would need to run the code to get the actual values from the code list. You would need to run the code to get the actual values from you would need to run the code. You would need to run the code to get the actual values from you would need to run the code.INHALTSVERZEICHNIS
natural_image
Line drawing of a cabinet with a lid and internal shelves (no text or symbols)natural_image
Symbol of a trash bin crossed out by a diagonal line, with no text or labels present.Berlin Brands Group UK Ltd
PO Box 1145
Oxford, OX1 9UW
United Kingdom
Dear Customer,
Congratulations on purchasing this device. Please read the following instructions carefully and follow them to prevent possible damages. We assume no liability for damage caused by disregard of the instructions and improper use. Scan the QR code to get access to the latest user manual and more product information.

CONTENTS
Safety Instructions 20
Product Overview 23
Start-up and Operation 24
Door Reverse 25
Getting Started 26
Cleaning and Care 28
Troubleshooting 29
Product Data Sheet 30
Disposal Considerations 32
Manufacturer & Importer (UK) 32
TECHNICAL DATA
| Item number 10045908 | |
| Power supply 220-240 V ~ 50 Hz |
SAFETY INSTRUCTIONS
- Check that the voltage of the power supply in your home is the same as the voltage shown on the rating label of this product.
- This device may be only used by children 8 years old or older and persons with limited physical, sensory and mental capabilities and / or lack of experience and knowledge, provided that they have been instructed in use of the device by a responsible person who understands the associated risks.
- Keep ventilation opening, in the appliance enclosure or in the built-in structure, clear of obstruction.
- Do not use mechanical devices or other means to accelerate the defrosting process, other than those recommended by the manufacturer.
- Do not use electrical appliances inside the food storage compartments of the appliance, unless they are of the type recommended by the manufacturer.
- Do not damage the refrigerant circuit.
- If the supply cord is damaged, it must be replaced by the manufacturer or its service agent or a similarly qualified person in order to avoid a hazard.
- It is recommended to check regularly the supply cord for any sign of possible deterioration, and the appliance should not be used if the cable is damaged.
- To avoid injury or death from electrical shock, do not operate the appliance with wet hands, while standing on a wet surface.
- It is not recommended to use this refrigerator with an extension cord or power board. Please ensure that the appliance is plugged directly into the electrical outlet.
- When positioning the appliance, ensure that there is at least a 5 cm clearance at the sides and a 10 cm clearance at the back as this is the main outlet for heat. This will allow for adequate ventilation.
- Do not place hot food or drink into the refrigerator before it cools down to room temperature.
- Close the door immediately after putting in any items so the inside temperature will not rise dramatically.
- Keep appliance away from any heat source or direct sunlight.
- To fix stably, the appliance must be placed on a flat and solid surface. It should not be laid on any soft material.
- Do not place any other appliance on top of the refrigerator, and do not wet it.
- Do not store something like ether, methanol, gasoline, which is easy to evaporate burn or explode.
- Do not use outdoors or in wet conditions.
- Never pull the cord to disconnect it from the outlet. Grasp the plug and pull it from the outlet.
- Keep the cord away from heated surfaces.
- This appliance has been incorporated with a grounded plug. Please ensure the wall outlet in your house is well earthed.
- Connect your refrigerator to an independent electrical socket and use a safe ground wire.
- Turn on electricity only 5 minutes later after electricity goes off. Otherwise, the compressor may be damaged.
This appliance contains the coolant isobutane (R600a), a natural gas which is environmentally friendly. Although it is flammable, it does not damage the ozone layer and does not increase the greenhouse effect. The use of this coolant has, however, led to a slight increase in the noise level of the appliance. In addition to the noise of the compressor, you might be able to hear the coolant flowing around the system. This is unavoidable, and does not have any adverse effect on the performance of the appliance. Care must be taken during the transportation and setting up of the appliance that no parts of the cooling system are damaged. Leaking coolant can damage the eyes.
Special notes
- Children between the ages of 3 and 8 are allowed to fill refrigerators with food and remove food.
- When positioning the unit, make sure that the power cord is not pinched or damaged.
- Make sure that there are no multiple sockets or power supplies on the back of the unit.
To avoid contamination of food, please follow the instructions below:
- A prolonged opening of the door can lead to a significant rise in temperature in the compartments of the appliance.
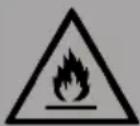
WARNING
When using, servicing and disposing of the unit, pay attention to the left symbol on the rear of the unit or on the compressor. This symbol warns of possible fires. There are flammable substances in the refrigerant lines and in the compressor. Keep the appliance away from sources of fire during use, maintenance and disposal.
Notes on correct use
- This device is intended exclusively for the storage of wine.
- This appliance is not intended for use as a built-in appliance unless explicitly mentioned in the instructions.
• This appliance is not suitable for freezing food. - The shelves have been installed in advance to allow the most efficient use of energy.
Note: It is recommended to set the temperature to 12 °C. If the temperature is set too high, the wine may spoil; if the temperature is set too low, a lot of electricity is consumed.
Special notes on the shelves
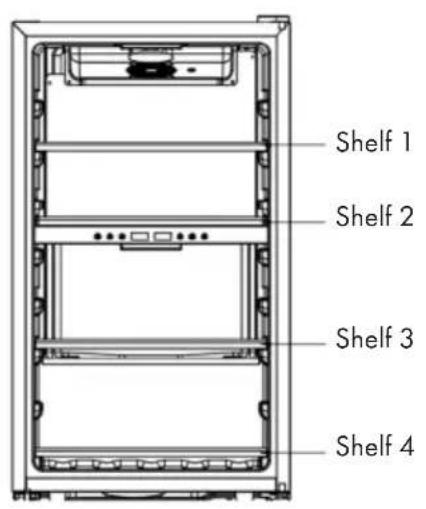
- The shelves were placed in advance in such a way that they allow the most efficient use of energy.
- Only use the shelves provided by the manufacturer.
- Never block the holes in the shelves or use other types of shelves not approved by the manufacturer, which may cause poor cooling or increase energy consumption.
• We recommend that you use the shelves as shown to ensure the most efficient use of energy.
Notes on ambient temperature
Install this unit in a location where the ambient temperature corresponds to the climate class indicated on the unit's nameplate.
| SN | Extended temperate | This cooling unit is designed for use at ambient temperatures of 10-32 °C. |
| N | Temperate | This cooling unit is intended for use at ambient temperatures of 16-32 °C. |
| ST | Subtropical | This cooling unit is intended for use at ambient temperatures of 16-38 °C. |
| T | Tropical | This cooling unit is intended for use at ambient temperatures of 16-43 °C. |
The ambient temperature influences the internal temperature and humidity of the wine refrigerator. For optimal operation of the wine refrigerator, we recommend an ambient temperature of 23 °C to 25 °C .
PRODUCT OVERVIEW
| 1 | Upper hinge cover | 7 | Feet |
| 2 | Fan mask | 8 | Lower hinge |
| 3 | LED light | 9 | Handle |
| 4 | Shelf | 10 | Door |
| 5 | Control panel | 11 | Door seal |
| 6 | NTC probe cover | 12 | Upper hinge |
Note: The temperature range of the upper zone is between 5-12 °C, the temperature range of the lower zone between 12-18 °C.
START-UP AND OPERATION
Before first Use
- Before use, remove all packing materials, including bottom cushions, foam pads and tapes inside of the refrigerator; tear off the protective film on the doors and the refrigerator body.
- Keep away from heat and avoid direct sunlight. Do not place the unit in moist or watery places to prevent rust or reduction of insulating effect.
- Do not spray or wash the refrigerator; do not put the refrigerator in moist places easy to be splashed with water so as not to affect the electrical insulation properties of the refrigerator.
- The refrigerator is placed in a well-ventilated indoor place; the ground shall be flat, and sturdy (rotate left or right to adjust the wheel for levelling if unstable).
- The top space of the refrigerator shall be greater than 30 cm, and The refrigerator should be placed against a wall with a free distance more than 10 cm to facilitate heat dissipation.
- Before initial start, keep the refrigerator still for half an hour before connecting it to power supply.
- Before putting any fresh or frozen foods, the refrigerator shall have run for 2-3 hours, or for above 4 hours in summer when the ambient temperature is high.
- Spare enough space for convenient opening of the doors and drawers.
Operation

| 1 | Press and hold the POWER button for 3 seconds to turn on the unit. |
| 2 | Press the arrow buttons to set the temperature in 1 ^ increments for a specific zone. Press and hold both buttons to switch to the other temperature zone. |
| 3 | Press the LIGHT button to turn the light on and off. |
DOOR REVERSE
| 1 | ||
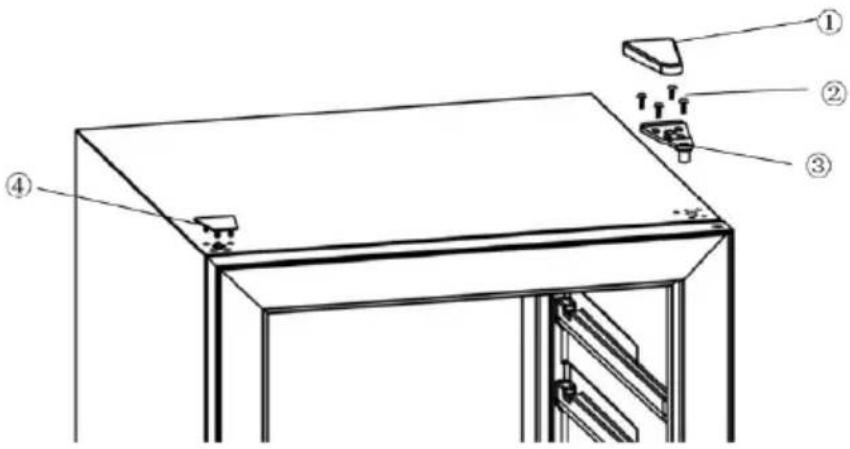 | ||
| Close the door. Remove the top cover (1) and the screws (2). Remove the top hinge (3) and remove the cover on the left side (4). | ||
| 2 | 3 | 4 |
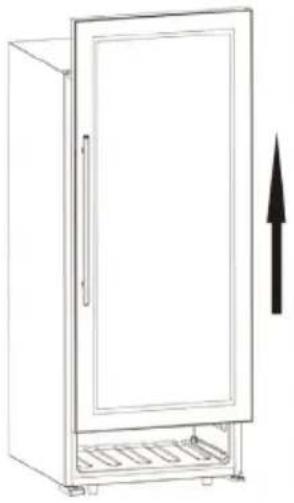 | 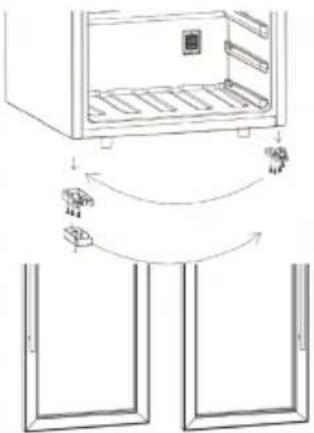 | 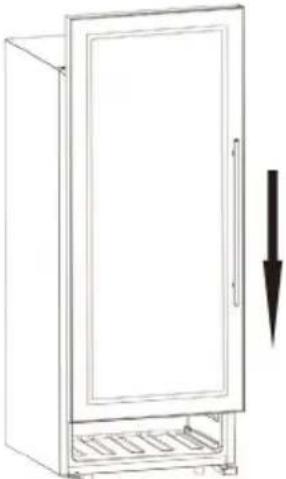 |
| Remove the door by opening and lifting it slightly. | Remove the lower right hinge and fit it on the left. Remove the left-hand door support and mount it on the right. Then turn the door 180°. | Lift the door slightly, move it downwards until it fits on the lower hinge. |
5
natural_image
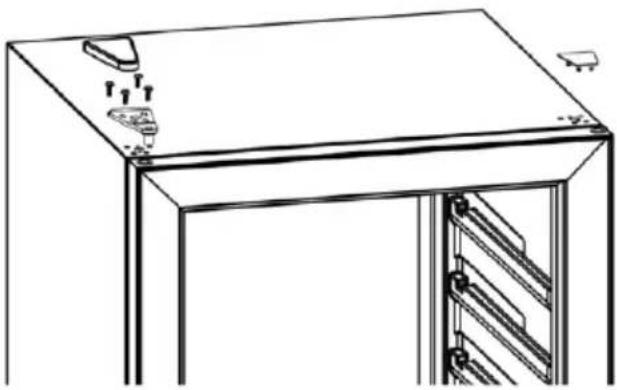
Line drawing of a cabinet with a lid and internal shelves (no text or symbols)Fasten the upper hinge on the left side and replace the cover. Insert the other cover on the right side.
GETTING STARTED
Plug in and switch on the cellar by pressing on the power button for a few seconds. When you use the wine cellar for the first time (or restart the wine cellar after having it shut off for a long time), there will be a few degrees variance between the temperature you have selected and the one indicated on the LED readout. This is normal and it is due to the length of the activation time. Once the wine cellar is running for a few hours everything will stabilize.
Note: If the unit is unplugged, power is lost, or turned off, wait 3 to 5 minutes before restarting the unit. The wine cellar will not start if you attempt to restart before this time delay.
Operating Noises
To reach the desired temperature settings, wine cellars, like all wine cellars operating with compressors and fans, may produce the following types of noises. These noises are normal and may occur as follows:
- Gurgling sound - caused by the refrigerant flowing through the appliance's coils.
- Cracking/popping sounds - resulting from the contraction and expansion of the refrigerant gas to produce cold.
• Fan operating sound - to circulate the air within the wine cellar.
Loading the Wine Cellar
- Do remove or relocate adjustable wooden shelves to accommodate larger type of bottles or increase the capacity of the cellar by stacking the bottles up when necessary. (See removing shelves)
- Keep smalls gap between the walls and the bottles to allow air circulation. Like an underground cellar air circulation is important to prevent mould and for a better homogeneous temperature within the cellar.
- Do not over load your wine cellar to facilitate air circulation.
- Avoid obstructing the internal fans (located inside on the back panel of the wine cellar).
- Do not slide the shelves outwards beyond the fixed position to prevent the bottles from falling.
- Do not pull out more than one loaded shelf at a time as this may cause the wine cellar to tilt forward.
- Do not cover the wooden shelves with alloy foil or other materials, as it will obstruct air circulation.
- Do not move your wine cellar while it is loaded with wines. This might distort the body of the wine cellar and cause back injury.
Notes on Temperature Regulation
Please note that depending on the loading and settings chosen it takes about 24 hours for the wine cellar to see the temperature stabilizing. During this time LED seems to move erratically in particular, It is normal and this process occurs whenever the setting is modified and/or whenever a large amount of bottles are added to the cellar.
These wine cellars reproduce the ideal conditions for wine storage, at a constant recommended temperature of 12 °C. T Unless stated by the wine maker on the bottle, We recommends 7 °C for your champagne, 12 °C for whites and 18 °C for reds.
Temperature Settings
Note: The LED displays by default the actual internal air temperature. In the event of a power interruption, all previous temperature settings are automatically erased and it will revert to the preset temperature settings.
The electrical board of all models comes with memory function. It is important to understand that there is a difference between the air temperature inside the wine cellar and the actual temperature of the wine: You will need to wait approximately 12 hours before noticing the effects of temperature adjustment due to the critical mass within a full wine cellar.
Once the temperature is set, it is strongly advised not to toy with it or adjust frequently. The thermostat will maintain the temperature inside the wine cellar within a +/- 2.5 °C range. But the thermal inertia of the wine and the glass is such that within this temperature range, the actual temperature of the wine will only fluctuate 0.5 °C to 1 °C.
CLEANING AND CARE
Cleaning the Unit
- First switch off the unit and disconnect the power plug from the socket. Remove the entire contents.
- Wash the interior with a damp cloth dipped in lukewarm water with a little detergent.
- Make sure that the rubber seal on the door is clean so that the unit remains powerful.
- The exterior of the wine refrigerator should be cleaned with a mild detergent.
• Dry the inside and outside with a soft cloth. - Dust and anything else that blocks the exhaust air openings will reduce the cooling capacity of the unit. If necessary, suck off the exhaust air opening.
Shutdown in absentia
- Turn off the unit first. Then disconnect the power plug.
- Remove the entire contents.
- Clean the unit.
- Keep the lid open slightly to prevent condensation, mould or odours.
Installation at another Location
- Turn off the unit first. Disconnect the power plug.
- Remove the entire contents.
- Secure all loose objects with adhesive tape.
- Tape the doors shut.
Energy Saving Tips
The wine refrigerator should be placed in the coolest place in the room, away from appliances that emit heat. heating pipes and direct sunlight. Make sure the door is properly closed when the wine refrigerator is on.
TROUBLESHOOTING
| Problem Possible Cause and Suggested Solution | |
| Wine cellar does not operate. | Not plugged in. |
| The appliance is turned off. | |
| The circuit breaker tripped or the fuse is broken. | |
| Wine cellar is not cold enough. | Check the temperature control setting. |
| External environment may require a higher setting. | |
| The door is opened too often. | |
| The door is not closed completely. | |
| The door gasket does not seal properly. | |
| The light does not work. | Not plugged in. |
| The circuit breaker tripped or a blown fuse. | |
| The bulb is out of order. | |
| The light button is "OFF". | |
| Turns on and off frequently. | The room temperature is hotter than normal. |
| A large amount of contents has been added to the Wine cellar. | |
| The door is opened too often. | |
| The door is not closed completely. | |
| The temperature control is not set correctly. | |
| The door gasket does not seal properly. | |
| Vibrations. Check to assure that the Wine cellar is level. | |
| The Wine cellar seems to make too much noise. | The rattling noise may come from the flow of the refrigerant, which is normal. |
| As each cycle ends, you may hear gurgling sounds caused by the flow of refrigerant in your Wine cellar. | |
| Contraction and expansion of the inside walls may cause popping and crackling noises. | |
| The Wine cellar is not level. | |
| The door will not close properly. | The Wine cellar is not level. |
| The door was reversed and not properly installed. | |
| The gasket is faulty (magnet or rubber is spoiled). | |
| The shelves are out of position. | |
PRODUCT DATA SHEET
Information according to Regulation (EU) No. 2019/2016
| Supplier's name or trademark: Klarstein | ||||
| Supplier's address: Wallstraße 16, 10179 Berlin, DE | ||||
| Model identifier: 10045908 | ||||
| Type of refrigerating appliance: | ||||
| Low-noise appliance: No Design type: freestanding | ||||
| Wine storage appliance: Yes Other refrigerating appliance: | No | |||
| General product parameters: | ||||
| Parameter Value Parameter Value | ||||
| Overall dimensions (mm) | Height 850 | Total volume (dm3 or L) | 118 | |
| Width | 480 | |||
| Depth 565 | ||||
| EEI | 171 | Energy efficiency class | G | |
| Airborne acoustical noise emissions (dB(A) re 1 pW) | 37 | Airborne acoustical noise emission class | C | |
| Annual energy consumption (kWh/a) | 143 | Climate class: | extended temperate, temperate, subtropical | |
| Minimum ambient temperature (°C), for which the refrigerating appliance is suitable | 10 | Maximum ambient temperature (°C), for which the refrigerating appliance is suitable | 38 | |
| Winter setting | No | |||
| Compartment Parameters: | |||||
| Compartment type | Compartment parameters and values | ||||
| Compartment volume (dm3 or L) | Recommended temperature setting for optimised food storage (°C) These settings shall not contradict the storage conditions set out in Annex IV, Table 3 | Freezing capacity (kg/24h) | Defrosting type (auto-defrost=A, manual defrost=M) | ||
| Pantry No - - - - | |||||
| Wine storage Yes 118 | 2 - A | ||||
| Cellar No - - - - | |||||
| Fresh food No - - - - | |||||
| Chill No - - - - | |||||
| 0-star or icemaking No - - - - | |||||
| 1-star No - - - - | |||||
| 2-star No - - - - | |||||
| 3-star No - - - - | |||||
| 4-star No - - - - | |||||
| 2-star section No - - - - | |||||
| Variable temperature compartment | - | - - - - | |||
| For wine storage appliances: | |||||
| Number of standard wine bottles | 54 | ||||
| Light source parameters: | |||||
| Type of light source | - | ||||
| Energy efficiency class | - | ||||
| Minimum duration of the guarantee offered by the manufacturer: 24 months | |||||
| Additional information: | |||||
| Weblink to the manufacturer's website, where the information in point4(a) Annex of Commission Regulation (EU) 2019/2019 is found: www.klarstein.co.uk | |||||
DISPOSAL CONSIDERATIONS
natural_image
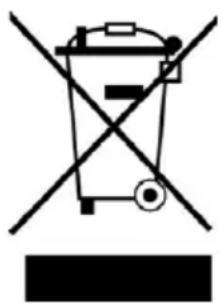
Symbol of a trash bin crossed with a diagonal line, no text or labels presentIf there is a legal regulation for the disposal of electrical and electronic devices in your country, this symbol on the product or on the packaging indicates that this product must not be disposed of with household waste. Instead, it must be taken to a collection point for the recycling of electrical and electronic equipment. By disposing of it in accordance with the rules, you are protecting the environment and the health of your fellow human beings from negative consequences. For information about the recycling and disposal of this product, please contact your local authority or your household waste disposal service.
MANUFACTURER & IMPORTER (UK)
Manufacturer:
Chal-Tec GmbH, Wallstrasse 16, 10179 Berlin, Germany.
Importer for Great Britain:
Berlin Brands Group UK Ltd
PO Box 1145
Oxford, OX1 9UW
United Kingdom
Estimado cliente:
ÍNDICE
natural_image
Line drawing of a cabinet with a lid and internal compartments (no text or symbols)natural_image
Symbol of a trash bin crossed with a diagonal line, no text or labels presentBerlin Brands Group UK Ltd
PO Box 1145
Oxford, OX1 9UW
United Kingdom
Chère cliente, cher client,
SOMMAIRE
natural_image
Line drawing of a cabinet with a lid and internal compartments (no text or symbols)FICHE DE DONNÉES PRODUIT
natural_image
Symbol of a trash bin crossed out by a diagonal line, with no text or labels present.Berlin Brands Group UK Ltd
PO Box 1145
Oxford, OX1 9UW
United Kingdom
Gentile cliente,
INDICE
natural_image
Line drawing of a cabinet with a lid and internal compartments (no text or symbols)natural_image
Symbol of a trash bin crossed with a diagonal line, no text or labels presentPRODUTTORE E IMPORTATORE (UK)
Produttore:
Chal-Tec GmbH, Wallstraße 16, 10179 Berlino, Germania.
Berlin Brands Group UK Ltd
PO Box 1145
Oxford, OX1 9UW
United Kingdom

area
| Category | Value | | -------- | ----- | | A | 100 | | B | 100 | | C | 100 | | D | 100 | | E | 100 | | F | 100 | | G | 100 | | H | 100 | | I | 100 | | J | 100 | | K | 100 | | L | 100 | | M | 100 | | N | 100 | | O | 100 | | P | 100 | | Q | 100 | | R | 100 | | S | 100 | | T | 100 | | U | 100 | | V | 100 | | W | 100 | | X | 100 | | Y | 100 | | Z | 100 |
KLARSTEIN
- INHALTSVERZEICHNIS
- Dear Customer,
- CONTENTS
- SAFETY INSTRUCTIONS
- Special notes
- WARNING
- Notes on correct use
- Special notes on the shelves
- Notes on ambient temperature
- PRODUCT OVERVIEW
- START-UP AND OPERATION
- Before first Use
- Operation
- DOOR REVERSE
- GETTING STARTED
- Operating Noises
- Loading the Wine Cellar
- Notes on Temperature Regulation
- Temperature Settings
- CLEANING AND CARE
- Cleaning the Unit
- Shutdown in absentia
- Installation at another Location
- Energy Saving Tips
- TROUBLESHOOTING
- PRODUCT DATA SHEET
- DISPOSAL CONSIDERATIONS
- MANUFACTURER & IMPORTER (UK)
- Estimado cliente:
- ÍNDICE
- Chère cliente, cher client,
- SOMMAIRE
- FICHE DE DONNÉES PRODUIT
- Gentile cliente,
- INDICE
- PRODUTTORE E IMPORTATORE (UK)
- Produttore:
- KLARSTEIN
Brand : Klarstein
Model : Vinamour 45D
Category : Wine cellar