PolarForce 40L - Refrigerator Klarstein - Free user manual and instructions
Find the device manual for free PolarForce 40L Klarstein in PDF.


| Brand | Klarstein |
| Model | PolarForce 40L |
| Product type | Portable compressor refrigerator |
| Capacity | 40 L |
| Dimensions (L x W x H) | 610 x 390 x 495 mm |
| Weight | 14,4 kg |
| Power supply | 220-240 V~ 50/60 Hz (AC), 12 V DC, 24 V DC |
| Power consumption | 0,8 A (AC), 5,5 A (12 V), 3 A (24 V) |
| Refrigerant | R600a (34 g) – propane |
| Insulation | Cyclopentane |
| Climate class | SN/N/ST |
| Star rating | 2 stars (freezing) |
| Temperature range | -20°C to +20°C |
| Operating modes | ECO (energy saving) and HH (high performance) |
| Battery protection | 3 levels (H1, H2, H3) against excessive discharge |
| Interior lighting | LED |
| Wheels | Large wheels and tow bar |
| Reversible door | Yes, left or right opening |
| Drain | Drain plug at the bottom for defrost water |
| Cleaning | Solution of warm water and baking soda |
| Safety | Protection against undervoltage, compressor delay |
| Included accessories | Cigarette lighter cable (12/24 V), AC/DC adapter |
| Error codes | F1 (low voltage), F2 (fan), F3 (start-up), F4 (speed), F5 (overheat), F6 (circuit), E0 (sensor short circuit), E1 (sensor defective), E2 (door) |
Frequently Asked Questions - PolarForce 40L Klarstein
User questions about PolarForce 40L Klarstein
0 question about this device. Answer the ones you know or ask your own.
Ask a new question about this device
Download the instructions for your Refrigerator in PDF format for free! Find your manual PolarForce 40L - Klarstein and take your electronic device back in hand. On this page are published all the documents necessary for the use of your device. PolarForce 40L by Klarstein.
USER MANUAL PolarForce 40L Klarstein
text_image
COOKINGCO COOKINGCO KINGCOOKING KINGCOOKING COOKINGCO KINGCOOKING KINGCOOKING KINGCOOKINGKLARSTEIN
www.klarstein.com

area
| Category | Value | | -------- | ----- | | 1 | 100 | | 2 | 100 | | 3 | 100 | | 4 | 100 | | 5 | 100 | | 6 | 100 | | 7 | 100 | | 8 | 100 | | 9 | 100 | | 10 | 100 | | 11 | 100 | | 12 | 100 | | 13 | 100 | | 14 | 100 | | 15 | 100 | | 16 | 100 | | 17 | 100 | | 18 | 100 | | 19 | 100 | | 20 | 100 | | 21 | 100 | | 22 | 100 | | 23 | 100 | | 24 | 100 | | 25 | 100 | | 26 | 100 | | 27 | 100 | | 28 | 100 | | 29 | 100 | | 30 | 100 | | 31 | 100 | | 32 | 100 | | 33 | 100 | | 34 | 100 | | 35 | 100 | | 36 | 100 | | 37 | 100 | | 38 | 100 | | 39 | 100 | | 40 | 100 | | 41 | 100 | | 42 | 100 | | 43 | 100 | | 44 | 100 | | 45 | 100 | | 46 | 100 | | 47 | 100 | | 48 | 100 | | 49 | 100 | | 50 | 100 | | 51 | 100 | | 52 | 100 | | 53 | 100 | | 54 | 100 | | 55 | 100 | | 56 | 100 | | 57 | 100 | | 58 | 100 | | 59 | 100 | | 60 | 100 | | 61 | 100 | | 62 | 100 | | 63 | 100 | | 64 | 100 | | 65 | 100 | | 66 | 100 | | 67 | 100 | | 68 | 100 | | 69 | 100 | | 70 | 100 | | 71 | 100 | | 72 | 100 | | 73 | 100 | | 74 | 100 | | 75 | 100 | | 76 | 100 | | 77 | 100 | | 78 | 100 | | 79 | 100 | | 80 | 100 | | Note: The actual values are not provided in the code. I have used the label 'Value' as a placeholder for the value detection. You would need to run the code to get the actual values from the code list. Please note that the actual values would be the result of this example. You would need to run the code to get the actual values from the code list. You would need to run the code to get the actual values from the code list. You would need to run the code to get the actual values from the code list. You would need to run the code to get the actual values from the code list. You would need to run the code to get the actual values from the code list. You would need to run the code to get the actual values from the code list. You would need to run the code to get the actual values from you would need to run the code.text_image
QR code image containing encoded data, no visible human-readable textINHALT
text_image
+ - HH/ECO °C RUN °F SETMONTAGE DER ZUGSTANGE
natural_image
Technical line drawing of a mechanical component with internal channels and mounting brackets (no text or symbols)natural_image
Technical line drawing of a mechanical component with internal channels and mounting brackets (no text or symbols)natural_image
Three black plastic electronic devices with handles, shown from different angles (no text or symbols visible)10046214, 10046217
natural_image
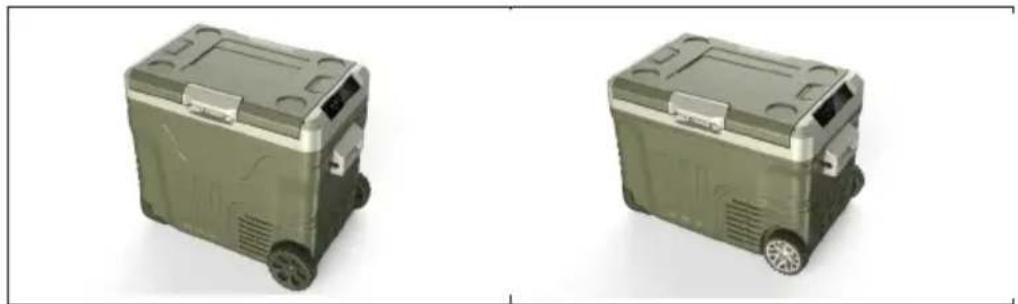
Two identical green military-style container models with wheels, shown from top and side views (no text or symbols visible)natural_image
Symbol of a trash bin crossed with a diagonal line, no text or numbers presentBerlin Brands Group UK Limited
PO Box 42
272 Kensington High Street
London, W8 6ND
United Kingdom
Dear Customer,
Congratulations on purchasing this device. Please read the following instructions carefully and follow them to prevent possible damages. We assume no liability for damage caused by disregard of the instructions and improper use. Scan the QR code to get access to the latest user manual and more product information.

text_image
QR code image containing encoded data, no visible human-readable textCONTENTS
Safety Instructions 24
Product description 27
Pull rod assembly 28
Functionality and Use 32
Car Battery Protection 35
Cleaning and Maintenance 37
Troubleshooting 38
Disposal Considerations 41
Manufacturer & Importer (UK) 41
TECHNICAL DATA
| Item number 1004 | 6212, 10046215 10046213 | 10046216 10046214, 10046217 | |||||||
| Capacity 30 L 40 L 50 L | |||||||||
| Protection class III III III | |||||||||
| Climate Type SN/N/ST SN/N/ST SN/N/ST | |||||||||
| Star Rating 2-star 2-star | 2-star | ||||||||
| Power Supply | 220-240V~;50/60 Hz1 Ph | 12 VDC | 24VDC | 220-240V~;50/60 Hz1 Ph | 12 VDC | 24 VDC | 220-240V~;50/60 Hz1 Ph | 12 VDC | 24 VDC |
| Electrical Rating | 0.8 A | 5 A | 3 A | 0.8 A | 5.5 A | 3 A | 0.8 A | 6 A | 3.5 A |
| Refrigerant | R600a/ 27 g | R600a/ 34 g | R600a/ 39 g | ||||||
| Foaming | Cyclopentane | Cyclopentane | Cyclopentane | ||||||
| Weight | 13.7 kg | 14.4 kg | 16 kg | ||||||
| Dimensions | 610 x 390 x 415 mm | 610 x 390 x 495 mm | 654 x 441 x 531 mm | ||||||
SAFETY INSTRUCTIONS
- Read all instructions before using.
- Remove all packing material and carefully check your cooler box to ensure it is in good condition and that there is no damage to the ice maker or power cord and plug.
- Ensure the voltage is compliant with the voltage range stated on the rating label, and ensure the earthing of the socket is in good condition.
- If the supply cord is damaged, it must be replaced by the manufacturer or its service agent or a similarly qualified person in order to avoid a hazard.
- Do not connect or disconnect the electric plug when your hands are wet.
- Never pull the power cord to disconnect the unit from an outlet. Grasp the plug or connector directly and pull it from the outlet.
- Do not bend or damage the power cord.
- When positioning the appliance, make sure that the mains cable is not pinched or damaged.
- Do not pull on sharp edges or corners.
- Do not touch bare, uninsulated power cords.
- Keep the power cord away from heated surfaces.
- Do not use an extension cord as this can negatively affect the performance of the unit. If you must use an extension cord, use 18 AWG minimum size and rated no less than 1875 watts.
- This product is supplied with a compressor assembly. Please allow the product to lie flat for 4 hours before use.
- Do not place the product upside down or tilt it more than 45 degrees to avoid product failure.
- Do not obstruct the ventilation; when the refrigerator is placed in the car, the refrigerator cooling window hole must be reserved for more than 10 cm space, if the cooling window is blocked, the refrigeration system will be unable to dissipate heat, which will cause a decline in cooling performance, serious high temperature protection and shutdown.
- Do not use hard or sharp tools to remove ice from the cooling box; do not use abrasive or solvent materials to clean the appliance.
- Do not expose the appliance to rain.
- Before use, please clean the inside and outside of the appliance with a wet cloth; do not use corrosive liquids; please clean the refrigerator compartment often to prevent odours and bacteria and to ensure food safety. Please disconnect the power supply and keep the inside and outside of the fridge clean and dry when not in use for a long time.
- This product is not intended for use by persons with abnormal physical, sensory or mental abilities, impairments or lack of experience and knowledge (including children), unless they have been given supervision or instruction in the use of the appliance by someone responsible for their safety.
- Children should be supervised to ensure that small children do not use the car fridge as a toy.
- Do not touch the cooled surfaces while the appliance operates, especially not with wet hands, because the skin may stick to the cold surfaces.
- At any time, make sure that the mains supply's voltage is correct. When using outdoors, if the appliance is connected to the storage battery, the positive pole and negative pole must be correctly connected.
- Unplug the unit before cleaning or before making any repairs.
- This appliance may only be repaired by qualified personnel, improper repair can lead to considerable hazards.
Note: If for any reason this appliance requires service, we strongly recommend that a certified technician performs the service. Repairs made by non-qualified personnel will void the warranty.
- It is recommended that the refrigerator is positioned away from any combustible sources such as gas, petrol, alcohol, lacquer and banana oil, etc. The aforementioned objects should not be stored in the refrigerator under any circumstances.
- This device is intended for household use only similar applications such as: - staff kitchen areas in shops, offices and other working environments; - farm houses and by clients in hotels, motels and other residential type environments; - bed and breakfast type environments; - catering and similar non-retail applications.
• Always keep and use the appliance out of the reach of children under age of 8 years.
- Cleaning and user maintenance must not be carried out by children without supervision.
- Children must be supervised to ensure that they do not play with the cooling device.
- Do not damage the refrigerant circuit.
- Ensure that there are no multiple sockets or power supply units on the rear of the machine. Do not operate the cooling device if it is visibly damaged.
- If the power cord of cigarette lighter or AC/DC adapter is damaged, it must be replaced by the customer service in order to prevent safety hazards.
- Don't move the unit when running, and not to run the unit at uneven road surface, it will produce unit vibration and big noise.
To avoid contamination of food, please follow the instructions below:
- Prolonged opening of the door can cause a significant temperature rise in the compartments of the unit.
- Close the appliance lid immediately after putting in any items to maintain the internal temperature of the unit.
- Clean surfaces that may come into contact with food regularly. Clean the water drain regularly.
- Store raw meat and fish in suitable containers in the refrigerator so that meat and fish do not come into contact with or drip onto other foods.
- If the unit fails to cool properly, dispose of spoiled food as needed.
- Two-star frozen-food compartments are suitable for storing pre-frozen food,
storing or making ice-cream and making ice-cubes.
- One, two- and three star compartments are not suitable for freezing fresh food.
- If the refrigerating appliance is left empty for long periods of time, switch off, defrost, clean and dry the appliance and leave the door open to prevent mould developing within the appliance.

WARNING
When using, servicing and disposing of the unit, pay attention to the left symbol on the rear of the unit or on the compressor. This symbol warns of possible fires. There are flammable substances in the refrigerant lines and in the compressor. Keep the appliance away from sources of fire during use, maintenance and disposal.
This appliance contains the coolant isobutane (R600a), a natural gas which is environmentally friendly. Although it is flammable, it does not damage the ozone layer and does not increase the greenhouse effect. The use of this coolant has, however, led to a slight increase in the noise level of the appliance. In addition to the noise of the compressor, you might be able to hear the coolant flowing around the system. This is unavoidable and does not have any adverse effect on the performance of the appliance. Care must be taken during the transportation and setting up of the appliance that no parts of the cooling system are damaged. Leaking coolant can damage the eyes.
Notes on disposal
Child entrapment hazard! Before you throw away your old fridge or freezer:
- Remove the doors.
- Leave the shelves in place so that children cannot easily climb inside.
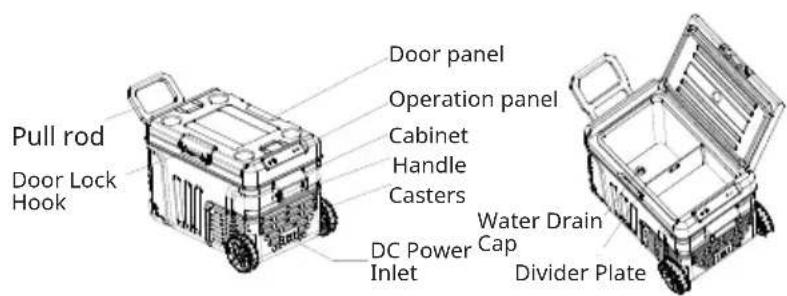
PRODUCT DESCRIPTION
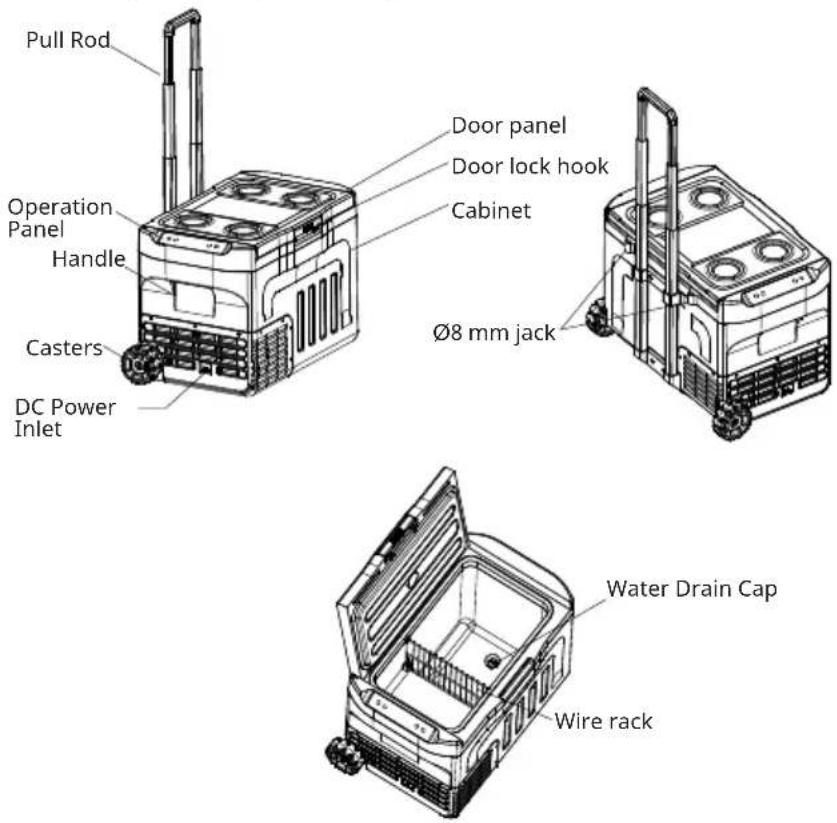
10046212, 10046213, 10046215, 10046216
text_image
Pull Rod Operation Panel Handle Casters DC Power Inlet Door panel Door lock hook Cabinet Ø8 mm jack Water Drain Cap Wire rack10046214, 10046217
text_image
Pull rod Door Lock Hook Door panel Operation panel Cabinet Handle Casters DC Power Inlet Water Drain Cap Divider PlateOperation panel
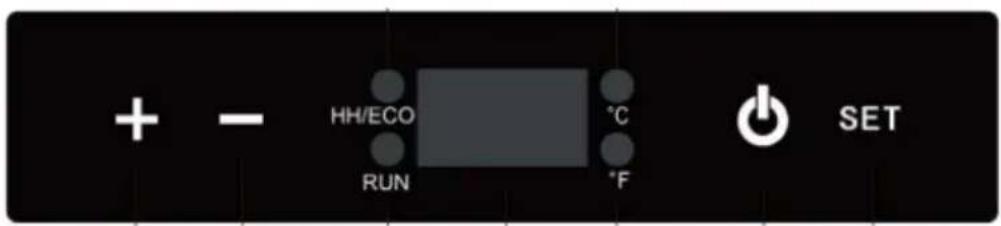
text_image
+ - HH/ECO °C RUN °F SETPULL ROD ASSEMBLY
- First insert the shaft of the pull rod into the groove of the handle, then insert two silicone cushions into the shaft to firmly connect the handle to the pull rod.
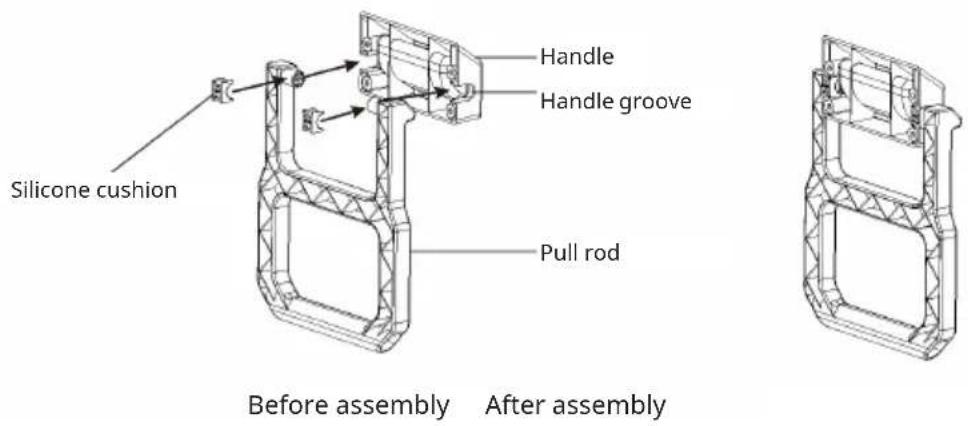
text_image
Silicone cushion Handle Handle groove Pull rod Before assembly After assembly- Using a Phillips screwdriver, remove the four original screws (M5 x 16) located on the side of the housing, as shown:
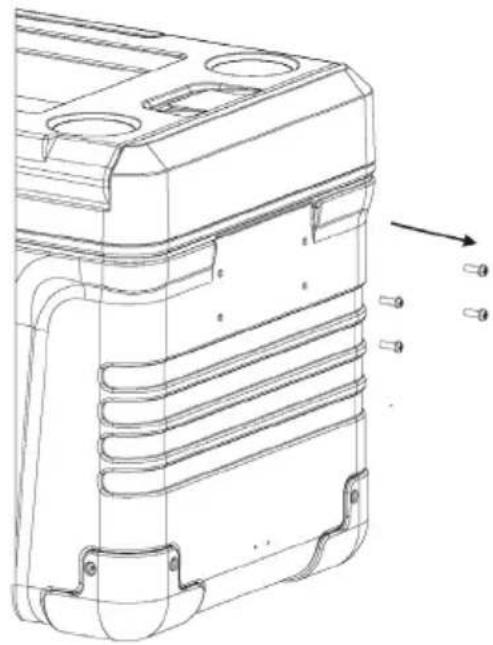
natural_image
Technical line drawing of a mechanical housing component with internal channels and mounting brackets (no text or symbols)- Align the assembled pull rod (step 1) with the four screw holes (step 2) using the four screws that have been removed, and tighten them using a Phillips screwdriver.
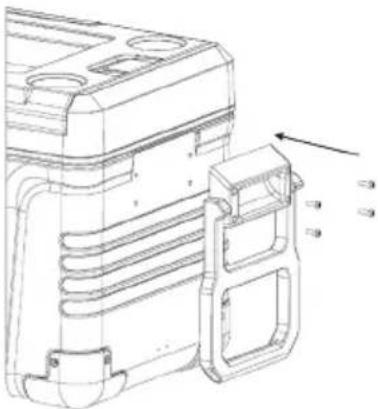
natural_image
Technical line drawing of a mechanical component with internal channels and mounting brackets (no text or symbols)- Align the pullrod fastener to the screw holes with two screws (ST 4 × 12 mm), then fasten them with a Phillips screwdriver.
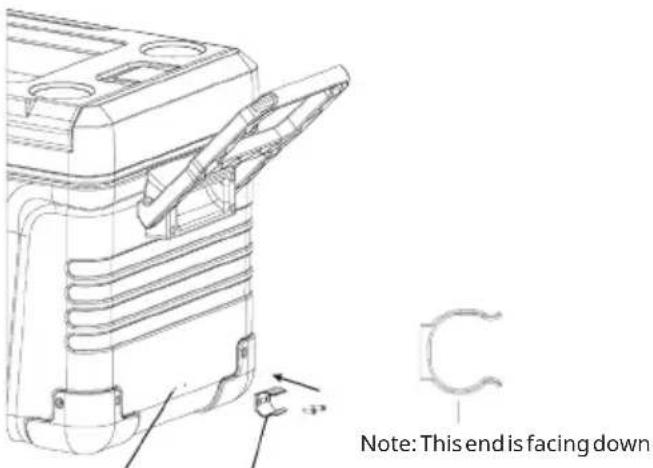
text_image
Note: This end is facing downPull rod fastener Mounting position
Reference drawing
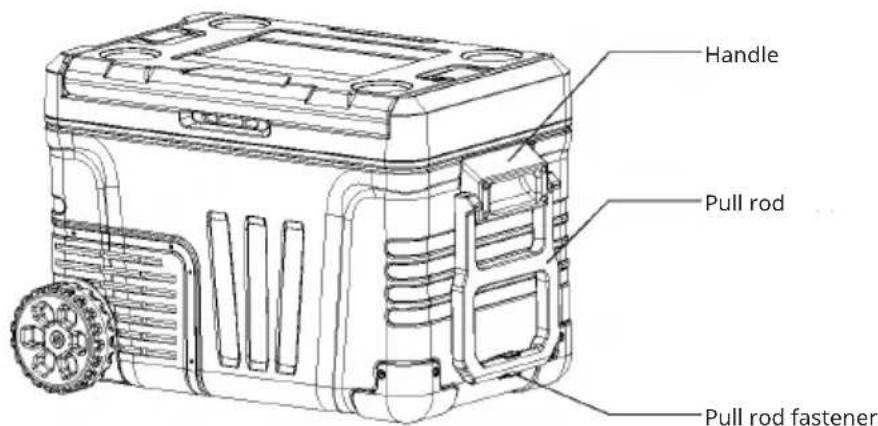
text_image
Handle Pull rod Pull rod fastenerProduct features
| 10046212, 10046213, 10046215, 10046216 | 10046214, 10046217 |
| Cooled by high-efficiency DC compressor, high reliability, long service life, high energy efficiency and fast cooling speed. | |
| Fresh mode and freezing mode can be converted, foaming door, camping environment look, elegant design, easy operation. | |
| LED lighting in the cooler compartment, so you can clearly see the food you want to store. | |
| Bottom water drain plug, easy to drain the condensation water. | |
| Vehicle, indoor or outdoor use, can be operated either by DC 12 V/ 24 V vehicle cigarette lighter or by AC/DC adapter supplied by AC electric mains, also operated by DC 12 V storage battery or solar panel cell through special voltage regulator. | |
| Comes with compressor time delay protection function. | |
| Power-off memory function. | |
| 3-stage battery monitor to protect the vehicle battery. | |
| Wide temperature setting range: From -20 °C (-4 °F) to over to above 20 °C (68 °F). | |
| Aluminium alloy rod and large size wheel design, suitable for outdoor ground. | Pull-rod and big size wheel design, suitable for outdoor ground. |
| Inner concave digging hands on both sides of the box. | Left and right side reversible door design, can change door opening direction. |
| Free adjustment of space between compartments in the box by different positions of impregnated steel wire partitions. | |
| Supplied with 2 ∅ 8 mm jacks, can be used for fixing fridges, hanging accessories etc. | |
10046212, 10046213, 10046215, 10046216
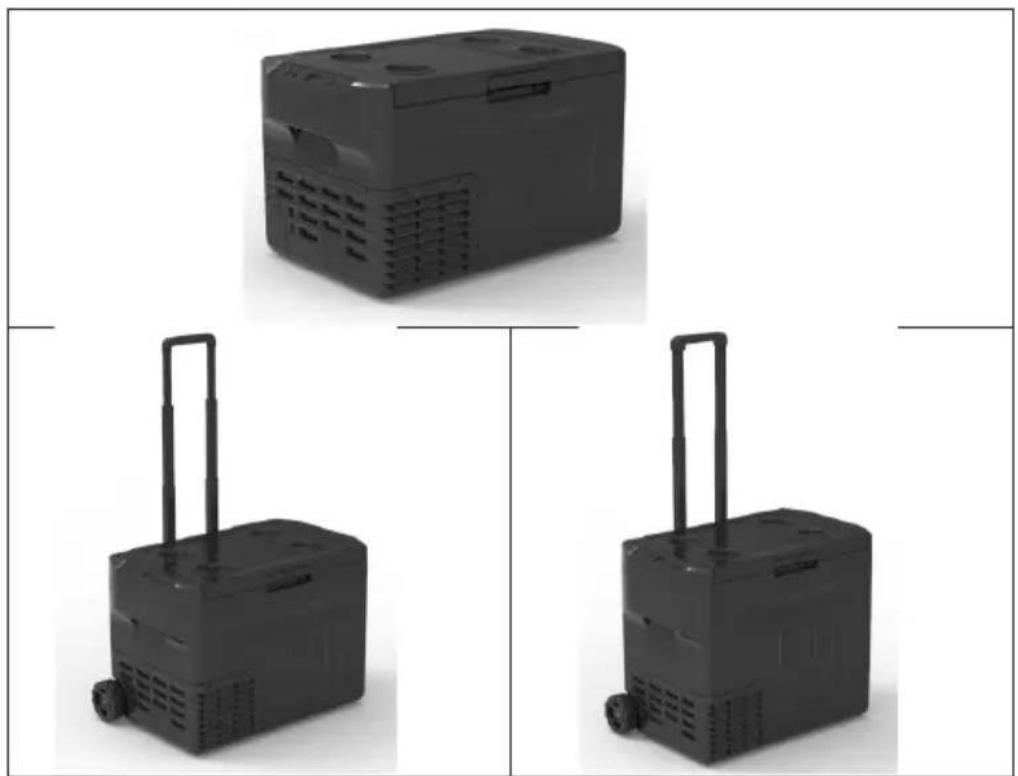
natural_image
Three black industrial electronic devices with wheels, shown from different angles (no text or symbols visible)10046214, 10046217
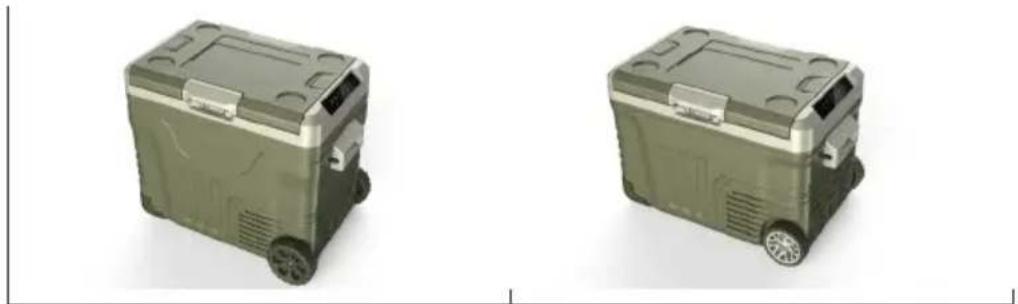
natural_image
Two identical green military-style cargo containers with wheels, shown from top and side views (no text or symbols visible)FUNCTIONALITY AND USE
Before the first use
Important: If the unit is brought in from outside in winter, allow it to warm up to room temperature for a few hours before connecting it.
- Remove the packing material.
- Clean the unit thoroughly. Wipe the outside with a soft, dry cloth and the inside with a clean, damp cloth.
- Check that the voltage on the rating plate matches that of the power supply.
Connect your unit as follows:
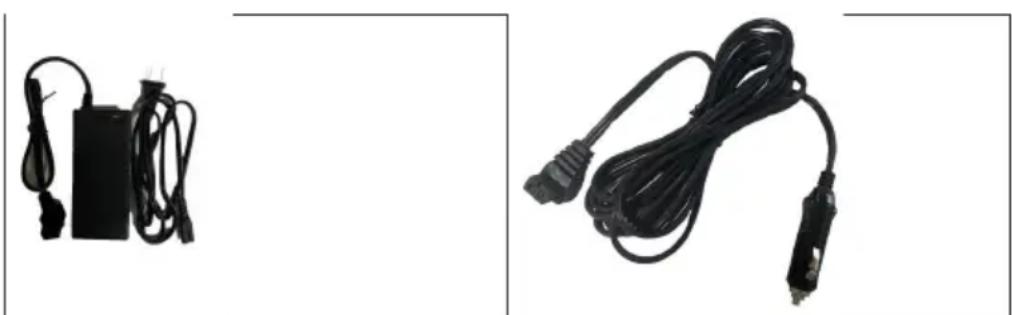
- Connect the DC cigarette lighter cable (Fig. 1) to the cigarette lighter socket in the vehicle.
- Or connect the unit via the AC/DC adapter (Fig. 2) and then connect the AC power plug of the AC/DC adapter to the AC power supply.
natural_image
Two black cables with connectors and connectors, one plain and one with a plug (no text or symbols visible)Figure 1
Figure
- It is recommended to wait at least two hours after switching on before placing wine, drinks or other food in the refrigerator.
Note: As this appliance can be set as a wine or beverage cooler, a fresh food fridge or a freezer, be sure to select the correct set temperature according to the food being stored.
Function buttons
Temperature setting
Press the button "+" to increase the temperature and the button "-" to decrease the temperature.
On/off
Press the button 🤨️ turn the unit off or on.
If the unit is switched on, press this button for more than 3 seconds to switch it off. Otherwise, when the unit is off, pressing this button once will start the unit immediately.
Function settings
Press and hold the button "SET" for more than 3 seconds to enter the internal parameter settings.
Compressor operation indicator lights
This is a two colour light, “GREEN” colour light means “ECO” compressor running mode and “RED” colour light means “HH” compressor running mode.
On/off indicator light
This is a two colour light, when the unit is off with DC power on the colour light will be red and when the unit is on and the compressor is running the light will be green.
Temperature unit light
When “°C” is light up, the temperature unit is Centigrade and when “°F” is light up, the temperature unit is Fahrenheit.
Temperature Digit Display Window
Displays the units set temperature and the advanced parameter settings.
Starting the unit
Connect the unit to the DC power supply, whether the unit was switched off or not the last time the unit was supplied with DC power, the unit will switch on immediately. The actual temperature inside the refrigerator compartment is displayed and the compressor starts after a delay.
Note: Press the button ☑r more than 3 seconds to turn the unit off. Shortly press the button ☑o turn the appliance on again.
Adjusting the temperature
- After starting the unit, you can set the temperature to your desired value by pressing the "+" or "-" button, the range is from -4^ to 68^ .
• Each time you press the "+" or "-" button, the temperature digit will change
by 1, and if you keep pressing the "+" or "-" button, the temperature digit will change rapidly.
Compressor running modes
"HH"- Normal operating mode
"ECO"- Energy saving mode, i.e. the compressor runs at a lower speed to reduce energy costs.
Note: We suggest that you always run the appliance in ECO-mode (default mode) to save energy. The mode "HH" is only to supply fast cooling function an requires more energy.
- While "H1" or "H2" or "H3" is flashing in the display window above, press the "SET" button again briefly, the last set of compressor running mode "HH" or "ECO" will start flashing.
- Touch the "+" or "-" button to change the compressor from "HH" to "ECO" or from "ECO" to "HH". It is recommended to set the appliance to ECO mode for fresh food storage and to HH mode for freezing and high ambient temperatures.
- The selected mode "HH" or "ECO" will flash in the display window for a few seconds before returning to the actual temperature display. The selected mode is then memorised.
Setting the temperature unit
If the display shows "HH" or "ECO" while the compressor is running, briefly press the "SET" button again and the temperature unit "°C" or "°F" will start flashing. Touch the "+" or "-" button to change the temperature unit from "°C" to "°F" or from "°F" to "°C".
The selected temperature unit “°C” or “°F” will also flash in the display window for a few seconds before returning to the actual temperature display. The temperature unit is then memorised.
Note: If no key is pressed for approximately 10 seconds, the above advanced parameter set programme is automatically exited.
Recommended storage temperatures
| Item Temperature | |
| Fruits and vegetables 5 °C (41 °) to 10 °C | (50 °F) |
| Fast food and pastries -3 °C (27 °F) to 4 °C | (39 °F) |
| Seafood and aquatic products -11 °C (12 °F) to 4 °C (25 °F) | |
| Frozen meat -18 °C (0 °F) to 12 °C (10 °F) |
Energy saving tips
- Keep the unit doors closed as much as possible, especially in warm/humid conditions.
- Ensure adequate ventilation around the back and sides of the appliance and avoid direct sunlight.
- Allow warm food to cool to room temperature before placing in the appliance.
- Do not open the appliance more often than necessary.
- Excessive ice build-up will increase energy consumption. Defrost the appliance when the ice / frost is 0.6 cm thick.
• Always run the appliance in ECO-mode (default mode) to save energy.
CAR BATTERY PROTECTION
The unit is equipped with a 3-stage battery monitor which protects your vehicle battery from excessive discharge when the unit is connected to the vehicle DC supply. This will ensure the normal operation of your unit and also protect your vehicle's battery.
If the cooler is operated with the DC output of the vehicle's cigarette lighter switched off, the cooler will automatically switch off when the supply voltage drops below the set level. The cooler will switch on again when the battery has been recharged to the restart voltage level.
At level "H3" the battery monitor reacts faster than at levels "H1" and "H2".
Battery protection gear voltage parameter values
| 12 V 24 V | ||||
| Switch-off Voltage | Restart Voltage | Switch-off Voltage | Restart Voltage | |
| H1 (Low) 9.6 V | 10.9 V 21.3 V 22.7 V | |||
| H2 (Middle) 10.2 V 11.4 V 22.3 V | 23.7 V | |||
| H3 (High) 11.2 V 12.4 V 24.1 V 25.2 V | ||||
Suggestion
- If the cooler is powered by the vehicle's starting battery, set the battery monitor to "H3".
- If the cooler is connected to a separate supply battery or the AC/DC adapter from the AC mains, the battery monitor level "H1" is suitable.
- Due to the voltage difference of the DC power output between different vehicles, if the low voltage protection occurs and "F1" is displayed in the temperature display window, you can set the monitor level to a lower level.
Note: If the cooler is still running after the vehicle engine has been switched off, the protection level must be changed to "H3" (high), otherwise it may consume too much electrical energy to start the vehicle.
Setting the protection level
The default setting of this low voltage protection battery monitor is H2 level. When the cooler is switched on, after pressing the "SET" button for more than 3 seconds, the last set level such as "H1", "H2" or "H3" will flash in the temperature digit display window. During the flashing process, touch the "+" or "-" button to select the battery monitor level "H1" or "H2" or "H3" to protect your vehicle's battery. The selected monitor level "H1" or "H2" or "H3" will flash in the display window for a few seconds before returning to the current temperature display.
CLEANING AND MAINTENANCE
Cleaning the unit
- Always disconnect the DC power plug from the DC power socket before cleaning.
- If necessary, clean the inside of the machine with a solution of warm water and baking soda (1 tablespoon per 2 litres of water). Dry with a soft cloth.
- Do not use steel brushes or harsh detergents to clean the liner.
- Dirt from the condenser should be cleaned by a qualified technician if necessary.
- Ensure that the air inlet and outlet openings on the unit are free of dust and dirt.
Storage
- Remove all items from inside the unit to empty the cooler.
- Switch off the cooler.
- Disconnect the DC power plug from the DC power socket.
- Leave the door slightly ajar to prevent odour build-up.
Defrosting the unit
If you set the appliance to freezing mode at a lower temperature, ice will accumulate on the inside wall of the storage compartment if the appliance is left running for a long time. When the ice is more than about 5 cm thick, defrosting must be performed to improve cooling efficiency. Follow the steps below to melt the ice:
- Switch off the appliance and disconnect the DC power supply from the DC power socket.
- Remove all objects from inside the unit.
- Allow the ice to melt completely.
- Drain the water by unplugging the water drain plug, then wipe off the defrost water with a dry, soft cloth to completely dry the interior wall.
- Reconnect the DC power supply to switch on the appliance.
WARNING: Do not use mechanical devices or other means such as sharp objects, screwdrivers, electric hair dryers, etc. to speed up the defrosting process.
TROUBLESHOOTING
| Problem Possible Cause Solution | ||
| The unit does not work, the LED does not light up. | No voltage has been detected on the DC power supply. | In most vehicles, the cigarette lighter socket must be switched on before the DC socket is supplied with power. |
| The fuse in the cigarette lighter or in the unit has blown. | Replace the fuse with a new one of the same electrical rating. | |
| The unit does not cool (plug is inserted and the control panel displays normally). | Faulty compressor or refrigerant leakage. | Check that the compressor is running or not. This can only be repaired by an authorised repair centre. |
| The unit does not cool (plug is plugged in, the display shows error code “F1”). | Low voltage protection battery Monitor is set too high. | Set the battery monitor to a lower level. |
| Battery voltage too low. Test the battery and recharge if necessary. | ||
| The display shows an error code and the appliance does not cool down. Please refer to the below explanation in the “ERROR CODE DISPLAY” section. | Please refer to the below explanation in chapter “ERROR CODE DISPLAY”. | This should only be repaired by an authorised service centre or professional. |
| The compressor is running but the liner does not get very cold. | The ambient temperature is too high. | Allow more time for the unit to cool down, or move the unit to a better environment. |
| The cooling system may be blocked or refrigerant may be leaking. | Contact the service department or a specialist. | |
| The liner is very cold and the compressor runs continuously. | The ice or frost on the liner wall is too thick. | Start defrosting. |
| The door is not closed properly and is opened too often. | The door should be closed as much as possible and not opened too often. | |
| The condenser is not well ventilated. | Place the unit in a well-ventilated location. | |
| The set temperature is too low. | Set the temperature higher. | |
| The unit is noisy. The unit | is not level. | Place the unit on a flat, hard surface. |
| The DC power supply is out of range. | Connect the unit to normal DC power source. | |
Note: If the abnormal situation cannot be resolved by simple fault analysis, contact our customer service hotline for assistance.
Errorcodes
| Code Error Type Processing method | |
| F1 DC input voltage too low. Check the battery | voltage or adjust the battery monitor level. |
| F2 Cooling fan failure. Check if the fan is blocked or short-circuited. | |
| F3 Compressor starting fault. Disconnect the unit from the power supply for 30 minutes and restart the unit. | |
| F4 Minimum compressor speed fault. | Change the operating mode from the control panel. |
| F5 Overheating warning on the compressor control board. | Move the appliance to a well-ventilated place. |
| F6 Compressor drive PCB fault. Replace the compressor drive PCB. | |
| E0 The actual temperature sensor is short-circuited. | Connect or replace the sensor. |
| E1 Actual temperature sensor is broken or disconnected. | Reconnect or replace the sensor. |
| E2 Door is not properly closed or air circulation around the unit is blocked. | Lock the door to the cabinet by checking the door lock hook. Remove the obstruction around the unit. |
DISPOSAL CONSIDERATIONS
natural_image
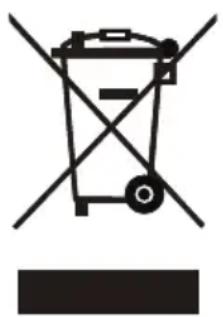
Symbol of a trash bin with crossed lines and a horizontal bar below (no text or labels)If there is a legal regulation for the disposal of electrical and electronic devices in your country, this symbol on the product or on the packaging indicates that this product must not be disposed of with household waste. Instead, it must be taken to a collection point for the recycling of electrical and electronic equipment. By disposing of it in accordance with the rules, you are protecting the environment and the health of your fellow human beings from negative consequences. For information about the recycling and disposal of this product, please contact your local authority or your household waste disposal service.
MANUFACTURER & IMPORTER (UK)
Manufacturer:
Chal-Tec GmbH, Wallstrasse 16, 10179 Berlin, Germany.
Importer for Great Britain:
Berlin Brands Group UK Limited
PO Box 42
272 Kensington High Street
London, W8 6ND
United Kingdom
Estimado cliente:
text_image
QR code image containing encoded data, no visible human-readable textCONTENIDO
text_image
+ - HH/ECO RUN °C °F SETMONTAJE DEL TIRANTE
natural_image
Technical line drawing of a mechanical component with internal channels and mounting brackets (no text or symbols)natural_image
Technical line drawing of a mechanical component with internal channels and mounting holes (no text or symbols)natural_image
Three black plastic electronic devices with handles, shown from different angles (no text or symbols visible)10046214, 10046217
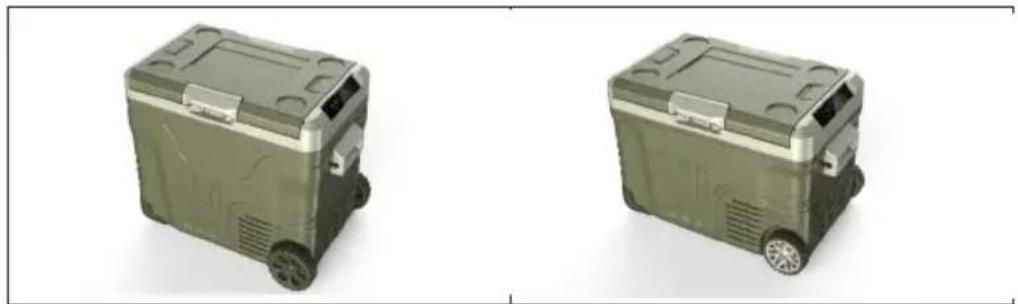
natural_image
Two identical green military-style container models with wheels, shown from top and side views (no text or symbols visible)natural_image
Two black cable connectors with attached cables, shown from different angles (no text or symbols visible)Figura 1
Figura
natural_image
Symbol of a trash bin with crossed lines indicating no waste, and a solid black rectangle below (no text or labels)Berlin Brands Group UK Limited
PO Box 42
272 Kensington High Street
London, W8 6ND
United Kingdom
Cher client, chère cliente,
text_image
QR code image containing encoded data, no visible human-readable textSOMMAIRE
text_image
+ - HH/ECO °C RUN °F SETMONTAGE DE LA BARRE DE TRACTION
natural_image
Technical line drawing of a mechanical housing component with internal channels and mounting brackets (no text or symbols)natural_image
Technical line drawing of a mechanical component with internal channels and mounting holes (no text or symbols)natural_image
Three black plastic electronic devices with handles, shown from different angles (no text or symbols visible)10046214, 10046217
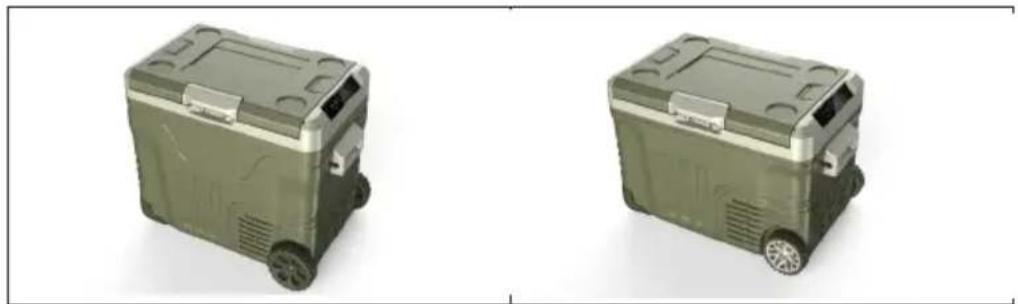
natural_image
Two identical green and silver toy cars with wheels, shown from top and side views (no text or symbols visible)natural_image
Two black cable and plug devices on white background: one with charging cable, the other with coiled cable (no text or symbols visible)Figure 1
Figure
natural_image
Symbol of a trash bin with crossed lines indicating no waste, and a solid black rectangle below (no text or labels)Berlin Brands Group UK Limited
PO Box 42
272 Kensington High Street
London, W8 6ND
United Kingdom
Gentile cliente,
text_image
QR code image containing encoded data, no visible human-readable textINDICE
text_image
+ - HH/ECO RUN °C °F SETMONTAGGIO DELL'ASTA PER TRAINARE
natural_image
Technical line drawing of a mechanical housing component with internal channels and mounting brackets (no text or symbols)natural_image
Technical line drawing of a mechanical component with internal channels and mounting holes (no text or symbols)natural_image
Three black plastic electronic devices with handles, shown from different angles (no text or symbols visible)10046214, 10046217
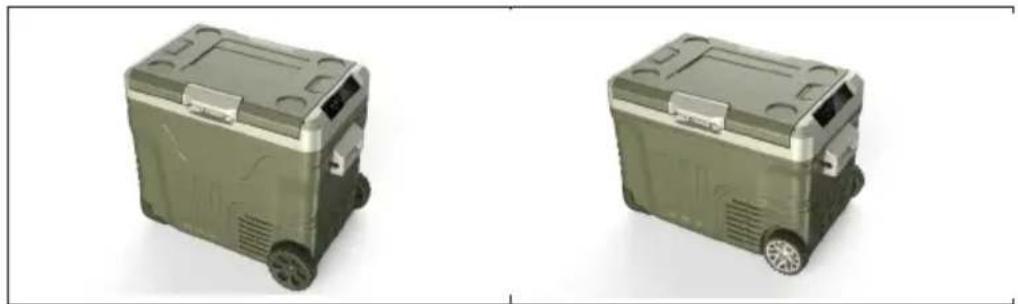
natural_image
Two identical green military-style container models with wheels, shown from top and side views (no text or symbols visible)MESSA IN FUNZIONE E UTILIZZO
natural_image
Symbol of a trash bin with crossed lines indicating no waste, and a solid black rectangle below (no text or labels)PRODUTTORE E IMPORTATORE (UK)
Produttore:
Chal-Tec GmbH, Wallstraße 16, 10179 Berlino, Germania.
Berlin Brands Group UK Limited
PO Box 42
272 Kensington High Street
London, W8 6ND
United Kingdom