
Metrobreeze 9 New York City - Air-conditioner Klarstein - Free user manual and instructions
Find the device manual for free Metrobreeze 9 New York City Klarstein in PDF.


| Product type | Monoblock mobile air conditioner |
| Brand | Klarstein |
| Model | Metrobreeze 9 New York City |
| Cooling capacity | 9,000 BTU/h (2.6 kW) |
| Recommended area | Up to 25 m² |
| Power supply | 230 V ~ 50 Hz |
| Power consumption | Approx. 900 W |
| Dimensions (W x D x H) | 45 x 38 x 70 cm |
| Net weight | 30 kg |
| Noise level | Approx. 52 dB (A) |
| Water tank | Continuous drainage possible |
| Airflow | 300 m³/h |
| Main functions | Cooling, ventilation, dehumidification, timer, oscillation, remote control |
| Fan speeds | 3 speeds + auto |
| Adjustable thermostat | 16 °C to 32 °C |
| Air filter | Washable filter |
| Maintenance and cleaning | Clean the filter every 2 weeks; clean the condenser annually |
| Safety | Anti-freeze protection, automatic shut-off in case of overheating |
| Spare parts and repairability | Remote control, window kit, exhaust hose available as spare parts |
| Included accessories | Exhaust kit, remote control, window adapter |
Frequently Asked Questions - Metrobreeze 9 New York City Klarstein
User questions about Metrobreeze 9 New York City Klarstein
0 question about this device. Answer the ones you know or ask your own.
Ask a new question about this device
Download the instructions for your Air-conditioner in PDF format for free! Find your manual Metrobreeze 9 New York City - Klarstein and take your electronic device back in hand. On this page are published all the documents necessary for the use of your device. Metrobreeze 9 New York City by Klarstein.
USER MANUAL Metrobreeze 9 New York City Klarstein
natural_image
Exterior view of a KLARSTEIN air conditioner unit with control panel and temperature display (no readable text beyond branding)Klimaanlage
10028190
10028191
KLARSTEIN
natural_image
Diagram showing a door opening and its side view with directional arrows, no text or symbols present.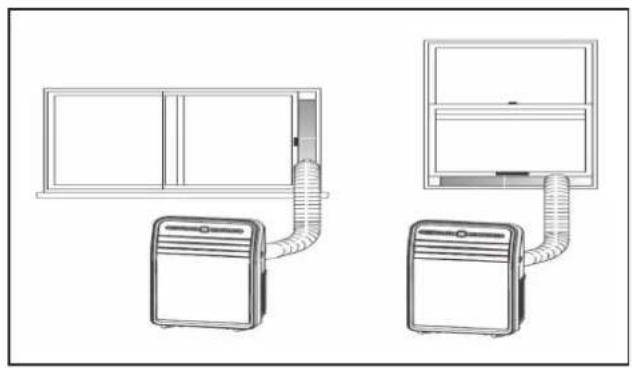
natural_image
Diagram of two household air conditioning units connected by tubing, no text or symbols presentnatural_image
Technical line drawing of a showerhead with a circular no-smoking symbol (no text or labels)natural_image
Technical line drawing of a device's internal components, showing battery casing, battery pack, and housing (no text or symbols)natural_image
Line drawing of a portable air conditioner unit with fan and bucket (no text or symbols)natural_image
Illustration of three different household appliances: a fan-shaped heater, a grid-mounted air vent, and a solar panel with cooling mechanism (no text or symbols)HINWEIS:
natural_image
Illustration showing two methods of disinfection: one using a tool to prevent a surface, the other spraying particles onto a grid (no text or symbols)natural_image
Symbol of a trash bin crossed with a diagonal line, no text or numbers presentCongratulations on purchasing this Klarstein equipment. Please read this manual carefully and take care of the following hints on installation and use to avoid technical damages. Any failure caused by ignoring the mentioned items and cautions mentioned in the operation and installation instructions are not covered by our warranty and any liability.
Contents
Technical Data 10
Safety Instructions 10
Product Description 11
Panel and Remote Control 12
Installation 13
Before first Use 14
Use and Operation 14
Cleaning and Care 15
Troubleshooting 16
Disposal Considerations 17
Declaration of Conformity 17
Technical Data
Item number 10028190, 10028191
Power supply 220-240 V \~ 50-60 Hz
Dimensions 830 mm (H) x 443 mm (W) x 340 mm (D)
Safety Instructions
Read all the safety and operating instructions carefully and retain them for future reference.
General Instructions
- This machine is intended for household. Do not use for others.
- Use the machine in rooms, and place it in a dry environment, and do not use it outdoors.
- Do not pile items around the machine, to avoid obstructing the machine to exchange air.
- Do no place heavy objects on the machine, so as to avoid damages to the machine.
- Do not operate the machine with wet hands or in damp environment.
- Wipe the machine with a soft cloth, and do not use wax, thinner or irritating detergents.
- Clean the strainer regularly. Once every two weeks is recommended.
- For your health, do not drink the condensed water the machine discharged.
- If you don't use the machine for a long time, unplug the power cord.
• Non-professionals do not disassemble or repair the machine without authorization. - Do not use damaged power cord or power cord plug. Do not plug the power cord into loose outlets.
- Do not damage or use damaged power cord or power cord with unknown type.
- Before use, ensure the voltage used to meet the requirements.
- Do not attempt to modify or extend the power cord without authorization.
- Do not handle the plug with wet hands. This operation may cause an electric shock.
- When unpluging the power cord, hold the plug and then operate, and never pull the cord.
- Do not control the machine on and off state by plugging and unplugging opwer cord.
-
Turn off the machine before unplugging.
-
Do not share an outlet with multiple high electrical appliances.
- Keep the machine away from heat sources and avoid direct sunlight.
- If the machine sends a strong noise, odor or smoke, switch off it, disconnect the plug and check reasons immediately.
- Do not place heavy objects on the power cord to avoid it being crushed and causing eletric shock.
- Do not put your fingers or hard objects into the outlet air guide bars.
- Do not allow water to enter the machine's electrical parts.
- Do not allow water to enter the machine's electrical parts.
- If there is water inside the machine, turn off it and disconnect its plug immediately, and then contact qualified service personnel for servicing.
- If it needs wiping, cleaning, moving or replacement of machine machine parts, turn it off and unplug it.
- When a gas leak occurs, please open windows to ensure air circulation and then run the machine.
- Do not allow children or other special people touching the machine, in order to avoid harm. If it needs, the operation must be carried out under the supervision of adults.
Hints on Placement
- Place the air conditioner on flat ground and keep it placed vertically to ensure the normal operation of its compressor.
- The space between the conditioner and its surrounding objects shall be ensured to be 50cm at least, and its air inlet or outlet shall be kept unobstructed.
- Do not use the machine near gasoline or other fl ammable liquids.
- Do not use aerosol sprays and other solvents near the machine, or it may cause plastic deformation, or even damage the electrical components of the machine.
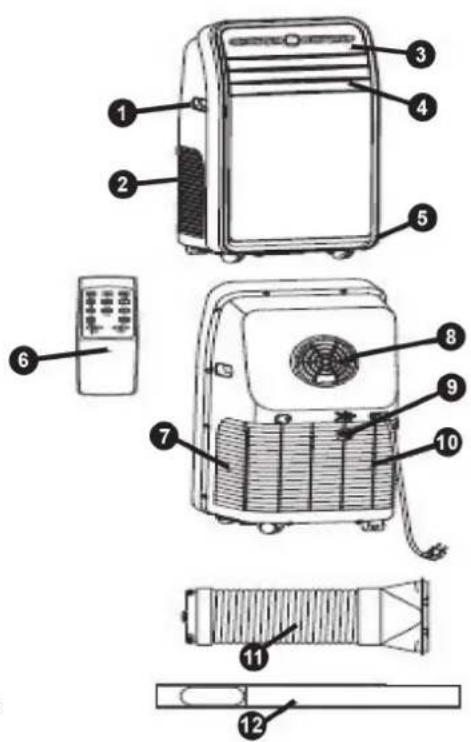
Product Description
1 Handle
2 Air inlet (left)
3 Control panel
4 Air guide bar
5 Truckle
6 Remote controller
7 Air inlet (right)
8 Air outlet
9 Outfall
10 Inlet grille
11 Exhaust pipe assembly
12 Window seal plate assembly
Panel and Remote Control
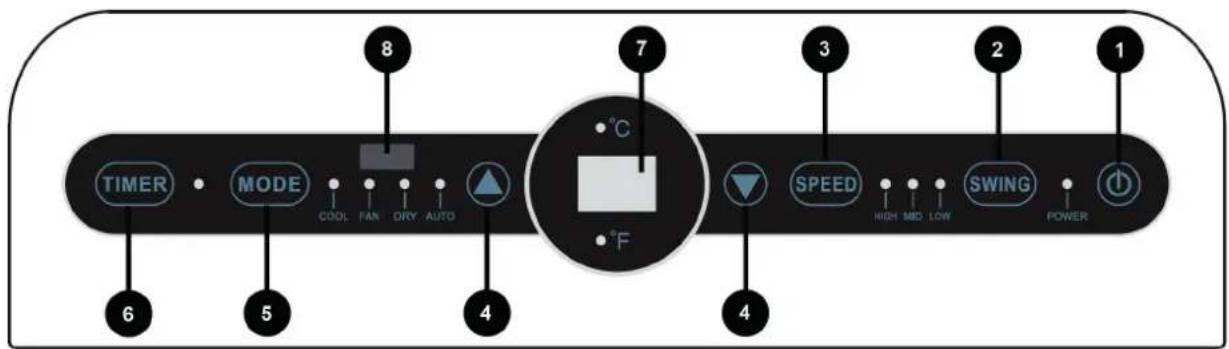
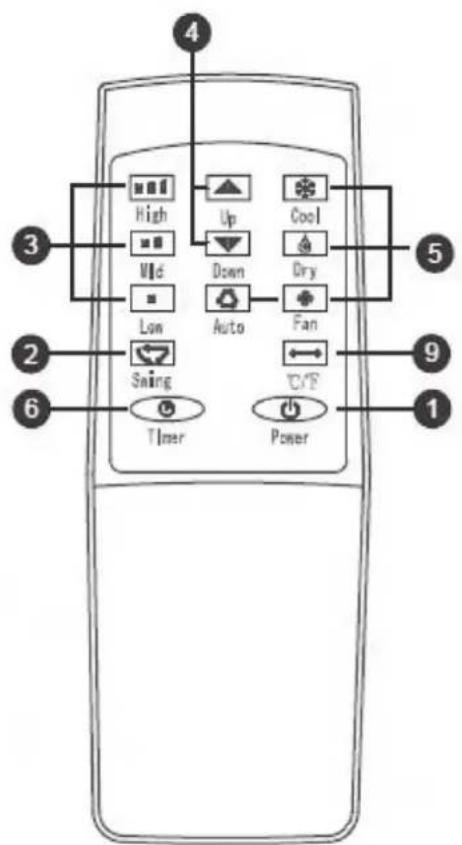
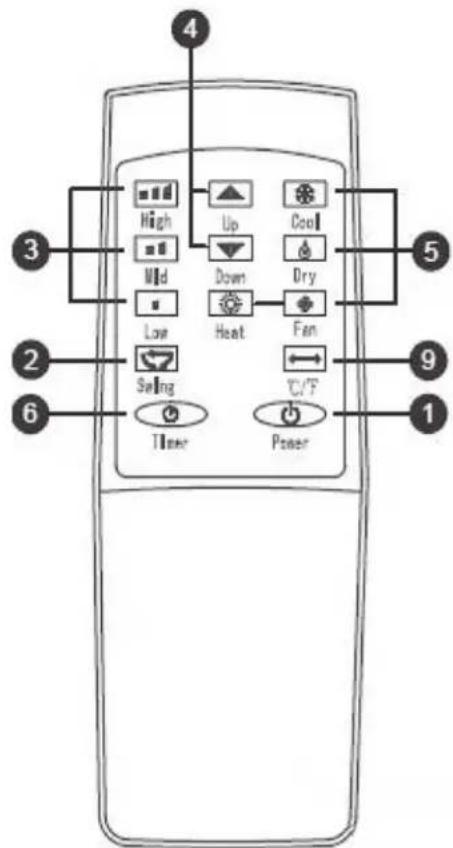
1 Power Press the button to turn on/off air conditioner
2 Swing Pressing the button can make air guide bar swings automatically.
3 Wind speed Press the button to select high, medium and low wind speed.
4 Up and Down Press to set temperature and time.
5 Mode Press the button to select one of the modes.
6 Timer Press the button to set timed start or shutdown time.
7 Display This window displays the adjust temperature and time.
8 Receiver Receives signals transmitted by remote controller.
9 Celsius/Fahrenheit Realize the display conversion between Temperatures.
Single refrigeration
Cold and heat producing
Installation
- Place the machine at flat floor near a window.
- To maintain a good air circulation and obtain an optimum machine performance, it shall leave a 50 cm space around.
Mounting the Window Seal
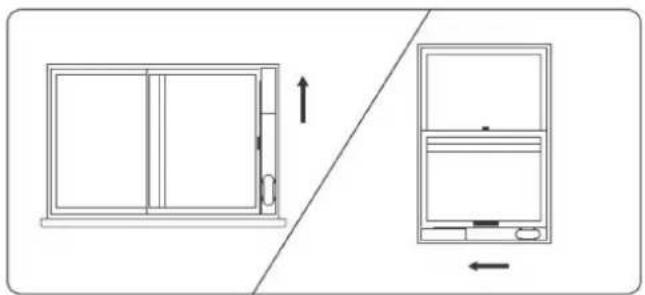
Step 1: Measure window size. Adjust the length of the window sealing plate, making it to fit the size of the window. After the length of window sealing plate is determined, fix it length dimension with screws.
Step 2: Install the fixed window sealing plate on the window.
Step 3: Screw the exhaust pipe assembly (exhaust joint end) into the rear panel exhaust port (counter clockwise).
Step 4: Place the exhaust pipe assembly (exhaust flat port) into the window sealing plate assembly and fix it with screws.
natural_image
Diagram showing a door frame with an arrow indicating upward motion, alongside a separate view of a monitor with a scroll and directional arrow (no text or symbols)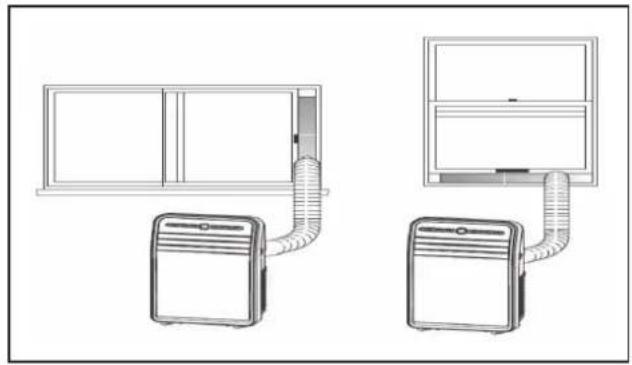
natural_image
Diagram of two air conditioning units connected by tubing, one with a window and the other with a monitor (no text or symbols)Important Hints on Installation
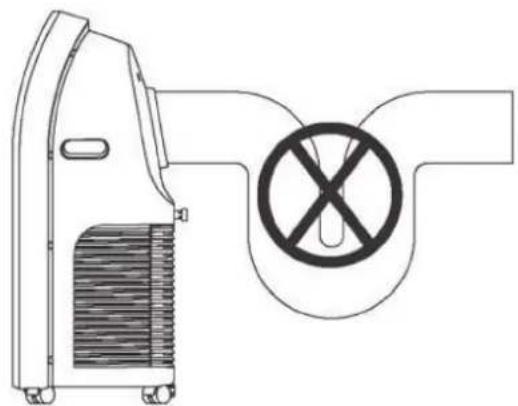
- The smoothness of exhaust pipe is very important. Incorrect installation will affect the operation of air conditioners.
- In installation, avoid the exhaust pipe bending substantially.
- Ensure the air flow smoothly inside the pipe.
- The exhaust pipe length is specially designed for this model, do not arbitrarily replace or extend it, or it will lead to failure easily.
- The maximum developed length of exhaust pipe is 1500mm. shorten its length as far as possible in use. It's recommended to keep it in level in installation.
natural_image
Technical line drawing of a portable air conditioner unit with a prohibition symbol (no text or labels)Before first Use
Remote Controller
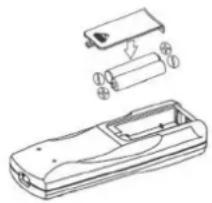
- Slide the battery cover on the back of the remote controller to open.
- Insert 2 new alkaline 7th batteries. When inserted, their terminals shall be ensured to be installed correctly.
- Put the battery cover into place.
natural_image
Technical line drawing of a device casing with internal components and an exploded view (no text or symbols)Important Hints on Using Batteries
- The remote controller only uses 7th alkaline batteries. Do not use rechargeable or other types of batteries.
- When replacing the batteries, replace both. Do not mix old and new batteries in use.
- If the air conditioner is not used for a long time, remove the batteries from the remote controller.
- If there is battery leakage, do not the battery.
- Chemicals inside the battery may cause burns or other health hazards; if their liquid flows to the skin or clothing, rinse with water immediately; if eating it accidentally, gargle with water immediately, and then go to a hospital and see a doctor for further examination.
Use and Operation
Refrigeration mode
- After being powered and turned on, its refrigeration mode or pressing mode button to select refrigeration mode by default, and the refrigeration indicator light is on.
- Press the up or down button to adjust the settled temperature (17°C-30°C).
- Press the wind speed button to select high, medium or low wind speed.
Air distribution mode
- Press the mode button or via the remote controller to select air distribution mode, and air distribution indicator light is on.
- Press the wind speed button to select high, medium or low wind speed.
• Temperature cannot be set.
Dehumidification mode
- Select dehumidification mode by pressing mode button or via remote controller, and the dehumidification indicator light is on.
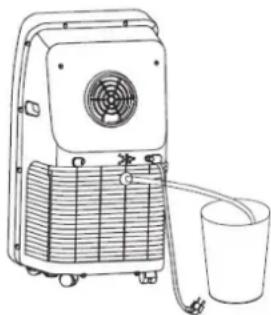
- As shown in the picture below, remove the plug of drainage outfall, insert the aqueduct, and put another end of the aqueduct into water containers or drain channels.
- When entering dehumidification mode, if the room temperature is ≥ 15^ , the compressor will start to work. Then control according to the following rules: when room temperature is ≤ 13^ , compressor stops; when the temperature rises back to ≥ 15^ , the compressor restarts (the restart of compressor shall meet the 3-minute delay protection function).
- In dehumidification mode, the fan run in low speed by default, and the wind speed are not adjustable.
• Temperature cannot be set.
natural_image
Line drawing of a portable air conditioner unit with fan and bucket (no text or symbols)NOTE: When the dehumidification function is in use, the exhaust pipe assembly shall be removed; otherwise it will lead to not obvious dehumidification effect or display "FL" water full alarm.
Automatic mode (only for single refrigeration type)
- Select automatic mode by pressing mode button or via remote controller, and automation indicator light is on.
- After selecting the automatic mode, it decides running state based on ambient temperature: When the ambient temperature is higher than 25^ , the running mode is the refrigeration mode.
- When the ambient temperature is lower than 25^ , the running mode is the air distribution mode.
Heating mode (only for cool and heat producing type)
- Select heating mode by pressing mode button or via remote controller, and heating indicator light is on.
- Press the up-and-down button to adjust settle temperature (17°C to 30°C).
- Press the wind speed button to select high, medium and low wind speed.
Time mode
- In standby mode, press time button to set time start. Press the up-and-down button to the time of start (0\~24 hours), and time indicator light is on.
- In startup mode, press time button to set time switch-off.
- Press the up-and-down button to the time of switch-off (0\~24 hours), and time indicator light is on.
Cleaning and Care
The product has an automatic water evaporation system. The circulation of condensed water cools the condenser. This not only increase refrigeration efficiency but save energy.
Discharging the Water Container
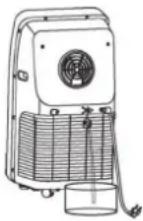
If the machine's water container is full, the display screen will present "FL" accompanied by audible alarm, and the compressor will stop working automatically. At this point, we need to discharge the water. Discharging steps are follows:
- Unplug the power cord and remove the exhaust pipe assembly.
- Remove the conditioner to a appropriate place.
- Disconnect the plug in drainage outfall to exhaust the water inside the machine.
- Re-plug the water plug well.
- Reinstall the exhaust pipe assembly and start the machine.
Cleaning the Surface
- To avoid electrical shock, turn off the conditioner and pull it plug out before conducting maintenance and repair.
- Wipe with a soft cloth. Do not use chemicals, such as benzene, alcohol, gasoline, etc. otherwise, its surface or even the machine will be damaged.
- Do not let water splash into the conditioner inside.
Cleaning the Filter Screen
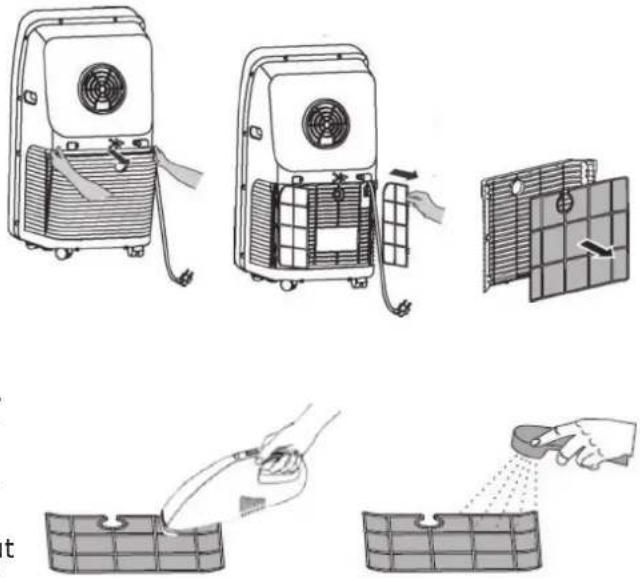
It's recommended to cleaning the filter screen once every two weeks, if the indoor air quality is poor, cleaning frequency shall be raised. Since the filter becomes clogged with dust, the conditioning effect will be reduced. Specific cleaning steps are as follows:
- Remove the intake grille and then filter screen in the direction shown in the following picture below. Put the filter screen into neutral detergent water or warm water (about 40°C) to clean, and then place in shade for drying.
- Reinstall the cleaned filter screen; Restart the machine, and it can run normally.
NOTE:
If the filter screen is not too dirty, just use a vacuum cleaner to suck the dust. If the filter screen is not too dirty, clean it with water or warm water. Do not use high temperature water (optimum temperature is around 40^ C) or harsh detergents (such as alcohol, petrol, benzene, etc.) to clean the filter screen. In order to avoid filter screen deformation keep the keep filter screen away from heat, and put in dry air for drying naturally. Do not operate the machine whose filter has not been installed.
Seasonal Maintenance
If the machine will be not in use for a long time, its maintenance follows the steps below:
- Pull out the plug in drainage fallout to drain off water.
- Keep the conditioner working 2 hours in the air distribution mode until its inside becomes dry.
- Turn it off and pull it plug out.
- Clean its filter screen and reinstall back.
- Remove its exhaust pipe and accessories, and keep them safely.
- Remove the batteries in remote controller.
- Put the conditioner into a plastic bag and place it in a cool and dry place.
Hints on seasonal Re-Use
- Confirm whether water plug and filter screen are installed.
- Check whether power cord is intact. If there is breakage, do not use the machine.
- Reinstall the remote controller batteries.
- Reinstall other parts following installation instructions.
Troubleshooting and Error Messages
Error Messages
| E1 Coil temperature sensor failure. |
| E2 Indoor temperature sensor failure. |
| E4 Anti-freeze protection: when the coil temperature is below 0°C, the whole machine will stop. When the coil temperature rose to 8°C or more, the protection will leave, and it will restore to its original work. |
Troubleshooting
| Problem Possible Cause Solution | ||
| Conditioner does not work. | No power. Power on. | |
| Screen displays “FL”. Re-start and power cut and drainage. | ||
| Off -timer function is activated. | Restart after it being turned off 3 minutes. | |
| The refrigeration effect of the conditioner is not good. | Direct sunlight. Pull curtains. | |
| Doors and windows are open, or there are too much people or heat source. | Close the doors and windows, and remove the heat source. | |
| Dirty fi lter screen. Clean or replace the fi lter screen. | ||
| The conditioner's noise is too big. | The conditioner base is not placed fl at. | Place on a fl at and solid surface, and try avoid shaking. |
| Compressor does not work. | Compressor delay protection has been activated. | Waite 3 minutes, and restart the conditioner when its temperature is reduced. |
Disposal Considerations
natural_image
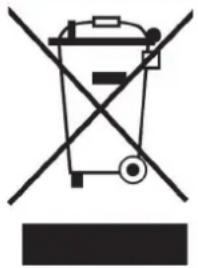
Symbol of a trash bin crossed with a diagonal line, no text or numbers presentAccording to the European waste regulation 2002/96/EC this symbol on the product or on its packaging indicates that this product may not be treated as household waste. Instead it should be taken to the appropriate collection point for the recycling of electrical and electronic equipment. By ensuring this product is disposed of correctly, you will help prevent potential negative consequences for the environment and human health, which could otherwise be caused by inappropriate waste handling of this product. For more detailed information about recycling of this product, please contact your local council or your household waste disposal service.
Your product contains batteries covered by the European Directive. 2006/66/EC, which cannot be disposed of with normal household waste. Please check local rules on separate collection of batteries. The correct disposal of batteries helps prevent potentially negative consequences on the environment and human health.
Declaration of Conformity
This product is conform to the following European Directives:
2012/206/EU (ErP)
2014/30/EU (EMC)
2014/35/EU (LVD)
2011/65/EU (RoHS)
Gentile Cliente,
natural_image
Diagram showing a door opening and its side view with an arrow indicating direction (no text or symbols)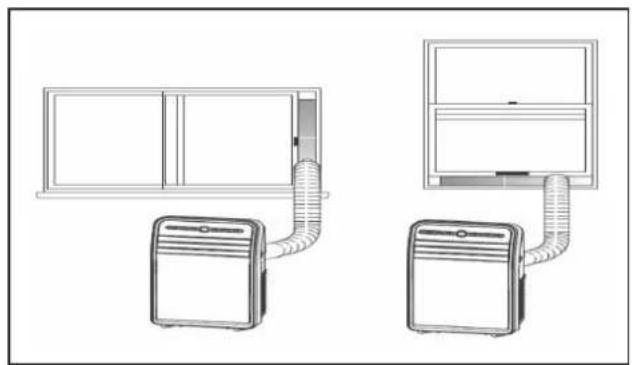
natural_image
Diagram of two household air conditioner units connected by tubing, one open and one closed (no text or symbols)natural_image
Technical line drawing of a portable air conditioner unit with a prohibition symbol (no text or labels)natural_image
Technical line drawing of a device's internal components, showing battery casing, housing, and battery pack (no text or labels)natural_image
Line drawing of a portable air conditioner unit with fan and bucket (no text or symbols)natural_image
Symbol of a trash bin crossed with a diagonal line, no text or numbers presentnatural_image
Diagram showing a door opening and its side view with an arrow indicating direction (no text or symbols)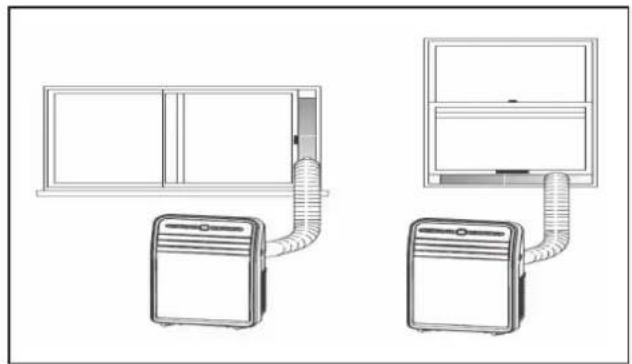
natural_image
Diagram of two household air conditioning units connected by tubing, no text or symbols presentnatural_image
Technical line drawing of a showerhead with a circular no-smoking symbol (no text or labels)natural_image
Technical line drawing of a device's internal components, showing battery casing, battery pack, and housing (no text or symbols)natural_image
Line drawing of a portable air conditioner unit with fan and bucket (no text or symbols)natural_image
Symbol of a trash bin crossed with a diagonal line, no text or numbers presentnatural_image
Diagram showing a door opening and its side view with directional arrows, no text or symbols present.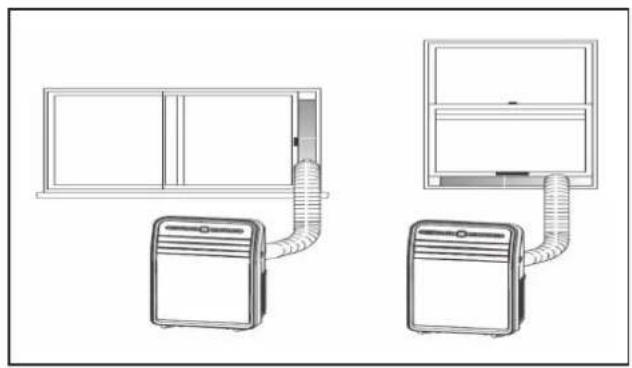
natural_image
Diagram of two household air conditioning units connected by tubing, no text or symbols presentnatural_image
Technical line drawing of a mechanical device with a circular component and a prohibition symbol (no text or labels)natural_image
Technical line drawing of a device casing with internal components and an external housing (no text or symbols)natural_image
Line drawing of a portable air conditioner unit with fan and bucket (no text or symbols)- Klimaanlage
- KLARSTEIN
- HINWEIS:
- Contents
- Technical Data
- Safety Instructions
- General Instructions
- Hints on Placement
- Product Description
- Panel and Remote Control
- Installation
- Mounting the Window Seal
- Important Hints on Installation
- Before first Use
- Remote Controller
- Important Hints on Using Batteries
- Use and Operation
- Refrigeration mode
- Air distribution mode
- Dehumidification mode
- Automatic mode (only for single refrigeration type)
- Heating mode (only for cool and heat producing type)
- Time mode
- Cleaning and Care
- Discharging the Water Container
- Cleaning the Surface
- Cleaning the Filter Screen
- NOTE:
- Seasonal Maintenance
- Hints on seasonal Re-Use
- Troubleshooting and Error Messages
- Error Messages
- Troubleshooting
- Disposal Considerations
- Declaration of Conformity
- Gentile Cliente,
Brand : Klarstein
Model : Metrobreeze 9 New York City
Category : Air-conditioner