
Metrobreeze 9 Paris - Air-conditioner Klarstein - Free user manual and instructions
Find the device manual for free Metrobreeze 9 Paris Klarstein in PDF.


| Product type | Portable air conditioner |
| Brand | Klarstein |
| Model | Metrobreeze 9 Paris |
| Cooling power | 9000 BTU/h (2.6 kW) |
| Recommended cooling area | Up to 25 m² |
| Dimensions (W x D x H) | 45 x 35 x 70 cm |
| Weight | 25 kg |
| Power supply | 230 V / 50 Hz |
| Power consumption | Approx. 900 W |
| Refrigerant | R290 (propane) |
| Operating modes | Cooling, ventilation, dehumidification |
| Fan speed | 3 speeds |
| Remote control | Yes, included |
| Timer | Yes, 24-hour programmable |
| Noise level | Approx. 55 dB(A) |
| Water tank | 1.5 L (automatic drainage in cooling mode) |
| Air filter | Washable and reusable |
| Care and cleaning | Clean the filter every 2 weeks; empty the condensation tank if necessary |
| Safety | Overheating and overvoltage protection |
| Spare parts available | Filter, remote control, exhaust hose |
| Repairability | Repairability index 7/10 (estimate) |
Frequently Asked Questions - Metrobreeze 9 Paris Klarstein
User questions about Metrobreeze 9 Paris Klarstein
0 question about this device. Answer the ones you know or ask your own.
Ask a new question about this device
Download the instructions for your Air-conditioner in PDF format for free! Find your manual Metrobreeze 9 Paris - Klarstein and take your electronic device back in hand. On this page are published all the documents necessary for the use of your device. Metrobreeze 9 Paris by Klarstein.
USER MANUAL Metrobreeze 9 Paris Klarstein
natural_image
Row of white icons representing kitchen appliances including blender, refrigerator, oven, washing machine, and microwave (no text or symbols)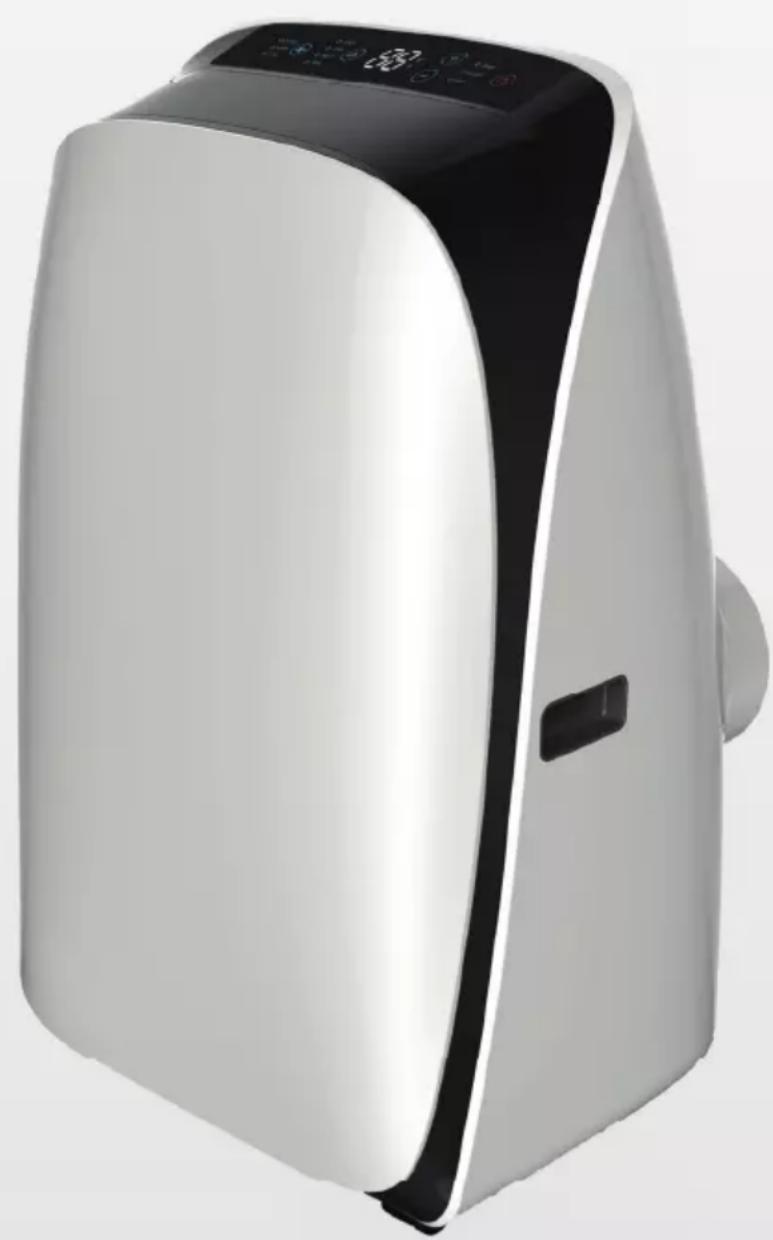
natural_image
White air conditioner unit with black lid and digital display (no visible text or symbols)natural_image
Illustration of a portable air conditioner unit with a circular checkmark indicating inspection (no text or symbols on the device itself)natural_image
Front view of a white portable air conditioner unit with ventilation grilles and control panel (no visible text or symbols)natural_image
Diagram of an air conditioner unit with airflow arrows indicating direction (no text or symbols)natural_image
Symbol of a trash bin crossed with a diagonal line, no text or numbers presentCongratulations on purchasing this equipment. Please read this manual carefully and take care of the following hints to avoid damages. Any failure caused by ignoring the mentioned items and cautions mentioned in the instruction manual are not covered by our warranty and any liability.
Contents
Technical Data 16
Safety Instructions 16
Accessories 17
Product Description 18
Installation 19
Control Panel and Controls 20
Use and Operation 22
Functions of the Remote Control 24
Cleaning and Care 27
Troubleshooting 28
Hints On Disposal 29
Declaration of Conformity 29
Technical Data
| Item number 10031336 | |
| Power supplx 220-240 V ~ 50-60 Hz | |
| Working temperatur range in cooling mode 16-36 °C | |
| Working temperatur range in heating mode 5-27 °C | |
| Internal fuse F3.15A/250V |
Safety Instructions
- This appliance can be used by children aged from 8 years and above and persons with reduced physical, sensory or mental capabilities or lack of experience and knowledge if they have been given supervision or instruction concerning using of the appliance in a safe way and understanding the hazards involved. Children shall not play with the appliance. Cleaning and user maintenance shall not be made by children without supervision.
- The air conditioner must be grounded .Incomplete grounding may result in electric shocks.Do not connect the earth wire to the gas pipeline,water pipeline,lightning rod,or telephone earth wire.After installment,earth leakage examination must be carried on through electrifying.
- Don't install air conditioner in a place where there is flammable gas or liquid. It may cause fire.
- If the power supply cord is damaged, it must be replaced by the manufacture or its service agent or a similar qualified person.
-
Don't put a finger, a rod or other object into the air outlet or inlet. As a fan is rotating at a high speed, it will cause injury.
-
Don't touch the swinging wind vanes. It may clamp your finger and damage the driving parts of the wind vanes.
- Don't attempt to repair the air conditioner by yourself. You may be hurt or cause further malfunctions.
- In lighting storm weather, please cut off the primary power supply switch in order to prevent the machine from damage.
- Don't use liquid or corrosive detergent to clean the appliance and don't splash water or other liquid onto it, otherwise, it may damage the plastic components, even cause electric shock.
- Don't operate the unit in the laundry rooms.
Important Hints on Use
- Don't apply the cold air to the body for a long time. It will deteriorate your physical conditions and cause health problems.
- Clean the air conditioner with a piece of soft and dry cloth. Don't use these stuffs for cleaning: chemical solvent, insecticide, inflammable spraying materials which will damage the appearance of air conditioner. Don't sprinkle water directly on the indoor unit.
- Close the windows and doors, otherwise, the cooling or heating capacity will be weakened.
- If the air filter is very dirty, the cooling or heating capacity will be weakened. Please clean the air filter regularly.
Accessories
| Part Name Quantity | |||
[0] 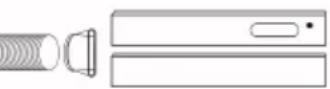 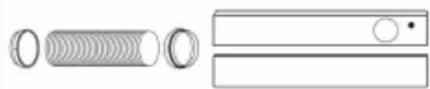 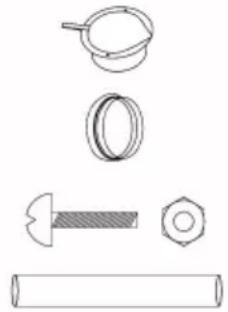 | Exhaust hose Apaptorl and Adaptor B (flat mouth or round mouth: depending on models), Window Slider Kit and bolt. | 1 Set | |
| Wall Exhaust Adaptor A (#) 1 | |||
| Adaptor B (round mouth) (#) 1 | |||
| Bolt and Nut 1 | |||
| Drain hose (#) 1 | |||
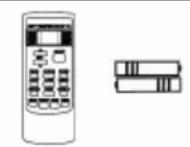 | Remote controller and Battery 1 | ||
NOTE: Optional parts (#), some models without
Product Description
Note: The descriptions in this user manual are text and figures may have slightly difference to the promotion information and actual appliance.
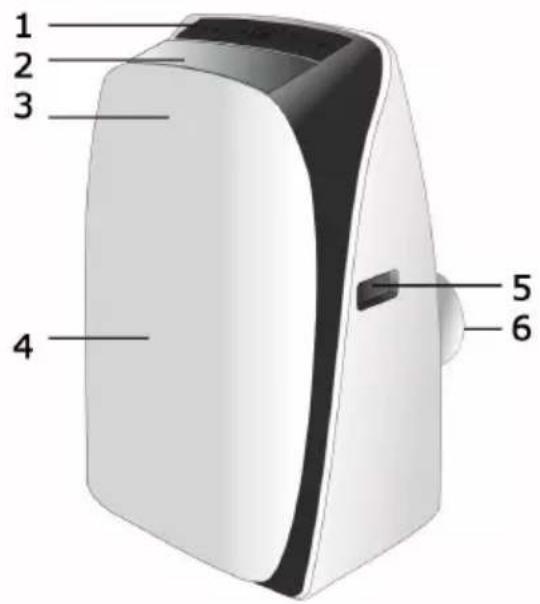
Front
1 Control Panel
2 Air outlet
3 Signal receiver
4 Front panel
5 Handle recess
6 Air outlet
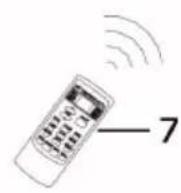
7 Remote Control
Rear
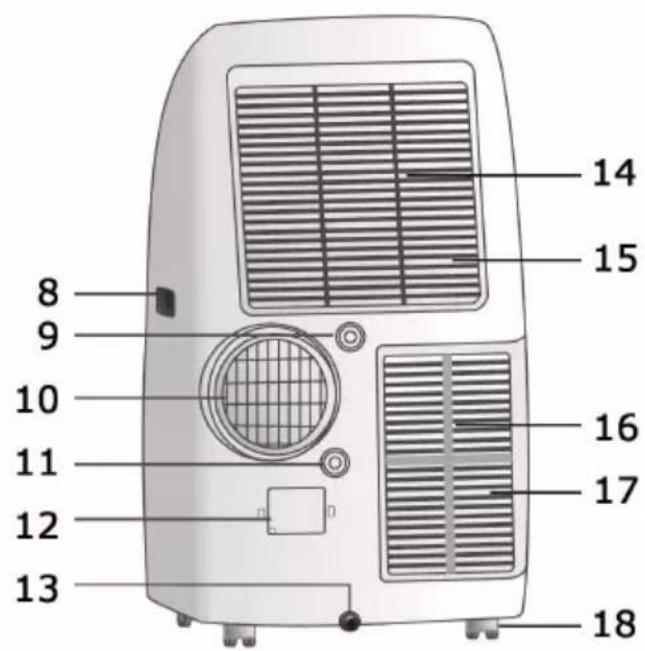
8 Handle recess
9 Upper Drain outlet
10 Air outlet
11 Pump Drain outlet
12 Power Cord outlet
13 Dottom tray Drain outlet
14 Upper air filter
15 Upper air inlet
16 Lower air Filter
17 Lower air inlet
18 Trickle
Installation
Hints on Installation
- The customer should have a qualified power supply coincident with that printed on the tag of the air conditioner.
- Must use special circuit and efficient grounding outlet matching with the plug of the air conditioner.
- If the supply cord is damaged, it must be replaced by the manufacturer, its service agent or similarly qualified persons in order to avoid a hazard.
- The plug should be easily accessible after installation.
- If the fuse of unit on PCB is broken, please change it with the type of F3.15A/250V.
References to the Location
• Install the mobile air conditioner in a flat and spacious location where the air outlets will not be obstructed.
- A minimum clearance of 50cm from walls or other obstacles should be kept.
- The gradient can't be more than 10 degrees with the horizontal plane· while putting and using the utensil
- The air conditioner shall not be used in the laundry.
- The plug shall be accessible after the unit is positioned.
Duct Mount Instruction
| 1 | Put the side of duct to the exhaust air outlet of mobile air conditioner. Fix it with unit correspondingly, then turn right. Push it downwards, make sure that it is fixed thoroughly. | 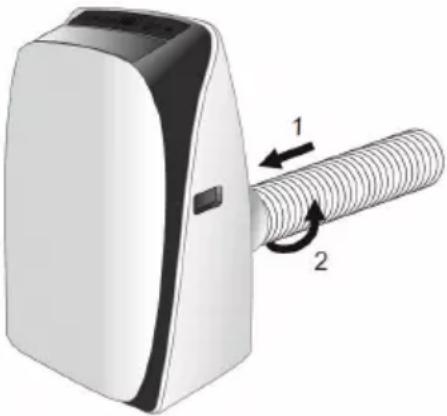 |
| 2 | Put the other side of the duct to adaptor. | 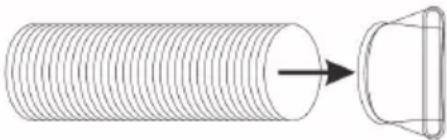 |
| 3 Put the adaptor subassembly to a nearby window. | 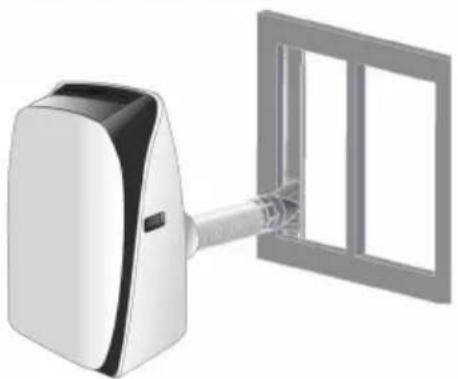 | |
| 4 | The duct can be compressed to 450mm minimum and extended to 1800mm maximum. It is better to keep the duct length to a minimum. Stretching or bending the duct excessively will affect the cooling efficiency. | 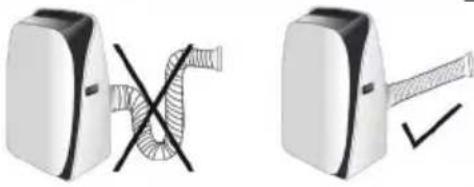 |
Window Kit installation
ur window kit has been designed to fit most standard vertical and horizontal window applications. However, it may be necessary for you to improve or modify some aspects of the installation procedure for certain types of window. Please refer to the following pictures for minimum and maximum window openings.
| Horizontal windowMinimum width: 67 cmMaximum width: 125 cm | 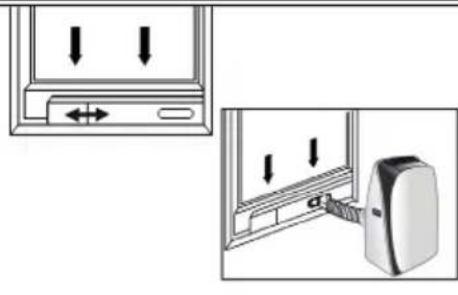 |
| Vertical windowMinimum height: 67 cmMaximum height: 125 cm | 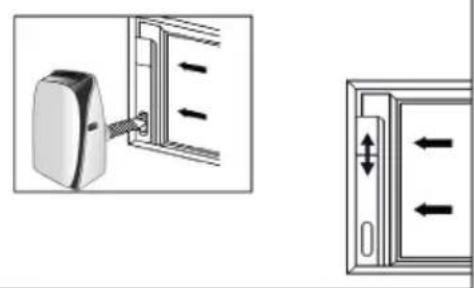 |
| Note: The bolt and nut are used to fix window fixing board. | 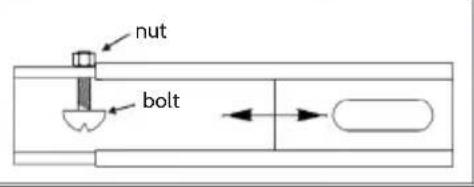 |
Control Panel and Controls
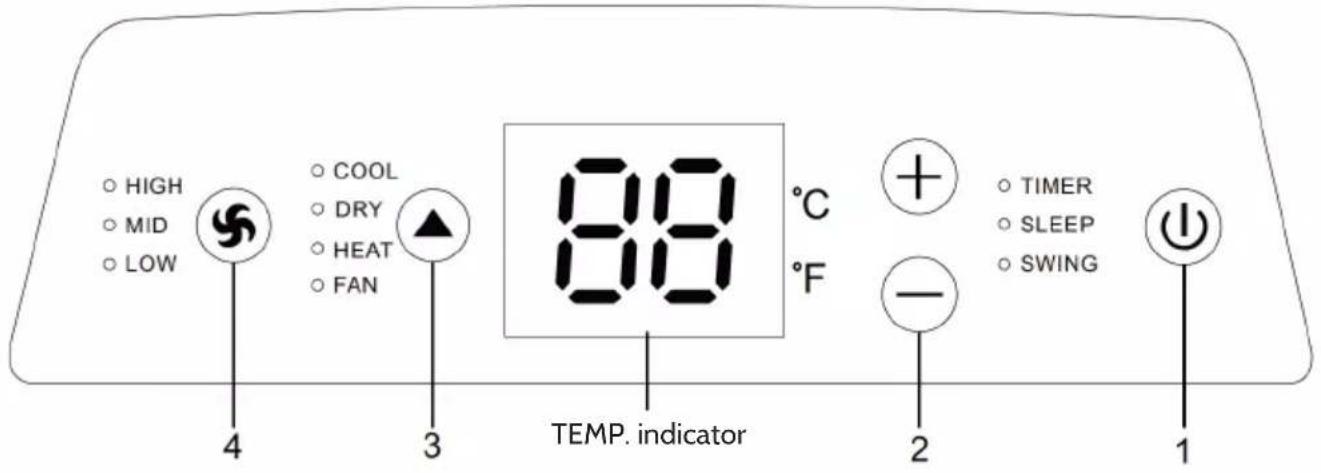
Indicator Lights
• HIGH: High speed indicator.
• MID: Mid speed indicator.
- LOW: Low speed indicator.
• COOL: Cool indicator.
- DRY: Dry indicator.
- HEAT: Heat indicator.
• FAN: Fan indicator.
• TIMER: Timer indicator.
• SLEEP: Sleep indicator.
- SWING: Swing indicator.
Controls
1 POWER: Press this button to make the unit run or stop.
2 [+]/[-]: Press buttons to make the room setting temperature increase or decrease.
3 ARROWS: Press this button, a mode is selected in the following sequence: COOL > DRY > HEAT > FAN.
4 FAN button: Setting fan speed in the sequence that goes from LOW > MID > HIGH.
Use and Operation
Before starting the unit
- Select a suitable location, make sure the unit is near to an electrical outlet.
- Install the flexible exhaust hose and the adjustable window slider kit.
- Plug the unit into a right outlet.
- Turn the unit on.
Heating operation mode (Cold wind type has no heating function)
- Press the MODE button in a sequence until the heat display is lighted.
- Press the “+” and “-” button to setting your desired setting temperature.
- Press FAN button to select the fan speed.
- Press ON/OFF button to start the unit and press it again to stop.
Cooling operation mode
- Press the MODE button in a sequence until the cool display is lighted.
- Press the “+” and “-” button to set your desired setting temperature.
- Press FAN button to select the fan speed.
- Press ON/OFF button to start the unit and press it again to stop.
Drying operation mode
- Press the MODE button in a sequence until the dry display is lighted.
- The fan will run at a fixed speed at this operation mode.
- Close windows and doors for the best dehumidifying effect.
- Press ON/OFF button to start the unit and press it again to stop.
Circulation operation mode
- Press MODE button in a sequence until the fan display is lighted.
- Press the FAN button to select the fan speed.
- Press the ON/OFF button to start the unit and press it again to stop.
Timer operation
- Press the TIMER button.
- Press the “+” and “-” button to adjust your timer time. Note: “Time off” is effective only when the air-conditioner is running. “Time on” is effective only when the air-conditioner is stopped.
Water drainage
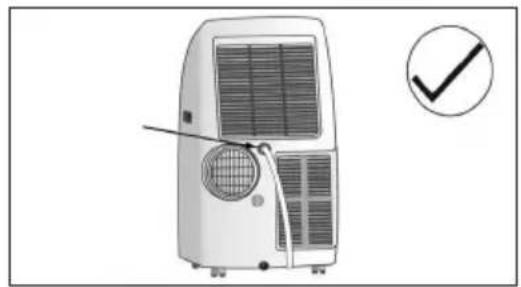
During dehumidifying mode, remove the upper drain plug from the back of the unit. Attach the drain hose to the hole. Place the other end of the hose in the drainage way or other drain areas.
natural_image
Illustration of a portable air conditioner unit with a circular checkmark indicating inspection (no text or symbols on the device itself)If the unit you bought has the pump drain outlet, as shown below, please drain in this way:
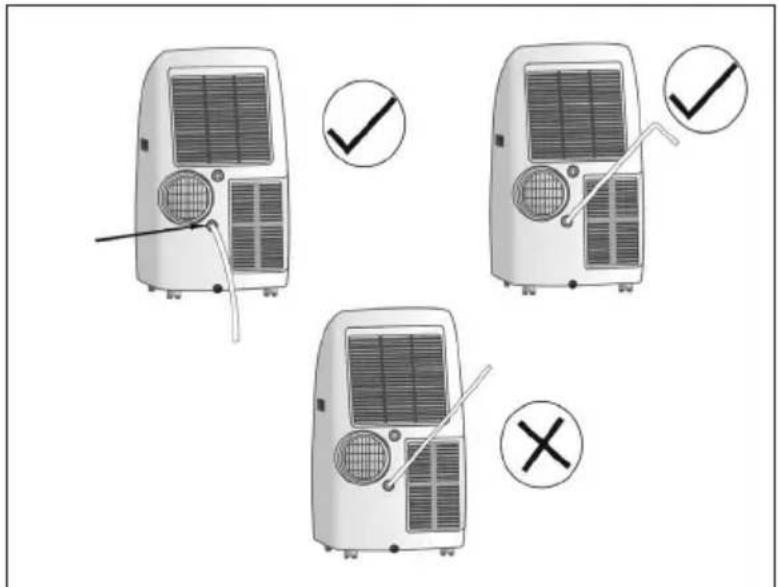
Remove the pump drain plug from the back of the unit, attach the drain hose to the hole. Place the other end of the hose in the drainage way or other drain areas. Make sure the hose is secure and there are no leaks. Direct the hose toward the drain, making sure that there are no kinks that will stop the water flowing. Place the end of the hose into the drain and make sure the end of the hose is down to let the water flow smoothly. Do never let it up.
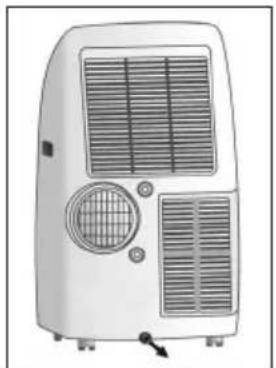
When the water level of the bottom tray reaches predetermined level, the digital display area shows "P1". Carefully move the unit to a drain location, remove the bottom drain plug and let the water drain away. Reinstall the bottom drain plug and restart the machine until the P1 symbol disappears. If the error repeats, call for service.
NOTE: Be sure to reinstall the bottom drain plug before using the unit.
natural_image
Front view of a white electric heating air conditioner unit with ventilation grilles and control panel (no visible text or symbols)Functions of the Remote Control
Importants Hints on Remote Control
- Before first time use of the remote controller, install the batteries and ensure the “+” and “-” poles are correctly positioned.
- Ensure the remote controller is pointed to the signal receiving window, and that there is no obstruction in between and the distance is 8m at the maximum.
- Do not let the remote controller drop or fling it at will.
- Do not let any liquid in the remote controller.
- Do not expose the remote controller directly to the sunlight or excessive heat.
- If the remote controller does not function normally, remove the batteries for 30 second before reinstall them. If that doesn't work, replace the batteries.
- When replacing the batteries, do not mix the new batteries with old ones or mix batteries of different types, which could cause failure of the remote controller.
- If the remote controller is not to be used for a long period of time, remove the batteries first, lest the leakage from them may damage the remote controller.
• Properly dispose the discarded batteries.
Note: This is a universal remote controller which provide all the function buttons. Please understand that some of the buttons may not function, depending on the specific air conditioner you have purchased. (If a specific function is not available on the air conditioner, pressing the corresponding button will simply have no respond.) HEAT and ELE.H functions are not available for cool only models, thus these two buttons do not work correspondingly.
Controls
| 1 ON/OFF | Press this button to turn on/off the unit. This will clear the existing timer and SLEEP settings. |
| 2 °C/°F | Press this button to set the temperature display to Fahrenheit, which is displayed by default in Celsius. The “°C” will not be displayed on the LCD. Press this button again to restore the temperature display to Celsius. Note: Temperature display in Fahrenheit is not available for some models. When temperature is displayed in Fahrenheit on the remote controller, it might be in Celsius on the unit, the function and operation of which will not be affected. |
| 3 SPEED | Press this button, you can select the fan speed as follows: Low > Mid > High > Auto. Note: AUTO air speed is not available in FAN mode. |
| 4 DISPLAY | Press this button to turn on/off the display. This is for the convenience of users who are unconformable sleeping with the backlight on. |
| 5 iFeel | Press this button to set the temperature display on the remote controller to ambient temperature and press this button again to set it to preset temperature. |
| 6 TIMER | With the unit ON, press this button to set OFF timer or with it OFF to set ON timer.Press this button once, a “ON(OFF)” will flash.Press the ARROWS (up/down) to set the number of hours in which the unit will be turned ON/OFF, with an interval of 0.5 hour if less than 10 hours, or1 hour if longer than 10 hours , and a range of 0.5-24 hours.Press it again to confirm the setting, the “ON (OFF)” will stop flashing.If the timer button is not pressed longer than 10 seconds after the “ON (OFF)” start flashing, the timer setting will be exited.If a timer setting is confirmed, pressing this button again will cancel it.Note: When a ON timer is set, all function buttons (except SLEEP, DISPLAY and iFEEL can’t be set ) are valid and when the ON time set is up, the unit will operate as preset. | 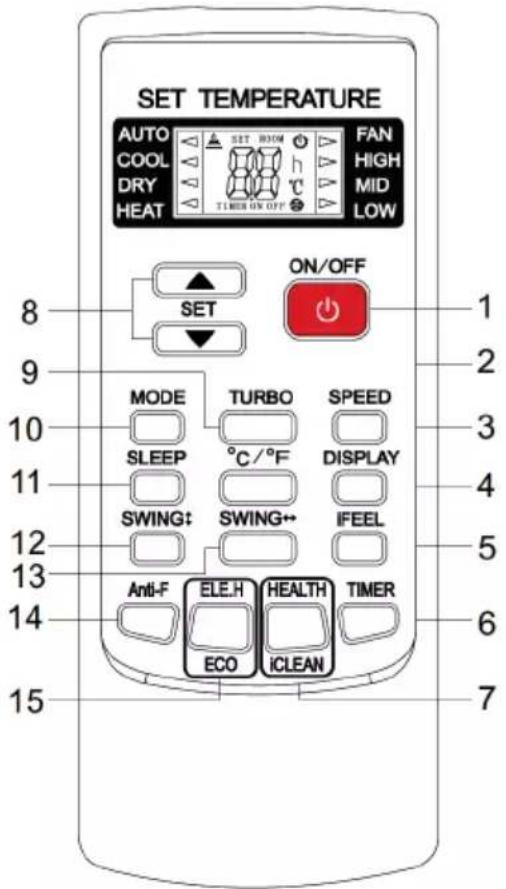 | |
| 7 | HEALTH | Press this button with the unit ON to activate health related functions, such as negative ion, electrostatic precipitation, PM2.5 removal, etc, depending on the actual configuration of each model. Press this button again to deactivate the HEALTH function. | |
| iCLEAN | Press this button with the unit OFF, the remote controller will display “CL” and the unit will automatically clean dust off the evaporator and dry it, to increase the cooling and heating efficiency. The iCLEAN function runs for approximately 30 minutes, during which if the unit is turned on with the remote controller or this button is pressed again, the iCLEAN will be deactivated. | ||
| 8 | ▲▼ | Each time the ARROW UP is pressed, the temperature setting will increase by 1°C and each time the ARROW DOWN is pressed, it will decrease by 1°C. The temperature setting ranges from 16°C (60°F) to 32°C (90°F). Note: The temperature cannot be set in AUTO or FAN mode, thus these two buttons are not functional. | |
| 9 TURBO | Press this button only in COOL or HEAT mode to set TURBO on or off to speedy the cooling or heating. When TURBO is on, the air speed is HIGH. When TURBO is off, the air speed will restore to previous status. | ||
| 10 | MODE | Press this button, you can select the running mode as follows: AUTO > COOL > DRY > HEAT > FAN. Note: HEAT mode is not available for cool only units. |
| 11 | SLEEP | Press this button to enter SLEEP mode, which the unit will exit after 10 hours of continuous operation and restore to the previous status. Note:The SLEEP function cannot be activated in FAN mode. |
| 12 | SWING | Press this button to activate up/down swing and press it again to fix the swing position. |
| 13 | SWING | Press this button to activate left/right swing and press it again to fix the swing position. |
| 14 | Anti-F | The Anti-F functions when the unit is turned off with the remote controller in COOL, DRY or AUTO mode. It will operate in HEAT mode (FAN mode for cool only units), with the internal fan running with weak flow for 3 minute before stop, to remove the moisture within the evaporator so as to prevent it from giving off bad smell from mold.This function is not set in the factory. You may set it or cancel it any time you want as follows: With both the unit and the remote controller OFF, point the remote controller at the unit and press “Anti-F” button once, the buzzer will sound 5 times after 5 times, indicating this function is set. Once set, this function will remain valid except when the unit is power off or until it is canceled.To cancel Anti-F: Power off the unit. With both the unit and the remote controller OFF, point the remote controller at the unit and press this button once, the buzzer will sound 3 times after 5 times, indicating this function is canceled.Note: With Anti-F activated, it is advised not to turn ON the unit again before it is fully OFF. Anti-F function will be invalid when OFF timer is set. |
| 15 | ELE.H If this button is pressed in HEAT mode, the electric heating will be turned on/off. | |
| ECO | If this button is pressed in COOL mode, the unit will enter the ECO mode which has the lowest electricity consumption, and exit it automatically 8 hours after. Changing modes or turning off the remote controller will automatically cancel the ECO function. Press ECO button in ECO mode to exit this mode. Note: The ECO mode only works for inverter units. | |
Automatic operation mode
- Press the "MODE" button, select the automatic operation mode.
- By pressing the "SPEED" button, you can select the fan speed from LOW, MID, HIGH, AUTO.
- Press the "ON/OFF" button, the air-conditioner starts to operate.
- Press the "ON/OFF" button again, the air-conditioner stops.
- Note: In the fan operation mode, the temperature settings is non-effective.
Cooling/Heating operation mode
- Press the "MODE" button, select the Cooling or Heating operation mode.
- By pressing the the ARROWS, you can set the temperature range from 16°C (60°F) to 32°C (90°F), the display changes as you touch the button.
- By pressing the "SPEED" button, you can select the fan speed from LOW, MID, HIGH, AUTO.
- Press the "ON/OFF" button, the air-conditioner starts to operate.
- Press the "ON/OFF" button again, the air-conditioner stops.
- Note: The cold wind type has no heating function.
Fan operation mode
- Press the "MODE" button, select the fan operation mode.
- By pressing the "SPEED" button, you can select the fan speed from LOW, MID, HIGH.
- Press the "ON/OFF" button, the air-conditioner starts to operate.
- Press the "ON/OFF" button again, the air-conditioner stops.
- Note: In the fan operation mode, the temperature settings is non-effective.
Drying operation mode
- Press the "MODE" button, select the rying operation mode.
- By pressing the the ARROWS, you can set the temperature range from 16°C (60°F) to 32°C (90°F), the display changes as you touch the button.
- By pressing the "SPEED" button, you can select the fan speed from LOW, MID, HIGH, AUTO.
- Press the "ON/OFF" button, the air-conditioner starts to operate.
- Press the "ON/OFF" button again, the air-conditioner stops.
Backlight function (for remote controllers with such function only)
The remote controller has a backlight which can be turned on by pressing any button for the convenience of operation in darkness. The backlight will be automatically turned off if there is no operation within 10 seconds.
Cleaning and Care
Cleaning Air Filter
- Turn off the air conditioner and cut off the power supply.
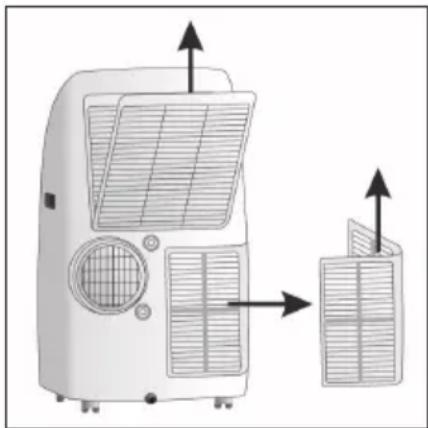
- Pull out the filter cover and remove the filter from cover.
- Wash air filter in warm soap water. Do not put air filter in the dishwasher or use any chemical cleaners. And dry filter completely before replacing.
- Attach the air filter to the filter cover using the attachment hooks on the inner surface of the cover. Put the filter cover back to its place.
natural_image
Diagram of a portable air conditioner unit with airflow arrows indicating airflow direction (no text or symbols)Cleaning the Unit
- For the purpose of safety, please turn off the air conditioner and cut off the power supply.
- Wipe the unit with dry cloth.
- If the unit is very dirty, please wipe with wet cloth dipped by cold water.
- If you don't use the unit for a long time, please pull out the rubber plug to drain the inside water out.
Do not use gasoline, benzene, thinner or any other chemicals, or any liquid insecticide on the air conditioner, as these substances may cause flaking off of the paint, cracking or deformation of plastic parts. Never attempt to clean the unit by pouring water directly over any of the surface areas, as this will cause deterioration of electrical components and wiring insulation. Never use hot water over 40^ C ( 104^ F) to clean the air filter.
Troubleshooting
| Problem Possible Cause Solution | ||
| Air condition will not operate. | The power switch is released. Switch on the power. | |
| Power supply failure. Wait for the recovery of power supply. | ||
| The fuse is burnt. Replace the fuse. | ||
| It doesn't reach the setting time for starting up. | Wait or eliminate the original setting. | |
| Unit doesn't start when pressing on/off button. | It is not three minutes after switch off. Wait three minutes. | |
| Room temperature is lower than the setting temperature. | Reset the temperature. | |
| The wind blowing out, but the cooling effect is bad. | Mistakes in temperature setting. Set a proper temperature, setting temperature should be lower than ambient temperature. | |
| The air filter is blocked by dust. Clean the air filter. | ||
| The air inlet or outlet of machine is blocked. | Remove the obstruction. | |
| Turn the air conditioner on in very hot room. | Allow additional time to remove stored heat from walls, ceiling, floor and furniture. | |
| Cooling capacity is insufficient. Reconfirm the required cooling capacity with your dealer. | ||
| The doors or windows are open. Close the doors and windows. | ||
| Noise or vibration. The ground is not level or not flat enough. Place the unit on a flat, level ground if possible. | ||
Hints on Disposal
natural_image
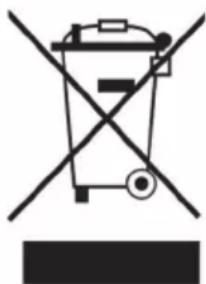
Symbol of a trash bin crossed with a diagonal line, no text or numbers presentAccording to the European waste regulation 2012/19/EU this symbol on the product or on its packaging indicates that this product may not be treated as household waste. Instead it should be taken to the appropriate collection point for the recycling of electrical and electronic equipment. By ensuring this product is disposed of correctly, you will help prevent potential negative consequences for the environment and human health, which could otherwise be caused by inappropriate waste handling of this product. For more detailed information about recycling of this product, please contact your local council or your household waste disposal service.
Your product contains batteries covered by the European Directive. 2006/66/EC, which cannot be disposed of with normal household waste. Please check local rules on separate collection of batteries. The correct disposal of batteries helps prevent potentially negative consequences on the environment and human health.
Declaration of Conformity
Producer: Chal-Tec GmbH, Wallstraße 16, 10179 Berlin, Germany.
CE
This product is conform to the following European Directives:
2014/30/EU (EMV)
2014/35/EU (LVD)
2011/65/EU (RoHS)
206/2012/EU (ErP)
Estimado cliente:
natural_image
Illustration of a portable air conditioner unit with a circular checkmark indicating inspection or status (no text or symbols on the device itself)natural_image
Front view of a white portable air conditioner unit with ventilation grilles and control buttons (no visible text or symbols)natural_image
Diagram of an air conditioner unit with airflow arrows indicating airflow direction (no text or symbols)natural_image
Symbol of a trash bin crossed with a diagonal line, no text or numbers presentnatural_image
Illustration of a portable air conditioner unit with a circular checkmark indicating inspection or status (no text or symbols on the device itself)natural_image
Front view of a white portable air conditioner unit with ventilation grilles and control buttons (no visible text or symbols)natural_image
Diagram of a portable air conditioner unit with airflow indicators (no text or symbols)natural_image
Symbol of a trash bin crossed with a diagonal line, no text or numbers presentnatural_image
Illustration of a portable air conditioner unit with a circular checkmark indicating inspection or status (no text or symbols on the device itself)natural_image
Front view of a white portable air conditioner unit with ventilation grilles and control buttons (no visible text or symbols)natural_image
Diagram of a portable air conditioner unit with airflow arrows indicating airflow direction (no text or symbols)natural_image
Symbol of a trash bin crossed with a diagonal line, no text or numbers present- Contents
- Safety Instructions
- Important Hints on Use
- Accessories
- Product Description
- Front
- Rear
- Installation
- Hints on Installation
- References to the Location
- Duct Mount Instruction
- Window Kit installation
- Control Panel and Controls
- Indicator Lights
- Controls
- Use and Operation
- Before starting the unit
- Heating operation mode (Cold wind type has no heating function)
- Cooling operation mode
- Drying operation mode
- Circulation operation mode
- Timer operation
- Water drainage
- Functions of the Remote Control
- Importants Hints on Remote Control
- Automatic operation mode
- Cooling/Heating operation mode
- Fan operation mode
- Cleaning and Care
- Cleaning Air Filter
- Cleaning the Unit
- Hints on Disposal
- Declaration of Conformity
- Estimado cliente:
Brand : Klarstein
Model : Metrobreeze 9 Paris
Category : Air-conditioner